Leaderboard


Popular Content
Showing content with the highest reputation on 05/22/2017 in Posts
-
We haven't finished adding everything, but you can find owner's manuals, component manuals and videos on the Oliver University page. You can find the Oliver University under the "Travel Trailers" tab in the main menu. http://olivertraveltrailers.com/oliver-university/ We will be adding some other "how-to" videos as we get them from the videographer. If there is something you don't see, let us know and we will add it.2 points
-
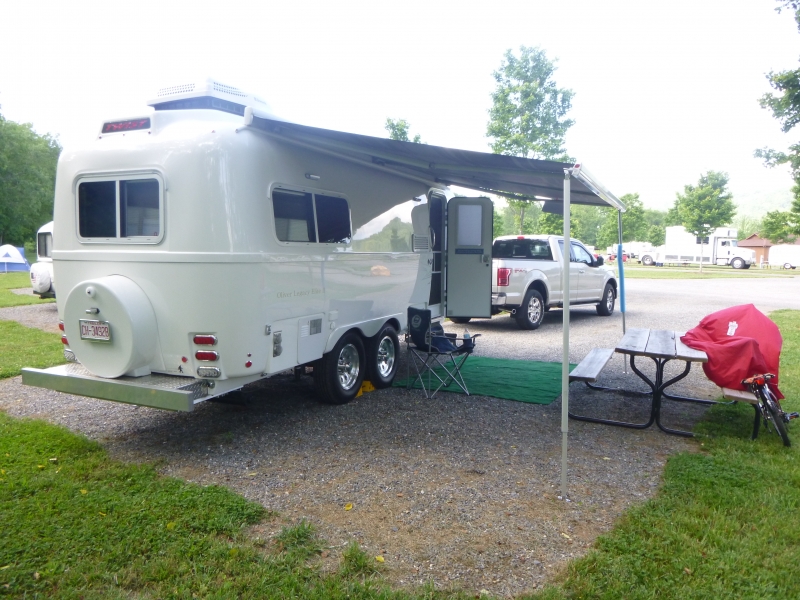
The second annual Eggs on the Hiawasee River Rally finished last night (May 20, 2017) only an hour or so before the rains moved in. Starting with a fish fry supper on Thursday night and ending with a pot luck supper on Saturday evening. Numerous brands of fiberglass campers were there along with about seven Oliver Elite II's and a demo Elite II ( and a bunch of door prizes ) that Brent and Kelly Robinson (shown in the orange and blue t-shirts in the picture below for those that have not met them) brought down from Hohenwald. Being the only sponsor/vendor in attendance, Kelly and Brent kept very busy showing the Oliver to campers and non-campers alike. The Rally is help at the River Bend Campground which has nicely spaced campsites, cut grass, a pool, flowers and clean shower facilities. The entire campground was full for the weekend, so, if you plan on attending this event it would be wise to get your reservations in early for next year. Bill
 2 points
 -
Over the past few years, I've read a number of blogs on the original 100 item challenge. As in, living with 100 items.. no more. One of the things we live about camping is simplicity. (Disclaimer.. don't have to count heat , water heater, wonderful shower in the 100). At the end of every season, now ten times, I unload the camper, and anything we haven't used in the last year, does not go back in bins to be reloaded in the spring. Our load gets lighter each year. We're certainly not at the 109 item threshold , but we get closer each year. For me, camping means a lot of processes are slower. Building a fire to make dinner takes time. But, it's worth it. And, that's just a small example. Uncomplicated life actually can take more time. But, the rewards are worth it, for us. We use that time to look around, and enjoy. Especially, the stars in a non-light polluted out of the way place. Sherry1 point
-
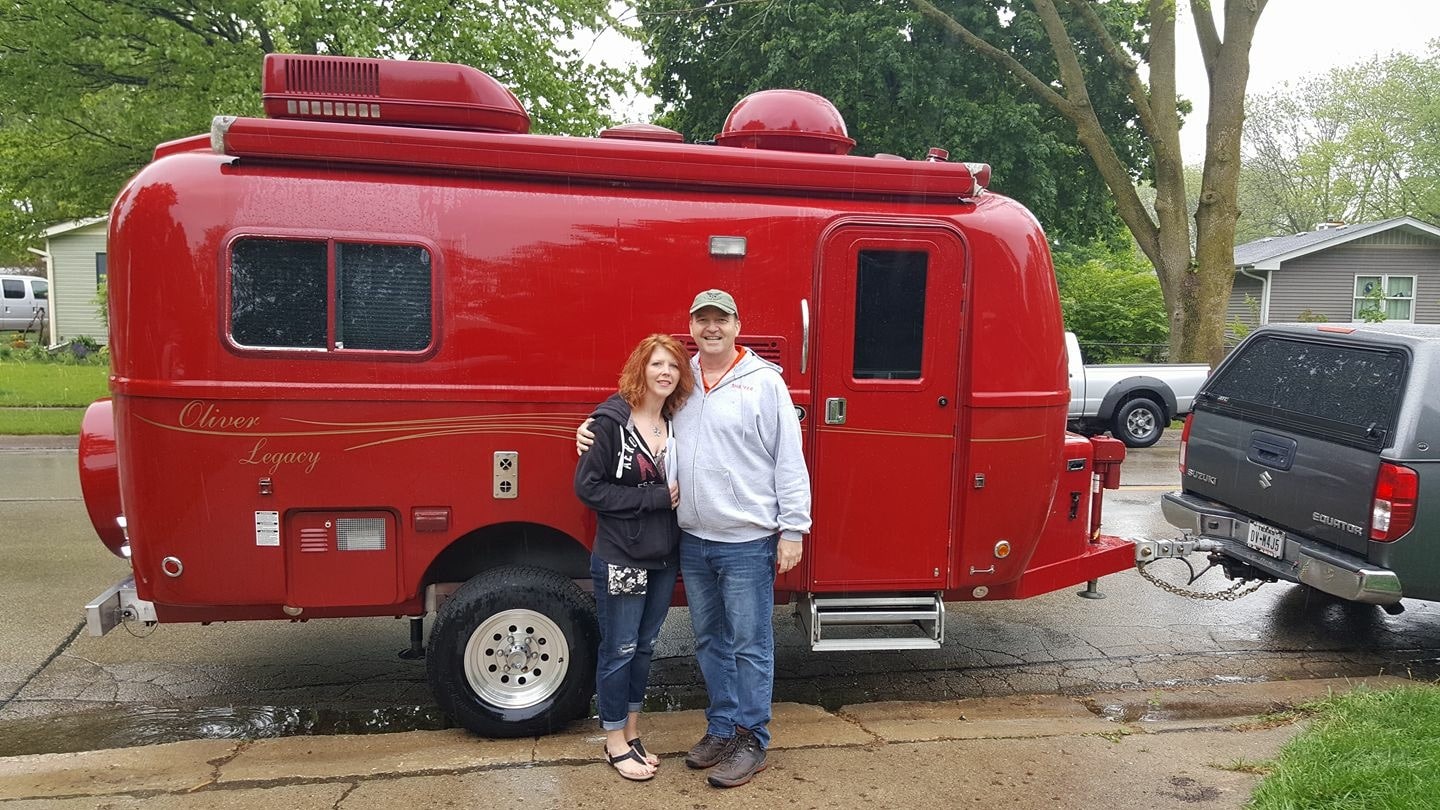
We are soo excited. We were planning on getting a new Oliver in a few years but there is no way that we could pass up a RED Oliver. Hull # 10. Winn and I live just outside of San Antonio, Texas. We traveled up near Chicago to get this baby. We had tears on both sides. Happiness and sadness. I promised my students that I'd be back in time for class on Monday so it was straight up and straight back. It's the last full week of school so it is filled with activities. Dang. My plan to get out of field day in the Texas heat is foiled again. Can't let them down. Lol My husband is retired Airforce and currently does contract work as an environmental engineer. I teach fifth grade science. We like to travel around during free time. We we currently have a 1984 Uhaul. The plan was to sell it but I changed my mind. I couldn't do it just yet. Maybe later :-)
1 point
-
Debbie and I met John last week after he picked up the Ollie in TN when he purchased a Gen-Set from us. They were also having a family reunion in TN last weekend. Had the pleasure of meeting his Wife, but did not have the pleasure of seeing his new Ollie when we met. Assume he's on the road heading home right now. John, Safe travels!1 point
-
Sometimes, you think the shade is in the perfect spot, but it isn't. Look to the left and right at the alignment. It's pretty tight on our 2008. An 1/8 or 1/16 off won't allow the blind to seat. Just slide it a little to the left or right. With the blind off, you can see the bottom clips that have to seat. A gentle pop with the hand will seat the clips, if it's properly aligned to begin with. Even so, your blind may work loose on bumpy roads. Sherry1 point
-
If the blind is coming off, with ours, the metal brackets needed to be tightened. Then they snap right into place. They're easy to take off and clean or some people like to turn them the other way so that the night shade comes up from the bottom.1 point
-
Great idea, Matt Thanks for all of the resources !!1 point
-
What? I am still buying things! I bought a triple Stanley tool box set today. Where is the list of 200 things? I have 500 tools I imagine. I'm feeling very down and it's all because of SeaDawg! lol1 point
-
After nine years, finally had a problem with the SMEV cooktop. The bigger burner (of course) lit with a full, beautiful blue flame, but wouldn't stay lit. Not after multiple tries (with longer hold times, finally up to a thirty count.) I cleaned the burner, and the cover, and the thermocouple pin. The igniter ceramic coated pin, for good measure. Still a no go. So, I figured, likely the thermocouple was bad. Making coffee, pancakes, and sausage on the little burner, for a group, was not a fun prospect. I tried lighting again, looked at the position of the pin vs the flame, and thought the pin was out of the flame. I let everything cool, and applied moderate pressure to the pin with my thumb to get it back in the flame. Tried again. Got my burner back! I'd probably bent the pin at some point cleaning the cooktop, over the last nine years. My thumb pressure probably moved it 1/64 to 1/32, but it was evidently enough. Glad of it, as replacing the thermocouple requires disassembling the top... Plus a new thermocouple, which I did not have. Sherry1 point
-
OK, Tali and I restrung the shade with the broken string this evening. Not the most enjoyable task we've ever done but it beats a sharp stick in your eye. A little complicated until you've done it a couple of times but once you "see" how it works it's really not too bad. I had to partially disassemble another one to see how much tension to put on the strings. I'll be happy to restring one for anybody for only $500.00 string included.1 point
-
Springs maintain tension on the cords. Each cord is fixed and taped in place where indicated in the previous post. Cord in shade handle is not fixed allowing the handle/shade to slide up and down on the cord. Hope this helps.1 point
-
Had some extra time today and started making better sketches of my Ollie's shade cord routing. The following shade sketch shows the cord routing on the day and night shades. If the night shade is being threaded (shade in top of frame), the taped side of shade is positioned at the top. If the day shade is being threaded (shade in bottom of frame) the taped side of shade is positioned at the bottom. The cords from night shade are routed to the spring in the bottom of the frame. The cords from day shade are routed to the spring in the top of the frame. I'm working on additional information and will post as soon I have it. Hope this helps!1 point
-
A slow bow and scrape...1 point
-
Mountainborn is back as a Keymaster?1 point
-
Installed shade cords in our rear window and decided to leave frame original color. Could not find any shade cord re-thread diagrams matching the Ollie's windows. Decided to make rough sketches of the frame cord routing and shade cord routing before taking the shade completely apart. Frame cord routing: Shade cord routing: The cord used is about 30% thicker (1.5MM cord) than the original cord, did not use tape where indicated in the sketch because the new cord was sandwiched tightly between shade & frame without tape, used thicker cord on right: Broken old cord: There is one spring in the top and bottom of frame for cords to tie to: With larger diameter cord, threaded each hole one at a time instead of multiple holes: Copied the original cord routing: Night shade with new cord re-threaded: Job completed:1 point


-
Recent Achievements
-


")


")


")
