Leaderboard


Popular Content
Showing content with the highest reputation on 07/05/2017 in Posts
-
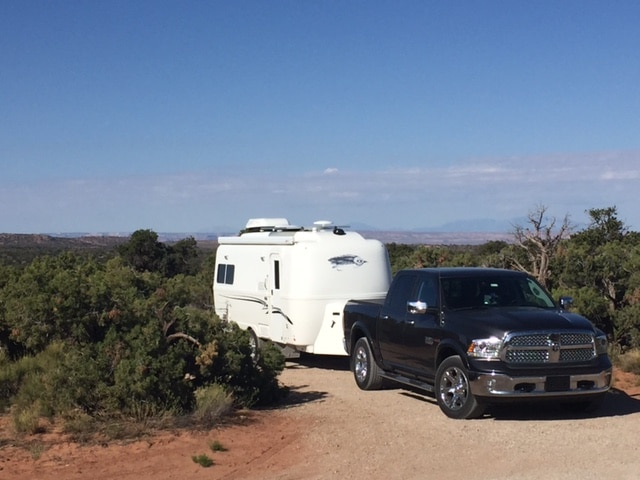
Recently finished a 7,000 mile trip over three-plus weeks, and we were well taken care of by Ollie. No issues whatsoever, running the gamut from boondocking to overnights at KOA in all kinds of weather. Started in NW Florida, up to Utah through TX & NM, over to Yellowstone, Tetons, explored Wyoming, headed east through Montana, ND, and across to Canada at Sault Ste Marie, Ontario, Quebec and ended in Downeast Maine. Will explore some of the Canadian Maritimes as best we can this summer. As a heads-up, the only thing that went unnoticed the whole trip- the nut that holds the spare tire cover on loosened up about 1/3 of the way over 7,000 miles. Worth checking now and then to make sure it's tight. (TV averaged 18.9 mpg for the trip)
 10 points
 -
I noticed while washing the trailer....the cover looked slightly mis-aligned, so checked the nut. Took about 6 or 7 full turns to tighten it back up. Also, regarding washing...for those new to fiberglass and gel coat.... after owning several boats and now the Oliver, it's surprising the seemingly innocuous things that can cause a stain...in boats, suntan lotion, kids spilling juice, etc. can cause a stain that's very difficult to get out. Tree sap, bugs and unidentifiable road grime can as well. All this to say don't wait until the end of the season to wash your rig if you can help it. Helps to avoid little annoying stains that you wished you had taken care of sooner.3 points
-
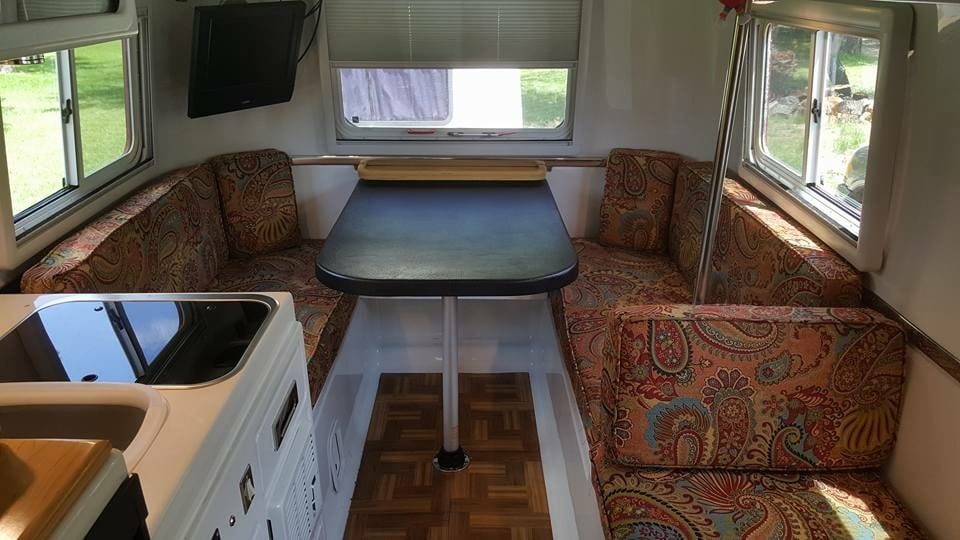
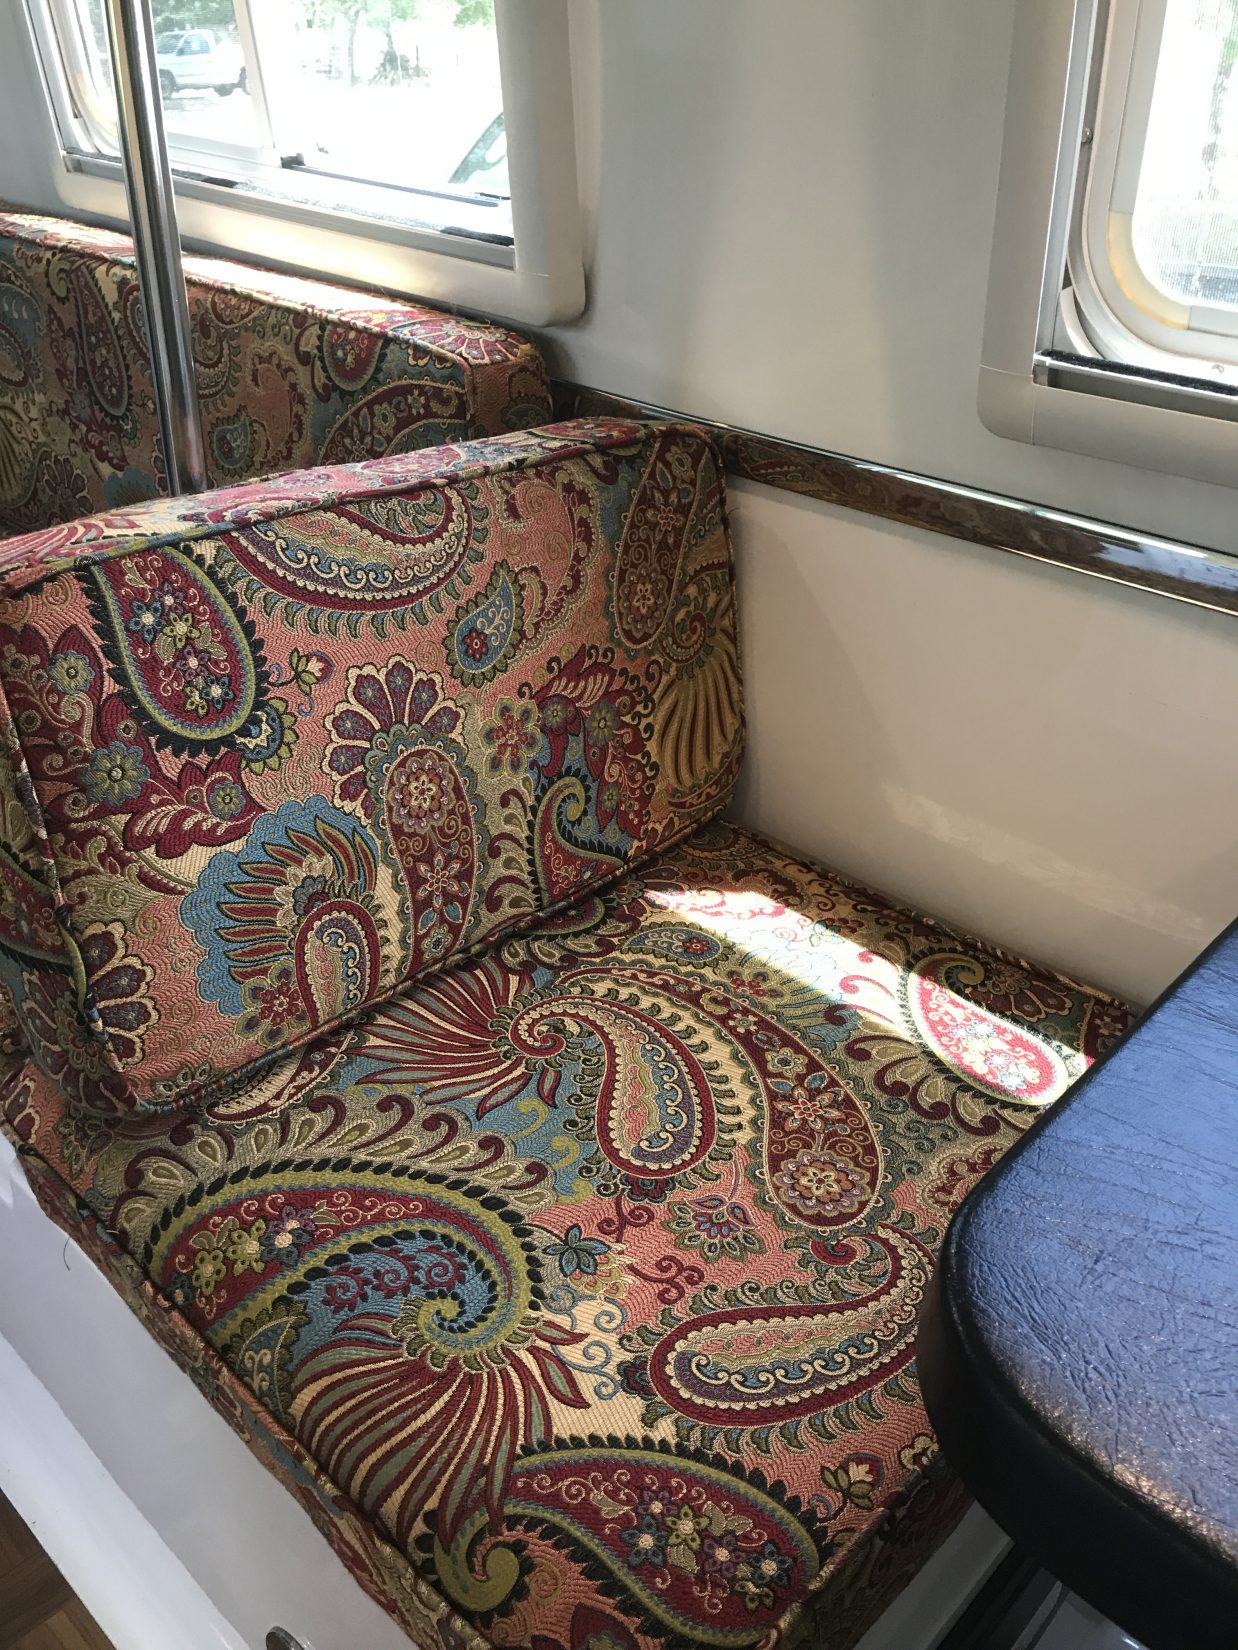
We wanted new cushions for the JellyBean. Somehow this bright red camper wound up with brown and light blue cushions that just didn't quite work. We had the hubby's upholstery cousin sew us up some new ones. Love them. Much brighter now
3 points
-
Brian, That's some amazing mileage, and what a great trip starting right here on our street. David2 points
-
Great trip and great pictures! Wondering how you came to notice the nut had loosened. Can't say that I have EVER checked mine. 18+ mpg ...wow. I barely get that in my gas powered 150 when not towing. Perhaps 21 alone, and 13.5 towing. Isn't it amazing, all the little spots we can find, especially when we leave the interstates and wander through this fantastic land. We love it. I am off to play with it now..getting ready for the net adventure, where ever and when ever we decide to pull out. Today, I plan to try and quieten the water pump, then check the water level in the batteries.2 points
-
Good trip and great to hear that you had no problems. I must have looked at your picture with the stream for a solid five minutes to see if there were any "risers". Just has to be some nice fish in there! Yellowstone is just about my favorite place on earth - if one could just reduce the number of people that go there! Also, love the horses - my wife and I have done 8 to 12 day horse trips through much of the mountain west. There is simply no better way of seeing the back country up close without all the work of a backpack. Thanks for sharing! Bill2 points
-
Justin - Looks like you have got a bit of a learning curve thing going on here. The whole deal really isn't that difficult, but, it would be best to try to take it one step at a time and understand just how the various systems in your camper work - separately and together. I'll try taking a stab at answering some of your questions above. 1. the 450 ah batter(ies) that you mention are really four Trojan T-105's. These are lead acid batteries. I mention this just so you don't get confused with either the standard batteries that come with an Oliver or with the "AGM" batteries that have 400ah. 2. I would not place a strong bet on the 640W option but you could always add "portable" solar panels if you needed them. 3. Propane - your fridge, cook stove, water heater and furnace all can run on propane. With the standard two 20 pound propane tanks on my Oliver I can go as long as just about two months running the fridge, cooking meals, and heating water for showers on a single tank. Be a bit careful with this information in that I do run the fridge virtually all the time on propane, BUT, I use very little heating water for showers (I use a sun shower most of the time) and almost never use the furnace. 4. A/C - Simply put - even with the four batteries there is simply not enough power to run your a/c. Of course you could always add more batteries, but where would you store them and batteries are very heavy to be hauling around. The problem really circles back to how much energy do you have and how much energy are you using. An A/C uses way too much energy for typical camper batteries to support. Therefore, you either need what is called "shore" power (regular electricity like you use in your house) or "generated" power using a generator. There are some fairly quiet generators on the market and virtually any generator can be made to plug directly into your camper just like one does with regular "shore" power. 5. Electrical power (shore power) - yes, assuming that there is an available outlet, you can plug directly into your friend's house. The only "problem" here is that most campers use what is called 30 amp service and have a 30 amp service electric cord and plug. Most of the circuits on most homes are wired for 15 to 20 amp connections - therefore, any single line (circuit) from the house will not supply enough power for you to use ALL of the things inside the camper that you might want to use (say, both the a/c and the microwave) and the design of the plug will not match. While you can easily get around the design of the plug (adapters are sold for this purpose), you can not get around the power issue without tripping circuit breakers, blowing fuses, or simply reducing the amount of power you use at any given moment. 6. Wind power is a great idea, but, there are reasons why one does not see more of this in use on campers - noise, lack of wind, size of equipment, weight of equipment, etc. Hope this gives you a start on your camper education road. However, only you can get the information you need regarding how much power you will use. Again, it appears to me that one of the first things you should do is educate yourself on a bit of electrical knowledge - the relationship between amps, watts, volts, etc. Good luck! Bill2 points
-
We left the Oliver Rally and headed for Helen, GA. We had a nice site at Unicoi State Park just 2 miles from Helen - a very nice park. While there we had a very friendly camping neighbor. He asked where were headed next and I told him we were going to a COE campground near Boomer, NC just north of Wilkesboro, NC. His reaction was the same that we got from Topgun when we told him. Not the best area and not much to do there. Our Helen neighbor lives in Banner Elk, NC. He offered us a parking spot next to his business on the edge of town. 50a Electric and water, he sometimes parks his RV here. After a night in our COE campground, we drove up to Banner Elk and are now camped next to his business. What a great site! Banner Elk motto: "Ski Capital of the South". You do meet interesting folks while camping! Mike
1 point
-
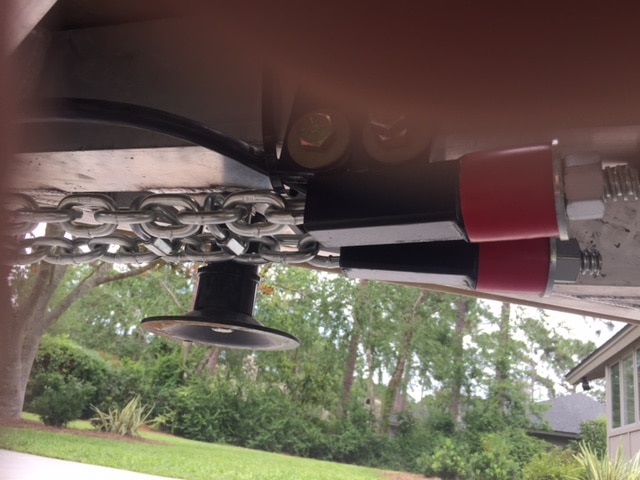
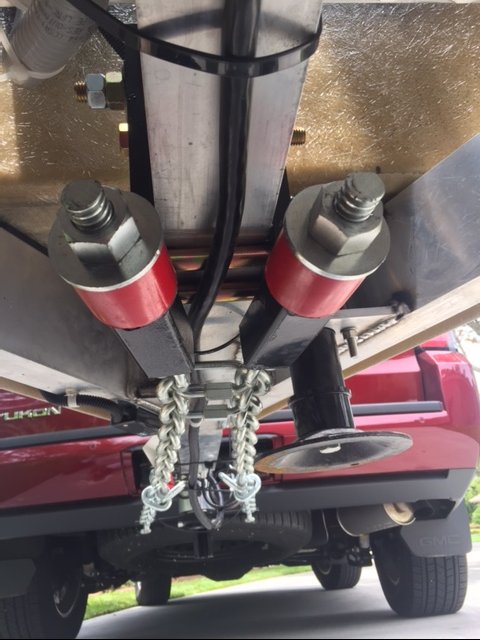
Alternative Mount for Andersen WD Hitch Attached are photos showing the Andersen WD Hitch mounted to the center box shaft of our Oliver Elite II, as described in my earlier post above. John Shkor, SailorsAshore
1 point
-
I'll second Sherry's advice to take a look at Technomadia's website. The system that we're retrofitting is largely influenced by their recommendations. Computer aside, it sounds like your usage is fairly normal. I would get a watt meter like this one and measure your laptop's consumption over the course of a week or two. Then add that number to the 70-80Ah average and see where that puts you. 200W is 16.7 amps on 12 volts (V x A = W). That seems very high, so its normal draw is probably well below that. Maybe I'm misinterpreting what you said. I have written in my notes that a typical laptop will take ~10Ah to recharge from zero, though I don't remember where I got that info. edit: even that number is high - I just checked and a new 15" MacBook Pro would need 6.3Ah to recharge from zero. AC is out of the question without a generator except for short periods, and even then not that often unless you get some lithium batteries. Lead acid batteries don't like heavy draws like that. You can do it on occasion, but when you do you will get far fewer Ah out of them for that charge cycle, and if you do it often you will shorten the life of the batteries. Like Bill said, if you're planning on borrowing electricity from a friend's house, don't plan on anything more than a 15A circuit. That's 1800W so you will have to keep your usage below that point - probably well below that, since there will surely be things inside the house running off that circuit as well. You would definitely need to buy the soft-start option for your AC unit, and you'd probably be on the verge of tripping their breaker anyway. The ultimate solution to that is to get a hybrid inverter/charger that has a power assist feature, allowing it to draw both from batteries and shore power at the same time. With that, you can limit the amps that the charger is allowed to draw from your shore connection. You'll find a good discussion of that at Technomadia. BTW, to connect at your friend's house, you just use a simple adapter on your trailer outlet that will plug into a standard extension cord. I know that it all seems confusing at first, but there's really nothing that's inherently difficult about it. Over time, you'll learn the lingo and the basic principals, and after that it's all pretty simple.1 point
-
What a great trip! Love your pictures.1 point
-
GrayGhost, Great trip and beautiful photos! Appreciate the heads-up on the loose tire cover nut, too. Your Ram gets excellent fuel economy!1 point
-
I contacted Sage at Andersen because I was getting a lot of noise and a "racheting" effect when turning. I've had my hitch for 15 months. They sent me a new white liner to replace the black one that was making so much noise. I watched the YouTube videos and it seemed like it would be fairly straightforward to remove the ball. Wrong. I first used a jack under the ball and almost had my truck tires off the ground. It wouldn't budge. I reversed the hitch and broke out my sledge hammer. No luck. I contacted Andersen and they sent me a refurbished assembly (looked new) with a white liner and asked that I mail them my noisy one. Good customer service. Mike1 point
-
I'd say you're in the right spot. You could pay to have a suitable outlet installed for your trailer, and not worry too much about the power. It would be a useful exercise to estimate your consumption, so you could reimburse your friend properly. Unless you're in a climate zone where you need ac or electric heat, you won't use much. Especially if you install solar, and use that source first. You will also need a place to dump grey and black water. We do this at home in a sewer clean out. Wind generators can be very noisy. Solar is silent. What's your climate zone? Frankly, kudos on building a minimalist lifestyle. Check out the blog of technomadia. They worked out of an Oliver for several years. Now they travel and work via vintage bus and boat. They're very interesting, smart young people, who have made the minimal lifestyle work for over a decade. Sherry1 point
-
John, wow, that was a great and detailed post. Thank you. It is easy but a little unusual to add pics from your computer. You do not need a web host. Look below the text box at "Attachments". Click "Select File". A popup window will open. Navigate to the folder where your image is (I move mine to the Desktop for quick access) If you are using a notebook you will need to navigate to your pictures app. Select the image and then hit "Choose". Your pic will upload and appear at the bottom there. You can add more pics by selecting "Add another file" You can delete a pic by using "Remove this file" If you want your pic to appear in the text box with your description , click a location and then drop back down and click "Insert into content". It's a little odd but the method works great and if you put your pics in with your commentary it does look very nice. Please upload some pics of your Anderson setup! PS, you should NOT list your email address on public forums. It is asking for it to be hacked. You can edit your post to delete it. Always use a Private Message for sensitive stuff. Thanks. John Davies Spokane WA1 point
-
John & Sheila Shkor Sailors Ashore Alternative Mounting of the Andersen No-Sway Hitch Sheila and I have just taken delivery of our Oliver Elite II, Hull #217, and will be participating in the forum under the sobriquet "SailorsAshore." As the name implies we are lifelong sailors who reached a time when change in activity appealed to us. As trailer rookies we wanted to enjoy good handling and minimize the possibility of sway when towing with our softly sprung GMC Yukon. The Andersen no-sway weight distribution hitch looked like the right thing. I know that the Anderson hitch has been mounted onto many Oliver trailers and is giving great service. From Forum discussion and pictures, however, it appeared that there might be room for improvement. With the standard factory mounting, the axis of chain tension is not in alignment with the mounting brackets. The chains also pull somewhat sideways from the frame member on which the brackets are mounted. There are occasional reports of bracket slippage. And the force resulting from chain tension has to be carried through a number of welded joints in the frame. (The Forum contains a number of cautions about soft aluminum welds.) I wanted to see if I could come up with an alternative mounting system that might be closer to what the engineers would call an elegant solution. The chain tension required to shift tongue weight off of the hitch can be quite high. Our GMC Yukon has a 120" wheelbase and another 52" from the rear wheels to the trailer hitch ball. That is a 172" lever arm, long when compared to the 6.75" vertical distance between the center of the ball and the triangle plate on the Andersen hitch. The mechanical advantage (or disadvantage in this case) is 25 to 1. That means to transfer 150 lbs (of our estimated 600 lb loaded Oliver tongue weight) from the hitch to the front wheels, total chain tension must equal 3,750 lbs. (All numbers are approximate.) That sounds like a lot, and it is. But Andersen Manufacturing engineered the hitch to take this kind of loading. For those in doubt, please see the video at: https://www.youtube.com/watch?v=xvM7mCnqmwo. Mr. Ryan Andersen demonstrates the hitch and states "We like to compress the bushing....and that puts about 2,000 lbs pressure on the chain. With both of them they push the trailer forward with about 4,000 lbs. of force." What I wanted to find was a way to mount the chain brackets directly on to the center box shaft of the trailer frame. This location is attractive because the tension force is carried fore-and-aft solely by the center box shaft, without going through any welds. The axis of chain tension is closely aligned with both the mounting brackets and frame member. And the center box shaft is the heaviest and strongest component of the trailer frame. I first thought about mounting the brackets out in the open just behind the Bulldog coupler, but Andersen counsels against making the tension chains too short and Oliver didn't want to lengthen the trailer tongue. Instead, I found room to attach the chain brackets inside the propane locker, just forward of the propane bottles. (They could be mounted aft of the propane bottles, but that would make them harder to reach for adjustment.) A problem to be overcome was keeping the starboard chain from pressing on the tube of the tongue jack, since both would be in roughly the same plane. This was easily accomplished with two "quick links" which hold the chains closer together where they run by the tongue jack tube. This results in a slight "hour-glass" shape which does not interfere with the function of the chains or flexing of the bushings. (I have pictures showing this, but haven't figured out how to get them into the forum post. If anyone wants the pictures, send email address to (deleted) and I will by reply email.) The other thing I did was ask Andersen to fabricate the chain mounting brackets with a slight offset, which they were willing to do. This was to line up the axis of chain tension for the hour-glass shape I anticipated. Once mounted, however, it was evident that I over-estimated the angle needed for the offset. If I was doing it over I would go with a five degree offset. A potential weakness in this mounting method is that all of the tension load is carried by two brackets rather than being split between two pairs. This increases the possibility of bracket slippage, so I did two things to compensate. First, since I had to get longer bolts to span the 3" wide center box shaft, I upgraded to Grade 8 bolts. These stronger bolts enabled a bit more torque and friction. Second, I mounted the idler brackets just forward of the chain brackets to provide additional support. We experienced no slippage on the tow home and subsequent trips. Is this installation an improvement over the Oliver mounting method? Hard to say, but I like it better. At this stage it is only a prototype, and I am sure others will see possible improvements. If this catches on, however, perhaps someday Oliver will start welding aluminum cheek pieces with the right geometry onto the center box shaft. That would provide a mechanical stop to absolutely prevent slippage of the chain brackets. It would be an easy and inexpensive thing to do when the frame is in fabrication. P.S.: What a wonderful resource the forum is. Pioneers Betty & Mountainborn Harmon, video-meister Buzzy, all-things-mechanical Raspy & John Davies, and others too numerous to name, know much and have shared. Being able to draw on the accumulated wisdom of those with real world trailer experience has been priceless in enabling us to get a jump on understanding our Ollie. Many thanks from we sailors ashore to all who have contributed. # # #1 point
-
We were at the plant last Wednesday and brought up the water situation with Jason. He said there was some hoops to jump through to get it approved by whoever approves that stuff. he thought it would have to be a DIY mode for now. We did get a set of the new style LP gas cover clamps, which will be a DIY project. Hated the old ones, just too hard to deal with. Stan1 point
-
Thanks for the kind words Yvonne. Please let us know what Jason says. John1 point
-
We found the picture we liked for the tire cover. Auto Arts in Raleigh NC had an artist on site to air brush a duplicate of the picture to the cover, and then they applied several coats of clear coat. Great job auto arts ! Disclosure, We are very proud of our son in law and daughter's business. (Auto Arts) http://www.autoartsinc.com/
1 point
-
Don't worry :) Becoming a trailer owner or RV owner of any kind will turn you into a plumber, electrician, truck driver, garbage man or is that a Waste Disposal Technician in no time... It's all part of Pee-wee's Big Adventure :)1 point
-
Here's my solution. 1/8" plastic shim.
1 point
-
I don't know why I assumed that the two 160W panels would run front to back - it's an easier installation and takes less room to keep them all running side to side. What's cool is all the options these 80W panels open up. Oliver could easily change their standard package to 400W, and offer a 560W package that still allows the customer to keep both the A/C and TV antennas. The third option, at 720W, is probably pushing it, but who knows - it only depends on where precisely the A/C and bathroom fan are located. I know the size of those but not their location front to back. But from the photos, the rear of the A/C looks to be a bit in front of the rear of the awning. I would guess that the A/C could be placed as far back as the awning, though I think the curve on the top of the roof begins a bit ahead of that, which is probably why the A/C is where it is.
1 point


-
Recent Achievements
-


")


")


")
