Leaderboard


Popular Content
Showing content with the highest reputation on 08/25/2017 in all areas
-
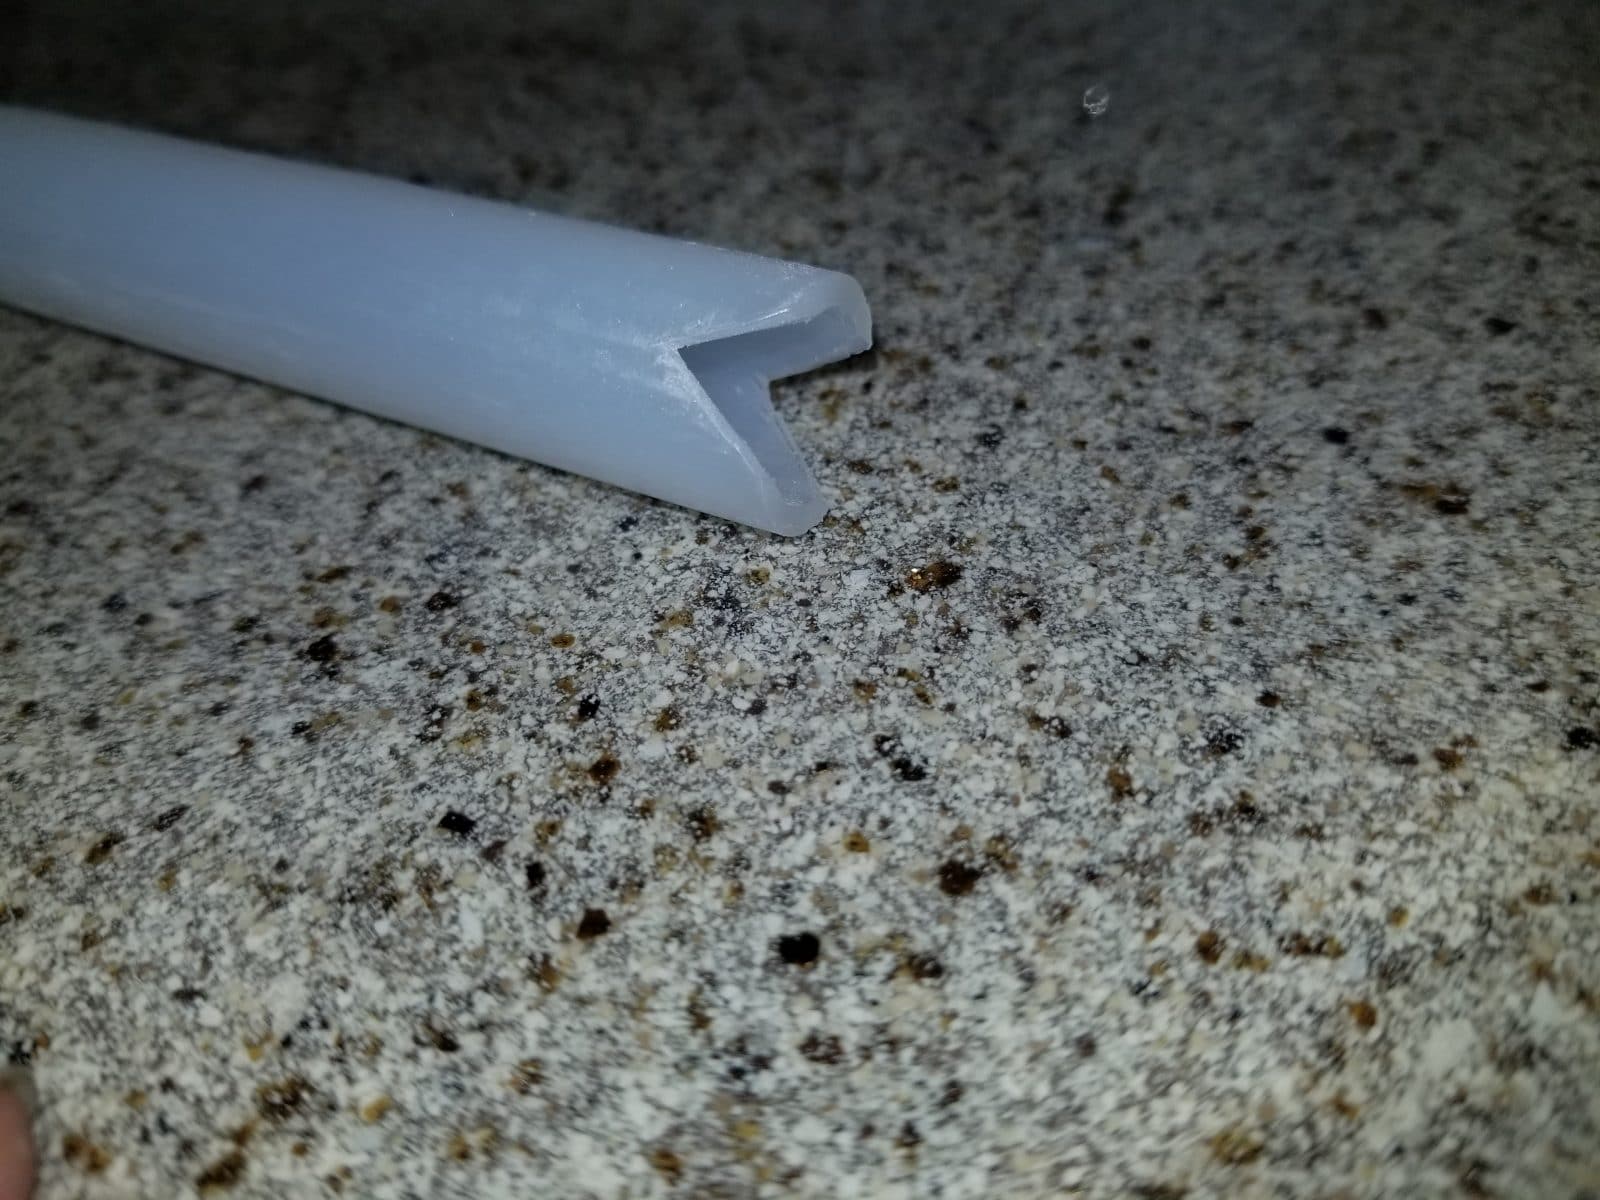
I had a list of about 5 items I asked Oliver to check out Monday. One was the water pickup. I was told it was about a 45 minute job. I didn't get a chance to see the tube inserted in mine, but did get a chance to watch another trailer being modified. The pex tube is notched then pushed all the way to the bottom of the tank. I'll try to attach a picture in this message. This morning I had a chance to test results. As level as I could get it, the level indicator showed 6% before it started to suck air and stop pumping. This was down from about 35% before. So I'm happy with the results. FYI, before, it would start sucking air at about 35% but feed would continue down to maybe 25%. The new set-up stops drawing quickly. I possibly could have pulled s little more out by raising the nose.
 4 points
 -
Good point about the cover flipping to the right. On the Oliver Facebook page someone posted a photo of an Ikea-like shelving system that they mounted on the wall behind the sink & stove that the cover might interfere with if it weren't sideways. We did. We hope since our Ollie build won't begin until November, that when we go up in October if we don't like our choices we can change them. It's unsettling to select something sight unseen that is rather pricey. Floor - Seagrass; Fabric - Tuxedo Grey; Blue & Orange stripes - Go Gators!
2 points
-
I've just returned from a fly fishing trip in Colorado. On the way back to Western North Carolina I stopped at the Mothership and had the guys at the plant "do" a couple of things for me. One of those things was seeing if I could get the "new" mod done on the fresh water tank. Jason told me that it would be no problem and would not take them very long to complete. When the work was done, Jason gave me my total bill and I noticed that the "Fresh Tank Modification" was billed at $47.50 but was marked "N/C". Certainly it is possible that since the rest of the bill totaled almost $1,000 they just threw this mod in on the deal, but ... So, not only did I get the mod, but, they did not charge me for it! Talk about great service at a great price! So, if you are near Hohenwald and/or are planning on getting some other work completed, you might want to ask (nicely) if they would do this "mod" for you. Finally - once again I simply can not say enough kind words in regards to the work and helpfulness of these guys at Oliver. Jason, Richie, Justin, Dustin (and others) not only work their butts off doing great work in a hot and humid plant, but, they are simply great guys and more than willing to do whatever is in their power to help. Its simply amazing to me what these guys will do for a couple of donuts and a can of soda! Thanks to them for all they did for me. Bill1 point
-
Reed - those are the "old" three way valves. Don't know exactly when they made the switch but, as far as I know, this is what was used through at least March, 2016. I've never had a problem with them. Bill1 point
-
We went with the "standard". As we thought it gave us the most counter space for us. Also when two in the area it is easier (and safer) to reach the burner controls. We also thought the cover was vulnerable to damage being exposed when open in the sideways orientation. By opening toward the wall, it is out of the way and thereby protected. Also didn't like that a pot handle might stick out into the aisle, where two people trying to navigate than space could cause potential problems...1 point
-
We went with it sideways. Anita advised that it allowed more usable countertop to the left of the stove. Didn't get any measurements tho. In my mind it made sense. Also, it allows the cover to be flipped up to the right to act as a splatter barrier to the seating/bed area. Otherwise it just flips to the back. She also mentioned that they were considering making the sideways position the norm as more peopl order it that way than the current standard way. As as an aside, Have you made any decisions on fabric/flooring? -Angela1 point
-
John, that is a nice set up. It sure would be nice to have my Ollie at the house. I would have to do some major modifications to an existing garage. When we built this house 12 years ago....if I knew then what I know now! Mike1 point
-
It's impossible to get away from wear when you have a forged, two piece coupler on a machined ball. Under normal circumstances, this would be predominantly on the top area of the ball, due to the tongue weight down force. This is where mine shows wear and it was expected. But with the particular design of the Anderson, there is a very large and constant forward force applied to the ball. The Bulldog coupler doesn't seem to really be designed for this, but is perfectly capable of handling it as long as the sliding sleeve does it's job. The way the two forged pieces come together to enclose the ball doesn't describe a perfect spherical shape to match the ball and there has to be some grinding. Load leveling hitches in general put a lot of force of the coupling/ball interface. Anderson used to say not to grease this interface, but I've recommended to always grease it. Bottom line: There will always be wear with this design. The chrome finish is the first to go. The ball and socket fit will never be perfect. Wear will be much faster with load leveling than with a simple coupling. I've never been a big fan of the Anderson design, but with the tongue design of the Oliver and the factory offering only this brand and design, it seems there will have to be some maintenance or replaced parts occasionally. I doubt anyone really needs one of these special hitches as the Oliver is incredibly stable by nature. Heavier rear springs or air bags would handle the tongue weight more efficiently than the awkward geometry of the tensioned chain design. If damping was needed, and I doubt it is, a strut design might be better than the cone clutch and chains of the Anderson that seems to always be making too much noise and need replacement.1 point
-
Well it is great to see that John is hooking his Andersen WD up properly. Unfortunately the wear on the ball is normal when our hitch is used as designed. With the chains correctly tensioned the coupler does push on the back of the ball and will leave evidence of that. With our WD hitch and a regular coupler the locking claw leaves a (smiley face) in the chrome plating because the ball is designed to be softer than the claw so the trailer is not having excessive wear in inconspicuous safety related spots. It seams to wear rapidly at first then it stops once the initial wear has settled in. Anytime there is metal on metal friction there will be wear, even with grease. As we can see from John's original ball, the difference is where it happens. Is it on the top and front of the ball with a traditional hitch or is it on the backside with the Andersen? If the ball is harder than the coupler the ball will not show much sign of wear but the inside of the trailer coupler will, however; that often goes unnoticed until it is to late. With the design of the Bulldog coupler there is a different wear pattern on the ball and it should wear to a point similar to the photo John provided then neutralize. This should not affect the performance or the safety of the connection at all.
1 point
-
I don't think this is a ground issue otherwise it wouldn't work hooked up to the tow vehicle. When I added aftermarket powered jacks, I hooked up direct to the charge line. So what I'm getting to is if Oliver hooked it up that way (and I'm guessing it is if you can power from tow) and the line is comprised on the way to the battery bank, then you probably won't be getting a charge to the battery from the tow vehicle as you travel. I'd be looking for a bad crimp connection or the charge line connection to the batteries.1 point
-
We just returned home from camping at Tellico Plains TN, Cherohala Mountain Trails Campground. Managed to take some eclipse shots!1 point
-
Just received another Oliver RSVP today! Lots of News/Updates DoItYourselfRV.com just posted 8 Scenic Oceanfront Campgrounds On The East Coast. Included in the list is Camp Hatteras, where Eggshells in The Outer Banks is held (and this year, Tearstock is joining us!) Come join the immense amount of adventure and fun with a huge flock of little travel trailers of all shapes and sizes. To make your reservations go to http://www.rvcompass.com/OBXrally/reserve.html and fill out the form to RSVP. You’ll get an automated email of how to proceed from there. We’re only 1 month away from releasing the schedule! Registrants, please make sure your spam filters won’t toss away our mass email notices (we’re over 120 rigs and growing every day). For a sneak peak of our tentative schedule, we’ve got morning coffee, yoga on the beach, a keynote speaker, night time DJs and campfires, catered food, seafood and beverage samplings, tons of informative OBX information to help guide you in getting the most out of your stay, trailer awards, lots of free giveaways, and a blowout showcase of the new generation of Liberty Outdoors brand trailers! Remote radio hosts and rockstar RV podcasters are scheduled to be live on-site during the event. Stay tuned to your email inbox two weeks before the rally, when we will release an OBX Trivia Treasure Map that will educate you and give you a better chance to win door prizes. In lieu of registration/rig fees, Please support our out-of-pocket expenses by making a small contribution of $15. In return to show our thankfulness, you’ll receive a Buoy Bag filled with goodies such as handcrafted gifts, rally memorabilia and great supply brand product samples at rally check-in. There is a limited supply of Buoy bags. To donate and learn more, please go to: http://www.rvcompass.com/OBXrally/donate.html1 point
-
New Land Being Made in The Outer Banks As the locals say, “The Diamond Shoals are surfacing for air…” http://www.onlyinyourstate.com/north-carolina/new-island-formed-in-nc/ For an OBX visual teaser, check out the stunning drone footage of North Carolina’s Outer Banks: https://vimeo.com/138117879 We’re currently in high gear pulling the rally activities together for registered attendees. Volunteers in some capacity will be needed, so as soon as we pencil it out we’ll let you know how you can help via email.1 point


-
Recent Achievements
-


")


")


")
