Leaderboard


Popular Content
Showing content with the highest reputation on 04/09/2020 in all areas
-
A number of people have changed them up. Just beware, that just like anything else, uv can change the uncovered area to a slightly different white than that covered by the stripes. Solution: slightly larger graphics. Imo.2 points
-
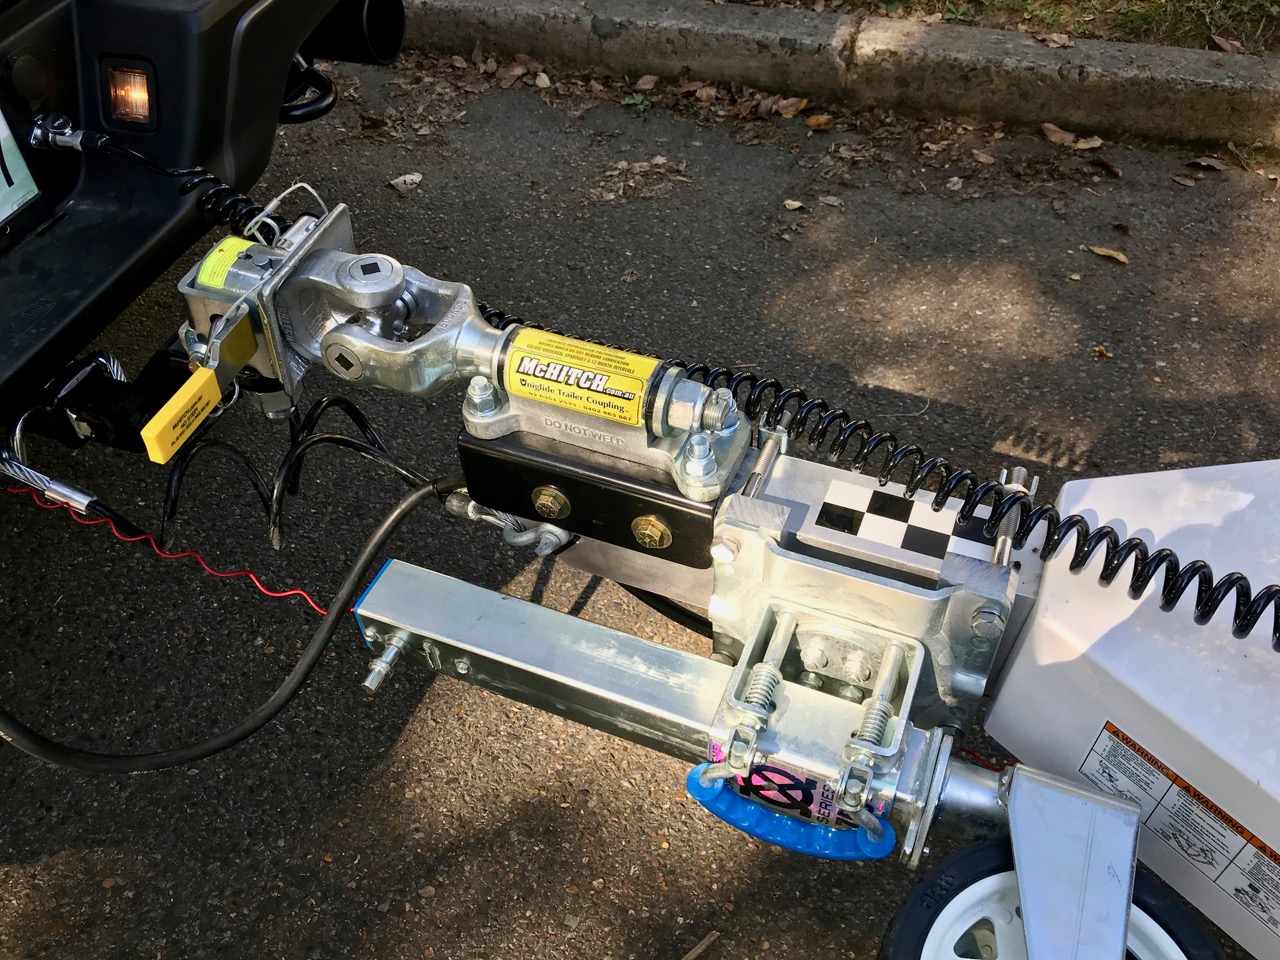
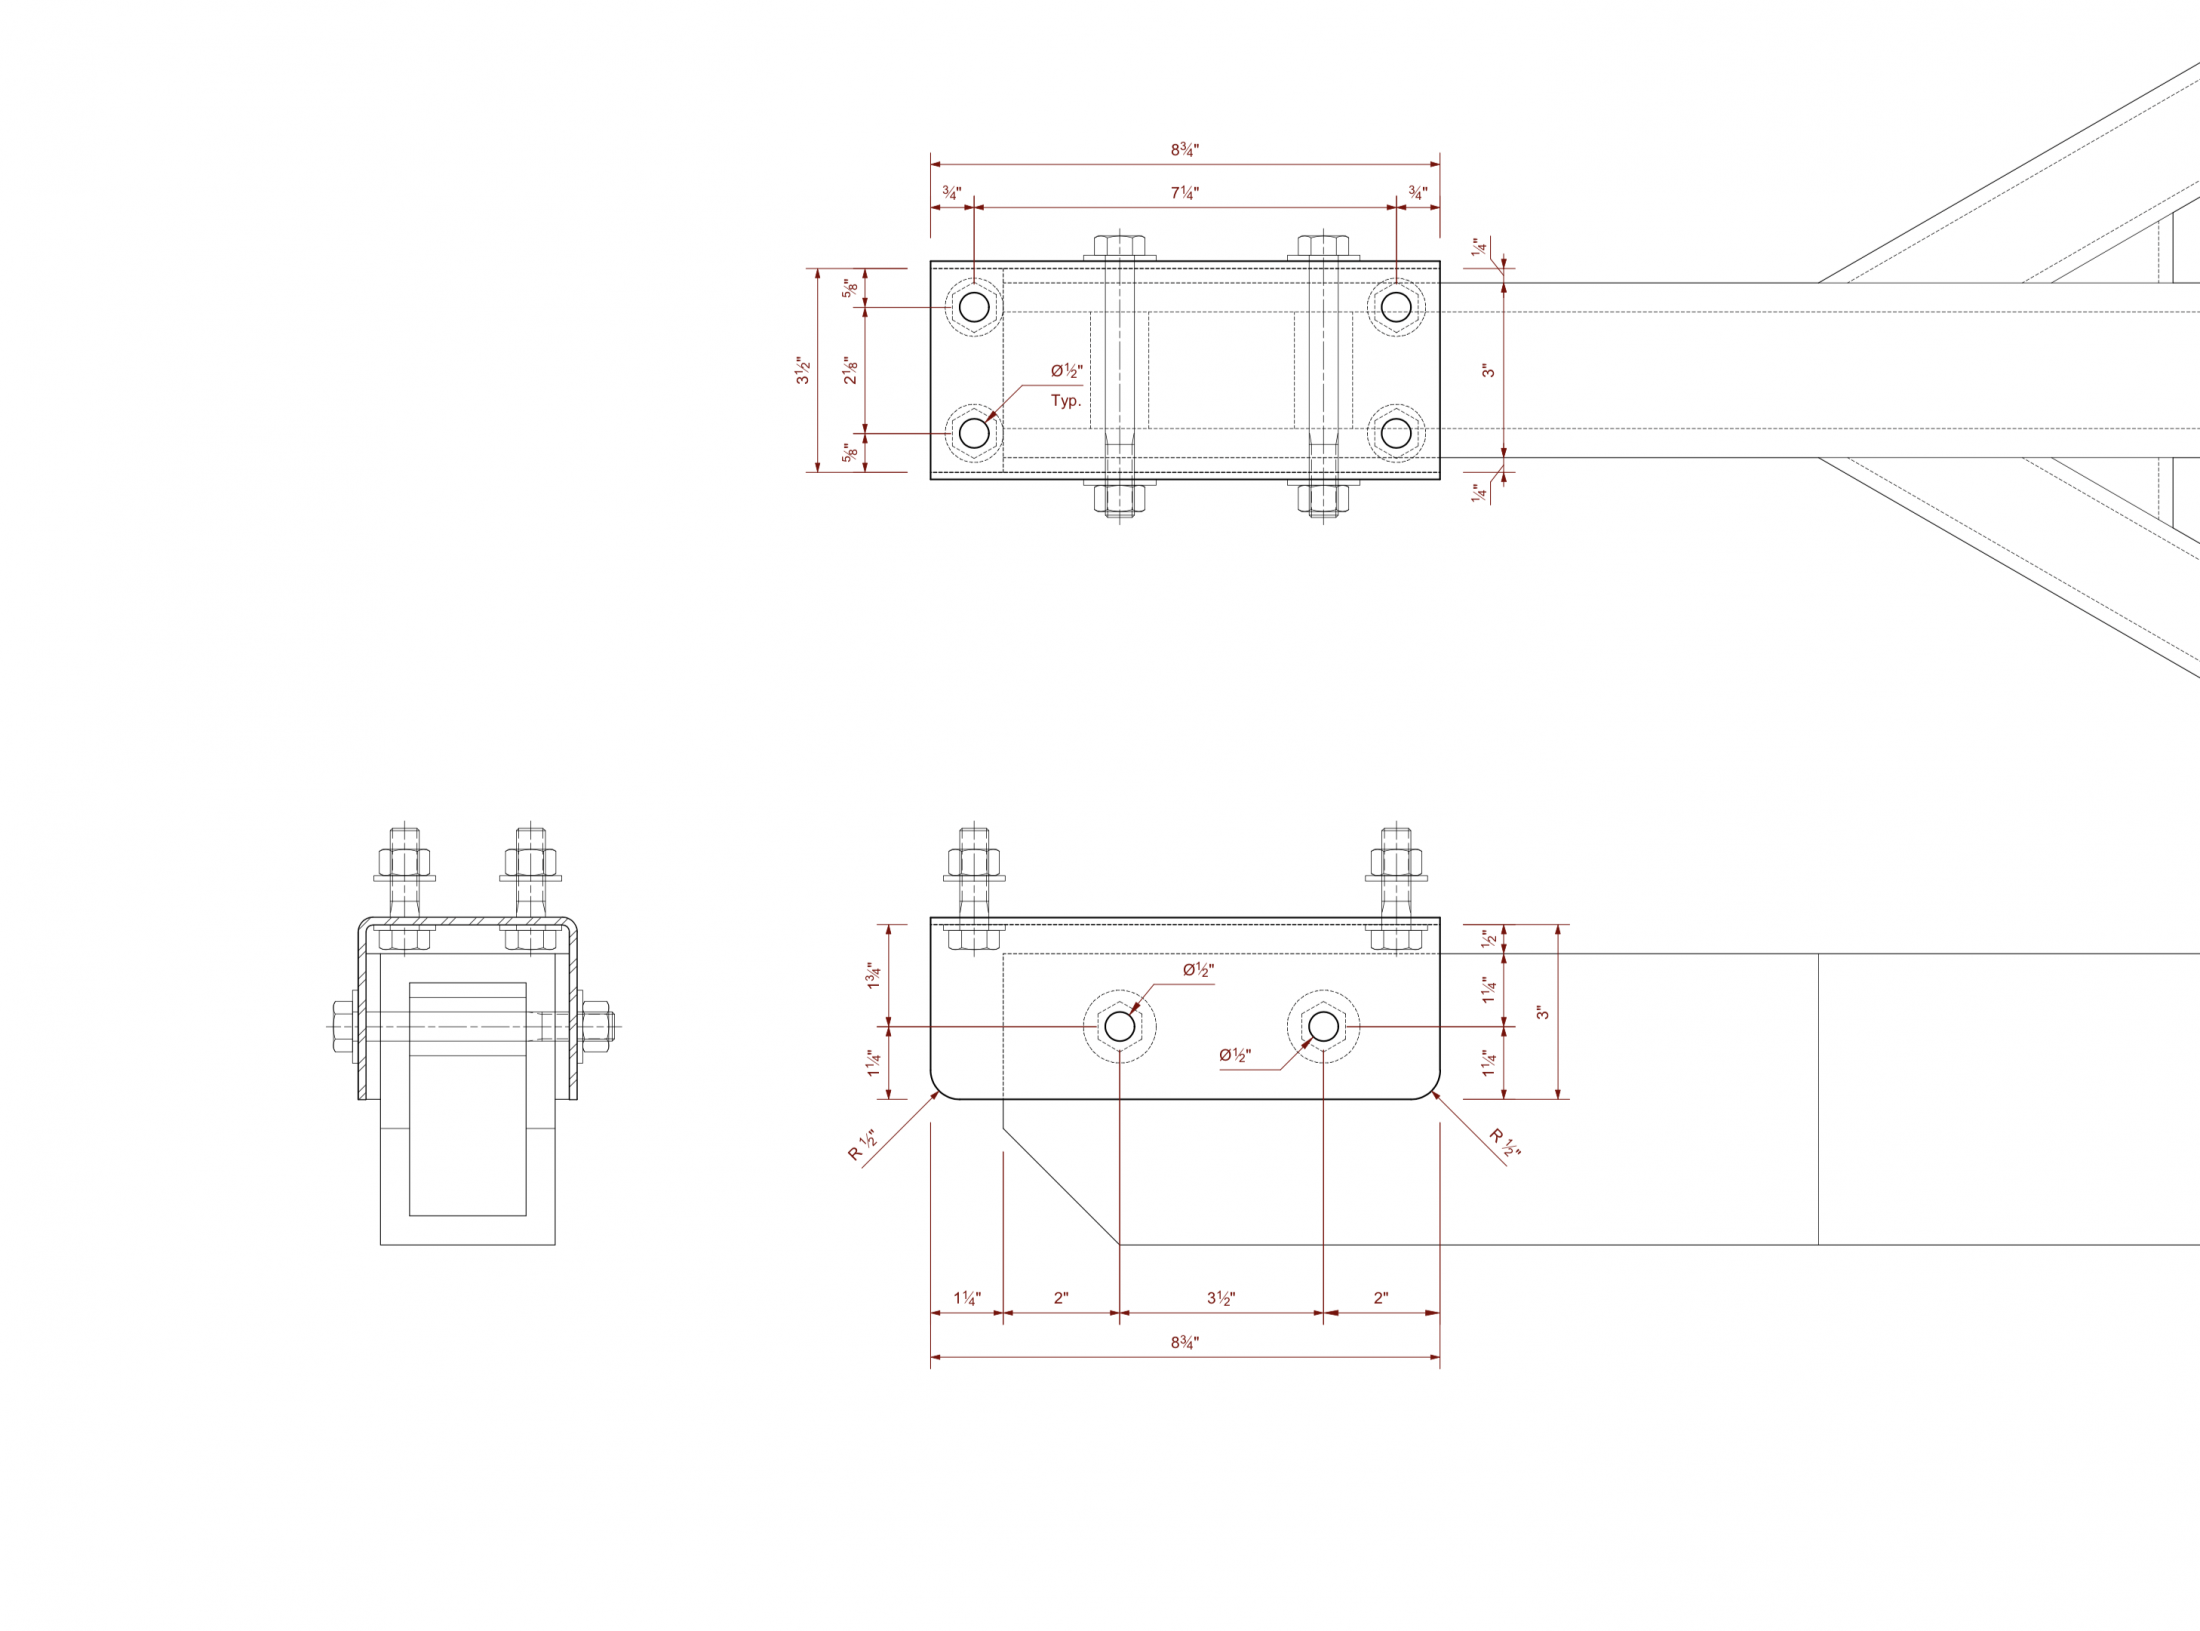
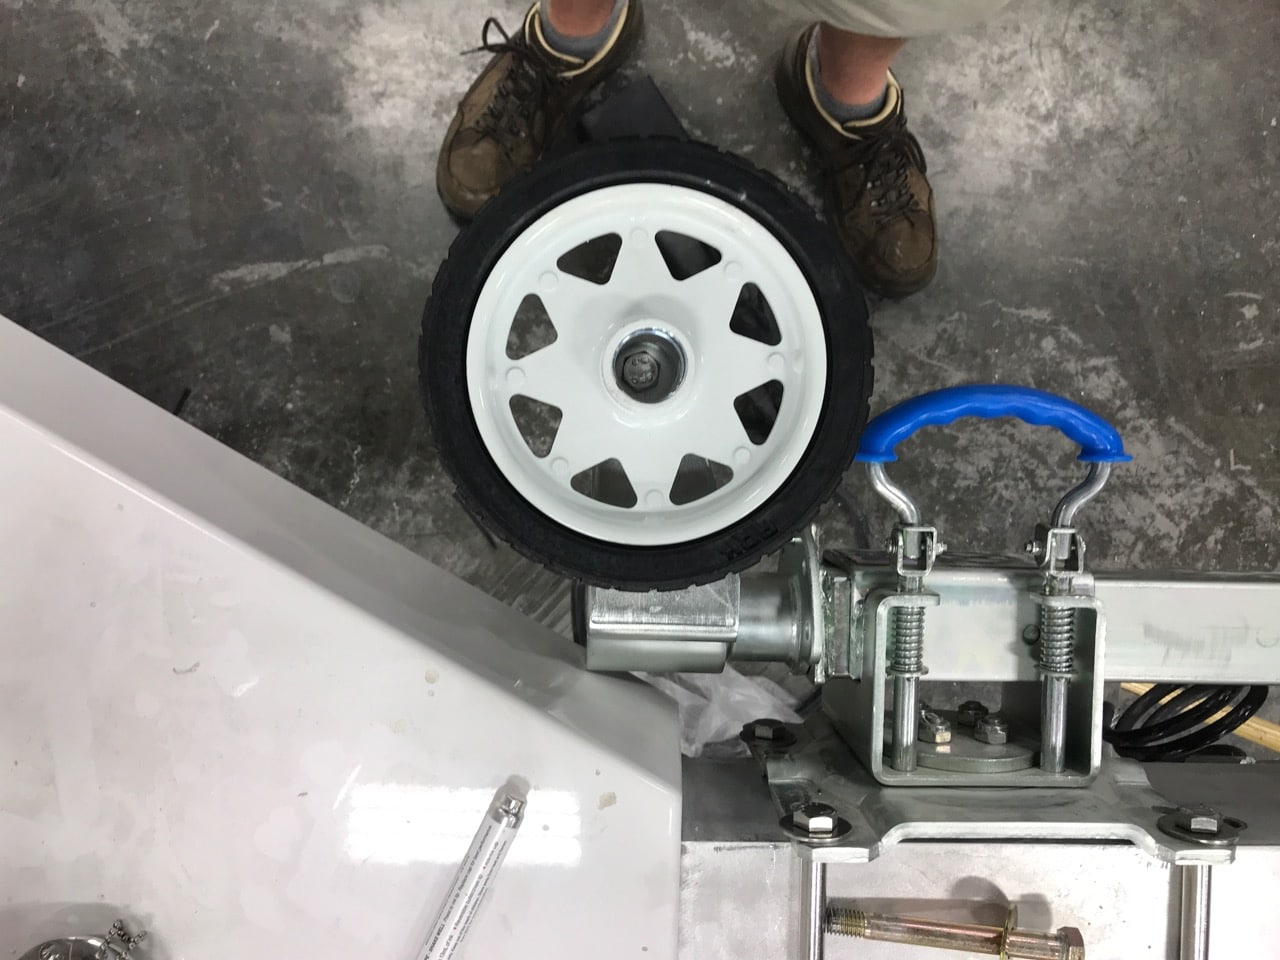
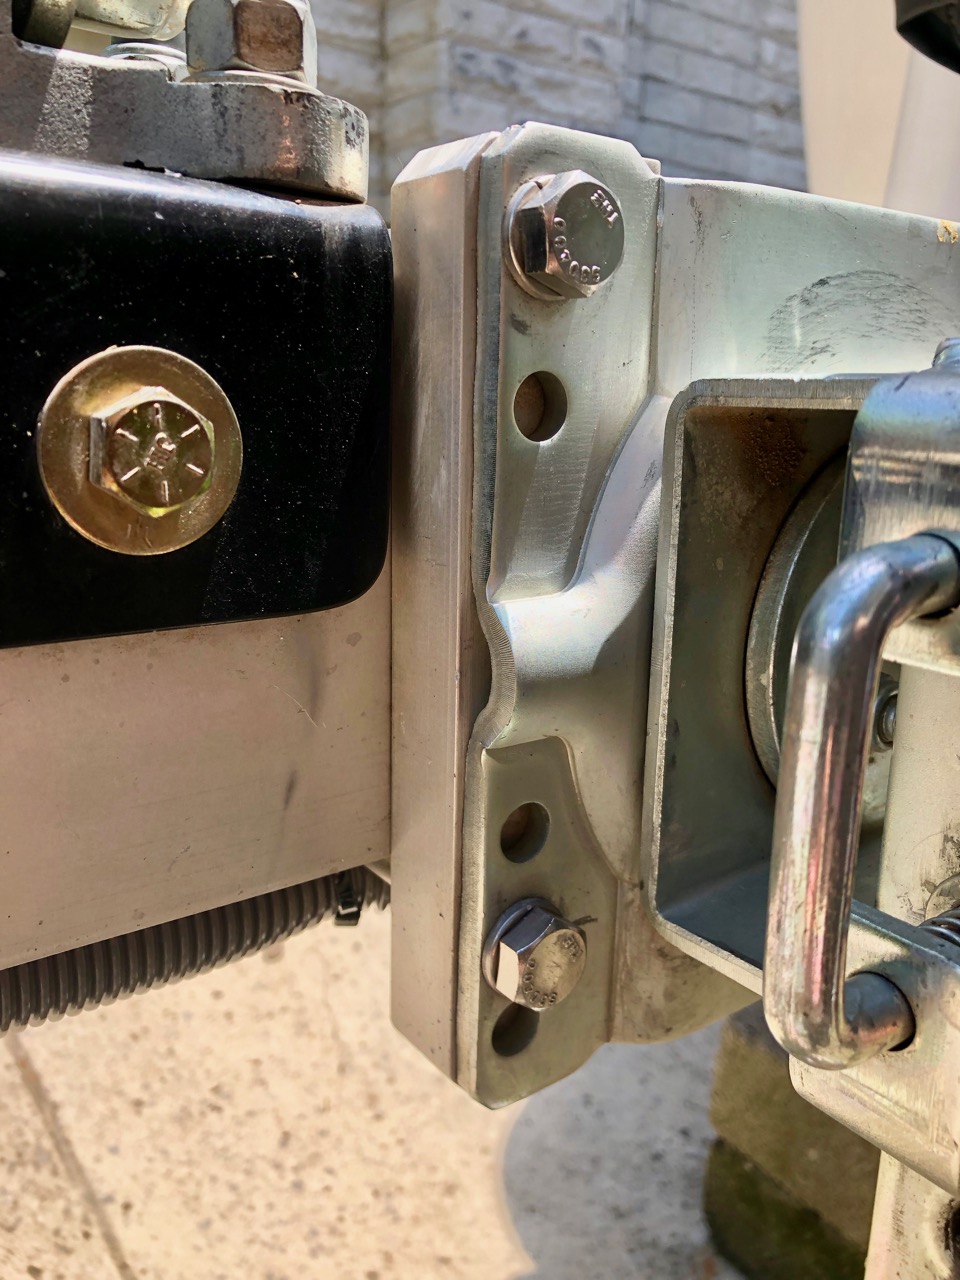
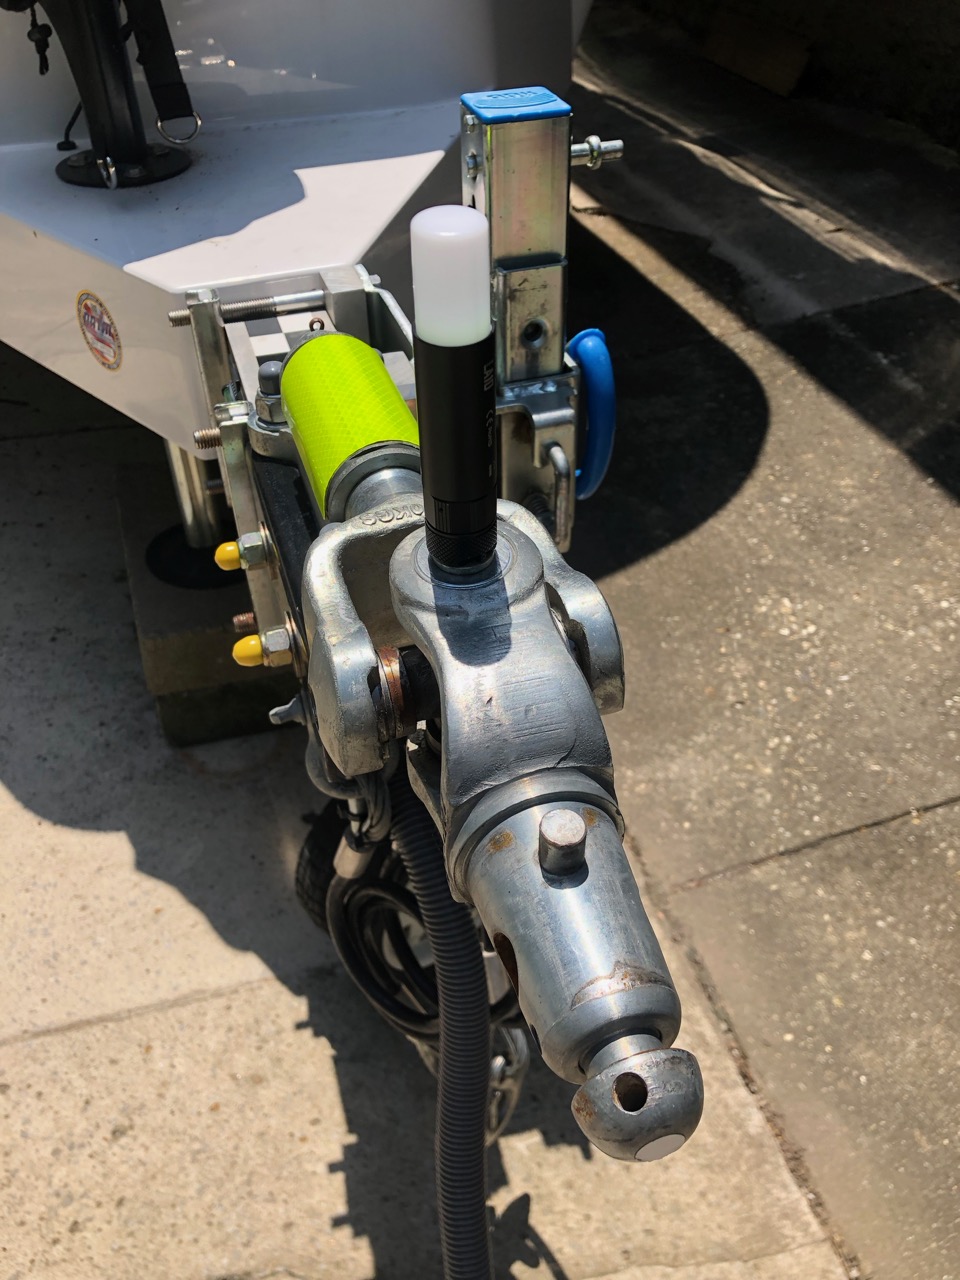
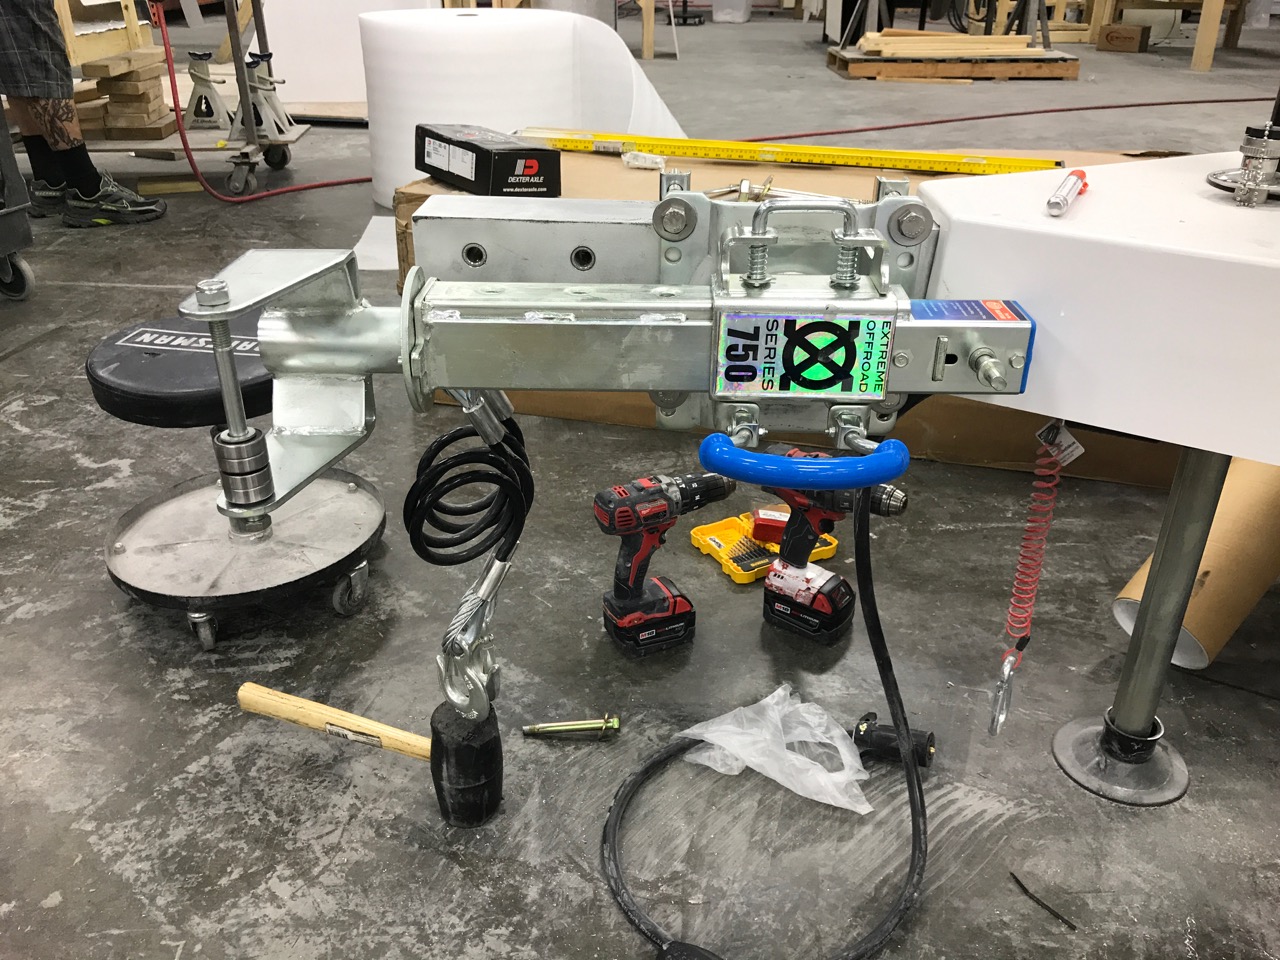
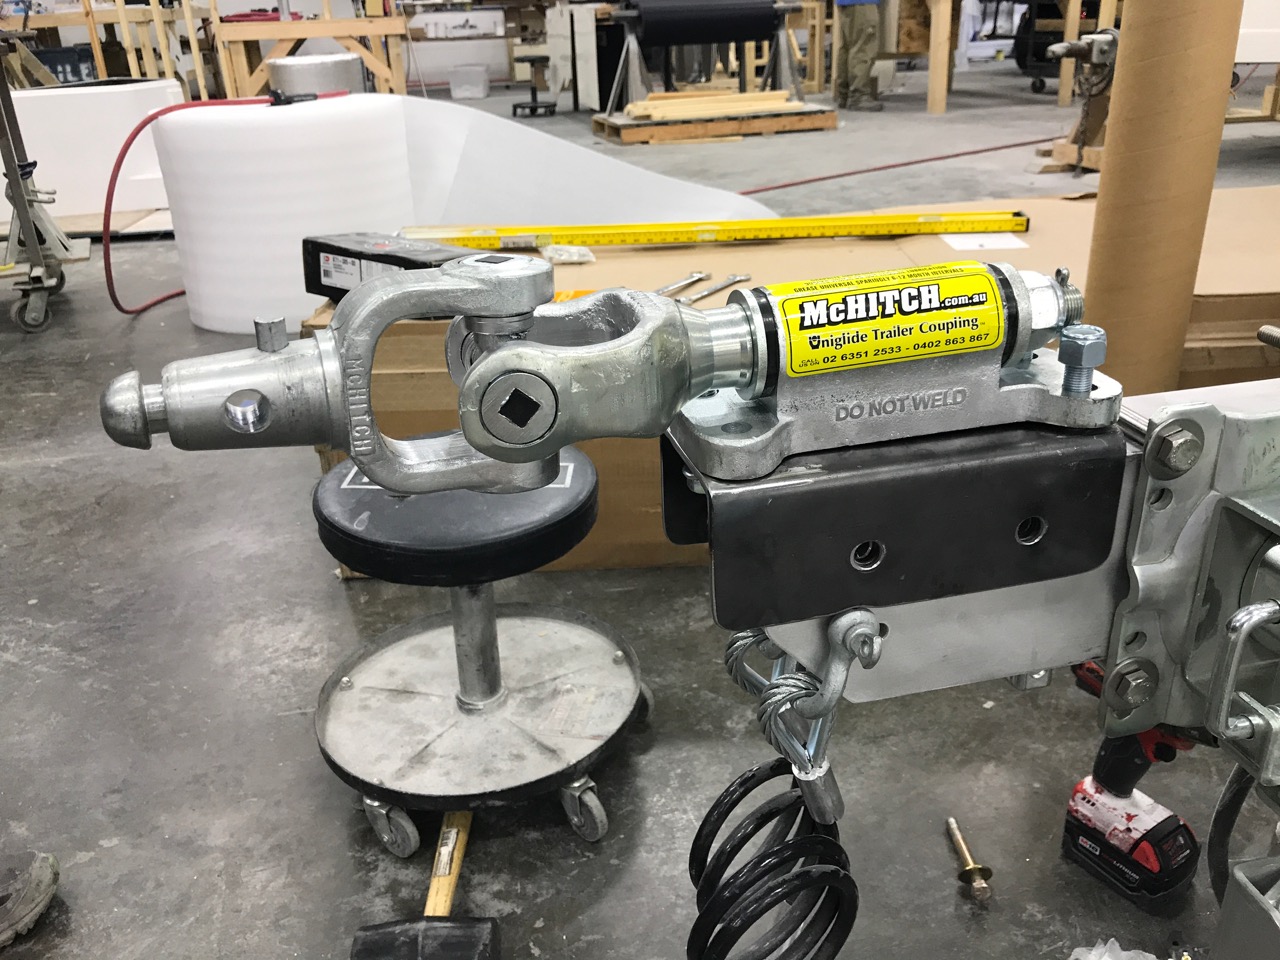
So most are probably aware that I've had these since delivery, but I've never posted about them - much to the concern of some (lol). The hitch, as advertised, is from McHitch in Australia. It's one of their automatic hitches in the 4.5 tonne (of the metric sort) version. The jack is an XO 750, also from Australia. You have to buy the hitch directly from their factory, but you can find the jack here in the US. The hitch was $750 shipped; the jack, $250. (The hitch price may have been Australian dollars - I can't tell from their invoice.) To attach the hitch to the Ollie's tongue, you'll have to have an adapter made, like this: The hitch bolts into the adapter and the adapter bolts into the same two holes on the tongue as the Bulldog, making them interchangeable. The female portion of the hitch will mount directly to any ball mount. The jack also requires a bit of work. The bolt spacing on the jack's mounting plate actually aligns quite well with the Ollie's tongue, but if you mount it directly to the frame, then the wheel just doesn't quite clear when folded: And there's no room to scoot the jack forward. You can fold it back the other way, but then the wheel is far enough forward to hit the truck in a tight turn - So you have to make some spacers, or if the guys in service are still as unbelievably nice as they were when mine was being built, maybe they'll make some for you. The ones they made for me are cut from 1" aluminum: So that's what we're talking about and how it attached to the trailer, but people are probably thinking - What again? Why did you spend money on this? The hitch, first: a multi axis hitch allows much greater articulation between the truck and trailer when going off road. Dips and twists in the road that would otherwise bind up a standard ball hitch are no problem with a multi axis hitch. There's also zero possibility of the trailer coming loose from the truck, thanks to the safety pin. The typical problem with these hitches, however, is that most designs are very difficult to align, and as such are commonly only used on small trailers that can be manipulated into place by hand. The McHitch fixes that problem by being largely self aligning. All you do is line up the hitch laterally when backing up to the trailer, then adjust the trailer height to match the truck's, then back into the hitch and it locks itself in place. The McHitch has two locking mechanisms: the first is the lever bar that drops into the groove on the main pin. That both holds the pin and lets you know that it's attached. Then you slide in standard locking pin a safety. Here's a video of how it works: It really works as advertised, and I actually enjoy hooking up and unhooking because it's so dead simple and quick. The u-joint on the hitch is from a Land Cruiser, so it's easy to source should it ever start to wear out. Maintenance is just greasing the u-joint once a year and keeping the locking bar greased so that it moves freely. I was a bit worried when I greased the u-joint that the pin would droop, making it difficult to hook up. But so far the u-joint has maintained it's stiffness. And it gets so little wear relative to what it was designed to do that it may never loosen up that much. You can get a WD attachment for the hitch if you want - I don't have it, and so can't comment on how easy or difficult it would be to attach to the Ollie's frame. There's also a keyed lock for the safety pin. The caps on the u-joint mounts are magnetic, so I use the top one to hold a little Nitecore LA10 flashlight/lantern when hooking up in low light - The XO jack serves three purposes. First is that it absorbs the bump from when you back into the McHitch. The Ollie's jack isn't designed to take that kind of force, so over time, either the jack or its mount are likely to get damaged. And of course if you were to bump the trailer particularly hard, then you might just destroy the jack or its mount in one go. The second purpose for the jack is that it provides an easy way to line up the trailer vertically with the truck, which I'll explain later. And the final purpose is what it was designed to do - allow you to recover the trailer if it's stuck, or maneuver the trailer while not attached to the truck. The jack is very stout, and strong enough to support the trailer while being winched. I haven't yet gotten the trailer stuck enough to use it like this. (I've gotten it stuck once, but was able to use traction mats on the truck to get both it and the trailer back to dry land.) But I have used it to maneuver the trailer around in a tight campsite, and it works perfectly in that situation. Here's a video of the XO jack in action: Obviously, you want to use extreme caution when using the jack in that way. It doesn't take much of a slope for the trailer to get away from you. Likewise, you need to use caution if you use the jack while hooking up or unhooking your trailer. I leave the safety chains attached until I've fully unhooked the truck from the trailer and placed the weight of the tongue onto Oliver's jack. The bonus to using that method is that the XO jack remains set to the truck's height, ready to be hooked up again. When it's time to hook back up, you just lower the tailer down until the XO jack is taking the weight, and you're all set to hook up. In cases where you have to lower the trailer's tongue to level, then I first raise the tongue, then swing the jack forward or lift it using the height adjustment pins, and then lower the trailer down to level. Hooking it back up would then be the opposite of that.
 1 point
 -
I think that for the average person who does not have a hard core rock crawling trailer, an offroad coupler provides peace of mind for that rare occasion when your stomach knots up and your sphincter does too. Most of the time a decent ball coupler will be transparent and trouble free. OTH Andersen recommends that you disconnect the chains in these situations. if you keep the tongue weigh really low, that won't add any new problems. If your are carrying 700 pounds on the ball, expect your light duty tow vehicle to be unhappy and maybe unsafe if you remove the chain tension. I towed a dinky little utility trailer maybe 30,000 miles over 12 years, I installed an Australian Treg polyblock coupler right way. It performed faultlessly and as a bonus, it looked very trick. I never had any issues backing that were due to the coupler itself. John Davies Spokane WA1 point
-
I know. I've been looking for a cache aerator for a couple of home faucets. Ours are old school key type caches, on a couple of faucets. It would be nice to replace with the coin slot cache type. There is a .5 gpm cache aerator on the website, in the 18 mm size, but not that cool basketball net pattern of the Mikado, which I so love watching. Makes scrubbing your hands for 30 seconds much more enjoyable. I hope that works for you. You found a beautiful faucet! I wouldn't be surprised if Ikea used neoperl to outfit their faucets. Actually, it would make sense. We used that Grohe control valve in a few places in Europe last year. Once we got used to it, we loved it. You'll probably want it at home, too, once you install it in the Ollie.1 point
-
We have the same aerator on our kitchen sink, and haven't had a problem. But that might be because we have the truma comfort plus model with the water circulator. So I'm curious now if anyone with the regular truma has tried this aerator and if it works for them.1 point
-
Before you send it back: The Truma has to detect approximately .4 gpm flow in order to turn on. Operation might be iffy with a .35 gpm aerator.1 point
-
The Neoperl Mikado .35 gpm aerator comes in a number of sizes now. I wonder if there's one to fit your new faucet? The aerator that's in the Ikea faucet sure looks like a Neoperl coin slot cache aerator to me. But, I'm only looking at a photo. https://www.conservationwarehouse.com/faucet-aerators-35-gpm.html Sherry1 point
-
Overland, Cool stuff! Will the .35 GPM aerator work with the new faucet? And Amazon has the faucet for for $164,🙈 what a deal. Mossey1 point
-
We were going to go to Lake Mineral Wells State Parks next week, only 39 miles from our home, it was to be a short trip, but get us out of the house for a couple of days. We were going to take our ebikes and ride the bike trail from minerals wells to Weatherford, Texas. For those of you traveling in the North Texas area I would recommend this park, it offers all types of terrain, large lake, boating activities, and the 20 mile bike trail, which can be walked, or ridden on a bicycle. You can check it out here, https://www.ebay.com/sch/i.html?_from=R40&_trksid=p2380057.m570.l1311.R1.TR12.TRC2.A0.H0.Xvw+.TRS0&_nkw=vw+bus&_sacat=0 trainman1 point
-
I am not so sure about departure angle issues with the Elite, but my rack in no way affects it on my Elite II. I have to worry about the extra length when backing, but the rear view camera takes care of that. https://olivertraveltrailers.com/topic/how-to-move-the-factory-cargo-tray-to-a-rear-rack/ I too think putting cargo on the roof is a poor idea in general, regardless of how well it is built. Tongue is best, if your TV can deal with the weight, rear is next, in moderation, followed a distant last by stuff ten feet off the ground. Remember that these are narrow trailers, so they would be more susceptible to problems when adding a bunch of mass up high. The factory experimented with spring over axle raised suspension on this trailer and did not like the results. John Davies Spokane WA
1 point
-
Running cables around the lower hull is no big deal. Going from top to bottom is trickier. Rideadeuce has had good luck adding panels with only VHB tape. I got Oliver to do 640w on my roof but that was back when they were still doing customs. I’m not sure what you can do about getting Oliver to add extra backing plates - probably won’t have much luck these days. It would be major surgery, but I’ve often considered what it would take to cut out the center section of the ceiling for access to the outer hull, then installing a fabric covered false ceiling to cover the hole, possibly adding some LED perimeter lighting in the process. It should be possible but would require some serious planning. You can also keep an eye on the tracking mount that one of our other owners (hardrock) is developing. Personally, I think you’d have better luck adding a nice custom dry box to the old style bike rack. Oliver has drawings of the old rack (which I prefer to the other home made solutions I’ve seen), so it wouldn’t be hard to build. And adding a box there would be so much easier to access, and surely would affect stability less than anything on the roof. The tax credit is for solar install. So long as you buy at least one solar panel (can be portable), then you can take the credit on the entire system, including batteries. It’s being phased out but it was 30% when I bought so it made quite a difference to the cost. Ask your accountant or just google for ‘solar tax credit’.1 point


-
Recent Achievements
-


")


