Leaderboard


Popular Content
Showing content with the highest reputation on 05/14/2021 in all areas
-
I think "think" you will be fine. Check gas buddy. You are heading out of the difficult areas. Go north, then east, probably.3 points
-
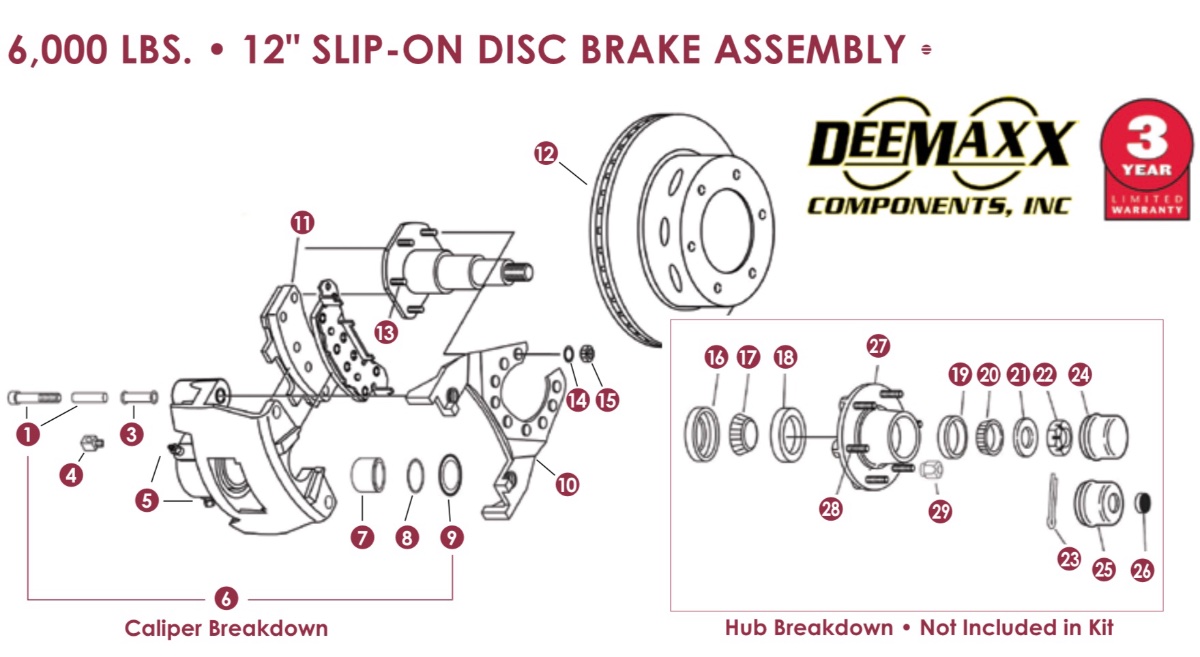
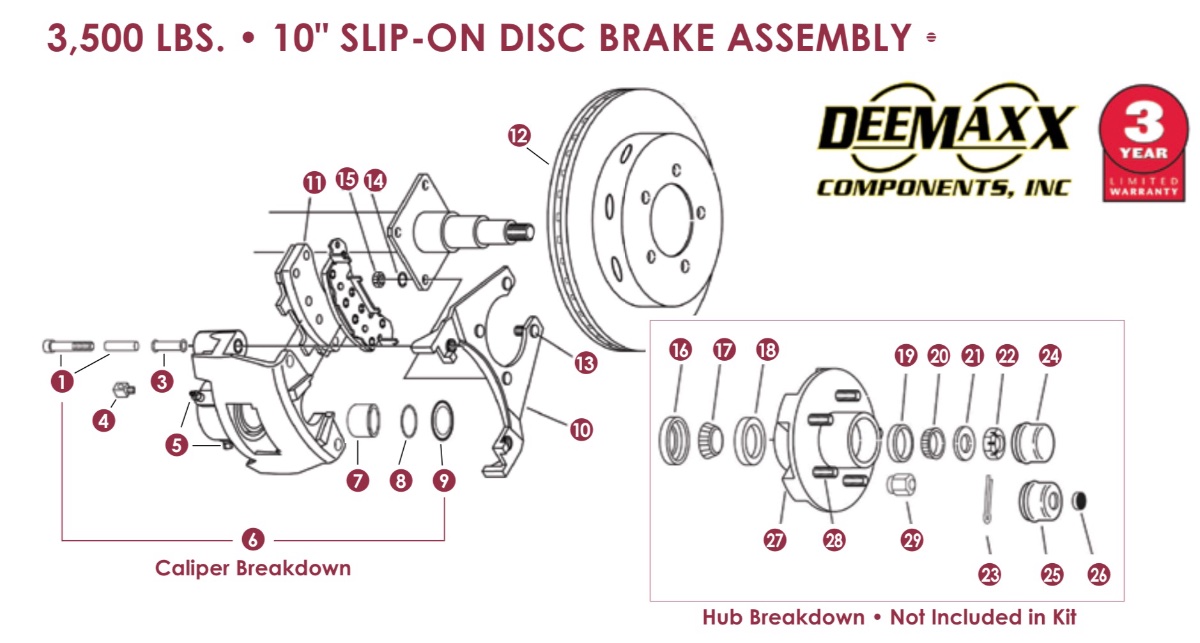
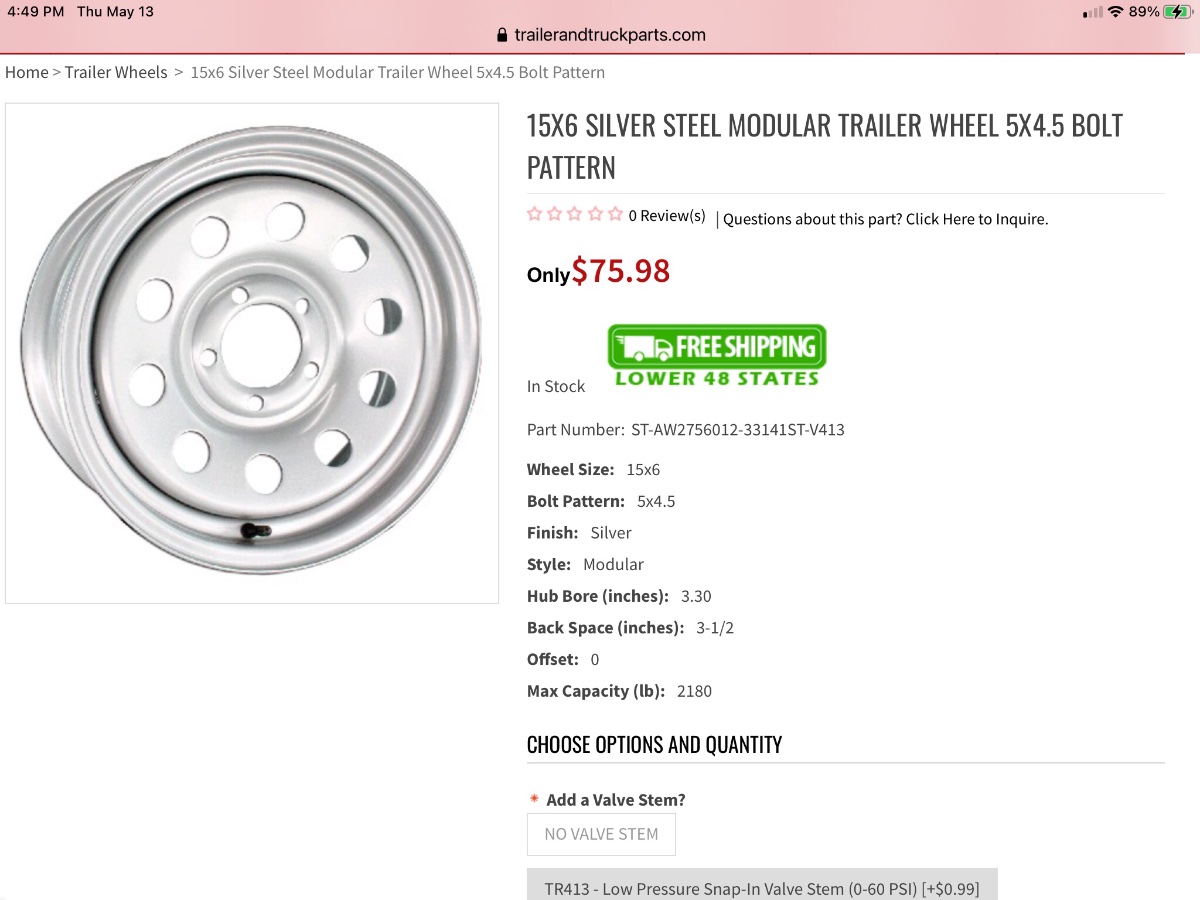
There are a couple of reasons, from my point of view, to change the wheels and tires…. 16 inch LT (10 ply) TRUCK tires are gross overkill for a 7000 pound trailer, they are expensive and they are really heavy. Going to a smaller 8 Ply tire saves money when the time comes to replace the tires if one gets damaged or as they age out (7 years is commonly recommended), plus they are a lot lighter and have less rolling resistance. You could buy an electric over hydraulic disk brake kit for a 3500 pound tandem axle setup and it would be completely plug and play. The current wheels are 6 on 5.5” bolt pattern, which is typical of heavier axles (like on the LE1) that have a 5 bolt brake mount pattern, but the LE2 has little 3500 pound axles with a 4 hole brake mount pattern. Pardon my language, they are bastards, neither here nor there. Nobody makes a bolt-on disk kit for this combination - the hubs have the wrong number of studs OR the brake plate is wrong….. . If you want to install disks, you must replace the axles on an LE2 with the bigger ones, with the proper matching brake plate and lug pattern, which gives you oversized parts and lots of extra mass. Or change the wheels and keep the old axles, and install a lighter system that is better matched to the trailer weight. I think it is crazy that Oliver decided to do this, it completely cripples any future brake upgrade. It will be a couple of more years before I have to replace the tires, enough time for Oliver to come up with a solution for me that does not involve complete axle replacement….. IMHO changing the wheels and tires when your current tires are fine makes no financial sense at all, but suddenly it does make sense when they get too old… Keep in mind your old 6 hole wheels would have some value, they could be sold on Craigslist or here in the Classifieds. Comments? I opened a Service Ticket, to see if there is any hope….. Here is the 10” Dexter slip-on kit (5 hole wheels): And the 12” kit (6 hole wheels, HEAVY parts): John Davies Spokane WA
 2 points
 -
Well, they (drum brakes) are inferior in some (even perhaps most) circumstances. Repair is one area where disks are much easier to work on. In "performance" situations disk brakes are also superior. If I was doing a bunch of hills or needing my brakes to be applied for relative long periods of time then disk brakes are much better. But, having said this it does not necessarily mean that drum brakes are junk from the standpoint of - do they get the job of stopping the vehicle done. I believe that while drum brakes are not the most elegant nor the newest or greatest technology, they still get the basic job done - i.e. they stop the trailer (assuming that the maintenance factors pointed out above are good). If I had the choice of drum versus disk brakes - I'd take the disks every time. But that is not to say that drum brakes are junk. Bill2 points
-
The "easy" way to tell is to take a look at the back of the drum. If there is a rubber plug take it out and look for a "wheel" on the inside of the drum that can be turned (via the notches in the wheel). Turn it one way and the brakes tighten while turning it the other way loosen the brakes. These are manually adjusted brakes. Since I'm hull number 117 and you (Mike) are fairly close, I'd guess that you have the same brakes as I do - self adjusting. Basically these brakes adjust each time you drive the Oliver in reverse. These are not as finely tuned as the current Dexter "never adjust brakes", but, generally they do a good job. This is particularly so if during your annual wheel bearing job the brakes are adjusted properly when you hub is put back on. Right after this annual job your first few stops just might be a bit lacking in stopping power - that is because you probably haven't backed up the Ollie enough times yet in order to allow the self-adjusting mechanism to full work its magic yet. As long as the big magnet inside the drum is still good, the magnet is getting power, and, you have reasonably good brake lining, you should be able to get more that reasonable stopping power from drum brakes under "normal" circumstances. Yes, this is arguably ancient technology. Yes, disk brakes are easier to service and can provide more consistent and reliable stopping power under a broader array of circumstances. But, properly serviced drum brakes have proved to be a reliable source of stopping power for many years on many vehicles and trailers. Bill2 points
-
I don't believe that for most of us the larger bulldog is necessary at all. However, I do agree with JD that the "newer" Andersen is a good improvement from the previous designs. I've owned at least two of the previous designs and having the current one both prevents water from getting into the anti-sway system (thus helping to prevent that "nasty Spawn of Satan" noise) AND from allowing the friction cone material from coming out of the top of the assembly. I also agree that it is well worth the $100 that Andersen wants for the upgrade. An added bonus is that Andersen doesn't want your old housing back. This means that you have now got a really nice door stop too. 😊 Bill2 points
-
Very interesting to hear the opinions of others on similar equipment. My first response to the title here was - Why on earth.... But as usual - JD has a well reasoned answer to that question. I have no complaints with my brakes - after 17k miles they remain in decent shape - and I'll take another look at them in the fall. But then I tow with a 2500 with a robust breaking system - and the Oliver doesn't have to work that hard on the braking. The Oliver seems to represent a great platform for the "I can make it better" crowd. And conversely - works really well for the rest of us.... Now here is a counter opinion - I have a mind to switch from the E-II down to a E - I, Find a pre-owned - basic - and go from there.... Carry on. RB2 points
-
The corners of two of the non-slip step treads (leading edge, right side as you face the steps), on our 2021 Elite II have come "unstuck" from the step (Poor grammar, I know; my HS English teacher is probably groaning). I imagine they are installed with the self-stick backing that comes on the strips. What adhesive would you recommend to re-glue them to the step? I would ask our friendly Ace Hardware expert, but it's much more fun seeing the answers my Oliver friends come up with, which might help others who experience this minor problem. I just took a batch of Molasses Crinkle Ginger Cookies out of the oven. Can you smell them? 😋
2 points
-
2 points
-
I do feel like the current drum brakes on the Oliver's are useless - at least the ones on mine are (relying on them is dangerous), so this mod would be compelling to me. It's too bad that it takes a smaller wheel to upgrade the brakes because I like the look of the current tire/wheel combination on the Ollie's. I think small wheels on a tandem trailer look cheap. I suppose you could still get "bigger" LT tires with the 15" rims and it wouldn't be that noticeable. Thanks for bringing this to light JD, I didn't realize this design boxed us in so much. 😞2 points
-
On our way back to Texas from Tennessee we found that the interstates had fuel, some of the small towns on the backroads did not. North of Tennessee should be okay.2 points
-
I've successfully replaced a broken Bathroom Door Mirror. It was pretty darn easy, however I'm going to provide step-by-step instructions below for anyone who has any concerns about how to do it one's self. Note: Be very careful handling glass! It's possible to get severe lacerations, if you're not reasonably careful. You may want to wear some light work gloves with silicone grippers on the fingers. Mirror has Safety Backing which is intended to keep broken mirror from having exposed sharp edges, but it's not perfect. 1) Order a new Safety Mirror w/Safety Backing in these dimensions 18.5" X 61" X 1/8" from your local glass store. I don't recommend picking it up until you have the broken one removed and can bring the Plastic Backing Board to provide added support for the new mirror when transporting it home. 2) Remove door from Ollie by unscrewing the 4 screws on the hinge side of the door inside the bathroom. When the last screw comes loose, be ready to carefully lift the entire door and hinge assembly from the fiberglass door opening. 3) Place the door on a open, flat surface. Begin by removing the 2 screws that hold the door handles to the frame, and set those aside. Next, remove the plastic door latch by removing it's screw, and set aside. Next, there are 4 screws, one per corner, that hold the aluminum frame together. It probably doesn't matter where you begin, but I started by removing the two screws on the long side opposite the hinge. Set screws aside, and begin to gently work the aluminum frame from the mirror, the 1/8" plastic backing, and the silicone seal that holds the mirror in the frame. Once off, set aside. Move to either the top or bottom frame piece, Loosen until free, the screws that stay connected to the hinged frame piece. Carefully remove top and bottom frame pieces. Finally, remove hinged side from mirror. Note: Be sure to notice how the one piece silicone seal is placed on the mirror edges. Notice how it fits on the corners. You'll want to duplicate that exactly with the new mirror, if you want it to go back together easily. 3) Remove Silicone Seal and set aside. Carefully remove Plastic Backing Board from 1/8" mirror. It was glued to the mirror, so it may take some gentle prying. Mine came off easily because the glue was no longer holding them together. 4) Take Plastic Backing Board to glass shop to glue or tape to new mirror before transporting. Make sure your vehicle has a flat space long enough to support entire mirror. It would be a bummer if you hit a bump and it broke before you got home. New mirror cost me $130 5) Begin reassembly by removing tape if it was used to keep backing board on mirror. Place Silicone Seal on new mirror exactly the way it was on the broken mirror. I recommend starting with the hinged side first. Very gently work the mirror, backing board and silicone seal into the hinged frame piece such that the top and bottom frame pieces will fit perfectly to the 45 degree angle cuts. This allows for perfect screw and threaded holes to align perfectly. 6) Gently press top/bottom frame pieces onto mirror/backing board/silicone seal such that they match perfectly with hinged piece. Screw the top and bottom screws from the hinged side into the top and bottom pieces. 7) Now install the other long frame piece until it matches perfectly with the top/bottom pieces. Once together, install the two screws you set aside. 8) Now you can reinstall it into the trailer. Simply lift into place such that frame holes align holes in fiberglass opening. Replace screws till tight. 9) Lastly, reinstall Aluminum handles and Plastic Latch. Voile! You have a new mirror which you will never allow to break again because you learned your lesson the first time, as I did LOL.2 points
-
Bill, thanks. I was pretty sure our brakes were self adjusting. I was just wondering why some owners would feel that these same brakes were so inferior. BTW, I do plenty of backing up! Mike1 point
-
Yep - I can make a bunch of trips to the grocery store (2.5 miles round trip), to Lowes (7 miles round trip), or even WalMart (8 miles round trip) before I start to be concerned about that large gas tank in the truck getting below half full. I do feel a bit sorry for those that do not have as much choice as we do regarding how and when they must use their vehicle. This evening's local news still said that upwards of 70% of the gas stations in the Asheville area are without gas. But, by early next week things should be greatly improved. Bill1 point
-
I think I'm good, sitting in the woods, till it all gets straightened out.1 point
-
Today (Friday May 14) two of the three gas stations nearest my home did not have gas. However, yesterday all three had gas at least for part of the day. News reports tell us that the pipeline that was shut down is now fully functional. Therefore, once the "panic" stops and once there are enough fuel delivery drivers to deliver the product from the pipeline terminal to the individual stations, everything should return to "normal". Bill1 point
-
The problem with the old bridge is that back when it was the new bridge it was just two lanes and was later reconfigured to four very narrow lanes. And it also kind of bounces as traffic goes over, so cars naturally slow down on it already. With double the traffic, it's super slow. That bridge gets most of the freight traffic, so it'll be crowded.1 point
-
Nice video - Thank you Jason! Through trial and error while bringing our new trailer back to WA state, we sorted the Anderson out (aided by James input during our delivery walk through). We did polish out some burrs on the hitch and pin which took just minutes and made hookup go smoother. Despite very heavy head and cross winds encountered across the prairie, we found the Oliver II towed extremely well behind our F150. The trailer has exceded our expectations and our thanks go to the Oliver team.1 point
-
JD, thank you for your very helpful advice! I do believe a call into Andersen to check out the upgrade deal (if still available) is a great idea.1 point
-
When I Googled "E6000" guess what the first result was . . . . . . Ace, of course! Will pick some up today.1 point
-
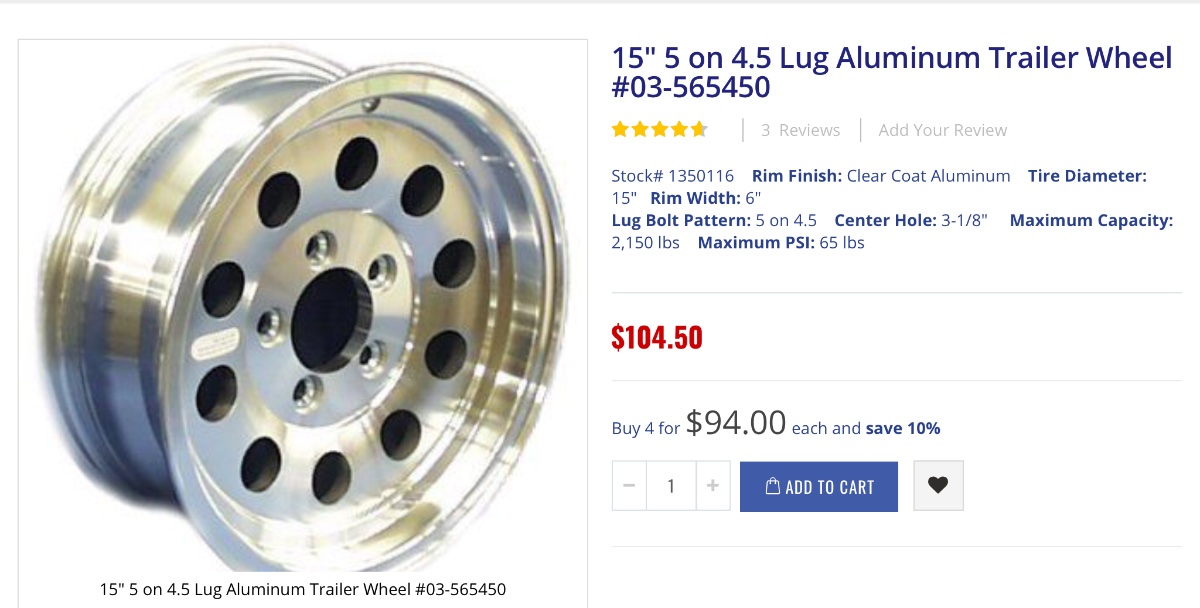
There are good looking SUV tires in a 15” size that would look fine. The Michelin LTX 225/75R16 on “Mouse” are discontinued, I don’t know the specs for the current ones being used. They have an outside diameter of 29.4”, max load 2680 lbs @80 psi, 6-7” rim, and weigh 38 lbs (which is actually very light for an LT tire). The current equivalent in a 15 is the LTX Defender M&S 235/75R15 Load D. 28.8” OD, section width 9.3”, max load 2271 @50 psi, 6-8” rim, 34 lbs. These Coopers would look more aggressive and offer some sidewall protection for gravel, which is important to me. I am a big fan of Coopers…. A real AT offroad tire like a BFG A/T KO2 will be a whole lot heavier, maybe 44 lbs. You would need to choose a 15x7” zero offset aluminum trailer wheel, there are plenty of them out there. Total package weight (5 sets of wheels and tires) would save about 20 lbs of rolling mass. Whether or not these non-LT tires with their softer sidewalks are “appropriate” to install on a trailer is another discussion, but I think they would look fine and not at all teeny. But I like my trucks to have tall sidewalls, smaller wheels look better to me🙂 If an owner were concerned about rim damage (potholes), rock chips (gravel), or winter towing (deicers) a painted steelie would be a good choice and very easy to repaint when it gets scarred up, I would buy something like this one: John Davies Spokane WA
1 point
-
Not deer season, but the bbq festival is coming up so all the welders are busy building new rigs. I offered to fix it with some 3M 5200 and VHB tape but I haven’t heard back yet.1 point
-
The local stations received fuel today. Back to normal it seems. RB1 point
-
I only saw two tankers from Columbia to Spartanburg, esstbound. Might be because the Colonial storage terminal is somewhere near Greenville. Columbia lines for gas (out onto the shoulder of the interstate) made me grateful we had stopped in Kingsland, Georgia, and again in a more rural area near Orangeburg SC. Both good stops. No need to join the lines in Columbia. We carried 20 gallons on Jerry cans. Just to be sure.1 point
-
Perfect!!! Our son has a plasma cutter . . . . . and he's licensed to blast 😀1 point
-
Duane - I do know that this has been done by at least two Oliver owners and (hopefully) they will chime in here. However, if it were me, I'd give Jason and/or Richie in the Service Department at Oliver a call. I'm sure that they will be able to help you. Bill1 point


-
Recent Achievements
-


")


")


")


