Leaderboard


Popular Content
Showing content with the highest reputation on 09/24/2025 in Posts
-
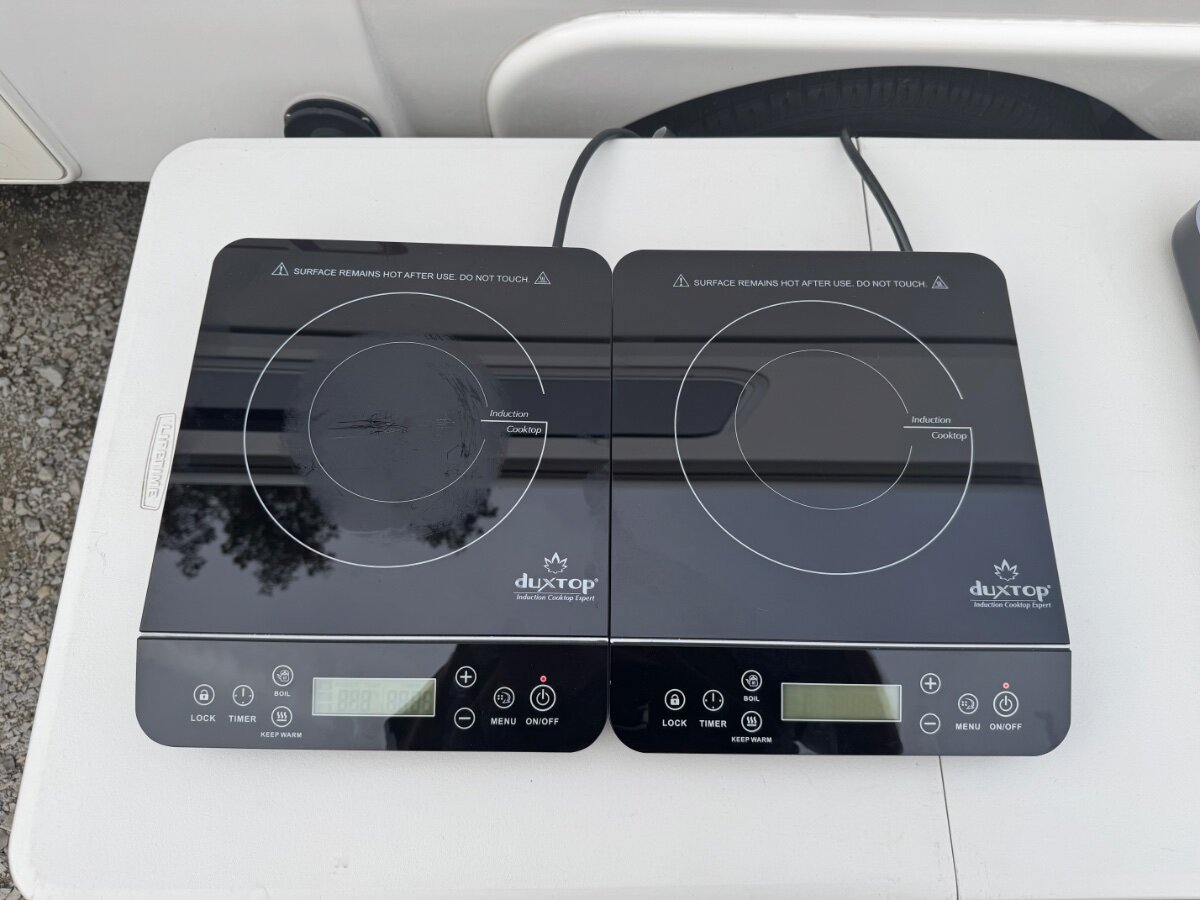
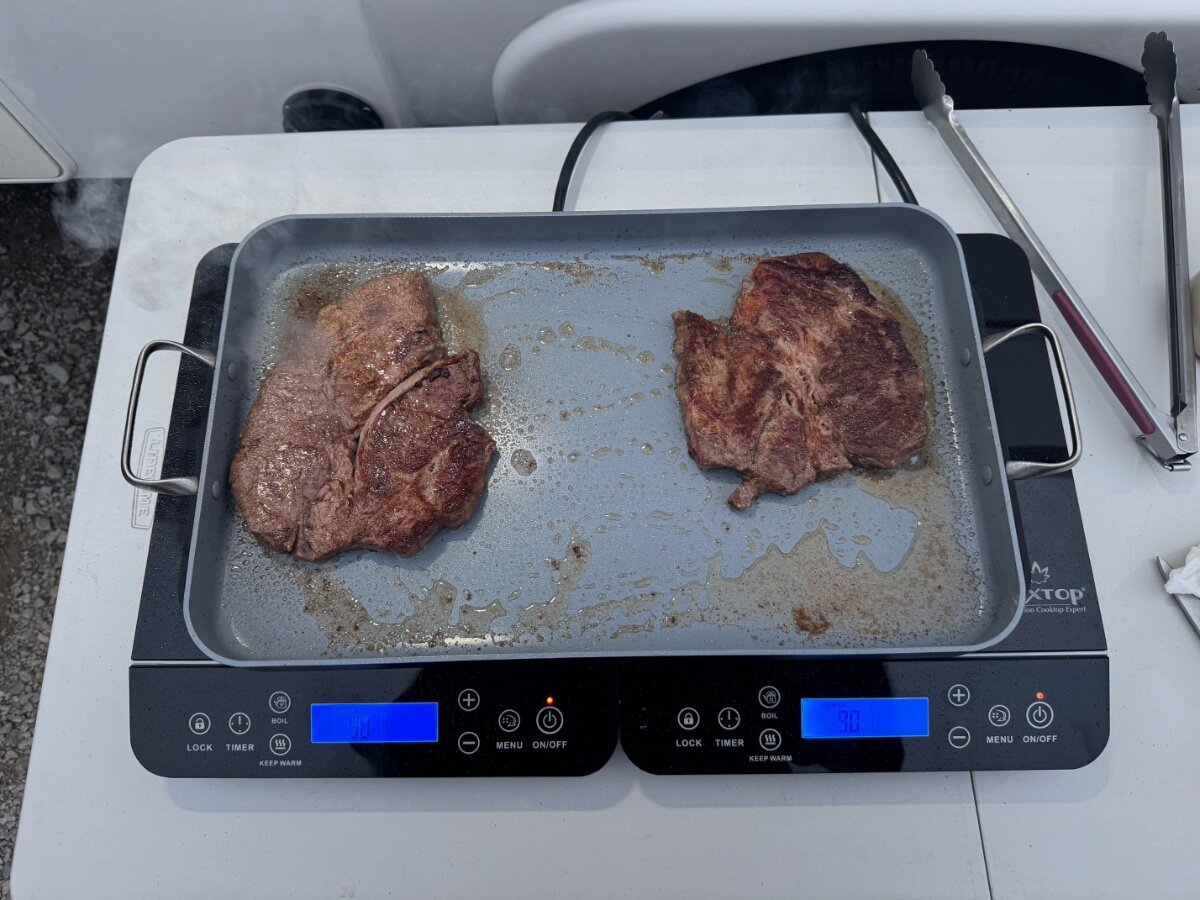
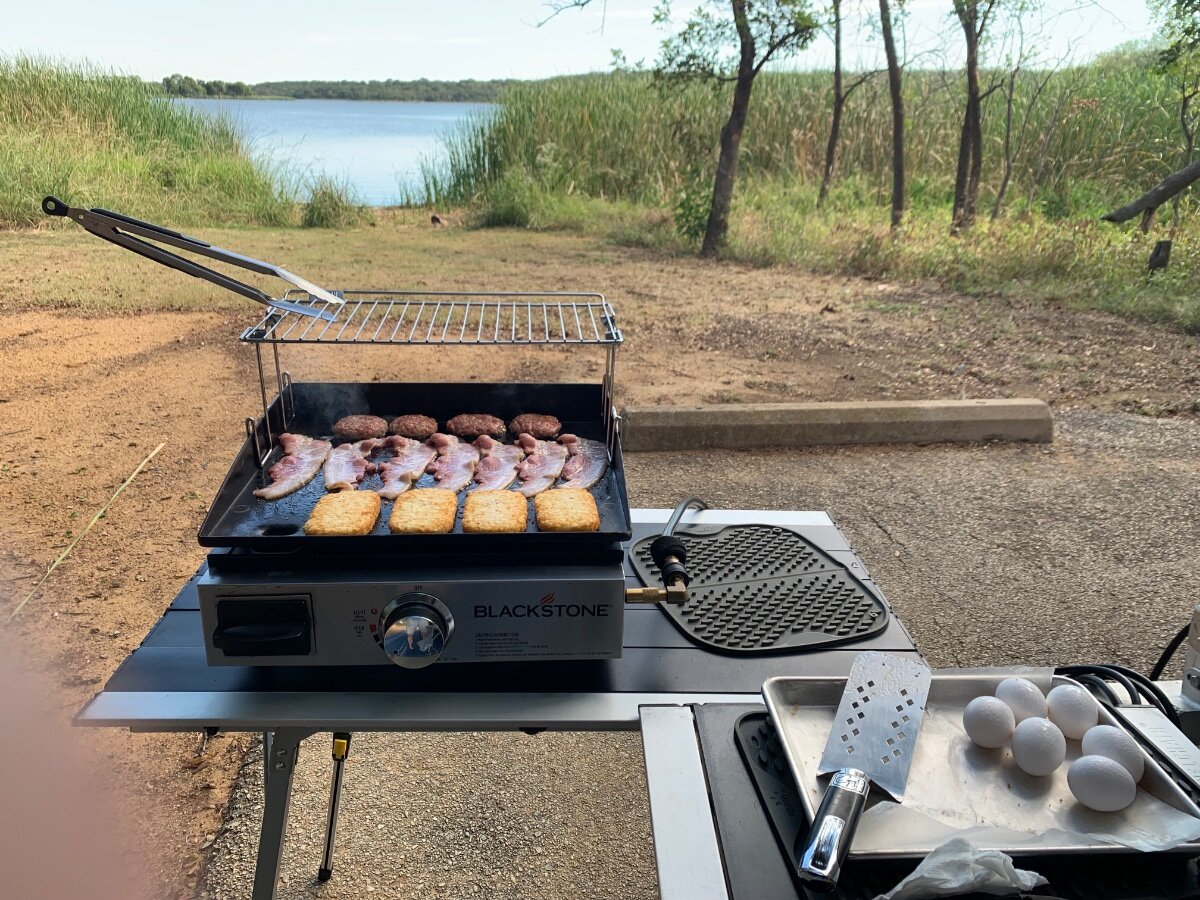
I’ve decided to try something new for outdoor cooking. We’ve had the single induction hot plate I mentioned in my post above and it works great both for inside or outside cooking. It’s extremely fast to heat up, and even quicker than gas when adjusting temperature in the middle of cooking. Well we’ve also been hauling a 22 inch folding Blackstone grill around with us for the last 18 months and that’s what we’ve been doing about 90% of our cooking on. Because we’re in the habit of carrying so much gear along with us when we travel, there’s really no room for the Blackstone in the back of the truck, and for that reason I’ve been strapping it on the top of our rear cargo box behind the Oliver. Needless to say I’ve never been very comfortable with that arrangement for a number of reasons, mostly the extra weight it adds to the back of the camper, but also at about 90 pounds, it’s quite heavy and awkward to load up onto the box. After seeing the two burner induction stove Oliver is installing in the new campers, I started thinking about the same concept for a portable induction setup. But I also decided a double burner unit would not be as versatile as just adding a second single burner unit. The double burner models all divide the 1800 watt capacity between the two burners, limiting the cooking heat range of each element. By adding a second single burner hot plate, both would be able to run at the full range of heating capacity at the same time. There are several ways to accommodate the electric demand. I usually set up my camp table next to the curb side outlet for using the hot plate. For the second one I can either run a heavy 25ft cord under the trailer to the pedestal directly, or I can set my EcoFlow lithium power pack under the table and plug directly into it with the second one. I actually did a little experiment this evening running both induction plates off the lithium power pack at the same time just to see how well it would perform and was very pleased with the results. Even with both induction plates running on the highest settings simultaneously, the EcoFlow was still over 1600 watts below its maximum output capacity, and it showed that a full charge would last over an hour at that rate. At a more moderate setting for each hot plate it read that it had about three hours of capacity. I continued my experiment by grilling up two steaks for supper on the system and couldn’t be happier with the results. The steaks were cooked to medium and it took less than fifteen minutes. Including this and the other experimenting I did, the power pack was still at 84% soc, enough for several more meals without recharging. This new cooking arrangement only required the addition of one single element hot plate and an induction ready ceramic coated griddle that spans both hot plates, all of which fits easily in the front closet. And now I won’t have to load and haul the heavy Blackstone around with us anymore. Here are some pictures for entertainment purposes.
 5 points
 -
Tunnel Mountain Campground just outside of Banff. Home for the next couple weeks
5 points
-
Eli is getting used to the Ollie. Hopefully he will be a traveler. Thanks for all the great ideas!
2 points
-
Brings back memories. That's a great place.2 points
-
Too late for breakfast, but be here around 6:00 this evening for mesquite smoke infused Prime ribeye and fix’ns ‘ON’ the Blackstone and GrillGrate! Camp R&B, Lake Mineral Wells SP.
2 points
-
What time can I show up for breakfast? Looks great!2 points
-
Not giving up my BS, this 17” griddle is so versatile; the grease trap is a must!
2 points
-
Nothing like new running gear Mike. Did Lew and crew add the heavy duty shackles and wet bolts? I had them face the new HD wet bolts inward to make it sooooo much easier to grease them.🤔 Congrats. Best 2.5 hrs of install labor we have ever spent on our Oliver. Safe Travels from The Great North Woods!2 points
-
Sorry in the delay getting back we have been crazy busy and haven’t had a chance to reply. We were also thinking of using the basement for the litter box. We plan to do a one night camping trip soon and bring him along he is only 7 weeks and is just starting to use his litter box with less accidents. We have been driving him around in the car to get him used to it and so far he seems to like going for a ride. Thanks for all you help. Bill Nancy and Eli
2 points
-
A new contender in the fiberglass RV market for the US: Awaken RV -https://share.google/Zzpg4orVpsEvoSdpL Nice looking exterior. Autoevolution reporting a price of $82,500 and dry weight of 5500#: https://www.autoevolution.com/news/awaken-rv-s-fiberglass-morningstar-flagship-camper-is-here-to-shift-how-american-s-camp-257902.html1 point
-
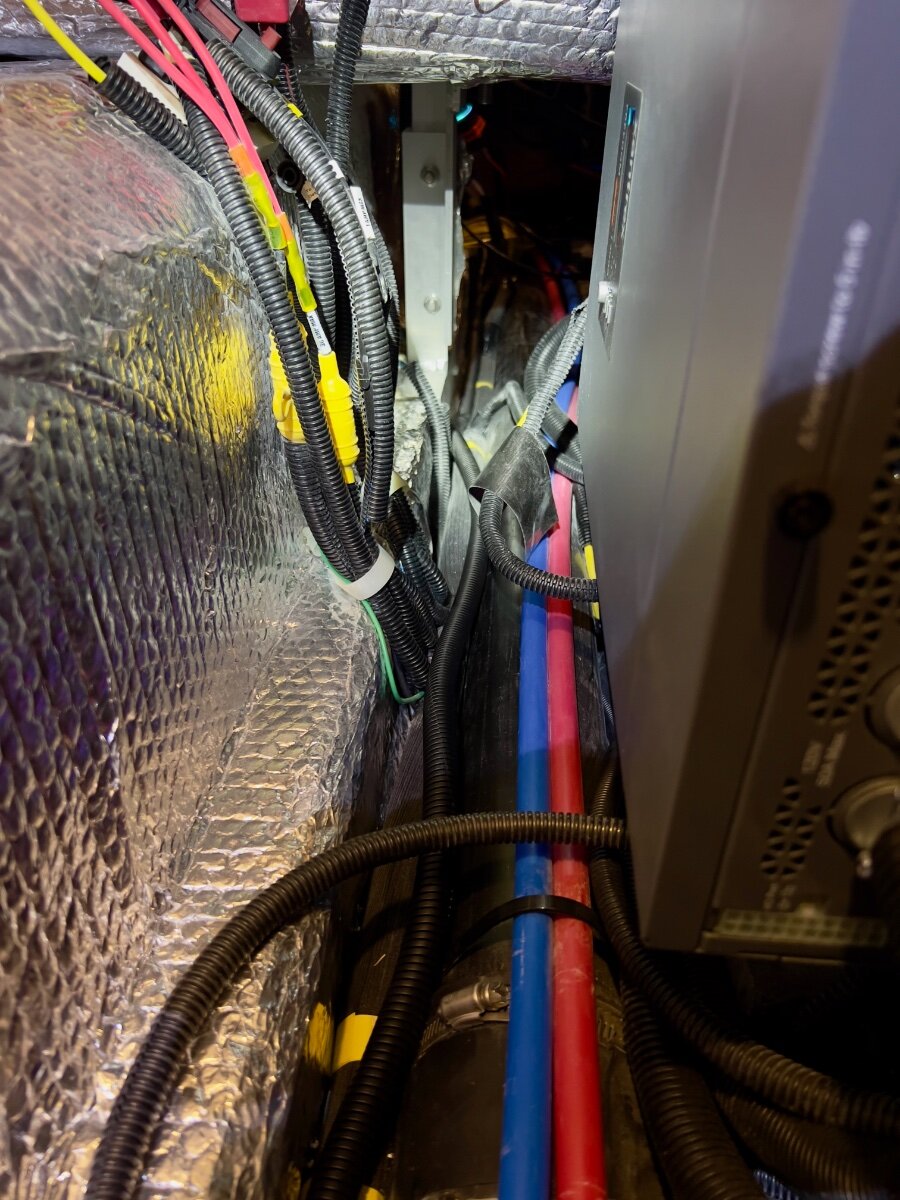
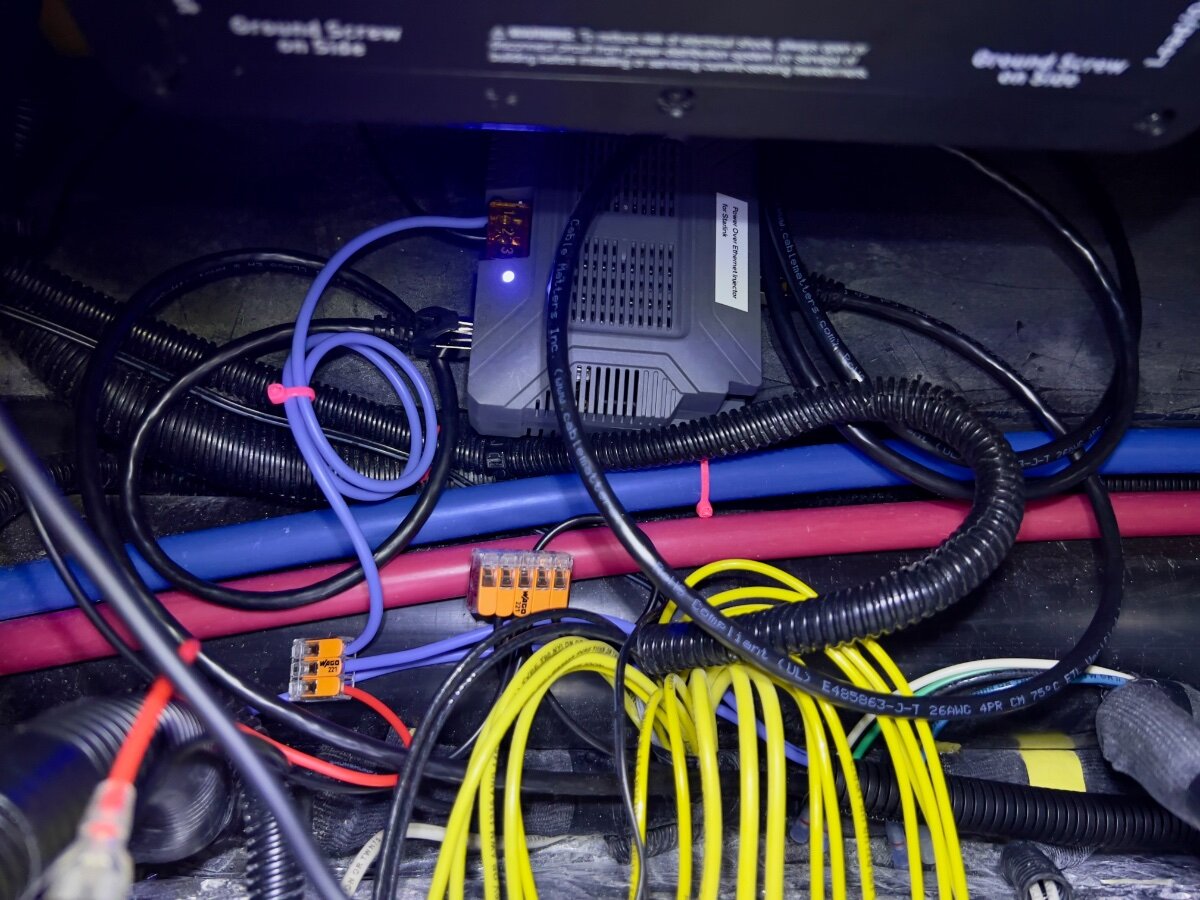
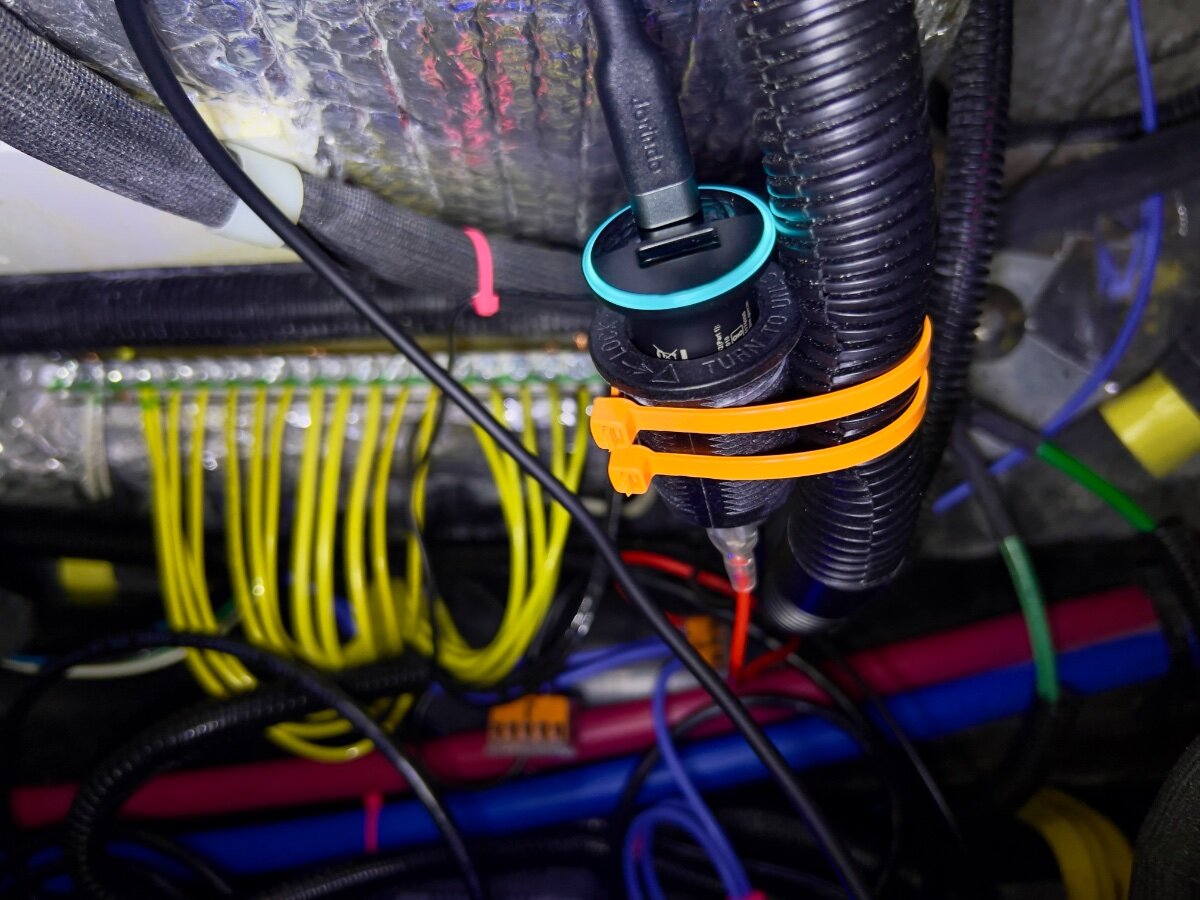
On a recent trip from Dallas to South Carolina we stayed in multiple locations with no (or very limited) communications capabilities (cell phone or WiFi). Over the three years we have owned our LEII, there have been many other occasions with no ability to communicate. As a result, we decided to order a Starlink Mini and a Starlink Router Mini to use on our trailer trips. I have been following Starlink related postings on the OTT Owners Forum, especially since the release of the Starlink Mini. I have found the postings by @Snackchaser particularly helpful in planning the installation of our Starlink system. I especially liked the use of a Power over Ethernet (PoE) injector to power the Starlink Mini and to provide an Ethernet connection from the built-in router back to the trailer, using a single cable. Installing the PoE injector and a DC powered router in the attic of the LEII seemed a reasonable location, being nearly directly above the exterior Furrion ports for connecting satellite and cable TV. So I planned to install in a similar location in the attic of our LEII, assembling a list of the components required. I ordered a PoE injector from MobileMustHave.com and the rest from Amazon. Once all the key components had been delivered, I began the installation, with the first step being to replace the Furrion Satellite coax port with an RJ45 pass-through connector and to fish an Ethernet cable from the basement to the attic. Replacing the Furrion coax connector with the RJ45 pass-through connector was no problem, even though enlarging the hole through fiberglass exterior shell was required. However, fishing an Ethernet cable from the basement to the attic proved to be a major obstacle. Although I have prior experience fishing wires through difficult spaces, I was unsuccessful getting a fish tape (or rods) from the attic to the basement. I could get the end of the fish tape rods down near the ceiling of the basement, where the interior shell ends and multiple cables run up to the attic area at the rear of the trailer, but not into the basement. As suggested, I tried following the A/C drain line and multiple other locations but could not get past the bottom of the inner shell into the basement. I tried running the fish tape/rods in both directions. No luck. Consequently, I began to ponder other installation locations inside the trailer for the PoE injector and Starlink Router Mini. After a couple of days, I had an Aha! moment- install the PoE Injector and Router Mini under the rear dinette seat. I inspected the space between the basement and the rear dinette seat, nearly all of which is readily accessible from the two rear street side hatches and the rear dinette seat hatch. Only the space under the battery compartment is not accessible from directly above, but is easily accessed from either side. I looked for any obstacles to using this location and found none. I could easily route the Ethernet cable from the Furrion/RJ45 pass-through connector forward to beneath the rear dinette seat. I located the PoE Injector atop the trailer frame member, just below the Progressive surge protector box, which is mounted on the aisle wall of the rear dinette seat. The PoE jack and the power terminals of the PoE Injector are positioned toward the front of the trailer. I connected a 20 foot shielded Cat 6 cable from the inner side of the Furrion/ RJ45 port, then routed it under the floor of the basement, around the street side rear stabilizer, then following the waste water line, forward to the area under the rear dinette hatch. About 3 feet of excess cable are coiled in the basement, concealed by the rear wall of the basement. I installed a lighted rocker switch through the forward basement wall, mounted high, almost directly above the side-to-side bubble level on the left side of the basement entry. This switch is to control 12VDC power to the PoE Injector and the Starlink Router Mini. Using 14 AWG silicone coated wire, I ran two purple colored wires from the space beneath the rear dinette hatch back to the rocker switch on the forward basement wall. A third, 14 AWG black wire was also run along the same route to the rocker switch. The switch has two terminals with red lead wires,: one to the DC power source and one to the load. The third terminal has a black wire, which connects to ground (the bus bar). The ground wire enables the light on the switch to operate when DC power is ON. On the DC power panel, position 15, I installed a 15 amp fuse. One of the purple wires connects to the 12VDC positive terminal on the PoE Injector. The other purple wire connects to position 15 on the rear of the DC power panel, using a crimp on connector. The single black wire from the switch connects to the ground bus located under the rear dinette seat. Another 14 AWG wire connects the PoE Injector negative terminal with the other end connecting to the bus bar. All wire-to-wire connections were made using Wago lever lock connectors. I also added a 12VDC auxiliary power outlet (cigarette lighter type) which is connected to the same circuit as that which powers the PoE Injector. An Anker 323 USB-C Car Charger Adapter (USB Power Delivery (PD) capable) plugs into the auxiliary power outlet. A USB-C to Male to DC 3.5 x 1.35mm Male Power Jack is used to power the Starlink Router Mini from the Anker charger. I found the Starlink Router Mini conveniently fits on top of the Progressive Surge Protector box. I later secured it with a releasable zip tie around the surge protector. The 20 foot Cat 6 Ethernet cable from the rear connects to the PoE jack of the PoE Injector. A 5 foot Cat 6 Ethernet cable connects to the LAN jack of the PoE Injector and to the WAN/Satellite port of the Starlink Router Mini. All Cat 6 Ethernet cables used are shielded. I believe this installation location approach has several advantages over an attic installation: Access is MUCH easier. Fishing wires is no challenge. A dedicated circuit from the DC power panel provides power to all Starlink related components. A lighted switch for the PoE Injector and Starlink Router Mini is located in the basement, near the exterior pass-through Ethernet jack. The PoE Injector is located where it cannot be covered by clothing or other cargo stored in the attic which might cause overheating. The VERY bright blue light on the PoE Injector is not visible in the cabin (always ON if power to the PoE Injector is ON). The Starlink Router Mini is located centrally in the trailer and should provide uniform WiFi coverage within the trailer. We have not yet taken the Starlink on a shakedown trip, but plan to do so at the end of August. Regards, Don
1 point
-
I think they've discontinued the rewards program and gone back to the old site visit system. Saw an email about that recently.1 point
-
Unfortunately, no. We were scheduled to attend a gathering in Pennsylvania last week, but both Deb and I were still nursing a really nasty chest cold that dragged on for almost three weeks. Ugg! Next Tuesday we head out for a week in west-central Ohio, where I will experiment with the various setups I have. The section of Indian Lake State Park where a dozen or so of us are gathering is heavily wooded, so I doubt I'll be able to get any benefit from the mast. I'll likely have my 150' of Ethernet cable out trying to find a bit of open sky. I also recently grabbed a Makita battery adapter with the Starlink Mini cable as the output that offers yet another quickly deployed setup. I carry three Makita batteries and a charger in the trailer, so with the adapter, I can plug in a battery and toss the Starlink Mini anywhere and have service within its inbuilt wifi range. I have deployed the mast here at home. I already had a pair of SeaSucker 4.5" vacuum mounts that I was hoping to use with Flagpole Buddy's generic mount. But with the angles of the hull, there was no way that would have worked. I already know how well the SeaSucker mounts hold, and the 6" Airstream mounts from Flagpole Buddy are just as good, but bigger. I stuck both mounts on the rear, above the left turn signals and an even height above the belt. I bought two extra sections for 16' of height above the lower mount, so close to 20' overall. I left it on for about a week without once needing to pump in more vacuum. And every day I really tugged on the mast, and rocked the trailer to see if it would come loose. It worked great! I did find it a little finicky to get the correct angle on the two bases to get the mast vertical. But once aligned, I put a Sharpie mark at the top so that it will be easier the next time.
1 point
-
Have you field tested your setup yet? Bought mine a couple months ago and making first use at camp this week. Went with the Airstream Suction Cup Mount Kit plus an extra 4’ pole section for at 12’ lift. These mounts are angled and work great since the Oliver has similar side concours as AS. Real impressed with the SLM, was able to stream a movie while heavy weather moved through the area last night. Been using a FPB with the suction cup mount for five years for a windsock and weBoost with no issues; these suction cup mounts rock!
1 point
-
Not trying to sell anybody, but if you like electric camping alternatives and adding options to your camping utilities, EcoFlow has some real awesome pricing right now on some of their bigger power stations. I'm talking 65% discount from normal pricing. The Delta Pro even has a 30 amp plug right on the panel that can power your camper for a few hours of AC when dry camping overnight. This is what I have in the back of the truck and use it mostly to power our portable fridge, but it offers many options including emergency backup for short power outages at home. I also love that it's a no noise option in the campground. I'll post some links here to the items I spoke of in the previous post for anybody interested. The sky's the limit on this stuff. EcoFlow Delta Pro https://us.ecoflow.com/collections/delta-series/products/delta-pro-portable-power-station?variant=40516140138569 Duxtop portable induction hot plate https://www.amazon.com/dp/B01FLR0ET8?ref=ppx_yo2ov_dt_b_fed_asin_title&th=1 Greenpan ceramic coated induction ready griddle and skillets https://www.amazon.com/dp/B0D2J2LL5B?ref=ppx_yo2ov_dt_b_fed_asin_title&th=1 https://www.amazon.com/dp/B074CWBJ5D?ref=ppx_yo2ov_dt_b_fed_asin_title Storage bag for griddle https://www.amazon.com/dp/B0CZJFFGMM?ref=ppx_yo2ov_dt_b_fed_asin_title1 point
-
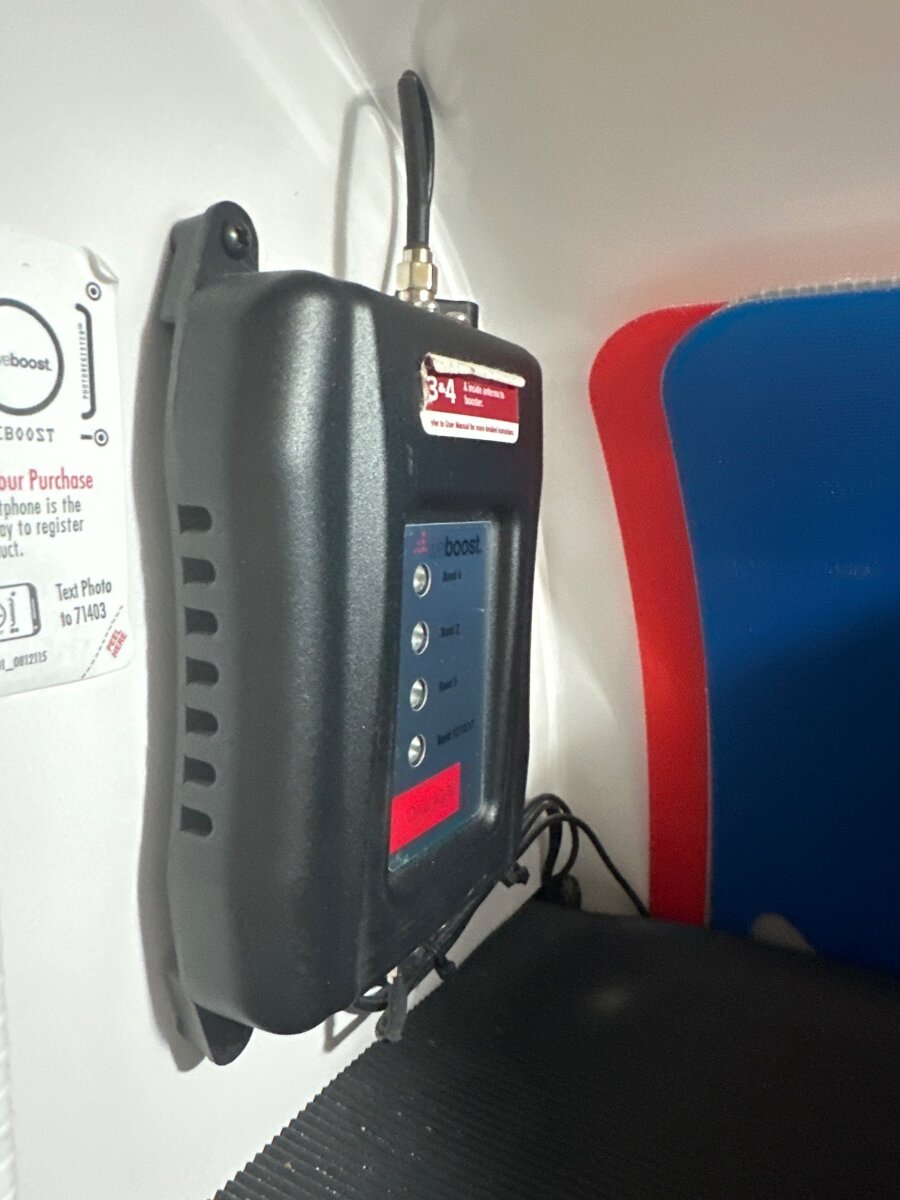
In our 2019 factory installation the cell amp is mounted on the left wall of the cabinets above the dinette. This has an access port inside the upper part (right side) of the pantry, but the wires dive down a run along the back channel of the shelf forward to power switch and the antenna runs back through a hole into the pantry . The cell boost antenna is a magnet mount on the street side top rear of the roof.
1 point
-
So about the same as a Dometic 13.5k AC on high powered by 12V DC.0 points


.jpeg.799f3cf194b3b21d05b2a7bb19f728b1.jpeg)
.jpeg.dd379fc2e5087fa6910ce21b437441ad.jpeg)
forPoEInjector.jpeg.2ff4c7b3725adaf25e5bdfc30965ceff.jpeg)
atopProgressiveSurgeProtector.jpeg.5c03a313182d5fdb47bf1a254dec329d.jpeg)


-
Recent Achievements
-


")


")
