Leaderboard


Popular Content
Showing content with the highest reputation on 11/07/2025 in Posts
-
I think that I might be of a little help here regarding the brackets that are used to bolt the jacks to the Oliver frames. Historically Oliver used two pieces of flat aluminum, welded together for these brackets. However, in 2016 there were a number of these brackets that were put into a jig, tack welded and then the operator went "out to lunch" so to speak. Next these tack welded only brackets were then installed all was good - UNTIL - one of them broke (I believe that this was on my brand new Ollie). At this point Oliver switched to brackets made of angle steel which required no welding. I was told that all potential owners of the effected trailers were notified and either parts were mailed to those that requested it or the Service area replaced the defective parts as requested. Apparently, there were owners that either were not notified or simply disregarded the notification by Oliver. Bill
 3 points
 -
Inside corners are a typical area where gelcoat, which is relatively brittle, can fracture. Which is why it is never good practice to have square inside corners that concentrate flexing at a single point. Surprised you had a fracture with a nice radiused corner (Or is it? Is there a square cutout in fiberglass under the round WH flange?) Pretty sure the crack is just in the gelcoat and does not mean the fiberglass underneath is also cracked. So mostly just a cosmetic defect. Not sure how to "repair" a crack like that, and if a repair wouldn't suffer the same fate over time. Hopefully someone may know and chime in. Sorry to hear about your other woes. Our 10 year old trailer had some issues at the start, some also potentially dangerous. But since getting all that sorted, all has been great. Just had to replace my plastic toilet flange that was broken. Just the usual maintenance one would expect over time. Good luck. Dave3 points
-
I'm so sorry to hear that you feel this way and am sorry for the "problems" that you have had with your Ollie. My personal experience with both the Oliver Company and its travel trailer product has not been without "issues". But, those issues were either not Oliver's fault or were taken care of by Oliver with few (if any hassles). Just for my own frame of reference I took a look at the current warranty for Corvettes - it is three years for the fiberglass panels. This does not make your experience of having to deal with the crack in your Ollie, but, at least it is covered under a warranty that is a full two years longer than a Vette's. I also looked at the warranty on Bigfoots and found that it is either three years or five years depending on a number of things (so, it is unclear which it is and for what items). In any case, Bigfoot's warranty is no greater than Oliver's. Good luck with getting the crack repaired. I truly hope that this will be the beginning of a better relationship. Bill3 points
-
Kind of difficult to put a "turtle neck sweater" on the Ollie! 😁3 points
-
Ours is not mounted and it is not a problem for me. It takes a couple minutes to get it out of the case and plug it in to either the Oliver or the Jackery. I like the advantage of being able to put the Oliver in the shade and being able to move the mini to where I get some signal. I am thinking of a small tripod as a mount just to get it off the ground.3 points
-
I have yet to use my city water hookup. Fresh water hookup and boondocking ports are my preference as I control peak pressure to the system with these. The city water hookup is a gamble as the city water pressure can be very high. Sometimes dangerously high to our plumbing. So that's why I don't feel the need to "Feel Lucky"! When winterizing, I also find it more difficult to get the RV antifreeze into the city water hookup unless I remember to "vent" the system: Opening the exterior shower valve and it's handle latch helps just a little. Removing the exterior shower head helps a bit better. Opening an interior cold water valve works even better. GJ2 points
-
True that, but a pole may reach near top or above a tree canopy which has proved very beneficial on many occasions. True that, but for extended stays I don’t want to tend to a battery with limited run time and thus, find use of the cord connected to a continuous power source more to my liking. Never on a window, but an occasional ‘hickey’ on the fiberglass brings back very fond memories!2 points
-
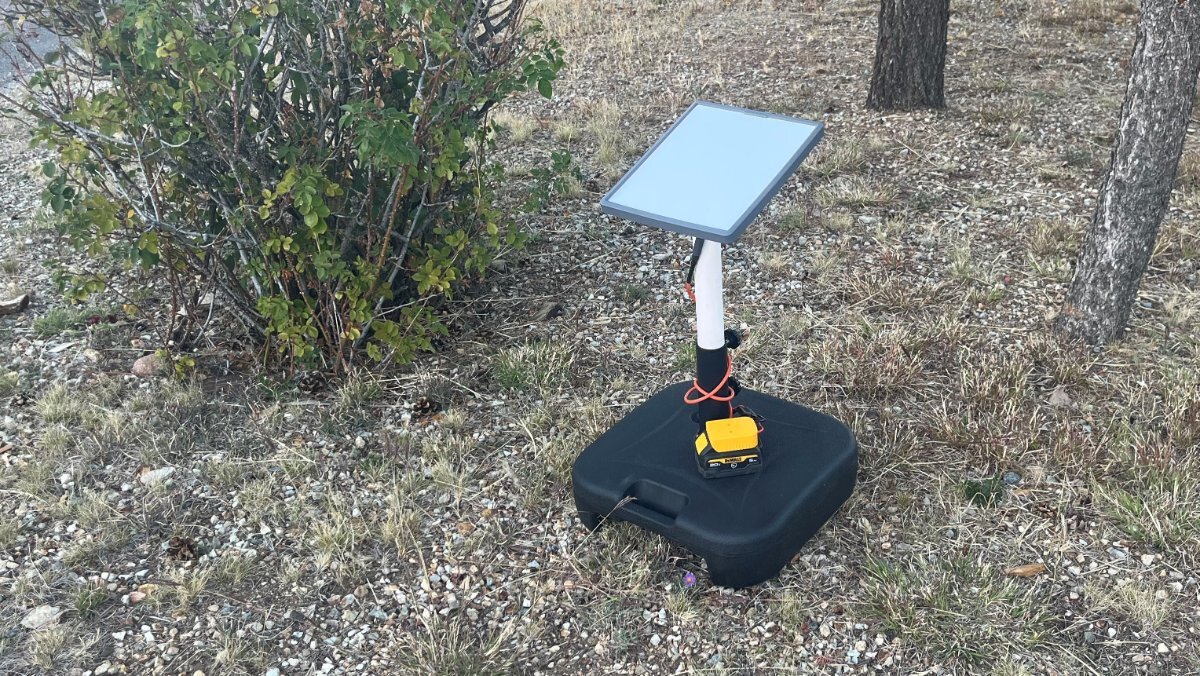
Given this is our main mount, nicely sitting in our truck bed, I was thinking of a moveable stand for the occasions where the truck cannot be parked clear of trees! Meanwhile, my son broke the base to a fan he uses often in his apartment. After removing the broken base, I thought, "a patio umbrella stand would work nicely." So why not use an umbrella stand for the Starlink Mini dish? The kind you fill with water would be convenient, since when empty it weighs less than a pound (we always carry 35 gallons extra water on the TV). It works great and can be placed anywhere! I purchased this model from Lowes, since it is rectangular (most are round) and it has a nice handle. https://www.lowes.com/pd/Patio-Premier-Patio-Premier-Square-Blow-Mold-Umbrella-Base-Black/1002629278 You can configure all the fancy poles and mounts you want and I'm done with $50 total in parts ($10 for PVC parts) which will work anywhere without cables. 😎
2 points
-
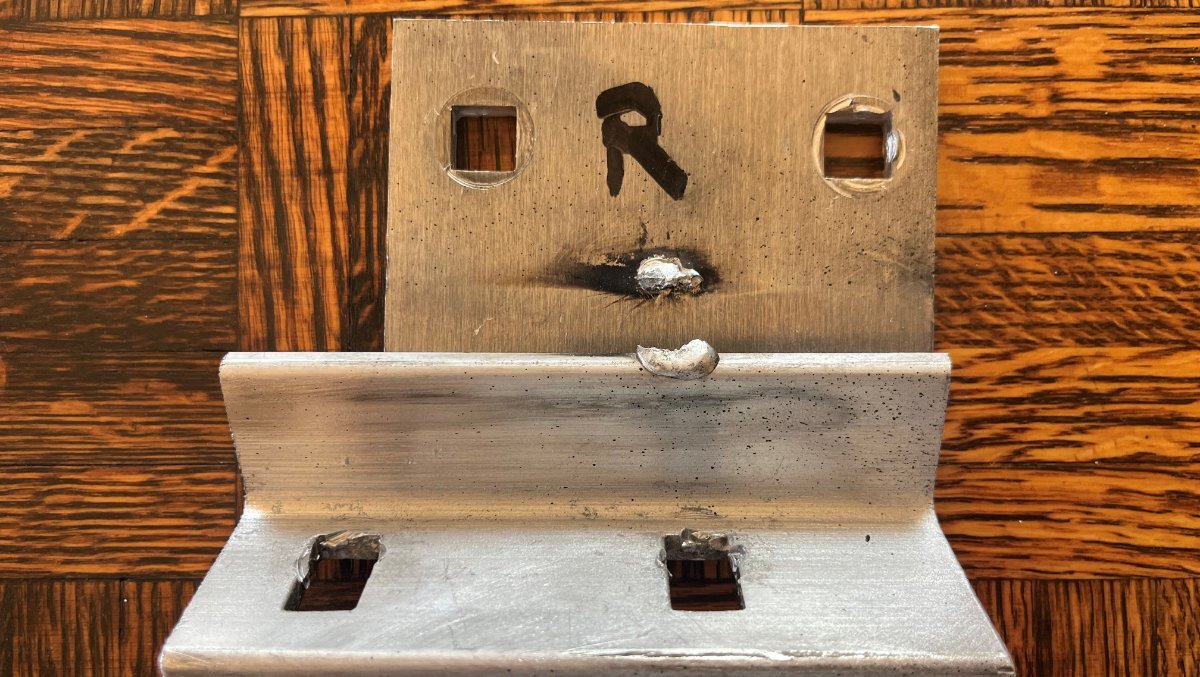
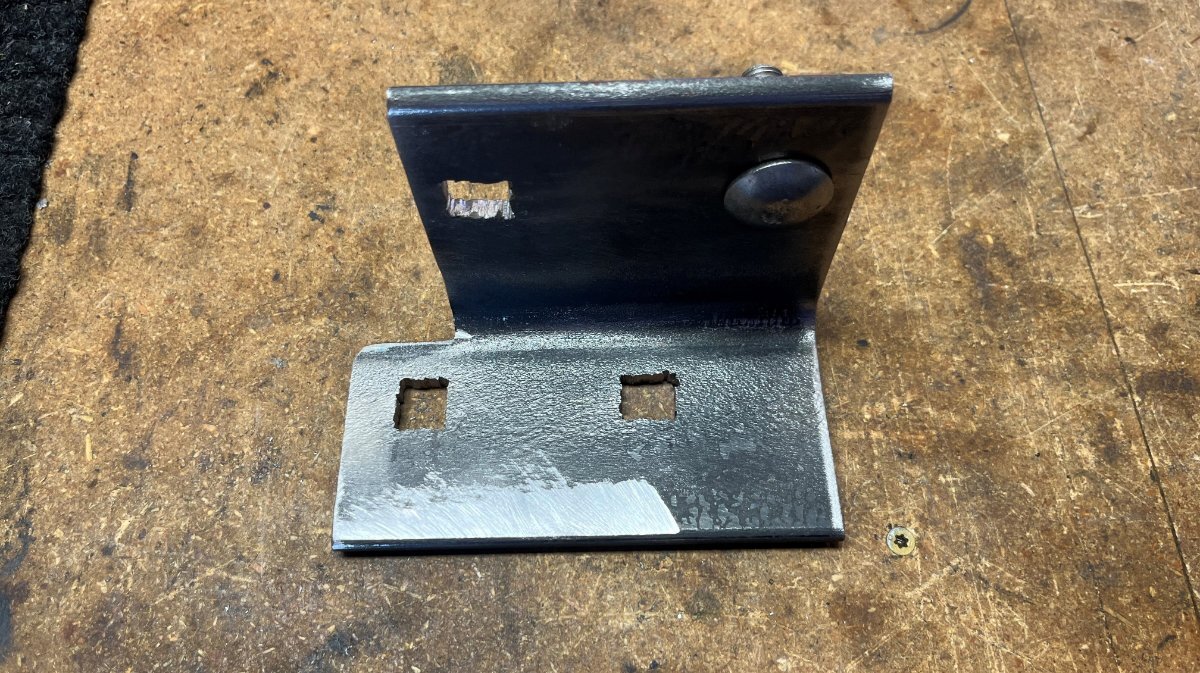
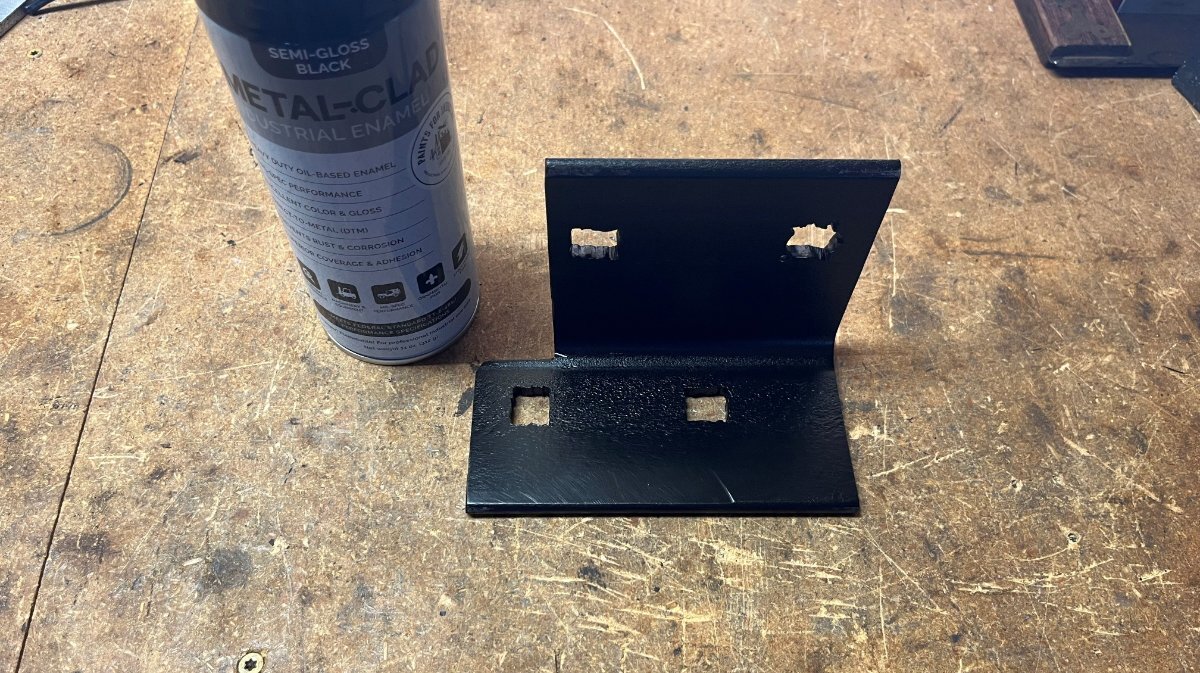
And BOTH bolts holes are too large. When they are the correct size you will not see the square opening at all as it should be completely hidden by the head of the carriage bolt.1 point
-
I believe it's OK when the OP broadens the scope of the thread. @Steph and Dud B can reword the title to, "Found a Crack - Defect #21!"1 point
-
I attached a picture of the tack-weld failed mount when I submitted a service ticket and was told OTT did not have brackets they could send me! My next service ticket was re artwork for the front hull. When I was told again NO, I asked why I should ever again enter a service ticket? Five (5) times and not once have I received useful help. But then, if you want something done right… Obviously they do have these brackets. At least the one I fab’d is better than OEM. My square holes for the carriage bolts are of correct size. No need for precision when you drill holes that wide! It’s not easy making square holes in 1/4” steel in a home shop, but should be EXACT when manufactured! if yours is still lose, replace them with hex-head bolts, use a washer and position a wrench on the topside, against the bracket, while you tighten from down below. Sheesh! If half of your 21 issues are like this quality made bracket, I’d feel the same way! Ours is only in good shape after I’ve put 1000+ hours into ours in sweat equity! Which is btw crazy.1 point
-
Good to see you're back John, safely returned home from your annual mainland trip and contributing here as always! 😂 This is a point of confusion that it seems even Mike Sharpe did not understand the full installation process when I talked to him on the phone, hence his thinking this was a Barker issue (not). The bolt holes that OTT drills into the lower hole and frame are not drilled to precision so that a one-piece bracket can be used (e.g. precision in distance between holes at +/- 0.010"). The ALUMINUM brackets are made by Oliver (same aluminum used in the frame). All Barker components are made from STEEL! Barker welds the STEEL bracket to their jack for Oliver and they have a special Oliver-only part number (learned from talking to Barker rep). After the jack is put in place, the two aluminum brackets are tack-welded. Then they must be removed and fully welded on a workbench, then final installation bolted/torqued into place. If they were manufactured to length (welded by Barker), there would be no reason for a tack-weld followed by a complete weld. In fact they would use a one-piece bracket. Why are these aluminum parts when steel is used for frame pieces? Because OTT only welds aluminum! More info in my post linked below. I can see exactly how it was originally installed by removing and reinstalling these jacks. I believe I have done more jack work than any other Oliver owner, now that I have rebuilt all 3 jacks, ready for the next 10 years! 😎
1 point
-
Post deleted. See JD's post above for the real skinny!1 point
-
This is valid. There were many, many RVs built around 2021-22 with far worse quality issues than we've had. The problem for us is that we paid quite a bit more than a standard RV's price to avoid those issues. I can forgive problems with 3rd party things like appliances and fixtures. Oliver couldn't control that. I'm far less forgiving of workmanship problems like wiring, plumbing and, obviously, their own fiberglass. Yes, I would like to know more about what's going on here. Is this strictly cosmetic or is that a significant stress fracture? (I've been underneath looking at the frame in that area and it all looks OK.) Should I worry about water intrusion and freezing? Will the crack spread up the curve onto the sidewall proper? Scheduling a long trip in advance is difficult for us because my wife's medical treatment plan can change on any given month. But I can't think of any shop around here experienced enough in both fiberglass repair and RV appliances to do the work. (I'm assuming the water heater needs to come out.) The last few trips this year had been uneventful and I was perfectly content waxing the trailer (and thinking we had come to some sort of understanding) when I found the crack. Ugh!1 point
-
We've had quite the opposite experience in our 2 1/2 years with hull #113, manufactured 10 years ago. Though I have read everything on our Forum since and I do see many more issues in late-model hulls vs. the oldies but goodies! I've worked a LOT of upgrades, but only a few repairs. And every issue I've found is when we were home. 130 days on the road everything has worked, no issues while traveling, knock on wood! I found a breaker wired in the wrong direction. I have issues with how OTT wired things, but no electrical failures to-date. I've upgraded and rewired everything anyway. I recently found OTT forgot to fully weld (tack-weld only) the mount to one stabilizer jack. OTT blamed Barker, but actually OTT makes these welds as part of the standard installation procedure. I made a new bracket with $10 of steel. We also had two small welds fail on the frame, two cross-members were hanging on one side. Local guy welded them for $75. We had a drawer latch fail, the orange colored connector to the slide, just $10 and 10 minutes to repair. Now I have extra parts if another fails. Prior owner complained of a noisy Suburban furnace, so OTT install an Atwood furnace back in 2018. Likely prior owners had worked through other issues of which I would be unaware. The interior panel of the entrance door is lightly cracked, but this is from wind banging the door. This will not happen anymore now that Lippert friction hinges are installed. We love our Oliver as it is now with my upgrades (inverter A/C coming soon)! We purchased a used Oliver at a good price and I do not expect anything out of OTT since it's long out of warranty. Yes, I would feel differently if we paid new price and had 21 issues listed to date. I don't see better quality out there. Even Winnebago, that some consider to be the best, is not better. We plan to keep our Oliver and leave it to our son when we are done with it. Don't want another brand, don't need something better. If I found this crack on our hull, I would leave it alone and just keep an eye on it. Often bodywork on something small is worse in the long-run! They will likely just do something cosmetic, some fill on the surface. Which is fine, but certainly not worth a trip to Hohenwald for me, in my opinion.1 point
-
We have two 10Ah batteries. One will power the Starlink Mini all day! One's on the charger while the other is being used. The 50' power cable is supplied. We've just never had a need to use it, so recently I stopped bringing it along! I guess if your going to sit two weeks at a campground with hookups... But that's not us. I can setup the dish on a lunchbreak while traveling, in a minute with no cords. No thin 50' power cord getting wet and dirty, tangled up in the weeds, needing to be wound-up and stowed each time. Everything in our Oliver is battery-powered! 🤣1 point
-
Must only be moved to get a clear view of the Northern sky. My claim is 2/3rds of the time mounted to my truck works great with clear view (and only $10 in 1 1/2" PVC parts). The other times, I'll use this umbrella stand (another $30) with the SAME pole-mount which makes setup sooooo easy! 🤣 Tripods are generally made for cameras with a 1/4" screw attachment. They are fully adjustable which takes fuss to get lined up on both angles required. My setup uses the supplied pole-mount plate from Starlink at the correct angle to the horizon, so all you need is a 2" pole perpendicular to the horizon. It spins easily with one hand (no screws, no clamps), to get the correct angle in seconds. Just my opinion. Others want the long-pole setups and some are OK with laying the dish on the ground or picnic table. I was laying it in my truck bed prior to creating these mounts. Tripods, tall masts and suction cups are fine, but this is much easier for me! 😎1 point
-
Recall on the 3.5 V6 twin turbo has been expanded to another 127k vehicles. If you own one, it's probably a good idea to go to Toyota's recall page to see if yours is affected. 127,000 Toyota, Lexus Vehicles Recalled for Engine Debris Toyota Recall lookup1 point
-
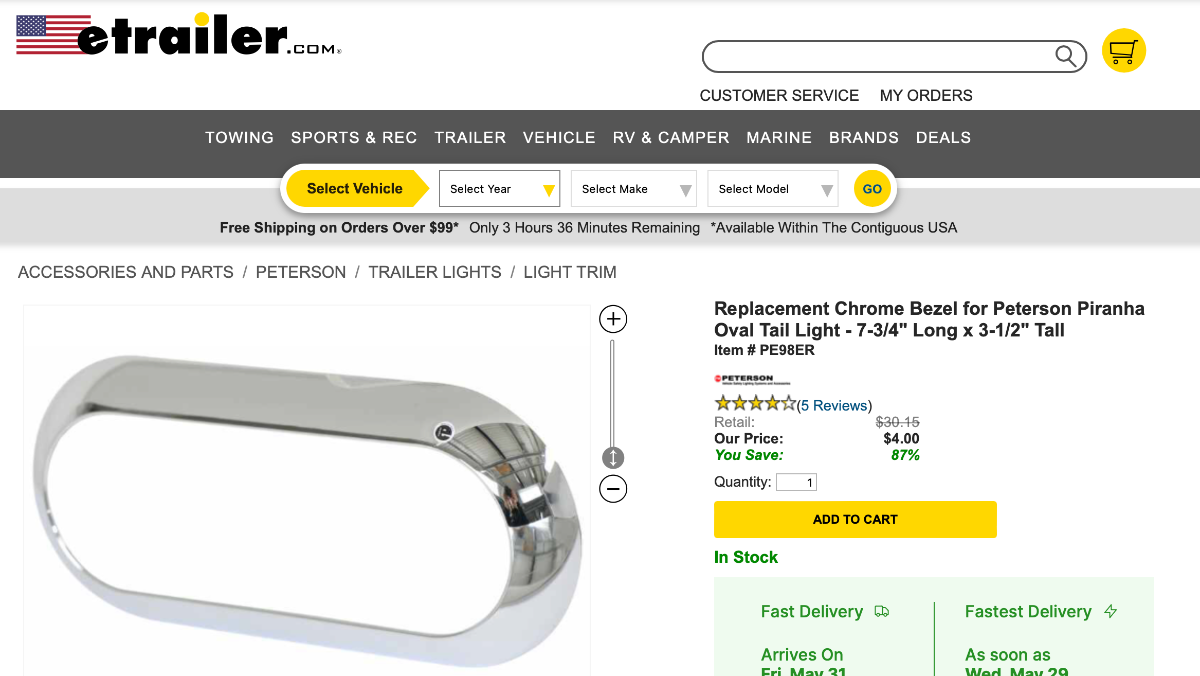
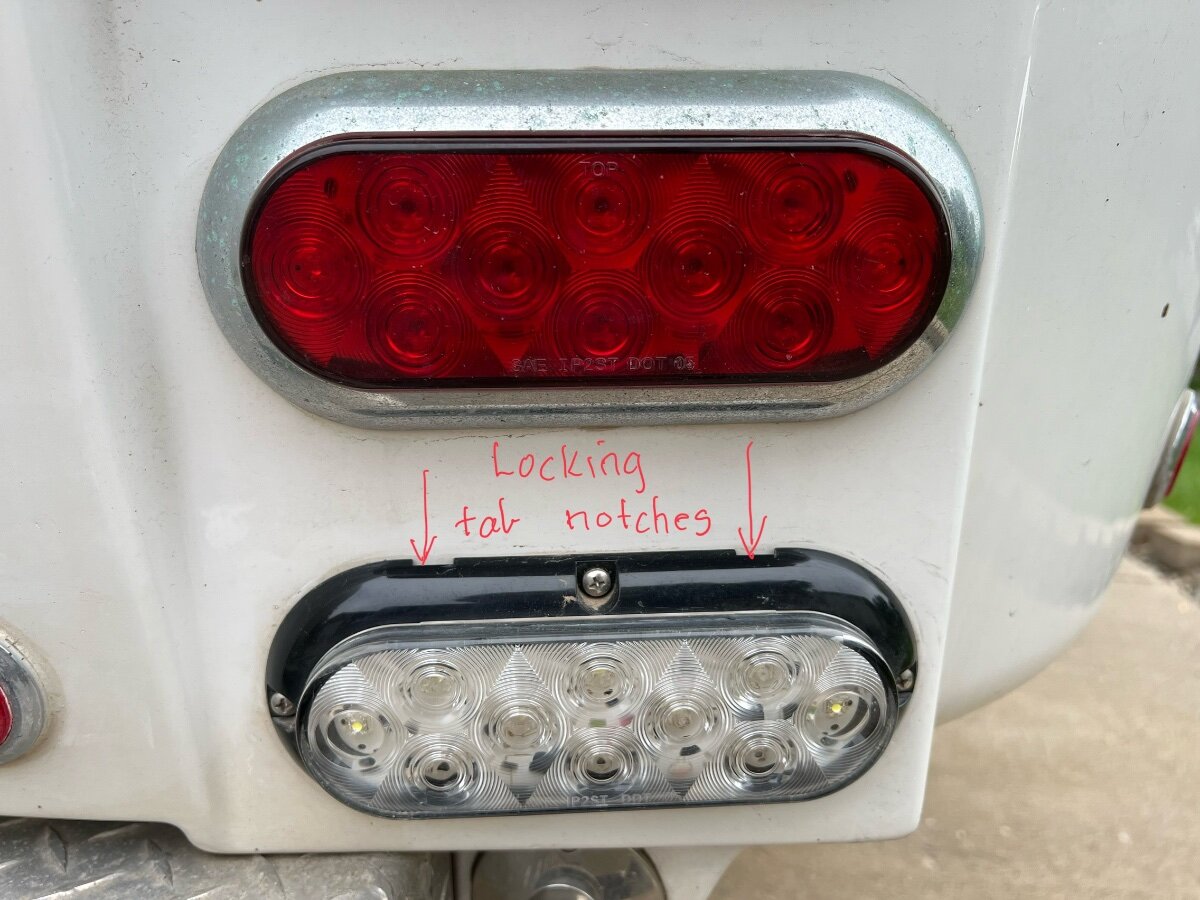
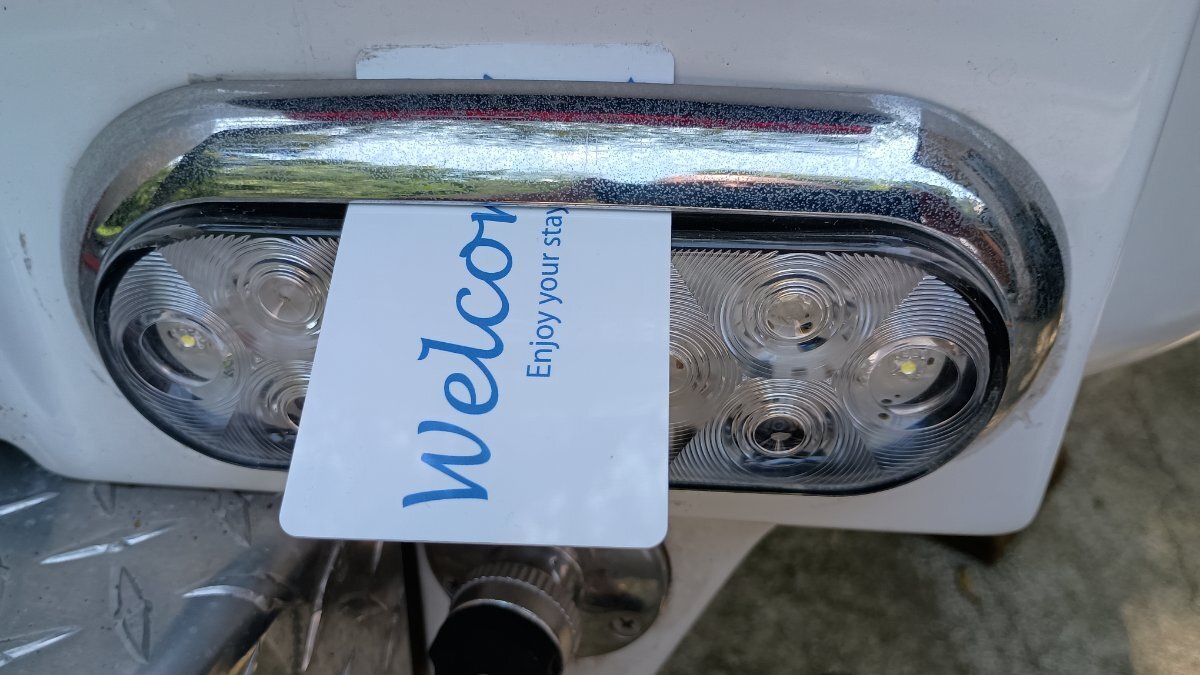
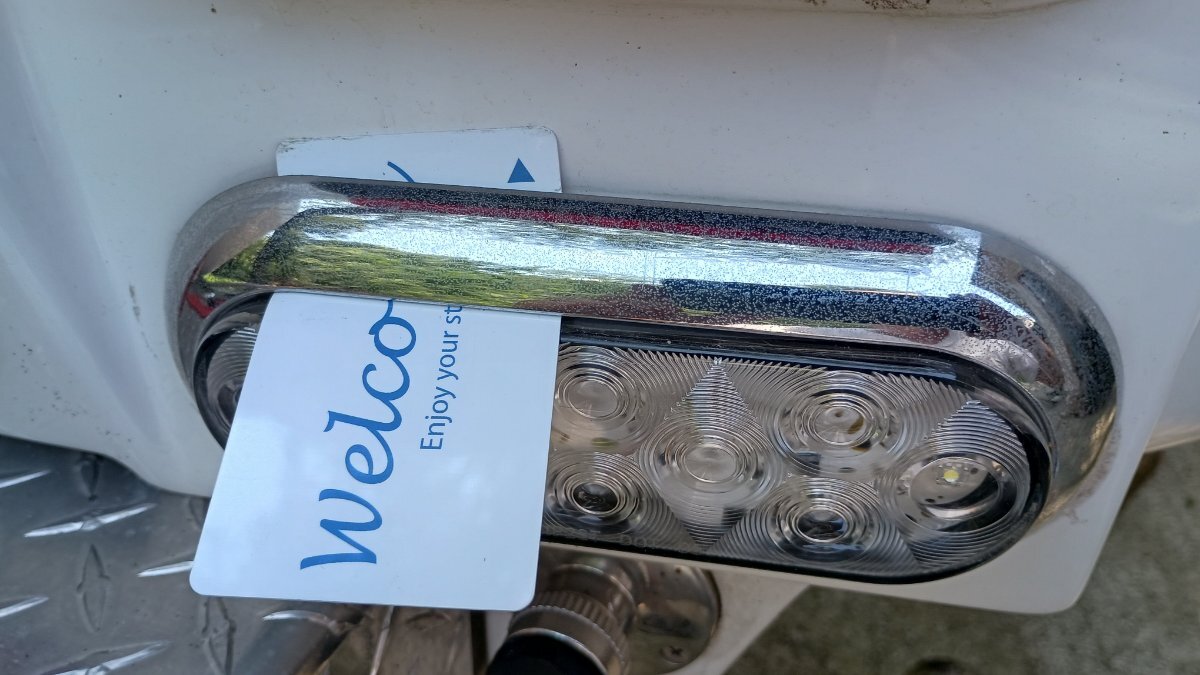
Hello All, I've been reading the forum regularly since 2017 and don't remember anybody mentioning this. The chromed taillight bezels on our 2018 tail lights were turning a gross matte green from winter road chemicals used in Minnesota and maybe a Colorado trip over I70 on my way to Moab in March a few years back. I found that etrailer.com sells just the chrome bezel separately and that I didn't need to buy the whole tail light if I wanted the taillights to look nice again. The replacement bezels are only $4 each, so I bought a set of six. Since they fit and are inexpensive, I may just buy another set and put them away for a rainy day. They are held in place by four tabs on the back of the bezel and old bezel just pops off. I've attached a photo of where the bezel tabs lock in on the light housing. There are four bezel tabs, two on the top and two on the bottom. I used a few thin screwdrivers and an old fillet knife to get them to pop loose. After learning where the tabs are on the first one it made removing the next five much easier. There are many other items on my trailer that are ugly due to unrepairable road chemical corrosion, but at least this one is fixed. Hope this helps someone else with their northern winter use trailer too. Ken
1 point
-
Thank you, Jerry. I will try a credit card tomorrow, I should have saved some hotel keycards from when I traveled for business! Maybe I have one or two somewhere. I pulled on a few edges today and thought, I better look into this. And thank you @KenB for the good info in your posts! 😂1 point
-
I'm thinking that this will be a fairly easy fix. If it were mine - I'd send a note to Oliver Service asking what they think. Bill1 point
-
I am not having a problem but I did note that this is the slowest part of the winterization process. It DOES pump slow. That said, I rarely use my city water hookup.1 point
-
Assume that you already know that the "third brake light" is nothing but a decal placed (on the outside) over a red lens?
1 point
-
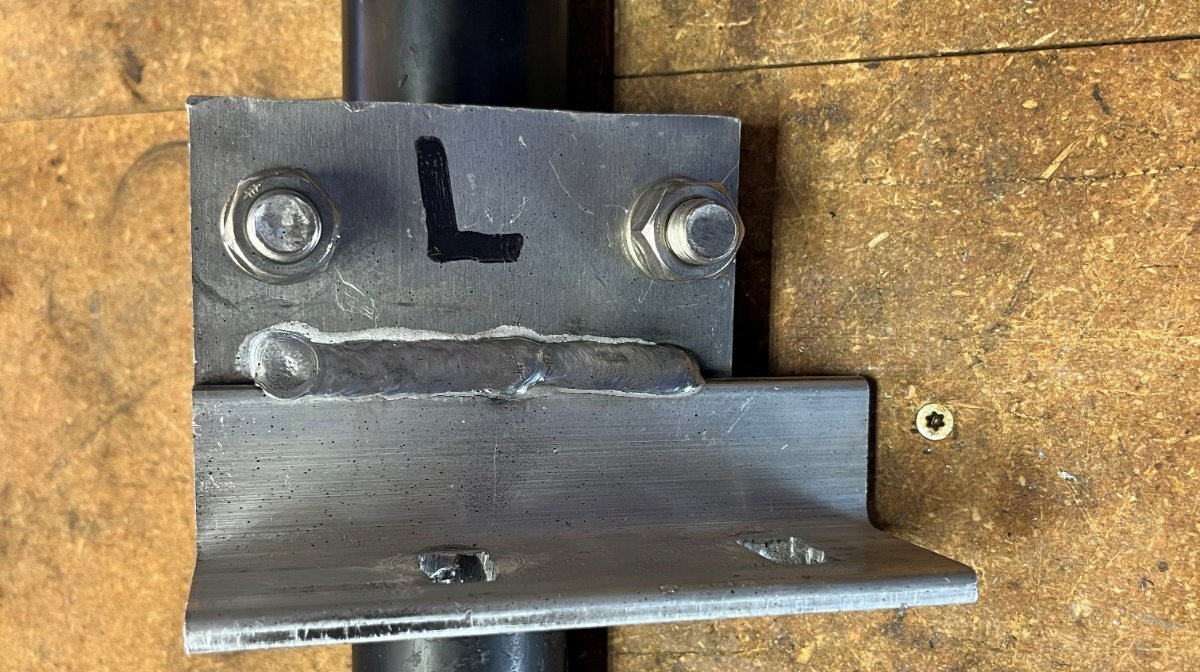
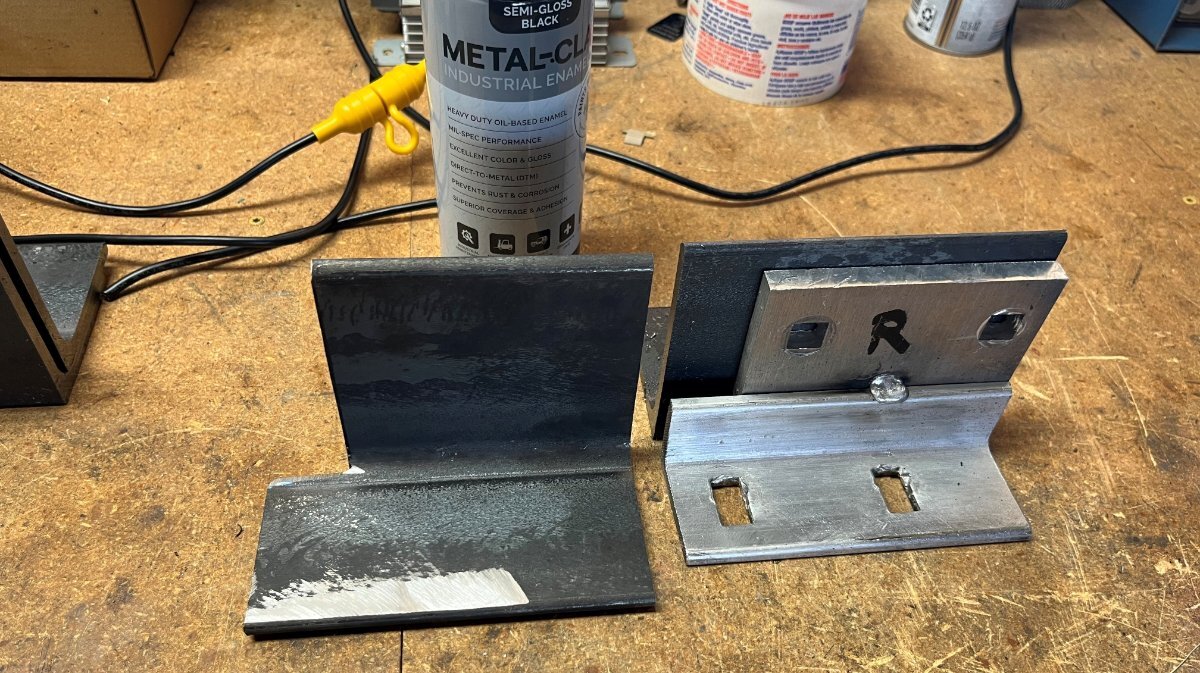
I could have had the aluminum brackets re-welded, but then I thought of a way I could fix this myself if I had the right 1/4" steel angle iron. OTT uses two pieces fitted together since they're easier to fit in place during installation. One piece would require the holes to be drilled in precise locations. Getting 4 squared offset holes to align exactly is no easy feat! 🤣 Solid steel must be stronger than 2 pieces of aluminum welded together. I went to Prescott Steel & Welding and they had the steel I needed and also referred me to a good welder that also works with aluminum. For $15 They cut me two 3x4" angle iron 5 1/2" long and another $10 for this Direct-to-Metal paint which is amazing! One coat, covers in seconds, no drips. Wish I knew of this paint in all my years of auto restoration! Must have taken me 2 1/2 hours total to fab this bracket. Being L-shaped there is no way to trace the original part, so measure and measure again and hope for the best! I drilled the 1/2" holes and cut the corners with a jigsaw. My first hole was not so clean, thinking I could drill 1/8" holes in the 4 corners (it didn't work). I purchased two brackets, but after I realized the other side had full welds, I just made one saving the 2 hours it would have taken me to make a second bracket. Both sides are done and tested. I still have the wheels up in the air on the side with the new bracket! 🤣 If the weld had not failed this rebuild project would have been done last Friday when Barker delivered the new heads. Beds are in and Chris is making the beds! We'll leave to Colorado by the weekend, a few days later than plan, but all the better! 😎
1 point
-
Awesome job, thanks!! You should start a YouTube channel!1 point
-
This is the bearing after pressed back in. You can feel it bottom out, when the air tool starts making a noise. Then the snap-ring fits into its groove. And we know the snap-ring is right when you grab one end by the hole, pull it towards the other end and the entire snap-ring stays in the groove while it circles around a bit.
1 point
-
Pushing the new bearing into the hub is much easier than pulling the old one. Apply some grease to to inside of the hub and reapply grease on the press bolt and washers. You'll need the larger 05# press on the opposite side (as pictured). I used a 1 1/4" closed-end wrench to hold the bolt on the inside and a short 2x4 under the drum to hold the wrench up in place.
1 point
-
Thought I would post this in case anyone else was reluctant to remove the bezel with metal tools and risk buggering up the light or gelcoat. This involves using an old credit card, or hotel key. First slide the card between the light and bezel in the center. Next slide the card from side to side to release the clips. Sometimes there’s a click. Now the bezel can be gently pulled off. I didn’t find it necessary to release the clips on both sides but that could be the case at times.
1 point
-
In retrospect that's what I should have done, but this was on the warranty list for that first trip back to Hohenwald. They had the trailer for a day and a half. When we went back to get it, they told me they couldn't find a problem with the bolts. I asked them to fetch a torque wrench and I showed them myself. Then we had to wait another two and a half hours while they got a new bracket from the factory and put it in.0 points
-
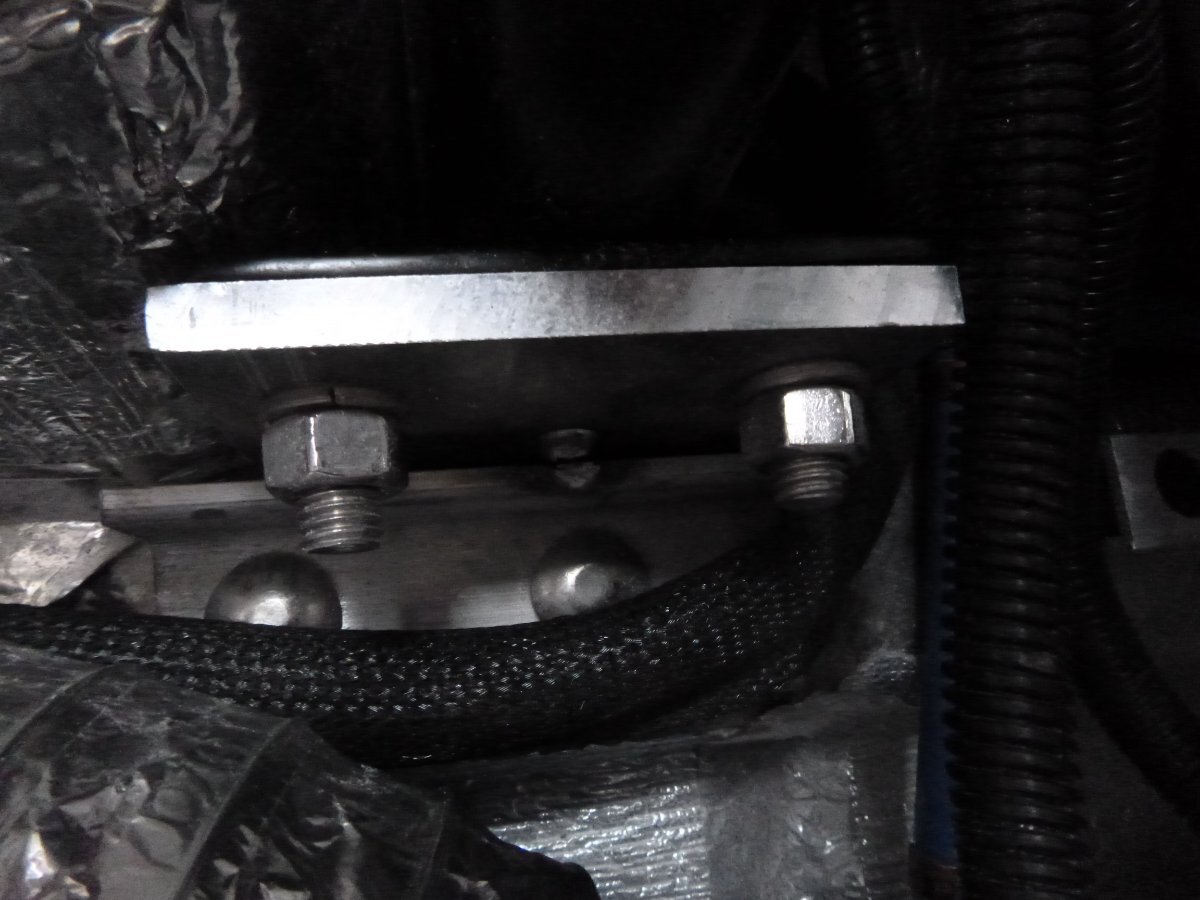
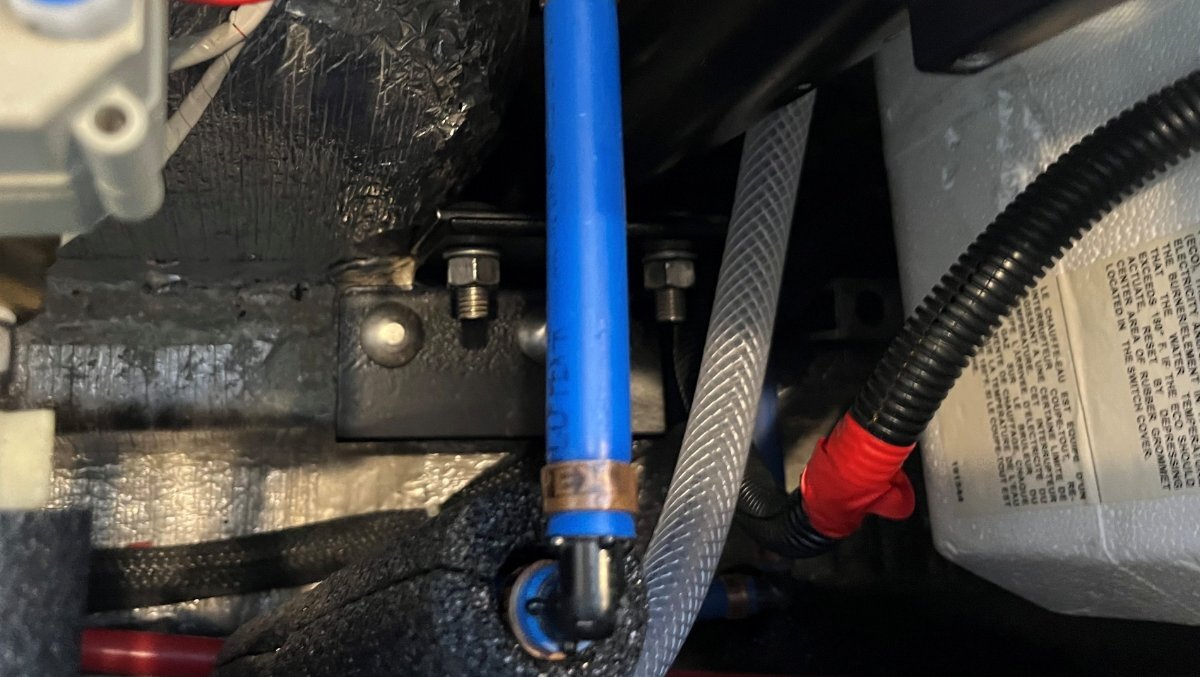
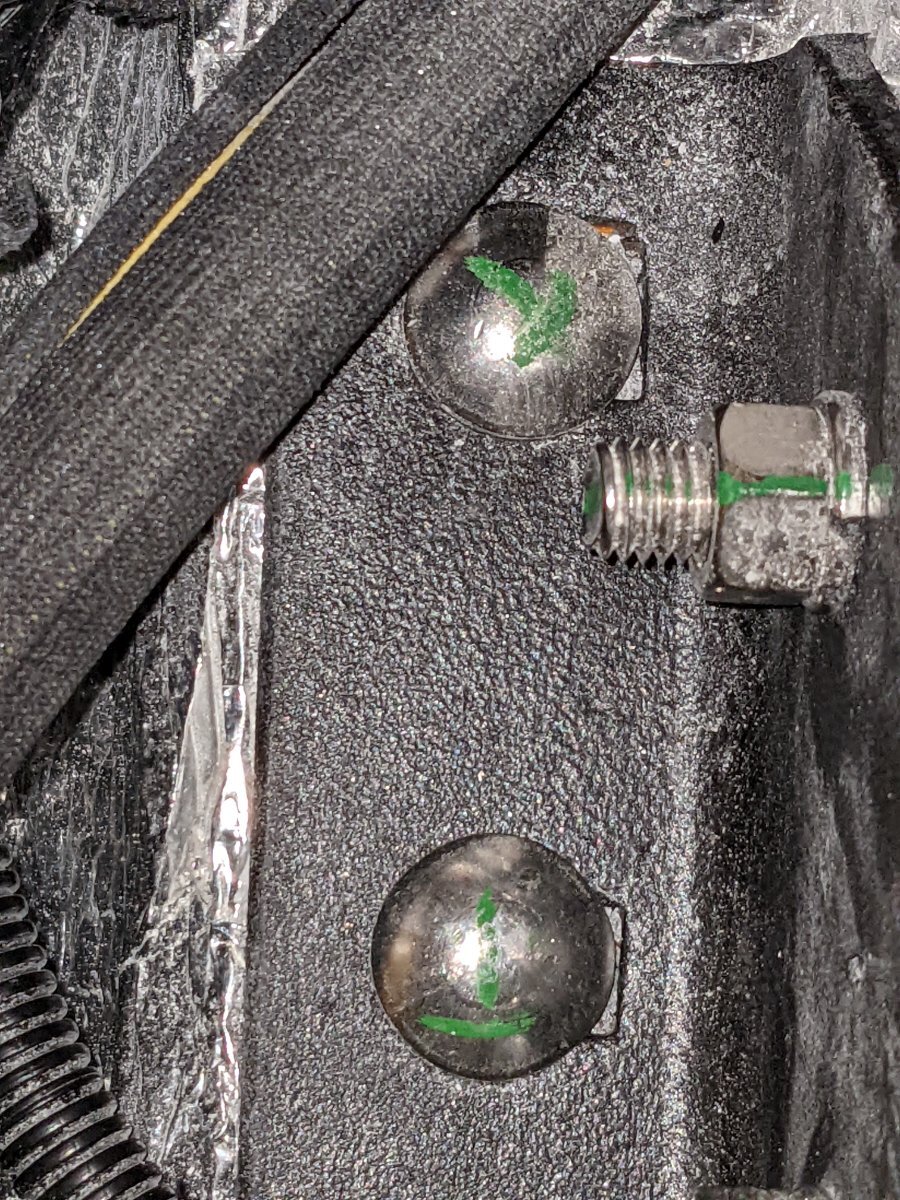
@jd1923 OTT must have changed their jack bracket setup. This is what we had at the base of our jacks. Looks like what you fabricated. Also the source of one of our other problems. If you look here, you'll see the square hole circled in red is larger then the other. Too large, in fact. The carriage bolt just spun around in the hole and couldn't be tightened. I found this trying to trace down the cause of that jack creaking under load. Don't know how that passed QC and got the little green marks on the head and nut.
0 points
-
Unfortunately, this is not one isolated problem with our unit. We've had 21 documented problems with our 3 year old trailer, some minor/cosmetic, others very serious/safety issues. (The toilet broke off on the way home from our delivery. The 120V wiring for our fridge melted because of an improperly installed Wago connector.) I've repaired the vast majority myself, but we've still had to make the 1,000 mile drive to Hohenwald 3 times for warranty work beyond my scope, plus a few repairs by our local RV tech at our expense. We've had good good luck with Oliver support as far as sending us parts and supporting us with local service but one of our trips to the OTT service center was well below par. An example: I asked them to pull the left front wheel because on the way south I could hear something loose in there. They told me they pulled the wheel and it was fine. When we got home we found a brake plate backer nut rattling around inside that drum. And OTT charged us for that "inspection"! I'm not bashing the entire line, and apparently most people have had really good luck with their Olivers, but this trailer has been a constant battle with failures large and small and is, quantifiably, the most problem-plagued RV we've had. I suppose at some point we'll have fixed all the flaws it came with and go back to just normal wear and tear items. That will be nice.0 points
-
Oliver will repair under warranty. That means finding a local shop or going back to the factory. Since we're already winterized and stored, I imagine we'll go back to Tennessee again in the spring. I have to call it now: This is the most problem-plagued RV we've owned in 26 years of camping. Very disappointed in Oliver.0 points
-
So - I'm confused - are you saying that, indeed, there are times that the dish works better if it is moved? 😇 Bill0 points


.thumb.jpg.e34bf01ef7f7d5e99ad31856d45afbeb.jpg)


-
Recent Achievements
-


")


")


