Leaderboard


Popular Content
Showing content with the highest reputation on 11/18/2025 in Posts
-
For what it's worth, we spent a couple of nights in New Mexico and Colorado in November 2022 when temps dropped as low as 9 degrees F. We did not winterize the water system, so we could continue to use it. We pulled the outside faucet inside. We placed digital thermometers in the "underbelly" of our Elite II near the outside faucet in the rear and under the front dinette seat. We kept our Truma Varioheat furnace running at 70 degrees F all night, but not during the day when we were on the road and daytime temps were above freezing. We also kept the antifreeze attachment in our Truma water heater activated. The digital thermometers confirmed that the temp did not drop below 32 degrees F in the "underbelly" even when outside temps were as low as 9 degrees F.4 points
-
I believe that there are simply way too many factors that should be considered for just about anyone to give you any kind of reasonable answer to your question. Wind, certainty of weather forecast, your own risk tolerance, how much time will you spend in the camper, is it sunny out and will you be camped in the sun, how much access will you really need to those water related items that are located towards the outer hull (i.e. outside shower, black tank flush, city and fresh water tank inputs), etc., etc.. Even though there are a number of posts right here on the Forum from owners that have experienced conditions similar to what you are anticipating, there are virtually never two that are exactly alike. For what its worth, I tend to be a bit more cautious in regards to situations like this. But, I'm from a backpacking background and many time travel alone. It is a bit easier only having to take care of one human versus two (or more). A couple of milk jugs filled with water and another one or two for drinking/cooking/bathing and I'm set. That sure beats virtually any time wasted on worrying about exactly what the temps are going to do and/or repairing damage caused by a frozen pipe. Having said this, I'd guess that you will be OK - particularly if you have the ability to make sure that some "heated" air gets to the rear drivers side and under the forward dinette seat of the Ollie. Obviously this is easy to do with the dinette seat but if someone is sleeping on the driver's side bed, it might take a bit of good positioning of a fan or small heater in order to assuage your worries. Bill4 points
-
It sounds like a fun trip! 😊 We have had limited experience camping in below freezing temperatures, and not in the mid teens as you mentioned. Our temps were in the mid to upper 20 degree range and only for a short couple of hours before sunrise. Our Oliver was not winterized and we had no issues with frozen water lines. We always make it a point to not to connect to city water with a freeze warning and use our on board water. We don’t drink from our fresh water tank, and always carry plenty of gallon jugs for drinking water. Our typical sleeping temp is 61d and we run a dehumidifier which keeps our interior just about perfect at 55% humidity. We always leave the bathroom door open to keep warm air circulating. As @topgun2 mentions there are lots of variables to consider. I think you will be fine just stay weather aware for sure. Safe travels and let us know how your trip goes!3 points
-
You might want to check the actual wire connection, I had one of the spade connectors come loose and resolved a similar electrical problem by simply squeezing the connector with pliers for a tighter fit.2 points
-
Happy Veterans Day As a veteran myself I understand at least a bit of what fellow veterans gave to our country and I certainly thank them for the time and sacrifice they spent/gave on behalf of all of us. We should all give at least a few moments today to reflect on what time and sacrifice means to all of us. Bill2 points
-
Happy Veterans Day! I spent the day surrounded by wonderful Veterans, and salute you all!2 points
-
Happy Veterans Day! Sincere Thanks to All of Our Veterans!2 points
-
Finally got around to picking up a Greenland Turbro Inverter AC/heat pump to replace the original Coleman that came with Hull 45 back in 2009. Been wanting to do this for a while now and couldn't resist once @jd1923 posted the about the anniversary sale going on that knocked the price down from a list of 1,499 to 1,099 with free shipping. Install was a breeze. The hardest part of the job was cleaning the gunk off the roof after the Coleman was removed. The seal for the Turbro is preinstalled so it's just a matter of getting the unit centered over the opening and bolting it down through the inside mounting plate. Since it doesn't have a wired thermostat, electrical connections were simple too. Just the 120v power and connecting the wiring between the rooftop unit and the inside cover panel was all that was needed. I have separate thermostats for AC and heat which made it easy but if you have a single thermostat for both AC and heat additional steps may be required. The Turbro comes with a remote with a wall mount and it also has a phone app available. Once fully installed, I connected our power cord to a voltage/amps/watts meter and used an adapter to plug into a standard 15amp outlet. I also turned off all other breakers to insure I was getting only the draw from the Turbro during startup and running. There were two main reasons I purchased the Turbro unit- One, because it uses the same extremely efficient "inverter" compressor technology used in mini-split systems and two, because of this technology the system is able to "ramp down" once set temp is reached and continue to run at a lower capacity instead of powering down and cycling like a standard single speed compressor does. Running in this manner reduces or eliminates the humidity spikes common with standard compressor systems and is very important to those of us who live and travel in hot/humid locations. Added benefit is that no soft start reuired and it can be easily run off the Honda EU2000 that we have as a backup. Since my brother is using our Ollie for temp housing while his house is being finished I didn't have much time for testing after the install, but here are some of my finding and opinions for the short time I had. The good- Power efficiency is right about what I expected, which is excellent. The unit slowly ramps up starting around 120 watts and peaks just under 1000 watts. As it gets closer to setpoint, it begins ramping down and settles in around the 500-700 watt range. At set temp I was seeing watts in the 120-200 range but couldn't tell if the compressor was running or not at those watts. The compressor is so quiet that it was impossible for me to tell. The air output continued to be cool so I assume the compressor was still running. Cooling and humidity control were both excellent too. Cabin cooled quickly after which I changed the setting on the remote to "dry" mode which locks the fan on low speed with compressor running. No humidity spikes seen at all. Outside sound level is about the best I've encountered. You will not annoy anyone around you running this unit at night, even if they're in a tent right next to you. LED strips built into the inside panel can be left off or set to white, blue or yellow. I think this feature will come in handy for us at night when getting up to go the bathroom. The not so good- While not close to Dometic level loud, and quieter than our old Coleman, it's not the quietest unit out there. Quiet enough for us for sure, but if sound level is the most important feature you're looking for then you should probably look somewhere else. On the bright side, I think the sound issue could be improved with an updated interior cover panel alone. I loosened the cover and dropped it a couple of inches down and the sound dropped dramatically. Another issue that makes me think the cover panel is the problem is that the airflow only can be felt across about 1/3 of the vent openings on both front and back vents. The ability to adjust the airflow between front and back vents with a damper would be another nice feature... Temperature control... Wasn't happy here. It seems to be about 4-5 degrees off from actual cabin temp. Hoping that this can be solved with the addition of the external Cielo wireless thermostat that @Ronbrinkturned us on to and has had great success with. I wish I had more time to test and give better feedback, but I most certainly will update this post once I'm able to. I want to see how it performs in different environments, how the phone app works, and how it interfaces with the Cielo thermostat before I make a final judgement. For now I'll give it an overall rating of A-. On power efficiency alone, an A++
 1 point
 -
Thanks for sharing. I would agree many variables will be in play. Rivernerd, how do you pull the outside faucet inside? Your trailer is much newer (about 1,000 trailers after mine), maybe you have different plumbing. I have seen where people layer in additional insulation between the hatch door and the outdoor faucet. In general, our experiences is as you have described. Our Oliver can handle a few hours of below-freezing temperatures each night, provided you heat the interior and monitor the driver's side hull. I was a hardcore winter camper in my youth but we will head for the barn if the temp is a hard freeze day and night1 point
-
I found a thermisor with a 10' lead. I used all of it for the route that I ended up using. It got me well away from the unit and out of the airstream of the plenum. Your test is limited by the length of the existing thermisor. None the less if you shield it from the airflow it will increase validity of the effort.1 point
-
I have noticed that some sensors (both temp and humidity) are more sensitive than others, so despite the calibration I still see a slight variation in readings between devices.1 point
-
Right now my built-in sensor is reading about 5 degrees off in cooling and 10+ in heating. Hopefully the Cielo will be able to work around this for me.1 point
-
The Cielo mimics the unit’s remote utilizing IR to extend control of the air conditioner as a ‘smart’ device. It has built-in temperature and humidity sensors, and provides advanced features via WiFi and the Cielo Home app. Both temperature and humidity parameters can be calibrated to more closely align readings if disparities occur.1 point
-
I use spray white lithium grease, then wipe off the excess with a paper towel. Lasts longer than WD-40.1 point
-
Dennis and Melissa; your first photo appears to show the small 'ball' in the end of the pin is missing. Perhaps it's my eyesight. That small ball is the only thing that will keep the pin from making its way free.1 point
-
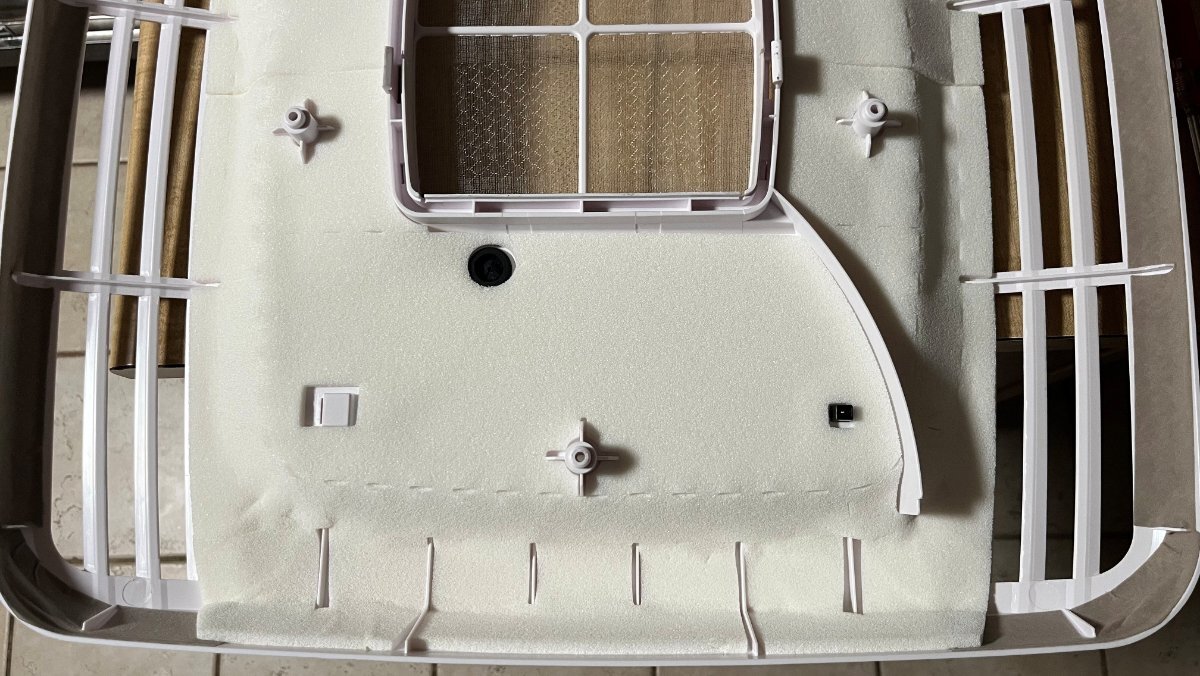
Your comment got me to open up the smaller 2nd package containing the interior air handler. The design is certainly poor for cold air handling. There is barely more than 1" clearance from where the air is forced straight down from the exterior unit to where it has to turn 90-degrees towards the front and rear (pic1). They only have a 4mm sheet of foam glued to the air deflector panel (pic2). And notice the thin plastic curved air baffle. It is designed to push more air to the front since the cold air ducting is further from the front. This extremely thin plastic baffle must alone be a source of noise. it looks like it would vibrate like the reed of a wood instrument! Some butyl or rubber on the back side of this baffle could help. You could remove this piece but that would push more air to the rear and your Oliver Attic would get very cold! Removing it and mounting a more substantial baffle further back would push more air to the front. I may do this after I find out how much these parts cost (in case I make a mess of things)! 🤣 In the Oliver, we'd prefer if the majority of air came out the front, towards the kitchen and dinette. The sleeping area will get to set temp soon enough. You can see why you noticed only 1/3 of the vents flowing. Without interior baffles, the air will exit mainly through the closest vents. All they had to do is have an extra inch there, room for greater airflow, and add some curved baffles to turn the 90. This air handler is smaller in length and width than many A/C brands I've seen. Though I've not measured height off the ceiling. They used 1/2"+ of height for an LED feature! 🤣 Notice the recessed opening around the perimeter (pic3). This space could have been utilized inside the Air Deflector. The recess will collect dust. It will be 4 weeks before I get ours installed. I'll run the A/C first without the Deflector Panel to see how quiet it should be. The inverter compressor, the rooftop unit, must be quiet. Somehow, we'll get more air/less sound out of the air handler, TBD! 😎
1 point
-
Congrats CRM on the install. Looks like a nice unit. My Tosot install was very similar with just the power wires, but with mine the gasket removal was much cleaner. I think whomever put that old Coleman on accidently flipped that seal on install. The sticky side is supposed to be on the AC unit. Makes a mess for you when swapping out the way they did it. This was mine right after I removed the Dometic. Hopefully, John's is like this. I just sprayed it off, then gave it a quick buff to clean it.
1 point
-
An occasional good cleaning and a shot of WD-40 will make these things last a long time. Pay particular attention to the little "ball" in one end and the "push button" in the other and also give the holes in the bumper a little shot of lube (WD-40 or something similar) from time to time. Bill p.s. you might also take a look in Tractor Supply if that is easier - they used to carry these pins.1 point


.thumb.jpg.e34bf01ef7f7d5e99ad31856d45afbeb.jpg)


-
Recent Achievements
-


")


")


")

