Leaderboard



Popular Content
Showing content with the highest reputation on 10/19/2026 in all areas
-
Living in Montana I do NOT think of the Oliver as a 4 season camper. Yes you can camp in moderately chilly weather as most of us have done at one time or the other but 4 season no way. If you want a true 4 season camper look at Imperial Outdoors and a few others built to similar standards. On our 2015 EII we have the suburban furnace installed which is only 16K BTU but runs at 40-50% efficiency cutting that value in half, and believe it is considerably undersized and noisy to boot. Not sure what they install on the newer models.3 points
-
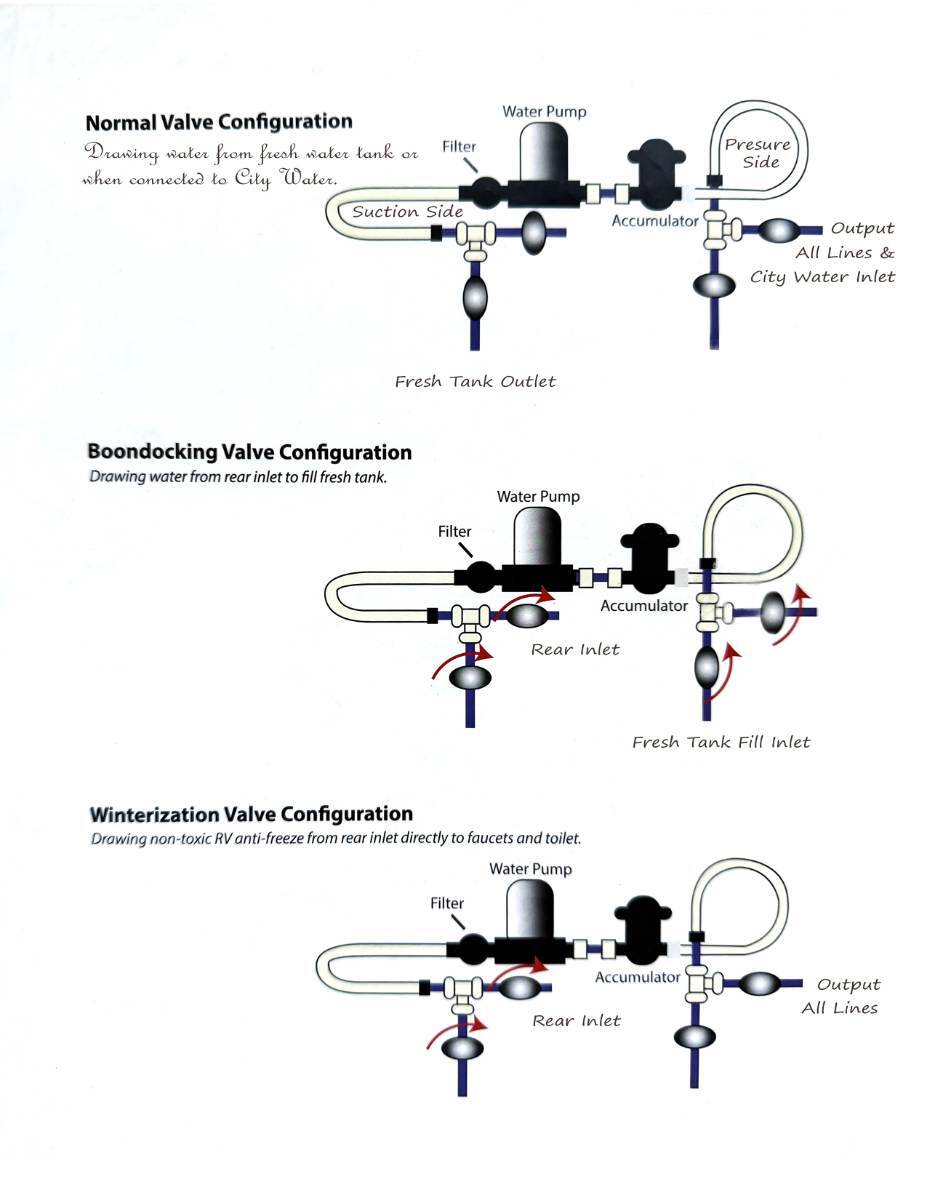
Picked up our Apex two weeks ago and have been in it every night - so far, so good. We planned to spend 3 weeks straight to learn and work out any bugs (very minimal issues so far) Pros - A dream to tow & bike mount has been solid/Eco flow display easier to learn that anticipated/battery re-charge amazingly fast/Houghton AC quiet and have ran all appliances (simultaneously) and some “faux” boondocking on the 48 volt DC system w/ no issues. It has been wonderful to arrive at the campsite with 98% battery every time. Overall love the attention to detail and quality of the design. Dinette cushions (backs) could be improved and wished they would have included the solar suitcase connection. Cons: Black/Gray tank indicators don't really warn you of a full tank, but the toilet gurgling and the shower backing up are sure indicators 🙂 I haven’t attempted filling the fresh water tank yet (to be honest I am intimidated by the multiple valves under the bed - wish they were labeled but thankful for the poster size diagrams on the compartment cover. Our background: Previous tent camper, then a Casita circa 2000s, and Airstream owner. So far impressed with the Oliver overall operation (Airstream could learn from Hohenwald orientation and pick up) and while tempted by the new Casita double axle trailer (significant price difference) the Apex is a well designed trailer and we have no regrets.2 points
-
Interesting that the Imperial RVs came out of the Ice Fishing market. Looking at the various models this is the design intent :"Four-season performance is standard. Nearly 3 inches of composite insulation, thermally broken windows, and heated water tanks keep the OB120 functional in extreme temperatures, with the cabin and systems engineered to perform down to -40°F. This cold-weather capability is no accident — it's the direct result of Imperial Outdoors' roots in building ice fishing structures designed to survive Wisconsin winters, applied to the most compact trailer in the lineup."2 points
-
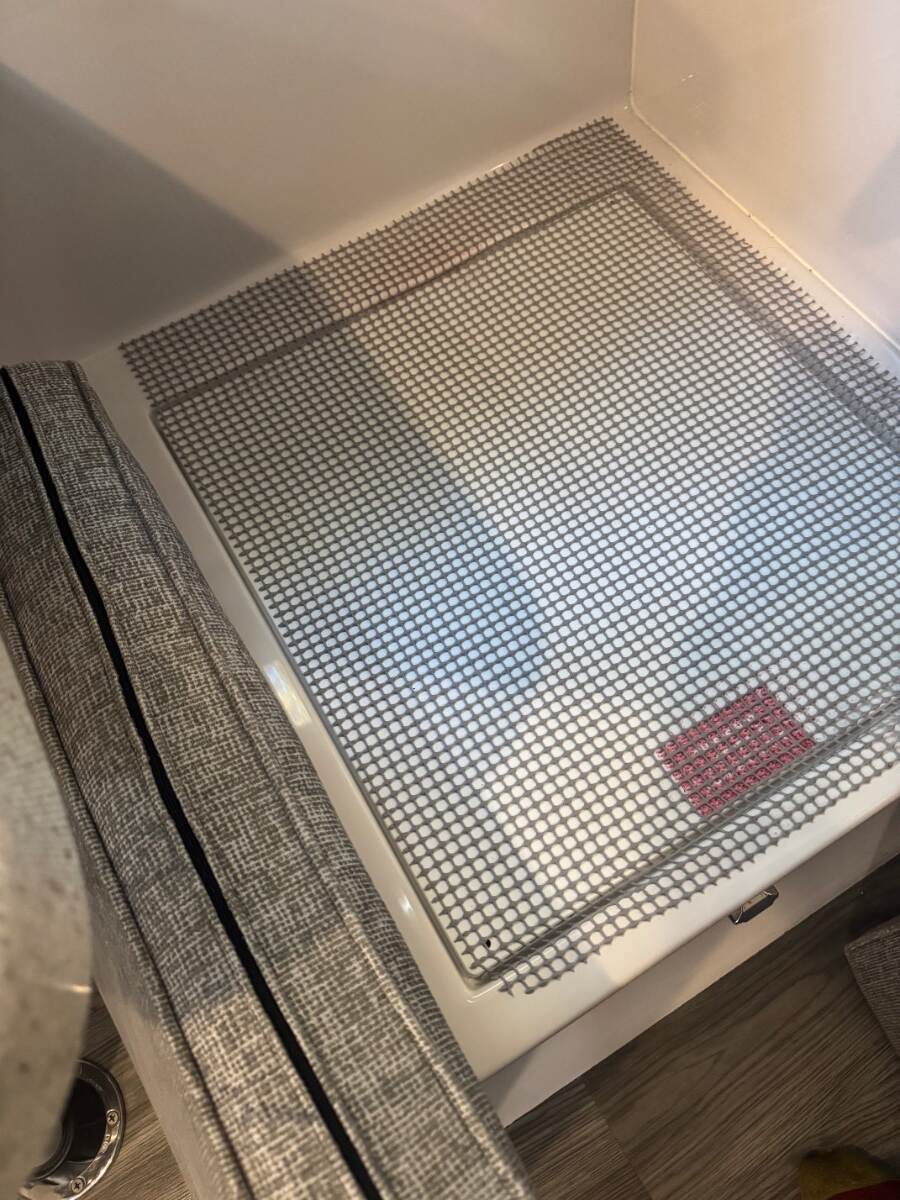
My wife’s solution to the dinette cushion YMMV
 2 points
-
We will be traveling overseas in a few days and I may not be able to respond for a while. Hopefully we'll be returning with our daughter who has been waiting 10 years to get through the legal immigration process🙏 Anyway, you're on the right track now, only remember that a current leak does not have to be on the specific component related to the mode. It also could be related to the neutral which is common in all 3 modes. Albeit, a neutral ground fault needs to be lower resistance for current to take the ground path. Think of it like this; 1 ohm or less is a direct short, under 1k on the neutral could cause a ground fault trip, anything under 25k on the hot side will cause a ground fault trip, anything up to a meg ohm is not great, but it might not trip the GFCI, and over a meg ohm is good insulation. Your right to relate the problem to heat, only the heat is just exposing an insulation weakness that is causing a ground fault enough to trip the GFCI. Do your testing after the breaker trips when it is still hot, or try a heat gun all over suspect insulation. Test hot and cold, and remember the resistance will change a little with temperature swings. Look for more significant changes. Since the power cord might have been pinched the first time you removed the oven, the heat could be softening the insulation at the pinch point causing current leakage there. It might not be easily seen, so It's worth examining very closely or just replacing the cord as a cheap first step. Hope that gives you something to start with. Good luck!2 points
-
Most 30-40 degree nights when using the furnace we find that just cracking the Maxxair vent a tiny bit using the hand knob is sufficient venting to prevent humidity/condensation buildup. We never open it all the way with the furnace on.2 points
-
We just had a freeze last night. My preparations were: turn on the "antifreeze" function for the water, disconnect the hose (we currently have fresh water hookups), "argue" with wife about the setting on the heater (she prefers 62, I prefer 60). EZPZ In my previous post I ignored a "feature" of the Ollie that I have found MUCH more challenging over the last 2.5 years: the CO alarm under the table. The Ollie seals up so tight that you could easily not use the heater on many freezing nights. Body heat is absolutely trapped. It's the perfect tent. So perfect, that certain gases accumulate and alarms get triggered. 😂 So, venting is required. Too much and you might as well be outside. Especially if it's raining. Too little and alarms will wake you up repeatedly. Last night we got it just right: Max air vent open, but off; heater ran intermittently, but never labored, no alarms. Comfort and safety. Check.2 points
-
Our 2022 is new to us this year, and I shared the same initial confusion when looking at the water‑valve diagram. While it’s a great feature to have the valve positions shown based on the function you want, I also wanted to understand the actual start and end points of each line. So, I enhanced the diagram and placed a laminated copy under the bed next to the water pump. Below is that updated drawing. Please let me know if you spot any errors in it.
2 points
-
Hello Apex #2 from Apex #1, Hull #1738, 2Dreamin👋 Totally agree on the dinette cushion backs, it was annoying every time we got up from the dinette so I see a solution in our future. City water connection is on the curbside and Fresh water tank fill is on the street side. We got the compost toilet and are very happy with our decision, this was after months of contemplating it, then deciding not to do it and then changing our minds after talking with the Whitaker's at Denali National Park in Alaska earlier this summer. We did fill the fresh water tank to test out the pump and also testing out the pressure of the pump for the tankless hot water heater (THWH) and that worked great. To set our preferred THWH temperature, I hopped in the shower, turned on the faucet hot water only while DH was setting the temp to 107 which worked great for both of us actually. Using only the hot water side of the faucet eliminates cold spots with the tankless. The only time we experienced any issues was while at a campground that had 'low' water pressure which reduced how hot the water came out, the tankless also works on water pressure, this is where the fresh water pump came in handy. We find the EcoFlow to be a dream to manage, so much easier than our Airstream Interstate set-up, even after we had all the wiring ripped out, soft solar panels ripped off and an entire new battery system, inverter, etc and solar panels installed. We love the ease of operation with the EcoFlow. Enjoy your new Apex!!!!! Are you going to the rally? We are in site F202 points
-
That is a splice connector, specifically a Wago brand lever nut splice connector. Considered a good easy to use connector joining two or more wires together.1 point
-
I can relate. Many years ago, we headed south I -40, I was asleep in the passenger seat, my wife driving. I wake up - "what is that thumping?" Oh it started a min or so back! We pulled over, the tire on the boat trailer was just about gone, and the fender was toast. Lessons learned. TPMS is invaluable. RB1 point
-
Yes, for sure anything prolonged at 32 degrees is 4 season and I'm not interested. For us the 4th season is - go south young man, go south - a little farther, perhaps. Now to be clear, we have spent a few nights in freezing temps at elevation (10,000) and all was fine and toasty. As we are outdoors folks, and generally the really cold temps preclude outdoors - usually. I'll take a south Fla beach, or the Texas gulf over the snow and cold any day. Waking up at 30 degrees, in a tent in Yellowstone was great. It's better in the Ollie, trust me.1 point
-
Thanks DB - great overview and it helps. Thanks 2D, we can’t make the rally this year but hoping for next year. We are from Texas and currently in central Florida in a holding pattern due to the hurricane (but hoping to get home next week but I-10 and I-12 are going to be problematic) so we will see. We may crash the party 🙂 Yes on the Rec Pro water heater, use the hot water side to control the overall temp - same lesson we learned and I have also been removing our water pressure regulator to get the all important pressure for the water heater - that made a big difference as you stated. Thanks D&M for the notes - those are helpful in understanding what valve does what.1 point
-
Assuming its the same as the 2026 its super easy, just remember there's basically two modes you use the majority of the time. Pump or city: For the back ports you either fill the tank directly (streetside) and use the onboard pump, or you get pressurized city water (curbside) with the pump off. Boondock fill: If you want to fill unpressurized from a container, use curbside, with all the valves reversed. Including the one that's far at the back of the trailer in the T. Reverse all the valves again to use the pump normally. That's it. The third configuration is for maintenance; winterize, sanitize or descale I (and others) only use the onboard pump and fill the tank with softened water. I have a small RV softener installed under the twin bedside table used during filling. I also have a few small inline bullet hose softeners I might use sometime for pressurized water, who knows.1 point
-
Great to hear the initial "break in" is going well. Honestly, it does take a little trial and error to get comfortable with the valve configurations. Interesting choice on the reg toilet, vs the composting toilet, as the APEX is skewed towards the non-facilities spots. Took a real hard look at the Apex, and really like the blacked-out style, although I don't understand the tire choice, it is a great looking rig overall. Seems the II is a better fit for our future RV needs. Hope your journey continues to be all that you imagianed.1 point
-
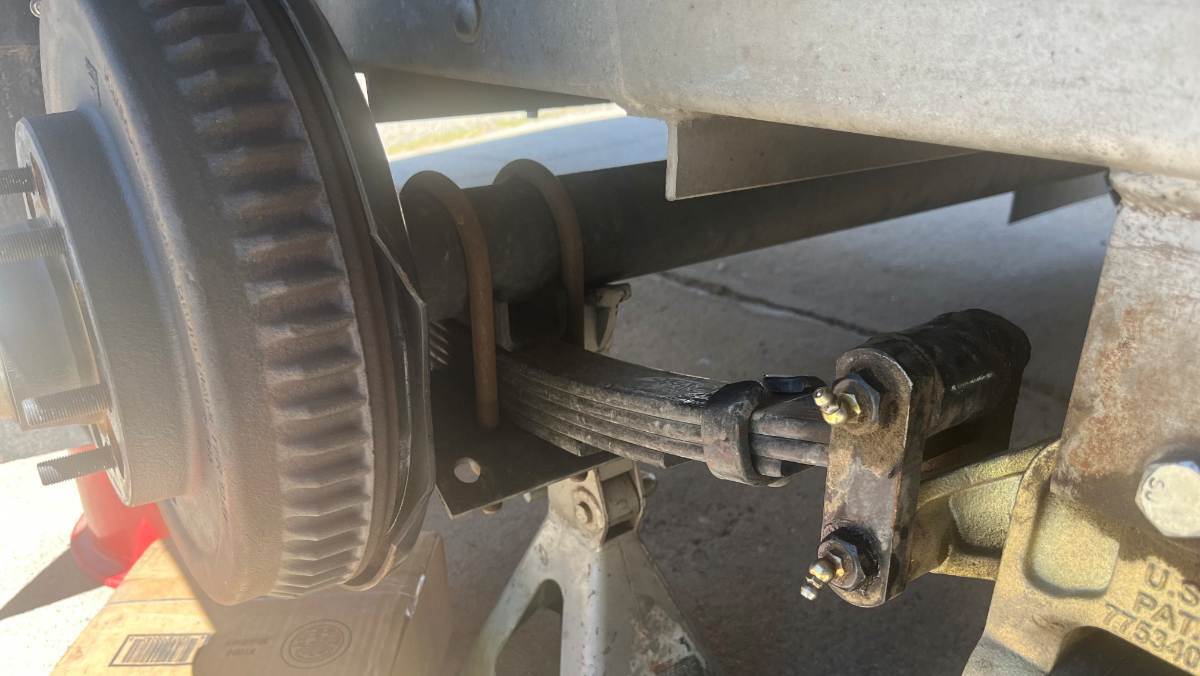
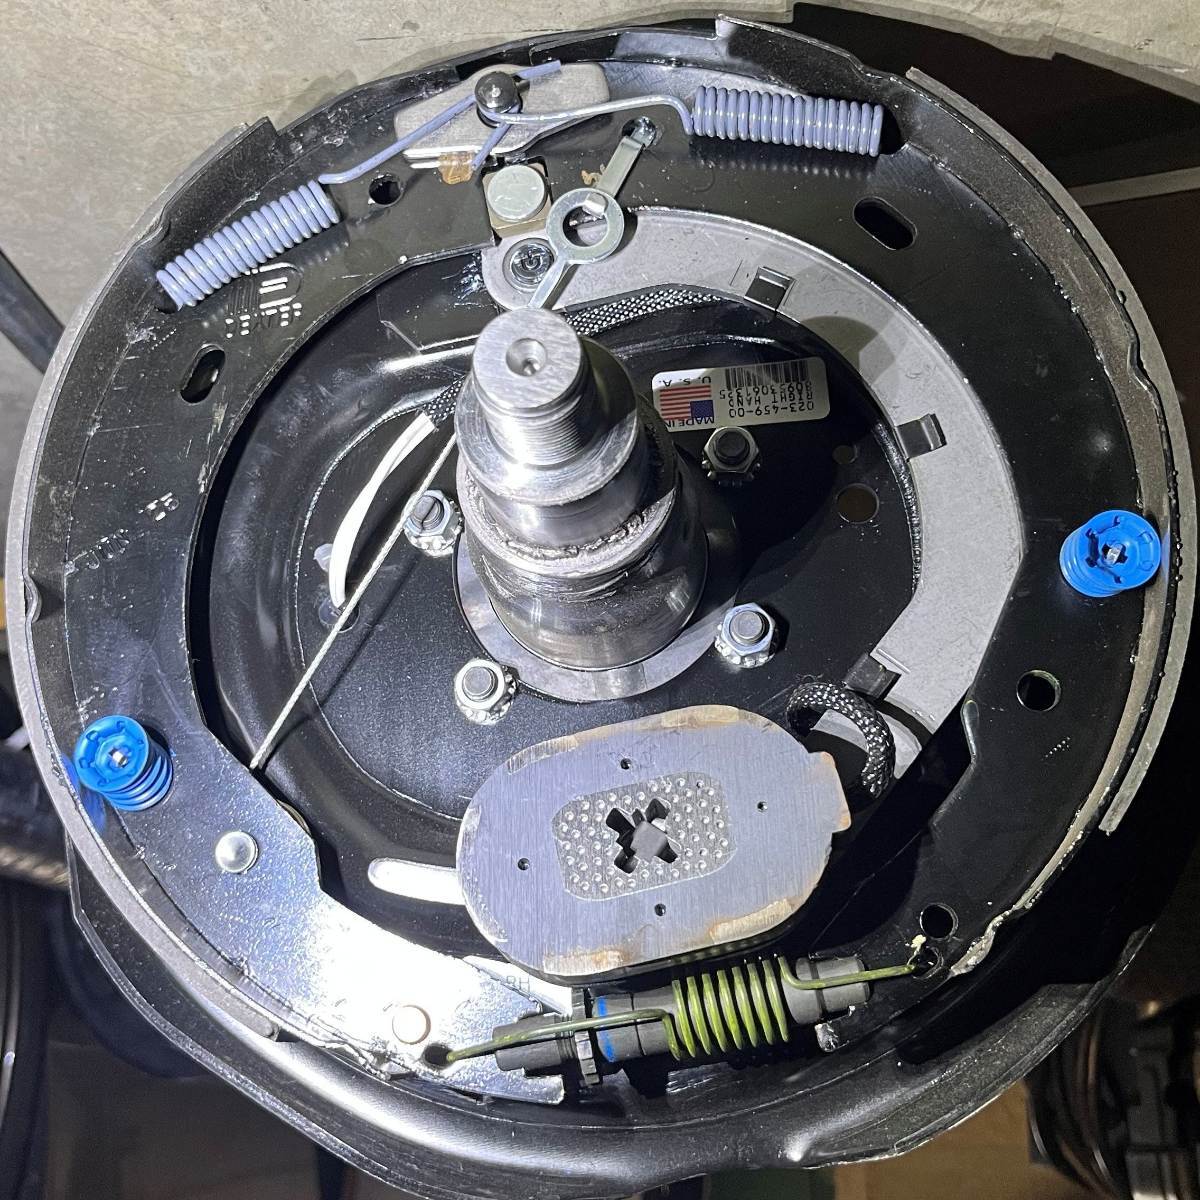
This maintenance can be completed in 2 hours (by the young experienced mechanic), or you could take most of the day! Have fun and pride in your Oliver! Take your time. I did the curbside yesterday and did the other side today (not young anymore, like splitting tasks across days). The second side went very fast today, done in only 90 min having the tools out and ready. This is just how I worked our suspension maintenance, in how it made sense to me, based on my automotive experience, not Dexter nor OTT approved! IMHO this maintenance should be conducted annually, or perhaps bi-annually for those who tow 10K +/- miles in a year. Some may work this routine every two years. Following is a suggested 10-Step Suspension Maintenance procedure: 1) On level ground, jack up one side of the trailer, using the rear leveler jack, while the Oliver is hitched to the tow vehicle (mandatory for safety). 2) Spin each tire to see if it rolls freely. Listen carefully for any unusual sounds. Try to wobble each wheel left to right (3-9 clock positions) and top to bottom (6 - 12) to observe any free-play. There should be no observable free-play with the Nev-R Lube bearings. 3) Remove the lug nuts on both wheels with impact (no impact, loosen with tires on ground). Place a jack stand under rear axle, close to wheel, for safety since your body will be under the trailer to do some of this work (see pic1). 4) Grease all six (6) wet bolts, plus two (2) grease fittings on the EZ Flex. Use a power grease gun if available with a LockNLube coupler attached. Add just enough grease to see some ooze from an edge. Wipe up all excess grease. A straight-blade screwdriver helps to remove old grease from recessed areas. Wipe grease fittings before and after and place caps back on (I don’t use caps). 5) Torque all suspension bolts to Alcan specs. 90 ft-lb for U-bolts, 80 ft-lb for the EZ Flex center bolt and both end-points, and 65 ft-lb on the shackle wet-bolts. The U-bolts will set at some point where they will not need further tightening. They rust into place and once this occurs, they’re done and you will not need to check again in future service (not true for the wet-bolts). I go lighter torque than Alcan specs on the wet-bolts, 70 and 58 ft-lbs which is an eighth (12%) lighter. The 80 and 65 numbers seem high to me. 6) Check drag on the drums. They should contact the shoes ON and OFF when spinning (shoes installed are not perfectly round). If they do not drag at all, the self-adjuster is not tightening properly (see pic2 brake assembly, adjuster at bottom). Mine were all dragging just right on like-new axles. There are two inspection ports on the backside. Unfortunately, there is no way to reach the gear to adjust it, due to the Oliver wide leaf/shock absorber plate. If adjusters are not working, the hub/drum must be removed (see step 8). 7) Pull the trailer emergency brake switch and turn the drums until they stop (to ground magnet). Check amperage draw at each wheel, placing amp meter clamp around ANY single wire behind wheel. Amperage should be 3A +/- without much difference between wheels. My LF wheel was 3.1A and the other three all read 2.8A, the two main brake wires coming out of the streetside Oliver hull read 6.1A front and 5.8A rear. These numbers look good enough to me! 8] Now the question is, do the brakes need a full inspection? I would say no for the first 2 years, then later with enough miles towed (>25K miles). Perhaps work a full inspection after 3 years. Then skip year 4 and do another full inspection year 5. Something like that! Clean brake dust without internal inspection: Use compressed air to blow through all openings of the braking plates to remove all shoe dust from the interior of the brake drums. Wear safety glasses and stay upwind from the cloud of brake dust. Blow throughout until you see only clean air. Full inspection of trailer brakes: Remove the bearing dust cap, the small outer circlip and spindle nut, then slide the drum off. Use compressed air to remove all brake dust (Brakleen spray unnecessary). Make sure shoes are clean, free of grease, clean if necessary (sand shoes lightly). Check shoe thickness, There is not much material there to begin with (Dexter shoes new have only 0.18" or 4.5mm material). They will look thin but when wearing evenly should be good for many more miles. Check the action of the shoes by pulling the magnet to see all is working as designed. Replace shoes if necessary, or replace the entire braking plate assembly, which is bolt-on and economical. If you have enough miles to replace shoes, the drums should be turned or replaced. Replacing shoes without doing so would result in poor trailer braking performance. Drum assemblies with new bearings are very expensive! The Nev-R Lube bearings are warranted for 5 years or 100K miles (our hull will not clock 100K mile in the next 10 years)! Some who tow a lot may replace bearings every 5 years. I will carry replacement bearings and tools with me to replace as needed, as they could fail at any time or last many, many years. Then replace the drum, washer and spindle nut. To retorque, mount the wheel, lower the tire to just touching the ground and torque to 155 ft-lb. Then replace the circlip and dust cap. Remove wheel again to mount center caps, though many of us go without center caps so that hub temps can be checked at stops while towing. 9) Remove gravel from the tread of both tires, using a thin flat-blade screwdriver, while inspecting for tread wear, tire defects and foreign objects. I do this with All of our vehicles, every time wheels are removed for any reason. I’ve found many screws and other sharp metal objects in tire treads, sometimes causing slow leaks that can be fixed now vs. getting worse on the highway. 10) Mount rims, lower hull to get rim close, making it easy to place wheel on studs. Use impact on light setting and snug up lug nuts evenly. Lower hull to sit on wheels, remove leveler blocks, and torque lugs to 90 ft-lbs. Repeat all 10 steps on the other side of the trailer. Let me know if I missed something or other suggestions! 😎
1 point
-
Just for fun and my own sake, tl/dr all the positives Tongue Weight: Lowest in class, Bigfoot is as high as 1k, I have tongue and payload limits I’m working with GVWR: A touch on the heavy side for it’s size but well within my limits Size: True 25’ like the Escape 23’, but the Ollie is a 7’ compared to the 8’ of the Escape. The Bigfoot with front storage is a 28’ Fiberglass: Best in class with the custom honeycomb and mat patches in strategic locations Lighting: Best in class, tri-level interior and bi-level exterior Options: Best in class. Escape famously is configurable but mostly with low level ones (who needs a second exterior shower?), you can’t option out the stuff you’d want control over like batteries/solar. Bigfoot likewise has no power options and only options things like skylights (which are a bad solution to a dark interior) Build Quality: Best in class, I mentioned fiberglass above but the frame is equally boss Decor: Subjective but best in class IMO. Bigfoot is old school, Escape is, sorry just cheap looking. Ollie is classic will never go out of style Fixtures: Best in class marine quality Outside presentation: Best in class. Frames are ugly, only the Oliver hides it, and with fiberglass body no less Usability: Four season, Escape is three, Bigfoot is four Towing: Probably best of the three by a small margin, aero, lack of external gubbins. Bigfoot has a good front, good bottom but poor top and back, the Escape has a poor shape and bottom Water carry: Don’t know about the others (but probably average), but the Oliver is expressly designed for fresh water carry. Important for Boondocking and I want to bring water with me just in case the campground water is having issues Repair: As far as I can tell the Oliver is the most well designed for repair. As mentioned above, even in the unlikely event of a tank issue you can even swap those without too much trouble …1 point
-
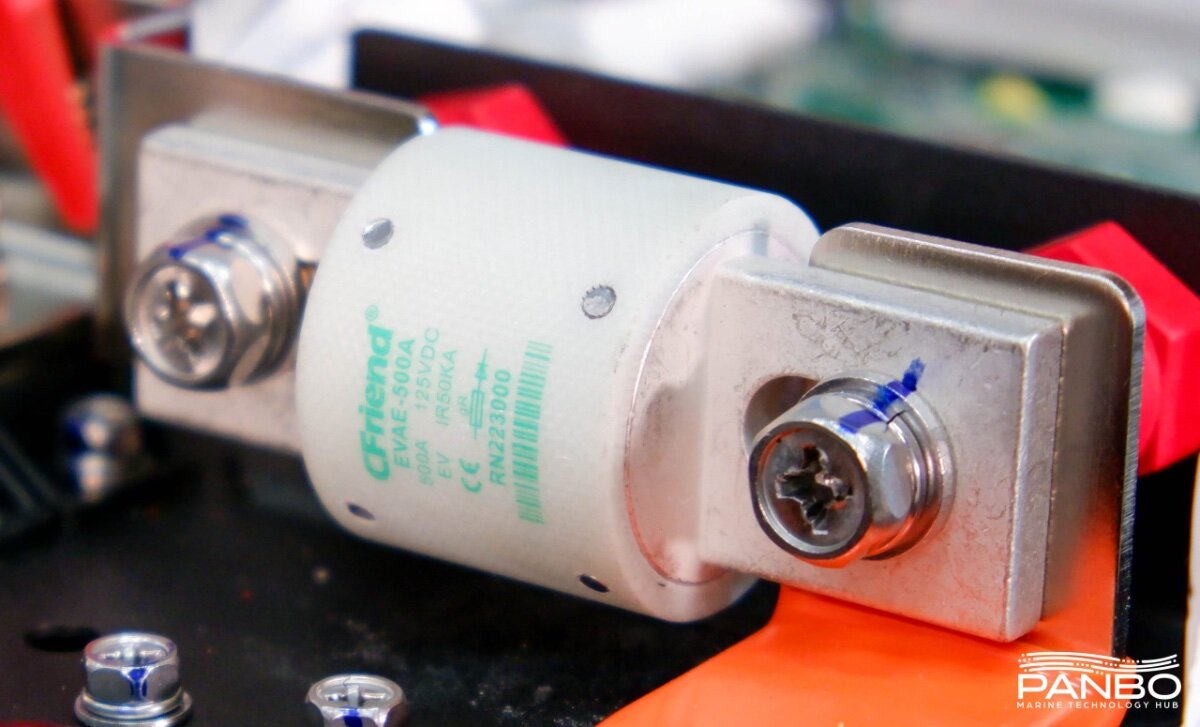
The Epoch 460 marine battery I have has a 500amp built in T-fuse plus my OEM build had a 300amp T-fuse directly outside the battery bay so I called it good. I did buy some 180 amp MRBF fuses for the terminal but ended up returning them. If you need any kind of fuses, I recommend Blueseas. Excerpt from Panbo.com “ Let’s get one exciting thing out early. These batteries contain a 500 amp fuse under the cover of the battery, just before the positive post of the battery. The fuse Epoch uses is from the EV market and carries an amp interrupt capability (AIC) of 50,000 amps. That rating means that with up to 50,000 amps flowing through the fuse, it will still successfully trip to an open and safe condition. ABYC’s electrical safety standards require a fuse with a 20,000 amp AIC. Before disassembling this battery, I’d never seen a class T rated above 20ka AIC. Thus far the only gripes I have about the fuse are that it appears difficult to source a replacement — which I’m hoping Epoch can help with by selling replacements — and I think Epoch should label the outside of the battery to warn there’s a fuse inside. That way, a boat owner won’t find themselves stumped if they accidentally trip the fuse. But, make no mistake this fuse is a really big deal and a really good thing. By placing a high AIC fuse inside the battery, installers are now relieved of the obligation to place a physically large class T fuse as close to the batteries as possible. The combination of fuse holder size and thick cables can make this a challenge. Knowing the fuse is inside the battery, an MRBF post-top fuse holder can now be safely used. Thus, the entire system is protected via the internal fuse, and the wire off the battery is protected by an appropriately sized MRBF on the positive terminal.” Cheers, Mike
1 point






-
Recent Achievements
-