Geronimo John
-
Posts
2,306 -
Joined
-
Last visited
-
Days Won
65
Everything posted by Geronimo John
-

Tire pressure confusion - Legacy Elite 2 POLL
Geronimo John replied to John E Davies's topic in Towing an Oliver
Where ever I park Ollie, I use my 2" X 6" X 11?" blocks, and I never just use one. My purposes are to shorten the amount of jack travel, and to act as a slip point should the trailer be moved in error. Having a shorter jack sticking down increases the odds that at least two of my blocks will slip against each other and save my jack and rear jacks as it falls. Point is if I were to take two of them and router out a pattern of the frame and spring plate, they likely would stay in place for our scenario. So, please measure them up for us when you get around to thee retest. Sure wish I had a wood router!!!! Nope I had not thought of that one. Moving the support point back increases tongue loads and decreases load on the axles. Good idea. Rates right up there on "Using your very best tire out of the five (or possibly 9 for some TV's) on the lame side. So, adding another item for the list: Will you TV spare tire fit your Ollie? Good to know in advance. If so, what rating and CONDITION is it? Better than Ollie's? At some point I'll take all the above suggestions and make a check list out of them and repost the group in a condense version. By laminating them and placing the half sheet of paper on top of the spare (Sorry John D.) the check list would be where you discover it (again) in your moment of most need. Ok after that brief diversion: What else should we be thinking we should have in mid for the scenario? GJ -
Tire pressure confusion - Legacy Elite 2 POLL
Geronimo John replied to John E Davies's topic in Towing an Oliver
Great suggestion, where possible! May as well look at filling up the back seat of the Crew Cab with heavy pantry or tools. Driving slowly with flashers to a better location is one to be sure to keep top of mind. Maybe fire off the rear view trailer camera and monitor any traffic impacts the situation may generate while slowly retreating to a safer location. Maybe pressurizing your spare tire to it's max pressure to take on all the load it can. Maybe consider the condition of your spare tire? Maybe it should be mounted on the opposite side if it is old but pretty and the other side has newer tires. What else? GJ -
HOW TO: Fabricate battery hold down straps and anchors
Geronimo John replied to John E Davies's topic in Ollie Modifications
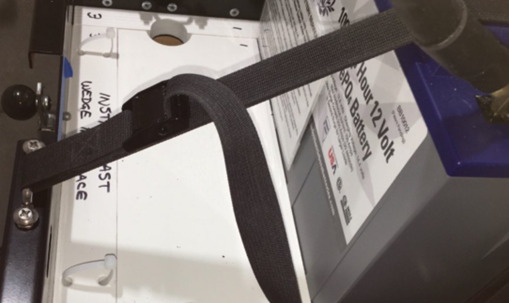
JD: Once again "hitch hiking" off your concepts. I have three Battleborns installed. I have installed two fore/aft straps using tray slots and hooks for the straps. I want to add one or two straps in the port/starboard direction(s), as this owner's are showing.... but do not want to have to remove the batteries and/or tray to do so. With three Battleborns, they tray is pretty much full so the angle of my to be installed strap would be pretty much vertical vs. 45 degrees or so as shown in pic below. I am thinking of just running a strap under the tray back ,and up the back side of the back BB, and back to tray latch end to the buckle. This would save a lot of time and be easy and quite secure as well. Any downsides? GJ
-
Tire pressure confusion - Legacy Elite 2 POLL
Geronimo John replied to John E Davies's topic in Towing an Oliver
Steve: Good test for visual understanding of the problem. Not much clearance between our tires and fiberglass. For discussion purposes, let's say are well away from any assistance. We hit something that destroys both right side tires. We only have a single spare tire. What would you do? I would: Try to slow down ASAP, deploy 4-way flashers, and quickly pull over if reasonably safe to do so. Deploy a visual warning well behind the trailer. Likely my wife with a red T-shirt and flag. Grab lug wrench and loosen both tires lug nuts slightly. Use Oliver jacks to raise the trailer tires off the ground on the blown side. Remove the blown tires/rims. Place dunnage between the springs and frame to try and keep clearance when lowered. ( I have 11 each 2"X6" short boards in a milk crate that I use for leveling OE2) Install spare tire and lower jacks so that the axle is supported by the dunage and frame Proceed slowly to a safer location and deal with the two blown tires. What have I missed? What would you do differently? GJ -
BLUF*: If you are just starting to look at DIYing Oliver electrical projects, and are not experienced with major electrical surgery, then I suggest reading further. As an Oliver DYI guy, I have relied heavily on more electrically inclined owner's guidance and suggestions. This forum has been invaluable in planning and execution of the installation of my Houghton, Battleborns, Victron 712 Smart, DC to DC Charging, and 3,000 watt inverter projects to name a few. A common thread of each of these projects have been the use of electrical cable, lugs, and specialized tools. As a Mechanical Engineer, I have always purchased very high quality tools and materials for my mechanical efforts. But for electrical efforts, I was far less informed. Frankly, my electrical hand tools were junk, my electrical lugs were Chinese Junk, and my hammer actuated lug crimper was not up to the task either. Worse, I would not know a quality cable if you hit me over the head with it. Then came Ollie. I knew I wanted my Ollie DYI efforts to be first rate and I had to learn about electrical tools and materials. But that process took a lot of time and effort. So good choices were made only because I listened to the DYI Owners who had already plowed the path. But what I did not really understand was why the high quality (and expensive) electrical components they recommended really do justify the higher costs. So, for the new to the DYI Oliver electrical system upgrade team, the below rather long winded video will fill in some of the voids. Shameless Plug: I do highly recommend and use: Kline Tools, Blue Sea Systems (anything) and BatteryCables USA (Pure Copper Cables, Lugs, Heat Shrink) GJ * NOTE: Bottom Line Up Front (BLUF)
-
Not necessarily due to the many variabilities involved. For the vast majority of TV's being used for OE2's, the charge current is not limited by the factory alternator size when charging up to 30 amp units like the Victron- Orion 12-12/30 amp unit size. Rather, I believe that the main limiting factor is the cable size driven voltage drop. For our size of rigs, the absolute minimum I would suggest using is 4 AWG. I also prefer running two parallel cables vs. using chassis grounding. For those using Litho's and/or having a Smart Shunt on the negative side, the only thing connected to the battery bank is the shunt. I believe OTT knows this and would be "Shocked" if they had not wired their Litho systems accordingly. Beyond this imperative we could have a discussion about wiring various other charging systems.... actually the topic of a thread or two. 😉 I'll leave the first part of this response to others to debate. However, the bolded part tosses a red flag in my pea brain. At a basic level, the PRIMARY purpose of the shunt is to MEASURE charge current and battery draw for the purpose of calculating the battery bank SOC. Whereas the solar controllers CONTROL the charge rate and doing so properly does impact battery life. Not the shunt. Granted using additional equipment may aggregate data for display and other purposes. But the basic equipment purposes remain the same.
-
NO. Not with one that has a tow rating under 10,000 pounds.
-
Tire pressure confusion - Legacy Elite 2 POLL
Geronimo John replied to John E Davies's topic in Towing an Oliver
From the charts I agree. But... If we are running 34 or 40 PSI with a tire minder, we would need to set it lower to alarm. I run our OE2 @ 50 PSI. This gives my tire minder an opportunity to alarm earlier, for the express purpose of giving me more time to find a safer place to get off the highway. Yes, this is a compromise of sorts, but far less than what John D. and I tussled OTT to reduce their required PSI of 80 a couple of years ago. -
Sadly this would seem to be a hail disaster like the AS's have become. GJ
-
The Riven does a bit better. But frankly I am surprised that Tesla offers a trailer hitch. None the less, not a suitable TV for our long distance towing with an Ollie. But we can only imagine what will be the case in the future as the battery densities get much better than todays. GJ
-
OK, you tossed down the gauntlet! Our F-150 3.5 EB shows range of 720 miles upon fill-up. Actually only get just under 700 miles though if I drive nicely. Regardless, I totally agree with your point that cross country travels are for sure out of the question for EV's. At least for some time from now. And maybe never for pulling an Ollie out west (especially). 🙂 GJ
-
Off-pavement recovery - equipment and best methods
Geronimo John replied to John E Davies's topic in Towing an Oliver
Now that would be an easy mod with real world benefits! Have on occasion wished it was there, but at the time it was not a priority. On my "B" list now! Thanks GJ -
Art and Diane: Congratulations! Such a wonderful Christmas gift, one you can enjoy forever. And they have a lifetime warranty too - you can bring them back at any time, as many times as you please. As a five time Grand Pa, I have learned that: "Grandkids are so much fun, we wish that we would have had them first!" GJ
-
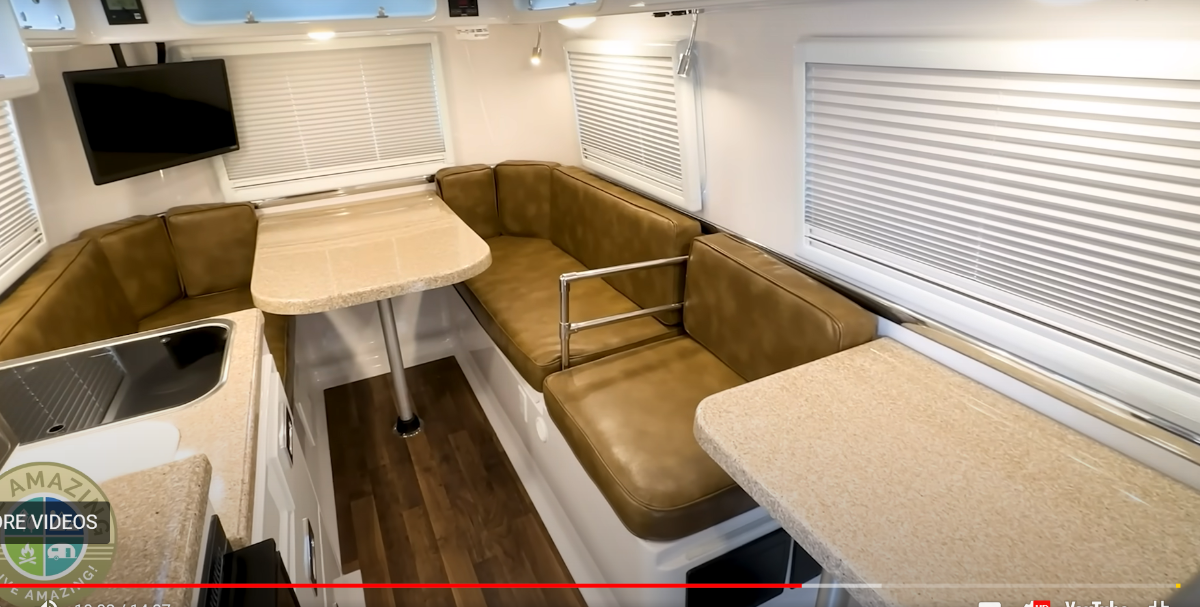
I had not seen this layout before. For us, I would miss the pantry. But certainly can see this layout for entertaining purposes would have advantages. GJ
-
i think he is wanting them for long term storage, not weekend campong. GJ
-
Can we see some pictures? Of the insert that is! 🙂 GJ
-
Newbies taking the plunge - Are we missing anything
Geronimo John replied to Dennis and Melissa's topic in General Discussion
I personally use the following safety procedures when ever I am jacking up Ollie for service of any nature: Keep Ollie fully connected to your tow vehicle. Nothing like having a 6,000 pound anchor attached. Flag the steering wheel as a reminder that you are connected and the TV can not be moved. Pocket any spare keys that your partner may have as further precaution. Use all three jacks to elevate the trailer only as high as necessary. Be aware of the geometry aspect of doing so, especially on the front jack. Use safety blocking at both sides of the trailer if your body is going to be under the trailer, especially if you have any tires removed. GJ: PS: No comment on using your jacks for service purposes..... This topic has been beaten to death several times already. If new, look it up. -
Newbies taking the plunge - Are we missing anything
Geronimo John replied to Dennis and Melissa's topic in General Discussion
Not trying to hijack the thread, but it is for sure related to the above. Three enhancements that I found to be VERY beneficial for our TV (F-150 crew cab short box FX4) are: Bilstein 5100 rear shocks E-Rated AT tires Rear air bags Despite spending the last five summers out west in the mountains, I did not really understand this until we did our 45 day Alaska trip. GJ -
JUST THE BEDS. But I recommend using just a 4" topper over the stock mattreses. It would bed less expensive and less troublesome for forragng under the beds and quite comfortable as well. GJ
-
Newbies taking the plunge - Are we missing anything
Geronimo John replied to Dennis and Melissa's topic in General Discussion
Ralph: I agree with your sage advice: "don't leave home without it". Not for sway control.... Ollie has near zero. But for porposing and general handling. Your quirks comment got me a LOL. For sure for sure. To a new Anderson user, my Anderson Golden Rules are: Keep the Andersrson pin, pin hole, plate and shaft clean and lubricated. When disconnecting, loosen the big nuts all the way until the square shaft threads ends are well inside the nuts. Raising the connected Ollie/TV up with your front jack will greatly improve your effort to connect the Anderson plate. Make sure to disconnect your Anderson only with the TV and Ollie in line.. ie not at an angle with each other. Failure will result in bad words when you try to reconnect later..... GJ -
FOR THE TWIN BEDS; We went with 6" memory foam. 4" would be a better choice should we ever need to replace them. GJ
-
Friends, this is a MFG defect of high order. From the below video, it appears that the axles come to OTT assembled. 11 seconds into this video: https://www.youtube.com/watch?v=Ngr0igwf20I The transverse running brake line is clearly routed to the other side in these replacement axles. So, don't waste your time trying to get Dexter to do anything. Been down that road with the EZ Flex Center Bolt Migration Issue. Instead, I recommend written reports to the NTSB and also the issue on every RV trailer forum you know of. GJ
-
Additional routine maintenance
Geronimo John replied to Ronbrink's topic in Mechanical & Technical Tips
thanks Ron. Corrected typo above in RED and GREEN. 🙂 GJ -
Additional routine maintenance
Geronimo John replied to Ronbrink's topic in Mechanical & Technical Tips
What root causes can you think of for this problem? Change in the bedding material to one that is more dense. Softer material would crush on both sides of the frame thereby form a channel that would keep it in place. More dense could slide out. Your turn! GJ -
Additional routine maintenance
Geronimo John replied to Ronbrink's topic in Mechanical & Technical Tips
Interesting out of the very many OE2's, the first two owners to mention this problem are both 2022 builds. Good move Ron and SNYSDUP!! I am guessing that before 2022 2020 there was somewhere around say 500 that came off the line. pre-Covid. Either we have a LOT of owners that don't crawl laps under their trailers, or something changed with the design, or installation, or both. Worth a question for sure. And I'll be inspecting mine this summer as well. GJ PS: Likely there will be a lot more of these. Question is how widespread through the fleet is the situation. Service Tickets all on this one. PSS: We need a catchy name for this syndrome. Covid Slip maybe?