Geronimo John
-
Posts
2,330 -
Joined
-
Last visited
-
Days Won
66
Everything posted by Geronimo John
-

Size of Generator needed to run Oliver ii AC
Geronimo John replied to Imelda's topic in Mechanical & Technical Tips
Jairon: He is using a telescoping ladder with pool noodles attached to protect Ollie. Home Depot and Lowes sell several models. As decked out, I'm about 245 pounds so I really liked the stronger version. It is a TeleSteps Climbing Ladder, Type 1, Model 1600E, OSHA Compliant. When I get up on top of Ollie, I extend it out the full length and it gives me a high hand hold to then slide off the side to the roof. This model collapses down to about 3' and fits very nicely in the front side (Behind the hanging cloths) of the coat closet as you enter Ollie. I cover it in a blanket to protect the fiberglass. Telesteps Climbing Ladder _Type 1_ Model 1600E _OSHA Compliant.docx -
Size of Generator needed to run Oliver ii AC
Geronimo John replied to Imelda's topic in Mechanical & Technical Tips
Sherry: OMG, I am falling out of my chair laughing at my silly mistake. My apologies I totally miss-read your suggestion. I thought you were spoofing Imelda and you were not. I know some computer artificial intelligence code writers (generators). One works at NSA. So when you suggested getting two ai generators, my mind thought you were saying Imelda should get two Artificial Intelligence code generators and connecting them up with parallel cables to provide the trailer power. It was so funny that I had to pull your chain. I have deleted my OOPs. Forgive me. 🙂 -
Size of Generator needed to run Oliver ii AC
Geronimo John replied to Imelda's topic in Mechanical & Technical Tips
SeaDawg; good suggestion! -
Size of Generator needed to run Oliver ii AC
Geronimo John replied to Imelda's topic in Mechanical & Technical Tips
Search "Generator" and you'll find about 1500 opinions. Personally I use the Honda EU2200i. Many use the Honda EU200i, some Yamaha's, and recently the Harbor Freight inverter line (Predator's) is gaining acceptance with a bit more power (3,00 to 3,500 watts). Honda have as many believe the best reputation, but they are also expensive. Lots on options and opinions already here on the site. -
TPMS -Tireminder App version
Geronimo John replied to TexasGuy's topic in Mechanical & Technical Tips
JD: On your recommendation back i 2018, I purchased the same TPMS. It works really well. One thing that I previously had no idea was occurring is that tire pressure changes A LOT from cold mornings to hot desert crossings at speed. Also, the tires in the shade side can be ten PSI or more lower than those basking in the sun. This info, and bouncing dishes and flying dinette cushions encouraged me to reduce tire pressure from 60 to 50 PSI cold pressure. Don't get quite the MPG, but do believe that it is a better highway tire pressure for wear and impact damage perspectives.. A nice tool to have is a battery powered air compressor. I especially like the DeWalt 20V one. -
My Ollie sits for about 8 months in a dark barn with the batteries hooked up to a 1.5 amp battery maintainer. As I don't have a Nature's Head, and I always service the batteries both at the end of the season, and again before my first trip........... I just disconnect the negative battery cable. I'm down to zero phantom electrical loads guaranteed.
-
This is my $5 solution. Not real high security, but it would sure slow down the bad guys. The three pack costs about $15 at Home Depot. Nice part is that I use the other two on my generator. If I need the third one, it is in "storage" at the propane tanks. 🙂 GJ

-
Rising fuel prices and your next trip
Geronimo John replied to BackofBeyond's topic in General Discussion
With my 2019 F-150 3.5 Ecoboost, SPEED is the major factor in my fuel consumption and costs. So long as on flat land intestate I keep it at 67 MPH (Low turbo boost zone), I get 14 MPG with Ollie in tow, 24 MPG solo. But kick it up to turbo boost zone, and the MPG drops quickly. With the huge power potential of twin turbos feeding basically a NASCAR engine, it will zoom up any interstate grade at any speed I would want to call legal. BUT, the mpg is severely impacted. -
@Topgun2 Bill: I see you have the 2017 F-150 set-up very simular to my 2019 F-150 lariat FX4. Did you have to modify the Rock Tamers mounting collar? Any issues with the back-up camera? Thanks, GJ
-
Attached is a summary that I keep in my trailer. It has much of what is discussed above and may be a handy reference for the future. Timken Bearings and National Seals.docx As is apparent, much of my Oliver bearings and seal info is from John Davies. A great source of information and advice. Thank you John D! Geronimo John
-
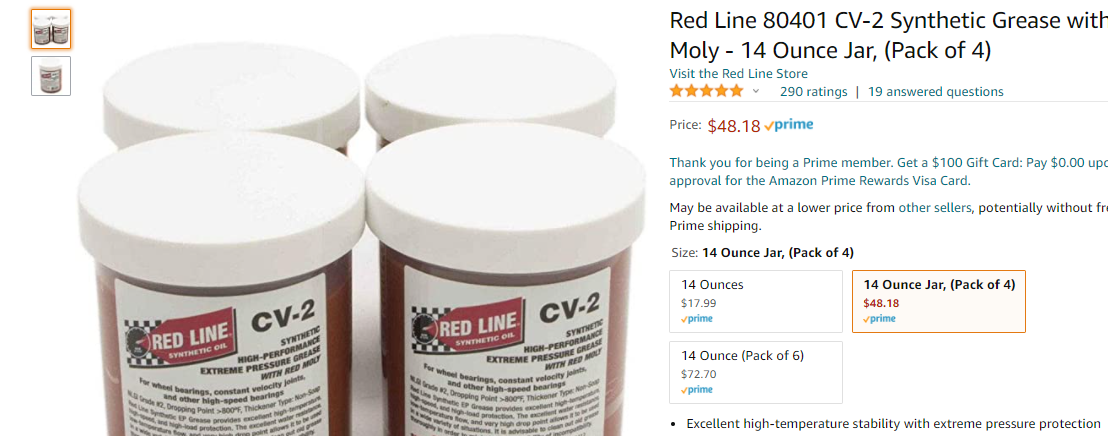
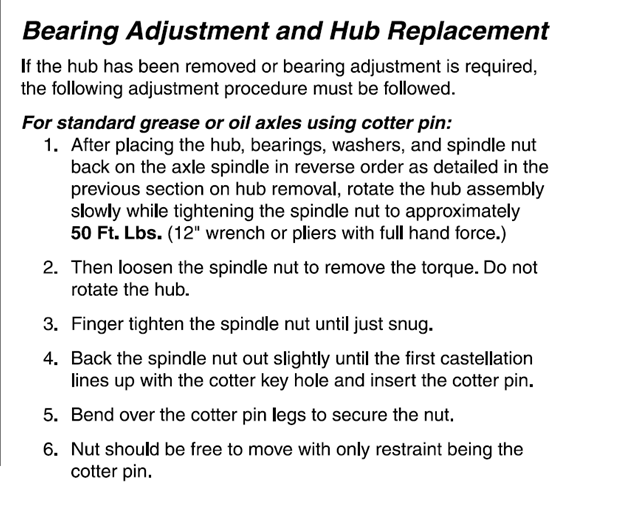
For the less bearing experienced, the "Cup" is the running surface of the bearing housing. Some refer to this replacement surface as the "Bearing Race". They are the same part, and should always be replaced when replacing the bearings. The reason for buying eight seals is that you need to replace the seals at each surface. The Timken bearings will last many many years with good grease and service. The seals generally get damaged in their removal process. They are cheap and saving a few $$ is nothing compared to a seal failure allowing grease into the brakes! I disassemble, clean with brake cleaner, dry and re-grease at the start of each season. But then I am also covering at least 8,000 miles a season. The cheap Dexter bearings IMHO should be trashed at your first or second service depending on your use. For the bearings and seal face, this is the synthetic grease that John Davies recommended, and many of us are using. I also highly recommend it: Red Line 80401 CV-2 Synthetic Grease with Moly (14 Oz Jars) . It is available via Amazon. Some owners use a "bearing grease press" to fill the bearings with grease before installation. I have tried some, and found that I waste a lot of grease with them. So, like many older salts, we just use the palm of our hand and a dollop of grease, kneading the bearing into the grease from both sides. This works very well, saves grease, and gives you the satisfaction of KNOWING that your new bearings are well lubricated. From Dexter, here is the Bearing Adjustment and Hub Replacement process: Finally, having a pile of rags and a trash bag handy is really helpful. Good luck and safe travels, Geronimo John
-
Jairon: I have been using Summit Racing for years, and also using Motion Ind. for bearings. I had not thought of Summit for the Timken Bearings. THANK YOU! GJ
-
HOW TO: Stone Stomper Gravel Guard.
Geronimo John replied to John E Davies's topic in Towing an Oliver
PERFECT. Thank you! -
HOW TO: Stone Stomper Gravel Guard.
Geronimo John replied to John E Davies's topic in Towing an Oliver
@Frank 😄 I note you Rock Tamers are on a Ford Super Duty and are mounted such that the arms are up (Increasing clearance of the flaps from the ground. Since a Super Duty sits "Taller in the Saddle" than my 2019 F-150, I am concerned that the Rock Tamers would be dragging the ground. Your thoughts? Thanks GJ -
Dexter axle loose bolt at the equalizer
Geronimo John replied to BackofBeyond's topic in Mechanical & Technical Tips
I reversed the bolt that had no splines left on the mounting tab. As bhncb states it is a lot easier to inspect. However if your mounting tabs have the factory splines, then I recommend you not swap the bolt direction. -
@ JD: We think alike. I carry the Ruger SP-101 for hiking, but modified it to have larger grips. For larger targets is the Winchester Defender (Pump) 12 GA Magnum. If needed, I have an Utah permit as well. That said, this is a bit off topic.....
-
I do as well. Having the ability of turning on the rear view camera during the day is handy as well. It has answered my question of "What is that idiot doing behind me". Just turning on the trailer lights give him/her a warning as well. More than once it was a 47 HP VW Bug drafting behind Ollie.
-
AGM Battery Mount Problem
Geronimo John replied to Mike and Carol's topic in Mechanical & Technical Tips
-
AGM Battery Mount Problem
Geronimo John replied to Mike and Carol's topic in Mechanical & Technical Tips
Ride and Fly: As our Ollie is often on mountain fire roads, I have had my concerns about the latch as well. Good idea. Do you bolt both sides, or just one? OWNERS: I am going to use "Blind Flange Nuts" (BFN) on mine so that I am not fishing for the washers and nuts behind the frame. For those not familiar with BFN's, below is how they work: A. With the battery slide tray locked with the Oliver slide lock, dill a bolt diameter size hole through the battery slide tray and the stationary frame of the unit. This will assure that you have them properly aligned so that the Oliver slide lock and your supplemental bolt lock work together for bolt insertion and travel. B. Remove the battery tray and drill a slightly oversize hole into the frame to accommodate the BFN. Your hole should ensure that the splines of the BFN "dig in" to the frame material. This gives a tight fit and aids crushing. C. Insert the BFN into the larger hole. I D. There are two ways to "crush" the BFN onto the stationary frame: Use a BFN Crush Tool. I use this when at home. Make your own BFN Crush Tool. I do this when "on the road" as I don't need to carry around the Crush Tool. Start by getting a longer grade 8 bolt (with all threads) and grade 8 nut that have the same threads as the BFN. You'll also need some washers and lubricant. Finally you'll need wrenches. Put the nut on the bolt and then your lubricated washers. Insert the bolt/nut/washers though the frame and through the BFN. With one wrench, hold the bolt steady. Then tighten the nut against the washers. This will pull the BFN bottom (BNF threaded section) towards the frame. In doing so, the center section of the BFN will be crushed forming a second "flange" on the back side of the frame that keeps it in place. Remove the bolt from the BFN. E. Reinstall the tray, lock it, and insert a bolt and lock washer to fix the tray in place. On final thought: It would be handy if you procure BFN's and bolts that use the same wrench size as the terminal bolts. Would save having more tools laying around hot terminals than absolutely necessary. ZAP! FLASH1 OUCH! Geronimo John -
Anderson Jack Blocks (The red buckets)
Geronimo John replied to Naegele's topic in Mechanical & Technical Tips
Sherry: I am using solid CONCRETE blocks. But the idea you are conveying is correct. Cinder blocks have no place under anything important or heavy regardless of how they are stacked. Good input.. I especially like your idea of burning the ground contact ones! Some innate pleasure in seeing termites bite the dust. 🙂 Thanks -
Anderson Jack Blocks (The red buckets)
Geronimo John replied to Naegele's topic in Mechanical & Technical Tips
For over 50 years I use cut sections of treated lumber (Recommend washing them with soap before handling). Cheap and replacement over time is easy. I started out using 2X12 treated lumber on the base and then a stack of 2X6's above. what I soon learned is that when used in soft ground, the trailer weight through the 2x6 stack would break the larger base. Maybe I should have used better wood??? While on the road, I did not have an easy way to replace the broken base 2 X 12's. So I was forced to use two 2X6's as a base. i placed them side to side, and then stacked 2X6's turned 90 degrees to the base ones. Have not had any issues this way. The icing on the cake is that NOW, all of the dunnage can stack side by side in my front tub milk crate. However, this past year I noted that during our annual 8 month storage, termites were infesting the ground contact 2X6 boards. So much for modern "treated" lumber..... My fix was to purchase three concrete blocks at Home Depot. They are about $2 each, Store SKU #679311, 7" X 7" X 4". i have placed them exactly where I want the trailer to sit each year. Once the jacks are over the blocks, I still use a single 2X6 as a slip pad just in case the trailer gets moved while on the jacks. I leave the foundation blocks in place while using our Ollie, and have a great target to back the trailer into the dark barn. (For new Owners,: You need to almost always provide slip pads every time you use your electric jacks! Many jacks have been destroyed by forgetting to do so, and then forgetting to raise the jacks. The more elevation used by your slip pads, the less jack you have extended for leveling of the trailer. So, WHEN you do forget, (as 95% of all experienced owners have done at least once I would wager) the less probability of damage to your jacks. Why did I say "almost"? Some places we are forced to use have elevation changes that make their use not advisable. When this happens, I leave my Ollie hitched and only partially level. I then put a sign on my seat that says "JACKS UP?" -
Black tank flush port question
Geronimo John replied to JohnZ3's topic in Mechanical & Technical Tips
The only purposes for the black flush (BF) valve that I can think of are: If a jack ass wanted to, he could hook up a hose to your BF hose bibb and flood your trailer with poop while you are away. If the black check valve in the BF line were to fail, black water could end up on your hands when you remove the BF hose bibb cove. I would wager that a significant number of the owners leave it open anyway..... On the positive side, not having that valve makes flushing your black tank faster by not having to go inside to open/close it. Either way, the odds are so low that it would appear that the cost of the BF Valve was not worth the extra. -
Customer design input-Larger Ollie
Geronimo John replied to BackofBeyond's topic in General Discussion
I average three months a year in our OE2. Sure lots of the above thoughts and ideas are great to dream about. But for the boondocking and high mileage that we cover, our OE2 is just about perfect. My only strong issue with the design is that the A/C noise is horrible. This issue is not a new one for Oliver as it comes up again and again. My hope is that Oliver is looking at a retrofit A/C units (Heat not required) that is substantually quieter than our existing units. The goal would be for them to offer it as an improvement for the next model year, and as an upgrade to existing owners when our "Hammer Mill" A/C units wear out. -
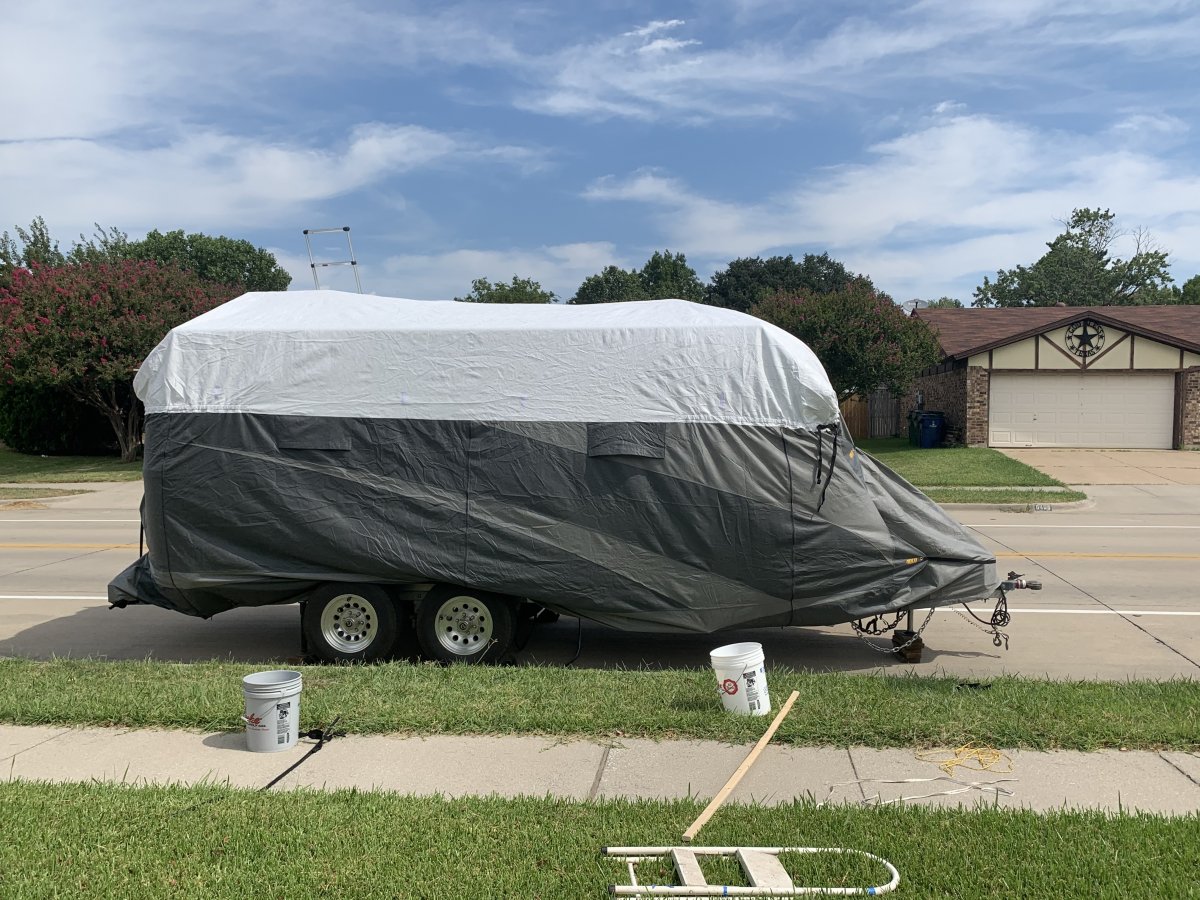
I store my Oliver in a 95% dark barn in Oklahoma. I wanted a cover that would provide insect and bird protection. I went with the ADCO cover, but the one received was larger than I needed. Circumstances required that I use it anyway as my summer flight back to Hawaii was just a day away. When my too large cover had a warranty issue, Ichose to go with the next smaller size stock ADCO Cover. They sent me a replacement at no cost. The one sent and shown is their 3840 stock number. I did a quick install of the cover just to test fit it. I was not trying to make a perfect install, just wanted to make sure it would fit. Hence the imperfect strapping alignments. For an off the shelf cover, it is still a bit larger than the Elite II requires, but gets the job done much better than it's bigger brother did. I would be interested if any Oliver Elite owner has tried their next smaller size. Likely to be too small I think. Yes I would order the 34840 ADCO again. If I did not have a barn, I would go with a metal carport with this ADCO cover. NOTE: I install my cover and set up the trailer so that the ground points of contact are the tires and three jacks. I do not need to use the ADCO provided wheel covers as it is a 95% dark barn. The jacks are all on 6" concrete blocks. This combination makes it harder for ground pests to get into a position to do any damage. So far, after two winters, no issues.
-
Dexter axle loose bolt at the equalizer
Geronimo John replied to BackofBeyond's topic in Mechanical & Technical Tips
So far, after 30 days, Dexter appears to be stonewalling me on this topic. Despite repeated calls, they have not even acknowledged the issue, or graced me with any sort of reply I have a list of four Oliver Owners that have had this problem. As mine is a two time failure, so we have six incidents. Once I get back to Hawaii, I will have the time and resources to work this "more vigorously". In the mean time, if other owners have had this issue, please PM me soonest. Thank you GJ