Galway Girl
-
Posts
785 -
Joined
-
Last visited
-
Days Won
25
Everything posted by Galway Girl
-
Saw this a while back and they hadn’t started shipping yet. The earlier video showed very rough cutouts in the cabinets ( no trim out) were as it was first prototype. See they went with Battleborn.

-
-
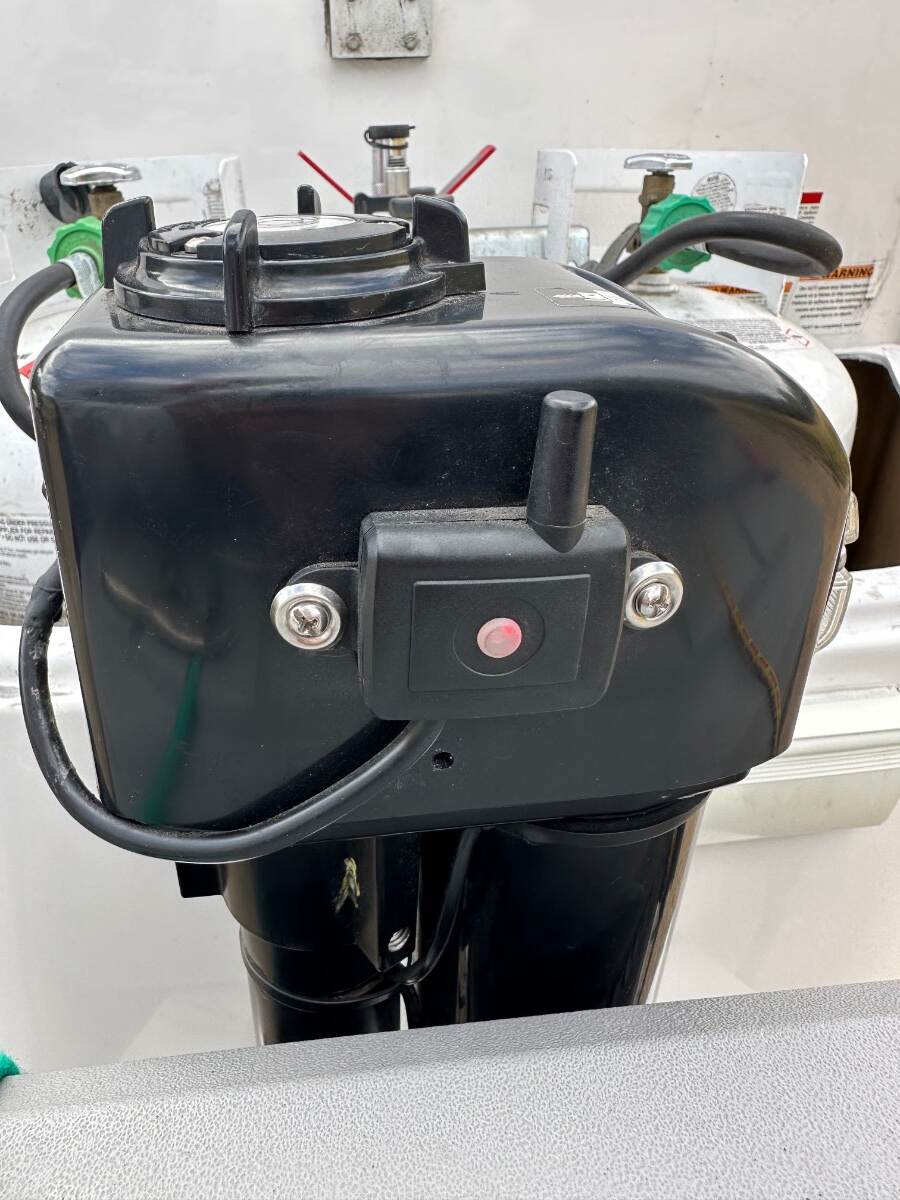
Check your 7 pin. If it gets water in it the on board 12v battery will trigger. see this posting https://4-ever-hitched.com/blog-articles/f/why-were-my-tail-lights-on-all-night tail lights on ??
-
Running gear looks the same , just a wheel & tire change and some black accents. At least they are trying something different. If they changed up the suspension for better off road that would make a difference.
-
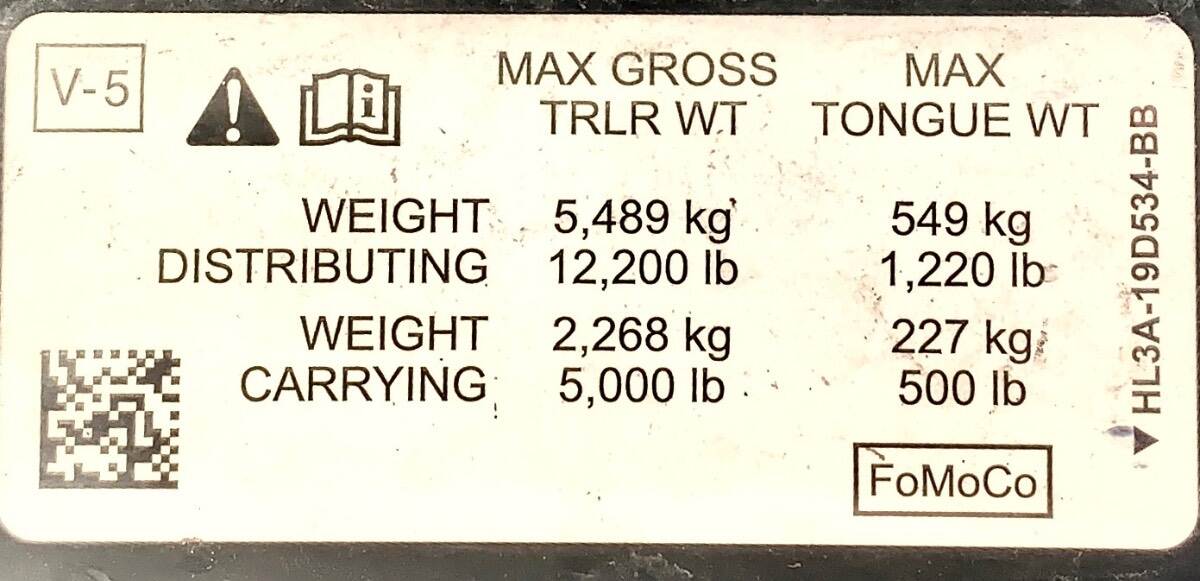
Usually the 1/2 Ton Trucks are limited by the 'dead weight" or weight carrying capability. The receiver unit on the truck you have should have a sticker like this one (from a 2018 F150) either on the actual receiver hitch or on the door frame. Notice that on this unit the max Tongue weight capacity is 500LB. (Weight carrying the case where you don't have a WDH and is essentially the dead weight from the trailer tongue down on the ball.) An Elite II tongue wt when loaded is easily above this 500lbs, and requires a weight distribution hitch to be safe and legal. In this F150 case, once a weight distribution hitch is applied, the F150 can then handle up to 1220 Lbs of direct tongue weight. The towing guides for most vehicles state the method for determining how much adjustment is needed from the WDH. Most have you: 1) Measure the unloaded truck's front wheel well height through the center of the front wheel. 2) Measure the wheel well height after loading the unit and attaching the trailer. In most cases the amount of weight distribution needed is set to bring the front end back down by at least 1/2 of the total difference in those two measured heights. Example: Unloaded measures 37" Loaded measures 41" (4' total rise). Apply enough WDH force to lower that front measurement by least 2" ....or 39" when loaded. Each manufacturers towing guide states specifics by vehicle make and model. CS
-

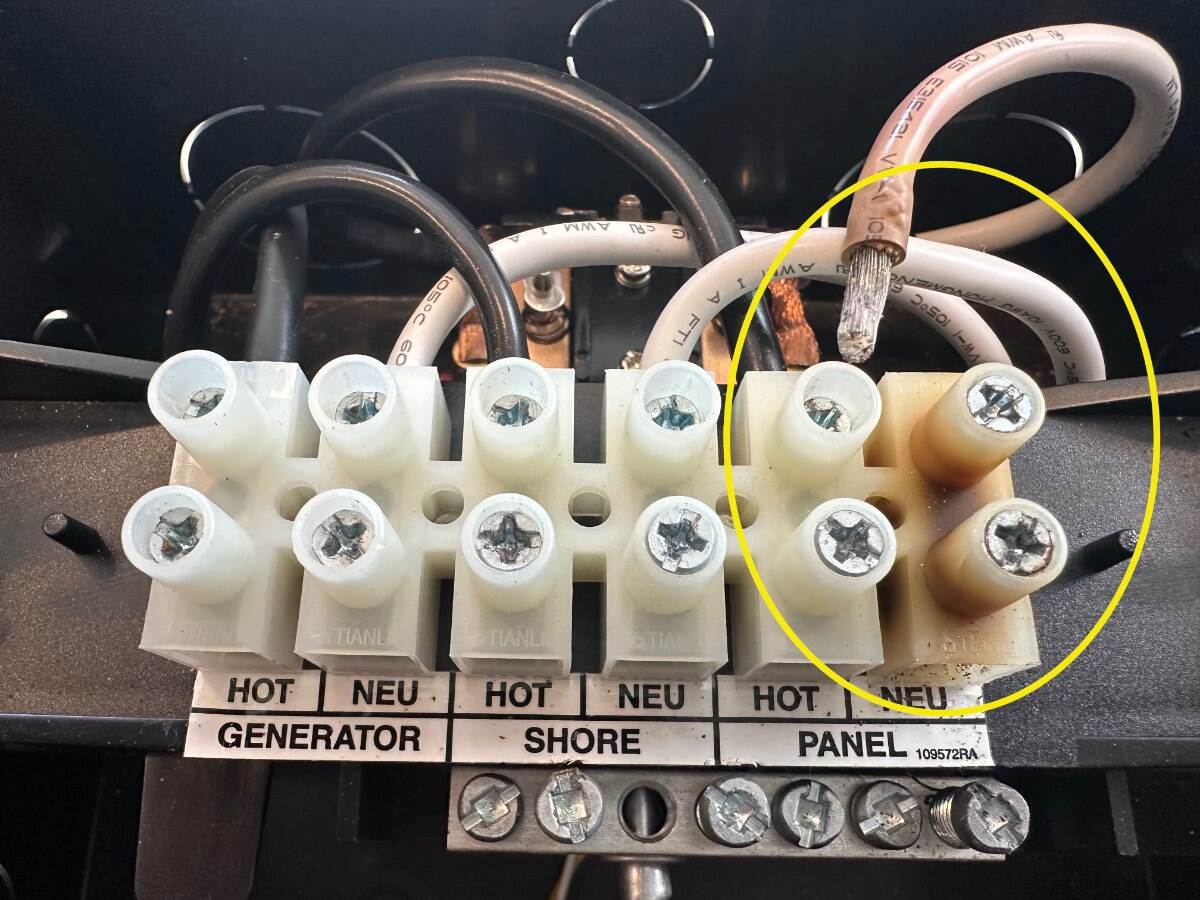
PD-5100 Automatic Transfer Relay - Loose connectors
Galway Girl replied to Wayfinder's topic in Mechanical & Technical Tips
My original was subbed out by PD as a warranty claim. Now the second one has the issue with the Neutral leads both in the box and from the street side. I'll be buying a new version of this box PD5110010Q.
-
Made in USA leaf springs
Galway Girl replied to Mountainman198's topic in Mechanical & Technical Tips
Sorry I checked my quote from Alcan and part # not there either. We ended up sticking with our original 3.5k’s as we had just put in new brakes and bearings. I suggest you ask Alcan when you order your springs as they’ll have that p/n for sure and it will need to match for the spring order. They also know the axles lead time by heart! Craig -
Confirming Sway Control with HD trucks in 2026
Galway Girl replied to Wayfinder's topic in Towing an Oliver
FYI - This years Ford Towing guide has a ton of useful general info as well. 2026-Ford-RV-&-Trailer-Towing-Guide_r7_fnl-Mar19.pdf -
Confirming Sway Control with HD trucks in 2026
Galway Girl replied to Wayfinder's topic in Towing an Oliver
When we first bought our EII we had a F150 with a hitch rating that required load levelers and sway control for any tongue wt above 500lbs. So we bought the Anderson and used it for 2 years...but then we upgraded trucks. We now have an F350 Diesel 1 Ton Short Bed with a 3" receiver which has a dead weight rating of 2120lbs. We use a B&W Tow N Stow hitch and that's it. We've not had any sway or issues and it's dead simple to adjust if needed and hookup/unhook much easier than using either the Anderson Antisway (with Chains) or the types that have WDH Bars and Sway Bars. We don't need sway control as our truck also has braking sway control built in that states in the user manual that manual sway controls shouldn't be used. CS
-
Made in USA leaf springs
Galway Girl replied to Mountainman198's topic in Mechanical & Technical Tips
We have 3.5K Axles and used 4 leaf Alcan, had them do the install, they gave me the 5th leaf to carry with me if we wanted to install it later. After 5k miles with 4 leaves we're just fine. That said if you have the 5K axles on your trailer, then most folks use the 5 leaf version to match the axle rating. -
Yes we made advanced reservations but we found many campgrounds less than 50% occupied by mid September. Probably the best to book in advance at the “National Parks “ as they are the busiest. We were in Canada Sept 5-Oct 1 Weather was very mild , in 55-65F range most days . Nights in 40’s. There were 3 rainy days, but some campgrounds are on bluffs so pretty windy.
-
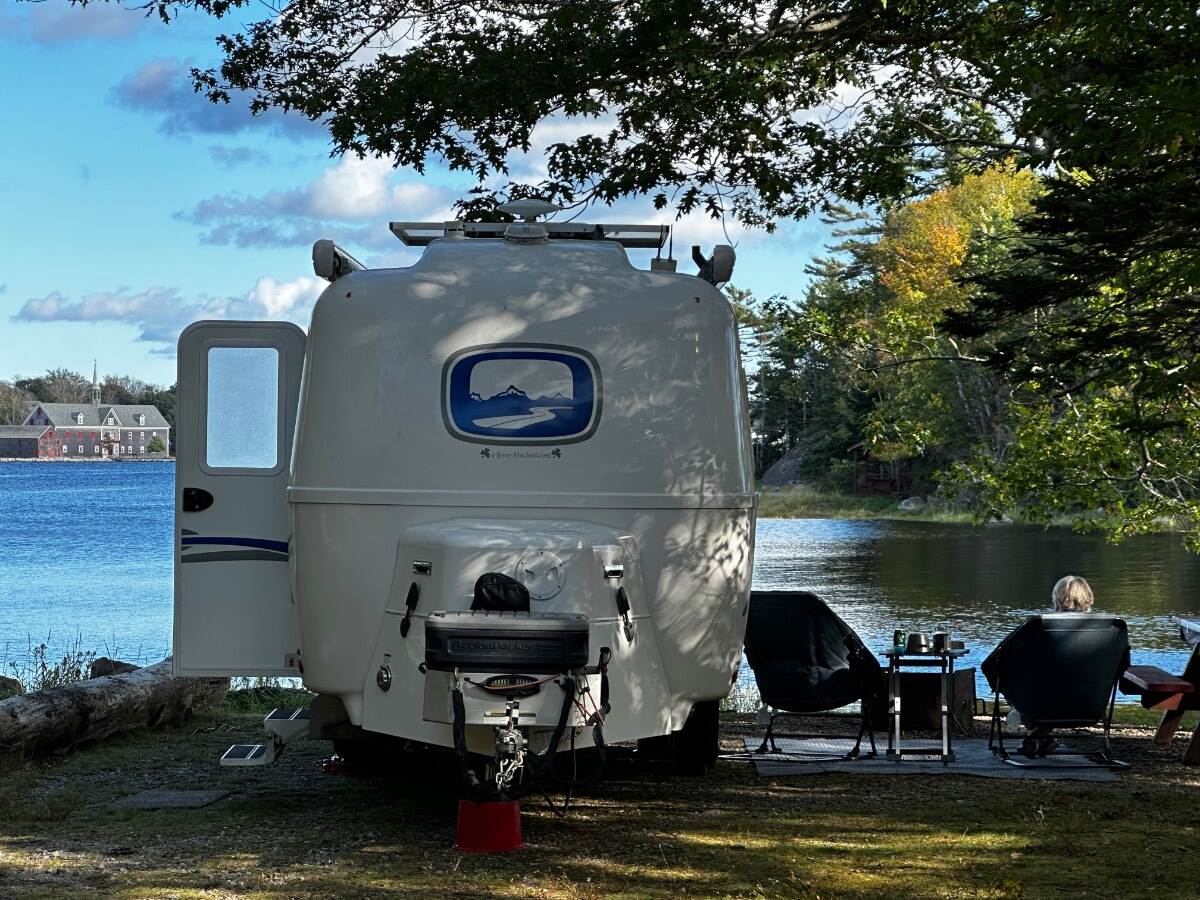
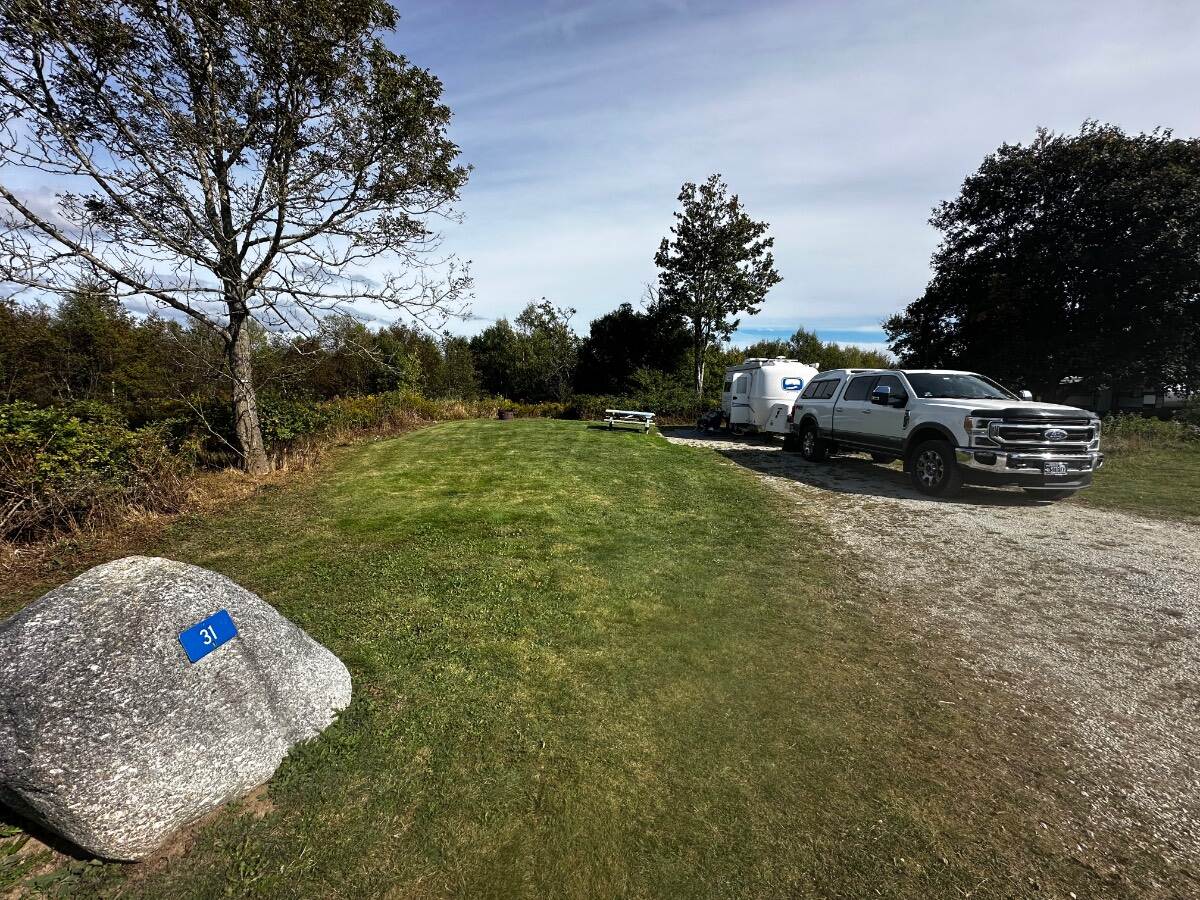
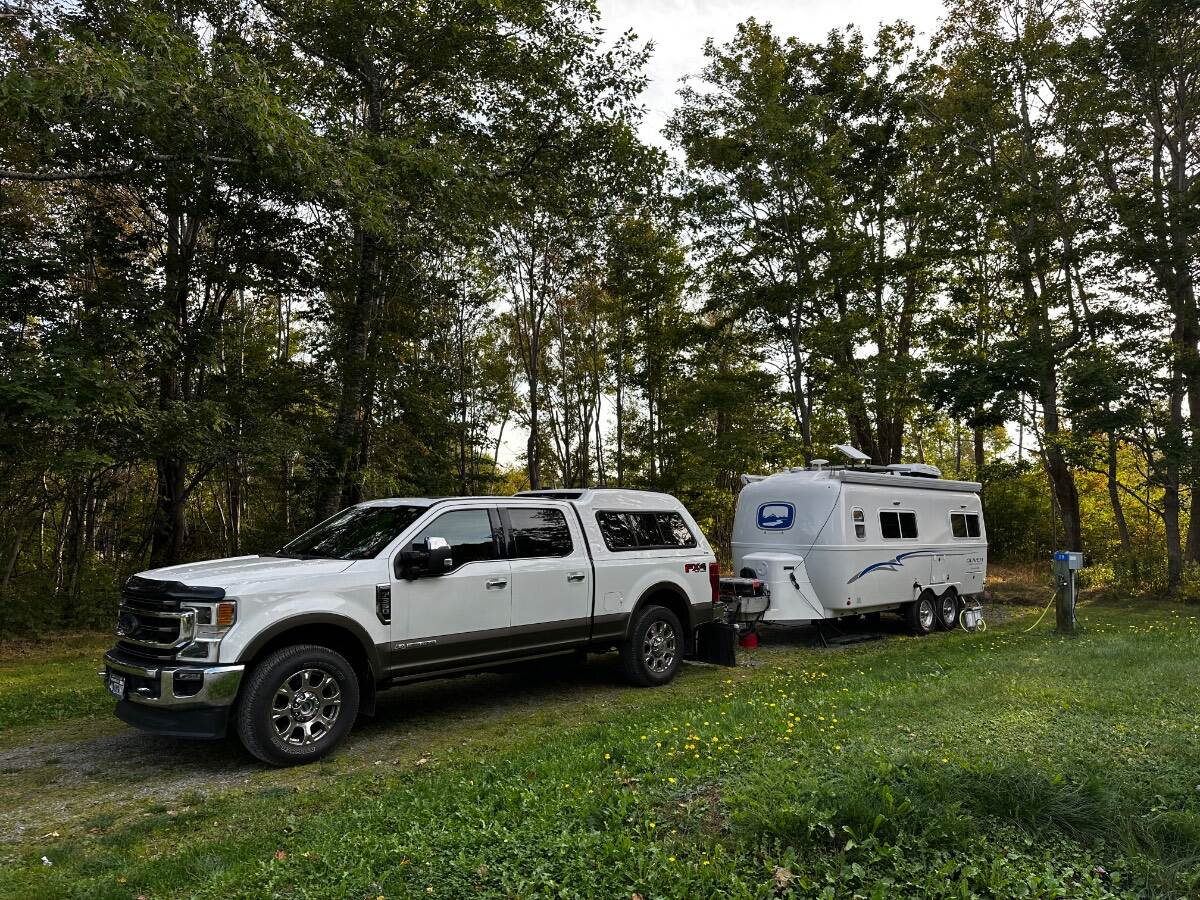
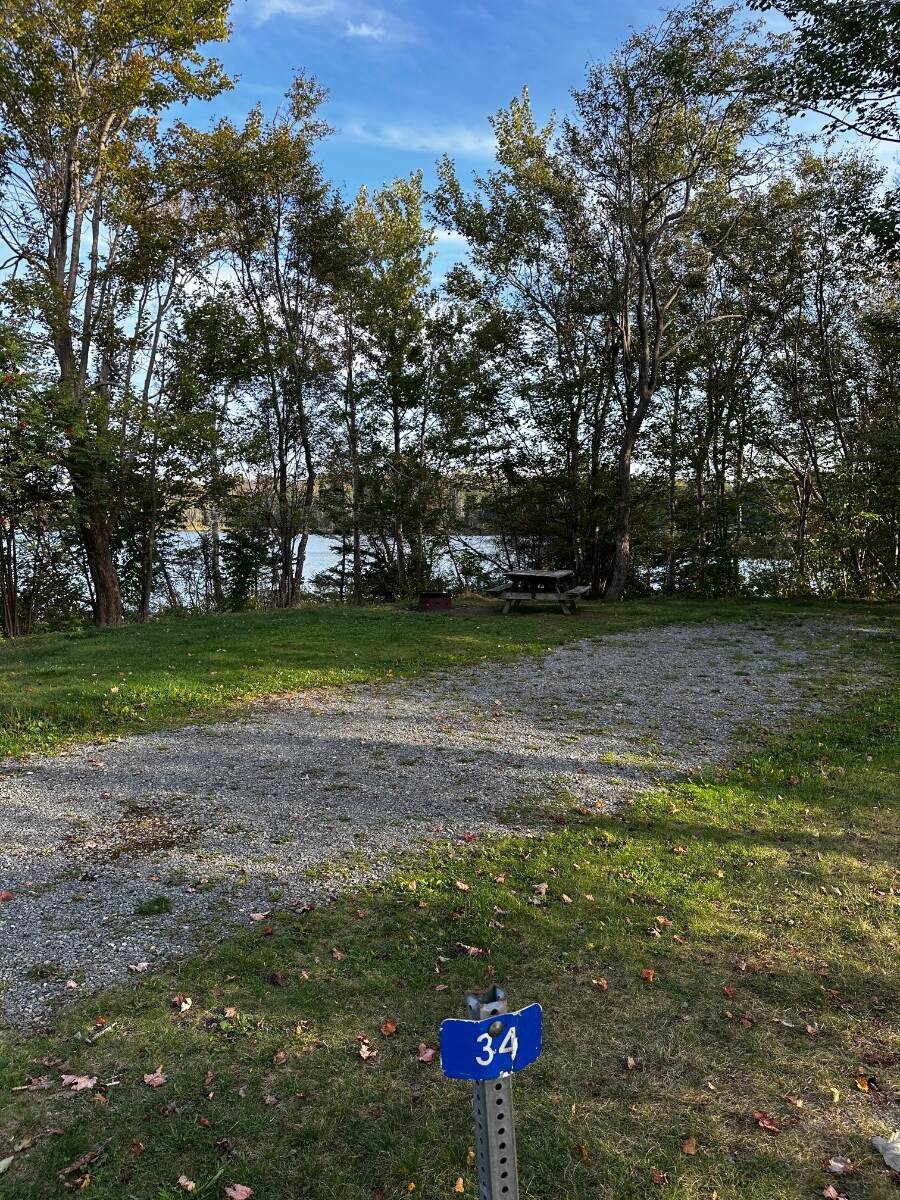
We did a full month long trip in Sept thru early October to the area shown 2 years ago and it was barely long enough. Each of the items with a TENT on the map are highlighted in our trip..."the big loop" and and be seen in pictures with comments here: Scroll down to the pix section on Nova Scotia Main Island. https://4-ever-hitched.com/the-big-loop-2024 Graves Island Provincial Park - Site 31 Shown - is Just South of Halifax on the main island. Puts you perfectly in a spot for the UNESCO site of Lunenburg, Halifax and Peggys Cove as day trips. I would stay there at least 4-5 days if I were doing over. To get into the park you cross a causeway into the park which is on an island. Going south don't miss staying at "The Islands PP" Further SE = Site 54 - Islands Provincial Park - Puts you on the edge of the water....this is on the SE Corner of the main Island. North on the main Island before you cross onto Breton Island you may want to also see the Fortress of Louisburg...which is on the north east side of the island. A good stop point is Mira River Provincial Park as you can easily drive down to Fortress Louisburg from Mira River...and then north after that stop. SIte 28 - Electric & Water at Mira River PP Above....but the site 34 below would fit and is right on the bay, but no Electric or Water... I've labeled all the campsite photos for each park in our blog, but If you have any specific questions we could get on a call. Craig & Rose
-
Maximizing amp hours for boondocking
Galway Girl replied to Olive2Roam's topic in General Discussion
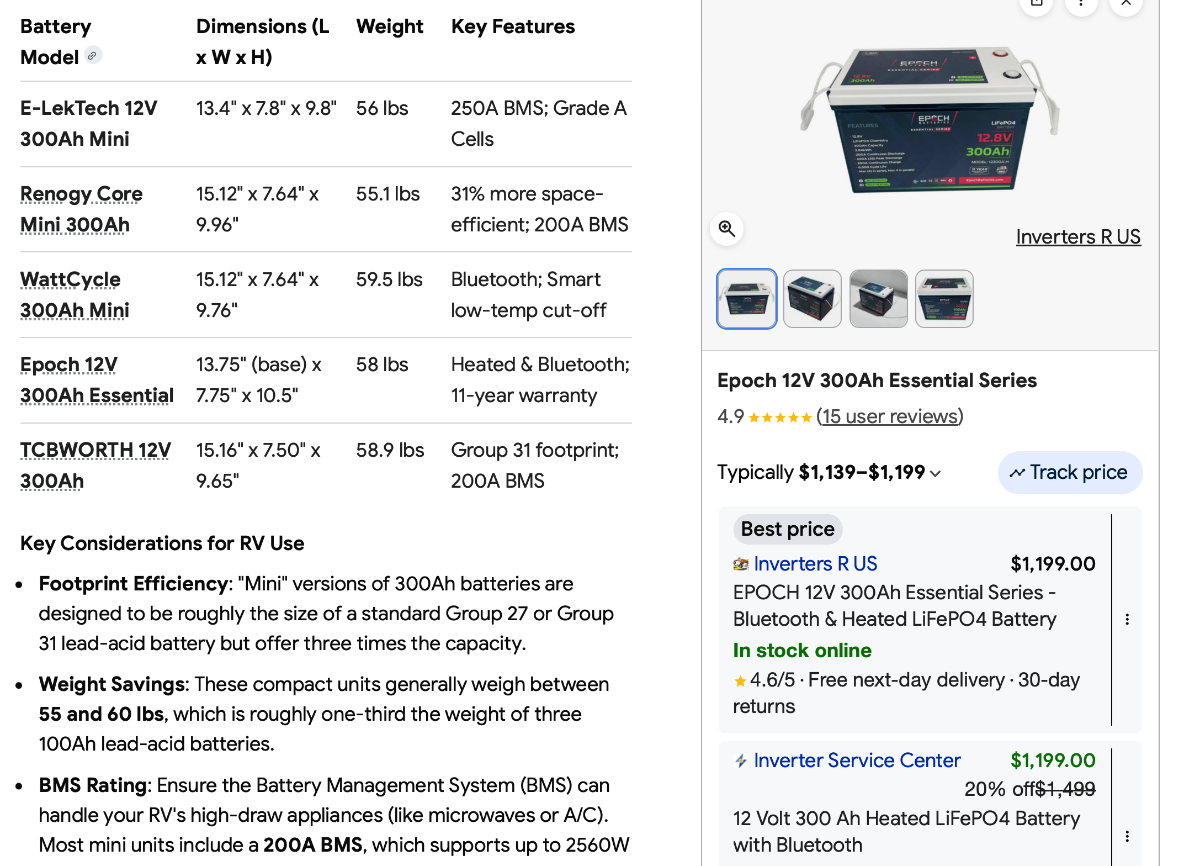
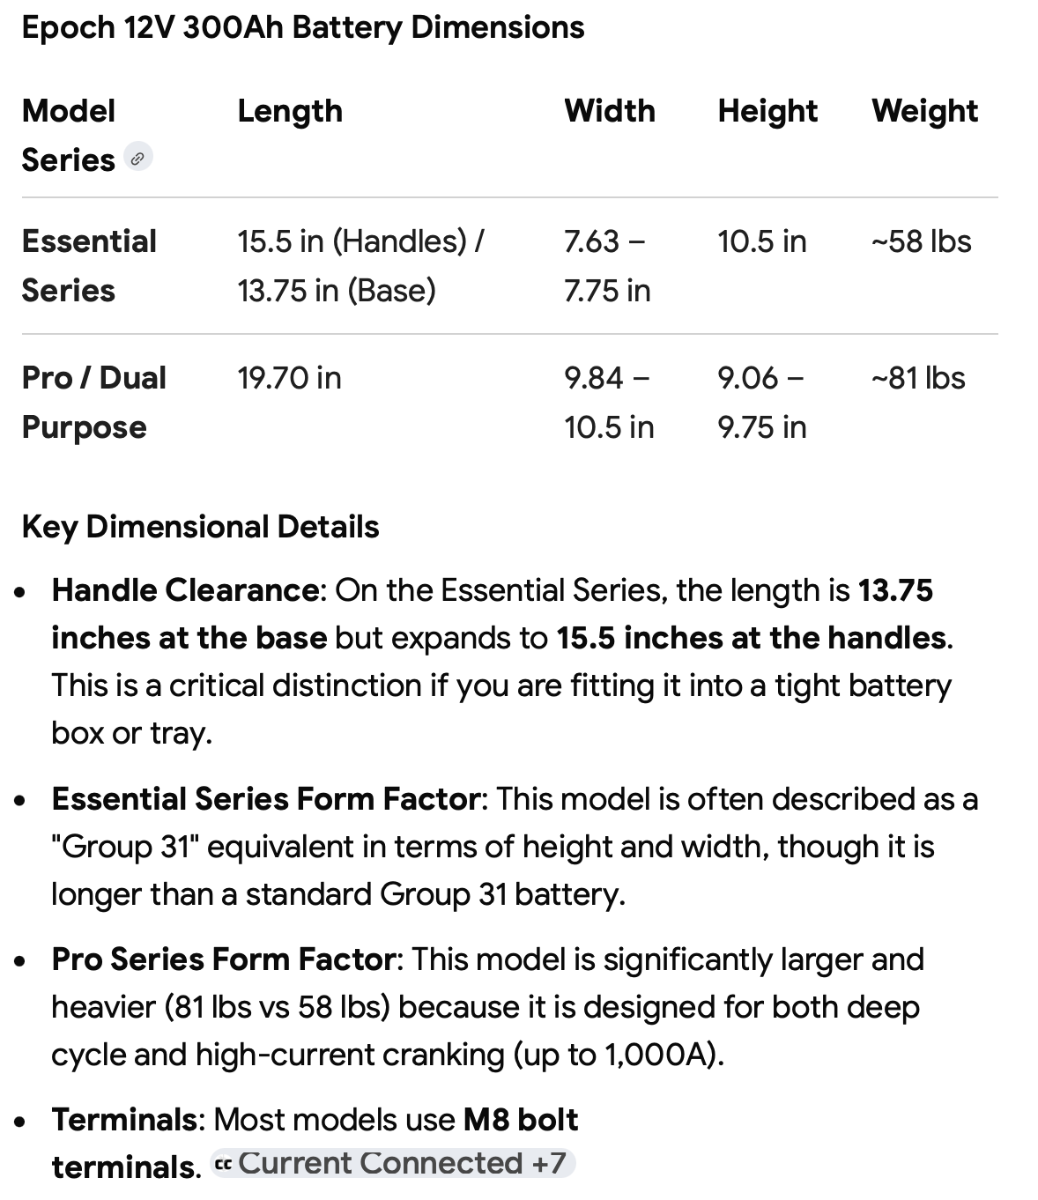
Not sure of the full dimensions of your space in LE1 but you may want to check out some of the 300AH mini batteries like this one from Renogy. Renogy 300AH Mini Core They claim a much smaller footprint ...but be aware,,,this model doesn't have self heating for cold temp charging, but they do have low and high temp cutoffs for protection. List prices are currently $879 direct. Here are Epoch Dimensions Just an idea of others:
-
Put on 50k miles since repair. No changes or movement. Craig hull 505 (Galway Girl)
-
Which connection anchors did you use..for the side of the trailer mount? CS
-
Saw this post from another user...quite detailed. I mounted the sending unit for our system (not Tire Minder brand) on the outside of our front jack power head. You can easily pull 12V from the inside of the power head and decide if you want/need an on/off switch for the circuit. * I just leave mine on all the time...as the draw is minimal.*
-
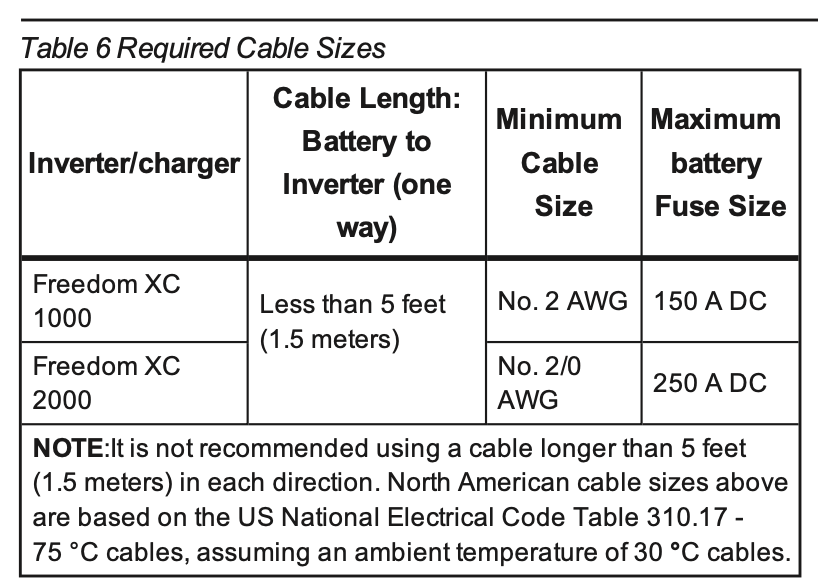
For those with the Xantrex Freedom XC2000 inverter here's that same table. These XC2000 was the unit used put through 2024 with the lower tier battery configurations. Also these units don't allow running the AC off DC. (So these are configurations other than the "Platinum" or dual 320AH Lithionics)
-
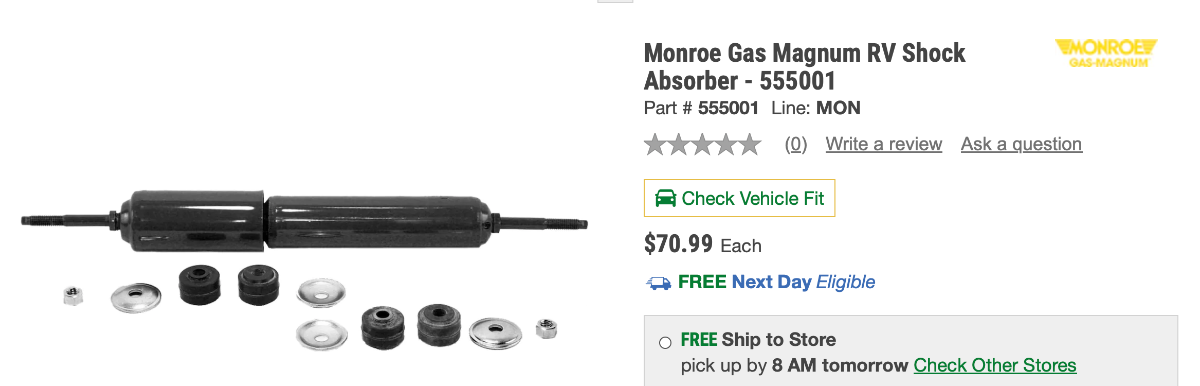
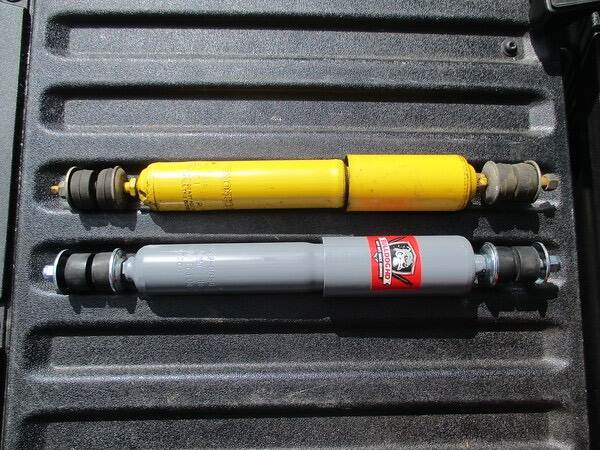
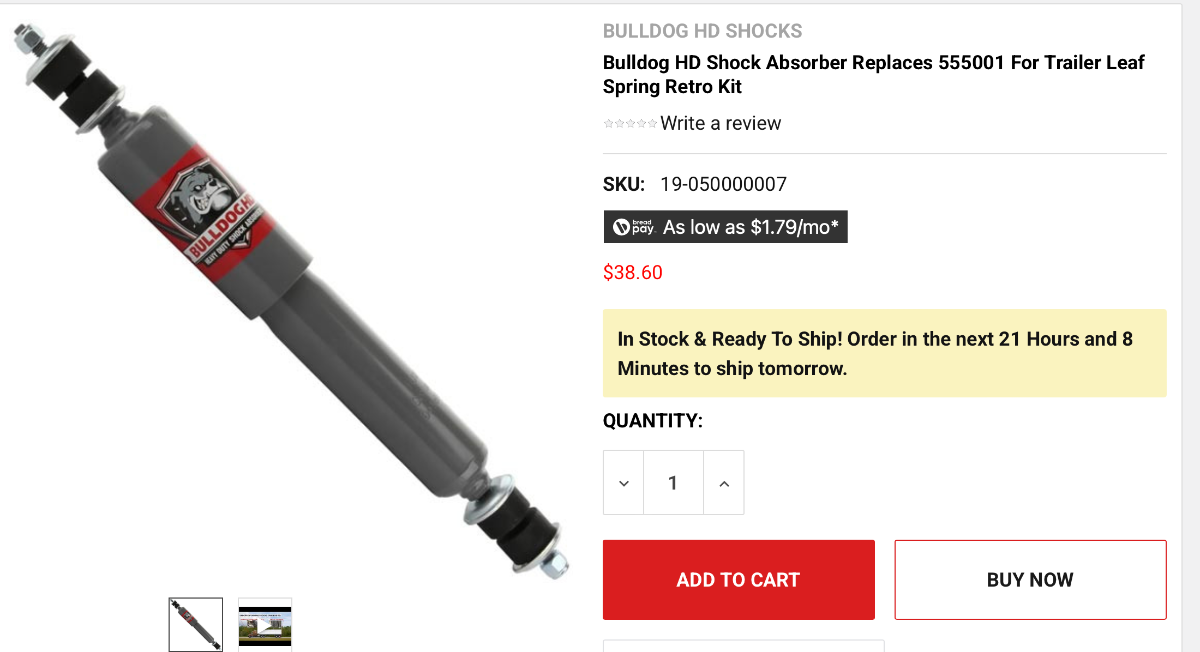
These are the ones shipped from the factory with the trailer: Bulldog Shocks are the ones folks tend to 'upgrade' to if replacing the OEM shocks. Bulldog Shock Parts to Replace Monroe 555001 (OEM) Bulldog part number: HD1213-0656 Price about $150.00 for 4 depending upon supplier. Monroe (Yellow on Top in Pix) Bulldog on Bottom. Link to 4 states truck parts: https://www.4statetrucks.com/bulldog-hd-shock-absorber-replaces-555001-19-050000007 Craig
-
Removing shelf under bathroom sink for plumbing access.
Galway Girl replied to Mroth's topic in Ollie Modifications
To make changes in your signature: Click on your name in the upper right corner of the page. It will pop open this window: Look under SETTINGS and click on account settings. In the settings tab that opens up...near bottom you'll see signature with the pencil icon. Click on that signature line and it will pop open...you can add what you want including maps of your travels, hull # etc. Craig That brass port is the anti-siphon air gap from your black tank flush. The inlet to your external black flush hose bib on the side of the trailer (down low just below the dinette window) runs up to that antiphon then back down to the side of your black tank which is where it connects to the wash head. Once done flushing, that air breaker enables water to drain back out of the inlet port line out the street connection to your flush port. The air gap is an anti suction device that keeps black tank water from coming back out the exterior flush lines. It also makes that line self draining to prevent freeze ups in the flush line. (After you take your hose off after flushing...you'll see about a quart of water drain back out the connection.) Hope that helps.
-
Here’s a blog post we wrote showing the installation of snap pads on our 2019 back in 2020. It is so easy! Blog with installation video
-
Preview for Oliver friends: Since we're between trips with Hull 505, we decided to try out some ai song creation tools and do a road log video. This is the link below is to our page which includes the lyrics for the video shown below: Blog Article with Video and Lyrics Craig & Rose Video from our website below: Oliver 505 640 - SD 480p.mov
-
Hoping for the best for all BB owners.
-
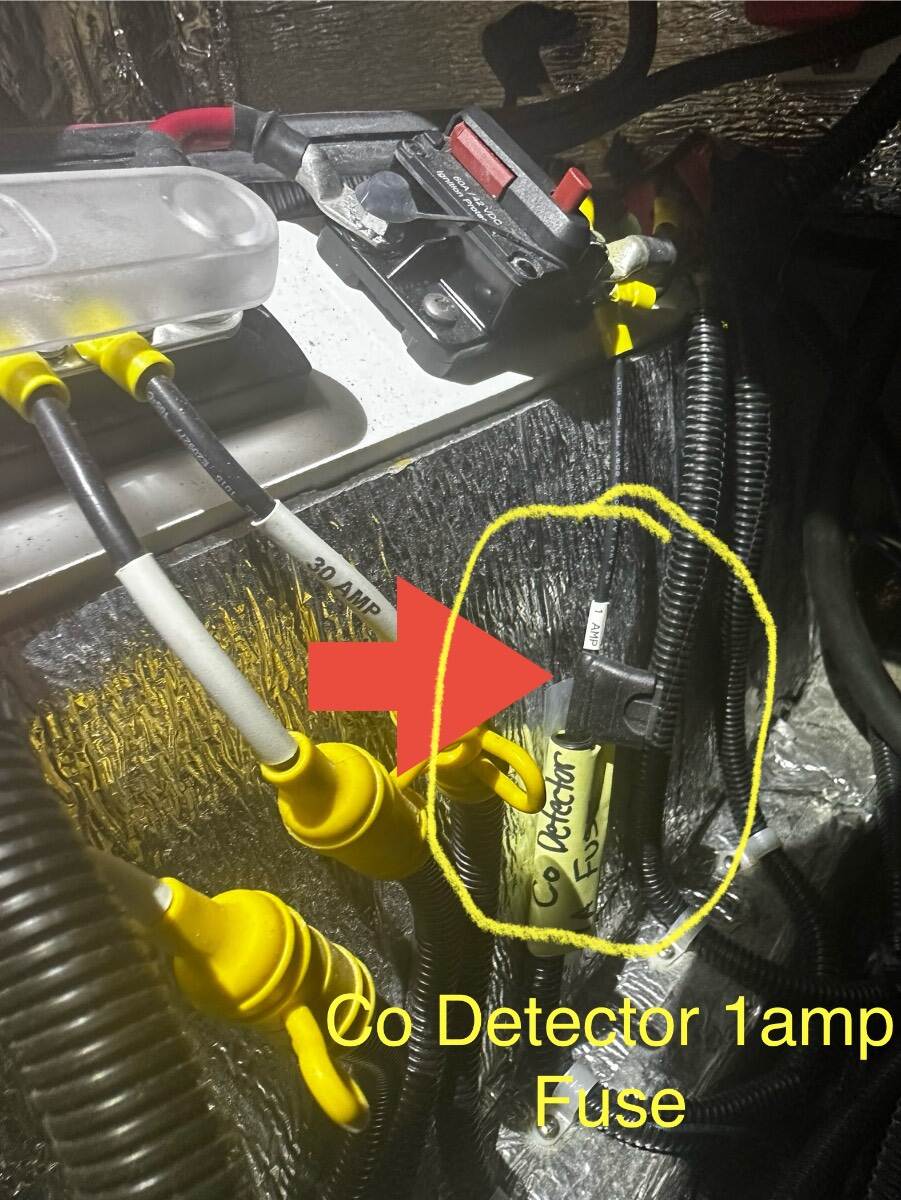
No voltage to CO/LP detector?
Galway Girl replied to Dave and Kimberly's topic in Mechanical & Technical Tips
If you follow that cut wire back you'll eventually find an in line automotive style 1 AMP fuse in a holder nearer to the area where the 12v lines go to buss bars etc (Under the street side bed). It's that fuse you could have pulled instead of cutting the wire. You may have inadvertently popped that fuse. Hope you find the fuse and that it helps. (This is a 2019 trailer so your wiring may be different.)
-
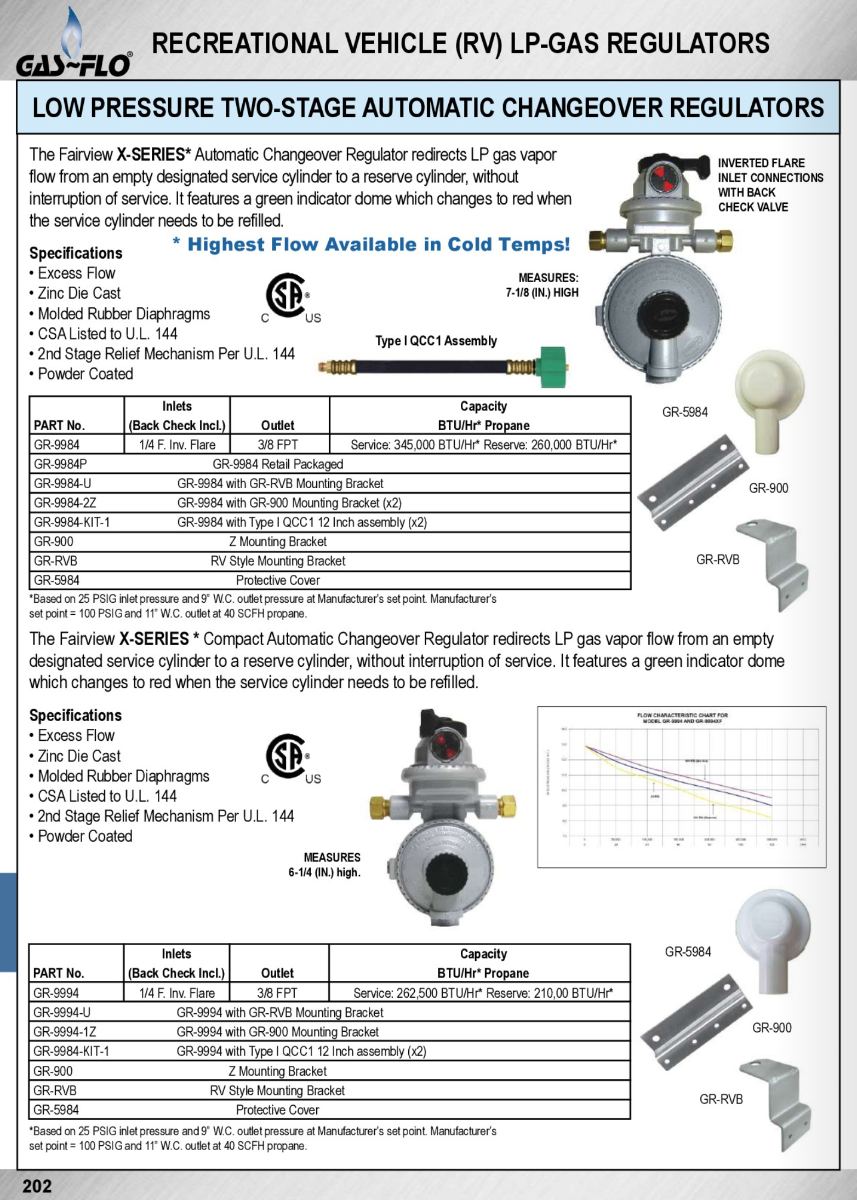
Inspectable Item: Propane Area
Galway Girl replied to Wayfinder's topic in Mechanical & Technical Tips
I checked AC out yesterday, the version they sell is the 262K BTU version (bottom in data sheet)GR-9994. Amazon has the GR-9984 with 345,000 BTU version (top of data sheet) for about $95 and E-Trailer $125 or so...
-
Inspectable Item: Propane Area
Galway Girl replied to Wayfinder's topic in Mechanical & Technical Tips
It can happen more often in colder weather. Try turning off gas, unscrew side you were using to release gas and reattach and turN back on. See if sound goes away. If not consider another regulator. ai answer: Common "Normal" Causes Diaphragm Vibration: The most common cause is the rubber diaphragm inside the regulator vibrating as it moves to maintain steady gas pressure. This is generally harmless if there is no gas odor. Environmental Factors: Outside temperature, humidity, and barometric pressure can cause internal components to resonate or vibrate more than usual. High Gas Flow: If you are running multiple burners or a high-output appliance, the increased volume of gas rushing through the small internal orifice can create a high-pitched noise. Low Tank Level: In some cases, a tank that is nearly empty can cause the regulator to hum as it struggles to maintain pressure. When to Take Action If You Smell Gas: A high-pitched "hissing" accompanied by a rotten egg smell indicates a gas leak. Shut off the tank valve immediately and evacuate the area. Poor Performance: If the noise is paired with weak, yellow, or flickering flames, the regulator may be failing and need replacement. Overfilled Tank: If the sound started immediately after a refill and is accompanied by a gurgling noise, the tank may be overfilled, putting excess strain on the regulator.