Ronbrink
-
Posts
1,191 -
Joined
-
Last visited
-
Days Won
38
Everything posted by Ronbrink
-

1UP Quik Rack With Oliver Standard 1.25" Receiver
Ronbrink replied to Rivernerd's topic in Mechanical & Technical Tips
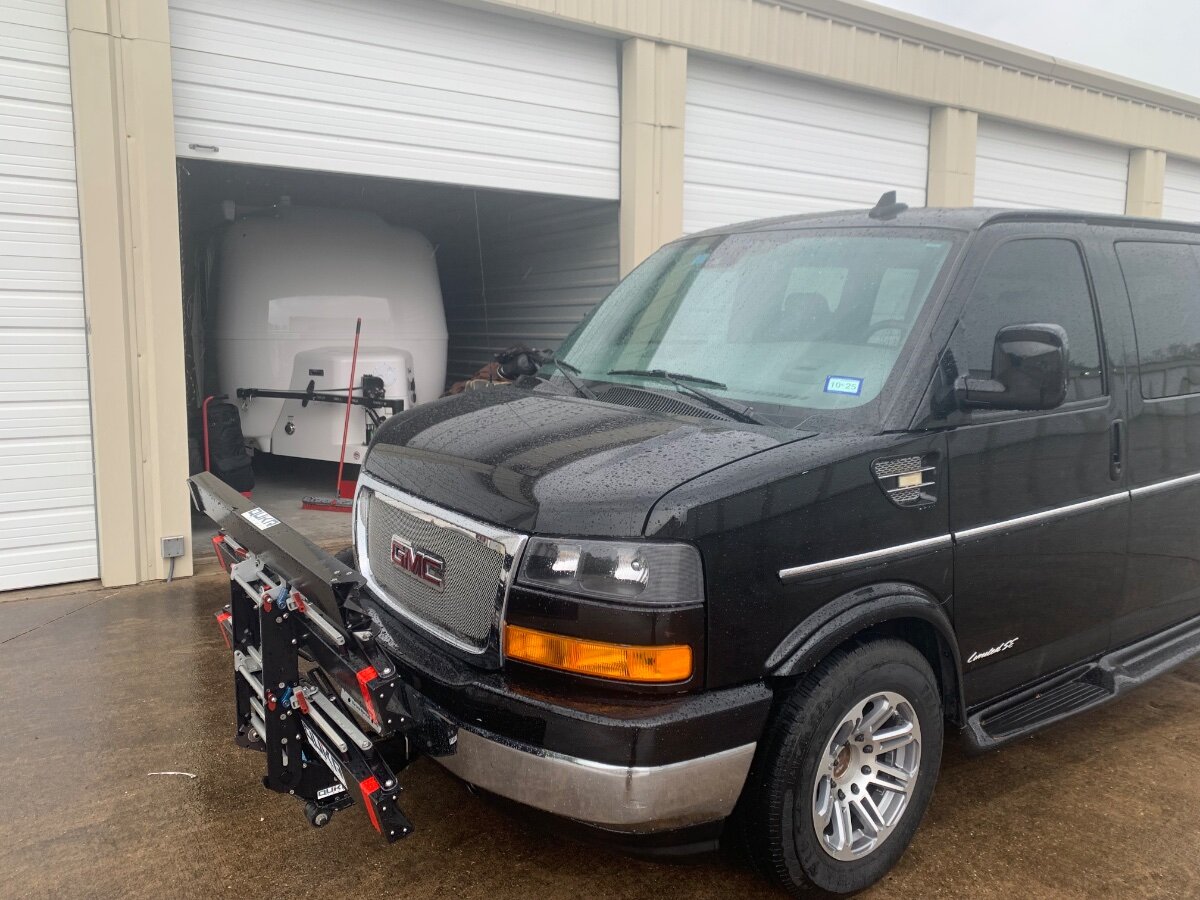
I do not have the 1UP bike rack, but rather the comparable QuikrStuff Mach2; it too is rated for RVs in the 2” receiver model. As @mossemi pointed out, the 1UP model you mentioned is not suitably rated, but the 1UP SD model would meet your need. Regarding Oliver’s receiver, the 1.25” stock receiver can either be modified as you noted or simply replaced with a 2” receiver for light loads. Personally, I have a front-mounted 2” receiver hitch on my TV.
-
Incredible noisy AC, any solutions in sight.
Ronbrink replied to Nick and Linda Stratigakis's topic in General Discussion
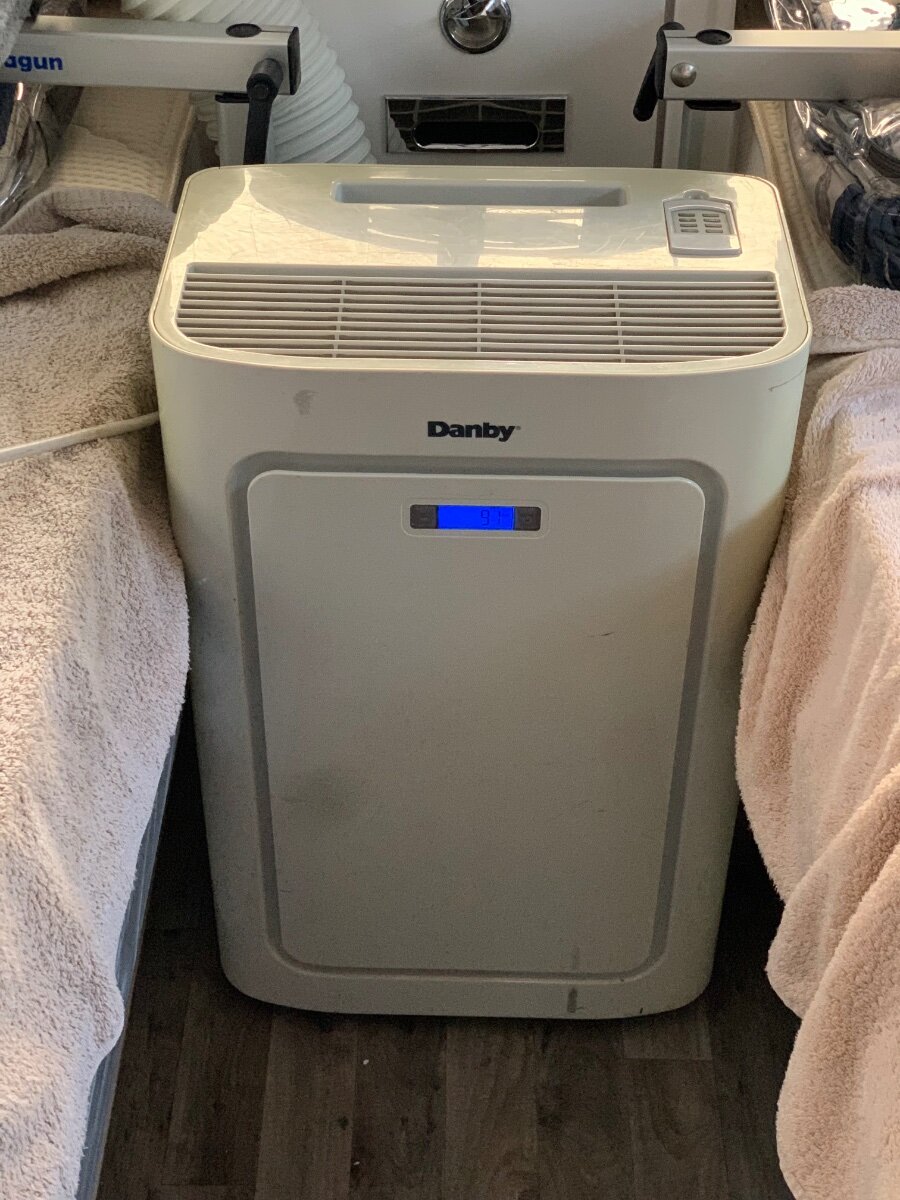
I did the same with a portable air conditioner given me and generally used when working in confined spaces, garage or shop for heat relief. Shown here being used in the Oliver, vented out the side window, when replacing the noisy Dometic Penguin ll last summer. Useful in a pinch, but certainly wouldn’t want to travel with one and endure the encumbrance! Unlike the DPll, my Atmos replacement is quite both in and out; oftentimes I can’t even hear it running when outside the trailer, so don’t think all RV rooftop air conditioners are created equal.
-
Yeah, I learned of others that had issues with their LevelMate and disappointment with the Max upgrade; fortunately nothing major with my Pro, only minor regarding battery life. I’m one to hang onto an investment and make do, so changing out the battery seasonally resolved that issue. Guess I’ve been lucky!
-
I found the 11K Dometic Penguin ll, originally installed in my 2020 OLEll, to be lacking in cooling efficiency with our Texas heat; a 15K replacement proved to be a better unit for my needs. If you don’t plan to camp in extreme heat or cold, perhaps an 11K/4500 BTU unit will suffice, but why limit yourself? Regardless of action taken, having the existing heater for backup may be a better plan over removal. With regards to installing a DC unit, you may first want to try to fish a path for the larger wires required before making that investment. Also, one would think a larger battery bank and even max solar necessary for this “new package for Oliver Boondockers”; added cost that doesn’t seem to be factored into the equation.
-
Many use the LevelMate products for front/back and side/side adjustments with use of a phone app. Leveling blocks/ramps can also be used to lift one side and rear stabilizer jacks then to fine tune. Front jack used for front/back leveling often with a block to reduce jack extension. Perfect leveling made simple!
-
You’ve got a really good truck and RV, so well equipped to overcome any anxiety! Ease into your adventures and you will soon gain confidence while enjoying the RVing experience!
-
No recent mention of the many tracking devices used and recommended by Oliver owners in this forum. Not to highlight the referenced tracker in the above 2016 post, but rather bring attention to the fact that GPS trackers are readily available and a useful tool in the event of theft.
-
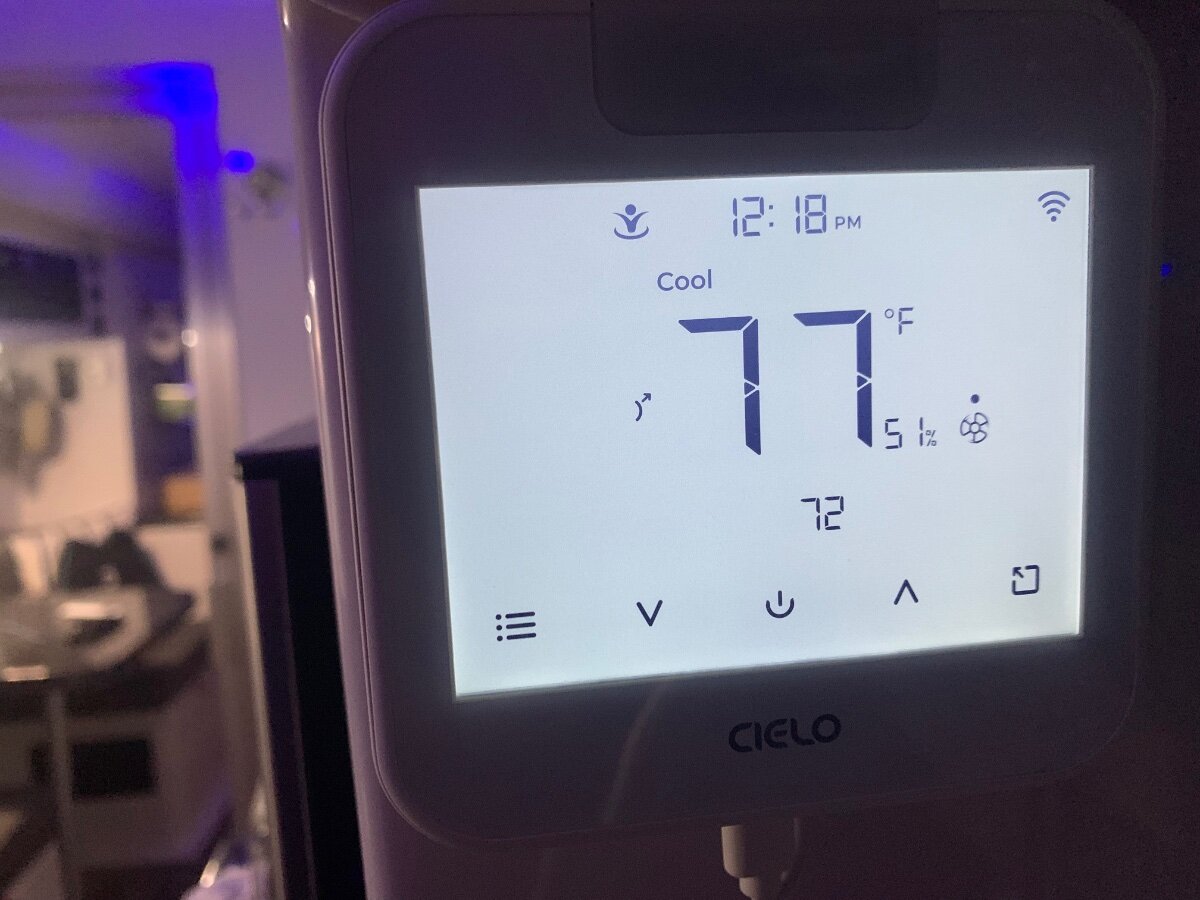
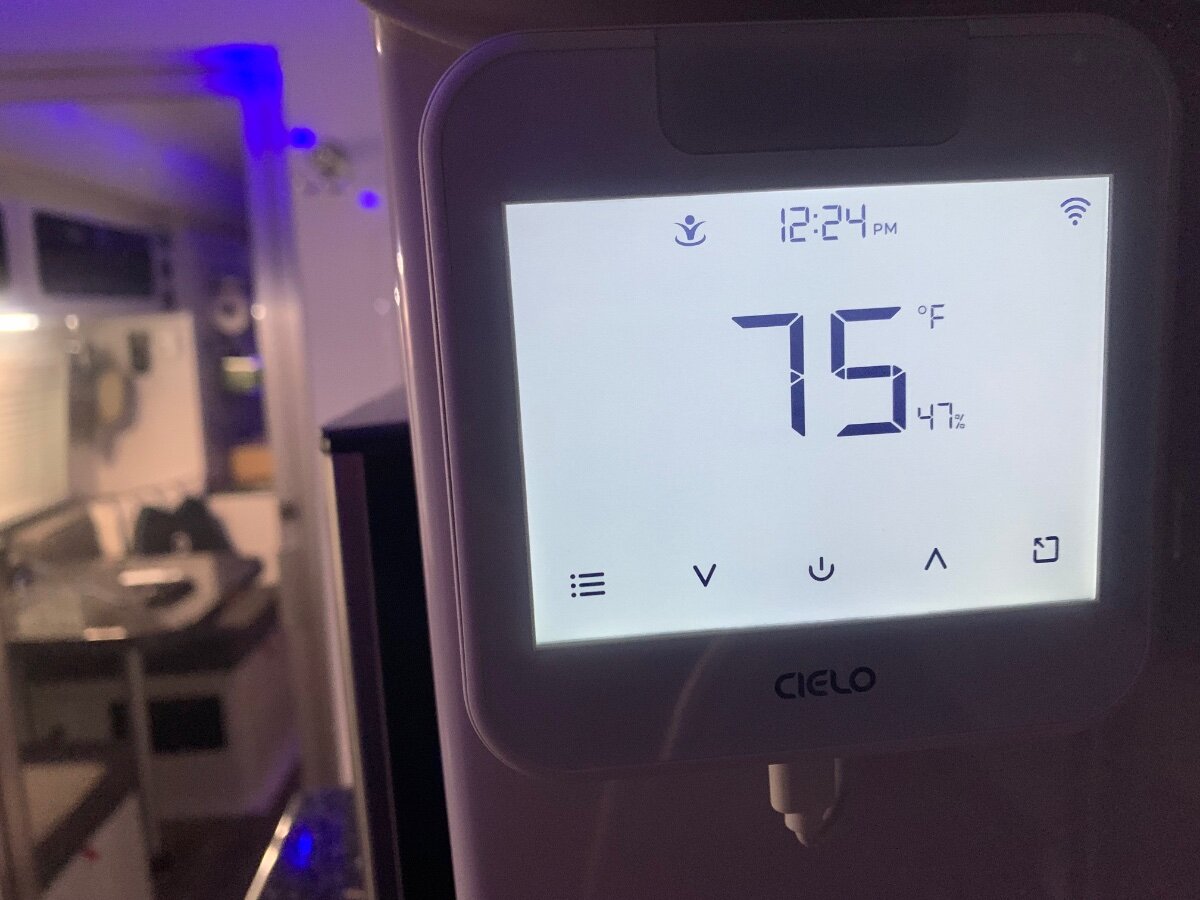
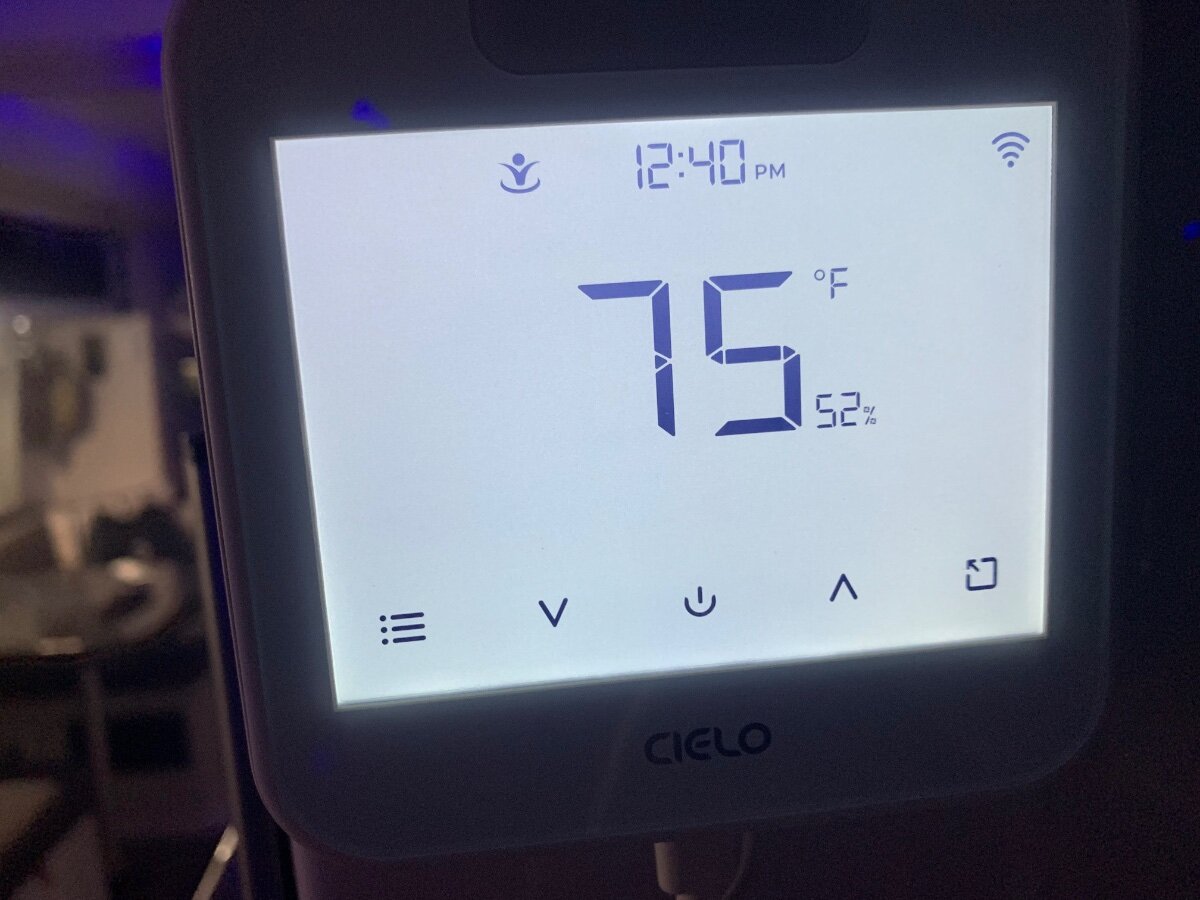
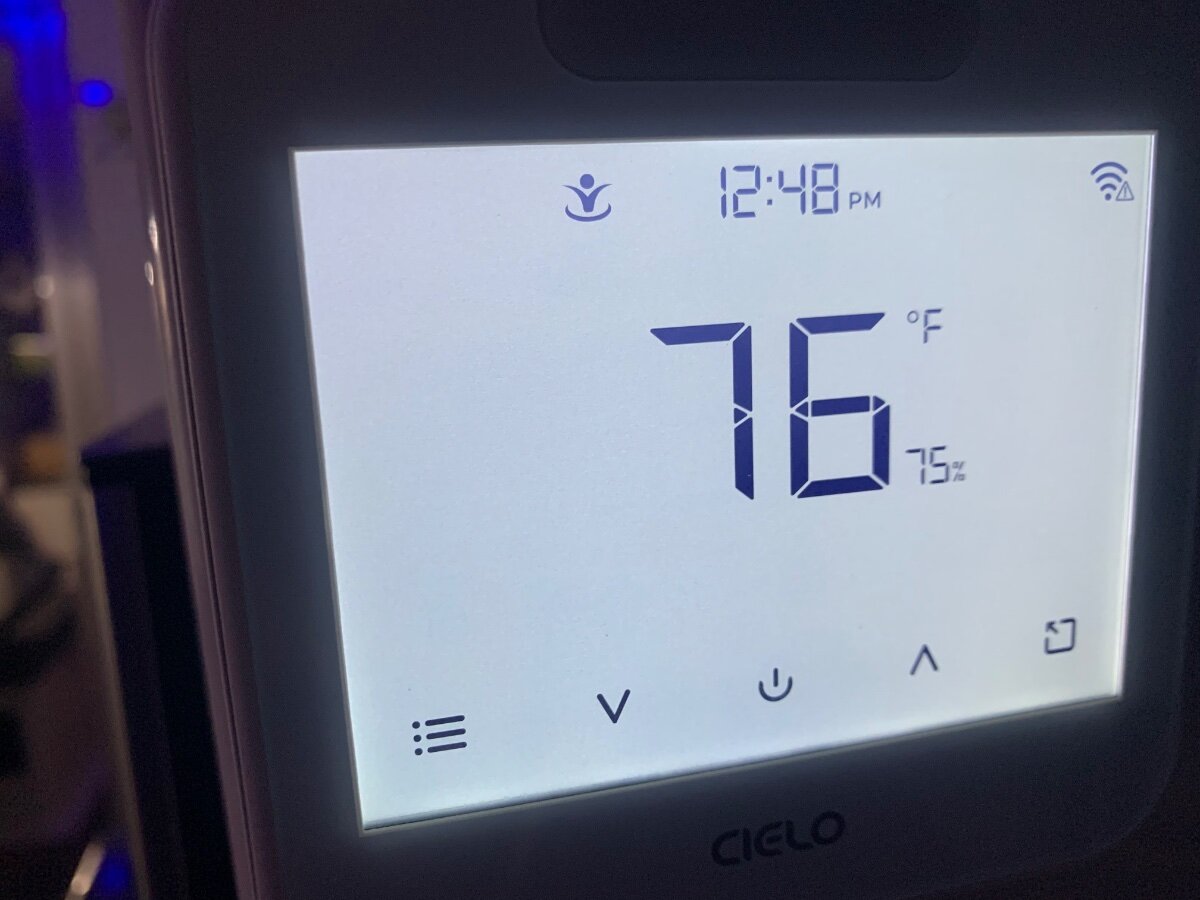
I have repeatedly stated how the Cielo Breez Max thermostat is effective in resolving inherent humidity spikes due to the a/c supply fan running continuously in the Oliver. This particular device has a Comfy Mode feature that will turn off said fan in sync with the compressor and thus, significantly lessen moisture from being reintroduced back into the cabin space. I would like to share the results of a test performed yesterday as tangible proof of its effectiveness: As I rolled up to the COW Barn with my Starlink Mini’s new Standby Mode unpaused (low-speed data plan), the Cielo phone app was used to start the Drieha Atmos 4.4 from my vehicle to begin cooling. I spent about twenty minutes reorganizing inside the van before opening up the CB and entering the Oliver. I should mention we had a temperature drop from the day before, so not real hot (83°), but relative humidity was high (72%) (P1). The Atmos was still cooling in Comfy Mode (preset to turn off when temp falls below 76° and turn on when temp goes above 77°) and the Oliver was 77°/49% (temp/humidity) at entry per the Cielo’s display (P2). A few minutes later the Atmos turned off in total (supply fan and compressor), the display was 75°/45% (P3). As the interior temp increased the Atmos turned back on in total, the display was 77°/51% (P4). It is important to note that the humidity rose 6% during this total off period. The Atmos then turned back off in total, the display was 75°/47% (P5) with a 4% drop in humidity. I let the Atmos continue to cycle in like manner a while longer before switching from Cielo to remote operation (P6) set at 75°. Since the Cielo can still be used to monitor temp/humidity, at time of remote start the display was 75°/52% (P7) and the compressor shutdown soon after (supply fan continued to run). When the compressor came back on, the display was 76°/75% (P8). Yikes, a 23% spike in humidity! The compressor shutdown once again, the display was 75°/53% (P9) and back on again, the display was 76°/74% (P10); a 21% spike. Compressor off at 75°/53% (P11), on at 76°/72% (P12); a 19% spike. As demonstrated, it is evident that the Cielo’s Comfy Mode does in fact lessen those dreaded humidity spikes experienced at times, you be the judge!
-
Hardwire your LevelMate Pro for under a buck!
Ronbrink replied to Snackchaser's topic in Ollie Modifications
The LevelMate PRO does have a Sleep Mode to conserve battery life if left in the on position, and oftentimes I think the battery is dead next use. However, hearing two beeps when toggling the switch off then on again indicates the battery is still good; no beeps, time to change the battery. -
2026 YM Oliver awning style windows and other changes
Ronbrink replied to Patriot's topic in Ollie Modifications
Me too, dawn is my favorite time with coffee in hand! -
2026 YM Oliver awning style windows and other changes
Ronbrink replied to Patriot's topic in Ollie Modifications
The exact one I bought is ‘Currently unavailable’ on AMZ, but this is one of several currently offered and appears to be much the same.
-
I’m still waiting to learn that someone has tested the Cielo Max Breez thermostat with the Truma Aventa, or even a Dometic, Houghton or Tosot for that matter. Said thermostat has a feature that will enable the fan to turn off in sync with the compressor when in Cool Mode and thus, prevent humidity spikes and save energy. A note worthy point, it is not necessary to decommission/remove the stock thermostat; it can still be used along with it’s remote for cooling and heating if need be. I installed a Cielo in my OLEll last May for use with the Drieha Atmos 4.4 installed a year ago and can honestly say “it works”! The Cielo can be operated via touchscreen or remote, but more importantly with a phone app from any where with Wi-Fi for the feature mentioned and more.
-
2026 YM Oliver awning style windows and other changes
Ronbrink replied to Patriot's topic in Ollie Modifications
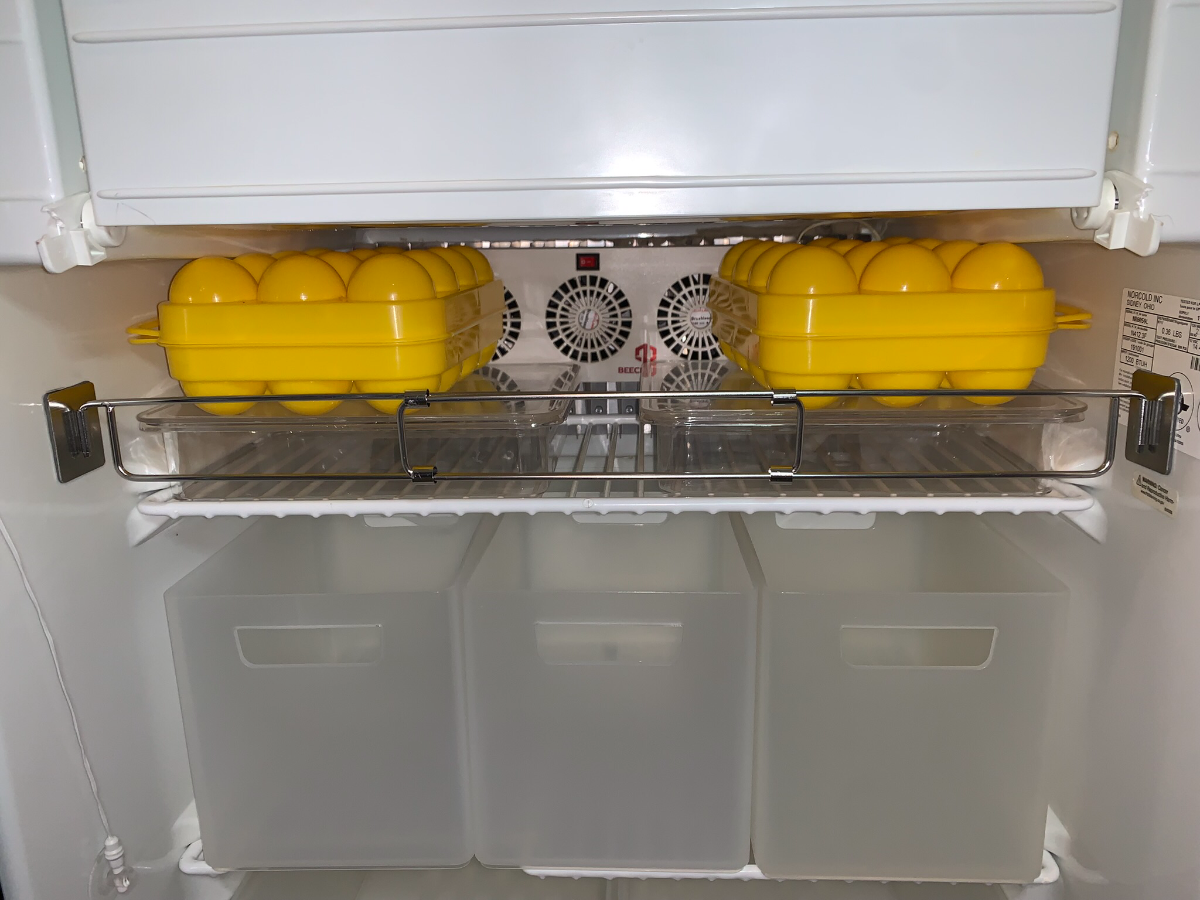
The rails along the wire rack outer edges are a nice feature to help keep things in place, ‘shift happens’! After our last broken egg incident when opening the door I added a rail to the top rack, problem solved. Easy install and can be lifted from either side to swing away for access, as necessary.
-
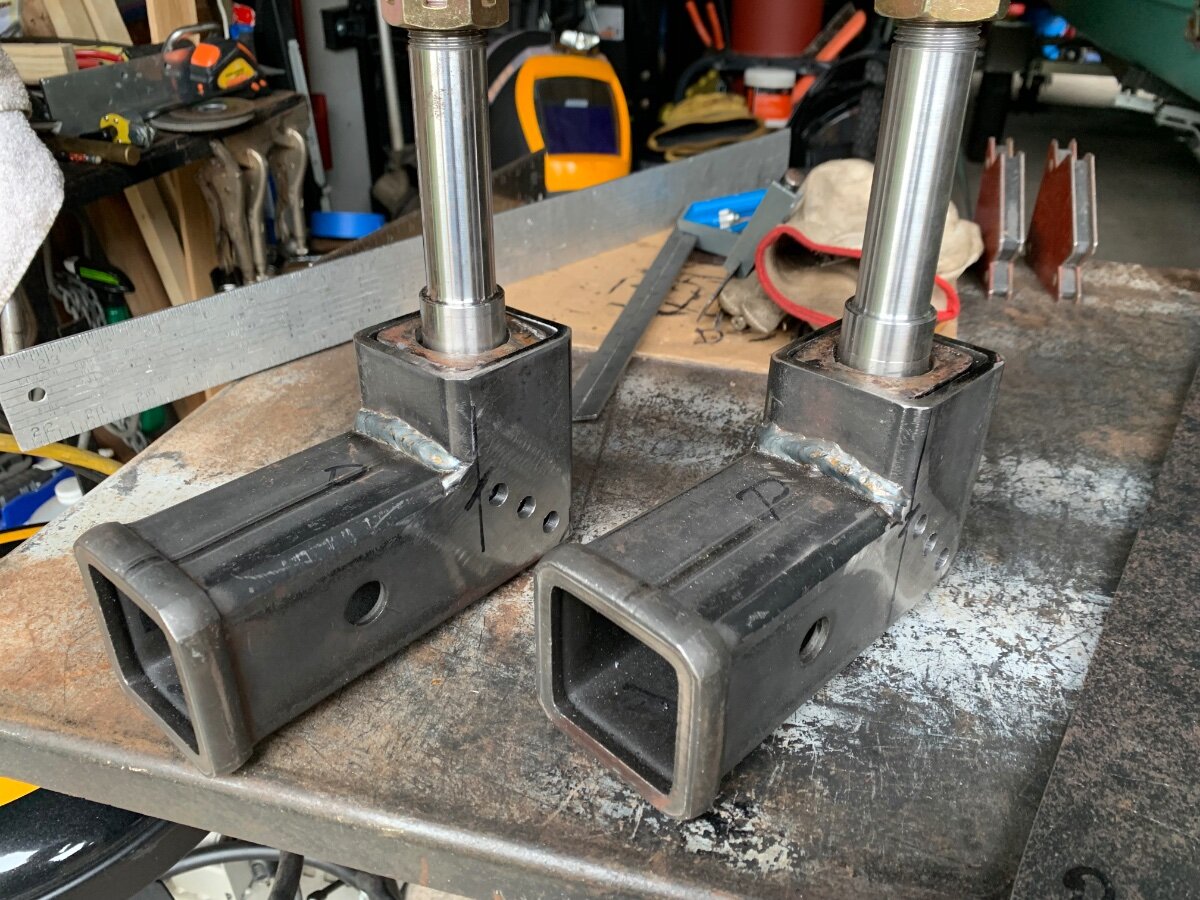
Slow progress, but progress none the less! Secondary receiver hitch/spindle bearing hinge assemblies furthered by addition of gussets for strength and support. Once welded out, a square tube will top each gusset to complete the swing out carrier arms. Custom racks will then be fabricated to hold and secure respective jerry cans and spare propane tank.
-
In general, Cool Mode prioritizes temperature whereas Dry Mode humidity. The Cielo Max Breez thermostat effectively and efficiently regulates these two factors and thus, no need to toggle back and forth between modes for optimum comfort with respect to variances in weather conditions (temperature/relative humidity).
-
Unique Camping + Marine RV wastewater treatment
Ronbrink replied to routlaw's topic in Mechanical & Technical Tips
Gonna try that, as well! Specifically, the Dawn Ultra formulation recommended in the video. Ordered a 2X56oz pack for14$ish on AMZ. -
Unique Camping + Marine RV wastewater treatment
Ronbrink replied to routlaw's topic in Mechanical & Technical Tips
Long video indeed, but very informative. Not so pleased with my Happy Camper now, gonna give theses Unique products a try; available on AMZ. -
I’ve seen several different placement configurations of these fans at the upper vent area on Olivers; attached directly to the vent panel or the panel frame, or supported behind the vent panel as you did; and facing straight forward blowing directly outward, angled or flat blowing upward. There may be some variances in performance due to placement, but I’ve never read anything derogatory on anyone’s installation. Regarding the bug screen, such pests have not been a problem for me, but know that it is an issue for some in different parts of the country. That said, I could probably attach a light-duty screen onto the back side of the upper vent panel if ever deemed necessary, as well as the lower panel in like manner. To your point, the commercially available screens, particular to fridge vents, appear more robust and may not work in conjunction with my method of fan installation; but some installers should certainly take this pest deterrent into consideration.
-
Nice installation! Did you add the bubble insulation in the upper cabinet or did it come like that? My attic has the same exposed on the rear wall in 579.
-
Do you drink the water from your fresh tank?
Ronbrink replied to Dennis and Melissa's topic in General Discussion
A dedicated electric cooler would be useful if space allows, not that difficult to source power. -
I have.no idea how this happpened
Ronbrink replied to Dennis and Melissa's topic in General Discussion
Nev-R-Lube, not Nev-R-Damage. Agree with @jd1923, worrisome None-The-Less! -
Where do you store the Lagun table and swing arm, in the Pelican case as well? I see the upright leg is securely bolted.
-
Accurately measure propane level for under $10
Ronbrink replied to Snackchaser's topic in Mechanical & Technical Tips
Problem solved! -
Accurately measure propane level for under $10
Ronbrink replied to Snackchaser's topic in Mechanical & Technical Tips
Using the auto changeover regulator definitely has its pros and cons, but not trusting it is operating as designed or deemed dependable is of dire concern to many. This is good advice regardless of the mode of operation, and key to ensure one’s propane supply never leaves you empty. However, stuff happens and my contingency is to carry a spare cylinder and regulator. -
BRAKES WORK... 2019 OLIVER ELITE II #448
Ronbrink replied to BoondockingAirstream's topic in Mechanical & Technical Tips
Perhaps Oliver should consider adding a ‘Rant and Rave’ segment to the forum. This Neanderthal is not alone, many Human Beans have posted in like manner. Just say’n!