MAX Burner
-
Posts
1,681 -
Joined
-
Last visited
-
Days Won
68
Everything posted by MAX Burner
-
JD - if poss, check-out any available "smart" alternators for your vintage TV. The new tech DC/DC chargers like them a lot... you might be able to get a 50amp model for your OTT in conjunction with a new smart alternator, just think'n out loud...(only into my 2nd cup 'o Black Rifle)
-
@Mike and Carol - it was great talking to y'all the other night! We're sorry we couldn't pass along a "proper" farewell before your departure. If you find yourselves in the proximity of northern NM (or even Cochiti Lake SP), please give us a "shout-out" and know that you'll have a place to un-hitch and relax a bit! Warm regards, A & D
-
Nice one, Mike - we've done the same drill... Do you have the negative lead from the SAE connector going to your SmartShunt? Just curious...
-
No clue, brother - I'll try sending you a test PM...
-
 No worries, Steve - will swing by with the 2 knuckleheads later on today... 😎
 -
@Steve Morris - Hey, Steve; good morning. If still needed, we can swing by later this AM with a wide selection of grommets that you can have a "look-see" - there may be ones in there that may fit. Cheers, A & D
-
@rideadeuce - Great work on your bath fan upgrade, Mike - that LED makes a ton of difference when more light is need in the head... You'll be loving it! Should be OEM, IMO... Awesome post! Cheers from Lake Guntersville SP!
-
Your on-the-road WiFi connectivity will be awesome! Very "jelly" over here, ha! Thanks for posting the flat mount option - its likely one of the best ways to go, IMO.
-
…great opening ceremony talk by Rodney Lomax, excellent dinner company, awesome raffle prizes - all along with a beautiful sunset!!!🌆 Perfect way to start the Rally!
-
Hey, @KenB - how many miles do you estimate were on your shocks before replacement? Just curious... TKX
-
Solid copy, @rideadeuce! Thanks for the vectors in Guntersville, Mike - will look forward to them! Cheers!
-
Model Year Changes - 2020 to 2023/2024
MAX Burner replied to Ralph Mawyer's topic in Ollie Modifications
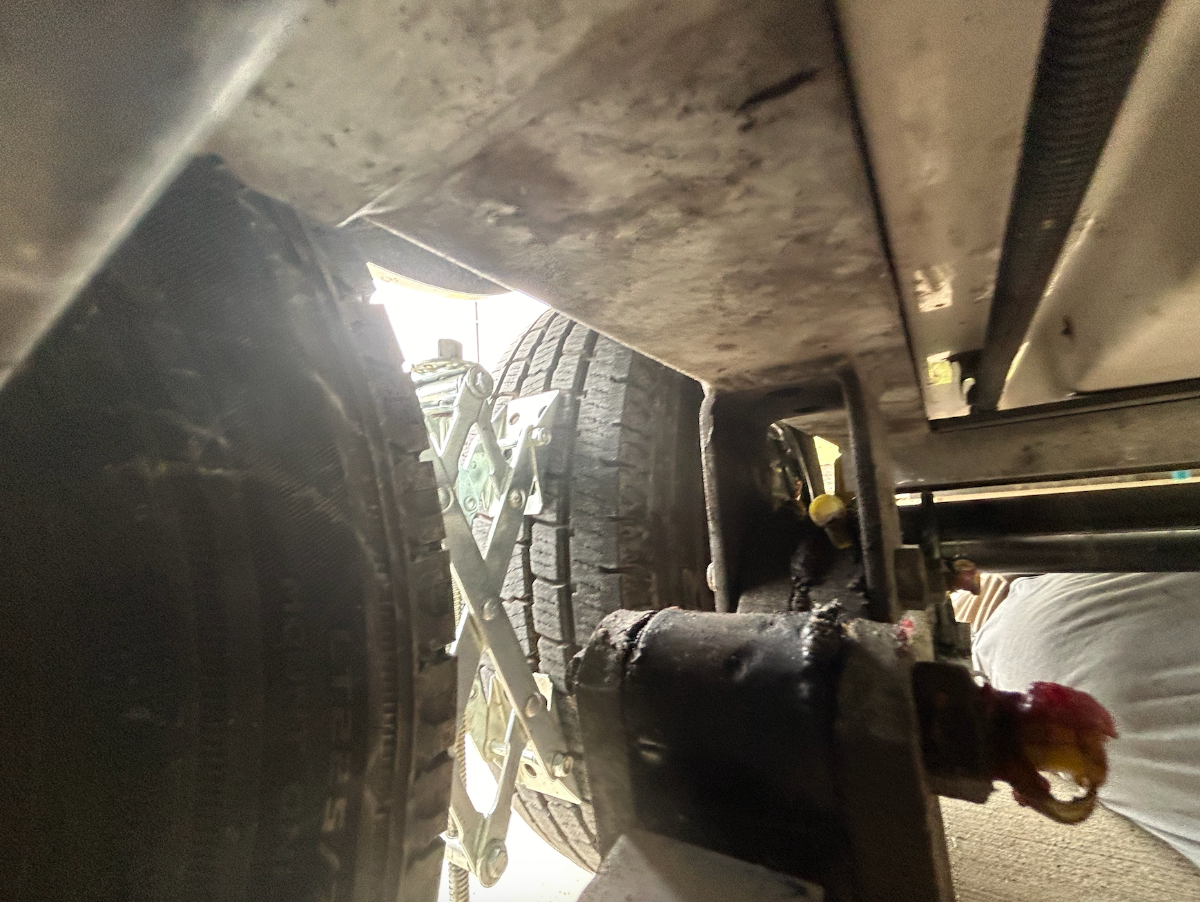
There are two more Zerks fittings in the center EZ-Flex mount on the frame - one facing fore, one aft, here's a couple pix to orient your perspective: Above pic show the forward facing Zerk... Above pic show aft facing Zerk... FYI: There's 8 zerks per side on our 2017 OTT...
-
Elite 2 Rooftop Reflective Canopy or Tarp
MAX Burner replied to NomadLife's topic in General Discussion
@Patriot - maybe provide a link to the pix of the set-up at your home for EXPLOR to @NomadLife... You've got an awesome protective structure that he may find interesting, just a random thought. See y'all tomorrow in AL! Safe travels, brother! A & D -
Hey, brother - just pulled into town early this afternoon. Staying at an RV park near the airport. D flies in tomorrow AM and we're headed to the owners rally on Tuesday. Can you recommend a good "Monday Night" food joint nearby? Just curious.... Cheers!
-
Awesome idea - impressive!!!
-
has anyone tried the new Dometic fresh jet 2200?
MAX Burner replied to Roadlotus's topic in Ollie Modifications
D and I can attest to how quiet the Houghton unit operates. We did a side-by-side comparison last summer - first running the Dometic in "Zone-5 Afterburner" (its only mode) and attempting to converse inside with little luck. We then moved into John's unit a few yards away with his Houghton running - OMG, a significant drop in db level and we could actually communicate normally... My subjective appraisal as it is... Just say'n. -
@CW. Craig/MaryLou - congrats on your new acquisition of Hull #962! @Coach and JoJo have passed along a wonderful example of an OTT to y'all, and you can make your mark on it by participating in these forums. As you already know, there's a huge compendium of information and experience from thousands of forum participants that await your searches for operating procedures, fixes, upgrades, and modifications. Welcome to the Oliver Family and we all look forward to your descriptions of "next adventures"! Cheers!
-
Made in USA leaf springs
MAX Burner replied to Mountainman198's topic in Mechanical & Technical Tips
Absolutely correct, Steve. We did the same procedure by drilling-out our spring plates for the 9/16" U-bolts. Not only are the U-bolts beefier, but the Alcan-provided nuts are 50% longer than those on the standard Dexter axle made with sub-standard Chinese spring steel leafs. More thread contact between bolt and nut = mo betta. This was one of the main decision points in going with Alcan versus Dexter spring packs for our application. Dexter's 5-pack springs are designed in the same fashion as the 1750# 4-packs - with the 4th longest leaf extending to only about 3.5" from either eyelet. This is the traditional break failure point that Steve's referring to in his description above. With the Alcan design, that 4th spring fills the gap by extending to the point where the 5th leaf starts curving for the eyelet. Another feature of the Alcans, previously discussed but adding here for clarity, is the larger walled bronze bushing - 3/16" versus 1/16" for the Dexters that had bronze bushings. This thicker walled bushing creates an even larger diameter eyelet = mo betta. Please note that the current Dexter 1750# 4-spring packs w/D52 axles are fixed with plastic bushings. I observed this first-hand last week when replacing our D35s for the D52s. Serious NOTE: Owners with the newer Dexters should determine if their axles are equipped with either bronze or plastic/nylon bushings. Why, you ask? If a rig's running gear is fixed with an axle kit using spring packs with plastic bushings and using Dexter EZ-flex wet bolts, the bushings will likely not last a season. The petroleum-based grease used for the wet bolts can decompose plastic bushings. Not good, IMO. The pic below shows Alcan's extended 4th leaf right to the curvature point of the 5th spring's eyelet - a robust design feature not found in either the 4- or 5-pack Dexter Chinese-made spring kits (FYI, the traditional breaking point with the Dexter 4-packs is about where the end of the 3rd spring is located, see below pic): Comment on Shocks: If one assumes that OTTs are "under sprung" - i.e., not heavy enough leaf springs, then the constant expansion/contraction rate that the Monroe's experience is very high. IMO, this wears out the shocks much sooner - and which were never designed for an "under sprung" suspension to begin with. Using heavier-duty shocks on the same running gear may last a bit longer but shock failure will occur sooner than if they were mounted on running gear of heavier design. The Alcan option may just allow our shocks to last their designed lifespan... who knows? Let's get some miles on these babies and find out! 'nuf said.
-
It came up some, Ranger Rick made us clear out and go to higher ground in the trees to spend our last night there... No biggie - up'n moved in 10 mikes.
-
...but at least we try to! HA!
-
Absolutely, makes total sense, JD! Had we not planned to attend the owner's rally, we probably would have lived with the 3.5k#-ers for a while. But here's a consideration - the D52 Dexters (or the older D44's and D35s for that matter) are custom cut to OTT width specifications (they're only approx. 62.5" flange-to-flange). I suppose one could order an OTT spec'd set of axles from Dexter in Sparta, TN but that could be costly for a single run off. We have not contacted Dexter to learn what the one-off cost/time schedule/shipping costs would be - maybe another owner could do that. Since headed eastbound from NM anyway, we decided to contact OTT directly, and coordinated with Jason Essary to acquire our axle kit. Timing was just right with the rally scheduled for next week. Our approach to the running gear upgrade became a phased approach instead of "all at one time in our shop" primarily due to logistics and cost. Alcan springs first, 5.2k# axles, then shocks (only by happenstance, not planning) - & the Cooper Discoverers only have about 15-16k on them. As far as labor costs, my time is free for me... We ate the cost of travel to Hohenwald because we planned on attending the owner's rally anyway - the entire running gear upgrade worked out well for us. HA!
-
Made in USA leaf springs
MAX Burner replied to Mountainman198's topic in Mechanical & Technical Tips
The height of the trailer after new spring pack installed was approx 5/8" higher. The hull and frame assy doesn't squat down as much with the heavier springs. The length of the 3/4" longer shocks wouldn't make any difference regardless of what spring packs are installed. They need to be fully compressed to get into the mountings anyway - just adjust the nose up/down to get the correct clearance. JFTR: Finished up with the "in situ" shock R&R drill at Primitive Campsite #8 at the Mousetail SP on the TN River just now -- and Casablanca is back to that "yellow" looking running gear. The only mod to the drill was using fresh nylocs instead of the nuts provided (a bit of overkill, but D's idea - "happy wife....): New axles, springs, fresh shocks, newer Cooper tires - isn't it a good feeling? Or an obsession??? Thoughts?
-
Right?
-
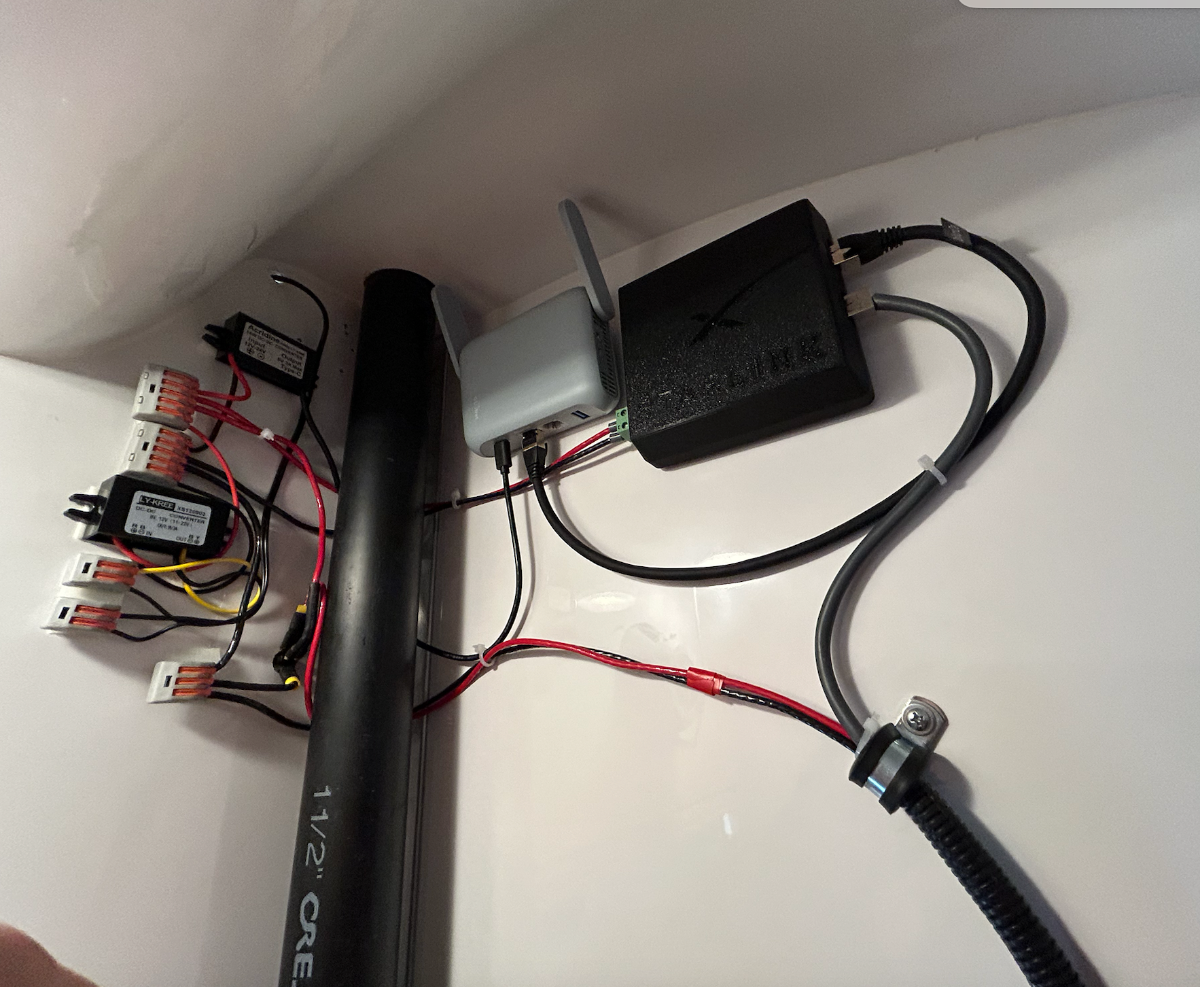
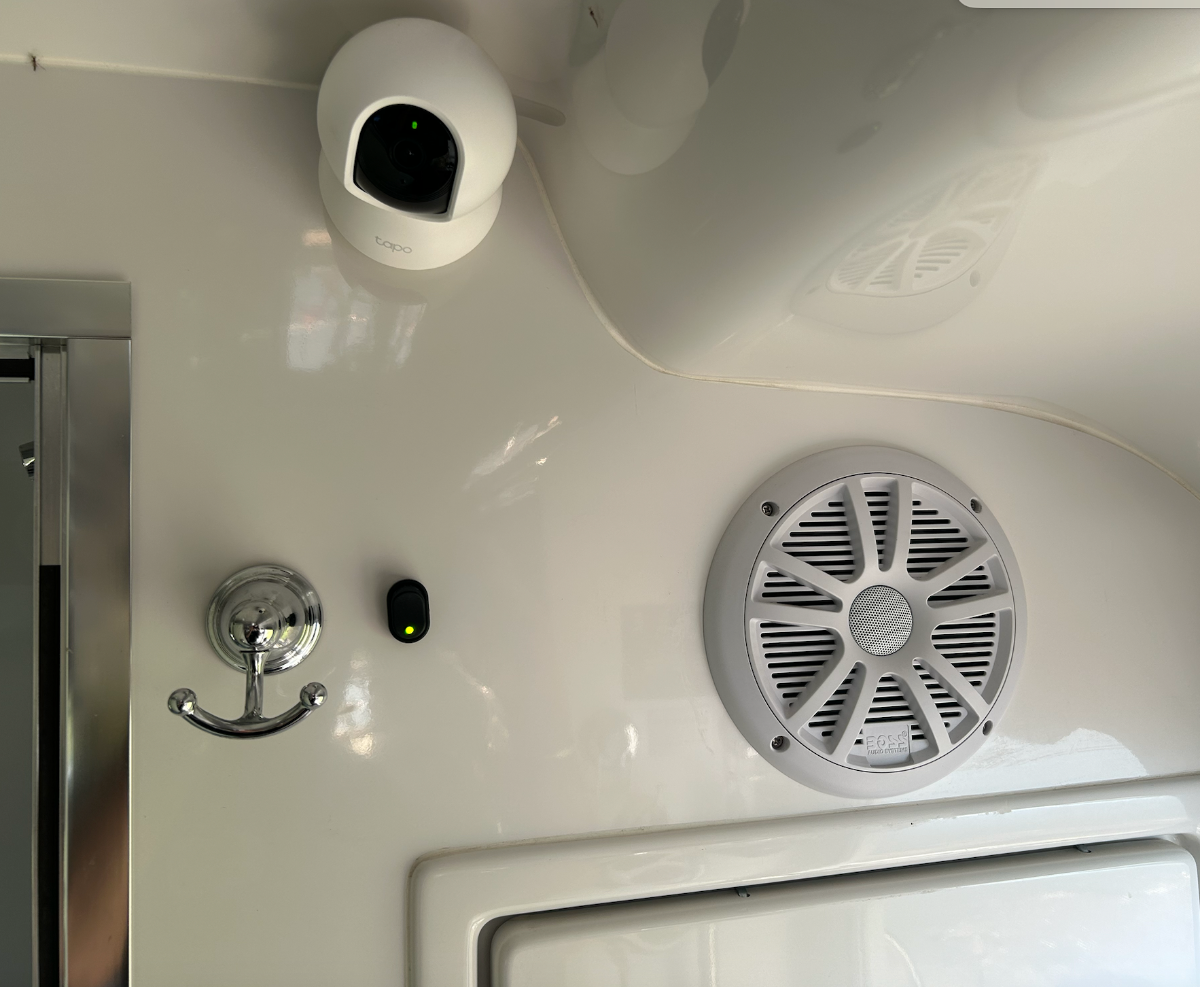
Apologies in advance for those who already read our post on the subject, but here's a "Reader's Digest" version of what our conversion finally ended up like... 1. We mounted the POE injector (converts 12vDC to 44vDC for dishy), DC-to-DC converter, 3rd party mini travel router, and wiring in the closet (the second DC-DC converter is for the Camera): 2. Power Switch for SL kit and Security Camera located on bulkhead above closet door: 3. Communication (Ethernet) Cable penetrates closet bulkhead (adjacent to bathroom), drops down under vanity, exits hull via a Blue Seas Clam along with DC-DC charger cables and OEM 12vDC cable (pls. ignore the knucklehead in the pic): 4. The SL Cable is routed forward into the "dog house" and exits via a "weather proof" (term use lightly) 4-pair connector: NOTE: Normally, we would mount the dishy on top of the flag pole which you'll see the mount for above, but today we've been informed by Ranger Rick that flood warnings exist on the TN River and we may need to "Exit Stage Right (like Yogi would say)" rather quickly, so dishy is mounted in it's travel box and placed on a picnic table for a rapid departure, if needed: This post is coming to you via our 12vDC Dishy kit, FYI... Good luck with your's! Feel free to PM us anytime regarding details not covered in this or our previous posting on the project. Cheers!
-
And a ""Good "Starlink" Morning"" from Casablanca at Primitive Site # 8 in Mousetail Landing SP along the TN River... Happy feet enjoying mid-60's temps this AM with a couple Knuckleheads and some Blackbeard's Delight Black Rifle in the mug: Headed to Nashville tomorrow to collect my bride and VFR-direct to Guntersville on Tuesday... Safe travels, All!