MAX Burner
-
Posts
1,681 -
Joined
-
Last visited
-
Days Won
68
Everything posted by MAX Burner
-
Concur, John! Unfortunately, we only bought 3 vents (last spring) -- since then, we've come to the same conclusion you and others have described for addressing the "hot box" in hotter WX conditions. Now that we're on a roll, the 4th return vent will likely find its way into the upper closet door bulkhead sooner than later!
-
These shelves are known around these parts as falling into the "Happy Wife, Happy Life" category of OTT projects, for sure. D loves these new storage elements!
-
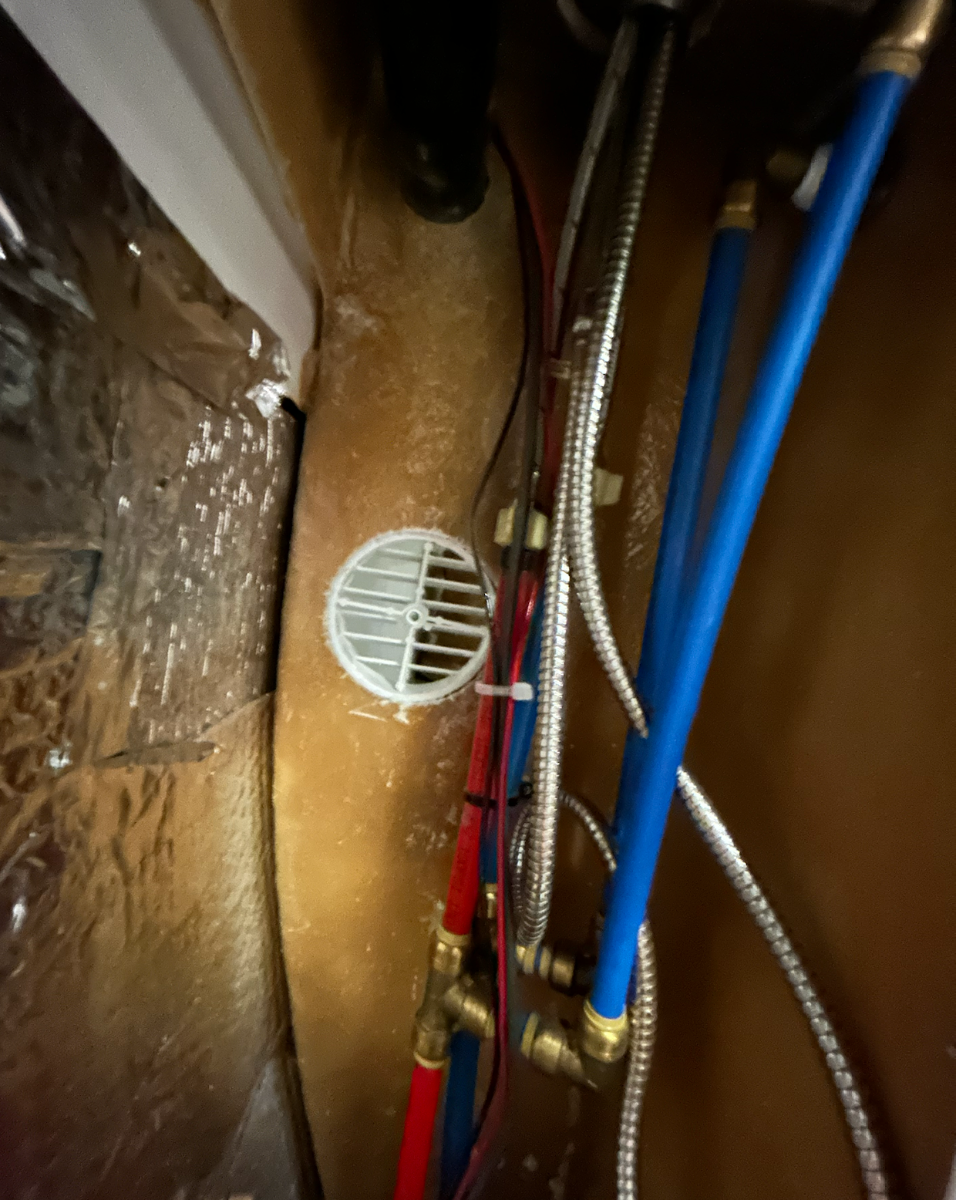
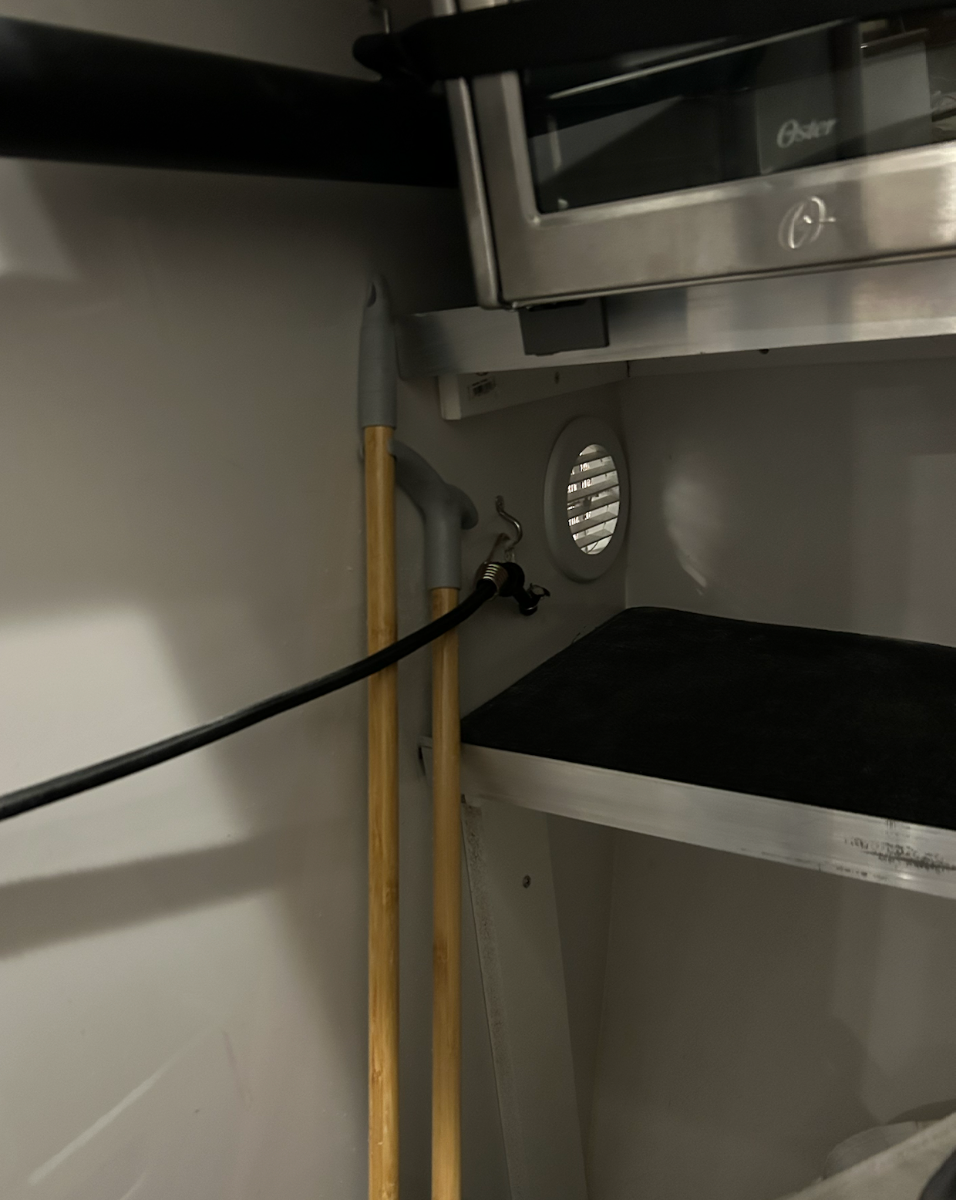
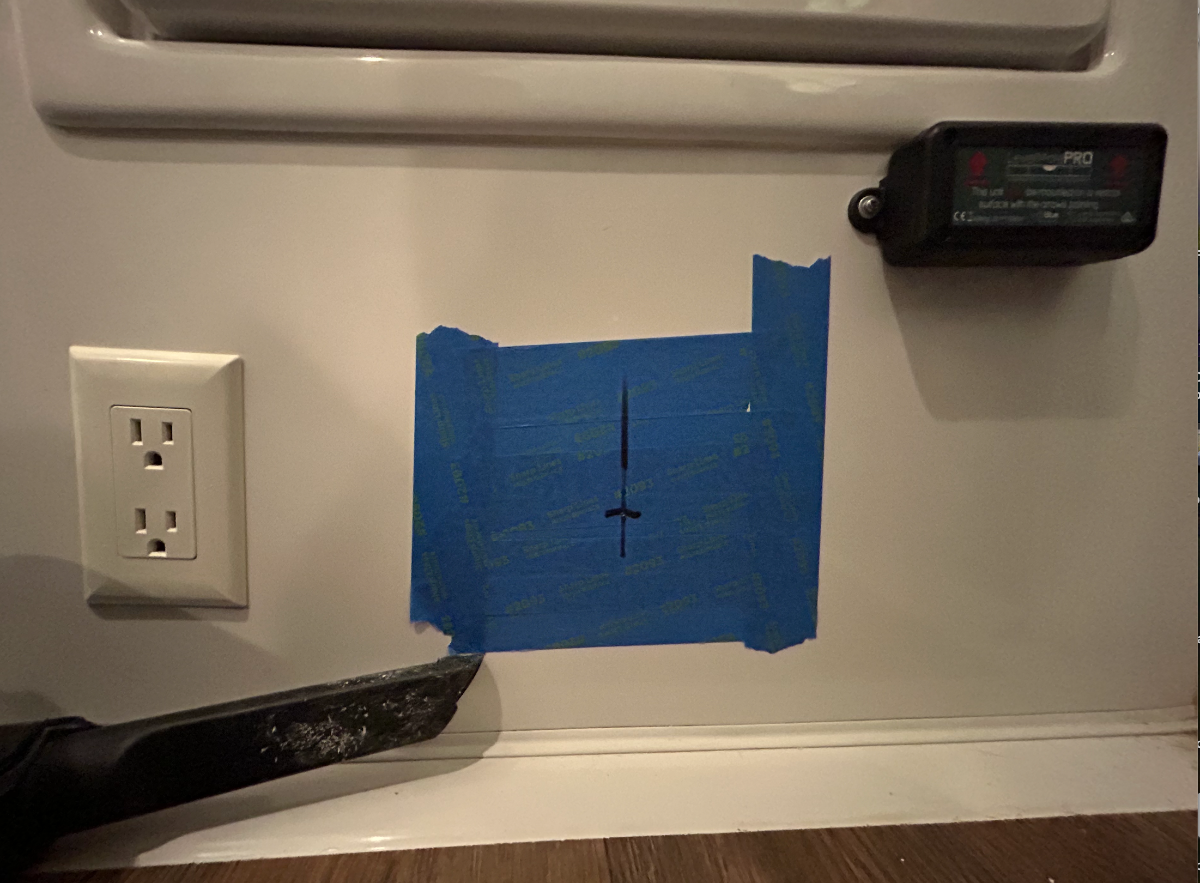
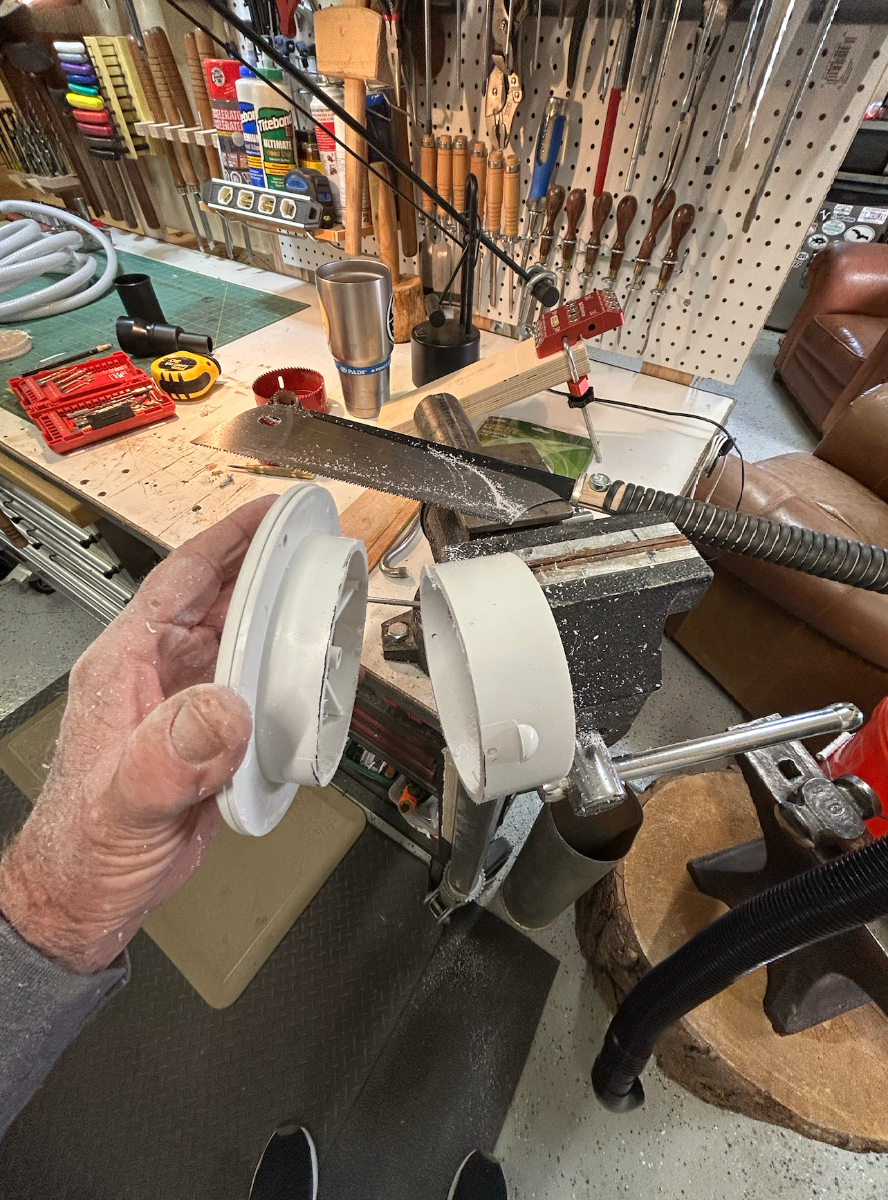
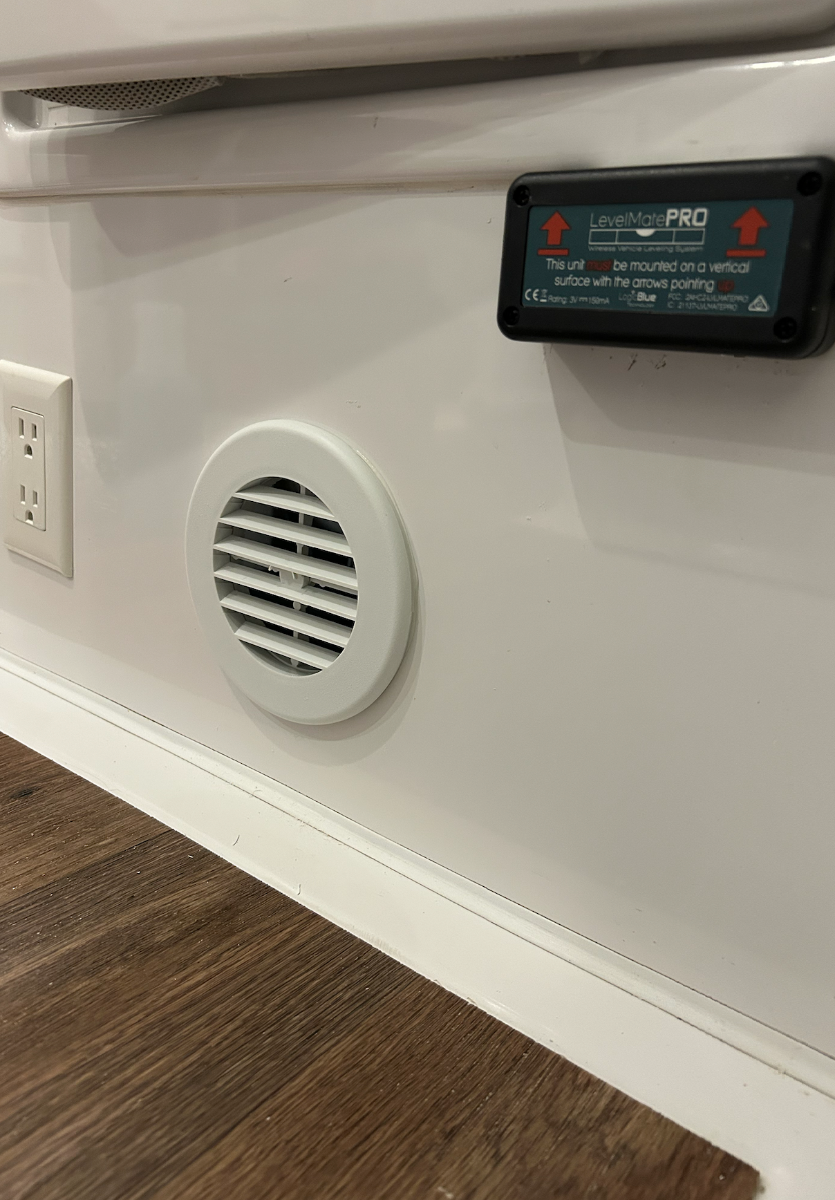
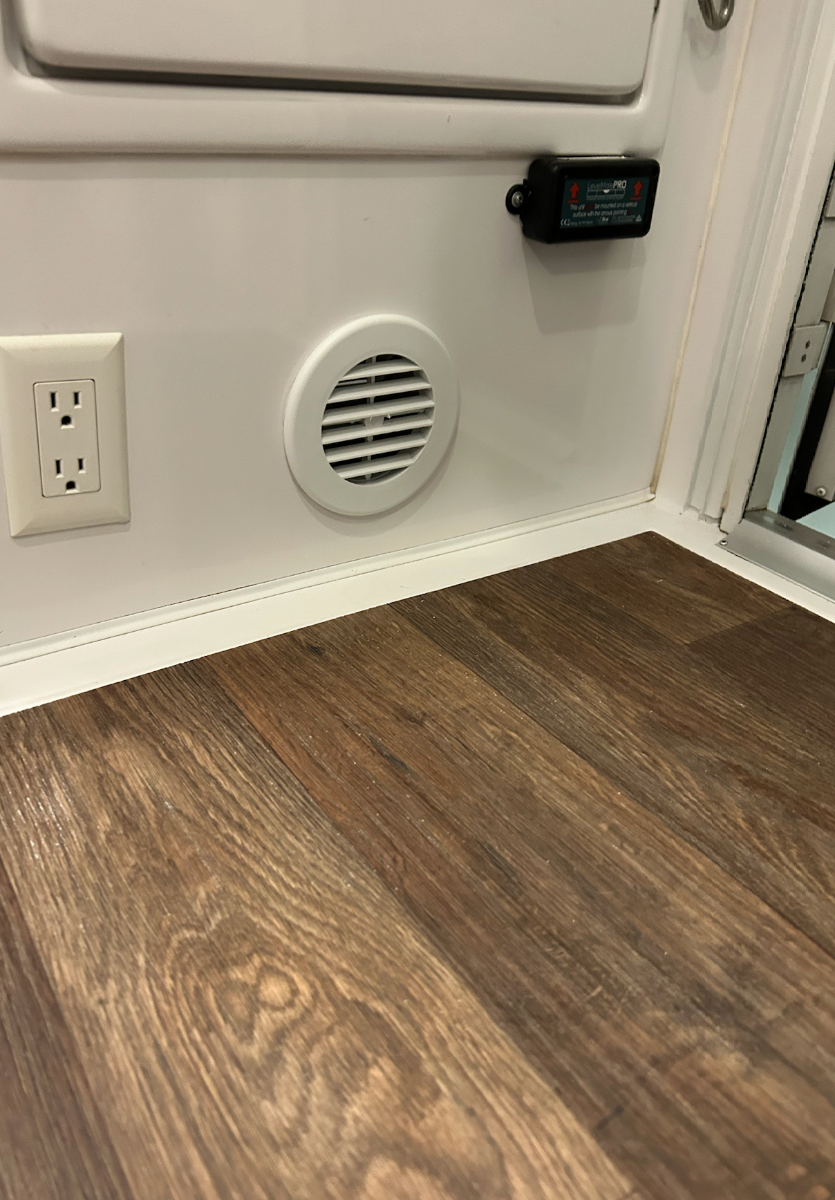
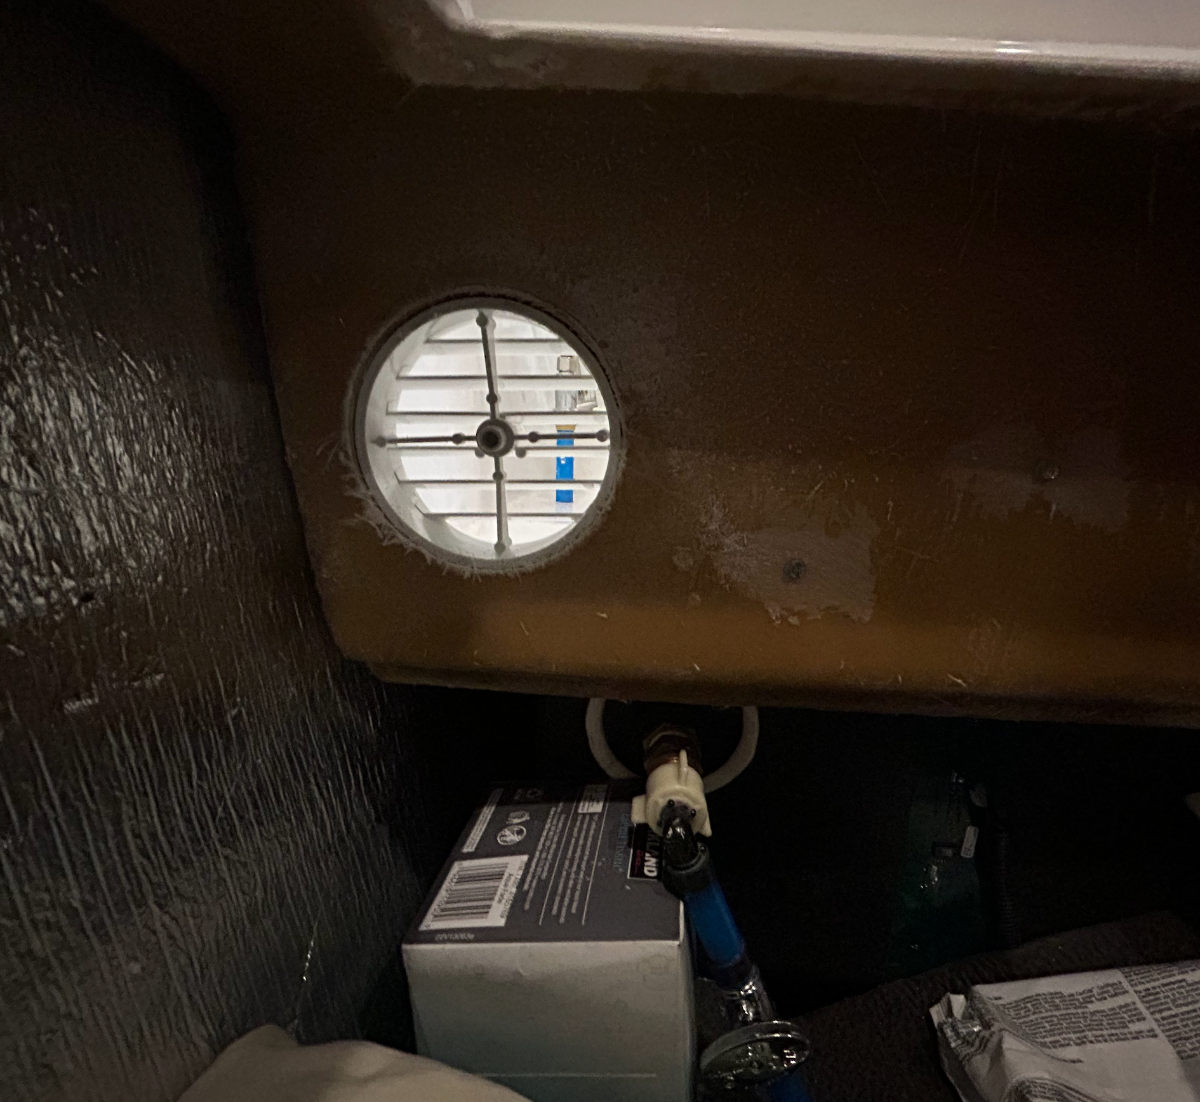
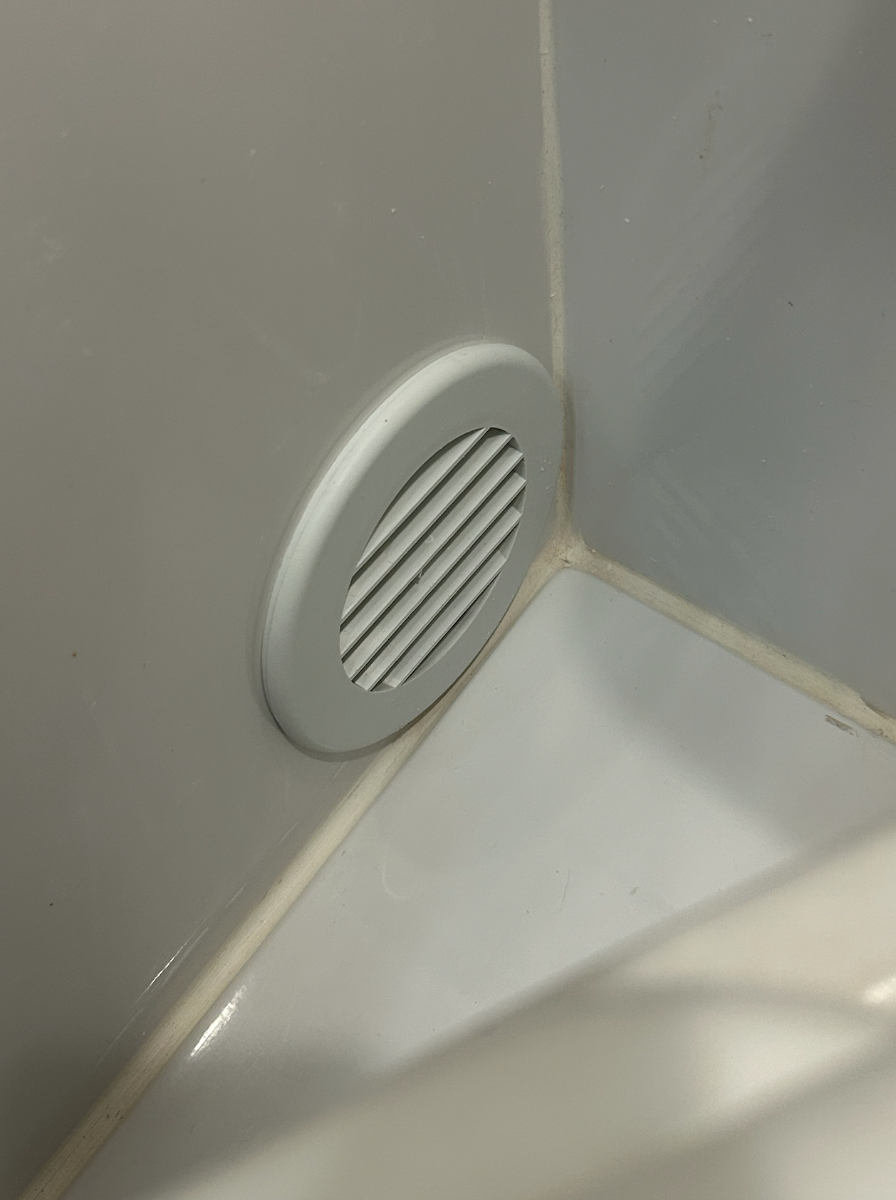
So, we finally got around to doing exactly what Dave's describing here and what other owners have mentioned in different threads. We've experienced the closet "meat locker" syndrome several times during cold weather trips. We stopped opening the closet door in the morning to keep the arctic blast of cold air from entering the main cabin. Started this project by installing the first of 3 return vents in the closet door bulkhead just below the jam: ABOVE: Measured the height above the floor of the furnace outputs (4.25") so this return vent would match. ABOVE: Cut the bulkhead with the trusty 4" hole-saw. ABOVE: Used the thickness of the cut-off to trim back the excess material on the stock Valterra vent ABOVE: Used a bead of clear silicon to secure return vent to gelcoat. Next, installed a second return vent between the closet and under the sink: ABOVE: View from under the sink ABOVE: View from inside the closet. Placed the return vent between the two lower shelves. Finally, installed the 3rd return vent under D's forward dinette seat into the bathroom bulkhead: ABOVE: View from under the forward dinette seat looking into the bath area ABOVE: View of return vent which was placed as low and as Portside as possible. The Casablanca has fairly decent furnace output flow in the bath and we have yet to modify the forced air ducts (on the "to-do" list) as @jd1923 JD has described in other threads. Our thought is that the return vents will allow for air to better circulate between the closet, under the sink, and under the forward dinette. We're hoping that this new air flow should aid in keeping the closet "meat locker syndrome" at bay. We'll see....

-

Propane cover weather stripping
MAX Burner replied to Dave Mazone's topic in Mechanical & Technical Tips
Same here, Dave -- based on your suggestion. We also put it along the bed rails as we were getting sliced by the unfinished fiberglass edge whilst making the beds. Also put it around the spare tire cover to protect it during a wheel change, FYI. -
Concur 100%. If boondocking multiple days in overcast WX (sans a GENSET), one can always plug the OTT into the TV and "idle-charge" the battery bank at 30 - 50Amps depending on what type of 12/12 charger is installed. With 740W of solar modules, we have not seen the need to haul the 48# Honda EU2000i much.
-
Remove the rain seal on the awning?
MAX Burner replied to John E Davies's topic in Ollie Modifications
It's all yours, Bill -- I'll bring it to the rally. -
No need to feel so sad, John! Our 30A Victrons do the job, IMO, for their intended use. On our typical move between locations we target 4 to 5hrs (MAX) road time -- leaving in the mid-morning with, say, a 70% SOC, by the time we're stopped for the day, we're right at 100% in our 300A-Hr Battleborns. The 4/0 cables you and I used for our applications handle the current perfectly. Still thinking we've both got the right 12/12 charger solution for our style of RV'ing (but, there is a bit of "Amp - envy" going on over here!). Now, that said, if our rigs had the larger lithium AHr storage like @jd1923 JD has, the 50A charger would be warranted, concur?
-
No more chasing snacks in the dark!
MAX Burner replied to Snackchaser's topic in Ollie Modifications
Same here - we try to go 18 hours before "break-fast" happens... -
Remove the rain seal on the awning?
MAX Burner replied to John E Davies's topic in Ollie Modifications
We removed ours a couple years back - mainly because it was badly oxidized and looked like crap. We bought a replacement strip, but never saw the need to install it - Casablanca doesn't see the light of day unless behind the Tundra rolling to the next OTT adventure. That said, anyone interested in a new awning strip can have ours for the cost of shipping... Just say'n. -
About the same here in north central NM - 26.7F, ATM. We'll be stoking up the wood burning stove in the "Cave" this morning to work on Casablanca as our highs are expected in the high forties, FYI.
-
D and I got into RV'ing after many years of backcountry skiing and backpacking. A pop-up tent trailer, 2 AS's, a Casita, and an OTT later - we are definitely a strong team. We do everything together (even Costco runs!)... HA!
-
RVLock company stands behind its product
MAX Burner replied to Snackchaser's topic in Mechanical & Technical Tips
We also had a great experience with RVLock last year when we replaced the keypad with the upgraded version (the numbers were peeling off on the original pad). After commenting this story to the RVLock folks manning their booth at the RV show in Quartzite last month - I was awarded with a huge swag bag of cool stuff! A great and responsive company, RVLock. -
Truma Pressure Relief Valve Leaking
MAX Burner replied to Rich and Jane Walker's topic in Mechanical & Technical Tips
Same here. We use our FWT exclusively for our water needs, as mentioned in other threads. Filling at home with a known pedigree of our (delicious) well water is standard practice for us. Granted, D still filters the well water through a Travel Berkey, but she does the same thing at home with the Big Berkey -- works out fine for our style of camping, FYI. -
Truma Pressure Relief Valve Leaking
MAX Burner replied to Rich and Jane Walker's topic in Mechanical & Technical Tips
Looks like the ceramic filters range in what they can remove, such as Florine. In any case, ours seems to be doing the job, FYI... -
Same here. We use 550# paracord lanyards on our milk crates that live in the "garage."
-
Dc to Dc charger Victron Orion 12 I 12 - 30
MAX Burner replied to johnwen's topic in General Discussion
We love Flag when there's no snow piled up.... MartAnn's is our fav spot for brunch/lunch, FYI. Best to Lew and Mike when you see them. I'm thinking @Mountainman198 Lance and Casablanca were a couple of Alcan's first OTT customers last year.... Stay safe, brother! See y'all down the road... -
Truma Pressure Relief Valve Leaking
MAX Burner replied to Rich and Jane Walker's topic in Mechanical & Technical Tips
@Mike and Carol - Hey, Mike: Just now saw this... We haven't tried the new ceramic Berkey filters, should we? We're currently using 4x activated charcoal types with a couple spares under D's dinette seat. -
@Steph and Dud B I'm getting one!
-
New axles may not fit all older sub-frames
MAX Burner replied to Wayfinder's topic in Mechanical & Technical Tips
100% concur, @Geronimo John, John! We've got the disk brake upgrade on our radar and will likely drop the hammer on them when our current 12" drums need replacement...FYI -
Greetings from Northern Virginia, new owner of Hull #1056
MAX Burner replied to EurekaJ's topic in Introduce Yourself
@EurekaJ - Hey, Jay! Welcome to the Oliver Family... We look forward to seeing pix of your future OTT adventures. Thank you for your service to our Great country! -
Valterra Electric Black Tank Dump Valve
MAX Burner replied to Galileo's topic in Ollie Modifications
@Galileo - Hey, Val! @ScubaRx Steve and Tali are owners that have upgraded to disc brakes. There are others, too. The newer Dexter "Never-Lube" axles are configured with sealed bearing "cassettes" - I believe they're only available with the 5.2k# axles (I may be wrong here). One still needs to inspect them annually, however. Last time I checked, the disc brake upgrade was definitely only available with the heavier axles and not for the 3.5k# axles. The disc upgrade is on our radar screen but not until our 12" drum brakes need replacement, FYI. -
Recommend a clamp meter that will measure DC amps
MAX Burner replied to a topic in Mechanical & Technical Tips
Same here. It get's used fairly frequently on trips... -
Nice looking piece of kit, for sure. Definitely not a cheap date!
-
Dc to Dc charger Victron Orion 12 I 12 - 30
MAX Burner replied to johnwen's topic in General Discussion
...coming in late on this thread. It's very encouraging seeing that many owners have now installed (or will be installing) DC/DC chargers. @jd1923 - especially interested in the performance of the 50A version! I'm sure y'all know, there's a soft setting in the Victron app that toggles the TV engine off/on sensor. The default is in the sensor "ON" position, as I recall. This keeps the system from discharging the TV battery when the charger circuit is connected to the OTT with the TV engine not running. I'll try to get some shots of the Victron app from the TV when fully connected and engine running. I nominally read about 27Amps, FYI. @johnwen - glad to see you're up and running, brother! Best to Wendy! Charge on, men! -
Cricket noises from the lights
MAX Burner replied to Going Coastal's topic in Mechanical & Technical Tips
Hey, Bill @topgun2 - but what about this "Sparky Spot" in Hatch, NM? Arguably one of the best places for an authentic green chili cheeseburger on the planet.... HA!