topgun2
-
Posts
7,757 -
Joined
-
Last visited
-
Days Won
464
Everything posted by topgun2
-
And so - the adventure begins. Excited for both of you! Just wait until they start following you into gas stations, rest areas and the like. Or, when you come back to your Oliver from grocery shopping and there are three or four people checking it out. "What is it?" "Who makes it?" Etc. So glad that your first trip was a good one and that your dreams are indeed coming true. Bill
-
ShallowGal - Again, WELCOME. Since you have already seen the Oliver in person you do not have to rely on the opinion of those of us that just might have a bias for the Oliver. You already know that it is simply the best camper available that is produced by a great company which is staffed by some truly nice people. I'd suggest that you use the "search" function found on the main Forum page and fire away with those questions. Certainly there are some very sharp minds and special people that inhabit this area of the world. Bill
-
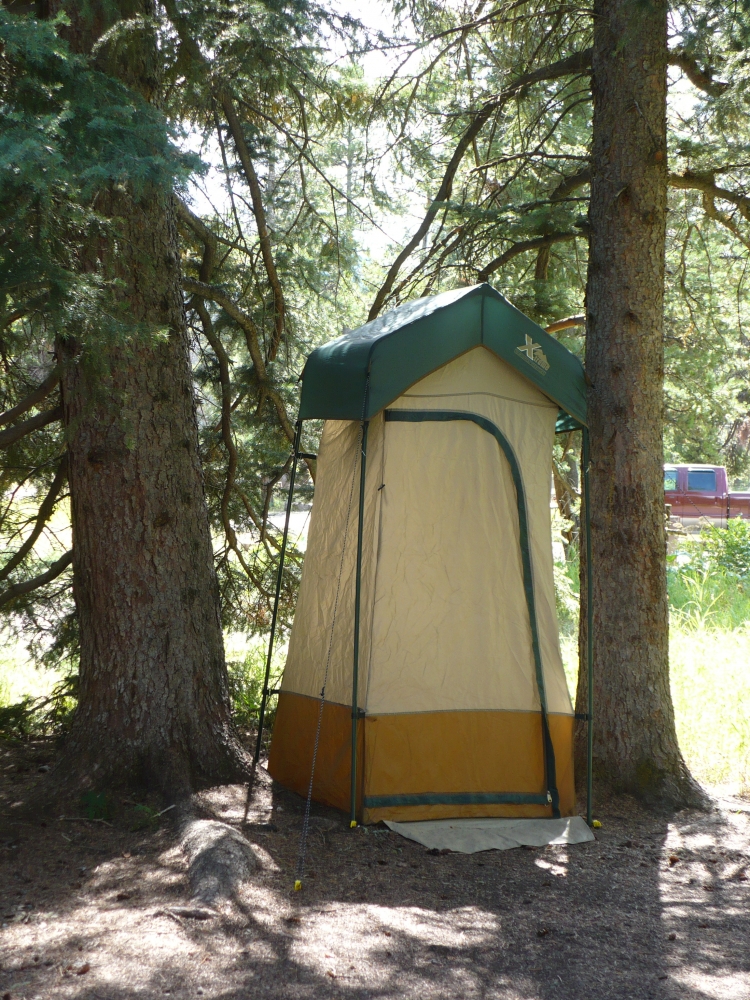
I'm basically with John on this one - there are many reasons to use an outdoor shower (particularly in the West where grey water is allowed to be "dispursed" on open ground in many places). If left in the back of my truck while I'm fishing all day (or on a picnic table that is exposed to the sun most of the day) the water in it is simply too hot to take a shower immediately after returning to camp (great excuse to sit down, reflect on the day and have a beer or glass of wine). I generally use a shower tent but have shied away from getting the more expensive ones for the reason John cites - when it gets too dirty after a few years I simply pitch and replace it. By using the outdoor shower one has more room to shower, you don't fill your grey water tank, you don't use any of your propane (assuming that you use a solar shower) and (assuming that you refill your solar shower either from the campground pump/water supply or from a crystal clear creek) you don't use your on-board water supply. With the addition of a simple portable toilet, a shower tent can also be used for "other things". For extended boondocking trips I use a simple toilet that uses what amount to plastic bags with a bit of "material" in the bottom which absorbs fluid and reduces odors. According to the directions, these bags can be disposed of with the regular trash. They are available both on line and at WalMart. Again, using these saves space in the black tank. I store the shower tent and solar shower(s) in the area beneath the street side bed where they fit perfectly - my shower tent is the single room variety. Bill

-
Since my hull number was assigned and advised to me shortly before completion I assume that the assignment happens close to the time that the VIN number is requested and received. Since the VIN # is not assigned until after the trailer has been weighed and that doesn't happen until after the trailer is fully constructed with all of its options and propane tanks installed, one can only assume that the trailer is virtually complete and off the main production line. As far as I know - you are correct regarding the hull numbers - there are no duplicates. Bill
-
HMD - Assume that you are aware that the Oliver can be ordered without the microwave. That space could then be used to store your oven and Oliver will give you a credit for the microwave that is not installed. Bill
-
JRbirdman - I assume that you are NOT using the Towready? Bill
-

Fresh water tank modification, new suction line.
topgun2 replied to Raspy's topic in Ollie Modifications
There's something about "having my tank done" that I like! Bill -
This conversation has been going on for a number of years now with many people wanting a convection. The Oliver answer has always been the same - the is simply not enough room to allow for one and meet all standards without a significant design change to the Oliver. Therefore, the answer has been to seek other methods - dutch ovens, electric toaster ovens, etc. Bill
-
How to: Santa Cruz locking shotgun mount in the closet
topgun2 replied to John E Davies's topic in Ollie Modifications
Indeed, in some Sates one is criminally (if not socially) liable for unsecured firearms. But, I think that it is likely that we just might not be talking about the same thing here. Having a firearm on your person and/or ready for possible use is a bit different than securing a firearm that is not being readily used or subject to unauthorized use. Bill -
Mike - in that case, I'd place a call to Jason and ask if there is something that you can check yourself (wiring inputs for instance). Or, the next time you are near Hohenwald be sure to stop and ask them to take a look at it. Something does not seem right to me in that I've always been able to get at least as good reception (if not better) versus those near me who are using a regular "bat-wing". Bill
-
To be honest - I had never given any thought to "retirement benefits" being received from the VA versus the DoD. Certainly I'm glad that Mike has pointed to this distinction and it has helped me to clear my thinking in this regard. I view that it is little different than many cases of similar benefits that are received from many non-military companies. While I was actively employed I received many benefits to include golf club and athletic club memberships. Upon retirement, these benefits continued only if I chose to contribute to the overall cost (I would pay reduced annual fees with my former employer paying the balance), or, they simply ended. I do not hold it against my former employer for not continuing to supply this (or any other) benefit because it was not part of our "contract" while employed. In a similar context - I used military campgrounds while I was on active duty, but, I also understood that I would not be able to use these same facilities when I was honorably discharged (not retired) and no longer on active duty. Certainly it would be nice to be able to use these camping facilities, but, I understand and accept the "terms of the contract" to which I agreed when I chose to take that step forward. Bill
-
Mike - you will know that it is "powered" when the little green light that is right on that push button switch is lit. Bill
-
Tie down points for the generator tray?
topgun2 replied to John E Davies's topic in Ollie Modifications
John - Assuming that you are talking about the generator tray/rack, I would guess that Oliver has not published a weight limit for it. However, even if they have it is probably no more than you suggest and may even be slightly less. I base this opinion on the weight limit that Oliver posted for the "hitch" on the rear of the Oliver. Also, I assume that you have thought about chain expansion links. While not very elegant and they would rattle when not in use, they would be simple to install and you could move/remove them if needed elsewhere. Bill -
Just go to the main Forum page and type in Twin bed risers in the "search" box. There are pictures there which show that unless you have some serious height to your legs reaching the floor while sitting on these would be a bit of a challenge (I think). Bill
-
Rubber Gaskets Around Porch Lights
topgun2 replied to Mike and Carol's topic in Mechanical & Technical Tips
John - thanks for the information. I think that you know that the issue here is not with water leaks but with the black gaskets "bleeding" onto the nice white fiberglass. The object of both the Captain Tolly's and the Dow sealant that Oliver handed out is only to keep the gaskets from this bleeding. That is why I was very careful in only applying this stuff to the gaskets. From what I've heard and read about the Captain Tolly's product, I'm guessing that it is a bit easier to apply (assuming that you only want to get it on the gasket). Bill -
Raspy - you got me to thinking (you have no idea of how had a thing that is to do these days). So, I did a little research and found the following to be very interesting on several levels. Bill Accordingly to The New York Times, "Less than 0.5 percent of the population serves in the armed forces, compared with more than 12 percent during World War II." But: "As of 2014, the VA estimates there were 22 million military veterans in the U.S. population. If you add their figures on veterans to the active personnel numbers mentioned above, 7.3 percent of all living Americans have served in the military at some point in their lives. But since only 2 million veterans and about 200,000 current personnel are women, that overall percentage varies a lot by gender — 1.4 percent of all female Americans have ever served in the armed services, compared to 13.4 percent of all male Americans. Seeing as you mentioned specifically that you served in the Navy, I thought you might be interested in a breakdown by branch of service: 3.1 percent of all living Americans have served in the Army, 1.7 percent in the Navy, 1.4 percent in the Air Force and 0.8 percent in the Marines, while the remaining 0.5 percent served in either non-defense or reserve roles. So that number you heard looks like a big underestimate. Perhaps the percentage was based on a younger age group rather than all living Americans (we know, based on that VA data, that more than half of all veterans are over 60 right now). We also know which conflicts those veterans served in. There are 5.5 million living U.S. veterans who served during what the VA calls “peacetime,” meaning they didn’t serve at any point during a conflict — 11,213 of them served before World War II had even begun. “Wartime” veterans are a slightly harder to group to categorize because many of them served in more than one conflict. For example, 2.8 million veterans served in only the first Gulf War (defined by the VA as lasting from August 1990 to September 2001), another 2.6 million served in only the second Gulf War (defined as the period from September 2001 to present) but there are another 1.6 million veterans that served in one of those conflicts as well as another (either the other Gulf War or something else). The VA also calculates the projected population of veterans over the next three decades. Based on its current information (i.e. assuming no future conflicts), the agency expects the number of living veterans to steadily decline to 14.5 million in 2043. Unsurprisingly, the only category of veterans projected to increase are the post-9/11 ones. Their numbers will rise from 3.9 million in 2014 to 6 million in 2043, according to the VA’s projections, meaning that those personnel will go from representing 1 in 6 military veterans to 1 in 2." source: By KARL W. EIKENBERRY and DAVID M. KENNEDYMAY 26, 2013 The New York Times
-
UNHINGED our laptop takes a hit while out on the road
topgun2 replied to mountainborn's topic in Mechanical & Technical Tips
Steve - I've always wondered why my wife keeps me around! Bill -
John - I almost hit the "Thanks" button but didn't because I didn't want someone to think that I was appreciative of the fact that an honorably discharged veteran can not use these facilities. However, thanks for doing the research. Bill
-
How about Wikicamp? Sherry says it is great in New Zealand. I've found that it is OK here but still believe that US Public Campground Project is better. Bill
-
Looks like you already have a good read on this one. Many commercial RV parks have cable so you don't need the Winegard for that. You've already got the DVD player and you have the ability to stream movies via your cell, so you don't need the Winegard for that. Depending on where you intend to do most of your camping - if it is in the boonies you will not have over the air TV signal - you just might not need it. So, unless you think that you might want to view a "local" weather and/or news program it looks like you simply don't need or want it. As John implied - you can always add it later. Bill
-
geO - welcome back to the land of camping. Glad to hear that medical issues and other non-camping issues have been taken care of so that you can get back to some real living. The last time I stayed at a military RV place I was on active duty and the beach was great - uncrowded, clean, quiet. I assume that the old rule still applies that one must be either active duty or retired from active duty in order to be able to use these facilities? Just being a nice guy with a nice RV and an honorable discharge will not cut it? Bill
-
Another plug for the Andersens - When it comes time to leave you can either simply drive off these ramps (slowly) or you can reverse your original direction. Assuming that you use a ramp for each of the two wheels you will have one ramp between the two wheels both starting and when you leave. It is simple to retrieve these because either one of the ramps fits easily between the two wheels. Since they come with their own chocks you can eliminate one of your two sets of chocks which frees up a bit of space for the Andersens. For situations where you might need height greater than the maximum 4 inches of the Andersens, you can use either "legos" type levelers or carry a couple of 2x6's. Either way - pick a method (probably the wood 2x6's is the least expensive) and experiment. You'll soon discover what works best for you. Bill
-
As John Davies says above, there is a method of opening and closing the mirrored doors that does not involve actually touching the mirrored part. Simply using your index finger you open the latch and then lightly pull on that latch as the door opens. As the door continues to open you leave you index finger in place allowing the door to fully open before removing your finger. When it comes time to close the door, again using your index finger, you reach behind the door placing your index finger in the latch. Then simply rotate your finger inside the latch surface as you lift and close the door. Really is a piece of cake and no prints are left on the mirrored part. Bill
-
Rubber Gaskets Around Porch Lights
topgun2 replied to Mike and Carol's topic in Mechanical & Technical Tips
To my knowledge the current gaskets have not been changed. The "problem" with the bleeding gaskets didn't appear on my Oliver until 6 to 9 months after delivery. At the Oliver Owner's Rally this past May, Oliver gave everyone in attendance a tube of clear Dow Aquarium sealant to be used on these gaskets to stop the bleeding. Basically this is a silicone sealant and I was hesitant to use it because I had read that one should never use silicone on a fiberglass trailer. In any case - I finally did use it (very lightly and carefully to not use anymore than necessary to cover just the exposed black gaskets). It has now been approximately 6 weeks and the gaskets have not bled. So, it appears that it "cured" the problem. How long will it last before it is necessary to re-apply? Don't know. If I was to do it again, I think that I'd try the Captain Tolley's - for no reason other than it appears to also work to cure the problem and I don't think that it is silicone. Bill- 97 replies
-
- 2
-

-
- lights
- captain tolley
- (and 3 more)
-
If you look very closely to the East you can probably see where you will be camped tomorrow night! Hope that Elizabeth is feeling better. Certainly looks like the weather is good for you - safe travels! Bill