AlbertNTerri
-
Posts
159 -
Joined
-
Last visited
-
Days Won
1
Everything posted by AlbertNTerri
-

Yet another option for your Starlink Cable
AlbertNTerri replied to AlbertNTerri's topic in Ollie Modifications
just saw your post. unfortunately we were unable to make it to the Olli rally. -
Truma Water Heat Fire in the Hole
AlbertNTerri replied to AlbertNTerri's topic in Mechanical & Technical Tips
UPDATE ON FIRE IN THE HOLE As previously reported we had the problem resolved after a local mobile RV service person (GBoyz Mobile RV Repair LLC Key West, Vern (cell) 269-370-3905) in Key West discovered and fixed the problem. We've been on site at an RV park from Jan-April without any further problems. We got an appointment at the Truma Service Center in Lakeland FL (Tampa) and brought the Olli there on our way home last week. The Truma Service tech was happy with the repair done in the field but out of an abundance of caution he replaced the burner assembly at no cost. We were at the service center for less than an hour. -
Draining Freshwater Tank
AlbertNTerri replied to Ollie Ollie in Free's topic in Mechanical & Technical Tips
When I drain our fresh water tank I first turn on the pump then open the kitchen and bathroom faucets until the pump stops pulling from the tank, after that I open the drain valve and raise the front of the trailer, doing it that way only takes about 30 min or less to drain. Of course, then I have to drain the gray water tank which I try to dump on some nearby foliage. -
When people ask me how I like my LE2, my canned response is, "I Love it, If you can live with the size, you won't find a better built trailer." I point out that Oliver makes two sizes and this is the bigger one. We have the king bed so when people look inside all they see is the bed and then the small kitchen/dinette area. It is functional but if we have to stay inside for bad weather it gets pretty small pretty fast. We're considering a larger trailer for when we stay for an extended time but for a month or less on the road you can't get a better unit. I wish they offered a larger unit, but alas, I expect it is no closer to reality then when I first asked about a bigger unit back in 2020. I'm told that it costs millions to R&D a new mold from drawing board to production. IMO, at this point Oliver is producing some of the best trailers on the market in their size and class. You can't beat it for the money.
-
Upgraded Shower and Bathroom Access Hatch
AlbertNTerri replied to NCeagle's topic in Ollie Modifications
How do you like having the door swinging in that direction? Do you think it would be more convenient if it swung the other way? It's one of my future projects that I'm planning for. I really like the way you cleaned up the inside of the vanity, I hope mine turns out as nice. a. -
Thanks for that, we're going to try it based on your stellar recommendation
-
Made in USA leaf springs
AlbertNTerri replied to Mountainman198's topic in Mechanical & Technical Tips
Very informative video, thank you for sharing that. It sounds like Tucker from service may have not been completely familiar with Olivers, he may have been speaking more generically about other travel trailers they've done installs on. When I told him I had an Oliver he seemed familiar with it but his familiarity may have just been due to there being so many of us ordering springs recently that the name struck a bell, I'm just guessing. In any event, after watching this video I'm thinking I'll stick with the dexter flex already installed and just upgrade to the new Made in USA springs. -
Made in USA leaf springs
AlbertNTerri replied to Mountainman198's topic in Mechanical & Technical Tips
PLUS TAX (of course) a -
Made in USA leaf springs
AlbertNTerri replied to Mountainman198's topic in Mechanical & Technical Tips
Just got off the phone with ALCAN, they do install Everyone I spoke with was very helpful including Randy, she’s the receptionist. Everything else I got from Tucker Here’s my report. ALCAN Springs 2242 US-6, Grand Junction, CO 81505 1 (970) 241-2655 https://www.alcanspring.com Randy (front desk) 2-3 weeks advance notice, should have no problem getting in Tucker (service) here’s the price breakdown: 2-3 hr labor @ $125/ hr $250.00 Springs x 4 $149.95 ea 599.80 +/- Wet Bolts x14 $13.99 ea 195.86 Lock Nuts x 14 99¢ ea 13.86 U Bolts, nuts & washers x8 $17.86 ea 142.88 +/-Shackles x 8 $5.99ea 47.92 (he said, they often see the holes rounding out in the old shackles) Mor ryde Eaqualizer $255 ea x2 510.00 ________________________________________________ Total $1,760.32 He will call Oliver to confirm it’s ok to have the 3” more of upward travel with the Mor ryde Equalize, that replaces the “flex suspension“. He noted that if Oliver says it’s OK that the upgrade in suspension will give a smoother ride and take out a lot more of the bumps if you hit a pothole for instance He also said that the Mor ryde Equalizer has Brass bushings that you can grease vs plastic bushings which is what we have. He said it’s not necessary, but that it will last a lot longer and will probably never wear out given the way we use them So you could reduce the price by $510 if you want to skip replacing the flex suspension. He said you can expect to Drop off @ 0730 & P/U early-mid afternoon the same day He said they’re stocking these things now so it should be no problem but by giving them the two weeks heads up, they can make sure they have everything in stock and if they have to, they can have a new set manufactured by the time you show up I told him I’d be there sometime in May or June after we leave Key West, I think I’m gonna go for the whole sh’bang (it’s only an hour and a half from the house) a -
Made in USA leaf springs
AlbertNTerri replied to Mountainman198's topic in Mechanical & Technical Tips
Is ALCAN just a manufacturer or do they also do installation? -
On the subject of finding places to stay, we've been extremely please with HipCamp, it's sort of the Air BnB of camping. You sign up for it, make a profile, then you get to rate the camping locations and they get to rate you. It can vary from an actual campground (rarely) to someone's driveway, or a field. We've stayed at a horse property, a farm that had a section of their pasture set aside for campers, there's a place outside of Hays KS that's 2500 acres on the Saline river with about 30 sites that are all about 500-1,000 feet apart from each other. Hookups vary too, from none to full hookups, prices vary as well, we've paid as little as $15/night up to $50 or more a night. The places are overall very clean and conducive to having a peaceful stay. We had tried boondockers.com, they were OK but we like HipCamp better. albert
-
Bathroom Vanity Cubby Modification
AlbertNTerri replied to Frank C's topic in Mechanical & Technical Tips
Wow, what a great use of space, very elegantly done, you've set quite a high bar for me to duplicate. I hope mine looks a nice as that when I get around to doing it. I'm thinking I'll add some shelving as well. That will really help tidy up the bathroom stuff/ cleaning supplies, a whole bunch of potential things can be stored in there. Thanks for sharing the mod!! albert -
2017 Ford F250 Lariat 6.2L gas 4x4 crew cab, 8' bed, 23 feet in length total rig length (truck and E2) about 47 feet nose to tail great ride, terrible MPG, only TV we could find during COVID Thanks for the list! albert

-
Faraday pouches for Tow Vehicle key fobs.
AlbertNTerri replied to Patriot's topic in General Discussion
Those look like Altoid containers, I'm going to try using one of those first and if it doesn't work I'll go to one of the other suggested items. I looked up the pouch mentioned in the video and then looked up some of the other pouches Amazon has listed, After looking through the reviews on all the ones I checked there are multiple complaints that they either don't work or only block the RF for a few weeks or months then stop working which makes me a bit gun-shy to spring for the fancy pouch (I know the guy in the video said that after months his still worked, but even the one he recommended had the same complaints). The Altoid container on the other hand is simple enough and you get a free supply of Altoids and it's cheaper than the plain boxes offered on Amazon. I think I'll try a cinnamon container first, if that doesn't work then I'll try a peppermint one. a. -
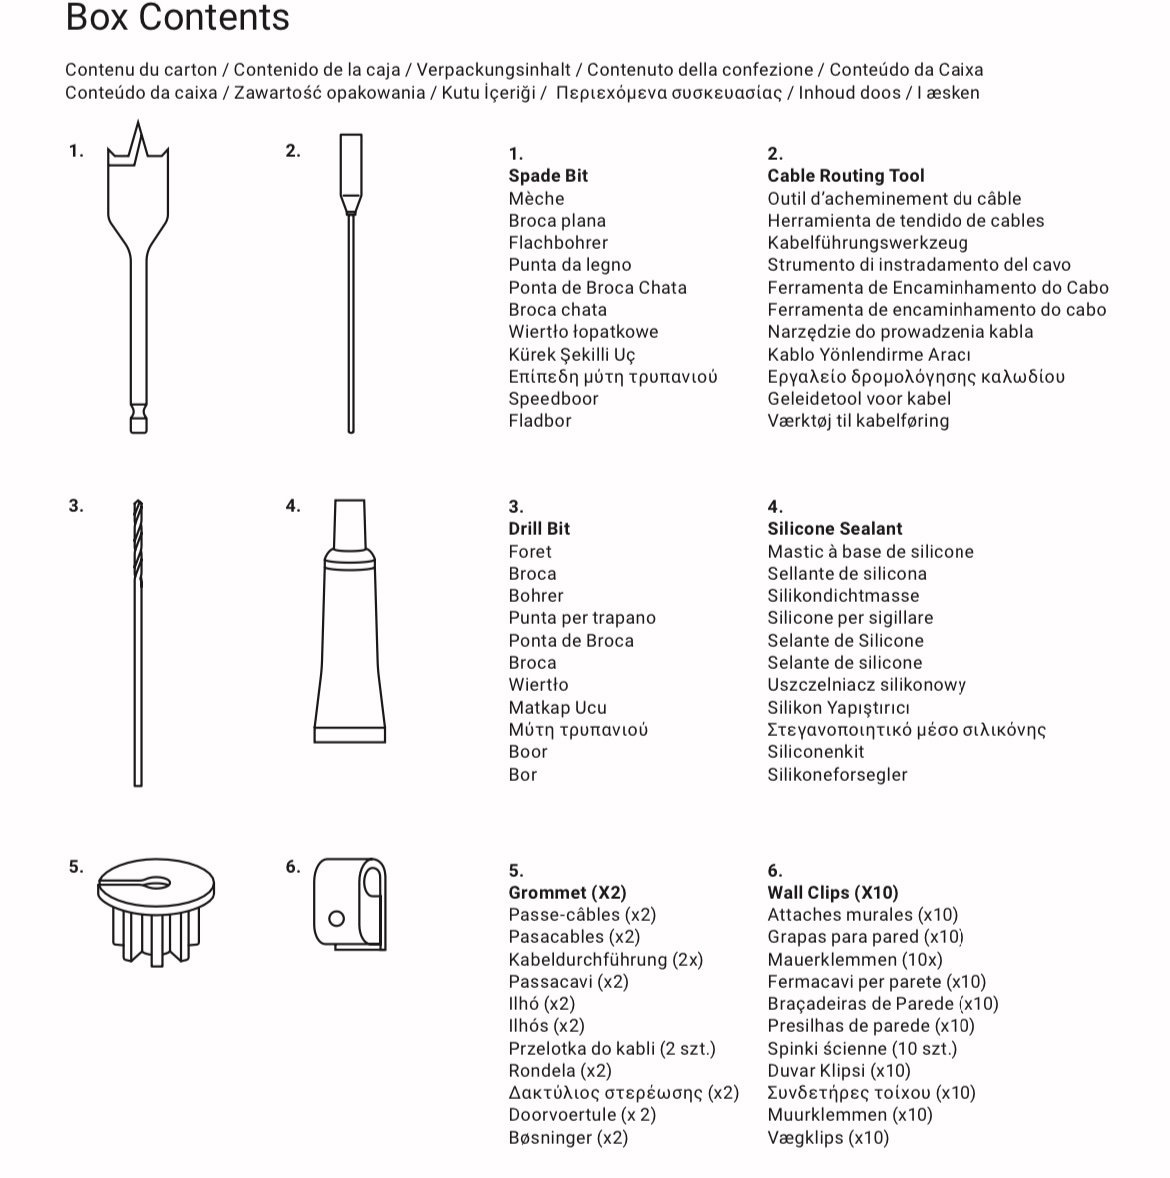
Yet another option for your Starlink Cable
AlbertNTerri replied to AlbertNTerri's topic in Ollie Modifications
Here’s a picture of what’s included in the Cable Routing Kit
-
Yet another option for your Starlink Cable
AlbertNTerri replied to AlbertNTerri's topic in Ollie Modifications
That’s a Starlink Short Wall Mount that you have to buy extra ($60) via the “SHOP” button on the Starlink app, As is the Cable Routing Kit ($32 — which I incorrectly called the House Mounting Kit) which includes two grommets (which I incorrectly called the Starlink Plug) and the correct size paddle bit as well as some other stuff. You can also buy a 150 foot cable ($130) through the “SHOP” button on the app instead of using the 75’ cable that comes with the Starlink. You will have plenty of room to coil up 150’ of cable inside the spare tire. When I get the fiberglass work done making a cable holder on the inside of the tire cover my plan is for it to be large enough to accommodate the longer cable just in case I decide I want to use one in the future
-
Well, I did a similar mod but used the 4 inch plastic deck port. Using the larger port makes it much easier for me to get my (large) hand through the hole to pull the handle. Additionally the door can now open and close even if the handle is in the "out" position, finally, having the hole a little larger than the handle allows for a bit of wiggle room in the placement of the port, it is much less of an exact science if the hole is 4 inches and the handle is just under 3 inches. I didn't worry much about the insulation, I just marked the hole and after an initial drilled hole, I used my cordless sabre saw to cut out the circle. The mounting was simply gluing in the base using 5200 marine adhesive. I did place a couple of clamps in the base ring overnight while the adhesive set. Finally, a small screw, 12 inches of chain and a bent piece of scrap metal rod I had around sufficed to make a removable device to allow the cover to either hang in place or be removed easily and stowed.
- 17 replies
-
- 3
-

-
- modifications
- drain
- (and 1 more)
-
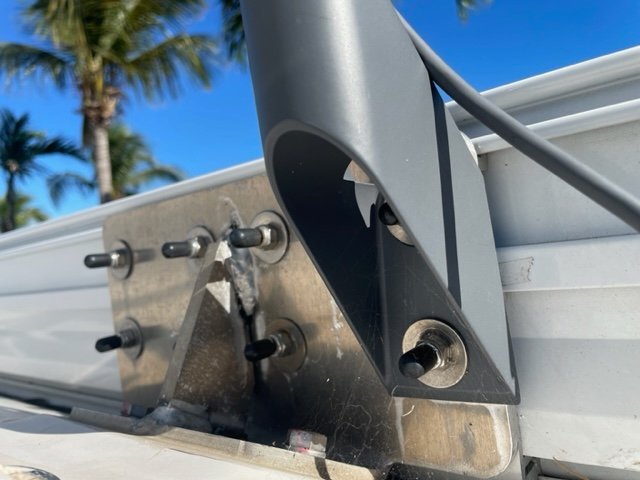
I mounted the short roof mount Starlink mount which has the same hole pattern as the Girard Awning. Plan is to also have a location to place my Harbor Freight flag pole (Starlink mount) adjacent to the trailer tongue (mount still to be fabricated). I fished the cable from the attic to the basement following the AC drain hose as noted in another's previous post, then using the paddle bit provided by Starlink in their house mounting kit, I drilled through the rear of the outside hull while still within the confines of the spare tire cover. I used marine caulk/adhesive (5200) to glue the included Starlink plug (that the cable runs through) to the hole drilled in the hull. Next I determined that I would need a max of about 50 feet of cable -- if I were to run out the rear, to the front of the trailer then up a 25' pole -- and coiled up the excess, zip tying (the excess) to the spare tire, the remaining 50 feet was then coiled and zip tied separately and marked at about the 8' mark which is the length needed to go from the exit hole in the tire cover to the dishey now on top of the rear-most awning attachments. Next was cutting a 4 inch hole in the spare tire cover and mounting a marine deck port cover, again using the 5200 adhesive. The next day after the adhesive had hardened sufficiently I drilled a hole at about 5 o'clock on the base of the port and then cut to the hole forming a "U" shaped hole to allow the cable to exit and still be able to replace the port cover. The cover-base has a small diameter o-ring that contacts the cover which of course was cut when I made the "U" shaped hole, I put a drop or two of super glue in the o-ring's channel and pressed the cut ends of the o-ring in place so it doesn't fall out and still provides adequate protection for water intrusion as well as helping assure a tight fit when the cover is screwed in place for travel. The 8' of cable just gets pushed up inside the tire cover for travel, however if I need to use the flag-pole for the dishey then I'll have to remove the cover, cut the zip ties and uncoil the 50' length, then recoil and zip tie it when done. Initially I tried just pushing the entire 50 feet of cable up through the new port hole in the tire cover which worked moderately well...but only one time. When I pulled it out and hooked it up the Starlink no longer worked. Upon closer investigation I discovered that I had kinked the cable enough to cause it to stop working. $85 and a couple of weeks later after the new cable was delivered I hooked it up and it worked fine, so then, after pulling the new (non-kinked) cable from the attic to the basement and all the enjoyment associated with removing the marine adhesive holding in the cable plug, I was again up and running. My plan in the off-season is to drop off the spare tire cover to my favorite fiberglass boat repair shop and have them add a mount inside the tire cover that will allow me to coil the unused cable on to the inside of the cover instead of being zip tied to the tire. It will basically be in the same location but attached to the cover making it easier to access the spare tire by not having to cut and later re-coil and mount the cable to the spare.
-
Looking through this entire post again, I'm now planning on adding the 2" vent to the bath/dinette wall and upper/lower vents to the closet. Anyone have thoughts on adding a vent going through the wall that is under the street-side bed area so air can circulate from the area near the exterior shower region to the floor of the main cabin, directly across from the large return air duct to the furnace that's on the curb side? I'm thinking that with the added 2" bath to dinette vent, the warmed air from the bath would be able to circulate under the street side of the cabin, under the battery box and then be pulled back to the furnace without causing a loss of airflow to the furnace. Am I over thinking this?? albert
-
I've also seen posts that noted that there was so much redundant heater duct in places that it formed a kink which severely restricted the airflow to the bathroom. You might try taking a peak inside the bath vanity to see if there's heater duct in there that needs to be re attached or straitened and look under the curbside bed to see if the duct has kinked or been crushed thus restricting your bathroom airflow. Since rideandfly's Hull 75 and Mike and Carol's #135 have the bathroom duct, I'm betting #113 does as well. a
-
for some reason when I went back and used the "Breaking Subzero" search I had to enter it, hit search, then enter it a second time and hit search again for it to bring up more than just the above post, so you might have to search it twice to find the thread
-
It looks like you have Hull #113. There have been many changes through the years to the trailers. Ours has a heat outlet just under the toilet paper holder in the vanity of the bathroom which keeps the bath quite nice and warm. I'm sure many will comment on your post over the next day or two, but my guess is that the problem you are describing is unique to the older units. There have been many threads posted on increasing the heat to various locations in the trailers. Paste this into the search bar (in the upper right corner of this page) for an interesting modification to help increase the heating to the street side under the bed and battery box, It could be extended to include the bathroom with only minimal effort I expect. Paste: "Breaking Subzero" Include the quotes to help limit what is retrieved. the thread was posted by: By Minnesota Oli February 11, 2021 in Ollie Modifications Good luck and please keep us posted on what you do albert
-
Pre Launch De-winterization
AlbertNTerri replied to Wandering Sagebrush's topic in General Discussion
PS: we have the composting toilet too, so black water is not an issue with us. a. -
Pre Launch De-winterization
AlbertNTerri replied to Wandering Sagebrush's topic in General Discussion
This is our second year of striking out during the freezing season. After going through a similar discussion last year considering the risks of freezing and the associated subsequent potential grief verses the benefits of just staying winterized until reaching the non-freezing part of the country, we decided the stress wasn't worth the benefit of being de-winterized for the journey. That said... This year we de-winterized in southern Florida at which time we discovered a significant problem with our Truma Aqua go on-demand water heater, which, had we de-winterized before the trip, may have been discovered prior to leaving Colorado (although the problem may have occurred from the jostling during travel...so...who knows, in any event, the WH is now repaired and working as expected, we did however have to go over a week without using it) Bottom line, I don't think it's worth risking freezing one elbow or pipe etc. given the grief that would ensue after finding water dripping out from between the shells so we opt to use bottled water and only de-winterize once reaching warmer climates. The only exception for us is IF we plan to stay in a cold location long enough to justify de-winterizing for the stay (say a week or longer) and then re-winterize for the next leg of travel. That's a personal. The Ollie is fine to be de-winterized in the cold while being used and heated on site. It's questionable at best however to be going down the road in sub-freezing temps as to whether the furnace will be able to keep enough heat between the shells to prevent EVERY valve, elbow, connection, pipe etc from freezing. My Advice: Bottled water Scramble south ASAP If you need a shower before your arrival to warmth the added expense of a night in a motel will pale to the cost of fixing a frozen water line. Albertt -
Thanks GAP for that input, your post was the one I was referring to. I'm sorry the mod didn't provide as much improvement as anticipated, it seemed like a great idea. Thanks for the update. albert