
jd1923
-
Posts
2,954 -
Joined
-
Last visited
-
Days Won
206
Everything posted by jd1923
-
 Agreed. If the bearing got badly damaged as it failed, it can cause damage to other parts but most of the time they would be reusable. I read somewhere that the spindle nut should not be reused and I do not believe pinching the nut would help any as this is hardened steel. But when asked on eTrailer, the rep replied as follows -- Does the Spindle Nut Need to be Replaced on Nev-R Lube Axles?
 -
This is the bearing after pressed back in. You can feel it bottom out, when the air tool starts making a noise. Then the snap-ring fits into its groove. And we know the snap-ring is right when you grab one end by the hole, pull it towards the other end and the entire snap-ring stays in the groove while it circles around a bit.

-
Pushing the new bearing into the hub is much easier than pulling the old one. Apply some grease to to inside of the hub and reapply grease on the press bolt and washers. You'll need the larger 05# press on the opposite side (as pictured). I used a 1 1/4" closed-end wrench to hold the bolt on the inside and a short 2x4 under the drum to hold the wrench up in place.
-
The bearing comes out towards the outside, towards the side where the snap-ring keeps it place, as shown in the first picture above. The first picture below shows the interior of the drum, the steel surface that the magnet grabs and on this side the opening to the wheel bearing is smaller. The bearing must be pushed through this smaller opening. In the second picture you can see the two sizes within the hub. It's a rather snug design! You need the 11# press fitting to push the bearing out. On the other end will be the 001# stay, bolted through it all. You should apply wheel bearing grease on the bolt where it will be threaded, both sides of the washers. After you pull the bearing out about 3/4" or more, when it bottoms out, you will disassemble and start over adding the 17# sleeve for additional clearance (not enough bolt length requires doing this in two steps). Then continue to crank down until the bearing releases, just pops out of the hub! I used the hand tools pictured which was doable but made the job tedious. A 1/2" impact would certainly help, so at home I used a HD pneumatic 1/2" impact to finish up. Remember, all auto shops have air tools and a 20 LB press would make butter out of pulling/pressing this bearing! This picture shows the hub of the drum now empty. You see the tools in order with the removed bearing inline. It came out nice and since it's a new part, it's going back in! 🤣
-
You will need a bearing kit: https://www.etrailer.com/Trailer-Bearings-Races-Seals-Caps/Dexter/31-73-3.html Or you can save some money purchasing parts separately. The Chrysler PT Cruiser, 2010 and earlier used the same bearing as their front-wheel drive wheel bearings. You can find them here and 100 other auto parts stores. https://www.rockauto.com/en/moreinfo.php?pk=1117862&cc=1441786&pt=1672&jsn=10543 https://www.summitracing.com/parts/tmk-set49?seid=srese2&utm_source=bing&utm_medium=cpc&utm_campaign=Brands+|+T&utm_term=4581596235429750&utm_content=GSAPI+5ba2a4366829c There's this company... Though I have no idea as to whether they are legit, but good prices as listed. Don't buy bearings here but it appears they have the correct snap-rings and perhaps other Nev-R Lube parts! https://www.easternmarine.com/catalogsearch/result/?q=Nev-r-lube And you need to get a bearing press. I suggest buying this even for those of you how would not entertain doing the work yourself. Most small shops will not have the correct size press fittings. https://www.harborfreight.com/front-wheel-drive-bearing-remover-and-installer-kit-21-piece-63728.html This kit is what I used it to remove and replace this this axle bearing! And you will NOT want to tote around this toolkit with you at 17x15x4" large and 25 LB heavy (though I could name a few Oliver Owners who would do so!). If you were to carry 6 LBS of numbered tools, as pictured... These are the tools i used.
-
After safely jacking up the Oliver, and removing the wheel, the brake drum/hub must be removed. First you'll need an extremely light snap-ring pliers for the spindle nut keeper which is required to get the hub/drum off. Then the spindle nut must be removed which requires an extremely large 1 7/16” socket. This nut is torqued to 150 lb-ft! You may need your spouse or travel partner to apply the TV brakes so that you can release this nut using a HD breaker bar. OR if you have a HIGH-Torque battery-powered 1/2" impact it makes this and several other tasks so much easier!🤣 Sockets of this size are generally 3/4” drive so you may also need a 3/4" to 1/2" socket adapter. The main bearing-keeper snap-ring is HD! You'll need quite a HD snap-ring pliers and good hand strength! If you intend to have an auto or trailer service shop work the bearing replacement, they can also remove the larger snap-ring, but it’s good to have all he necessary tools of which any small service station may or may not possess! These are the parts you would remove AND the same parts that may have to be replaced, besides the BEARING! I suggest having two complete bearing kits with you at all times.
-
The idea here is to understand what is required to service Dexter Nev-R Lube Bearings while on the road given a bearing failure. Specific knowledge, parts, and tools are required and it’s important to be ready for this issue that is likely to occur, sooner or later. Whether you are the person working the repairs or not, understanding this is equally important! Having the required bearing parts kits and the correct size bearing press tools would allow you to work this repair DIY, or at ANY local service shop, anywhere you happen to be in your travels when a bearing might fail. Without spares and tools, you’re stuck. No local repair shop will have the parts you need and very few would have the bearing press tools in the correct sizes on hand even if they have air tools and a press! Note this recent statement from an Airstream owner: “We're on a five week adventure and experienced a bearing failure that sidelined us for 5 days. I got the bearing from the local O'Reillys Parts Store...the other components I had to order from an online source. Despite all the Truck and Trailer industry in Oklahoma City, nobody had the spindle washer, nut or snap ring I needed. The bearing was easy to get and much cheaper than the Dexter option. It's the other parts that hold the hub on that can be challenging to find if you need it right now to get back on the road.” Once you remove the bearing cap with a light chisel or similar tool, this is what you will see --
-
But I’m not laying cables, not picking them up, not cleaning them off, not allowing them to dry, not buying and handling suitcases and “cord handlers” then repeat! We charge our starter and house batteries daily, Same for your phone and laptop batteries. Install the battery charger somewhere convenient, we have ours in the Attic. I ask Chris to swap batteries, one minute later she’s done and the backup is back on the charger. Usually, whoever takes Charley out for a morning outing will change the battery. If I asked her to go outside, good weather or bad, and wind up that friggin’ cord, I would get a look and then have to do it myself. Use the technology, or not, yes it’s your choice! The cable that came with our Mini is still in the box! Do you choose to make a call, with your cell phone only when connected by cord to power? 🤣
-
OK, IMHO this is starting to get ridiculous! 🤣 I'm trying to get you guys OFF the cord and your buying accessories and even suitcases to carry your Mini and more cases to carry extra cords, and extra-loooong cords, more and more cords! Why? Then we have other threads, some showing fancy builds with routers and POE systems, drilling holes in Oliver hulls for unnecessary Ethernet ports. (yeah, cut the cord!) 🤣 So @Patriot asked me if the DeWalt battery was waterproof? The answer is No. But anybody wanting a battery solution could easily buy a waterproof 12V or better a 24V LI battery to power the Mini. NP, 100s available. (cut the cord!) I purchased a waterproof case and upon delivery it sat on my parts shelf for several days while I was thinking... Would I want to build the battery adapter into a case, so that every time I need to change the battery (twice daily), I would have to open the case, change batteries and reseal the case? Should I force the need to do this twice a day for the 1 out of 20 days we see rainfall? No way! I returned the useless case today. This is my solution. I'm not as fancy as some of you. Don't spend money at all on cases and wire management devices, or stuff that holds more stuff, it's not me. I still wrap cords on my arm and elbow in a wrapping circular fashion and then toss the cord in the toolbox or trunk as I have done all my life. It will be OK! And it must be nasty to wind up that 50 ft cord when breaking camp, all wet and dirty, leaves and pine needles - Yuck! (cut the cord) This is my waterproofing solution for our Starlink Mini battery. We always poopy-bags available, or if not, EVERY Public Park has a dispenser! Low cost, no hassle and I might need a waterproof covering once or twice a year! 🤣
-
Dometic CFX5 Refrigerator Tow Vehicle Installation with Solar Power
jd1923 replied to jd1923's topic in Ollie Modifications
Amazon links for several components used: Dometic CFX5 -- https://www.amazon.com/dp/B0DVLZM9WW?ref=fed_asin_title&th=1 Grill (Fridge) Cover -- https://www.amazon.com/dp/B0CPPHPLLG?ref=fed_asin_title&th=1 Renogy 100W Flexible Solar Panel -- https://www.amazon.com/dp/B09W21FRBC?ref=fed_asin_title&th=1 Victron Energy SmartSolar 75/15 MPPT Solar Controller -- https://www.amazon.com/dp/B075NQQRPD?ref=fed_asin_title&th=1 10 AWG 30ft Duplex Marine Grade Wire Tinned Copper Oxygen-Free https://www.amazon.com/dp/B0B6HV5TXQ?ref=fed_asin_title&th=1 Bus Bar 12V 250A Single Bolt https://www.amazon.com/dp/B0D2CWHLCN?ref=fed_asin_title&th=1 -
Dometic CFX5 Refrigerator Tow Vehicle Installation with Solar Power
jd1923 replied to jd1923's topic in Ollie Modifications
We will have a real test on a 3-week trip to SW CO Sept-Oct. Soon, I will determine whether a 2nd solar panel will be necessary. The 75/15 solar controller can certainly handle 200W total. Yesterday at 4PM I pulled the truck back into our garage, so no more solar power. The truck starter batteries were at 12.54V at the time. The CFX5 was set at 25F with a few water bottles in it. At midnight, I set the thermostat up to 36F. Now after running for 20 hours without solar power, the start batteries voltage is 12.11V (-0.43V loss in 20 hours). I’m certain my truck will start fine today at this voltage. -
Dometic CFX5 Refrigerator Tow Vehicle Installation with Solar Power
jd1923 replied to jd1923's topic in Ollie Modifications
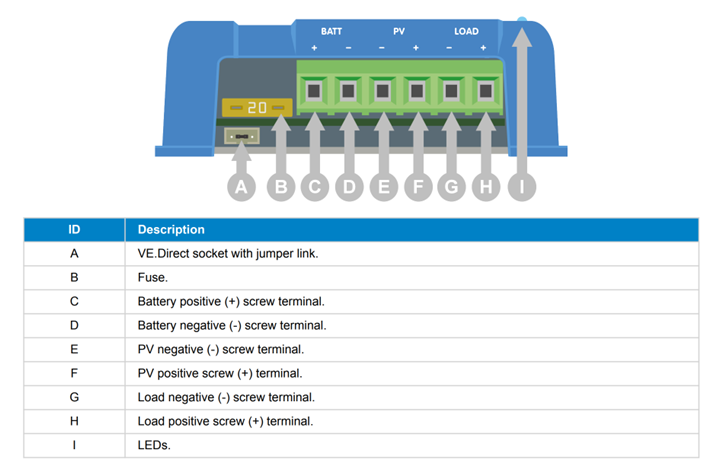
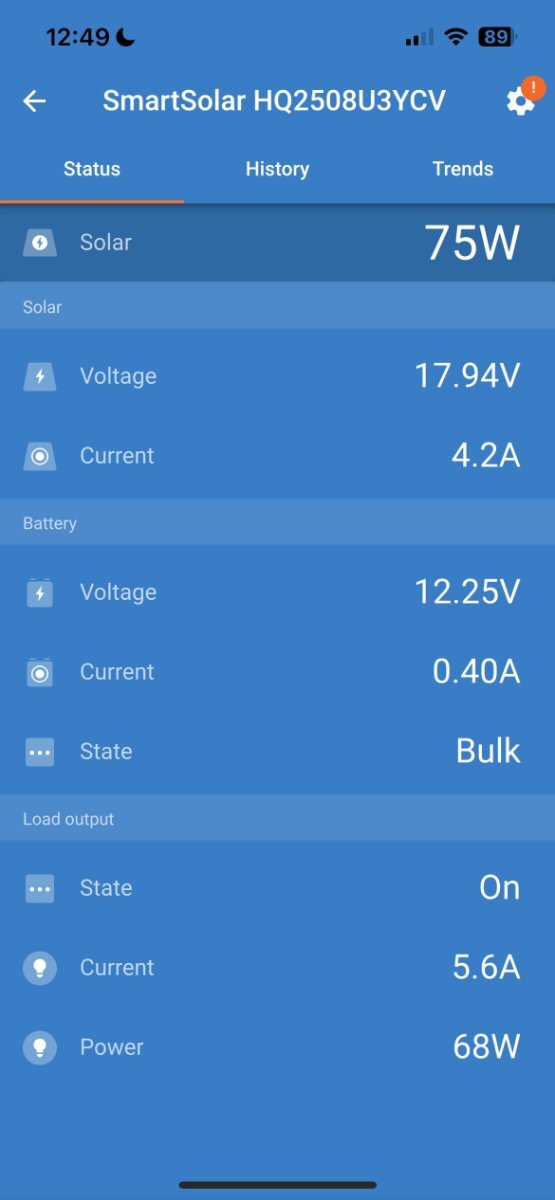
I’m really happy with the results! The 100W panel is regularly getting 70W, during the day, sitting flat, not angled to the sun. When getting high of 75W it handles the 5.6A required by the CFX5 with compressor running (observed 0A with compressor OFF, 3.7A lowest reading with compressor running and 5.6A highest reading), plus another +0.4A charging the TV starter batteries. This adds to 6A provided by solar. The Pepwave router was also running behind the scenes and it draws +/- 1A. This particular Victron SC has a terminal for 3 pairs of wires (see graphic). One pair for the battery (BATT), Solar Panel input (PV) and LOAD an output circuit. I thought this is a handy extra. I could have wired the CFX5 cooler to battery, but this LOAD circuit allows for special monitoring (the Pepwave is wired directly to the batteries).
-
Dometic CFX5 Refrigerator Tow Vehicle Installation with Solar Power
jd1923 replied to jd1923's topic in Ollie Modifications
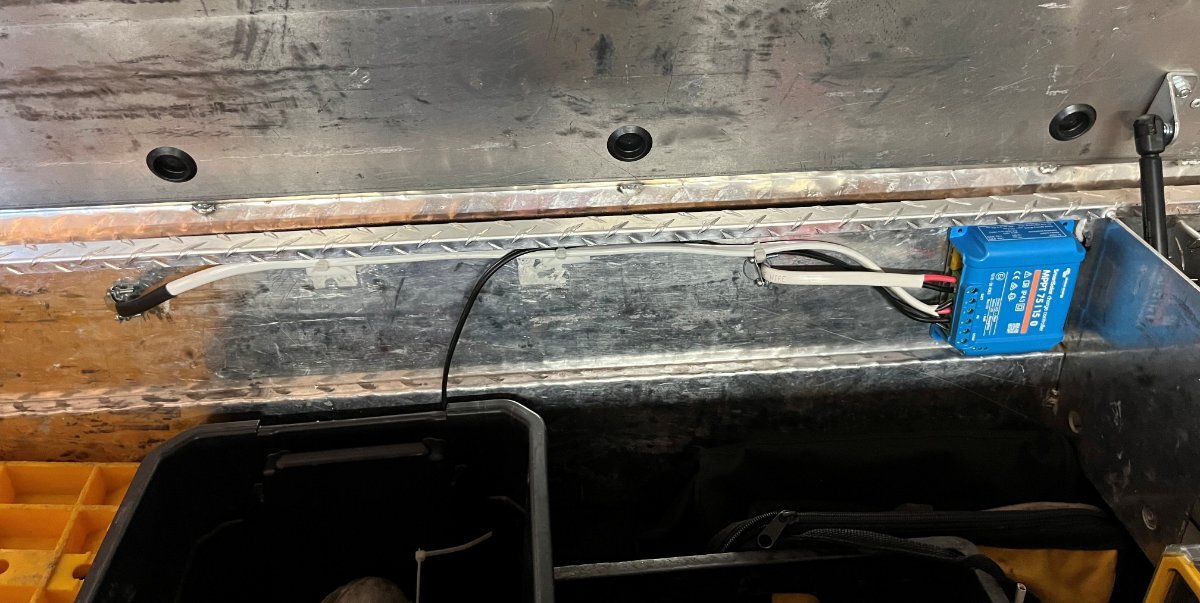
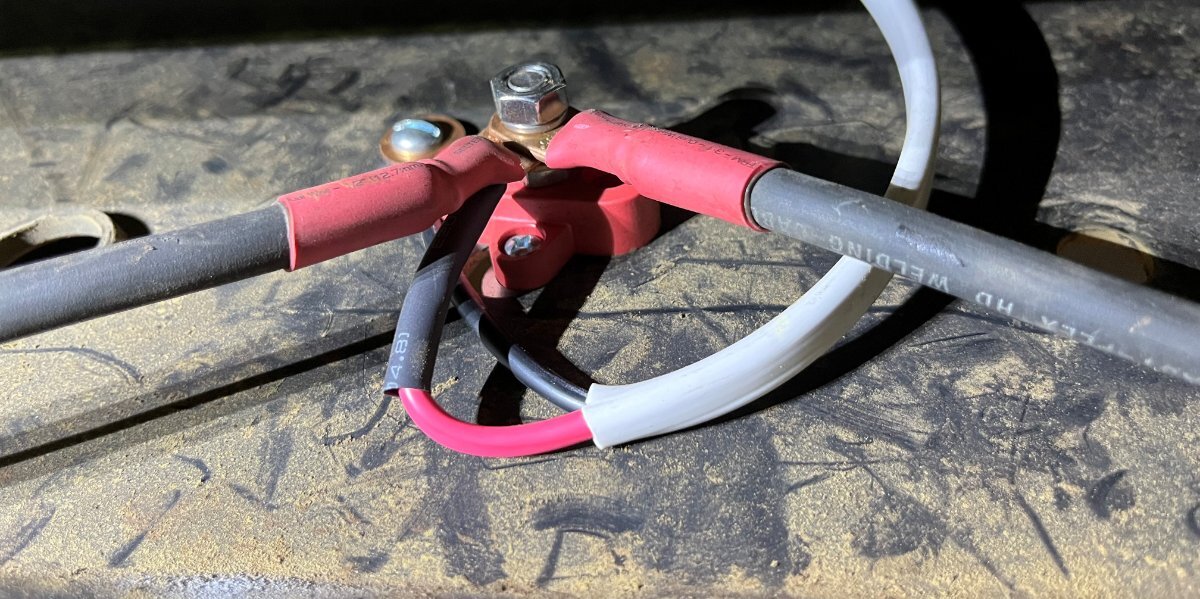
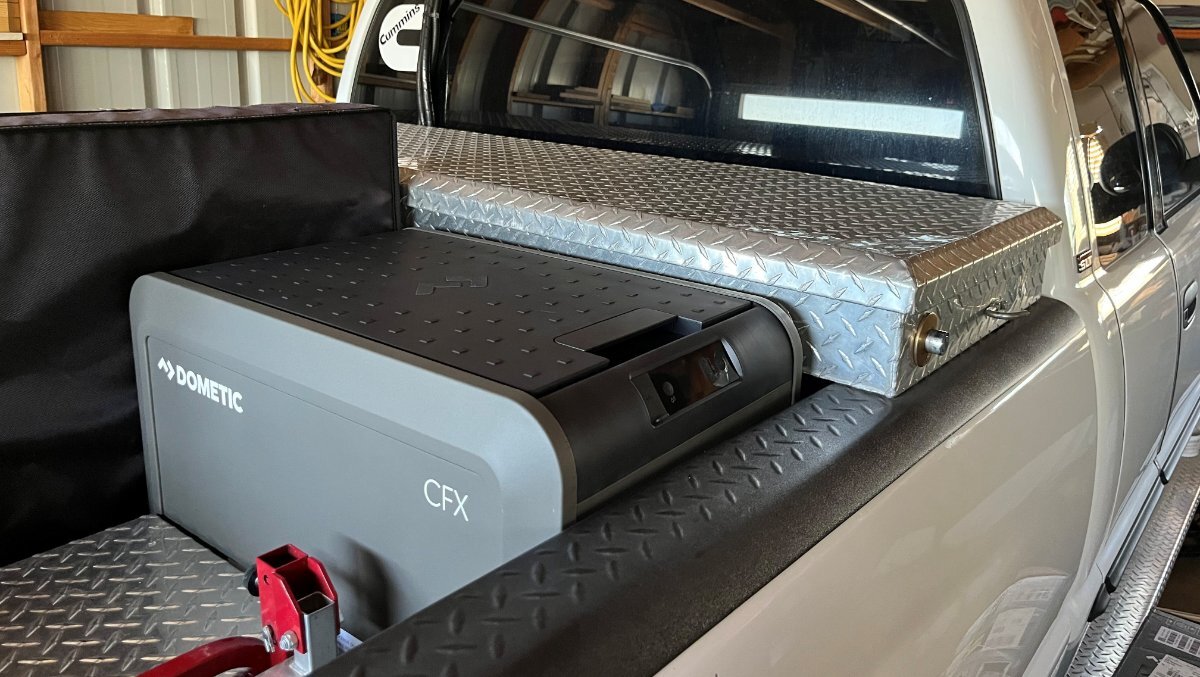
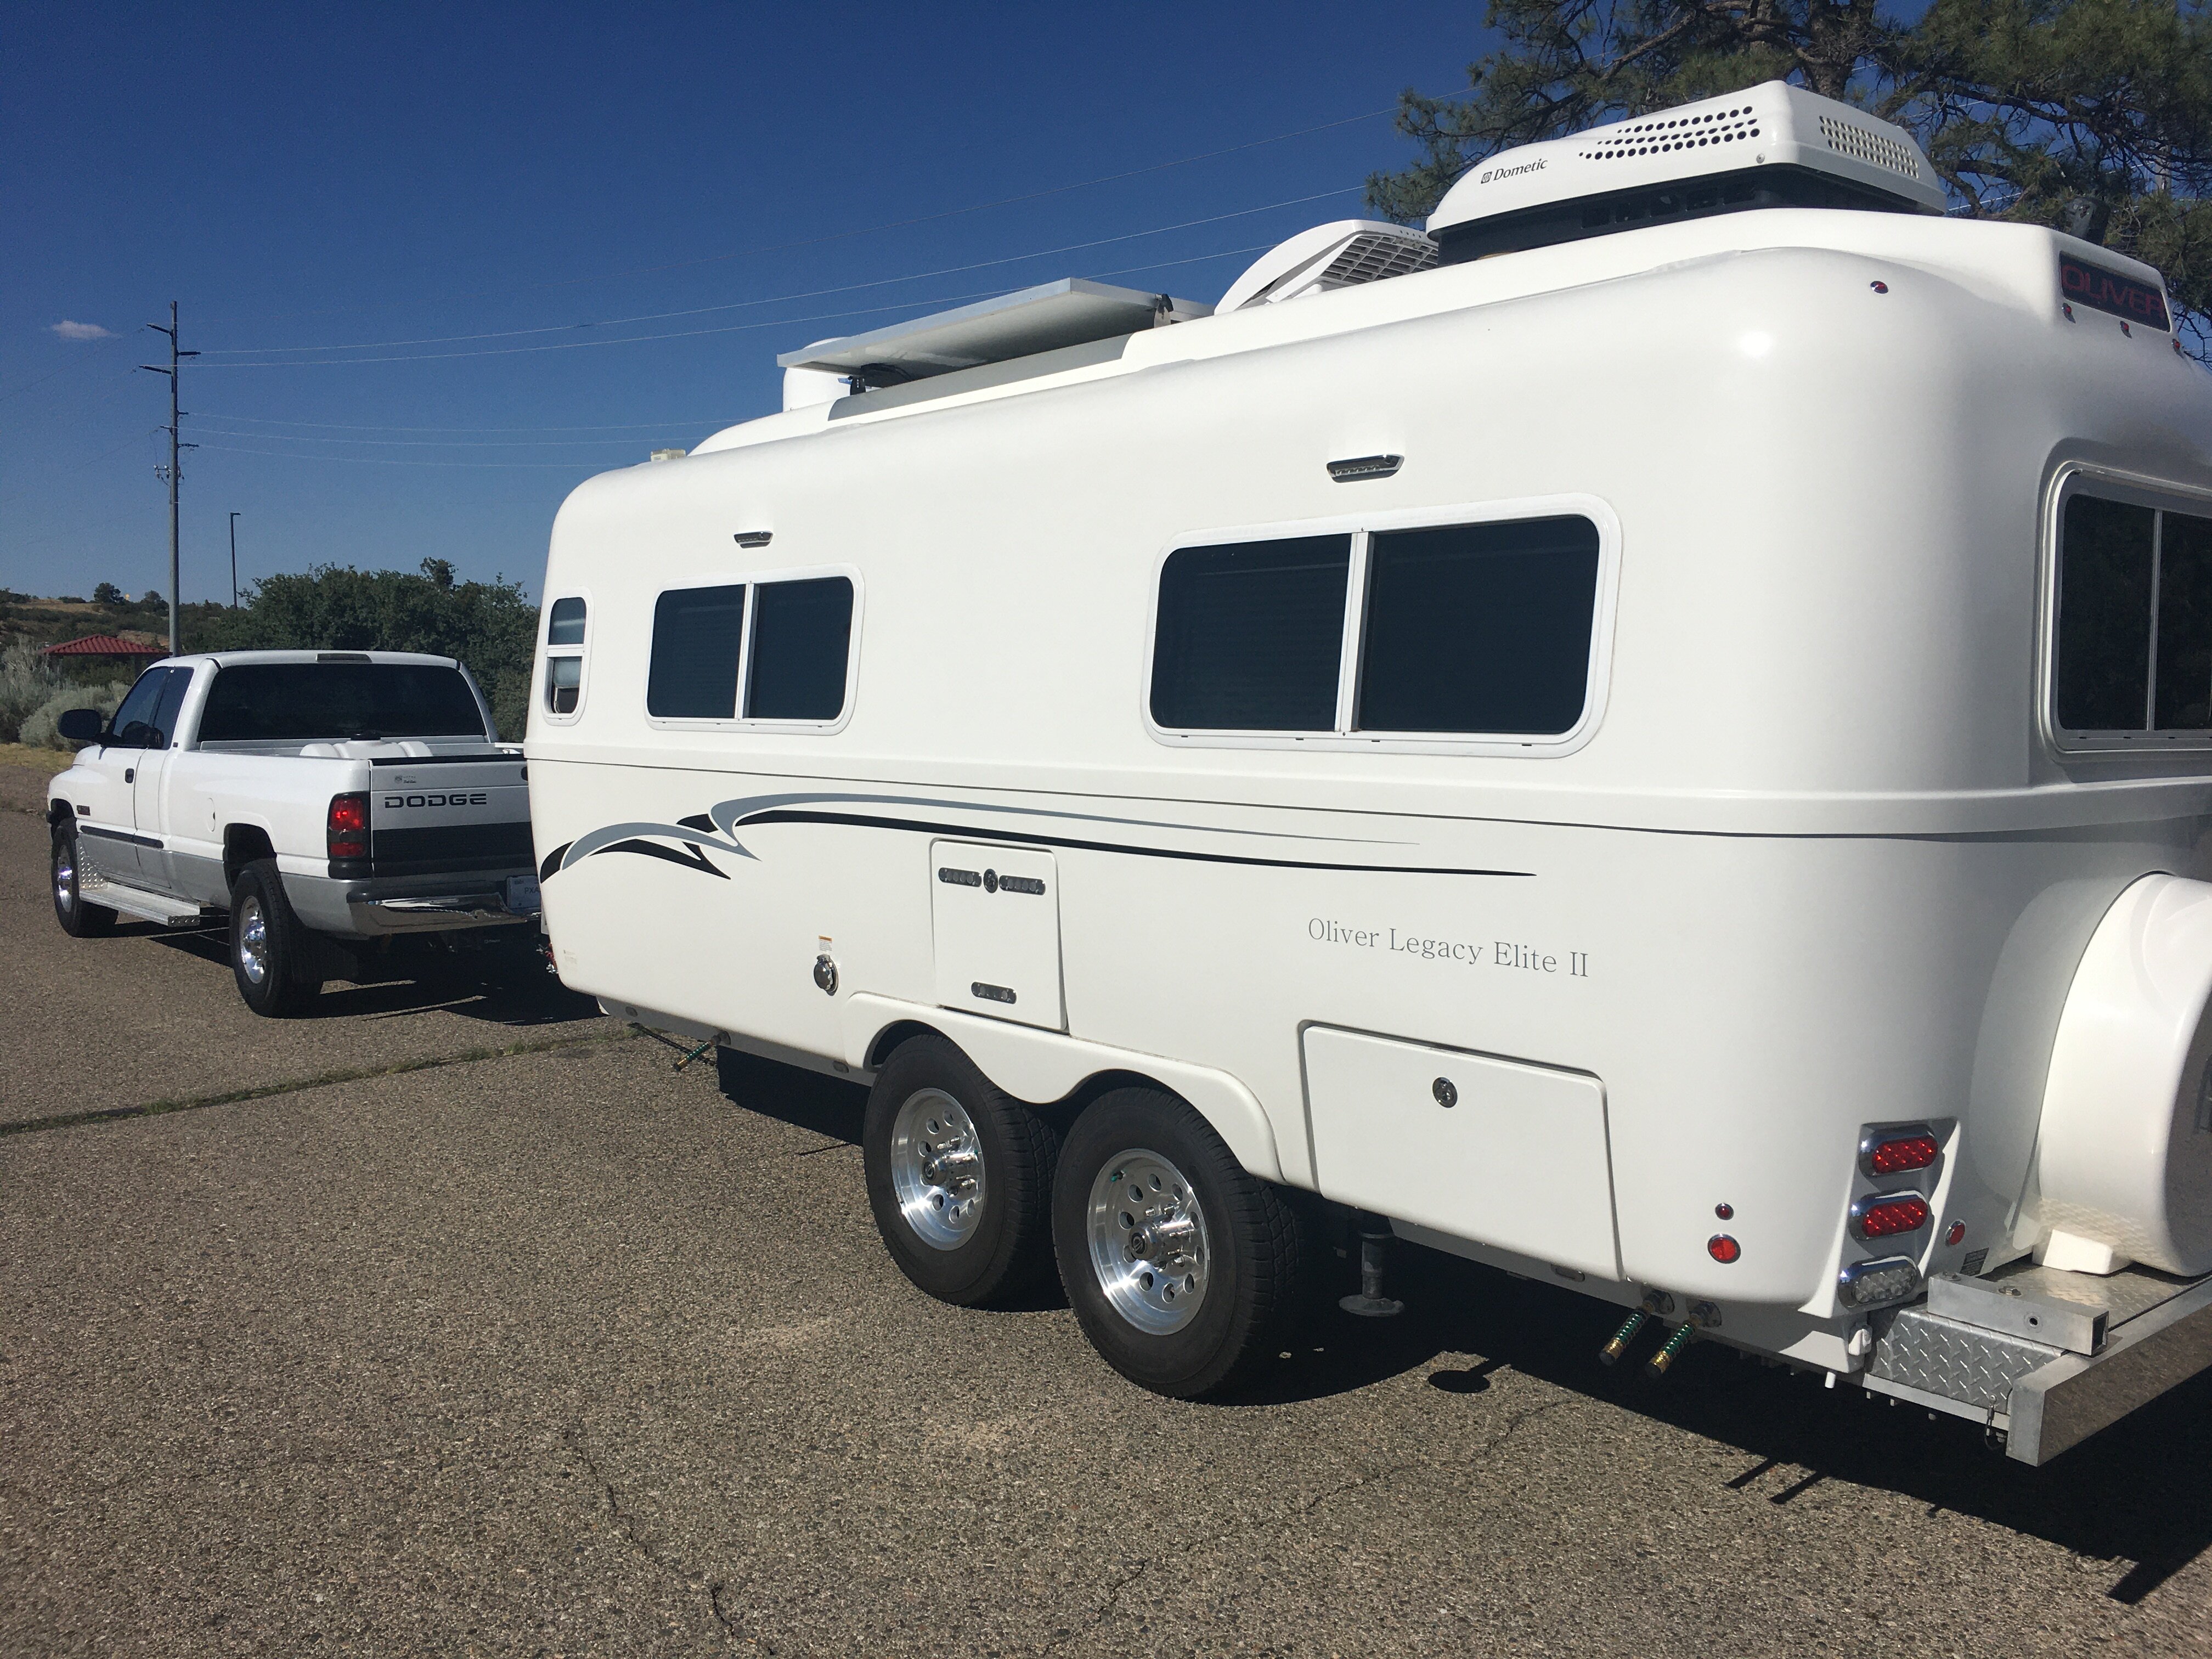
I came up with the idea to add a 100W Renogy flexible solar panel and a small Victron MPPT 75/15 SC. My goal was the solar energy should be enough to replenish the truck starter batteries while running the CFX5 refrigerator and our Pepwave router system. I had already upgraded the TV with a HO alternator and AGM batteries. The solar addition should keep my TV starter batteries fully charged, except in the mornings after running the router and fridge without sun overnight. After a few hours of late morning sun fully charged again. I have a spot in the bed where I could mount a second solar panel if needed. Those of you who have a truck cap should mount 2-3 of these 43x23” Renogy flexible panels in a heartbeat! I will share links for components used in a later post. I got the installation done Friday. I deleted the solar wire terminals and used butt crimp connecters and heat shrink adding a few feet of flexible 10/2 wire (left cable in the picture). The black wire pair is coming up through the bottom of the toolbox from the cooler. The short wire on the right exits the toolbox and goes stgright down to the frame where I intercepted the 4AWG wire from my DC2DC charger installation adding a simple single bolt buss for lowest possible resistance. Yesterday I thought I should trim the panel narrower. The Renogy panel is 23” wide and the standard truck toolbox is 21”. The job would have been easier if I had trimmed it before mounting it, but it came out very nice with a little extra effort. I used a boxcutter and a 1 1/4" bracket clamped to the edge of the panel and trimmed that amount off both sides, filing the edges smoothly afterwards. VHB tape was used to mount the solar panel to the toolbox lid and to mount the solar controller inside the box. I also purchased an inexpensive waterproof grill cover to protect the Dometic CFX5 cooler. They make an insulated cover for about $150 but I wanted more airflow than insulation and wanted a cover that would easily come off and on. I have a 1” piece of Styrofoam inside the cover to insulate the top from direct sun.
-
Dometic CFX5 Refrigerator Tow Vehicle Installation with Solar Power
jd1923 replied to jd1923's topic in Ollie Modifications
We took a 5-day trip and we absolutely loved having the extra cooled water and fridge space. On our way back home we stopped at a butcher, removed the drinking water from the fridge and set the thermostat down to freezer temps. It kept our steaks, chops and hamburger meats nicely frozen on the way home. On our first trip, I had 12VDC from the truck batteries wired to the fridge to run while driving. When camped we merely plugged in the fridge using a 110V extension cord plugged into the Oliver. The 110V connection will override the 12VDC, so you can have both wired to the CFX5 (not true in earlier models). -
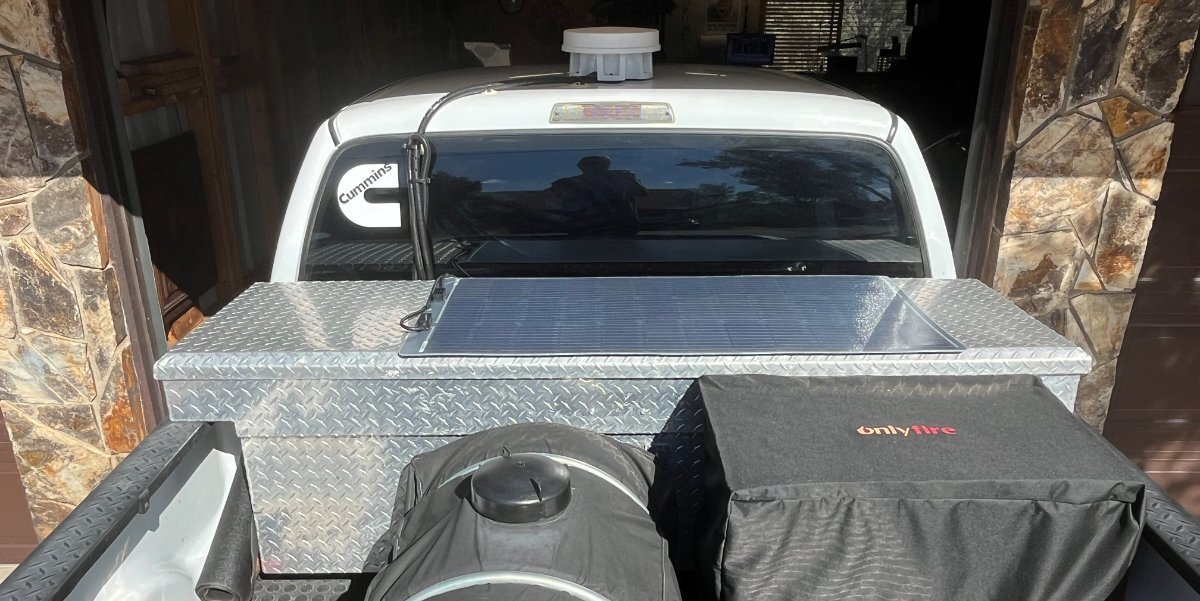
After deciding on which model to buy, what size would fit, and whether to go single or dual zone we went with the newest Dometic model CFX5. The single-zone 45L model fit perfectly in the front curbside area of the truck, behind the toolbox and in front of the wheel in arms reach from the passenger side truck door, so convenient holding cold water and food while towing! I built a stand to fit the cooler above the corner of the wheel well and bring the control panel to the proper height, just above the truck rail. Notice one stand support is cut short to clear the wheel well. There are four 6mm threaded sleeves built into the bottom of the fridge to hold it down. I let the refrigerator sit for 48 hours after having it sideways when mounting the platform. It looks very good installed, doesn’t it?
-
NO BRAKES ; 2019 Oliver Elite II-Hull #448
jd1923 replied to BoondockingAirstream's topic in Mechanical & Technical Tips
Payson is also Arizona and Reserve NM is a treasure! We got our first monsoon Thursday night after 10 months NO rain. We're hoping Monsoon Season goes long this year since it started late. I PM'd Ray with some ideas like calling this guy: https://lasvegas.craigslist.org/aos/d/henderson-brakes-more-we-come-to-you/7874395585.html I meant that if I can fix your brakes quickly, so can ANY decent auto mechanic. You really do not want to get on a public highway without trailer brakes (illegal, would not be insured), more so interstate travel! 🤣 You Oliver is a worth a good $15K more than you listed, given working brakes. Lucky for you this prospect was scared away. Delete your ad, get your brakes working and list at a better price for you afterwards. -
2026 YM Oliver awning style windows and other changes
jd1923 replied to Patriot's topic in Ollie Modifications
Yep, me too which is great. No sense liking what's not goin' to happen! We like our walls and windows and all our necessary corrections and wonderful mods! Our hull is turning 10-years-old this fall. Should have it another 10, or 20, and keep it in the family... -
This means your truck alternator and starter batteries are fine. What is the SOC% of your LiFePO$ House Batteries when starting attached is an issue? You really need to test. It reads like this wire is hot, connected to your house batteries (shown RED in the picture, but it's the BLACK wire in the Oliver trailer harness). If it is, and until you can correct this, you need to disconnect the trailer harness whenever your truck engine is off for more than a short break. Anybody that does not have a multimeter and knows how to use it, should get a test light and learn to use it. This is all you need for this test (plus maybe a nail to use as a second pointer to touch inside the harness coupler): https://www.amazon.com/WINAMOO-Premium-Automotive-Extended-Circuits/dp/B08D9RY532/?th=1
-
This only occurs when you're connected/towing and should not be an issue, given engine runing, alternator charging. Ever test voltage after your truck has been sitting for 24-28 hours? This would be a first step. You need to get your truck diagnosed independent of the Oliver. Your truck being weak starting could be battery, starter motor, ground or an assortment of issues (again nothing to do with the Oliver). Best wishes, JD
-
Some feedback on the Houghton air conditioner
jd1923 replied to Minnesota Oli's topic in Ollie Modifications
Perhaps Mary, @Roadlotus can chime in on this. She started the thread that Steve & Ma linked above and she just recently started this post where she now wants to remove the Fresh Jet after two years: https://olivertraveltrailers.com/forums/topic/10990-12-volt-ac-outequip/ Yes, Dometic products will use the same internal drain plumbing and most others with not. Dometic A/C products will also in Auto mode will turn the fan off and most other products will not do that. But I've heard from some Oliver Owners at rallies state they leave the fan on all the time since when it kicks back in so loud it wakes them up! @TimD like I wrote, I've been on the fence and similar to you, given Chris and I generally do not summer camp, we can get away without A/C most of the time, so still waiting... Also, check out these threads on the Turbro and Pioneer (Greenland clone) Inverter A/Cs. Yes, lot's of research required and keep us posted! https://olivertraveltrailers.com/forums/topic/10752-inverter-rv-air-conditioner/ https://olivertraveltrailers.com/forums/topic/10884-installing-pioneer-inverter-ac/ -
Some feedback on the Houghton air conditioner
jd1923 replied to Minnesota Oli's topic in Ollie Modifications
We haven't read re a Houghton install in about 2 years. There are other competitive brands today. Not sure anybody has proved the 9.5K version is viable. Houghton had humidity and thermistor location issues requiring rewiring. @Geronimo John is the resident expert re Houghton and he has all the fixes well documented. If QUIET is your main goal, look at Gree! Great unit as compared to most. Brand names include Atmos, then Tosot, all made by Gree. I witnessed @Ronbrink's Atmos installation, purred like a kitten and performed excellently! @mountainoliver just had SDG install a new Tosot and has a current thread. Search our Forum for 'atmos' 'gree' 'tosot' and/or 'SDG' to find these posts. This is likely the best all-around product offered today. Some of us are interested in "Inverter A/C" RV units that copy the "mini-split" units installed in many remodels/room additions today. The upside is less power consumption for us boondockers! Brand names include 'Greenland' and 'Pioneer' and the company name is Turbro. Search for these brand names or "Inverter.” BTW, this unit is on sale with promo code at $1200 plus tax. Likely the best price we’ll see this year or next, see turbro.com (turbro not turbo)! I'm still on the fence, but really want a viable inverter A/C which may take another 1-2 years to perfect! We just came off a 36-day trip up north, thinking A/C would not be an issue. Yet I had to book lame RV parks to run the G-awfully LOUD Dometic P2 almost 10 nights! PLEASE, just shoot me before we have to do that again! 🤣 There is a new thermostat on the market, the Cielo Breez Max! This product forces a fan shutdown when the compressor cycles off (to reduce humidity). Has not yet been tested on the Houghton, but works well with the Gree and Turbro products which may eliminate rewiring the Houghton re this specific issue. Search our Forum for “Cielo!” Hope this helps! And please keep us posted re your upgrade! 😂 -
2026 YM Oliver awning style windows and other changes
jd1923 replied to Patriot's topic in Ollie Modifications
It looks like an Oliver to me! Not much different. Is that wallpaper on the bath/closet door wall? -
NO BRAKES ; 2019 Oliver Elite II-Hull #448
jd1923 replied to BoondockingAirstream's topic in Mechanical & Technical Tips
@BoondockingAirstream it’s a shame that your tech did not show earlier this week, but that’s the state of responsibility since the “Greatest Generation” and us Baby-Boomers! 🤣 If you can drag that brakeless Oliver from Nevada to Prescott, I’d have your rig braking in less than 24 hours, promise! Find somebody who can read a multimeter and understands the 7-blade trailer connection and soon you should be “on the road again.” -
I gotta try this! True most of the time for most of us? Then it’s worth twice $5/mo! 🤣 I love Elon when he’s not arguing with the President. When he is, our Tesla stock goes down, but today it's >$100 a share higher than when they were fire-bombing EVs at Tesla dealerships! ‘twas the time to buy! He’s got my $5/mo!!! 🤣
-
Million Dollar Highway in a half ton truck with LE2?
jd1923 replied to routlaw's topic in Towing an Oliver
Y'all might find this article interesting. It appears Ford added the Exhaust Brake with the release of the 6.7L Power Stroke starting in 2011, with Dodge and GM +/- close in time. https://www.ford-trucks.com/forums/1490785-2015-exhaust-brake.html Ford guys online admitting the Ram having the better exhaust brake because the Cummins engine builds better back-pressure than the Power Stroke. I found this article because there is a very clean/reasonable 2015 Ford F-250 Super Duty 6.7L Power Stroke listed 4-Sale locally (grandpa passed only 130K miles). It's white with Super Cab... Hmmm? Anybody know what trans (and # gears) would be on the 2015 Power Stroke?