jd1923
-
Posts
3,649 -
Joined
-
Last visited
-
Days Won
281
Everything posted by jd1923
-
When 2x 1750 leaf springs are installed on D52 axles, the assembly is rated at 3500 LBS.
-
Your experiences may be different after more miles on your new hull. Ours waddled greatly and porpoised when not using the Andersen WDH. Awesome towing with the 5-leaf Alcans! 😎 Same leaf springs, given the D35 rating. Many Dexter 1750 LB leaf springs have failed with time. Keep an eye on the arc of your main leaf springs! When one starts to flatten, replace them.
-

Pebble Flow trailer and Rivian in the wild
jd1923 replied to taylor.coyote's topic in General Discussion
Reading more carefully, “except perhaps the Pacific coast.” We won’t even cross that state line in what used to be such a beautiful state. AZ is full of EVs and there’s enough ex-Californian issues here in politics, traffic on our roads… If I still had a commute, I’d buy a Tesla S (sorry, last time I purchased a GM product was so long, long ago)! And there’s no such thing as FREE! I prefer to use the term included. Shipping is included in the asking price and a charge station at work is a benefit included in your employment. Your company pays utilities. You can argue the life of systems. BTW, at 180K our Cummins is just broke-in full efficiency! I believe @Rivernerd in his $50K quote! If that investment was to save $200/mo, if that, it would take a 21 year payback period. We’ll keep paying our electric monthly. If we were a young couple, growing up with the technology of the day, there would be other considerations. Heck, $50K is a good cash price for a used Oliver! 😎 -
Yeah, we have a their Cali-King in the master plus a queen at home, two singles in the Oliver! The factory is in the valley west of Phoenix. We drove down with a flatbed trailer for the king (solid frame hybrid model), but the foam models are rolled up and shipped at the quoted price, always 25% OFF! I was guessing a custom shop in CA would be $$$! We got 30x75" mattresses, pulled the stitching on one corner and I trimmed the radius with an insulation knife after cutting a cardboard template. Tacked the corner together in a couple spots and the mattress pad holds it nicely together. We got the 12" for more comfort, but it's a bit too tall if you like to sit back there (we don't). The height also makes the window blinds too close when laying down. But the good news is the extra height keeps our old Springer off the beds! 🤣 Two 12" mattresses for under $1000 shipped to you door, and they have 6-8-10-12" heights. Less height is more firm and less money. https://rvmattress.com/products/brooklyn-chill?variant=46206649139399
-
Duragloss products for interior (923, 952 and 581)
jd1923 replied to DanielBoondock's topic in Mechanical & Technical Tips
I bought a gallon when Bill suggested it last time, June 2024. Amazon says unavailable today. We keep a small spray bottle with other cleaners in a tub behind the toilet. If y’all were nearby, I’d fill a bottle for you. We’ve only used less a pint so far! https://a.co/d/0gKeh4Do Also per Bill’s suggestion, got some 303 protectant. Use it more on our trucks than the Oliver and it does the job! https://a.co/d/0hAiMh3M -
Pebble Flow trailer and Rivian in the wild
jd1923 replied to taylor.coyote's topic in General Discussion
Same here, even in the Arizona sun. 90% of our roof is facing east or west. It may have made more sense if we had a large section of roof facing south. -
Beef up the leaf springs on the Oliver and ditch the Andersen ASAP 😎 (given a 2500+ series truck). Yes, as Chris noted, only with proper tension is it a WDH. And if OTT is still installing Dexter 1750 LB springs, the hulls waddle like a duck! 🤣
-
Pebble Flow trailer and Rivian in the wild
jd1923 replied to taylor.coyote's topic in General Discussion
Still is out West, except perhaps the Pacific coast. Interstates, campground hookups and generators just aren’t cool. 😎 They just installed a slew of Tesla charge stations at our mall here in Prescott. We could charge while shopping or playing pickleball, but the stations have been mostly empty since most mall-goers are only minutes from home. Don’t know of any others in our grand Yavapai County and the Prescott National Forest which equals the size of New Jersey! None in the public lands, meaning 85% of this very large state. When you get off the interstates, going downhill you have to drive more safely, slow down for steep curves, other drivers and stop at intersections. 10% to 8%, must be ideal on interstate roads. -
Factory service - Trust but verify
jd1923 replied to Steph and Dud B's topic in Mechanical & Technical Tips
If you want things done right, … (you know the rest)! -
Progressive Industries EMS Display says OFF
jd1923 replied to Tony and Rhonda's topic in Mechanical & Technical Tips
Does it actually turn the EMS off, or just the display? -
Get 4 new shocks and you may want to go Bulldog brand vs. Monroe. https://www.oreillyauto.com/detail/c/bulldog-hd-suspension/bulldog-hd-suspension-shock-absorber/bul0/hd12130656/ https://www.4statetrucks.com/bulldog-hd-shock-absorber-replaces-555001-19-050000007 From what I can tell in your picture, the upper bushings on the original shocks were badly over-tightened causing the rubber bushings to fail prematurely. Your picture shows too many threads up top leaving very little spacing for the rubber. You want to tighten these so that the rubber is just mushrooming and not much more.
-
Help: Shower filling up with Kitchen sink water. How?
jd1923 replied to Wayfinder's topic in Mechanical & Technical Tips
Thanks, Bill & Martha What Mike explained in the first paragraph of this post is he was pumping water into the black tank, as part of a cleaning process. He got distracted and left the water running. In this case the toilet bowl dump valve was closed. So the water could not go up into the bowl. The pressure from the hose after filling the tank to capacity, would then push the water up to that vent junction and into the gray waste system. This is an abnormal use-case where this occurred. Operator error, and hose pressure forced the overflow. Normally, this would not occur when operating the Oliver waste systems as designed. -
Help: Shower filling up with Kitchen sink water. How?
jd1923 replied to Wayfinder's topic in Mechanical & Technical Tips
I'm having trouble seeing how this could occur. But given this "has occurred" in your experience, please elaborate. Wouldn't the toilet bowl overflow first? We had our black tank once right up to the top, tank full and up the neck, 1-2" below the bowl. Had to stop using it until we towed miles to dump tanks. There was no black waste in the gray water. We also had the grey fill once to where it came up on the shower floor. In this case, we dumped some gray while boondocking since this is legal in in the SW National Forest lands when 500 feet from others and water sources. In neither case did waste of one kind go up the vent and into the other. I'm failing to see the physics that would cause water to get up to knee height which I believe is the approximate height of the sewer gas vent junction. Let us know. Thanks -
Help: Shower filling up with Kitchen sink water. How?
jd1923 replied to Wayfinder's topic in Mechanical & Technical Tips
Yes, as Mike explained and as John wrote nicely in two short sentences. Perhaps you did not see bubbles in the gray waste since there was enough gray water to break down the soap, kill the bubbles, which did not occur in your black waste. For a fact, black and gray waste are two independent systems, except for the venting of sewer gases as @Townesw illustrated above. However, the vents are at a height, a couple of feet taller, where the cross-over of liquids simply could not occur. Gray water would fill the shower floor and overflow into the cabin well before the height of these vents could be reached. -
Again, the first thing I would do is connect to a non-GFCI outlet. 30A outlets at campgrounds are not GFCI. I've heard new homes have nothing but GCFI circuits in the garage. What a pain! Our 1980 built home only has one GFCI breaker that feeds the outlets in three bathrooms. I wire outlets in the garage wherever I need one. Add a new breaker and run new wire. You could use a 10 AWG extension cord to reach a non-GFCI outlet for testing purposes. This first post below was started by @John E Davies. Check page 2 for the jack service I performed. I believe I'm the only one who has performed a full service where I disassembled the head, degreased all parts, and got new grease UNDER the gears. Your hull is 5 years old, so it's a good time. Do NOT follow the maintenance video shown in Oliver University! Do you know the saying, "**** on a bull?" It's better to leave it alone than to work this procedure! The second post is where I rebuilt the rear jacks which shows lubricating the full 18" lift gear.
-
It appears you are plugging into a 15A GFCI outlet in your barn, and this outlet blows. If so, this has nothing to do with the Oliver except that it is pulling more than 15A. @Steph and Dud B mentioned this above. A 15A household circuit may not be enough to handle the load internal to the Oliver. Also, don't ever use a GFCI outlet as a source for shore power as they are designed to blow in milliseconds. Throw ALL the 120VAC breakers in your Oliver panel under the dinette seat. Connect shore power to another household circuit. Not a GFCI outlet and if you have a 20A circuit choose that over a 15A. Many of us have installed proper 30A outlets where we park our Olivers. Something to think about, relatively simple to install or hire an electrician. After connected to a proper circuit. Turn on your 30A main breaker and then one at a time turn ON and OFF each other breaker. When ON see if the named appliance is working that is connected to that breaker. I don't know enough about GFCI outlets, but I'll bet @Snackchaser does! Hopefully, Geoff will chime in. Using a GFCI outlet as a shore power connection could be your sole issue.
-
Furrion Chill Cube – Product Review and Installation
jd1923 replied to jd1923's topic in Ollie Modifications
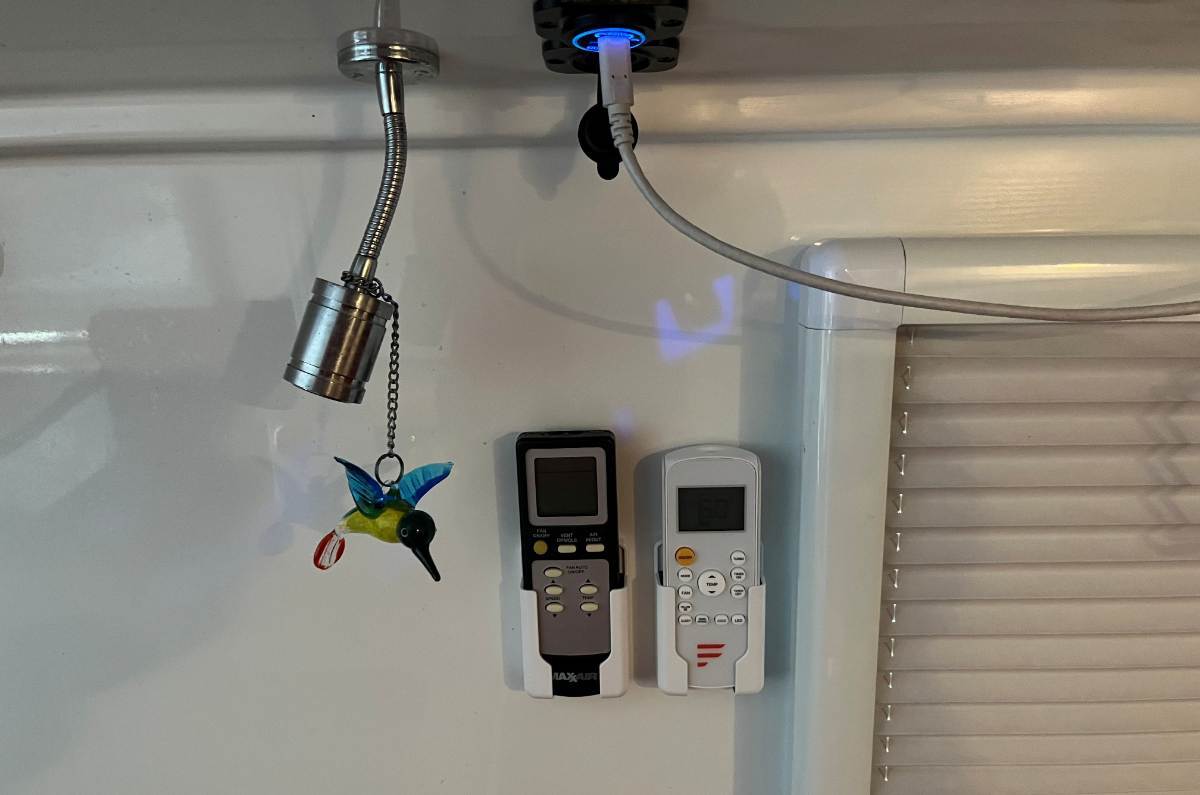
Can't wait to see your finished installation and get feedback on it's capability, given your Central Florida location. It must be getting warm down there! I have yet to see enough heat, and of course no humidity down here, to truly test it's cooling efficiency and Ah usage running on batteries! 😎 Will you run your A/C on inverter or shore power only? Here's my final touch. We have a half-dozen remotes in bins mounted front of the nightstand drawer. With the new Chill Cube, I decided to wall-mount two important remotes (mounted with 3M VHB tape only). These are now in a great central location which Chris can also reach from bed when needed!
-
Furrion Chill Cube – Product Review and Installation
jd1923 replied to jd1923's topic in Ollie Modifications
Before your model came to market, the ductless model that I purchased had no thermostat interface which the ducted version has. If your new model has such interface, you could study the interface and have one wall-mounted thermostat to control both the A/C unit and the furnace. My Chill Cube is operated by remote only which includes the follow-me temp control. Given yours does not have a thermostat interface, you could do what I did with mine or something similar. I removed the Dometic thermostat from the wall above the kitchen sink and replaced it with a simple 2-wire furnace thermostat which I mounted in a different location. I also ran two new 14 AWG wires I had on hand. Original wiring was just pushed into the wall unused, staying where it was. You could also remount a new thermostat in the same place, using the same wiring (grab the 2 furnace wires). BTW, I sold my P2 on Craigs and to sell a complete unit, the Dometic thermostat should really be included. I asked $500 for it, but after it was listed off-season for 2 months, a guy offered me $200 and my reply was CASH today, and he agreed. Glad to get that POS off my property which was sitting outdoors in the Vermont 2-wheel cart we use for yardwork! I always thought where OTT mounted the thermostat made little sense. So often at night, it was to hot or cold and you'd have to get out of bed to change temp. I mounted it in arms reach just under the pantry. I can reach it easily to change temp and Chris can see the actual temp reading from her curbside bed. It always frustrated me that the Dometic thermostat only showed set temp, not actual temp, so I had mounted a Ruuvi sensor above it. I wanted a new furnace thermostat that would display actual temp, so it can be compared to set temp. This is the product I purchased, simple and does the job well! It displays actual temp when idle and set temp when pushing the up/down arrows, go figure. One thing that seems backwards is the ON/OFF switch, where up is OFF and down is ON, where the reverse order would be intuitive. https://www.amazon.com/dp/B00H6ARNXO This build thread shows pictures of our new thermostat installed and the mask job to cover all the many holes in the wall above the kitchen sink! 😎 -
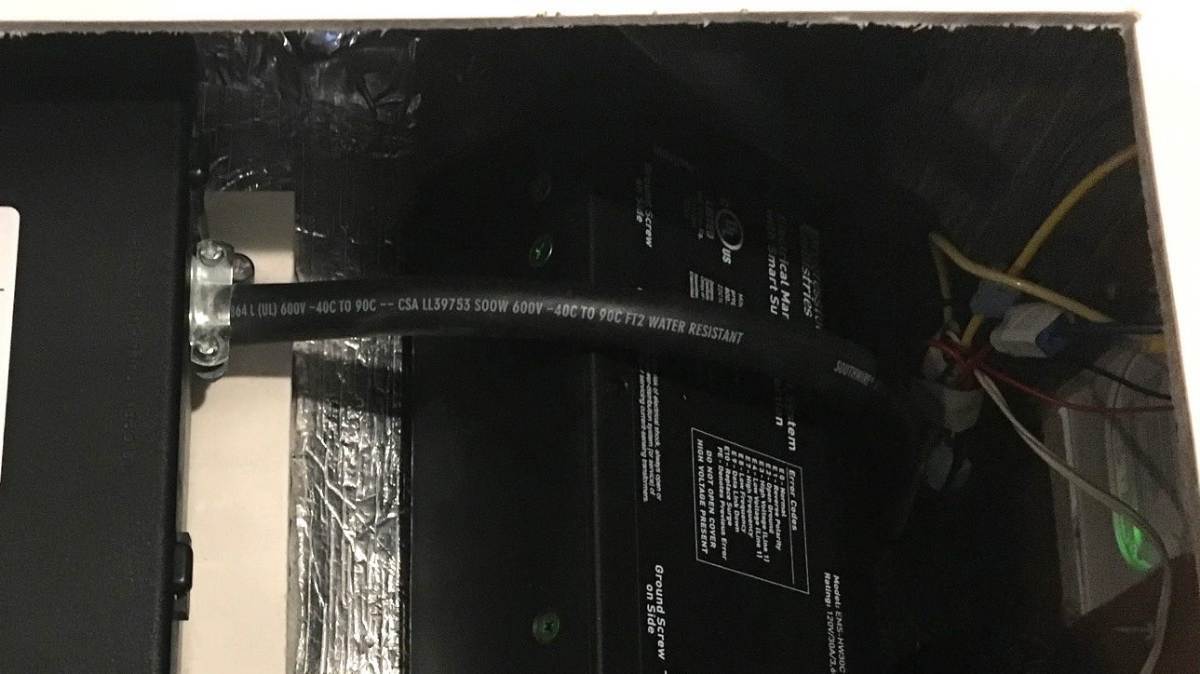
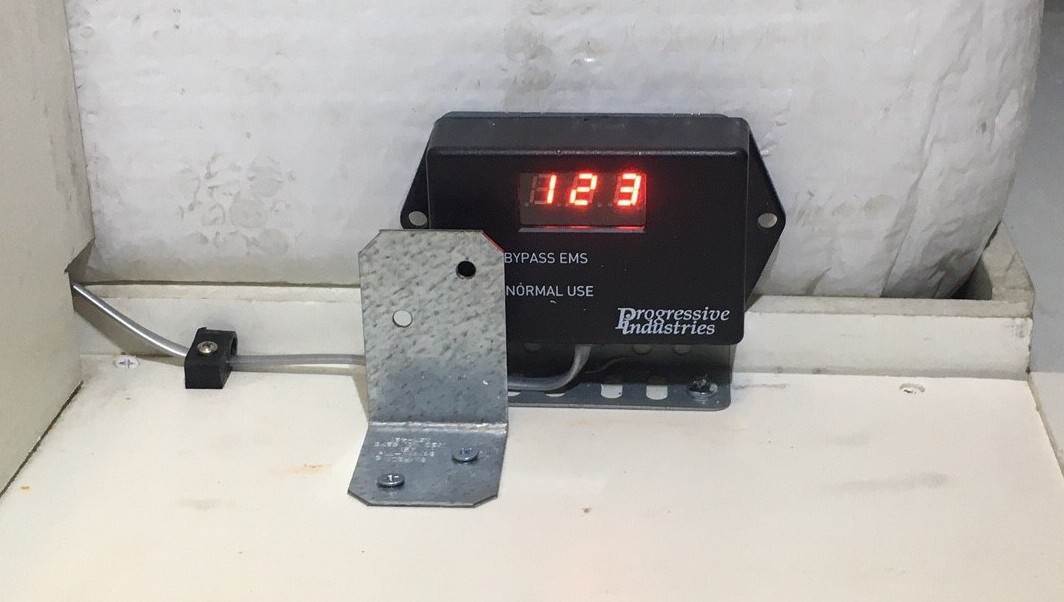
It "blows the circuit on the shore socket." What exactly blows? Does the 30A breaker on the pedestal blow? If so, you have a dead short in your shore power cable, the receptacle, or in the EMS (given you have one, more info below). The GFCI is after the fact. If wiring past the GFCI get a short, it will trip and all outlets are after a 15A circuit breaker. The jacks are 12VDC, so running off battery. If your jack has a short the yellow-jacketed 30A 12VDC fuse will blow. These items cannot be your issue. Do you have an EMS with a display? The display might be in the attic. If so, when you plug into shore power check the display for an error code. The display shows 4 readings for a couple seconds each. It shows voltage present and Hz, amperage being used, and error codes. If you see E0, it means no errors. If you have anything but E0, you have an issue with incoming power. The error code definitions are on the cover of the EMS. This is a picture of our EMS and our display (I installed ours in the trunk, readout in picture is showing 123V actual). We'll know more when you answer my first question and your EMS status...
-
Furrion Chill Cube – Product Review and Installation
jd1923 replied to jd1923's topic in Ollie Modifications
When you're able to wait on a technology purchase, usually products improve over time and get cheaper. This one is not cheaper ($412 more than I paid for the Chill Cube w/o heat pump). Though heat pump functionality would be good backup heat for our hull and for Chris @CRM if this was available, he may have gone this route vs. the Turbro. For them, a heat pump was a mandatory requirement. Hope removal of your rear A/C platform goes well. Let us know. https://unitedrvparts.com/products/furrion-chill-cube-non-ducted-heat-pump-2025008214-18-000-btu-white-facr18hepa-ps-am-1 -
Furrion Chill Cube – Product Review and Installation
jd1923 replied to jd1923's topic in Ollie Modifications
Paul, that's a strange "bump" or platform that mine did not have. You can see in my installation picture above the roof is smooth. On our hull they merely made the rear legs of the P2 taller, since the roof slopes down. Good thing is the Chill cube is almost a foot shorter, when installed it sits only on the flat forward section. Anything can be removed and my guess is it's just glued down. OTT doesn't suggest removing it! 🤣 Likely, only because they do not want to suggest a liability and nobody working there today has any idea of how it was installed. If it was me, I would take another day or two and delete that platform. It's not pretty! I would remove the silicone caulk, scrape and use acetone. Then I would slowly pry up around the edges, and spend some time cleaning up the roof. 😎 -
I’ve shared 100 new content posts to help others. You can’t help others here with the name of the store that actually stocks this part? And nobody has to agree.
-
What’s the name of the auto parts store and at what city location?
-
And how long for that special order? This is not "broke down on road" feasible. The point was to order ahead of time vs. looking for a parts store at the point of need. Sorry on the typo on the part number. The Summit link above shows the correct part number "Set49"
-
Yeah, cool technology, but we already know the OEM bearing is the Timken Set49. Also, it's safer to only use manufacturer's spec vs. any website content. https://www.summitracing.com/parts/tmk-set49 Genuine Timken parts are NOT often "easily accessible" and make sure you're buying from an authorized reseller. For example, say you broke down and were lucky enough to be close to a local Napa. They would sell you a China-made alternative that would take 1-2 days to arrive at the store location, while you're broke down somewhere. Then you have to get it installed. Not many PT Cruisers on the road anymore and in general AP stores only stock parts for new-model cars < 10 years old. I found this entering the 2010 PT Cruiser on Napa Online: https://www.napaonline.com/en/p/PGBPFW115 Ken and I worked through this when I tested the bearing install procedure (linked in my prior post on page 5). He has replacement bearings, related parts and tools already purchased and he travels with them. I got lucky getting damaged axle parts, so I carry two full bearing hub/drum assemblies in the TV toolbox (I also carry new Timken front hubs for the Dodge Ram). In my case, if a bearing goes bad, I can be back on the road in 1-2 hours! 😎 However buying full assemblies is exorbitant! I truly suggest if this is a concern of your, read the post I made showing bearing removal and replacement. At a minimum, do yourself a favor a buy 2-4 Timken Set49 bearings. Then you'll have the parts you need so that any trailer shop can install them for you. To be very safe, you may want to have extra circlips, nuts and washers. And if you want to DIY, my post details the required toolset.