jd1923
-
Posts
3,490 -
Joined
-
Last visited
-
Days Won
262
Everything posted by jd1923
-

Custom Mud Flaps for the Tow Vehicle and Oliver
jd1923 replied to jd1923's topic in Ollie Modifications
Time to repeat for the other side! Common thinking and my first thought was that I could turn the template upside and trace the mirrored view for the other side. Good thing I thought to measure twice. I positioned the cardboard stencil made for the right side and found I had to drill the holes about 5/16" lower for the left side. Who knows why except that only OTT could do so! Was a simple fix to adjust the drill hole placement, and otherwise the pattern flipped over was identical. Pictures show the streetside and how the jack fits with Andersen blocks, and the view from the rear showing both mud flaps (bumper off for polishing). Boy, I used to hate cleaning the road tar, grease and grime from under there! No more, just pressure wash the mud flaps! 😎
-
Custom Mud Flaps for the Tow Vehicle and Oliver
jd1923 replied to jd1923's topic in Ollie Modifications
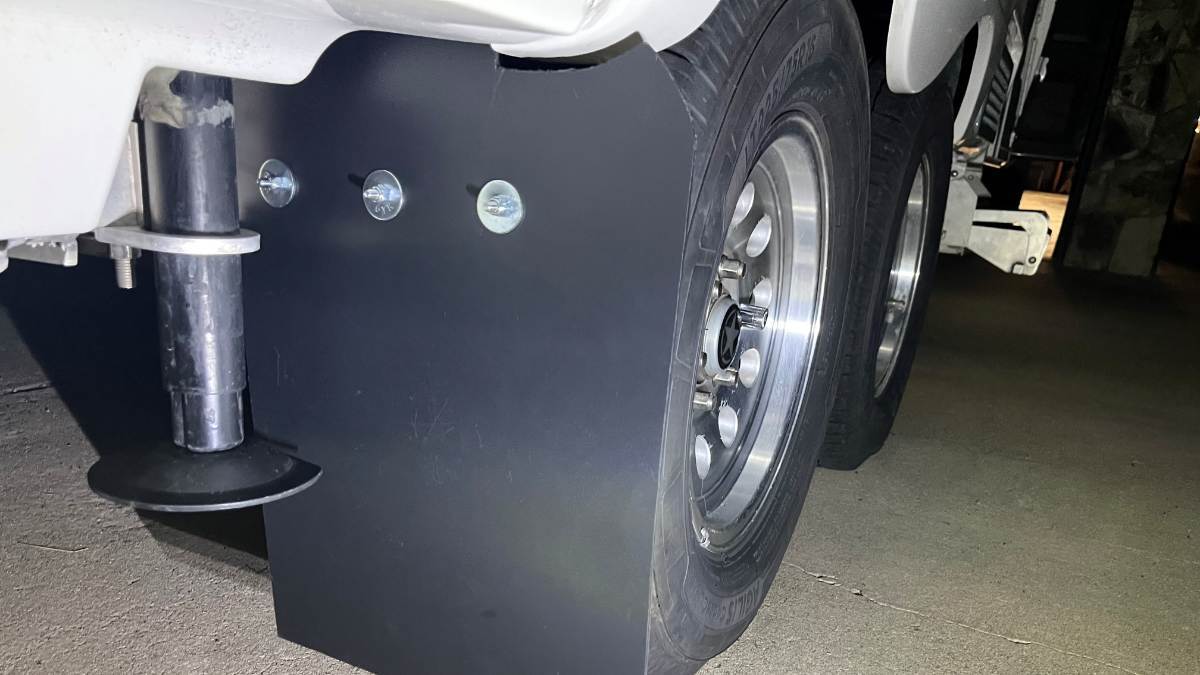
I cut the base of each rear stabilizer jack to have one flat edge. This allows more room for the flap to arc rearward while towing and so the flap material is not always hitting the same point on the arced edge. I don't believe the strength of the part was reduced much and these parts are readily available. I already have one spare! Use a 10" steel cutting blade on a chop saw and this is quite a strong piece of metal. By the time it cut through it had melted a ring into the plastic plate below. Filed the edges smooth on my bench grinder and steel brush. I may hit the open edge with spray paint later. So, the right side is done and I'm very happy with it! 😎 Several views to follow...
-
Custom Mud Flaps for the Tow Vehicle and Oliver
jd1923 replied to jd1923's topic in Ollie Modifications
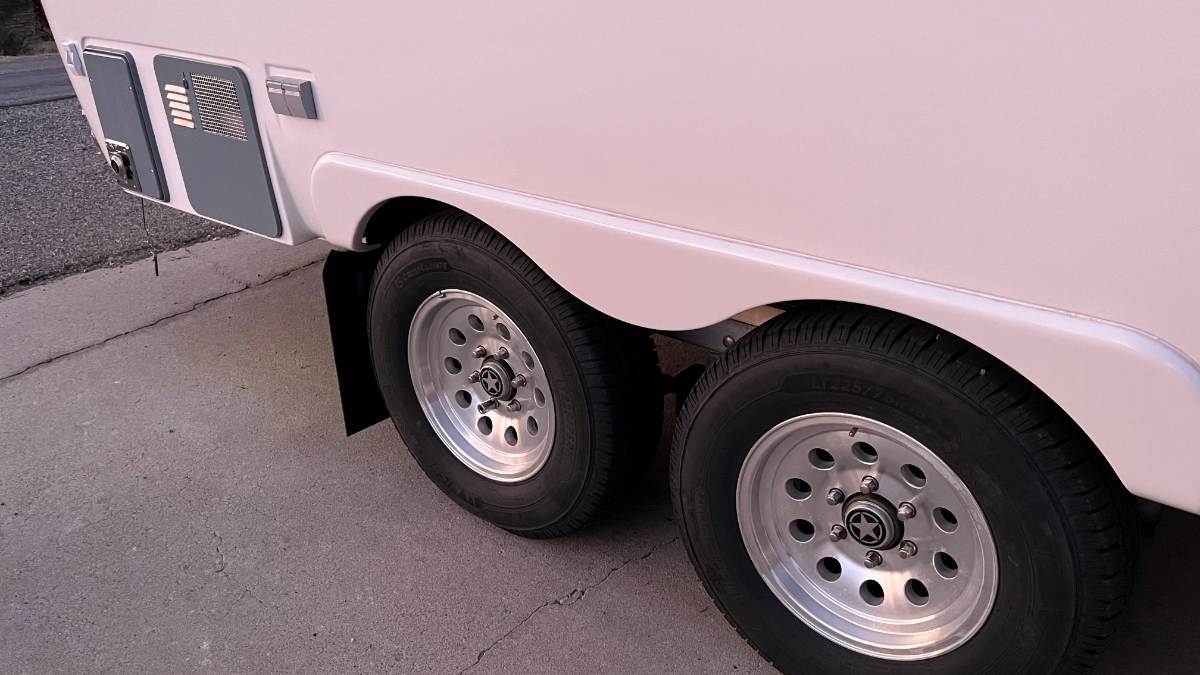
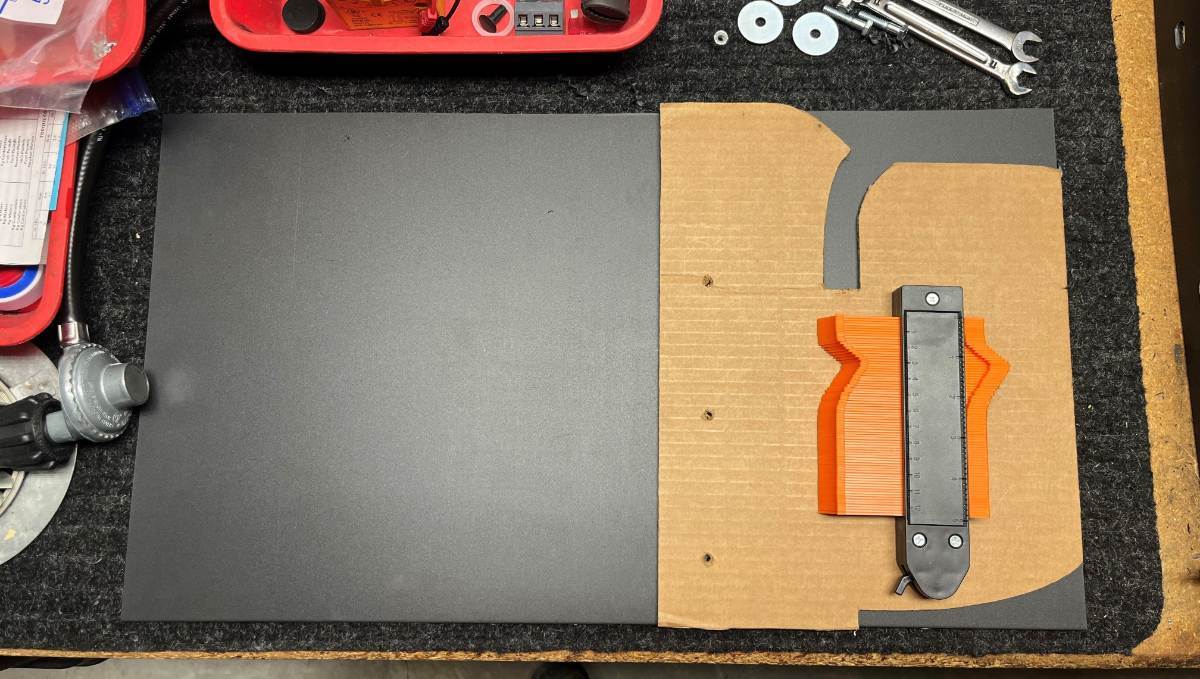
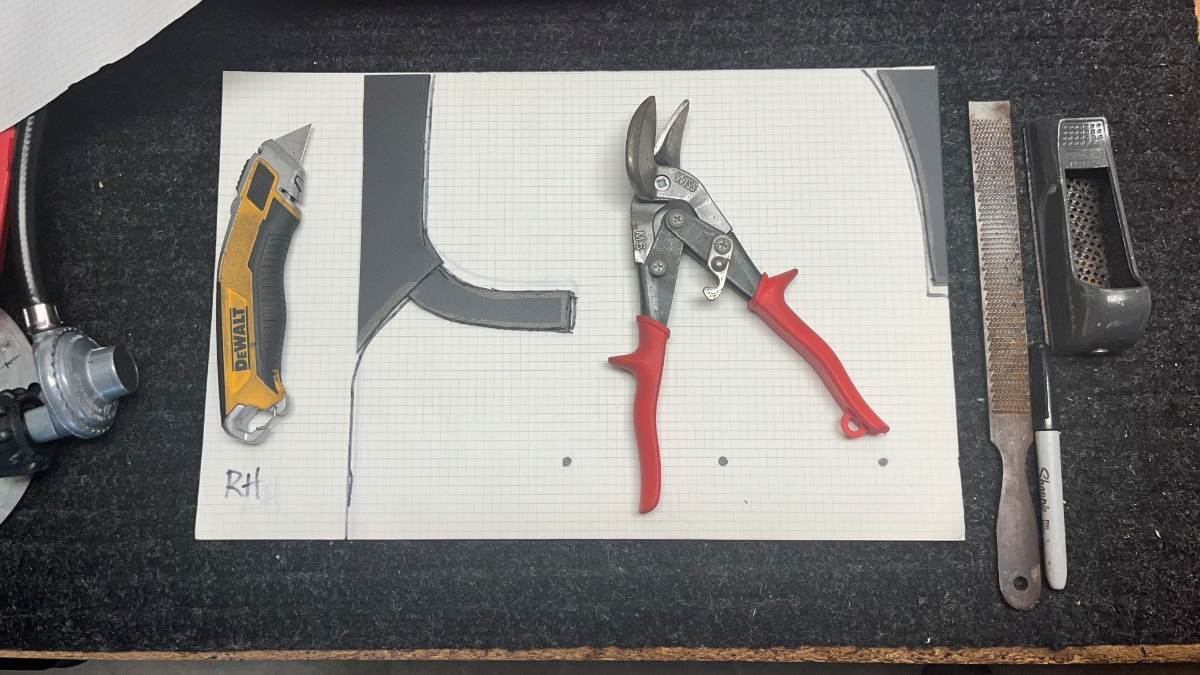
Next step; cut stock for the Oliver flaps. The stock was 24x36" so I cut every flap sideways making them all 24" long to start. I cut the Oliver 13 1/2" wide to stick out 1" beyond the tires and I made the area under the mounting bracket a 13 1/2" square which made the mud flaps sit 4" off the ground. It's too difficult to work with the full length of stock when cutting a pattern to fit around the curved body of the Oliver. So I cut a piece of cardboard 13 1/2" wide like the flap and 10 1/2" tall, the measurement from bottom of bracket to the top. I drilled the 3 mounting holes into the cardboard for alignment. I used the little curvy tool (stocking stuffer from Chris a few years back), took a few measurements and started to cut away at the cardboard making the opening longer and wider. I wanted at least 1/4" clearance above the fender and 1/2" below, so not to touch and to allow for cleaning the fiberglass. Another cut to follow the pattern of the inside wall until the cardboard was perfect. Then traced it onto the poly stock and cut some with a razor-knife and the sideways tin snips worked very well. Used razor blades, a grater block and files to clean up the edges, and voila! 😎 Afterwards, I traced the finished mud flap onto graph paper so I can share my template with our Oliver friends who would like to copy the design!
-
Custom Mud Flaps for the Tow Vehicle and Oliver
jd1923 replied to jd1923's topic in Ollie Modifications
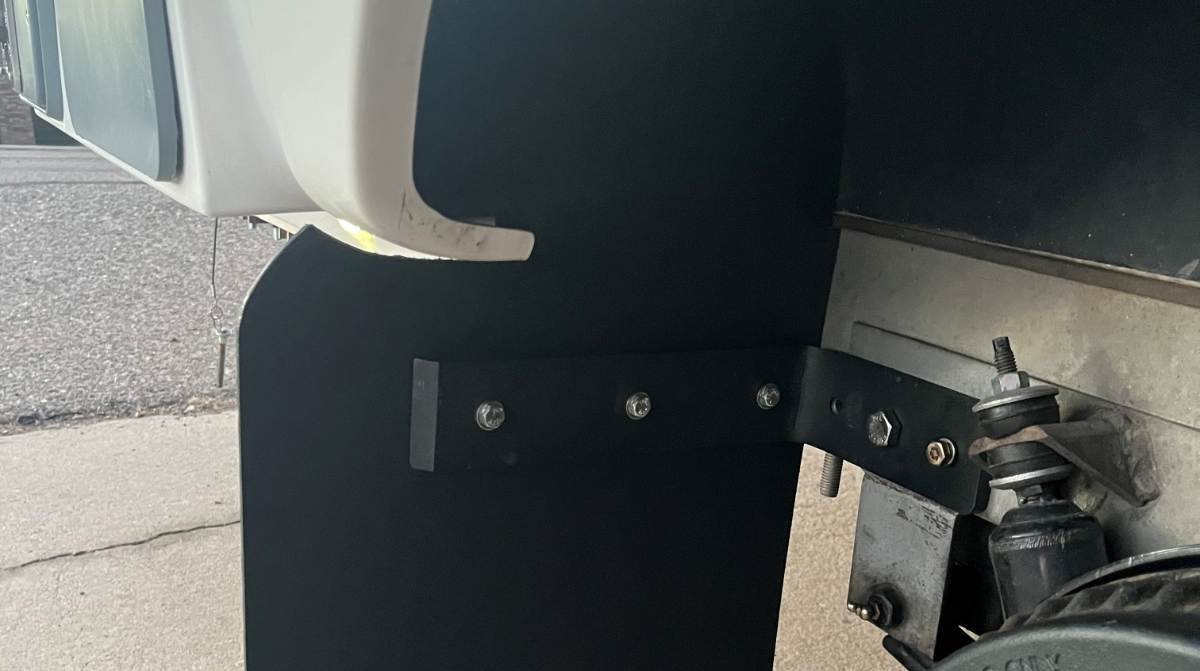
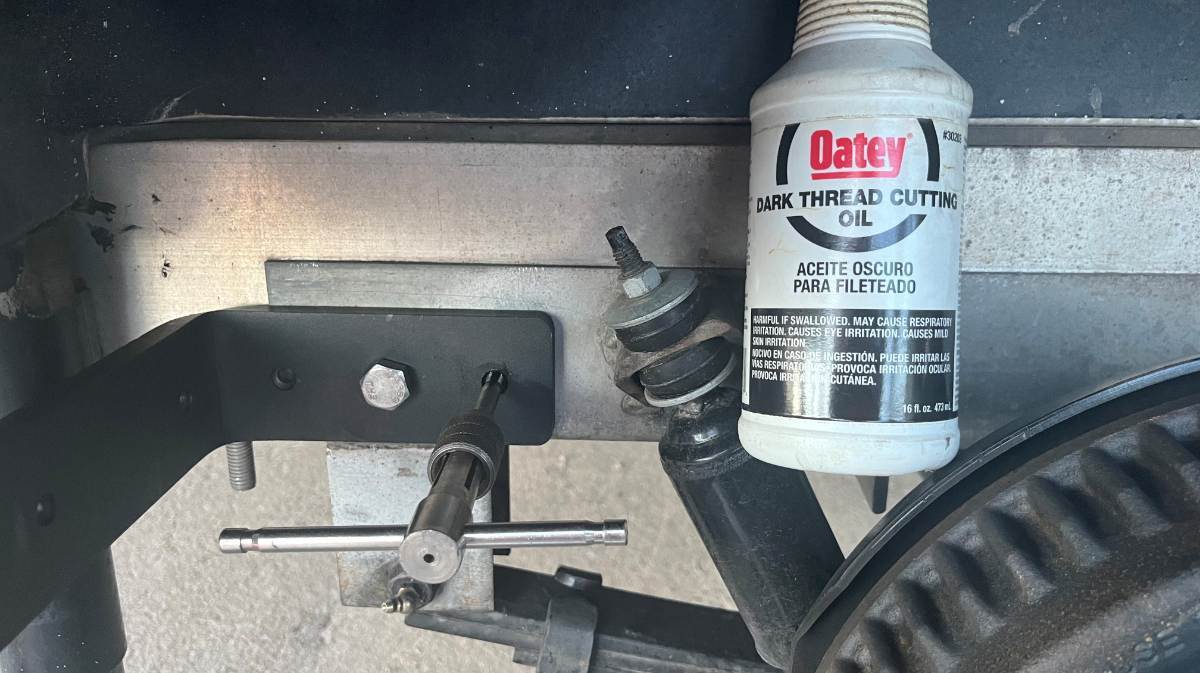
I understand most of you have good mud flaps on your TV, but on your Oliver? @John E Davies installed some on his Mouse back in 2018! Craig @Galway Girl did a similar installation more recently and maybe there are others. In the designs I've seen, the mud flaps were mounted behind stabilizer jacks where there is a frame cross-member, an easy place to bolt a horizontal mount. I was not happy with this design as it does not protect the full underbody behind the wheel, nor does it protect the stabilizer jacks from taking mud. My goal was to install a mud flap between the rear tire and the jack, but there’s only about 3-4" or space! I realized that with a fitting 90 bracket I could use a frame bolt for support. I removed the 3” carriage bolt that holds the rear of the steel suspension subassembly to the main aluminum frame. I purchased #5 ½” bolts, 3 ½” long to be a ½” longer allowing for the 0.4” depth the the HD counter bracket. After an hour and a half searching Amazon, I found these which turned out to be perfect! I got the 6x10” brackets, where the 10” length ends just inside the width of the wheels. https://www.amazon.com/dp/B095NRB6N4/?th=1 I used the stabilizer jack to get the rear axle up on a jack stand (placed under the plate centered between the leaf spring U-bolts). Then I removed the wheel and the base of the jack stand to allow for ample work space. Each side of the brackets has 3 predrilled bolt holes. On the 10” length, they’re perfect to mount the flap. On the 6” length, I got lucky! The center hole is just in the right spot to mount to the frame bolt. I drilled the center hole wider to ½” and bolted it in place tight enough to hold the angle. Then I used a digital caliper to get the bracket perfectly level to the frame. I used a 5/16” drill bit, the size of the existing holes, to scare a center, then switched to a ¼” drill bit which is the correct size for a 5/16”-18 tap. Drill through both the steel sub-assembly and the aluminum frame. I used a little cutting oil to make the drilling and tapping go easier. Then added Grade-8 5/16” bolts which I had on hand with blue thread-locker. The ½” bolt has a Nyloc nut. Torqued them down by feel with ratcheting wrenches and this HD bracket ain't going nowhere!
-
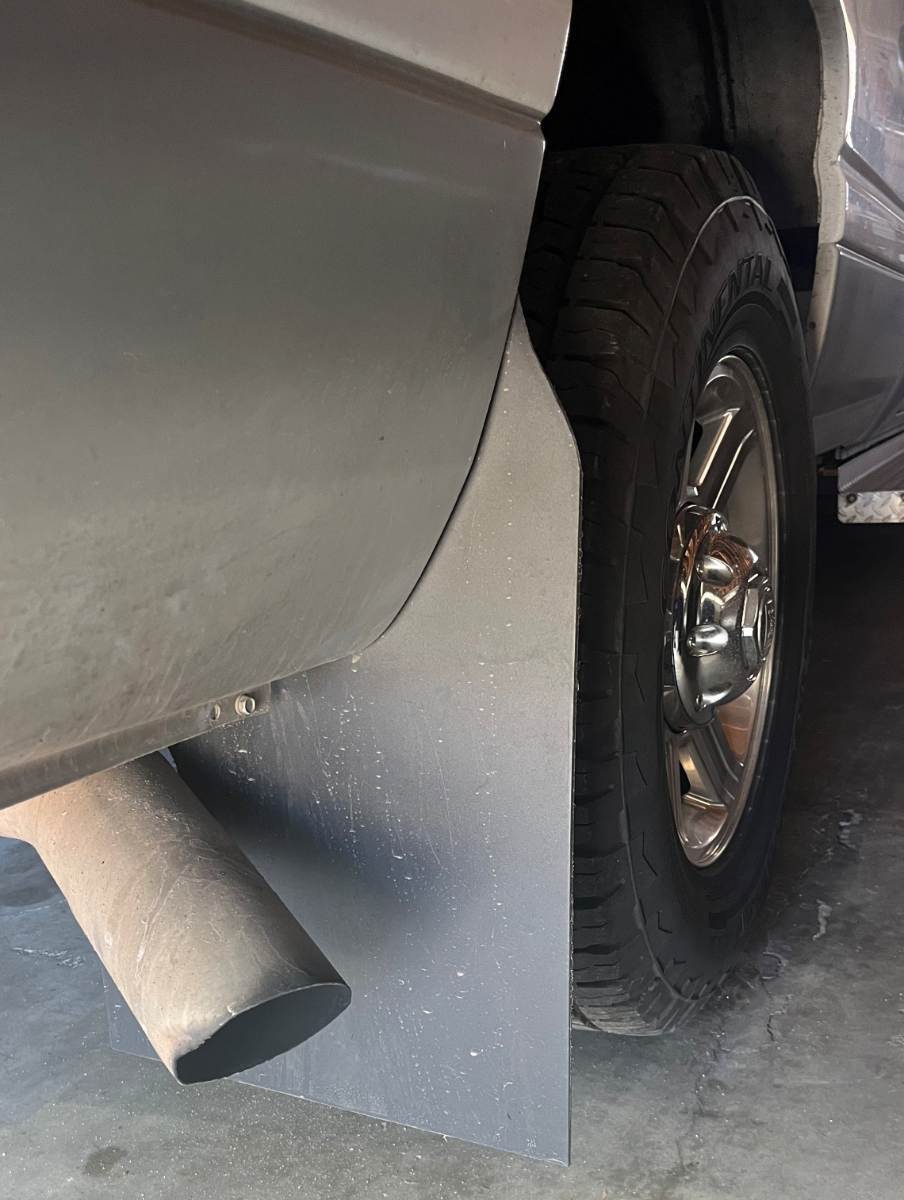
After spending considerable time and money to get our Oliver cleaned, stripped, buffed and ceramic coated, and all exterior trim painted or replaced, I figured is was time protect our major investment! Our TV had bolt-on 12x18" rubber mud flaps which were not nearly wide nor long enough to adequately protect the Oliver. On our camping trip last summer, we hit some mud in the grasslands of North Dakota and the entire lower front and rear bottom of the Oliver were packed with MUD! The TV is most important, to protect the Oliver front, so I started there. I looked for mud flaps that would fit and soon decided to get stock material that could be cut to size. I purchased this product. It's a poly non-rubber material 0.15" thick. It could be a little thicker but I like how it holds its shape and position, not flopping around like rubber. I purchased this huge 24x36" set made for semi-trucks so I had enough material to cut both TV and TT mud flaps! All for only $19! You could find better material but so far so good and now that I have worked this project, replacing the material in the future would be easy enough! 😎 https://www.amazon.com/dp/B06XRHB7GH/?th=1 I removed the original mud flaps, used them as a template and I added 3" in both length and width (1 1/2" wider inside and out). On the curbside, I had to make a large oval cut-out the the tailpipe. Because the new flaps are wider I cut a curve on top to blend the flap the the truck body (see pics).
-
A locked wheel could burn down a flat spot like that in just a few miles. @topgun2 Bill was correct in noticing from the picture that you're running too much tire pressure and so is anybody running over 50 PSI in an LE2, PERIOD! Unless you have D52 axles and HD springs providing a 10K LB platform and you've added upgrades and tools, every possible Oliver cabinet packed full, so your Oliver is up to 8000-9000 LBS. I know one owner that fits this description, but most of us carry under the 7K GTWR. I'm posting this table for the 4th time on this forum. These are the tires we have, but tire makes are all about the same. What's important is the tire size you're running and the weight you're carrying. Sure go 5 PSI over, but 10-15 PSI over effects the trailer ride and will over time deliver unnecessary stress and strain to your trailer suspension and all components. 65 PSI on our four LT225/75R16 tires carries 4x 2,620 LBS for 10,480 LBS GTW! 55 PSI on our four LT225/75R16 tires carries 4x 2,290 LBS for 9,160 LBS GTW! 45 PSI on our four LT225/75R16 tires carries 4x 1,950 LBS for 7,800 LBS GTW! @John E Davies towed his Oliver for years at 42 PSI, I fill up to 46 PSI, and filling over 50 PSI is ignoring the science for superstition!
-
Odd that's it's rolling fine now, after you jacked it up. Obviously at some point it was stuck in that one position. Brakes locking up must be it if the bearings are good, but why are they no longer locked up? Hope things work out for you quickly without anything major! Best wishes, JD
-
Furrion Chill Cube – Product Review and Installation
jd1923 replied to jd1923's topic in Ollie Modifications
Thanks, Mike! Before I had the scaffolding we installed an A/C on our Bigfoot. Adam climbed up the ladder on the big Class-C. There was an old Dometic up top where the fan had jammed. I instructed him to heave the old unit off the side, hit the gravel drive and nothing else! 🤣 I had the new A/C still in the shipping box bottom, tied a strap around it sitting at the bottom of an extension ladder. He pulled the strap as I walked it up the ladder. Either way you need two people. I'm not walking on top the Oliver, so my scaffolding investment has been helpful. When not in use, the upper section is stored away but the bottom frame sits around the nose of a car parked in our garage. I use the shelf for shipments in and out and empty boxes, it's been a handy staging shelf. You can always use more counter space! https://www.homedepot.com/p/MetalTech-Safeclimb-6-ft-Baker-Scaffold-with-Platform-and-Included-Trap-Door-1250-lbs-Load-Capacity-I-CISCH1/302038304 Or you can rent if you do not want to purchase and make room for one. This rental page shows a double set and outriggers like I purchased, plus the upper safety surround: https://www.homedepot.com/p/rental/Interior-Scaffold-I-TCISCH1/316821794 I'm on my 3rd jar of Marine-Tex with all the holes I've filled. Simple to use and the color is very close to our hulls, at least the older ones. I can't easily see the large holes I filled from where the TV was mounted in the corner originally. https://www.amazon.com/dp/B0014419V0/ I have some ready but will wait 'til we return from camping in a few weeks to fill these eight small holes. I'll need to drill a recessed bevel first making a shallow wider opening to better take and level the fill. I have other work too that needs a second coat, where before I removed the rear camera, the bathroom gray valve handle (replaced with electric valve), and the door latch that was riveted bottom right of the entrance (don't need it after adding Lippert Friction Hinges)! You need a second coat after the first shrinks. She's getting cleaner all the time! 😎 -
I just corrected the original post. JD
-
Furrion Chill Cube – Product Review and Installation
jd1923 replied to jd1923's topic in Ollie Modifications
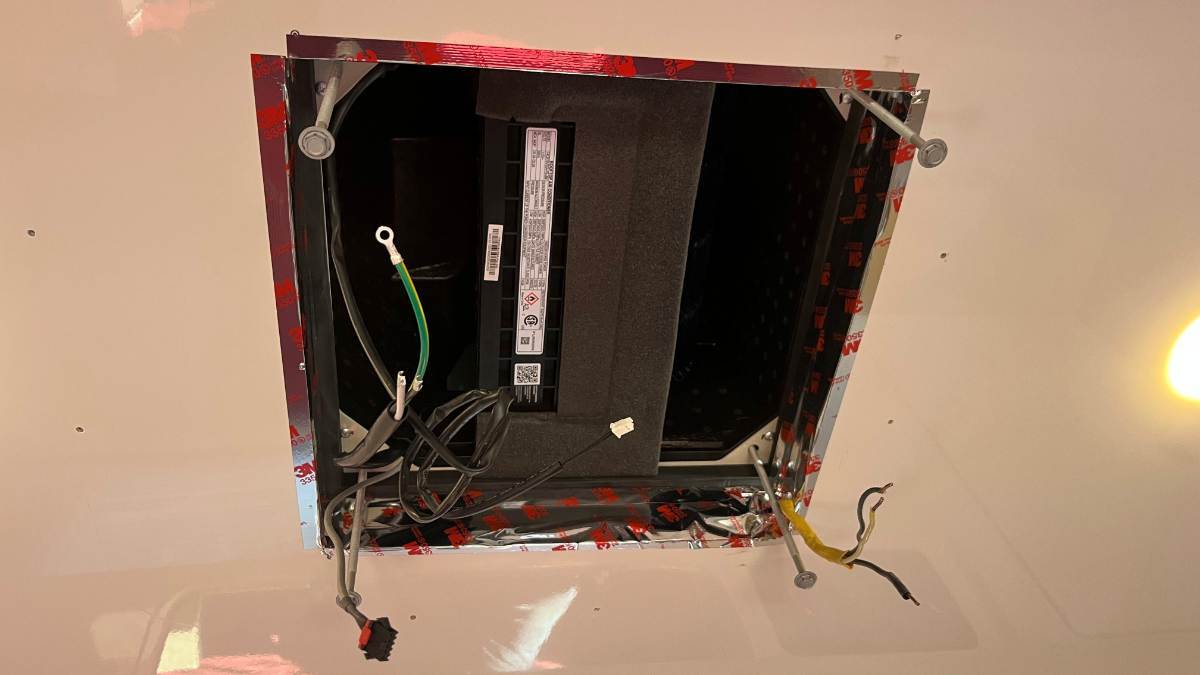
Adam and I got up on the scaffold to remove the defective (and refunded) Turbro unit. We set one scaffold cross beam and the same height as the roof so to have a place to rest the A/C on the way down. When we picked up the new Chill Cube, Adam said, “Wow, this one is light!” (Turbro weighs 88.2 LBS and the P2 was heavier, the Chill Cube is 72.4 LBS.) It’s also easier to maneuver with it’s tall square shape, foot-print about 60% of the others. I forget a bath towel like we used last time, so I took off my jacket to have something to help slide the top unit into place. Then inside, I pushed up on the A/C and pulled the jacket down through the opening. Screwed in the four corner bolts, to see and align the exterior unit over the opening. You don’t need the air baffle extension, and the primary hard foam baffle must be trimmed. I trimmed ours about 1/2". When you measure, realize the foam seal on the exterior unit once torqued should also be 1/2". If you trim too much (bad mistake) you will have a gap between the warm in and the cold air out! Better to error on trimming too little, but if it’s too tall it will be pushed up against a hard plate and could crush. I first cut only 1/4" off and it contacted the upper plate before the foam seal compressed at all. I then knew another 1/4" had to be trimmed. Better to do it twice, than to over cut! (many pics to follow) I was not able to use the 120VAC connector they supplied and used standard wire nuts instead. I also made a hole into the foam baffle to get the Romex into the center area. I moved the wire clamps to be usable based on the where the Romex was installed. Not easy to fit all the wires in the narrow center area. The extra length of some cables can be inserted into the junction box. The main thing is you have to feel the center mounting screw will seat without any wiring obstructing it. The instructions say to use the long screws for the plastic air handler, but they do not supply any! I used two long screws I had to get started, but once the plastic cover snapped into the metal frame all I needed was 5 of the supplied 1/2" screws. Mount the filter components and you’re done! (Notice the screw holes in last pic. I still need to patch the ceiling fiberglass.)
-
Furrion Chill Cube – Product Review and Installation
jd1923 replied to jd1923's topic in Ollie Modifications
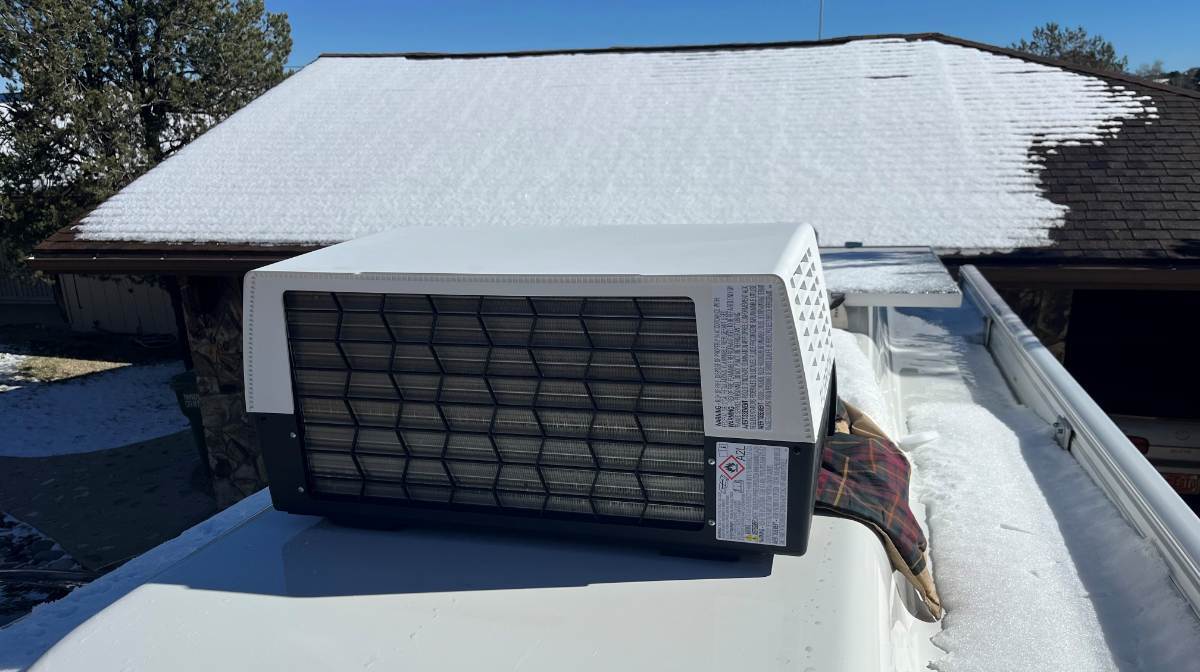
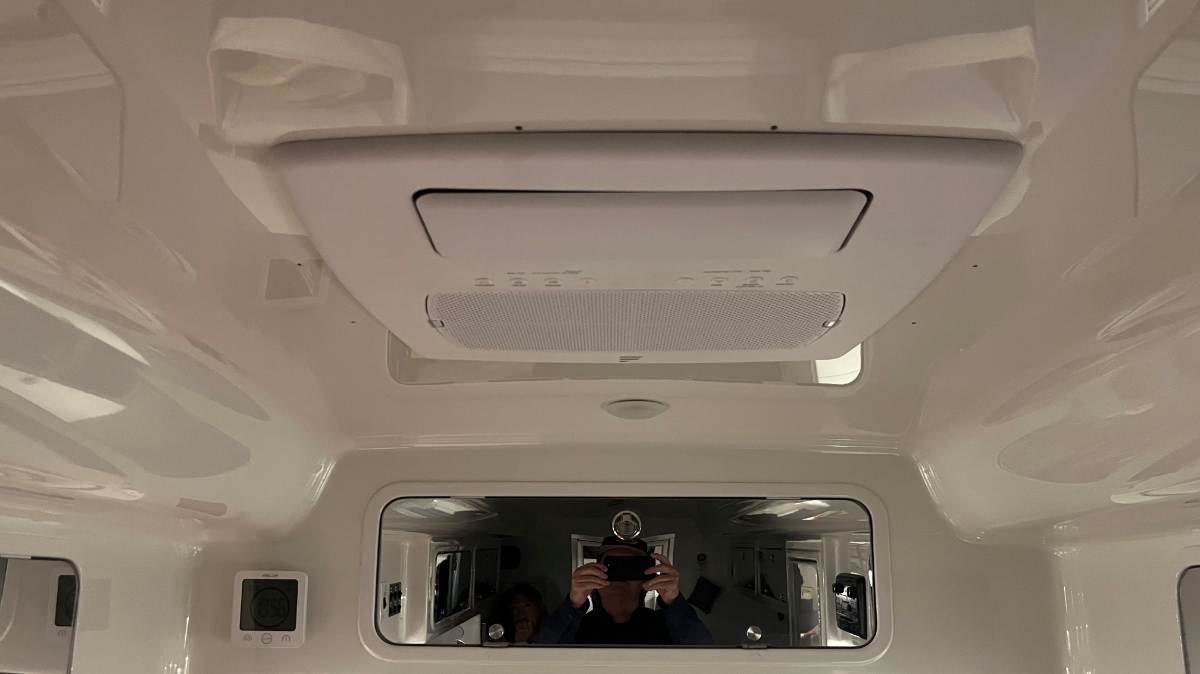
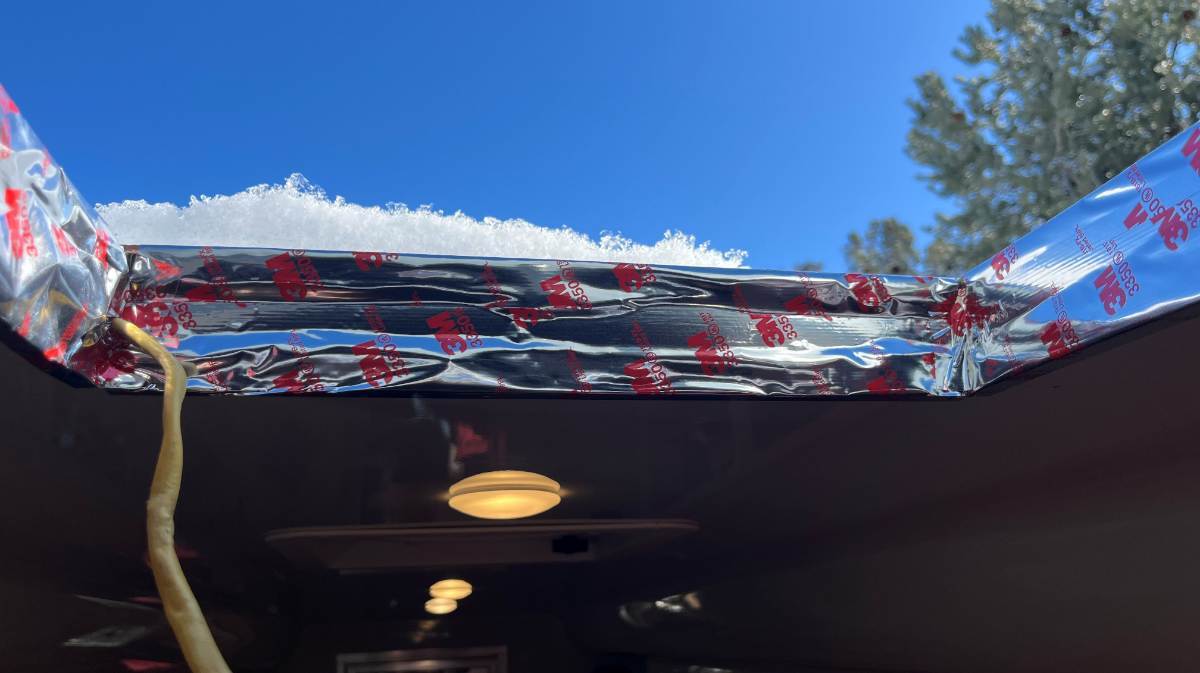
Back to the subject of the current Furrion Chill Cube, installation notes to follow... First step was to remove the Air Distribution Box (ADB) of the old A/C unit. Spend time cleaning the roof after removal. I had removed the old unit, plugged the 14x14” opening, prior to having the Oliver cleaned, stripped, buffed and ceramic coating. The new A/C unit is now mounted on a perfectly polished roof. At least clean the opening well so the new units seals well. Oh man, as usual, OTT with their drill-happy installers, we now have eight (8) drill holes in our ceiling! To date, I’ve had to fill over 30+ holes in interior and exterior holes in the fiberglass (beside here, the thermostat, the old inverter switch, the corner TV mount, the sat dish, Wi-Fi Ranger, both exterior cameras, etc.) OMG! Fortunately, new models like the Turbro and Furrion Chill Cube mount the ADB to the interior frame that’s bolted to the outside unit. If I had installed the original Dometic P2, I would have figured out a work-around, bolt to the frame or if need use 3M VHB on the edges vs. 8 screws. First measure the thickness of the opening (pic1) to know how much to trim the air baffle that fits inside. Cut off the thermostat wiring connectors and push remaining wiring and condensate drain plumbing into the ceiling, leaving only the 12 AWG 120VAC Romex wiring. Then I covered the opening with 3M 3350, a thin foil duct tape. I used one 14” length above and below wrapping about 1/2" on the roof and ceiling so it would stay sealed (pic2).
-
And that's why I ended with; "Hey, it's always fun to see what's new in General Discussion of our great Forum!" Though I spent a career in Technology and, just me, I've lost the desire! Way too much marketing today, too much noise, IMO. Talking Guitars! I've bought and sold more than 20 fine luthier-built acoustics in my life, mostly from 2007 to 2018. At that time we moved back to AZ where now I have more outdoor interests. I sold most, gave my son a couple and now have just two fine instruments, a McAlister Concert and Mustapick Hybrid (nylon strings). It's a lot like our Oliver, I don't need another TT or guitar in my future. At 70, I'm starting to realize the things I own are WAY more than most have and that we need. It's more time to trim the heard rather than continue being the hunter-gatherer! 🤣
-
My immediate feedback regarding this model and competition in the fiberglass market is, "Who cares?" We don't. We stopped looking in 2023 upon purchase of our Oliver. I've spent two years and a good 1,000 man-hours making improvements. I'm finishing custom mud flaps today, new quiet A/C was installed last week, new axles with Alcan Springs, 6 Victron devices and overhaul of OEM wiring, ALL new interior furnishings, beds and dinette cushions, hulls detailed inside and out! Start over? NO Way! A friend of ours, an ex-Oliver owner purchased a Brinkley I235. Being full-timers, the Oliver became too small for their needs and they sure did not like the Oliver windows. Brinkley replaced flat leaf springs immediately under warranty and after the 2nd set showed no improvement they worked a 3rd try with heavier springs. This reads about the same for leaf springs used by OTT. Some of these short-comings are industry-wide. "The grass is always greener." Yet all RVs, all TTs, and all products have issues and will continue to have some. Believe it or not, the list is shorter than ever and I'm actually about done! Hull #113 is no doubt better than the next Oliver that comes off the OTT factory floor! We also do not care what features OTT adds to the new models except to be happy for new Oliver Owners! In our opinion, the Oliver is better than examples seen to date in its simplicity of design and basic good looks! 😎 No way a new trailer will ever be a thought in our family. Chris loves getting away in the Oliver, me too, and it's become the perfect travel trailer for us! But if you're younger, need more room, and have a ton more money to throw at another travel trailer, and truly dislike the features of your Oliver that cannot be changed, then OK, "hasta la vista!" 🤣 Hey, it's always fun to see what's new in General Discussion of our great Forum!
-
We’re leaving Monday, be there in the afternoon! See ya! 😎
-
Furrion Chill Cube – Product Review and Installation
jd1923 replied to jd1923's topic in Ollie Modifications
Thank you Mossey, for this information! I don’t follow tech news much, just research what I need when I’m working on something. I’d hate to be contrary, but I believe this product hit the market last year! It has other brand names like Turbro and Pioneer! It sure looks like these models (in shape and position of condenser fan). This is likely another clone. Too bad, but TBD! 😎 -
Excellent thinking as this is exactly my reasoning! Last week we got down in the low 20s three consecutive nights. If it’s high 20s for a night or two, I’ve learned not to worry. I have a Ruuvi temp sensor in the rear lower basement, under the incoming water lines to keep tabs. We had water in the plumbing, hot water heater, etc. I worked the procedure and we’re good. The other day, since the Oliver was already in our driveway, I worked all 12 steps in <5 min (from memory after years). We’re leaving Monday morning to Quartzsite. Thank goodness I only have to fill the FWT, prime the plumbing, fill the extra 35-gal FWT in the truck and we’re on the road! 😎
-
Yes, good catch Roger, and Mike is correct in his comment! I had many critiques, 2 years ago, when I wrote these instructions and nobody had noticed this before! Just ask @Geronimo John, as I sometimes have a left/right brain thing goin’ on! Directions I’ve written that state drive East as I was thinking West! 🤣 it should read like this: 8) Connect the compressor airline to the Fresh Water inlet (a few seconds is all required). 9) Connect the compressor airline to the City Water inlet (leave it connected) Then yes, work step #10 on City Water. I will revise the instructional thread and I’m also going remove step #13 which I added upon suggestion, but do not believe is necessary. No pink stuff will ever be in my Walmart shopping cart! 😎
-
Yes, good thinking, and don't be afraid to let it go longer to lower SOCs in-between recharging.
-
Yes, load on the inverter creates a voltage drop. You do not see it as much when you have high SOC and ample LiFe PO4 Ah capacity. When I first tried to run A/C on inverter, back when we had lead-acid batteries, the load of the A/C dropped voltage from 12.8 to 12.1V immediately, hence the inverter started reporting warnings. I would drop your low/shut-OFF setting to 11.9V to start. Also, if you going into a cold spell and your Oliver is in storage, why recharge now? If they are disconnected, I would leave them at 50-60%. If you are connected and have some parasitic draw, then getting them closer to 100% SOC does make sense. 😎
-
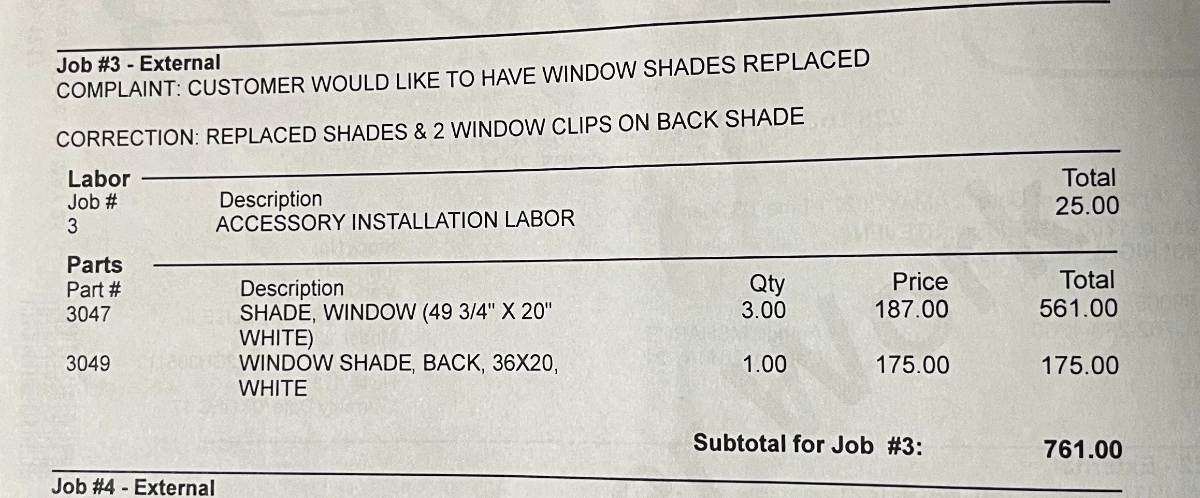
Day/Night Window Shade Questions
jd1923 replied to rideandfly's topic in Mechanical & Technical Tips
Us too Bill, but thankfully the second owner replaced them May 2021. Total cost was $761 for the set almost 5 years ago (2x as much today?). We also have the bright white frames and I've seen the yellowed ones in older hulls. Sure glad ours are now 5 vs. 10 years old! Two years ago, I removed and hosed them and they've Looked good and worked well since.
-
Furrion Chill Cube – Product Review and Installation
jd1923 replied to jd1923's topic in Ollie Modifications
Out here A/C coils fill only with red-oxide Arizona dirt. We lived a few years in South Fla where A/C coils amass all kinds of gunk! -
Furrion Chill Cube – Product Review and Installation
jd1923 replied to jd1923's topic in Ollie Modifications
Gotta love ya, my friend GJ! Next time you're on the mainland, please come to Prescott and together we'll get ol' hull #342 in better shape! 🤣 OK, so as you would, one point at a time... Actually, keep this one your wish list, as the wired thermostat interface is ONLY available on the ducted version which is not optional for our Olivers. My hypothesis: Out here in the SW there would little to NO condensate drip, but some in humid climates. Agreed, but... Looking at the specs I see a 3.25" difference (14.5" - 11.25"). It would be 5" to your low-profile Houghton. I promised @Tideline77 measurements which I took yesterday. My son Adam climbed up the scaffolding and place an 8' 1x3" on top of the A/C unit hanging off to the curbside. I measured the height and did not believe the number, so I measured it in the same way off the streetside, same number! I measured exactly 9' 8.5" on BOTH sides! Let's call it 9' 9" to top of the Chill Cube A/C on hull #113. OTT advertises the Oliver to be 9' 8" top of A/C! How is that? I put an A/C at least 3" taller than OEM! Crazy if this could fit in a garage with a 10 ft door. Chris said, "Who cares how tall it is? It's quiet! 😂 I would think you could simply hose from the rear. The dirt/gunk would fall out into the condensate trough and you would have to remove the cover and hose out the condensate path completely. Two-level scaffolding helps! 😎 All RV A/c manufacturers over-state specs. The Oliver is such a small, well insulated space with an inner hull that does not easily absorb heat. We'll be fine! 😎 I'll measure and provide real numbers this summer! But any Inverter or variable speed system will take near half the power consumption of standard compressor systems, no need for any kind of Soft-Start device. Yes, we like to camp in this range! The Chill Cube also has a Gear feature to gear power down to 75% or 50%! If your worried about high BTU fast cooling OK, but being able to run A/C conservatively, on inverted battery power, for a good amount of time is more our plan. We now have 900 Ah, and with summer temps I'd like to know how much cooling we get per Ah. Would 180 Ah (20% SOC) be enough to keep the Oliver Cabin comfortable all afternoon? If so, we could do that for 3 days knowing on day 4 we'd tow to DC-DC charge or stay a night at a campground and charge back up to 900 Ah! 😎 -
Recently? No, but I lived in Hampton VA, late 70s through the early 80s and knew the area and every road in Hampton Roads/Tidewater! 🤣 We often took the James River Bridge, though a dangerous 5-mile long low flat bridge, yet such a beautiful a drive! On a trip back from Florida we saw a van swerve, hit the guardrail and go in the drink, RIP! If you happen this way, take a short detour and swing by Smithfield, buy a special ham! There's a new road that wasn't there back in the day, I-664 looks like a decent I-64 alternate to get to VA Beach. I have not traveled this route. VA Beach has become a busy place, but walk the boardwalk, nicer along the north end of town, all the way up to Cape Henry. If I was to go all that way AGAIN... I'd have to head south the the Outer Banks and boondock on the shore, or the sound, for sure! 😎
-
Hide Interior Blemishes Using Decorative Emblems
jd1923 replied to jd1923's topic in Mechanical & Technical Tips
Going to a new A/C you have remote control for that. I added a heat-only furnace thermostat, so just ran two wires from under pantry around rear of basement to furnace. All original wiring for Dometic was left in the walls (not that I’d ever use it again)! -
Convert Old Paper Manuals into Digital Format
jd1923 replied to Wayfinder's topic in General Discussion
That will be two dinners after we install new axles on #110 at half price! 🤣