jd1923
-
Posts
3,589 -
Joined
-
Last visited
-
Days Won
275
Everything posted by jd1923
-
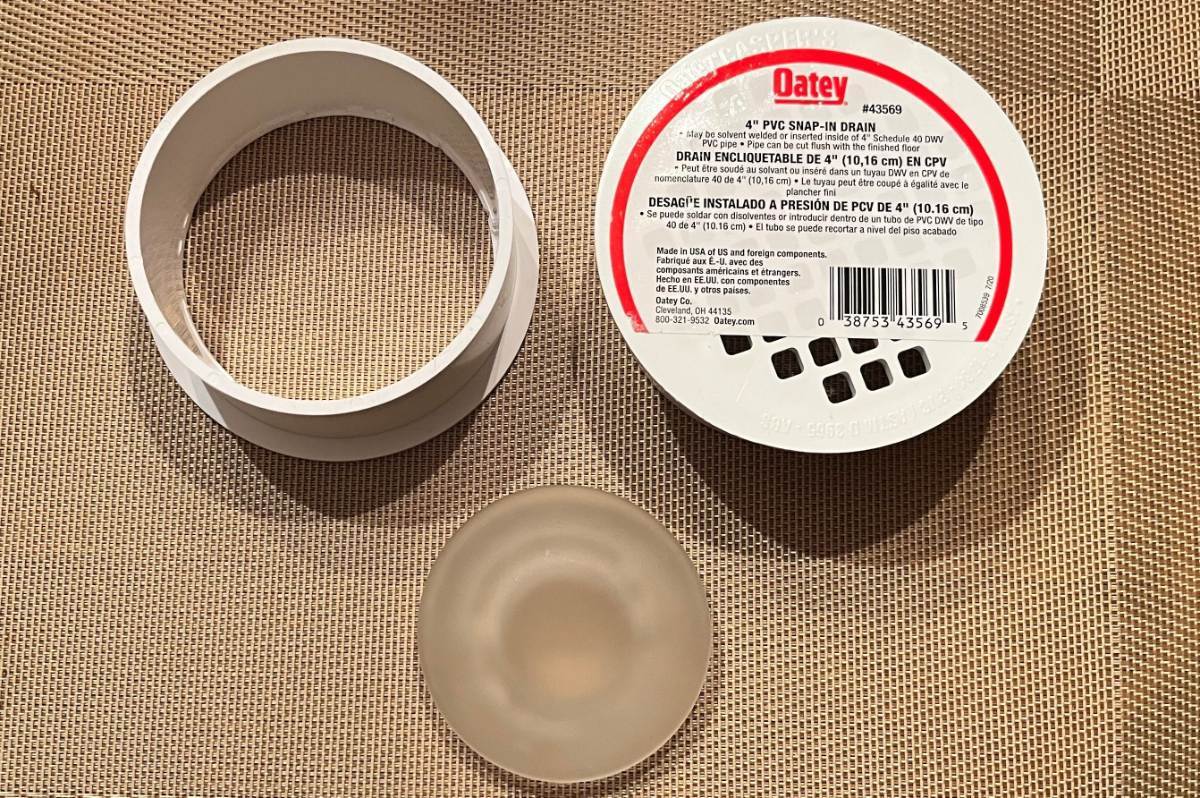
I've had this mod down at the bottom of my Oliver to-do list, and it's hard to imagine, but I'm down to the bottom! 🤣 We have the older glass LED lights that are 3 1/8"dia. The glare from the cabin lights is BRIGHT! And I certainly agree white PVC is the way to go, not black ABS for us and not something painted, extra work and would not age well. Long search looking at all the 3-4" PVC parts at Lowes and Depot and I found these 4" drain covers (see pic). With a 3 1/2" hole saw I cut the center out of one (not easy to keep the drill centered, use patience with the drill clutch on). It looks to be a good fit and these were only $3.60 ea at The Home Depot. They are 1 3/4" deep (off the ceiling). If you look at what @Fritz did above, he used VHB tape to mount his. I'm mounting at least 6 for Cabin and Dinette lights or a total of 12 to do all cabin lights. Getting 2-sided tape all around the perimeter of so many light shades would be a pain and if you don't seal the full perimeter light will come through the cracks. I wish 3M made a 1/4" round bead of VHB, but working flat tape around a perimeter is not fun. After cutting these parts, there is an 1/2" flat along the perimeter, a very good surface for sealing. I'm looking for suggestions for a proper sealant. It should bond to PVC to fiberglass, but not permanently! Something that could be removed with a solvent if necessary, and something that would not damage fiberglass. I know I don't want a silicone-based product (wish silicone caulk was never used on our fiberglass). Besides sealants that come in caulk tubes, or brush on, are there any thin bead sealants packaged like butyl tape? Would some brand of butyl hold these light shades? Any ideas? Thank you.

-
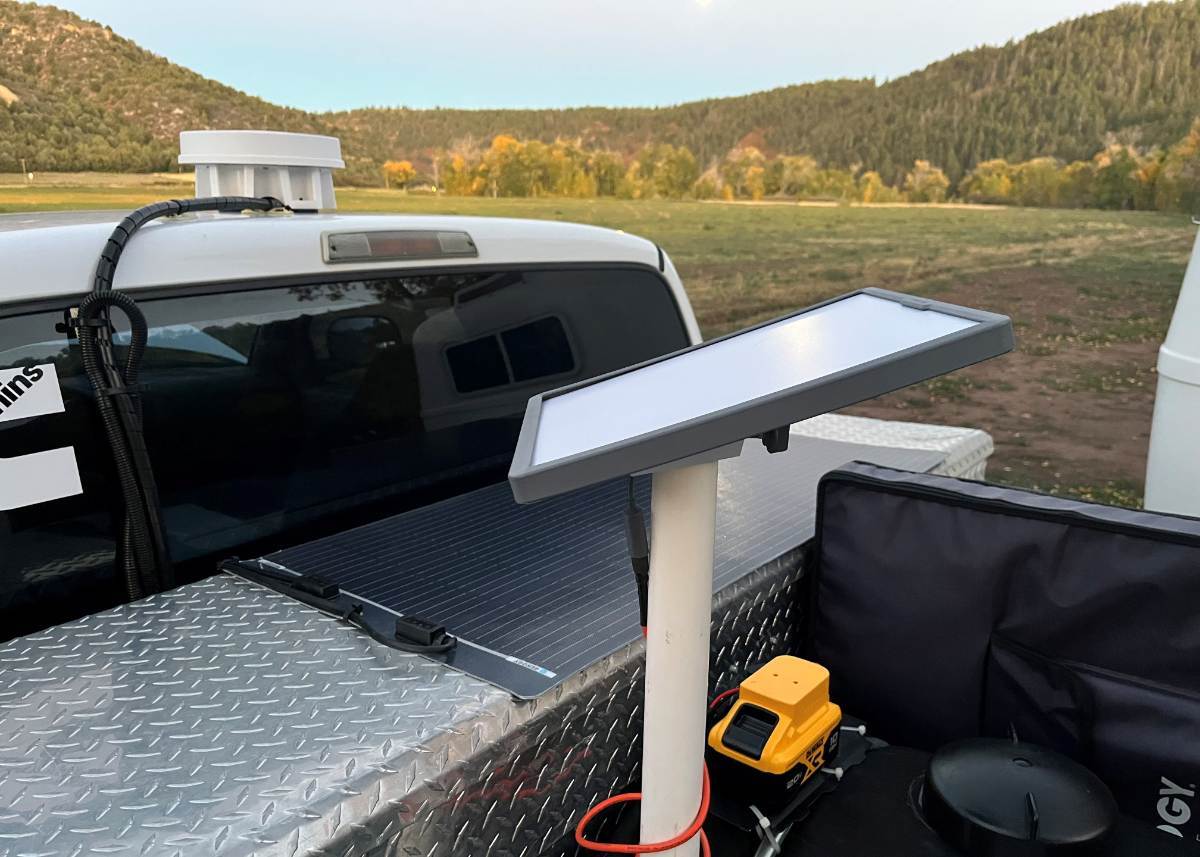
 Yep, to everything Geoff wrote. He is THE electronics/wiring expert on our, The Forum! I wired the DC-2-DC 12/24 charger as he wired, tuned it up to 30V, but so far have not used it. It's an amazing upgrade which I have installed and will use someday. If you look very closely at my picture, the harness going up to the rooftop cellular antenna, the cable tied down in a loop has Ethernet and 30V power supply for our Starlink Mini! There is only time for so much in life, and once I realized a simple battery is all we need for BASIC functionality... I've been using this day-to-day! 😎
-
Time to add a Forum Signature and update your location! 😎
-
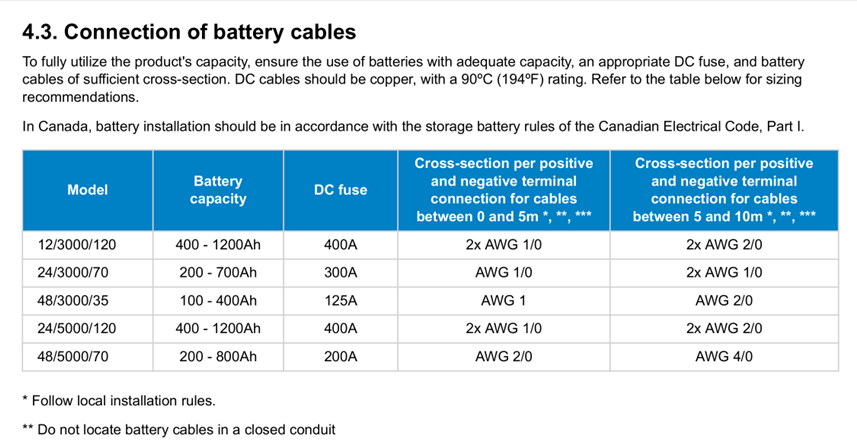
Excellent Mike! hard to determine cable size in a picture. It’s more the load to spec wire gauge and fuse amperage vs. battery type or Ah. If you have a 2KW inverter, 2/0 wire and 250A fuse are fine. 4/0 wire and higher fuse amperage are required to run a 3KW inverter at full capacity. 😎
-
I don't even use tire minders, but I still installed metal valve stems on all 8 wheels of our rig! And when you replace your valve stems, have them balance your wheels with the tire-minders installed (understood the don't weigh much, but why not?). 😎
-
Mike, very happy for you, on your 600 Ah upgrade! It looks like you used the bolts that came with the Epochs on all 4 posts. I found when the 4/0 lugs were doubled up that the OEM bolts only had a few threads to hold on. Yours might be fine, depends on the thickness of the lugs, but on two I used M8 bolts 5mm longer (see pic).
-
Axles manufactured in July 2025! Looks like you have a good opportunity in a Like New Oliver! 😂
-
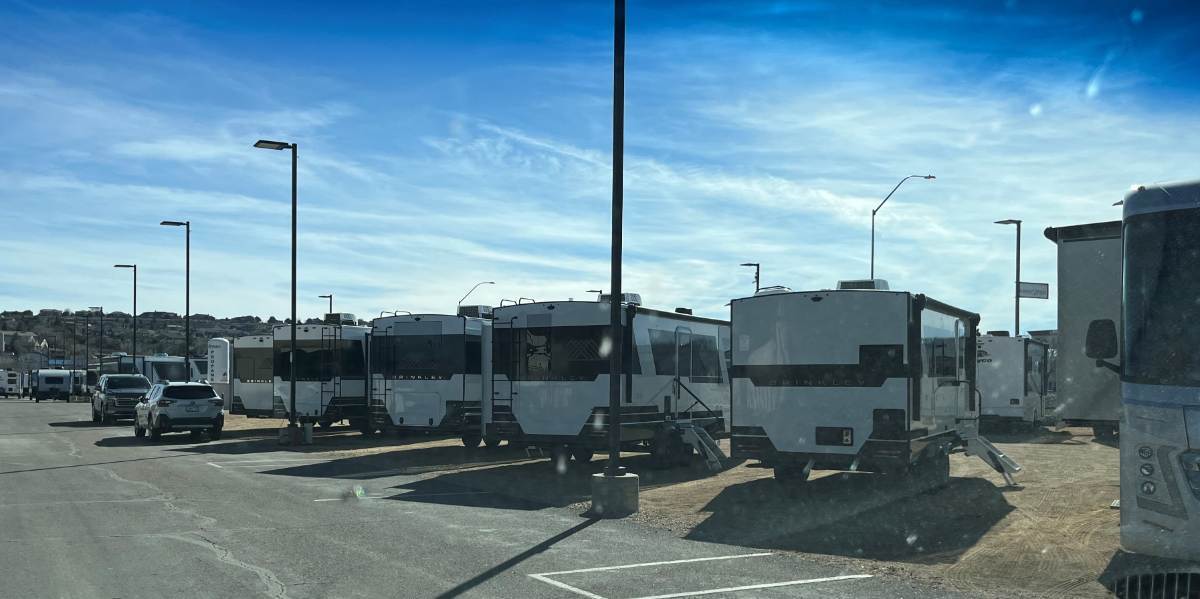
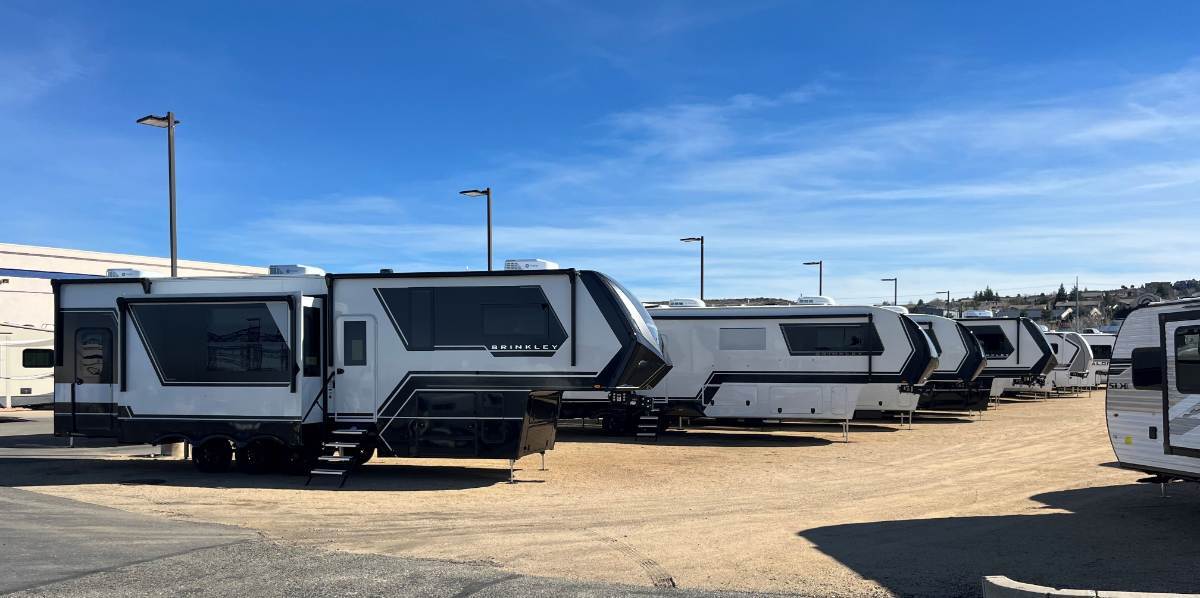
First we lost our friend Rich @rich.dev to how he wrote it in an email to me, "to the Dark Side." He purchased an Brinkley I235 travel trailer for more room. Rich still misses us and he's online here every so often. Later Rich and Thea traded in their I235 for a 5th wheel version, for even MORE room. We should see them in Quartzsite next year! Then our friend Art @MAX Burner moved to the Dark Side, also with an I235. I spent an evening with Art at Quartzsite, having a drink, sitting in one of his theatre recliners half-watching the big-screen projection TV, talking the night away! It was very nice and quite comfortable, but you know wallpaper on fiberboard panels is not the same as double-hull fiberglass! We don't hear much from Art here anymore, but he was in the middle of all our Olivers at Q. When we came back from Q, Blue Compass who took over 3 RV sales locations in our area, had 4 Brinkley TTs in inventory. We use their free dump station, and when returning on another trip 10 days later, one was sold. We were just there last week and Oh My! They now have 5 TTs and four 5th wheels, and you can tell by how they are parked with an empty space, they must have sold one 5th wheel as soon as they got them in! This new hot RV inventory is selling! They must be good trailers in how popular they have become quickly! But we have waaaaay too much into our Oliver, to ever visit the Dark Side! 😎
-
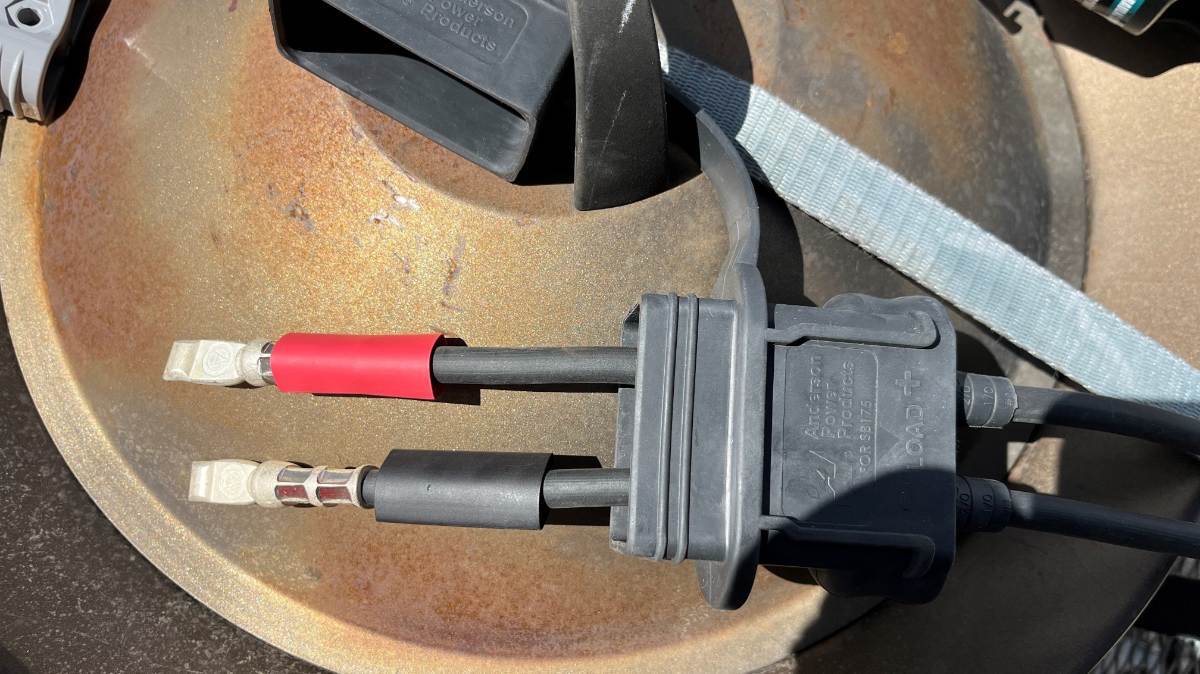
I like these better than the covers. You need a male and female pair and they're completely waterproof whether connected or not! https://powerwerx.com/anderson-36037p1-sb175-environmental-boot-load
-
Wow, what a bummer, but lucky landing. I'd much rather spend on replacing the fan, a simple installation, than have any fiberglass/body damage! It seems weather in the east has been on-n-off bad ever since hurricane Helene! Prayers and best wishes for an early spring and better weather going forward!
-
Good idea, if you're not using it. That's what I did from day one, since I stopped riding bikes (except dirt bikes 🤣) when we moved from Texas to the mountains. You have to be young and STRONG to ride road bikes out here! Recently when I got to my final big Oliver project, cleaning up the exterior, I decided to also remove the mounts which are NOT pretty! (see picture above)
-
Agreed, but... I also replaced the OEM China-made with Timken Bearings and new seals. Do NOT buy on Amazon or eBay! BTW, I forget to mention new bearing seals in my last post which you need regardless of replacing or re-packing bearings. But after spending $200-300 and hours of my labor, next thing I replaced the D35 axles with D52 and Nev-R Lube bearings. What a waste of my money and time! If you're going to keep the D35s, then do what GJ suggests. If you think you will upgrade and soon have Nev-R-Lube bearings, made in USA, that should last 5 years without maintenance, then just re-pack now. Something else to consider at this point in time, with spent brake shoes and needing other service, if you have any thoughts of upgrading axles, this is the time to do it. Should you spend $1000 +/- now or spend $2K plus labor on brand new upgraded axles with all new 12" brake assemblies, drums, bearings, etc? Following are my two posts where first I replaced OEM bearings with Timken and second where I replaced the entire suspension, D52 axles with Alcan Springs.
-
Of course, since you would not hammer out bearing races and reinstall them after being damaged merely by removing them. Unless the shoes were down to metal on the drums, the bearings should be removed (races stay), all old grease removed from hubs and bearings, get the drums turned and repack bearings. The complete braking plates with new shoes, springs and magnets are the way to go. Investing in new drums and bearings would about triple the parts cost!
-
Lot's of good replies here already! Am I correct in thinking new Oliver TTs now come with the Dexter D52 (5200 LB) Nev-R Lube axles? Some of us with older hulls had D35 axles installed and like Mike mentioned, have upgraded. So, you should be good here. Either way, OTT installs Dexter Chinese made leaf springs rated at 1750 LBS each. Although, we've heard rumors OTT is talking with Alcan Springs for USA made springs. Given you're buying new in 2026, you could ask them about this! Search for keyword 'Alcan' for more information. Many of us think 1750 LB springs are under-sprung (200 Oliver owners have installed Alcan Springs rated at 2750 LBS each), and there have been several failures of these springs documented. Our Oliver used to waddle like a duck when crossing bridge seams, gas station entrances, or speed bumps on an angle. Not anymore, and since our Oliver suspension is now handling itself, the truck tows better and I was able to remove the Andersen WDH. The Alcan Spring upgrade is a little over $1K plus labor.
-
Bob, I was wondering why do you have detachable cables? In most installations, like ours, there is a receiver installed under the truck bumper and the power cord on the Oliver side is permanently attached (not needing storage space). The DC-to-DC charger is such a great feature. Like you, we only stay a few nights at each location. We consistently get 40+ Ah charging every hour towing on the road. Please look us up when you travel southwest!
-
We've got a couple Forum Mods and several others who have miles in the 100K+ range, so they could answer to that. But 24K sounds too soon! Given your brake shoes have worn prematurely, it must be too much gain on the controller, your trailer is likely braking some for your tow vehicle. Hard to say on price, depends what they are truly replacing. You should look into purchasing complete brake plate assemblies. This is likely not the correct part (BTW Dexter support can tell you the correct part #s based on your axle tag), but for example a left/right axle pair is not expensive. If your handy at all, these bolt on. Or buy the parts you need and hire the guy to do the work. And to do it right, see if a local trailer or auto parts shop can turn (machine) the drums. https://www.etrailer.com/Trailer-Brakes/Dexter/23-26-27.html This is certainly a FALSE statement! The bearings only need to be re-packed. Worn shoes down to metal can damage the drums, not the wheel bearings. Believe me, I've owned many 50-60s classic cars that all had drum brakes on all fours and I've done more brake jobs than I can count, including rebuilding 3 dual-axle trailers! When I hear something suspect, I tend to not trust the shop. Beware and be cool! 😎 Also, we're here to help if you need installation advice. Best wishes, JD
-
My first thought is thanks for sharing! Even though we have ample carrying capacity, it's still of interest as what you have done here is truly excellent work! I've also heard very good reports re Sea Biscuit. Your white boxes, especially the rear box with the white railing surround, even white supports, look to be a perfect match like it was done at the factory, just gorgeous! 😂 18 months now? We remember meeting a friendly couple with a brand new E1 at the fall 2024 Texas Rally! Would that be you? Please, keep having fun in your cute little Oliver!
-
Before June 2023 I had no idea what an Oliver was! Found ours 4-sale locally and a few days later I brought it home in time for Chris' birthday. Another four days later, I joined "The Forum!" 😎
-
Strange, is your bumper not flush to the rear deck? I’ve slid ours off a half dozen timesI The bike rack mounts are removed on ours, but unless they changed something, the bumper is flush and could not be in the way. It should wiggle off after the center nut and washer are removed.
-
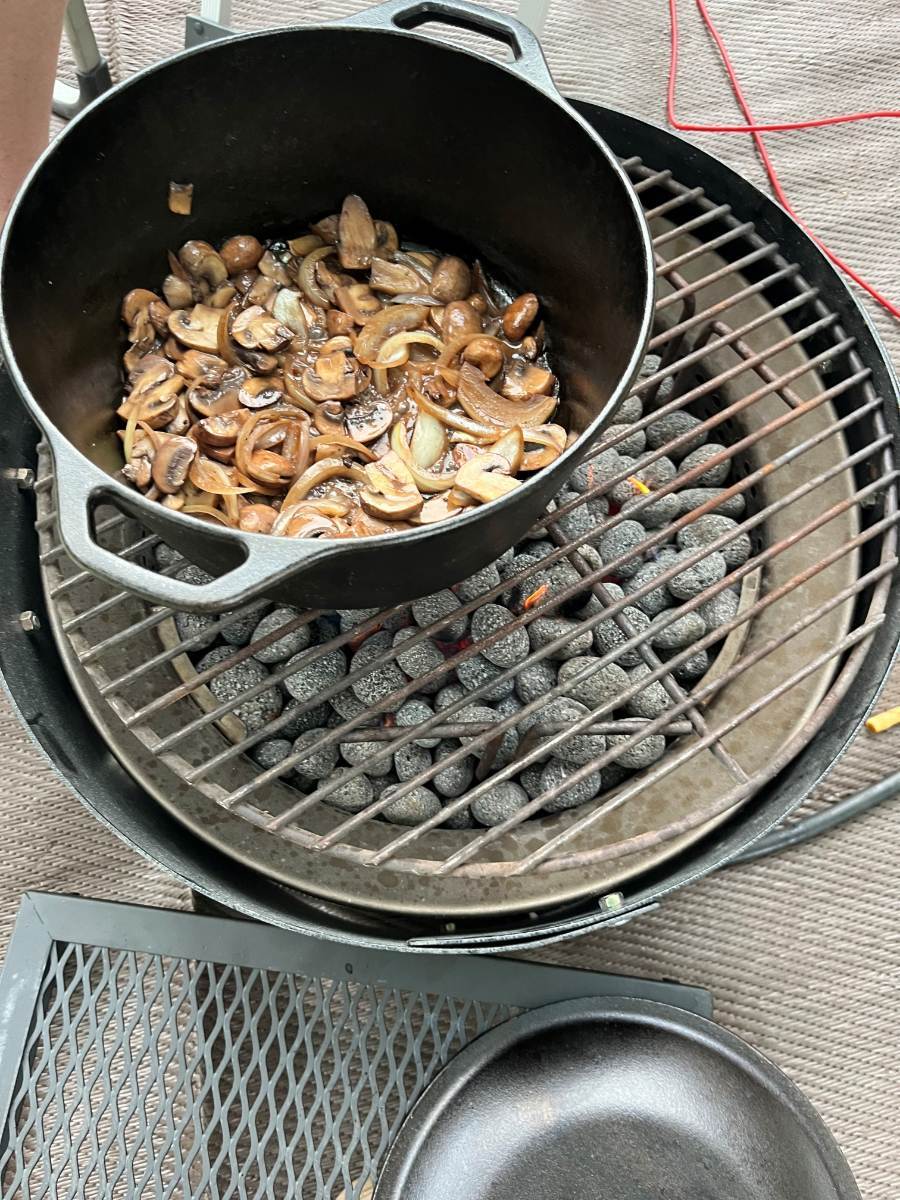
Sounds like a great setup! You do need high pressure if you want an outdoor cooktop requiring high pressure. I thought about adding a high pressure outlet, side-by-side to the OEM LP outlet front of the Oliver, but realized we don't need a high-pressure cooktop. For our Napoleon grill, or the Weber Q many use, Blackstone grills and our fire ring that we use everyday it's a simple plumbing fix to remove the regulators from all this equipment, then use the Oliver LP plumbing as-is. Chris can cook almost anything on the fire ring. That's a good use of LP, since we run it anyway for campsite warmth! I built a steel surround for the fire ring to allow it to run well in the wind and we have a grill top for high heat and a taller tripod to simmer foods (see pic). We replaced our OEM installed Marshall Excelsior MEGR-253 in January with the suggested Fairview model that I believe OTT installed in later hulls. This regulator failed immediately! First trip out it made whistling noises. Second trip out, making noise again, it shut down in some odd way. The fire ring kept burning, but no indoor appliance would start (HWH, furnace or cooktop). Then after 20-30 minutes, we could see the fire ring burning weaker and weaker. I had to disconnect both tanks and do a sort of pressure reboot and fortunately we did get the furnace and other appliances to work for a couple days to get back home. I wasn't going get stuck again, so I re-installed our original regulator for our next trip. I had trouble finding Marshall Excelsior products online except for Amazon, so I contacted the manufacturer. They suggested an authorized reseller that would back the 5-year warranty named Tweetys from Bulverde TX: https://tweetys.com/marshall-excelsior-megr-253h-excelaflo-automatic-changeover-regulator---high-capacity.aspx I went with the Marshall Excelsior MEGR-253H model, H for high output. Their tech support explained there is nothing wrong with running the H model and it would allow for running more LP appliances simultaneously. This is a well-built regulator and the one that's been working 10 years is now my backup. I tossed out the Fairview model since warranty claims on a $50 part is not worth my time, the return shipping costs and I would not want to chance installing a replacement. On occasion having a rear connection would be helpful. OTT installed one, but why in the bumper?! I'm not going to lower the bumper, push the waste hose out of the way to use it. We only open that at the dump station! I thought of moving it so to be accessible, but so far not worth the effort. OTT should redesign this, mount it like they did the front outlet. We added a 12' LP extension hose with a Y-adapter to run the fire ring and grill.
-
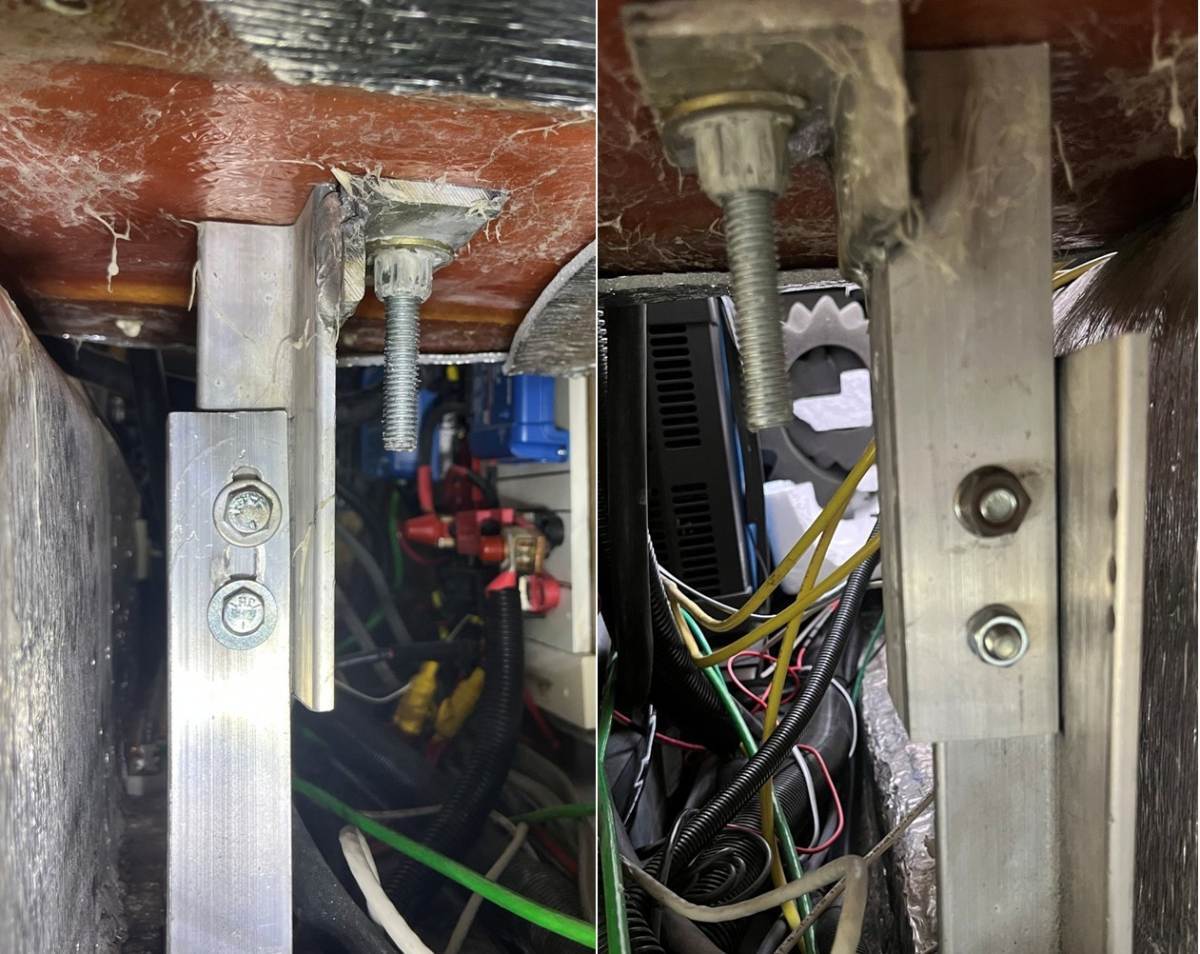
Highs in Prescott are 65F this week. Most of the year I can be outside working. I understand the East has been hammered this year. I hope spring comes early for y'all this year! 😂 Spent the whole day getting everything straight that I noticed during our recent trip, while getting ready for our next trip to St George UT, just 4 weeks away! I corrected the battery support issue and installed our new LP regulator. I did a full inspection of the battery post. The single bolt was in place, the nut was there but loose, with only one thread showing. The two angle-irons seemed to be aligned at a good angle. The base mount has two bolts screwed horizontally and firmly into the frame. The two large upper bolts holding the battery platform were solid. The battery base is square, the door flush, and everything looked good. I decided there was no need to raise the post, since the one bolt at the bottom of the grove was were it was when installed 10 years ago. The original bolt is a 5/16" bolt 1/2" head and since the groove was wider, I added a second 3/8" #5 bolt 9/16" head. I drilled about 3/8" below the top of the groove which would allow for raising the mount if ever needed. Drilling though both angle-irons, with a sharp drill bit, drilling slowly took some patience! Then Chris held a ratchet with a double-long socket extension under the streetside bed opening, as I tightened from the rear dinette opening with my favorite DeWalt 3/8" impact! I first tightened the original bolt, with a short burst of the impact and it now has 5 threads showing. It certainly was loose, still hanging on! Then we tightened the other bolt which has thread sealant and a Nylok nut to boot. This is done now, likely no need for future maintenance! 😎
-
Great post, Craig!
-
The picture below is from the Victron Multiplus manual. The first row is for 12V systems that need heavier AWG wiring than higher voltage systems. I and other Oliver owners have the Victron 12/3000/120, which translates to 12V / 3000VA inverter output / and 120A max charge rate) inverter installed. The inverter powering a microwave using 130A, a Dometic Penguin A/C or an 1800W blow-dryer (both about 150 DC Amps) takes more battery power than anything else. The 2KW inverter requires a 250A fuse and the 4/0 AWG wiring is overkill, very safe will never overheat. It can run the microwave, borderline on the blow-dryer which is generally only run for a few minutes. Borderline/not recommended to run an A/C unit as inefficient as the Dometic model, but fine for new inverter or variable speed A/C models. Victron suggests a minimum of 400 Ah in battery capacity (many have upgraded to 600 Ah and we recently added another Epoch 300 for total 900 Ah). Not sure why they call for 2x AWG 1/0 wires (maybe smaller wires are more easily routed in boats?), but cross-sectional surface area of 2x AWG 1/0 wires is just under, basically equal to one 4/0 AWG wire. The combined length of B+ and B- wiring must be less than 5m = 16.4 FT or larger cables are needed. In our hull the two cables add up to less than 12 FT. I replaced the 250A fuse with a 400A ANL fuse as spec'd in this chart and the OEM wiring OTT installed is just fine! 😎 I made the error of having our hot water heater turned on by electric, not realizing this I turned on the Dometic, no shore power, all on the Victron MP2 inverter. It ran for 10 minutes before I realized what I had done. The Victron output was over 3400W the entire time. It's rated at 3000VA but produced 400 more (there is some technical difference between VA and W which I do not yet understand). I believe they spec the 400A fuse so it can go over spec for short periods of time. The Victron MP2 is a beast!
-
While editing my above post, I thought again about this statement that I just wrote. Until I was educated by Alcan staff, I didn’t realize wet bolts should be torqued when doing maintenance. I’ve not noticed this in a service manual. I always thought a wet-bolt with a Nylok nut only had to be there, not overly tight nor loose. I remember having a suspension lock up in a flat bed car hauler. The mechanic at a trailer shop, merely loosened the bolts on the center link and the suspension dropped into place! I never torqued the wet bolts on the original suspension, though it was REALLY loose when I removed it. Thinking now that @Patriot has the right idea on this one. Crawl under your trailer once a year, lube the Zerks and check the torque on the wet-bolts and U-bolts. I also like removing the tires every so often, removing all gravel while inspecting, looking for punctures, clean the inner rubber. With the old-style bearings, pack them. Spin the drums and set the self-adjusters that do not always adjust adequately so the shoes are just rubbing. Im taking the wheels off anyway!
-
When I added the 45-degree Zerks, I tightened them down one-finger tight. Several of them at their set point were not at the optimal direction to clear the tires. When I lube, I loosen those Zerks a half turn to get a better angle, pump the grease to fill, then lightly tighten them back into place. Also, regardless of whether your Zerks are mounted inside or out, some may not want to take grease. Using the stabilizer jacks to lift the tire, take weight off, may help. If not, you may have to loosen the wet bolt, apply grease, then retorque the wet bolts when finished. Time to retorque all suspension bolts anyway. In my experience, this happens to 1-2 bolts each time. Check with Alcan ahead of time. They may not stock these parts, and you can always bring parts with you. BTW, given the age of your hull, if you’re replacing axles and springs, you’ll want to replace the EZ Flex center links too. Many have brought these parts with them too. Alcan will be happy to install them. Since you’re replacing the main components, replacing ALL parts at the same time makes best sense (see pic, I purchased 2 of these from eTrailer. The following thread is where I documented my DIY axle/spring installation: