jd1923
-
Posts
3,649 -
Joined
-
Last visited
-
Days Won
281
Everything posted by jd1923
-
Awesome, now 37 pages in a dead heat with “Where’s Ollie!” 🤣
-
Not, something miscommunicated! Your D52 axles are labeled 3500 only due to the OEM installation of 1750 LB springs. They are the same D52 axles. With an Alcan upgrade you’ll have a 10K LB suspension, but 3500 axle labels and 7,000 GVWR legally per the DOT sticker on the body.
-
Wow, all day long and no replies here on our 36-page Alcan thread! 🤣 Robert, you have a newer hull, so I assume you have D52 axles. Those with D35 axles should upgrade at the same time (my build thread below). You want to install everything NEW; D52 axles, Alcan 5-pack leaf springs, a new EZ Flex kit and new shocks. I had installed new shocks the year before, so after they tested good, I reinstalled them. I wish somebody would come up with a HD replacement shock (I've looked)! The Bulldog shocks are likely better than the OEM Monroe 555001 shocks, but they are both light duty shocks designed for 1750 LB springs. I wonder if the Oliver would tow any different without these shocks, given the HD Alcan springs. I'd like new HD shocks with similar min/max length specs but heavier, larger diameter shaft, piston and casing. Do differently? I would purchase the full Dexter EZ-Flex kit with HD shackles and wet bolts. I purchased the wet bolts from Alcan and new EZ-Flex center links only. I do love Alcan Springs, but their shackles and wet bolts are not splined so do slip, so not as good as the Dexter wet-bolts that come with the EZ Flex kit. Another route would be to look at a MORryde substitute for the entire EZ Flex kit. That's all I see, more info here =>
-
We don’t setup a waste line at campsites. We're never in one place for more than 5 nights and I don't deal with those fancy waste ladders which I associate with Class A RVers, who stay long with full hookups! 🤣 Instead we dump on arrival (often coming from boondocking) and on departure. When dumping, you must have the Oliver up in the front AND on the curbside. I use the LevelMate at the dump station to bring the front up a good +2" over level. Some may not know, the gray tank is on the curbside, with its outlet drain facing the streetside. If your Oliver is any lower on the curbside, your gray tank can be quite full after you thought you dumped tanks! I use an 8" Anderson block to lift the curbside jack so that it is at least +1" above level. Tanks are then fully emptied. This picture was taken at a dump station in Cedar City UT. I had to back in, so there was no other approach. You can see all what I had to do to lift the front! What's not pictured is the curbside jack is also lifted. Isn't RV life wonderful?! 😎

-
Our 2016, about the same thing. I reinstalled a replacement cable, but to do it properly I would have to reroute the waste drain plumbing. More here =>
-

Missing screws on cabinet cabinet drawers
jd1923 replied to Gliddenwoods's topic in Mechanical & Technical Tips
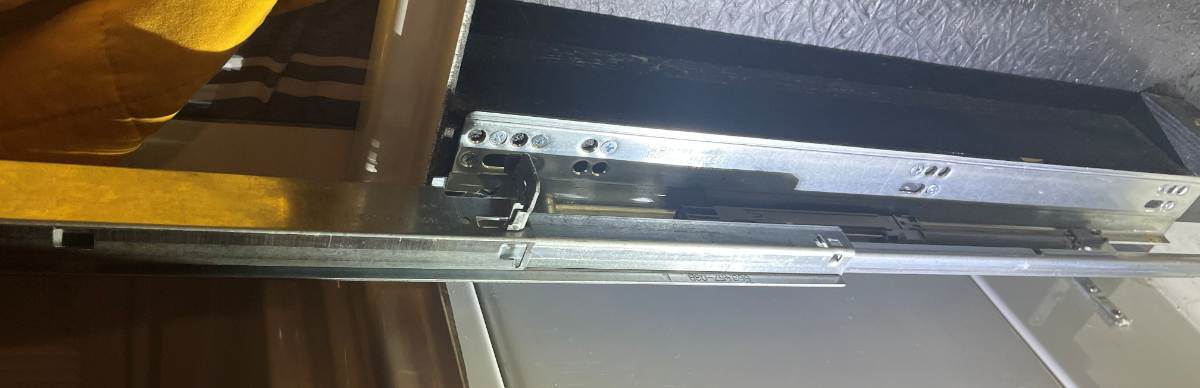
Just replaced the Blum slide on our nightstand drawer. This item is the OEM part replacement. Maybe I should have bought the 6-pack, LOL! The nightstand drawer and 5 kitchen drawers all use the 18" length, the short drawer uses the 12" Blum slide. https://www.amazon.com/dp/B0G7LQ3PQ4/?th=1 Lately, the drawer would open during travel so I suspected something was wrong. After removing the drawer (squeeze two orange levers underneath), I found the old slide was truly worn out. When fully extended the end would drop a couple inches. Not good! The new slide is in and now again it works great. But per the subject of this thread, OTT installed these slides with only three screws per slide! 😒 The slides are rated to carry 100 LBS, but three short #6 screws are certainly NOT! A couple year backs, working on a kitchen sink leak, I doubled all the screws on the kitchen drawers and went up one size. At the time, I forgot to do the nightstand drawer. The slides all wobbled a bit when unloaded with only 3 screws and I now contend it was the lazy installation that allowed this drawer to shake and eventually wear out the slides. These slides are substantial but need to be installed properly! BTW, Blum supplies 20 wood screws in these kits! 20 screws for 2 slides and 2 brackets not used for our application. I installed 8 screws on each slide! Why not? Blum certainly intends more than 3 should be used! I put 3 in the same holes to hold each slide in place and then drilled small pilot holes and screwed in 5 more (see pic)! Now this should last my lifetime. 😎 I suggest removing all your Oliver drawers, having at least 6 mounting screws per slide, 12 per drawer minimum.
-
True Induction Stove Top will not turn on
jd1923 replied to Lamar's topic in Mechanical & Technical Tips
Not powering up is NOT the same thing as it taking too many watts overloading an inverter! Given it "does not come on" (at all), it's simply not wired to a circuit supplied by the inverter. If an appliance wired to the inverter pulls too much amperage, your inverter will start making noise and will shut down when overloaded, but it certainly will "come on." What were they thinking at OTT! And BTW, a 2000W inverter by definition will run an 1800W appliance! Given the True Induction cooktop is rated at 1800W, and it's a 2-burner cooktop, then each burner is rated at 900W. If OTT had wired the cooktop properly, you could certainly heat up water for coffee on one (1) burner and run the fridge at the same time! You will be well under 2000W! 🤣 Get OTT to wire this properly! I would just DIY, as I suggested in an earlier post, but you have to be concerned of warranty issues. We have the LP cooktop of course, but like Bill mentioned also have an induction cooktop that we plug in indoors or out. We also do not use our LP stove stove to heat coffee water (unless battery SOC is LOW). We love these products! 😎 https://www.amazon.com/dp/B07KSNTSVR/?th=1 https://www.amazon.com/Aigostar-Eve-Electric-Cordless-Boiling/dp/B07D3R7RZT/ https://www.amazon.com/Melitta-Pour-Over-Coffee-Stainless-Filters/dp/B0CSQLHFW9/ -
Adding a Matching Rear Porch Light and some Front Lighting
jd1923 replied to jd1923's topic in Ollie Modifications
Got this working yesterday, using the screws supplied with the light on top and hardware I had in the shop to attach the bottoms. It looked hodgepodge today. I really should fab a proper bracket, but for now I just wanted to fix its appearance. Went to the local HW store and got four short 4mm countersink screws and two Nylok nuts and washers. I had to countersink the brackets further to get the screws flush. The assembly is much better, but now that the light is taller, I noticed two things. The base bracket looks cheap now that you can fully see it. And the height is right at the belly line where the hulls meet, so visually it's not good. It looked better shorter, but now the light is where you need it. If I was to do this again, first I would use the great idea @Steph and Dud B made above; to grab power and use the light switch on the jack. Second I would fab a proper bracket a bit shorter than this one and push it forward a couple inches to get the required angle. Then it's not up against the hull belly line and will look better. It's too late for me re the first idea, but I'll do the latter when I source the right stainless steel stock. Looks like one of those Star Wars robots! It's all the light we'll need to hitch-up and load or unload the truck in the dark when necessary. We now have proper exterior lighting on all four sides! 😎
-
Our old Furrion jumbo heads sure are ugly! Your new iRV62 looks sooooo much better, even with the large faceplate which has a clean look! Excellent work cutting out the plastic sheet plus the aluminum sheet for added strength. The wiring should be the easy part. You're 90% there! 😎
-
Adding a Matching Rear Porch Light and some Front Lighting
jd1923 replied to jd1923's topic in Ollie Modifications
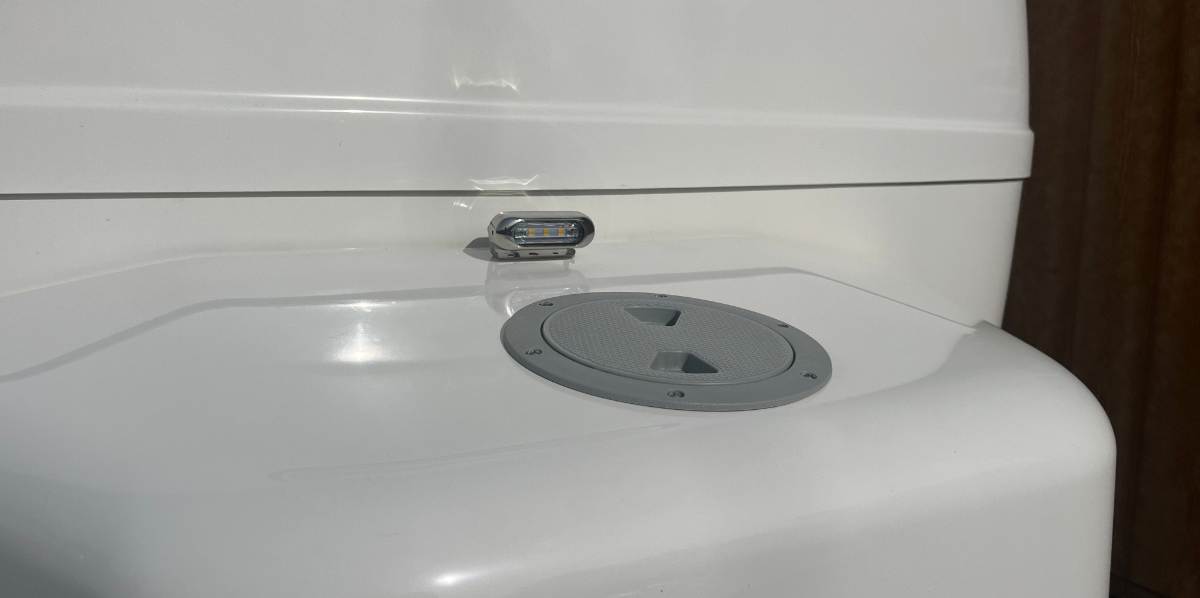
Difficult to find a taller bracket spread 2 3/4" (70mm). But this item gave me an easy quick fix. Brought the light up 1 1/4" taller and no more shadow. https://www.amazon.com/dp/B0DT7221NZ/?th=1 -
Many of us envy your annual trip, at least I do! But it's been proven, I just cannot fish! 🤣 How many consecutive Wyoming fishing trips will it be, Bill? (this year included)
-
Home for the Summer! 🤣 Come see us if your heading one state further West! 😎 Got electric and water for you, free dump station down the street, and lots of great camping around town and in the Prescott NF! (no bighorn sheep though, how cool!)
-
One exception may be Dan. @DanielBoondock ???
-
I've pumped from our 35-gal aux tank in the truck about 30 times. Only once it would not pump. My son was using the Oliver and he's new with RV stuff. He kept trying the water. Normally, when we here a first gurgle from the pump, we stop and refill the tank. Yes, when you loose prime, water will not pump regardless of the valve configuration. To fill water that one time, we had to tow to use a pressurized hose. I filled the FWT, then primed from the boondocking port and finally attached the hose to the City Water inlet to prime all faucets, the HWH and toilet. I wanted everything full! Also, we pump often when the truck is attached or at a distance, so I connect the 10 ft plus 25 ft hoses we carry, from truck bed to boondock port. Length of hose has not mattered in our case. However, OTT installs a basic water pump which we replaced with a REMCO US-made variable speed pump, with a little PSI and GPM bump over th OEM pump. 😎
-
I don't take the room to carry a ladder. With an old metal milk crate, I can reach up to our awning safety strap. Not going on the roof for anything! And for your dipstick and anything in the engine bay or an open truck bed, ya gotta get on of these! Somebody linked this in another post and I bought one. We always put it on our curbside rear truck wheel which allows Chris to climb up and reach in for cooking equipment. https://www.amazon.com/dp/B0002Q8TWI/
-
Adding a Matching Rear Porch Light and some Front Lighting
jd1923 replied to jd1923's topic in Ollie Modifications
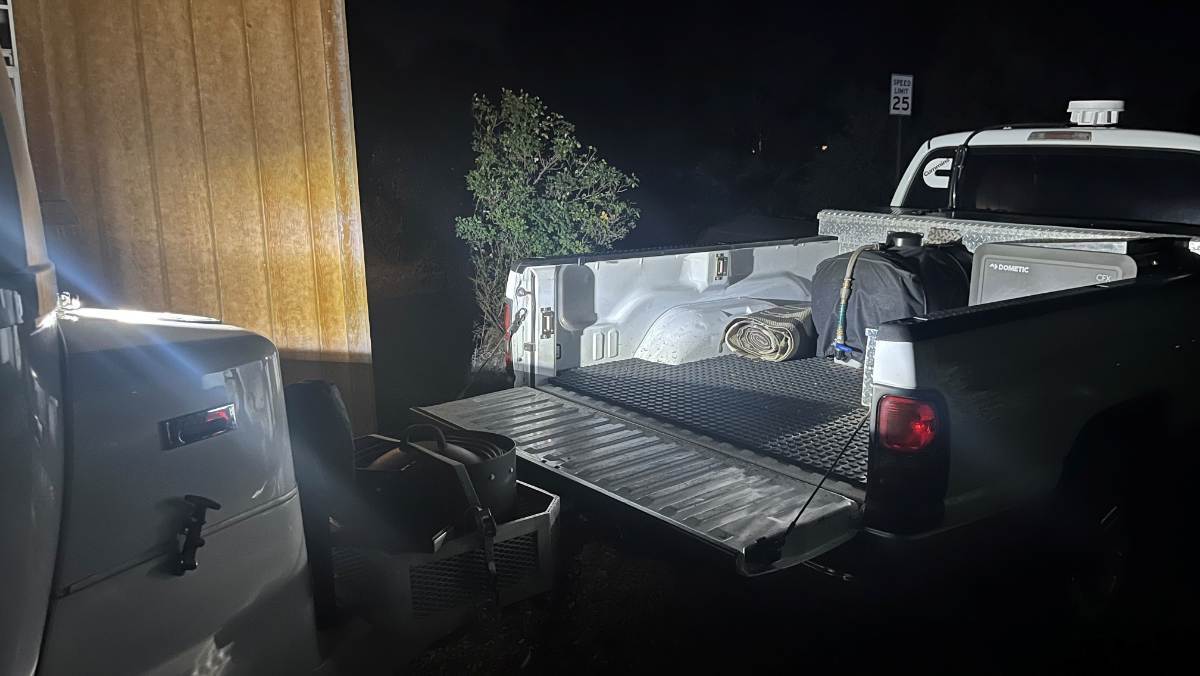
This is great, there's more than enough light! Notice there's a shadow on the close section of the truck bed. It's from the deck plate hatch. Those with newer hulls would not have this issue since the hatch is now placed below. The light just needs to be an inch taller. The bracket that comes with the light is so short, it only lifts the light 1/4". I have some ideas for this...
-
"Best" low profile AC replacemet
jd1923 replied to Gliddenwoods's topic in Mechanical & Technical Tips
Wow, just a $3,000 upcharge for a few hours labor! 🤣 Sorry @Gliddenwoods I can't help much since we would NOT ever again be without our HIGH-PROFILE Furrion Chill Cube! Its height in condenser and evaporator coils is one thing that makes it so efficient. At 3.25" taller than the Dometic P2 our Oliver measures 9' 8 1/2" tall at the top of our new Chill Cube A/C. It should fit under a 10 ft garage door. You should measure for yourself the true heights of your Oliver on top of the A/C and your garage door opening. I do not believe the advertised height of the Oliver E2 is accurate. Furrion has a low-profile unit, but it's not "whisper quiet" nor variable speed: https://furrion.com/blogs/rv/chill-cube-vs-chill-he-vs-chill-he-low-profile I hate to see anybody go with a Dometic A/C product. OTT doesn't exactly have a proven track record in picking winners in this category! -
Adding a Matching Rear Porch Light and some Front Lighting
jd1923 replied to jd1923's topic in Ollie Modifications
That's an excellent idea with the switch and 12V right there! You could remove the bubble level (for those of us who use LevelMate) and mount a post light top center. -
Adding a Matching Rear Porch Light and some Front Lighting
jd1923 replied to jd1923's topic in Ollie Modifications
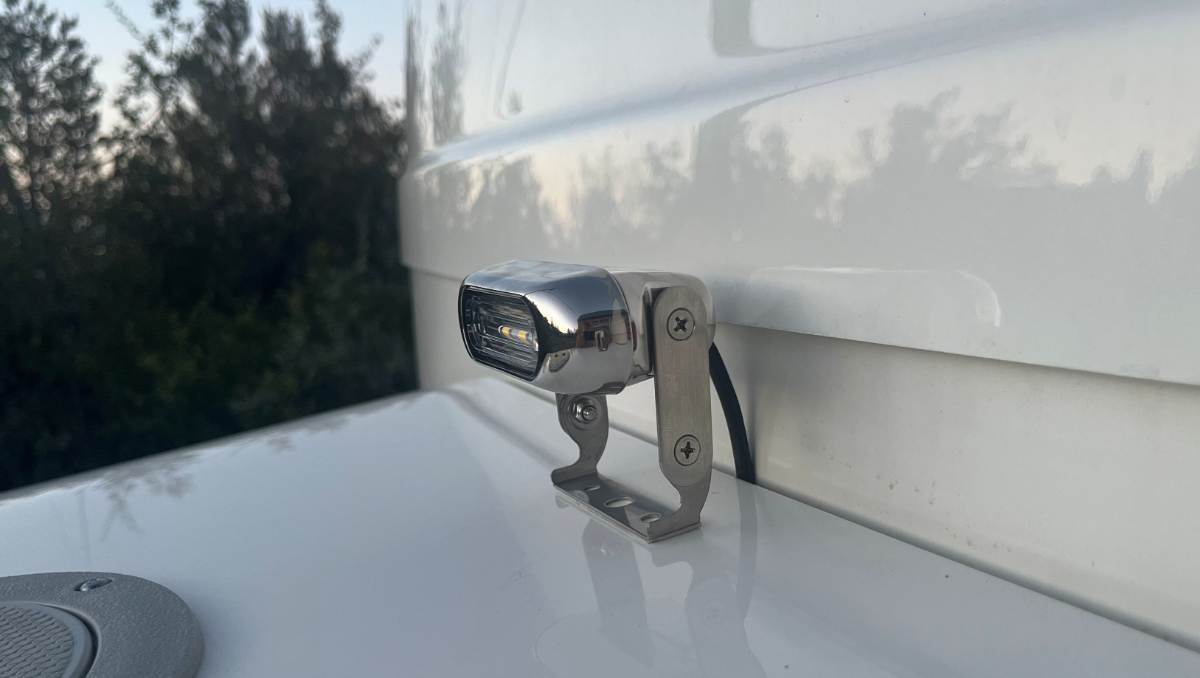
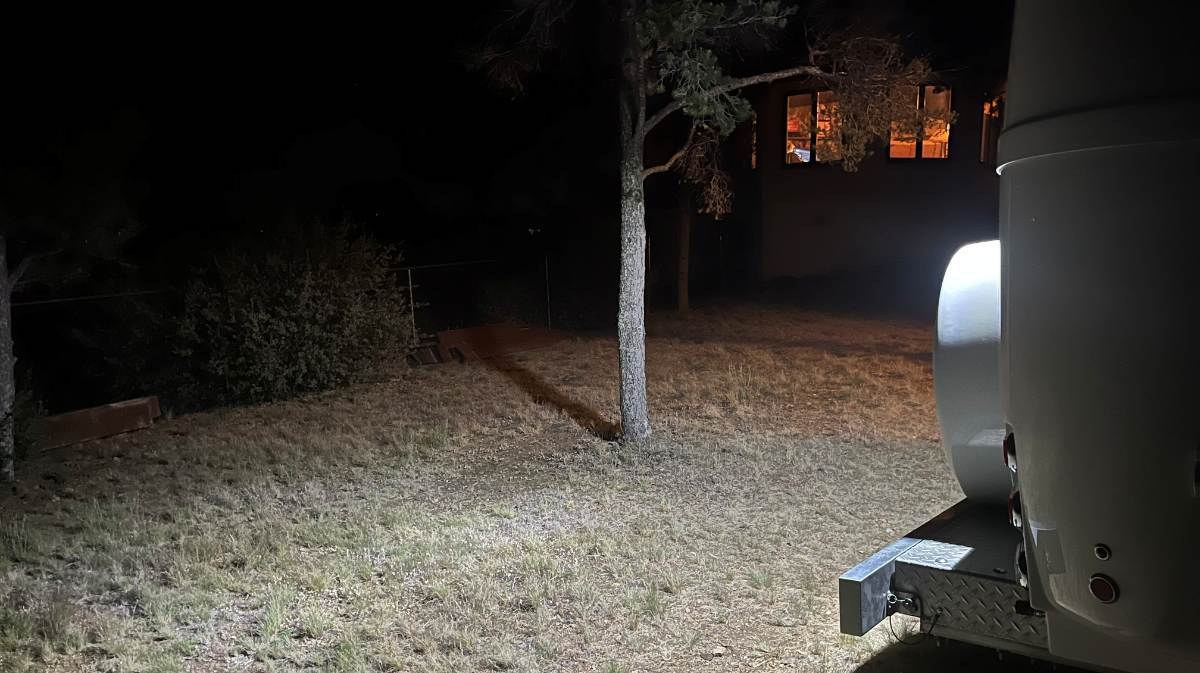
Finished my install on a front light, but won't be able to see how effective it is until it gets dark tonight (more pics after). My hope is that when the TV is attached, I can unhitch when getting to a campground after dark and see what's stored in the truck bed. I got this Docking Light on the same order as the Porch Lights. https://itcshopnow.com/products/exterior-led-flood-boat-docking-light I used 3M 4950 VHB tape to mount it the the top of the doghouse. There is of course a wire harness, so I drilled into the doghouse but not on top, just behind it where there is room and it's out of sight. I used a 13/64" drill bit which is a hair over the diameter of the wire loom. The picture shows the SAE disconnect wrapped up, only so it could be seen in the photo. Got to have a disconnect to fill the LP tanks. I tapped into the power for the emergency brake which is unfused 12VDC (the brake switch still has a direct connection). Added an inline 2A fuse and a switch in front of the doghouse. Added wire loom and tied up everything. Chose this location for an easy reach from either side, somewhere out of the way, and with a straight line for drilling the hole. The light draws 0.3A and provides 290 LM at 5000 K. Can't wait to see it at night! 😎
-
Maxxfan Dome installation (previously orientation)
jd1923 replied to Townesw's topic in Ollie Modifications
It actually looks very good in your pictures, so must look perfect from the ground. Job well done and an excellent detailed write-up! 😎 Too bad OTT doesn't make a small flat area for the bathroom fan in their fiberglass molds (inner and outer hulls). It would make for a better fit and make this job easier on all of us! -
Adding a Matching Rear Porch Light and some Front Lighting
jd1923 replied to jd1923's topic in Ollie Modifications
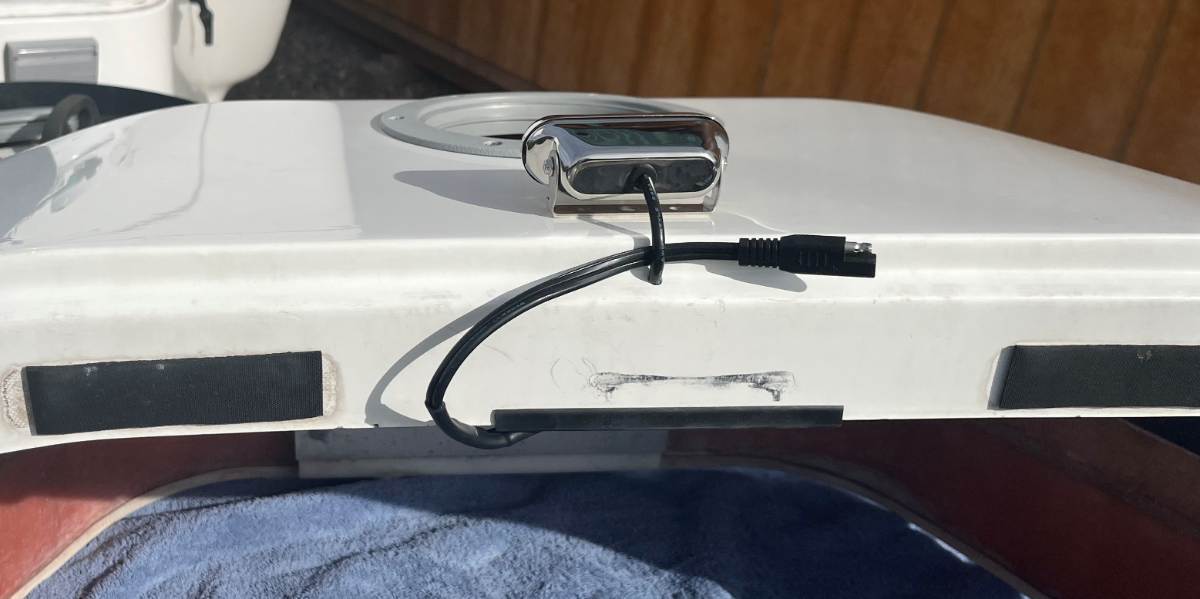
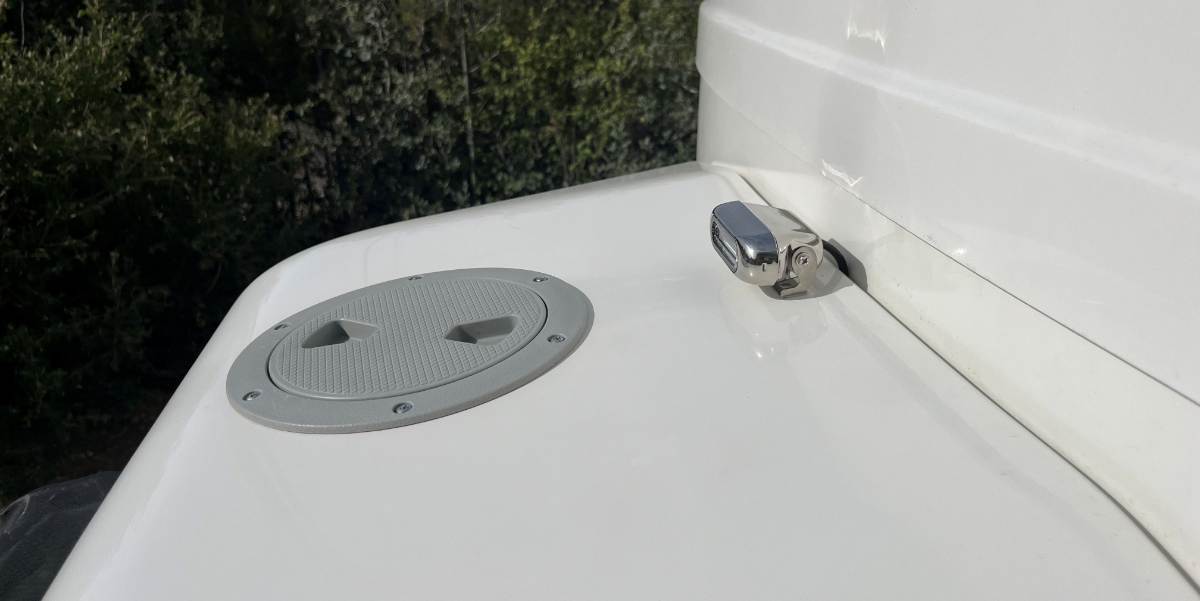
I realized I did not take a picture of the installed Rear Porch Light in the daylight so I did that today. I kept the black rubber seal that OTT was removing since they were causing streaks with age. The rubber looks to be good quality, not like the rubber surround on the Furrion 30A receptacles that really streaked badly. If it streaks later I'll simply remove it then, but at this time I didn't want to mess with sealant. If I do add a rear camera, it would be for security purposes while camping vs. having eyes when backing up. I would not mount it rooftop where OTT did, but surface mount something below the OLIVER taillight and above the new Rear Porch Light. We usually have the TV down and the rear window shade closed, so it's not easy to look to the rear. Either way, it will be nice to have light back there when needed. Got my front light done today. Pictures coming soon! 😎
-
I like what you did Bill, with the rubber and polypropylene spacers. For sure it's filing the angled slot that truly helps the friction and noise in the up down movement. You got yours smooth and straight! Noticing in your pics the step material is coming up in the corners which will soon break off with use. I did a similar job but also sanded down and ceramic coated the aluminum steps and added new 3M Safety Walk 4" Resistant Tape. Our steps still look very good almost 2 years later! 😎
- 1 reply
-
- 1
-

-
Portable solar panel with legacy elite 2 platinum package
jd1923 replied to Brian H.'s topic in General Discussion
Welcome Brian, looking forward to hearing more re your project(s)! Is it worth it? An extra 100W is a drop in the bucket, although aimed at the sun it is more efficient compared to each 100W on the roof. We added a Victron MPPT 30A SC and the 30-LB Renogy 400W suitcase. I've found almost 2 years later that we rarely use it and should have saved the upgrade $$$. Wish somebody told me this 2 years ago! We move around a bit. I now believe extra solar is for those who want to boondock in one place for a week or longer. And you have to chase the sun all day in moving panels. There is an Oliver owner who sells a machine that rotates the panel, but it's another thing to carry and it only holds one panel. The only guys I see running much solar are the ones that live in their campers, staying the 14-day limit on BLM lands. Since we move around a bit, sometimes just one overnight, most often we stay 3 nights and then "on the road again." In this use case the DC-2-DC charger is a much greater value. We can charge 200 Ah while towing a half day drive. 😎 Our 400W suitcase will not add 200Ah babysitting them all day on the sunniest of days! Here are my two related upgrade links: -
I finished the rear light! It looks great and lights up the park! The hard part is removing all the dishes, glasses, spices, etc. and putting them back! I worked a little trick and used some existing wiring. I'll run an extra switch leg, next time Chris wants to rearrange things up there! Thanks, Mossey.
-
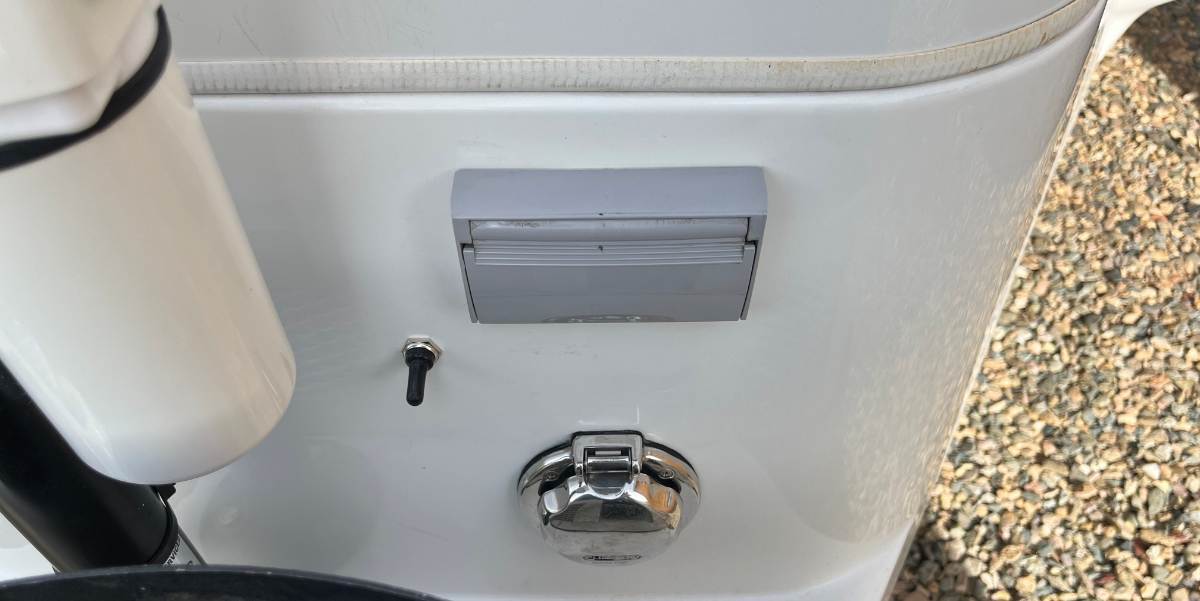
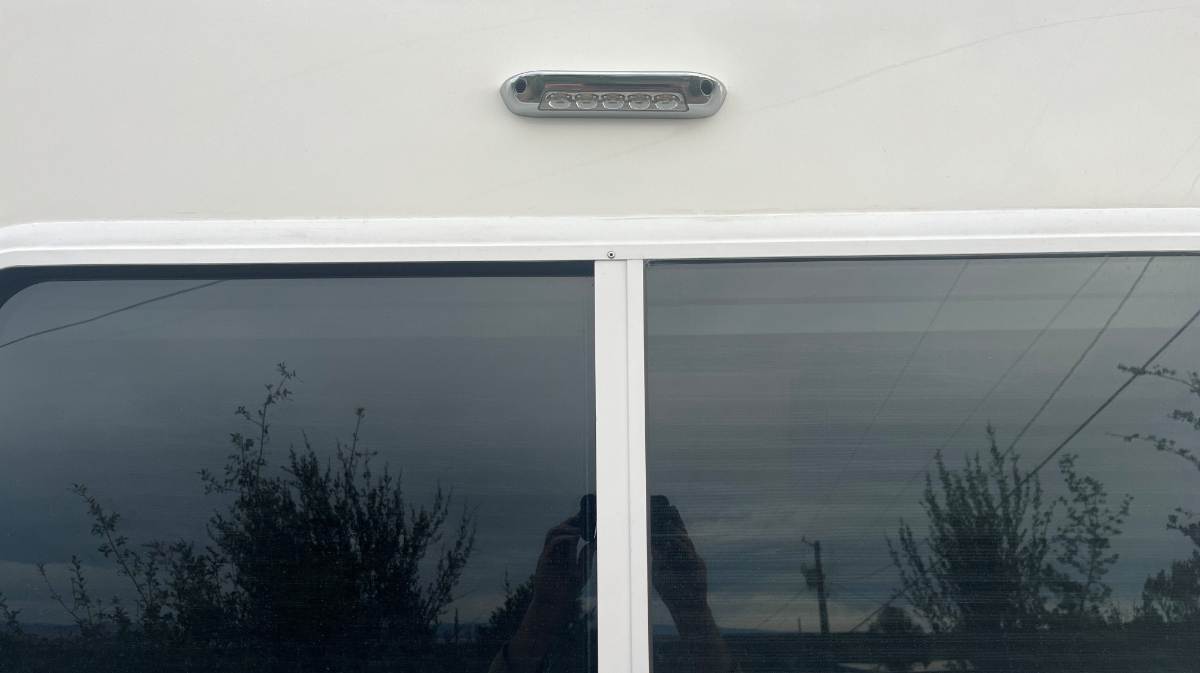
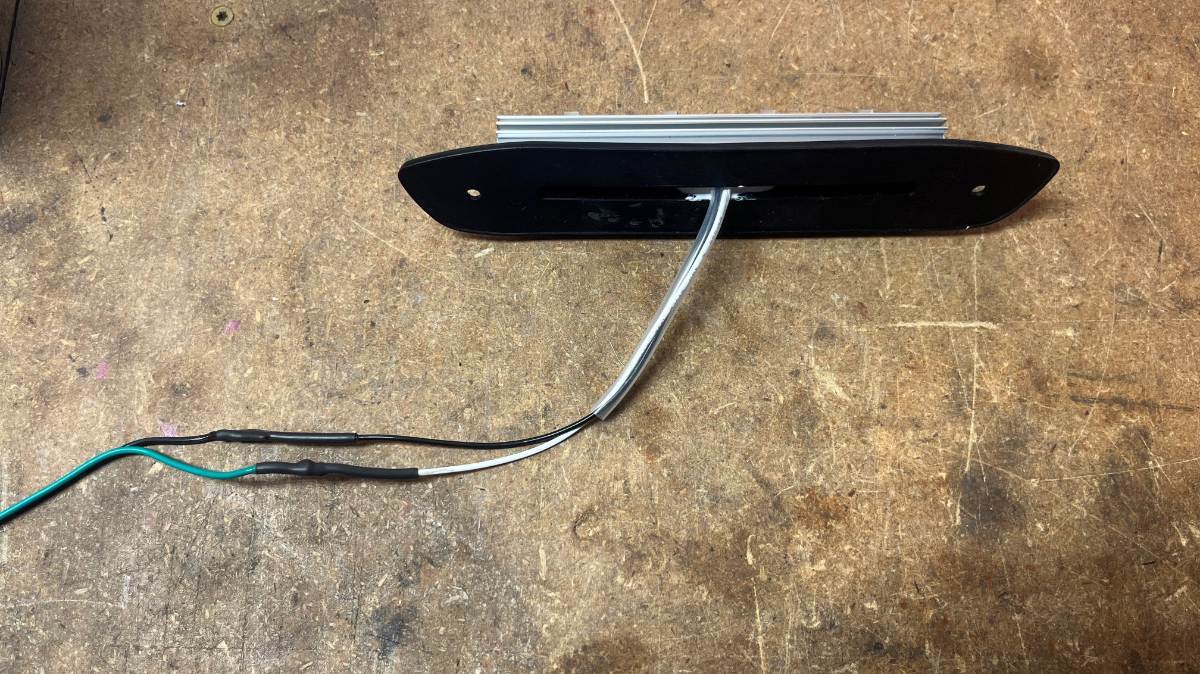
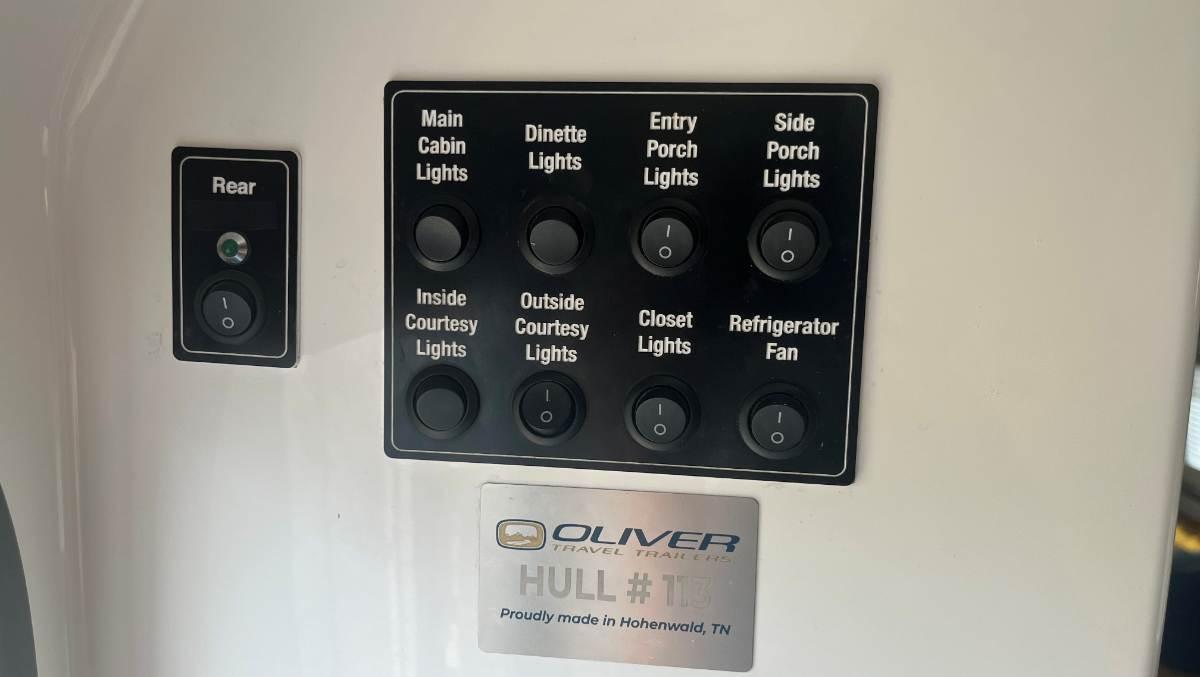
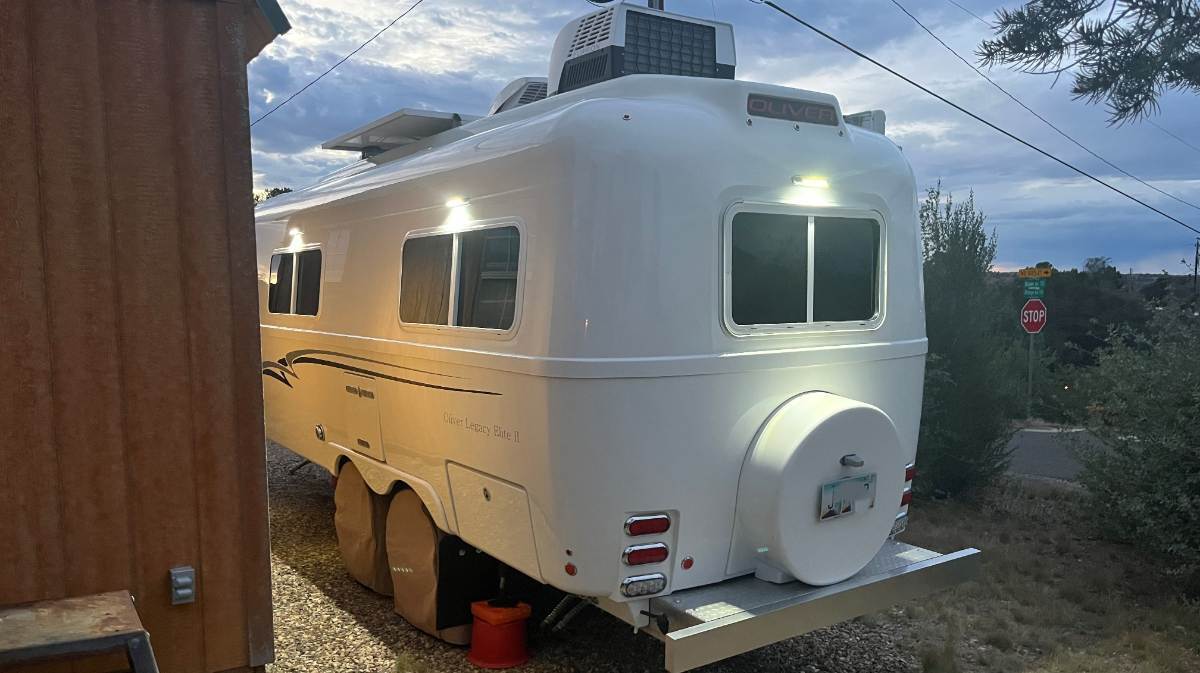
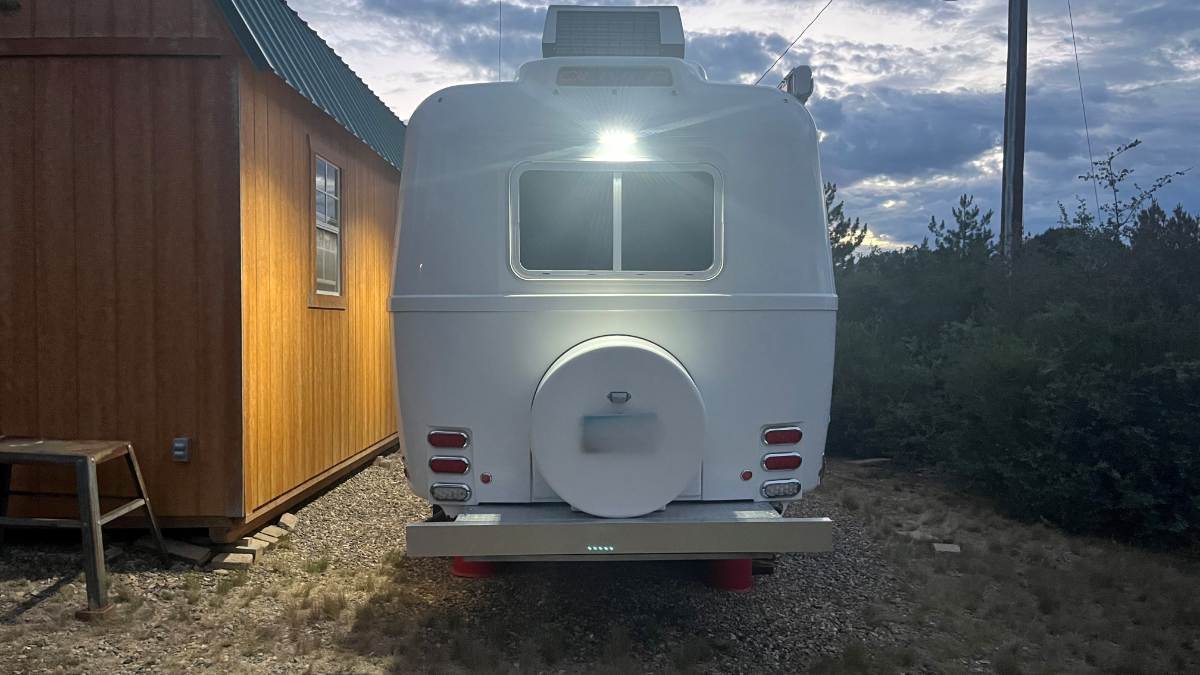
The Oliver Porch Lights are bright for a dark campsite, so we rarely use them. But if you need to light up the area they work great. I've often wondered, why isn't there lighting on the front and rear of the Oliver? I asked a year ago about replacement lights for our OEM Porch Lights and just purchased some recently. OTT should install these lights in all four directions. I would have done one up front too, but running wire would be difficult. I got something else for up front, more on that later. https://itcshopnow.com/products/assurance-exterior-flood-light?variant=50392962007319 I carefully measured the four Porch Lights OTT installed, as the distance from hull belly line, which btw holds a tape measure nicely, up to centerline of the Porch Light at the mounting screws. Turns out they were all installed at different heights +/- 3/4". As a special bonus, this light is 1/4" off from front to the rear mounting screws. My new Rear Porch Light, I promise is the straightest of the bunch! 🤣 It's not easy to choose the best spot to drill into the exterior of your hull, this one especially. I cut away some of the white insulation in the back of the attic. I used a 2-ft piece of metal fish-tape with the ends curled back, running it down the inside of the back exterior hull. Repeatedly, it measured 12" form the bottom of the OLIVER taillight to where the fish-tape hit the top of the rear window frame. It measured 12" so I figured I should go 10" max. Looking from the outside, there is a flat fiberglass frame around the rear window. Above that, the top rear is convex. I had to find the best spot so that the approx. 8" x 1 1/2" light would sit flat in both directions. If not water would get behind it. I drilled a 1/4" hole centered to the window, so the light is just above the flat frame area of the rear window. I soldered and heat shrink extra length of wire to the light. If they only attached 18" of wire! Offset the splices so that they would fit nicely into the drilled hole. It wasn't an easy pull but a few ins and outs and the light pulled flush (would be easier with 2 people, one in one out). I eyeballed the light level to the window frame. I wanted to VHB the light housing vs. drilling two mounting holes but the design of the light would not allow for it. They do not include hardware. Found the stoutest 1" course thread screws that would fit the openings and I drilled 6/94" holes after marking the centers. Wiring? I wanted to add the new rear light to the Side Porch Lights (streetside). However, I could not find the switch leg in the back corner of the attic and I did not want to remove all the stuff out of the kitchen cabinets. But that would be the right way to do it. Cabinets empty, you can easily run wiring up to the main switch panel. Our hull had a rear camera and a separate switch to power it. I removed the camera a year ago, so I'm using this separate switch with existing wiring. I copied something Geoff did, where he used a Sharpie to black out the word "Awning." Mine has a thin cut piece of black tape over the word "Camera" so it just reads "Rear" now! 🤣 I had to wait patiently for dusk and dark tonight! The hull looks great with the new Rear Porch Light to compliment the side lights. And finally, it alone lights up the yard! 😎
- 15 replies
-
- 13
-
-

-