jd1923
-
Posts
3,263 -
Joined
-
Last visited
-
Days Won
245
Everything posted by jd1923
-
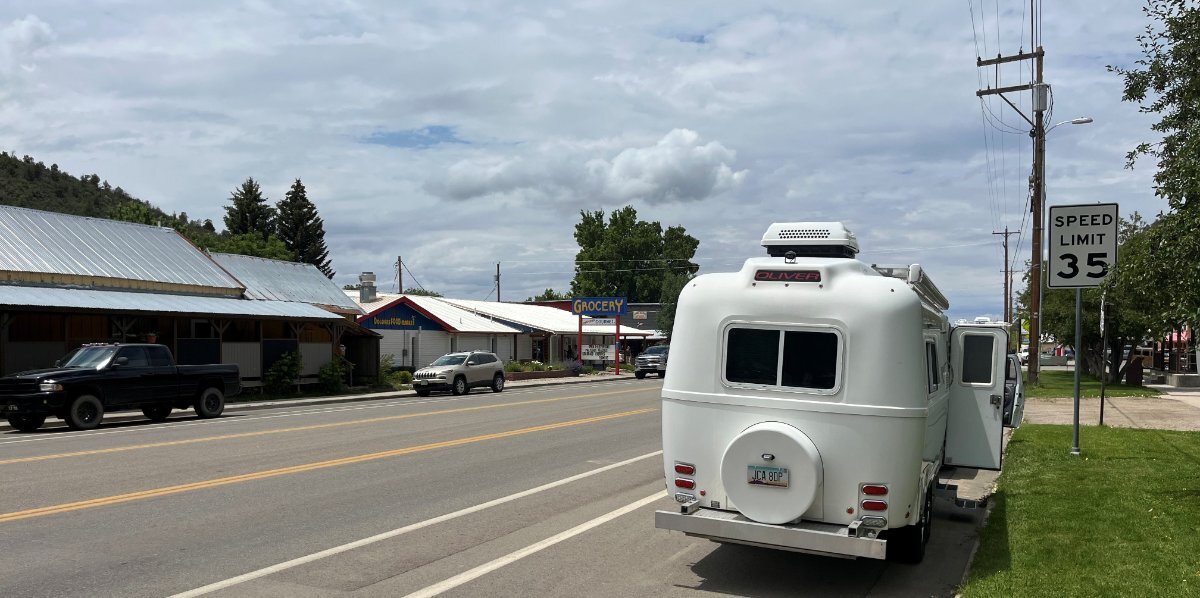
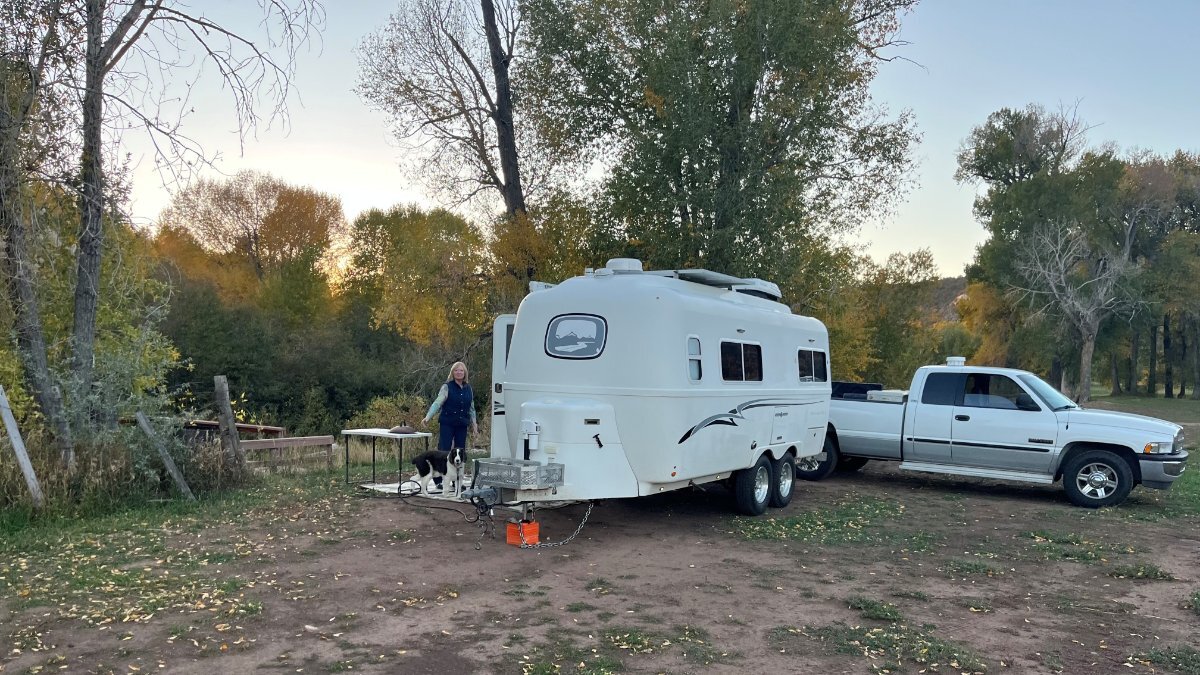
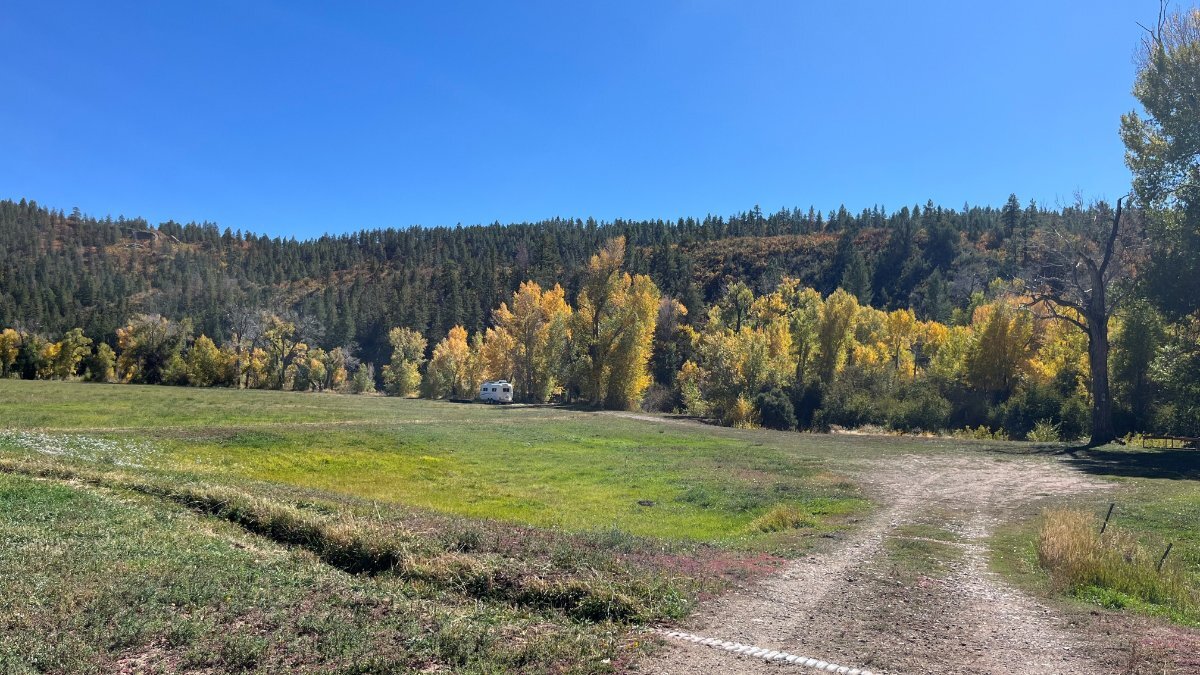
We're in site 5 which sits by itself for $35/night. Sites 3-4 were also nice and 1-2 are down in a bottom, all for $30. I imagine they're less busy since they are dry sites (good water offered at the farm), they're not keeping up the property so well and the river decks are not level and a bit creaky. Most RVers want hook-ups , but we wanted to be close to town and be alone. The RV park next door with hookups cost double and ALL the National campgrounds are closed now (we drove to McPhee Campground today). Not sure, are they closed after October 1st, or due to the Government shut-down? The Recreation.gov website is presently nonfunctional! Regardless of where you stay, come with empty fridge and shop at the Delores Market! Onsite butcher, great produce variety, local fresh baked goods and the best Cherry pie anywhere. They were out of pies when we stopped in late Sunday (got a small pumpkin bread instead, yum). We got an apple pie today with brown sugar crisp top! Yep, we've been there twice in just 24 hours! Pics from when we were here late june...

-
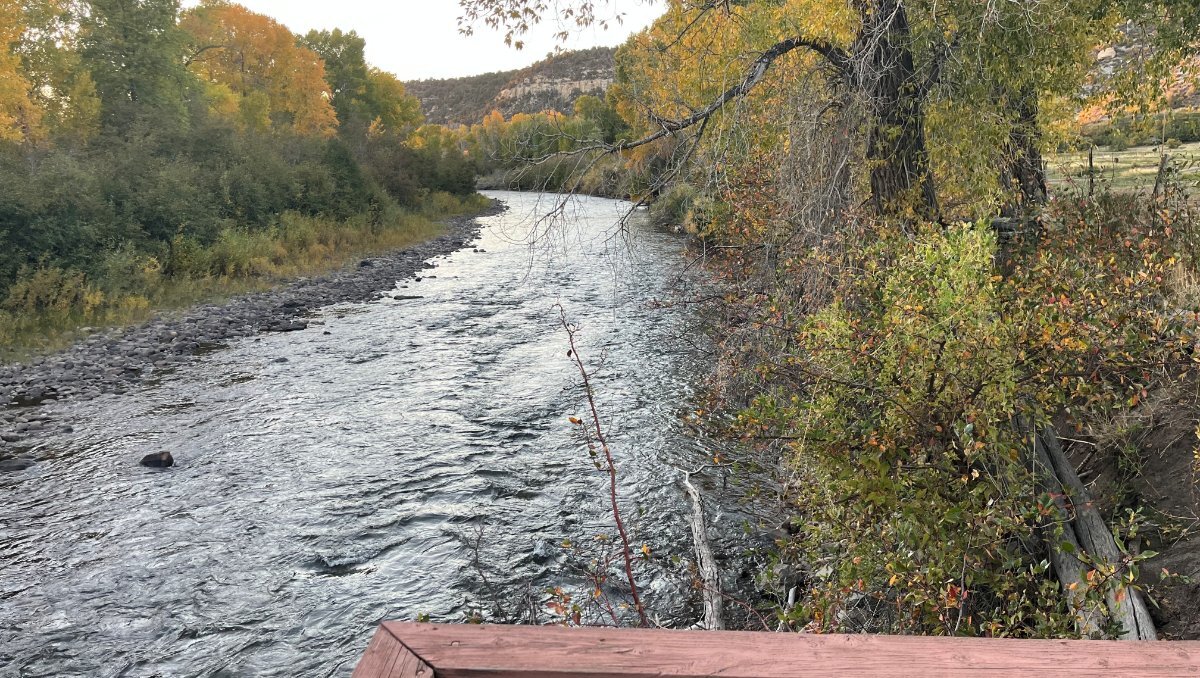
Where's Ollie? At Along the River a farm in Delores, CO! They were closed for the season but Jeanna (owner, tiny woman age 88, husband 96, farming all her life and today rides an ATV like a young girl), she said it's been a slow season, so she re-opened for our 3-night stay. We have the place to ourselves and the river sounds just wonderful! Delores Along the River.MOV
-

Starlink Mini Installation- 2022 LEII- Alternate Approach
jd1923 replied to dhaig's topic in Ollie Modifications
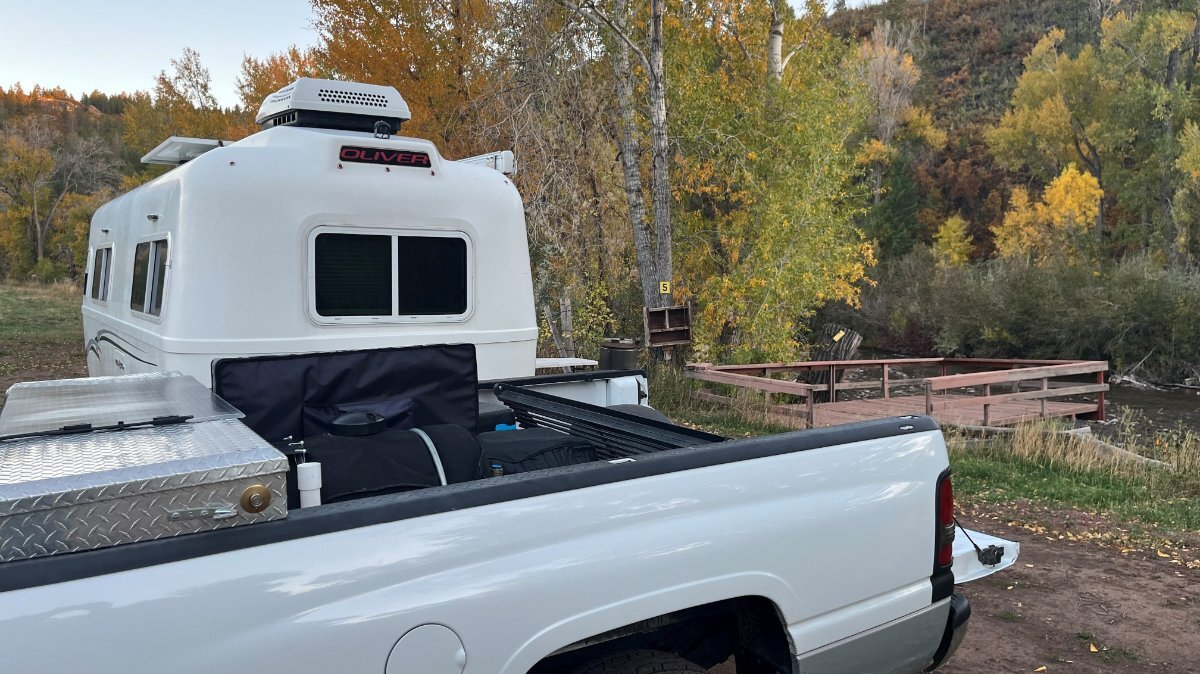
We've seen some fancy mounts and long masts, and they must be tall when mounted to the tall Oliver I wanted a simple 80% mounting solution. I say 80% because most of the time my truck is parked with view of the northern sky. 20% of the time, dish with battery pack will be moved to an open area where I simply place the dish on an upside-down milk crate. $10 in PVC parts from the HW store and a couple of large (2 1/2") hose clamps and I love this setup. I built this the day before we left and tried it out our first night in Colorado. I wanted a spot in the truck bed, out of the way and using the 1 1/2" PVC coupler, it is short when traveling and tall enough when in use. You merely pivot the upper PVC for any angle, 360-degrees. I tied a small metal platform (will mounted it better later) on the water tank for a battery stand. I have power and Ethernet already wired to the router behind the truck backseat and I will later reposition those cables so that they're run under the truck tool box and up the PVC post. It will be great to have the Starlink integrated to our Pepwave router soon. If you have a truck cap, you can do this too. Just mount the short PVC length to the side of the cap and paint it to match! For ours the color white is perfect as-is. All I did was to use acetone to remove the colored markings on the PVC to make it all white.
-
I don't have the miles yet, but agree with everything said here and Lance's post @Mountainman198, who was first and started this thread. However, the ride experienced could be different towing with a 1/2-ton truck like the F150 and I do believe the 5200 lb axles make a significant difference, providing a more solid suspension platform. We had our first road-test yesterday. At home, I ran two 30-mile test drives and before leaving home, I torqued the U-bolts 4 times! We drove from home to Tuba City (180 miles) and I retorqued all U-bolts and wet-bolts. The U-bolts all took a 1/4-turn min to a full turn or so. The wet-bolts needed a bit more tightening since I had not re-torqued since installation. 380 miles yesterday to Delores CO and our rig TOWED LIKE A DREAM! It was like were were on rails! Also, I had just added an aftermarket exhaust brake, so I was in tow-heaven for sure! 😎 During one test drive, a full gallon water bottle and our kitchen garbage can that were under the dinette made it to the entrance door (carpet was removed for cleaning). Yesterday when we arrived, oddities noted were that a plastic dish tub in the kitchen sink ended up on the floor, and ALL of our clothes in the closet came off the closet rod (I'm going to run a bungee across the rod to keep the hangers in place). We had NO cabinets or drawers open (no added drawer straps either) and nothing else was out of order. Not bad at all. I'm glad to hear that it should smooth out some after some miles. I would not trade back to the sloppy OEM axle and springs for anything, with the the trailer porpoising to and froe and waddling left-n-right like a fat duck. She sits solid now, and with new suspension, tires and fresh alignment on the truck, as I said, we were riding on rails! 😂
-
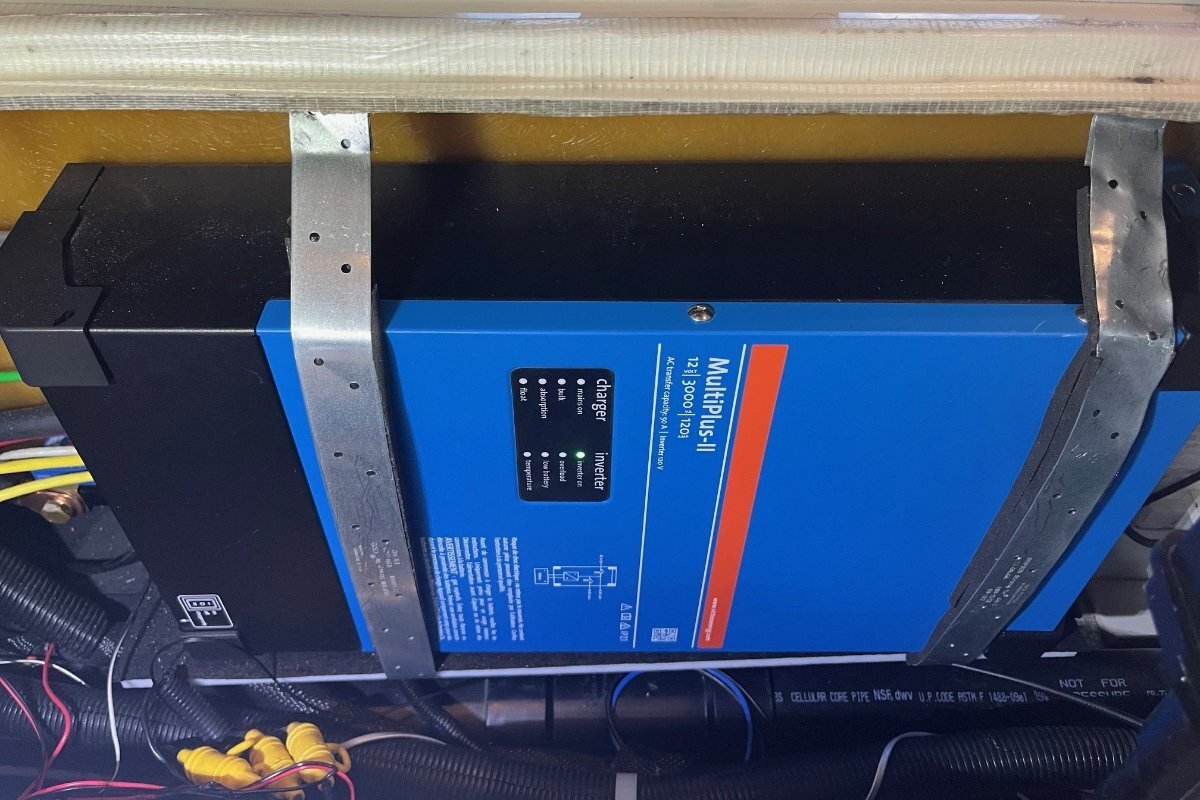
Me too. Love the threaded inserts that @katanapilot suggested for use in wood and perhaps PVC and other synthetic boards, minimum 1/2" thick and the board has to be of a woody-like substance that will take the threads of the inserts without cracking. Like the rivets that @Geronimo John suggested, for as he wrote, for thinner materials (where a threaded insert would not work). I used a different kind of rivet than the one pictured above (see link below). When it comes to something as heavy as the Victron Multiplus II (64 lbs), it should not be mounted to a board with any kind of fastener, when the board is merely glued to a vertical surface. This is why I built a platform, for it to sit on, and then strapped the MP2 connected at the top with rivet nuts to the inner structural fiberglass that supports the bed platforms. I also did not purchase any long rivet tool. I used a longer bolt and extra nut to compress the rivet in place (see pics). These are the 1/4"-20 "Plus Nuts" I used and I also bought an M5 set for lighter needs. https://www.amazon.com/dp/B0D4KBZG94?ref=fed_asin_title&th=1
-
Use space heater when below freezing???
jd1923 replied to Dennis and Melissa's topic in General Discussion
Your worry is certainly correct! I’ve read threads here re frozen pipes and my is space heaters! For me it’s like having a generator, I won’t carry or make space for either of them. 😎 We all learned when young that heat rises. The space heater will ONLY heater your inner-upper hull. No heat to the lower-inner hull and none to your basement, plumbing and tanks! Dry electric heat at head height is also not good on your sinuses, for us not good for sleeping. And our pup Charley appreciates having the furnace running as his bed is a cushion on the floor between the air and return ducts! 🤣 -
Your dinner of last night, bone-in chops and scallops, yum! But tonight, I can almost taste your Lobsters from afar! 🤣
-
I removed ours when I worked a major overhaul on the steps, sanded down the aluminum and scraped the old tread out to replace with 3M new. Surprising one came lose since ours where in VERY tight. On one side the nut end mushroomed and would not fit into the hole again, so it couldn’t be reused. I just used a standard short bolt same diameter with locknut (not wanting to wait and pay for parts and shipping for such a small item). I have a list of small things like this, that if I ever truly need parts from OTT, I’d get these too. They are nice bolts, how they fit with no threads showing!
-
Full Suspension Replacement - Alcan Spring and Dexter D52 Axles
jd1923 replied to jd1923's topic in Ollie Modifications
$24 for qty 10, too bad it's not for the dozen (qty 12) required, so total with Grainger would be $48 plus shipping. I'll stick with $10 and Prime shipping for qty 50 zinc-plated steel! First 2 Oliver friends we run into this winter in the Arizona desert... Just ask me and I'll have a dozen free 45-degree Zerks for you! 😎 (for those with Alcan wet-bolts) I'm going without the rubber caps this time. The ones I took off seemed to be dirt magnets! I'll do what I've always done, use a brass brush and paper towel, clean them before lubing! I've never seen Zerks capped on a car or truck suspension. -
Search the OTT Forum for 'TPMS' to get these suggestions and so many more. 🤣 This subject has been covered 10x! A small few of us, would not mount a sending device on a tire fill valve, there are issues! Given this thought, you may want to consider a professional installation, e.g. consider this thread, just started a few days ago... https://olivertraveltrailers.com/forums/topic/11078-dill-bluetooth-tpms/
-
Full Suspension Replacement - Alcan Spring and Dexter D52 Axles
jd1923 replied to jd1923's topic in Ollie Modifications
The finishing touch on this project is to install 45-degree angled Zerk fittings! 😎 It's a great solution for ease of access to the fittings (vs. installing the wet-bolts outside-in). Snug them up, just two-finger tight with a short wrench. Don't worry about the resulting angle. Even if it's facing the tire, you will still get a grease gun coupler like this to fit: https://www.amazon.com/dp/B00H7LPKKU?ref=fed_asin_title&th=1 If you replaced your wet-bolts, purchased the HD shackles and wet-bolt setup from Alcan, the Zerk thread size is 1/4"-28. I purchased this 50-pack, zinc-plated steel like OEM (could not easily find brass or SS in this size). Nice longer threads on this product: https://www.amazon.com/dp/B0DQBPTK3Y?ref=fed_asin_title&th=1 If you have the Dexter wet-bolts that come with the EZ Flex kit you'll need M6x1mm threads. This is a very nice brass set of 15 (only need 12): https://www.amazon.com/dp/B08R8GYYYM?ref=fed_asin_title&th=1
-
Good son! 😂 The 27" OEM Oliver TV is certainly a joke. Like you, we watch after dinner/before bedtime, also watch some morning news. I strongly suggest the Samsung 32" M80 monitors! You son may approve! With amazing resolution looking 3D, they are white framed with the screen only 3/4" thick! You can also run HDMI to HDMI-Mini or USB-C from a laptop. Two+ years now, still wonderful. https://www.amazon.com/SAMSUNG-Monitor-Display-Samsung-LS32FM803UNXZA/dp/B0F5VR52WZ/ I also Bluetooth connect to noise-canceling headphones, for when Chris drifts off to sleep or when the Dometic A/C must be running LOUD! 🤣 For more info, check out my install linked above. It is only a monitor which is all you need for streaming. If you must connect to RV park cable or a TV antenna, you would also need something like this: https://www.amazon.com/ZJBOX-Converter-Adapter,2-Remote,TV-Recording/dp/B0CZR2HBGF/
-
I believe you did right in replacing them You also have a good used full axle-spring assembly that could be sold locally to somebody building a lightweight homemade trailer for ATVs or whatever (I have my originals listed on Craigs). Look at your picture above and you can see the center bushings on both Dexter EZ-Flex equalizers are off-center meaning the center bushing are worn enough to be cock-eyed! You can get the full EZ-Flex set, or I just purchased the equalizers since we went with the Alcan HD shackles and wet-bolts. See more info here:
-
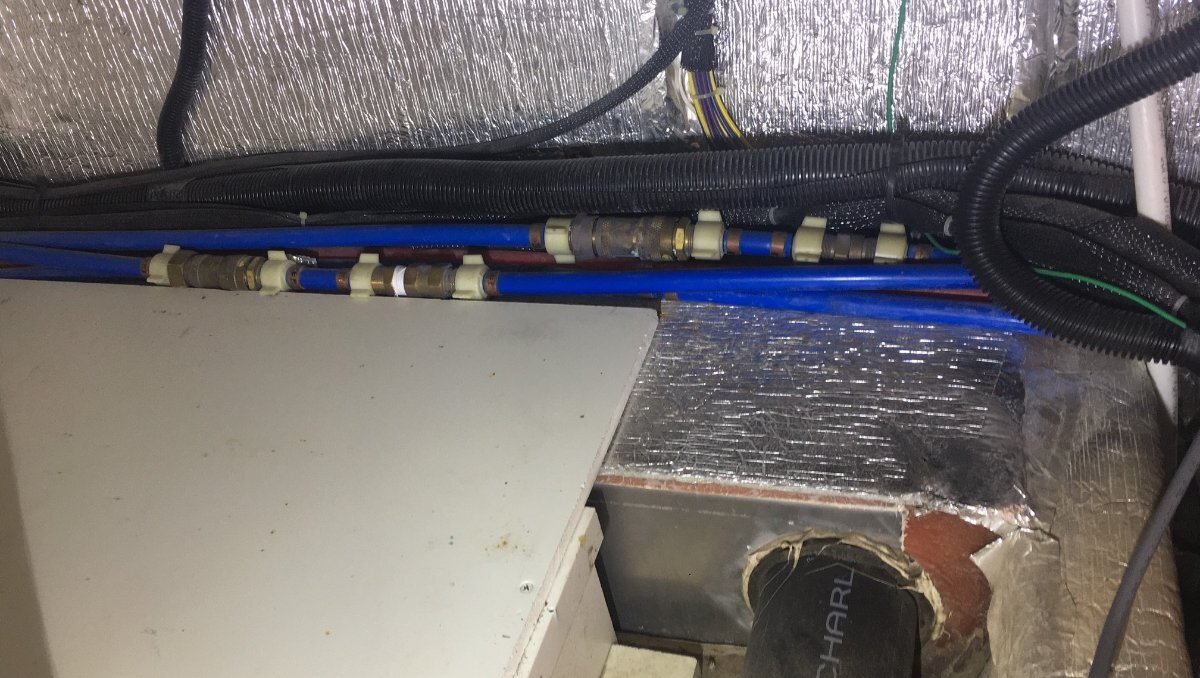
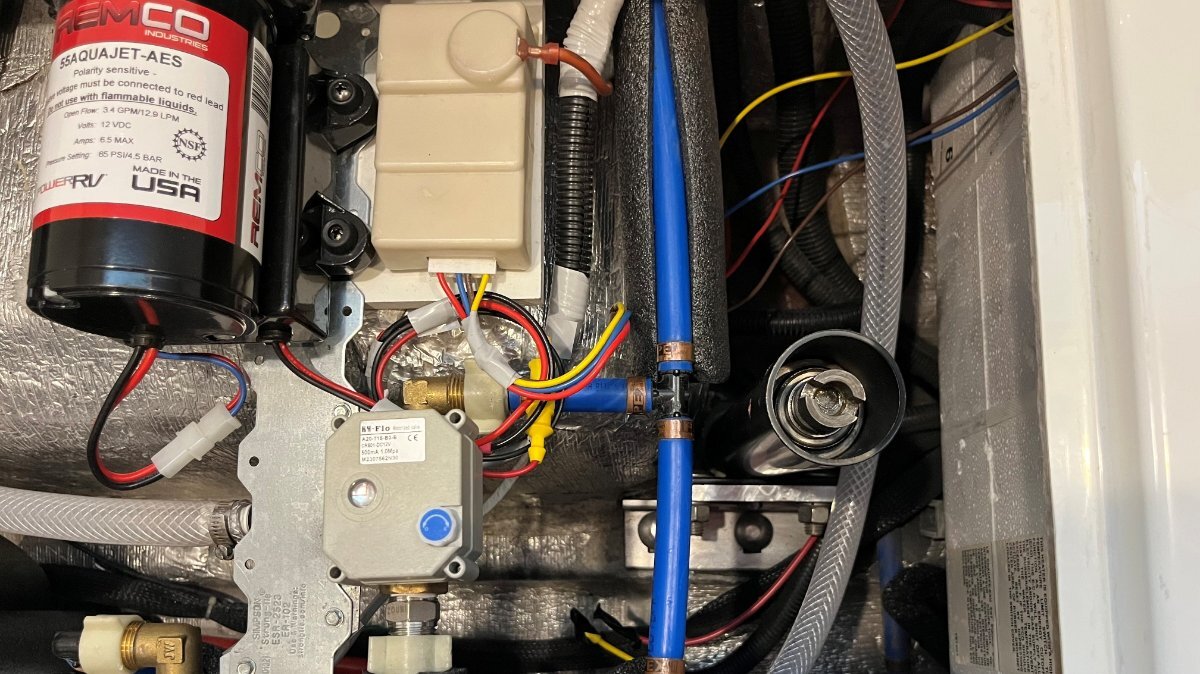
Look here first (see picture). The OTT schematic shows only the backflow preventers, but both devices were installed in our hull. There was also another thread where one owner removed and cleaned both, having the same setup we have. If it was an easy reach, I would have reworked ours 2 years ago! It's still on my list but we run 98% of the time on Fresh Water, so it's lower on the list. Running on our upgraded water pump we also get better PSI and GPM pumping from the fresh tank vs. City Water through the restrictor. This shows there isn't "something else going on." It's crazy that OTT also put a restrictor on the Fresh Water inlet which only serves purpose in slow-filling the fresh tank! You cannot build pressure in that line anyway, since the fresh tank has an open overflow.
-
Million Dollar Highway in a half ton truck with LE2?
jd1923 replied to routlaw's topic in Towing an Oliver
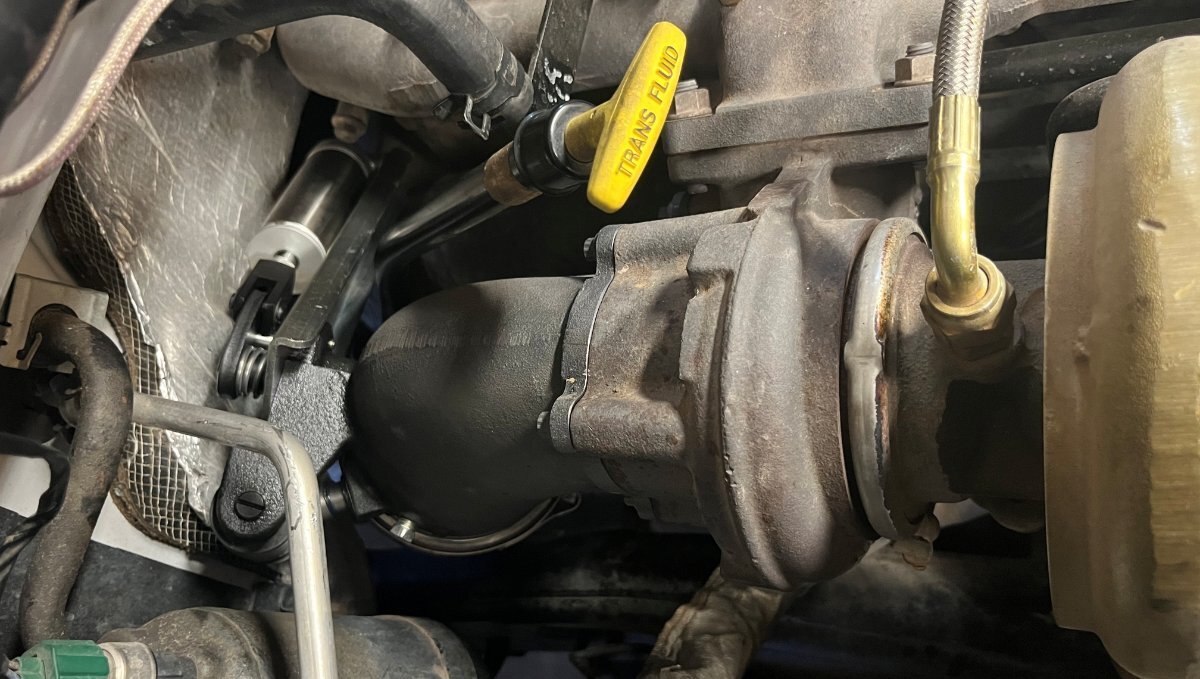
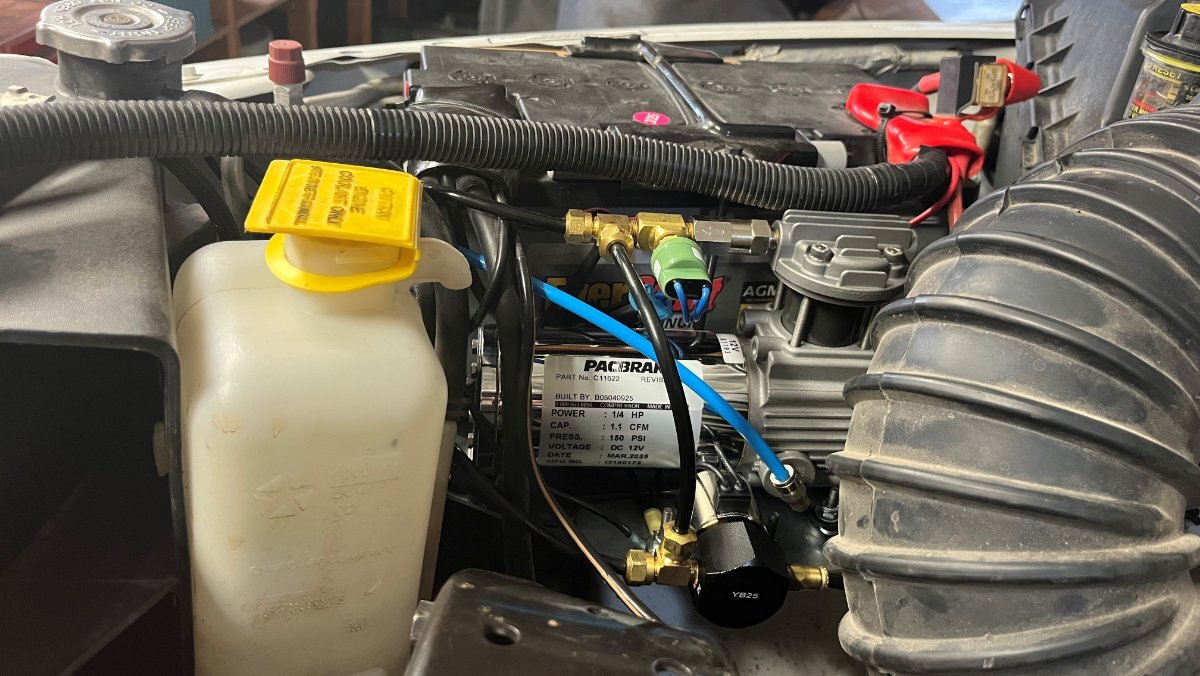
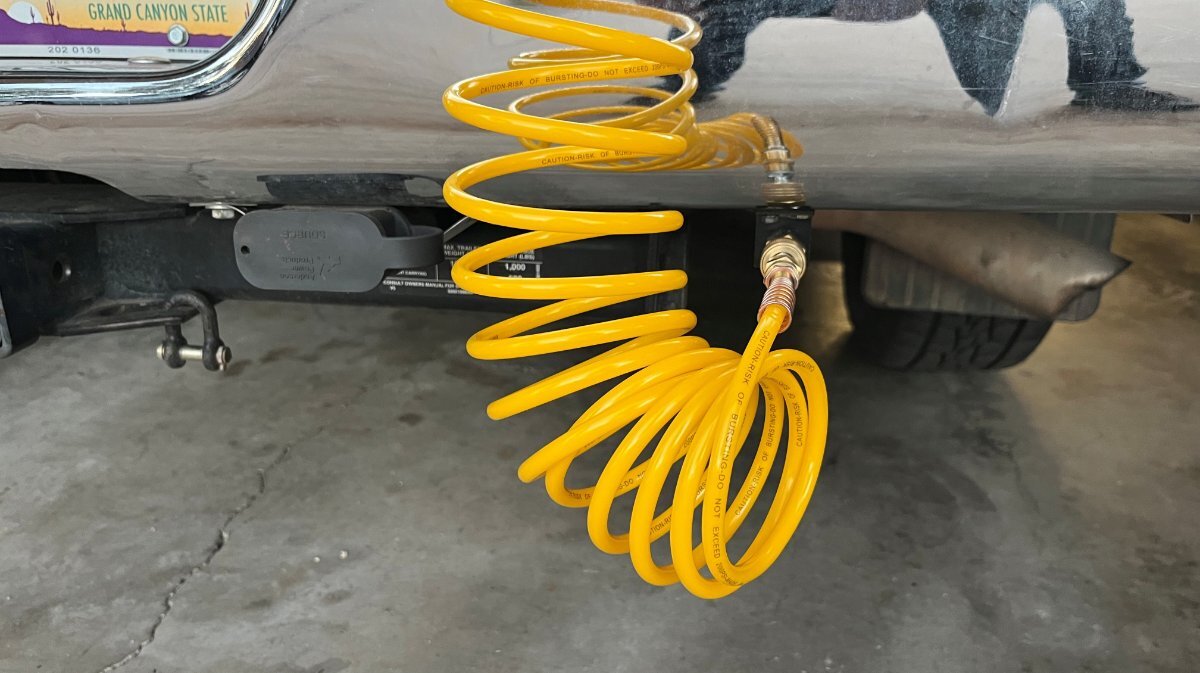
So as of yesterday, JD now has a Pacbrake PRXB Exhaust Brake!!! 🤣 The vendor swayed me with a 20% OFF Labor Day sale and Cummins Forum members convinced me of its product value! I got the work done and just yesterday went for a test drive. Wow I LOVE it! When I turn OD-OFF the exhaust brake consistently slows my Dodge-Cummins down to 25 MPH before releasing. There is also an engine warm-up feature that when ON pressurizes the valve partially to speed up warming (turned off when ECT hit 165F)! I'm not going to add a build thread here since I'm the only oddball here towing with a truck now 25 years old! It was quite a build (about as much work as upgrading axles). Though I did create a build thread on the Cummins Forum, linked here for those interested: https://www.cumminsforum.com/threads/pacbrake-on-the-dodge-47re-auto.2615212/?post_id=30091229/ An added bonus is the Pacbrake system comes with an onboard air compressor. So, I ran an air line to the rear bumper to air TV and TT tires or whatever. We're leaving Sunday for SW Colorado. Can't wait to see the brake perform on the many mountain road descents we'll see over the next couple weeks! 😎
-
Because OTT installed restrictors on our incoming water lines, we find water pressure on the City Water line to be poor! Not sure if they're still doing this on new hulls. Still on my list to remove these (keep the backflow preventers, lose the restrictors). I can turn on our water pump when connected to City Water to increase the pressure which as mentioned will not hurt the pump, so only better pressure. Not sure if this would work for all of you since the OEM water pump is entry level in its PSI and GPM. I've upgraded to a Remco variable speed pump, Made-in-USA, which can also run dry forever! 🤣 We used to do what Bill suggests, however I found that we would forget to turn the pump back on and the system would lose pressure and maybe need to be bled again. Now we keep it ON all the time with two exceptions. It's always OFF whenever we leave the trailer to go somewhere, and I turn it OFF from bed when we go to sleep (the LED is bright)!
-
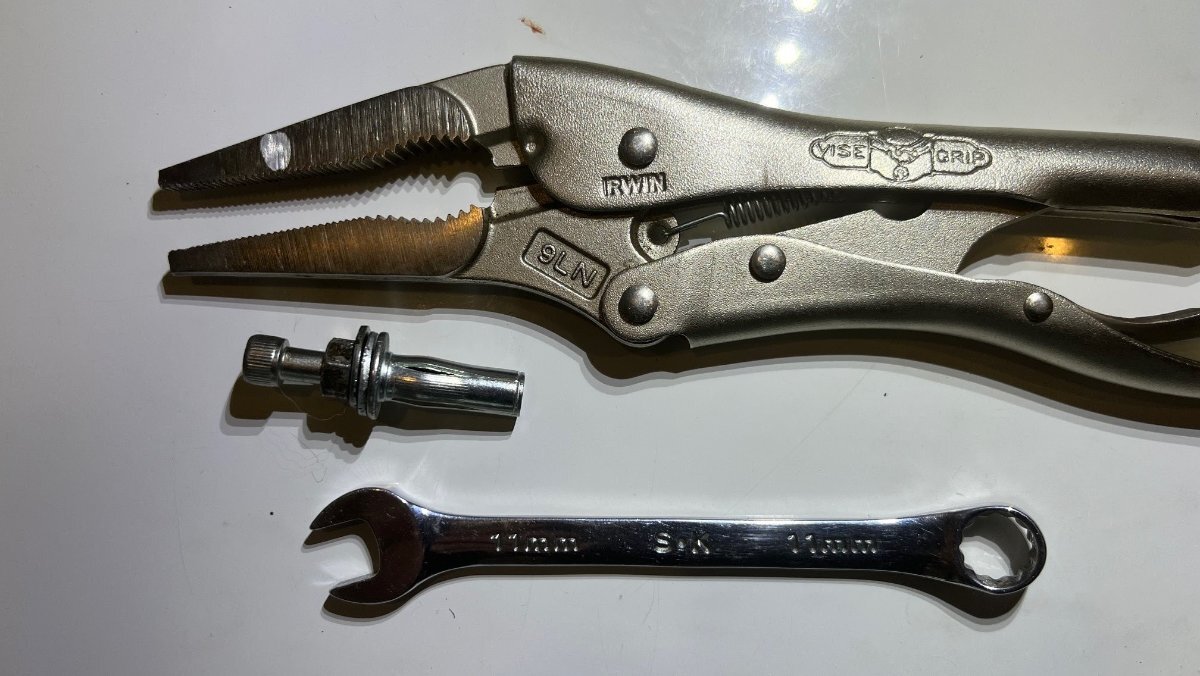
85 in-lb is only 7 ft-lb! I read 100 in-lb in their instructions (8.3 ft-lb). When I read in-lbs I never get out the torque wrench, because I wouldn't own one! I can push an open-ended wrench more than 7, 8 or 10 ft-lb with just two fingers. Just use a short wrench, not a long-handled ratchet, and make them snug enough to where you see the material compress slightly, you're done.
-
The fuse rating should be based on the max load amperage plus a safety margin (+25%). Ah of batteries is not a factor except for runtime. The inverter is the largest load in an RV. Xantrex specs 350A as shown above. Victron specs 400A for the Multiplus II 3KVA inverter-charger. Best to go with manufacturer’s specs. The 400A is likely OK for the Xantrex too, or buy a 350A fuse and keep the 400A as a backup. OTT installed a 300A breaker which has little margin if your running at a 3KW inverter at capacity. But you would have to run your A/C and microwave on inverter simultaneously to get to near 300A! 🤣
-
elite 2 Extra portable electric dual burners instead of propane burners?
jd1923 replied to Gail Dean's topic in General Discussion
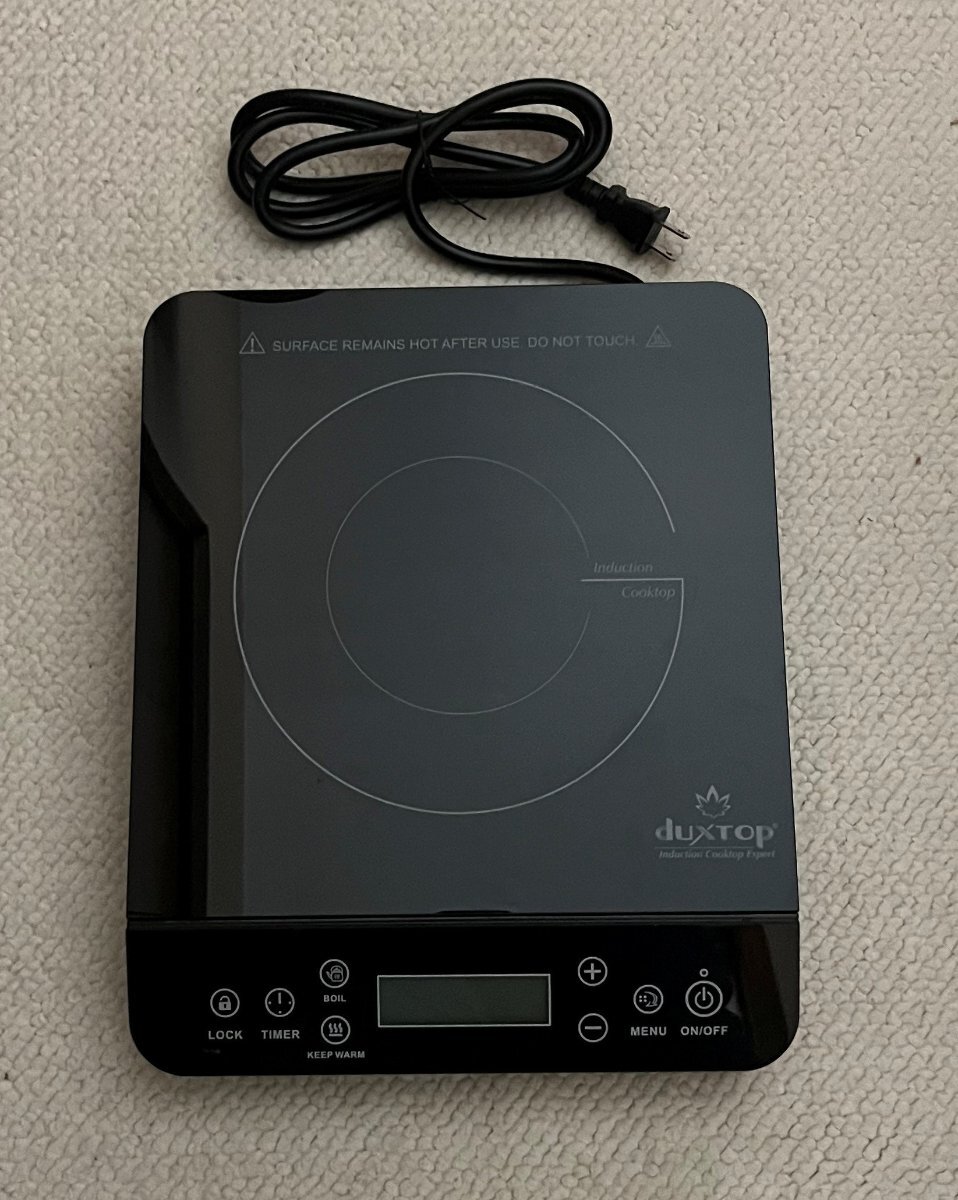
It took over a week to arrive, but Amazon Used "Like New" condition came with the sealing tape open but everything else was certainly like new! They still have them for $86 on the link above, vs new at $116. I had to bring it to a dark bedroom for the picture. It's so shiny-new that anywhere else all you see is reflections (like the picture of the dual-burner @Ollie-Haus posted above). Thanks again Chris & Stacie! My wife Chris was very happy as I surprised her today with this cooktop. She said, "All the cooking shows use these!" 😂
-
I use MRBF fuses for a positive bus I installed and also on my truck battery connecting our DC-to-DC charger. They are simple and inexpensive. And yes go with 350A given your Xantrex manual lists this spec. The ANL holder may fit better in place of your 300A breaker. If you install at the battery (either location is fine), then you will have to replace the positive cable or put another simple bus-bolt connection in place of your original breaker.
-
Far better protection than a breaker, get two of these (to have a backup fuse): https://a.co/d/bdK8VQb and a fuse holder like this: https://a.co/d/9V3H8RB
-
Barker VIP3000 Stabilizer Jack Slipping
jd1923 replied to jd1923's topic in Mechanical & Technical Tips
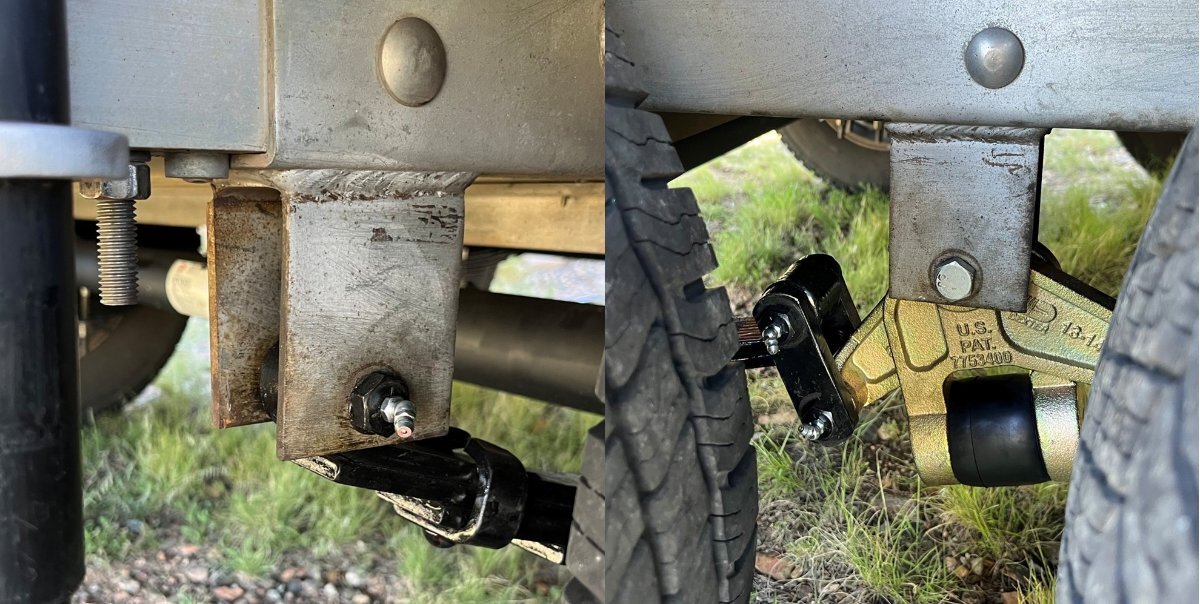
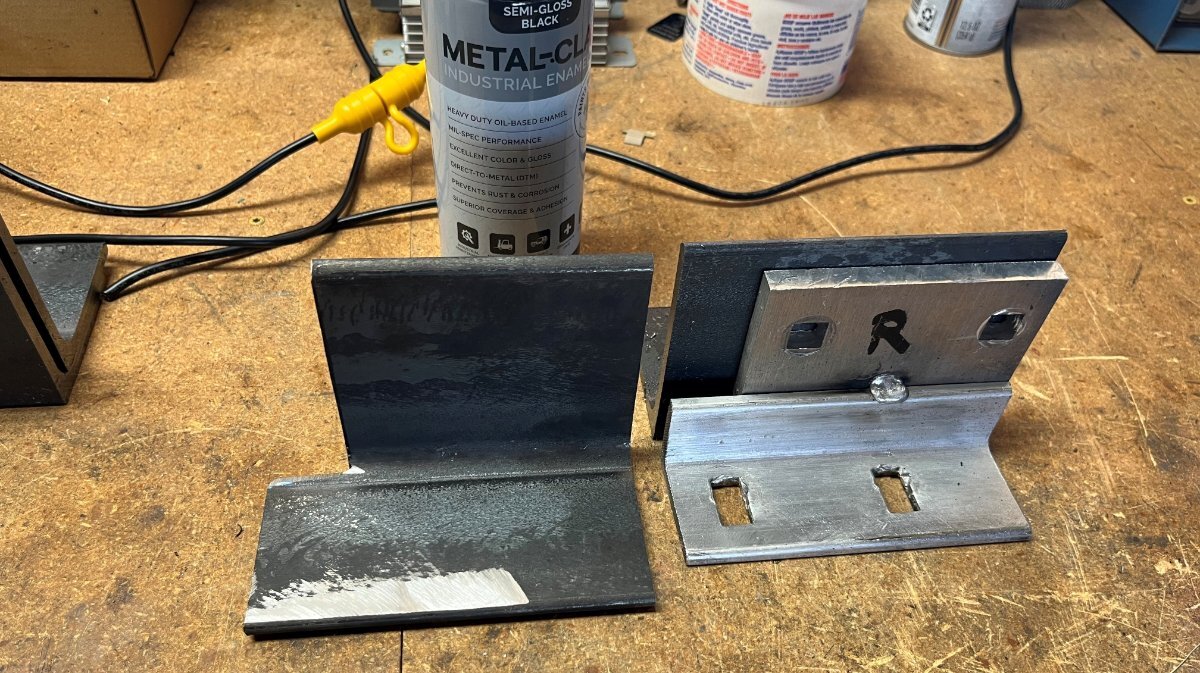
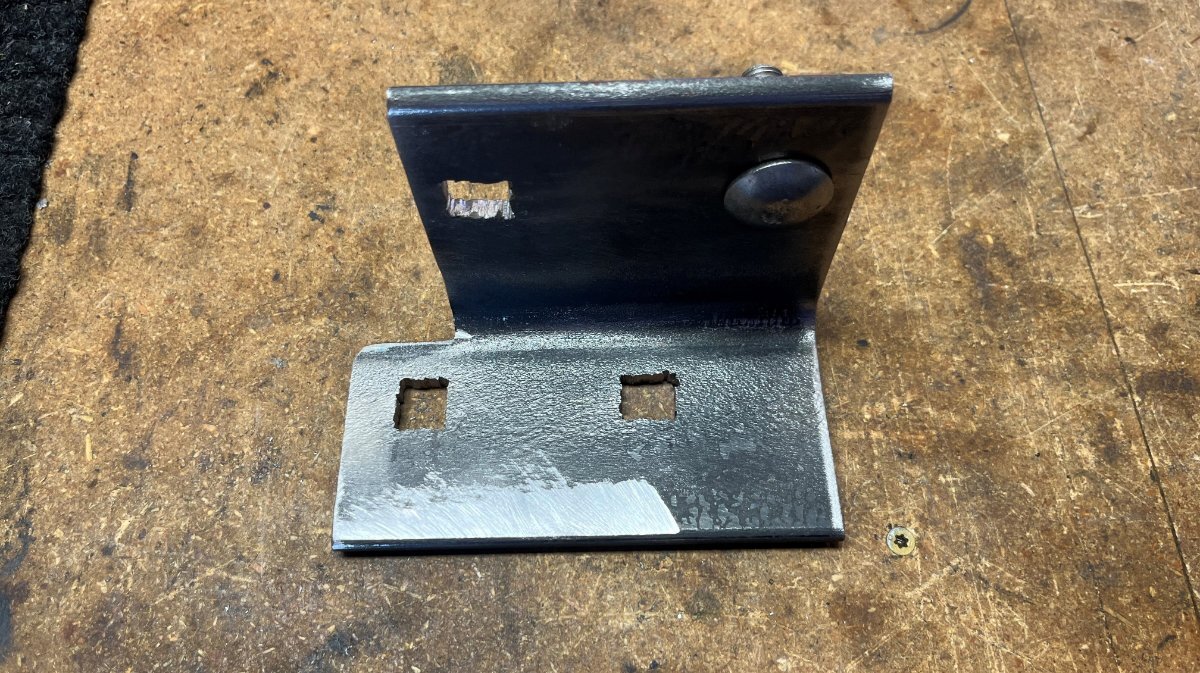
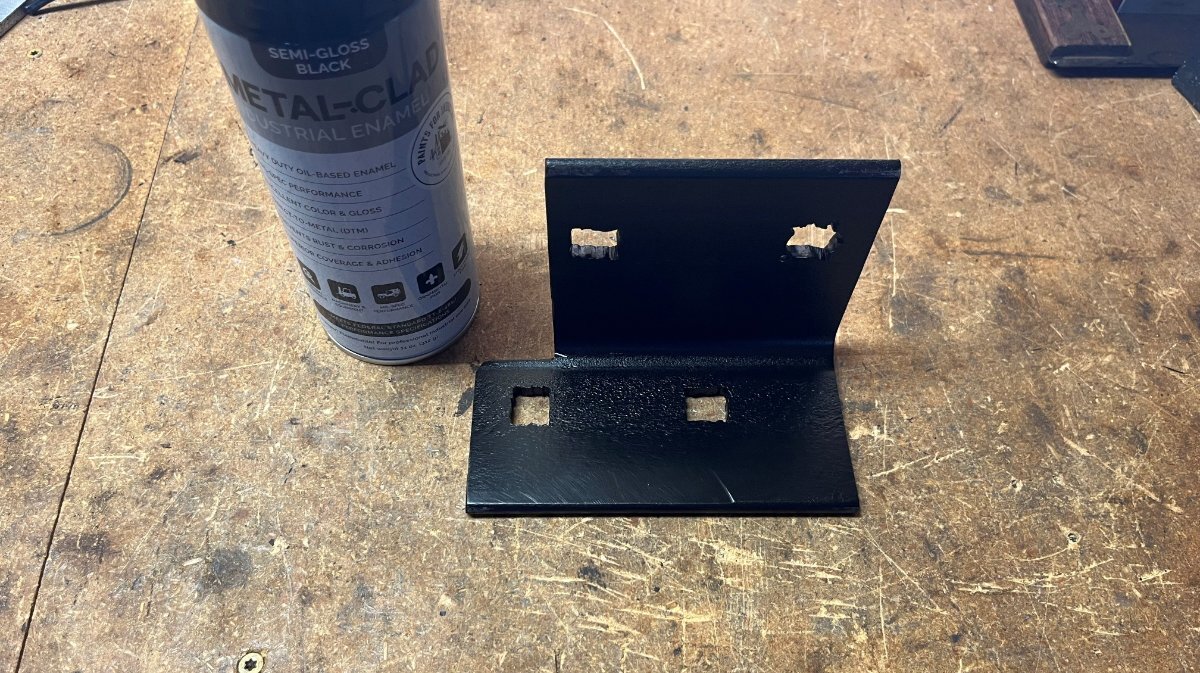
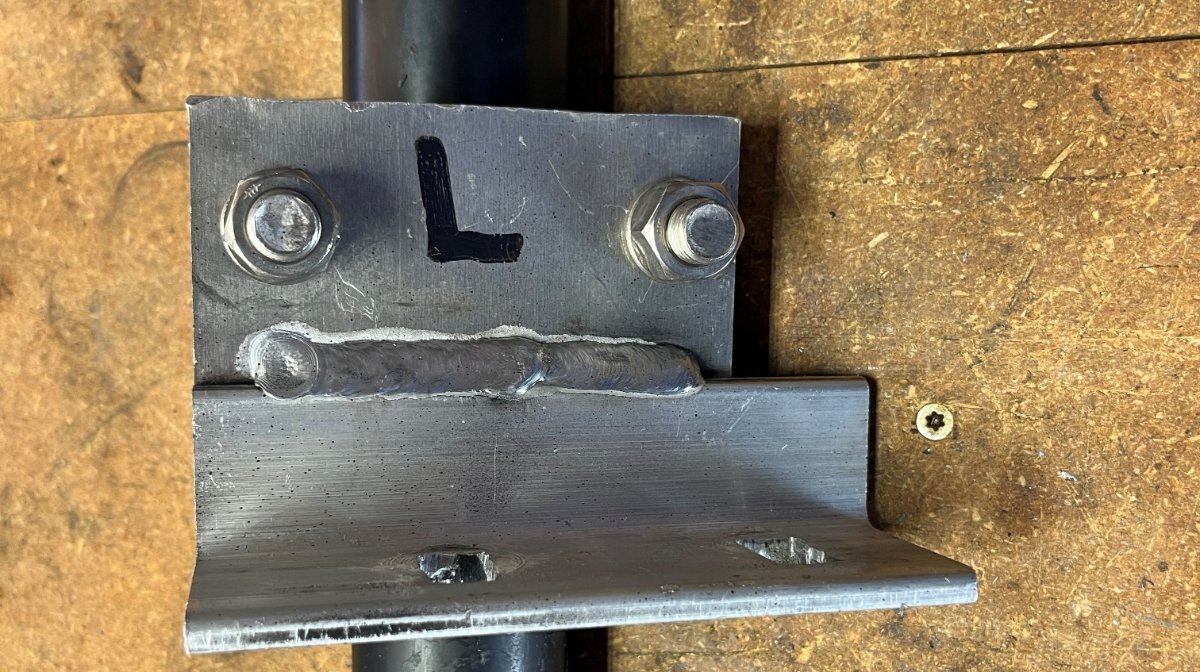
I could have had the aluminum brackets re-welded, but then I thought of a way I could fix this myself if I had the right 1/4" steel angle iron. OTT uses two pieces fitted together since they're easier to fit in place during installation. One piece would require the holes to be drilled in precise locations. Getting 4 squared offset holes to align exactly is no easy feat! 🤣 Solid steel must be stronger than 2 pieces of aluminum welded together. I went to Prescott Steel & Welding and they had the steel I needed and also referred me to a good welder that also works with aluminum. For $15 They cut me two 3x4" angle iron 5 1/2" long and another $10 for this Direct-to-Metal paint which is amazing! One coat, covers in seconds, no drips. Wish I knew of this paint in all my years of auto restoration! Must have taken me 2 1/2 hours total to fab this bracket. Being L-shaped there is no way to trace the original part, so measure and measure again and hope for the best! I drilled the 1/2" holes and cut the corners with a jigsaw. My first hole was not so clean, thinking I could drill 1/8" holes in the 4 corners (it didn't work). I purchased two brackets, but after I realized the other side had full welds, I just made one saving the 2 hours it would have taken me to make a second bracket. Both sides are done and tested. I still have the wheels up in the air on the side with the new bracket! 🤣 If the weld had not failed this rebuild project would have been done last Friday when Barker delivered the new heads. Beds are in and Chris is making the beds! We'll leave to Colorado by the weekend, a few days later than plan, but all the better! 😎
-
Barker VIP3000 Stabilizer Jack Slipping
jd1923 replied to jd1923's topic in Mechanical & Technical Tips
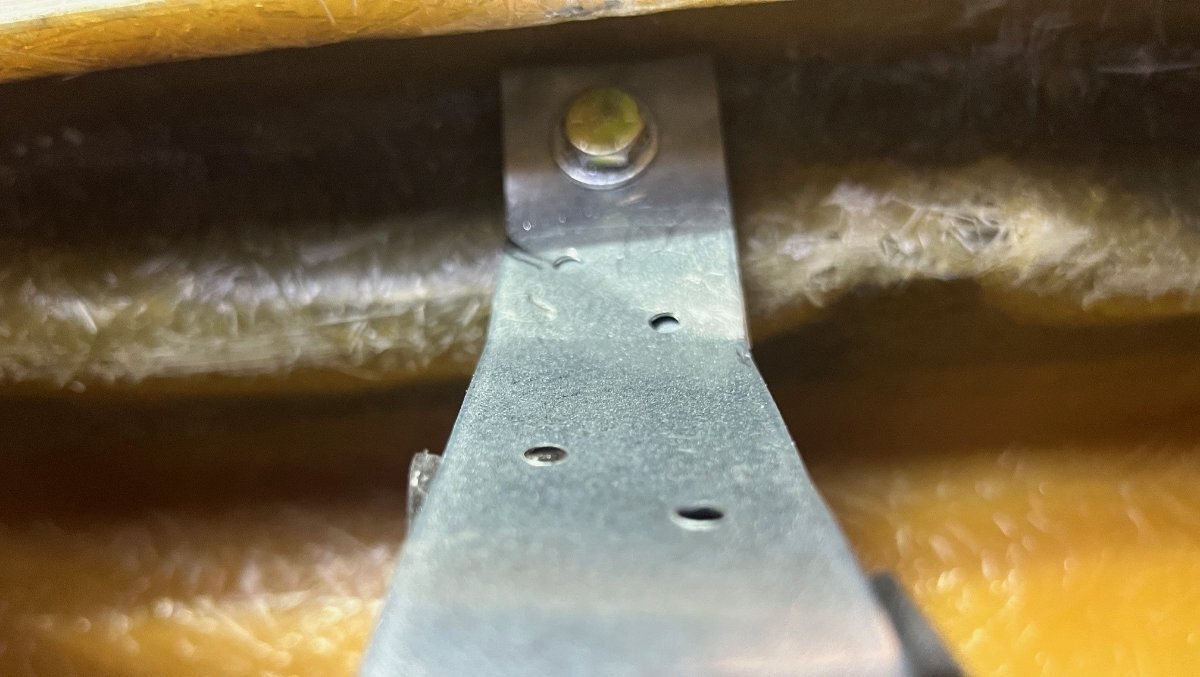
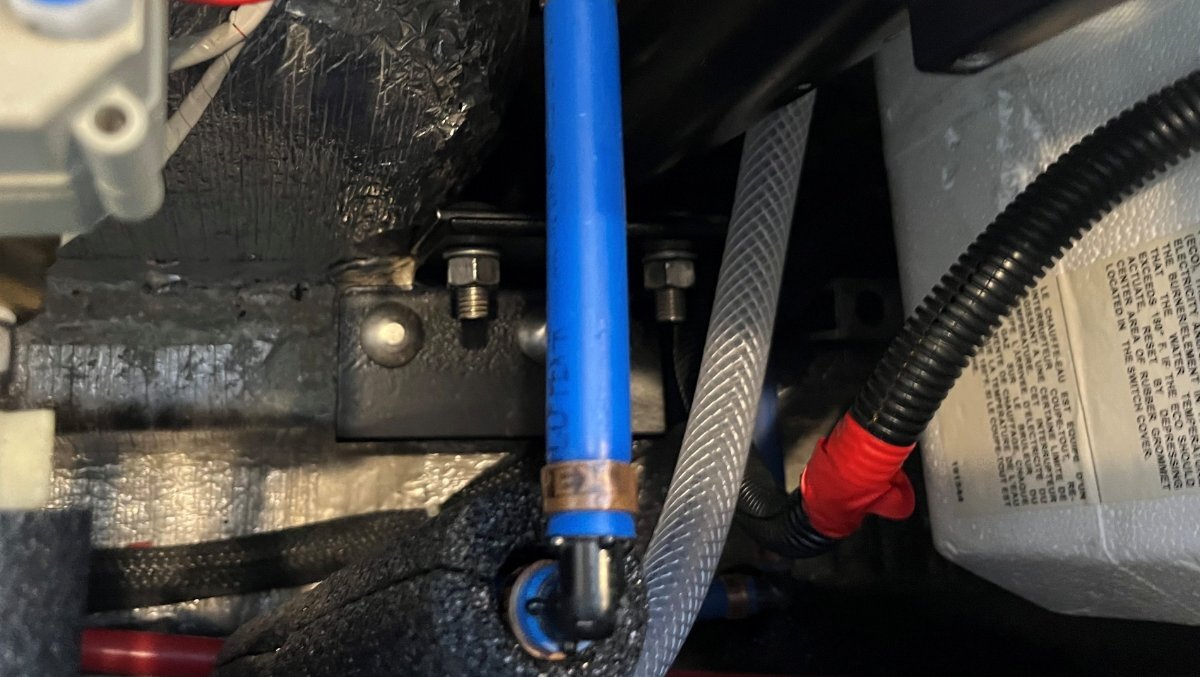
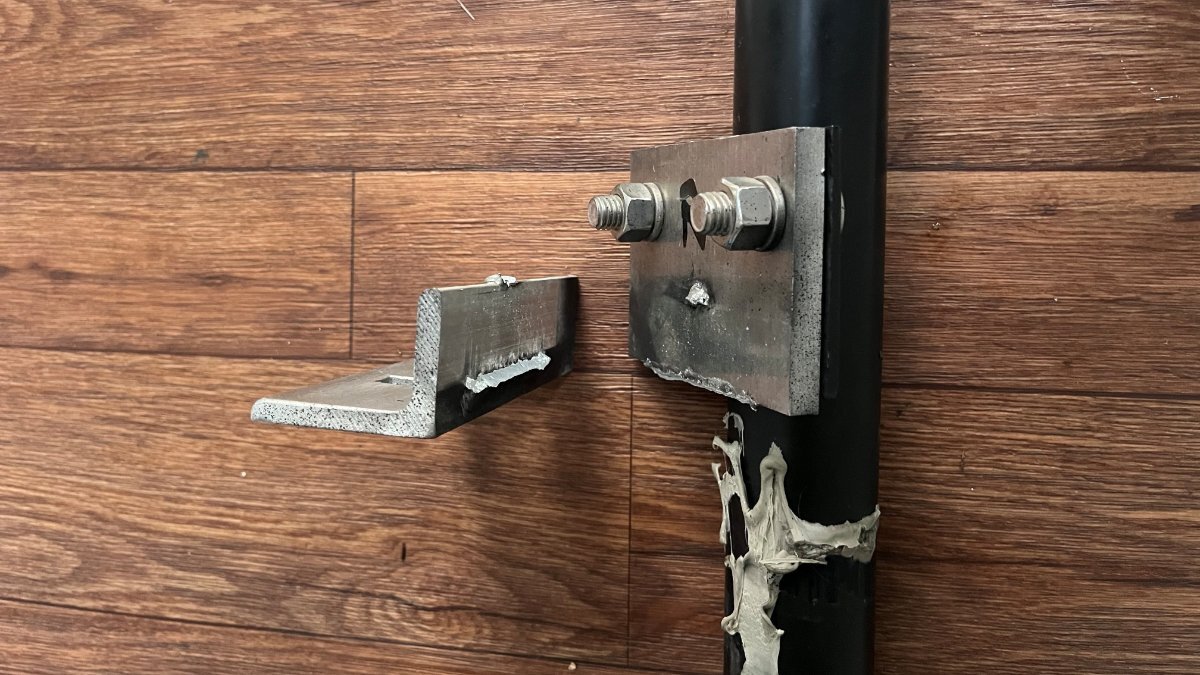
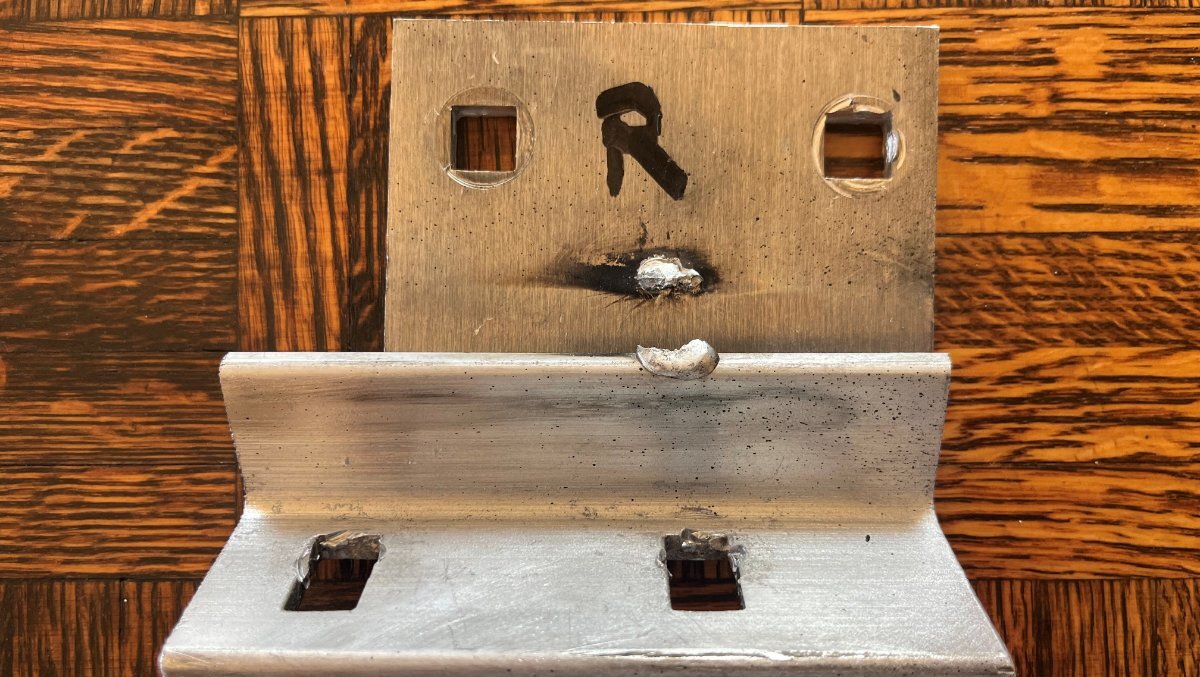
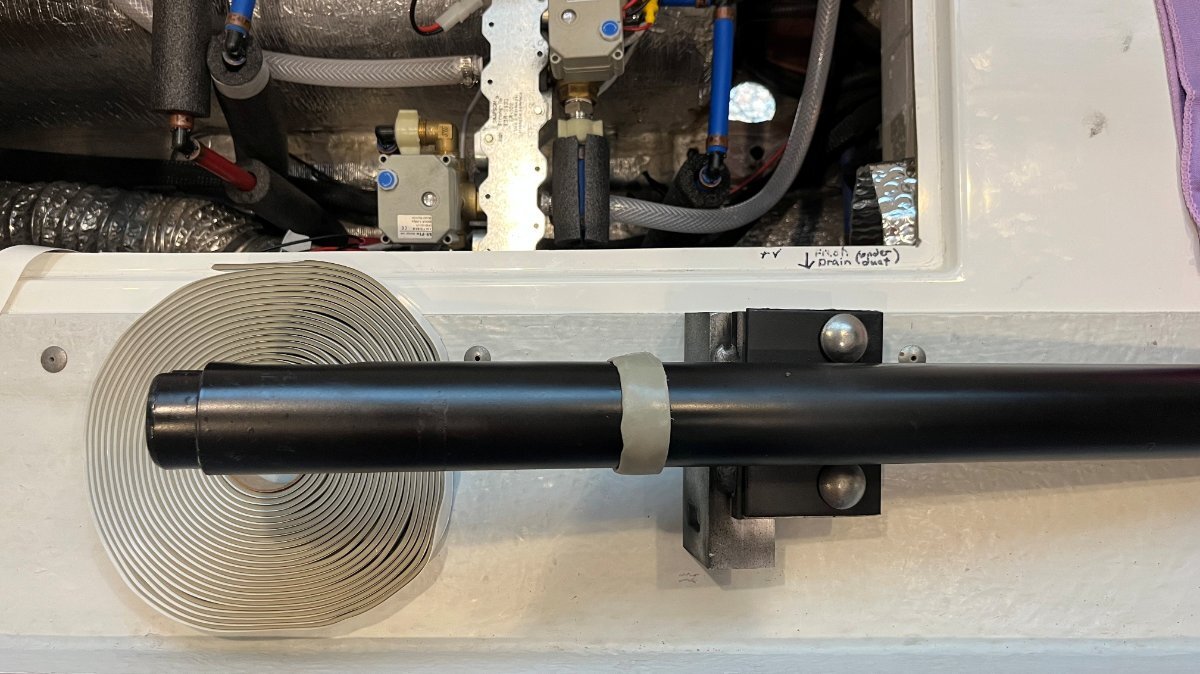
So, here's where this project went a little of course... Next step was to test the jack. Something happened that I could not imagine. It started lifting the hull, wheels not yet fully off the ground and BANG! The jack and hull dropped, OMG! 🫢 I asked Chris to come out so she could operate the button as I watched the jack. As soon as she pushed to lift the hull, I observed the outer post lift up into the hull. The outer should remain fixed, welded and bolted to the frame. I thought, the weld must have broke (it did)! I figured that when remounting the alignment would be slightly different and this could put new stress on the weld. I didn't pay much attention to the welds when it was out since they had lasted 10 years. I talked to a couple of Oliver Elders, first was Ken @mountainoliver who told me that years back some Oliver owners found out that OTT did not finish the welding job properly. Then a conversation with Steve @ScubaRx confirmed this fact! I wrote a Service Ticket and Mike at OTT responded promptly. He was thinking it was a Barker issue, but after our call I realized there was nothing OTT could do except perhaps pay for me to hire a local welder. IMHO, this was certainly an OTT installation issue. The installation procedure is to bolt the two aluminum blocks into position, tack weld them when in position, then remove the assembly to complete weld along both upper and lower surfaces. Turns out they forgot to finish the job on the curbside but did the full weld on the streetside (pics of both below). Next time y'all have your beds off and basement doors open, take a flashlight to inspect yours to confirm you have a full weld on top. Your top weld should look like my 3rd picture. If it only has a tack weld like the 2nd picture you need to remove the bracket (the jack can stay in place if you like) and have it fully welded properly. Thank goodness this happened while home AND that when it failed it did not damage the fiberglass under the bed. On this side we have 1/2" between the top of the motor head and the fixed fiberglass. When it failed it merely pushed the basement cover and bed up and down a couple inches.
-
Barker VIP3000 Stabilizer Jack Slipping
jd1923 replied to jd1923's topic in Mechanical & Technical Tips
Will do. Though keep in mind if the white one gets bad, I have two brand new black tops from the reman heads I bought! 🤣 -
Barker VIP3000 Stabilizer Jack Slipping
jd1923 replied to jd1923's topic in Mechanical & Technical Tips
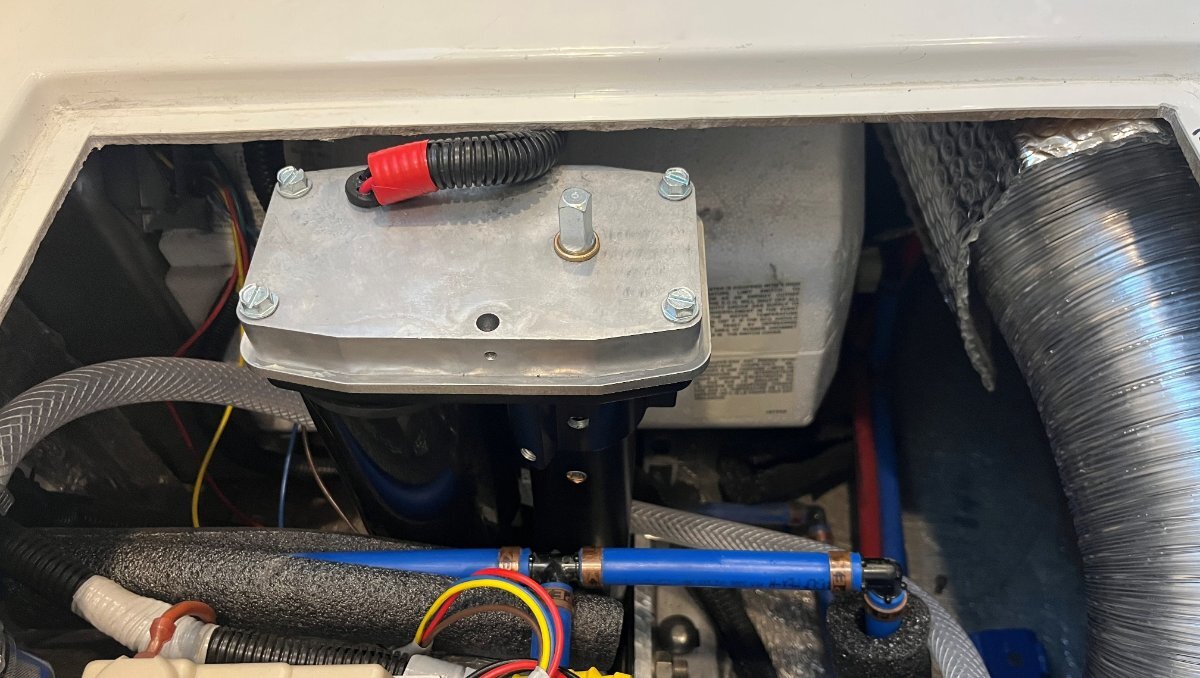
New motor heads, rebuilt post assemblies, all parts cleaned and painted and I'm ready for assembly! It's not easy to get the posts out and back in. To get them out, I removed the motor heads first, removed the long mounting bolts and used a hydraulic jack to break the old caulk bead pushing the post up. You could do this with the stabilizer jack itself if the motor heads clear the fiberglass of your bed platforms. Ours has 1/2" clearance on one side and only 1/8" on the other. OTT could cut the basement opening 1" further to the rear so that we have proper clearance, but it is what it is! 🤣 Put new butyl on the posts where the old markings showed the correct position. One is likely enough, but I ended up using two strips of 3/4" butyl on each post. Afterwards you can pushe the excess butyl down aring the post. You really have to cock the post on an outward angle to get it past a mounted support on the frame. Then get underneath to mount the nuts on the long carriage bolts. The aluminum bracket should be pushed in to support the post. Some thread locker on the bolt mounting the foot and all done in working these steps, now looking pretty good! The reman motor heads are standard VIP 3000 heads, meaning they are wired through the top vs. at the motor bottoms. Cut off the heavy gauge wire on both sides top and bottom as these are not used. The two lighter gauge wired, red and black are what is wired. Before crimping make sure the switch runs the motor in the proper direction. If it's running the wrong way swap the wires. I need to add 1 ft lengths of 12 AWG wire to reach the tops.