jd1923
-
Posts
3,285 -
Joined
-
Last visited
-
Days Won
247
Everything posted by jd1923
-
 Something else just dawned on me… The three lights out, are likely the same three you do not have switches on the remote panel, right of the kitchen. These are two-way switches and the others are all 3-way. This is another indicator of cause.
 -
So your Porch, Outside Courtesy and Closet (the ones without a lighted LED) do not work, and all the others do? Your first post listed more lights out. Those 3 have proximity to the doorway area. They must share a power source or ground separate from the others. Our older hull has no LEDs so in a way you have built-in test lights. I'm not a service ticket guy, but I would in your case. Send OTT this picture and explain exactly which lights do not work. Anybody who wires these for OTT should determine cause in a minute. Its likely not at the panel but at the 12V feed or a specific ground.
-
Reception is great because these 7-way antennas have 4 cellular antennas for receiving signal, one GPS antenna and 2 Wi-Fi antennas to send signal to your devices. The Oliver being mostly fiberglass construction allows radio waves to pass through (will NOT work with a metal-clad Air Stream where they would install a wired access point internal to the TT regardless of antenna location). @rideadeuce Mike is having an issue with coverage in the TV. He has a 5-way Cradlepoint antenna mounted on the rear of the Oliver. Your idea of mounting to the front awning bracket should be the best mounting location on the Oliver, except for taking a lot of headwinds, so mount it securely. Keep in mind the Wi-Fi signal originates in the router, but is broadcasted via the antenna, so mounted inside a closet or wherever does not matter except for it needing some, not a lot, of ventilation. Also, I mounted my router with 3M VHB 4950 tape. The only drilled hole you need in the installation is through the roof for the cables. The Icotek entry solution you were looking at could be installed by drilling two holes with a hole saw vs. cutting a rectangular opening. You only need the double grommet version with four 5mm holes in each and one plug. The cut-out size on this item is 43 × 24 mm. I'd bet 2x a 7/8" hole saw would be perfect! VHB the housing onto the roof and caulk the perimeter. 90 Degree Cable Entry Frame - 2 Socket - 73mm x 53mm – MobileMustHave.com Your last edit sentence finally gave me a reason for mounting the router in the Oliver! Thank you for that. There is one downside though, depending on where you travel. Out here we camp in many canyons without cell service. So, you would not be able to connect the Blink cameras anyway. When this occurs, we run the TV out of the canyon on a day trip and connect, use our laptops, etc. The Pepwave router also has the WAN input to add Starlink or like service. If you were to go this route, you would nearly always be connected. Mike also did a nice Starlink antenna install up front and he ran the cable all the way back on the roof. You could do the same front install and run that cable down the same entry point. If this upgrade may be in your future, buy this Icotek instead and drill 3 holes. Use a grommet plug until you need the 3rd opening: 90 Degree Cable Entry Frame - 3 Socket - 100mm x 53mm – MobileMustHave.com
-
@rich.dev, I was thinking again about running the 12VDC to the closet and knew there was a good example of this. Also, running DC lines from there, you could add a dedicated fuse for the router in the DC fuse panel and eliminate the inline fuse in the wiring. Note the description and pictures on page one, where Art @MAX Burner fishes two large 4AWG cables from the dinette to the bathroom vanity:
-
Somehow Bill, I knew the reply you would write, and I had a dream about some sad dog GIF!
-
Personally, I believe the utility box install is extreme overkill. We are NOT installing a 5KW inverter with 1800W solar system in a Class-A, not by any means! Are you needing a 1 1/2" conduit for another half-dozen future rooftop additions, NOT! Please think about the simple realities. I installed solar on a previously owned RV, by merely drilling two (2) 1/4" holes through the roof, for the two (+/-) 10 AWG solar panel feeds. No box, no Icotech entry solutions, just two simple 1/4" holes and a drip of Dicor on each, still working today, with no leaks. Or you can mount a big-@ss box. You can imagine what my choice would be! 🤣 It's up to you, do you want to mount a 6x10" box and blow two tubes of Dicor all over the roof of your beautiful Oliver? BTW, a rectangular junction box does not fit nicely on the curved roof of the Oliver! Most professional installers are young and inexperienced and it's up to you to make the best decisions for your assets. When the guy doesn't agree with you, just hire a new guy. Sorry @Wildbrew although your install is yes BEAUTIFUL, a work of art, and you should truly be proud of your exceptional work, it's simply overkill! Could be done with no platform and no large rooftop box. (Still love your work yet hoping to advise many others that less is more). We are to each our own, yet simple is often better. Think hard about your decision. I did my truck mount install in two days, not a single drill hole into our Oliver, just sayin'! I was working my job last week, teaching my online PMP class when Sparklight went down, resulting in no household Internet. While my students were waiting for just a minute or so, I connected to our truck-based Pepwave cellular router Wi-Fi, with T-Mobile 5G cellular service only missing a heartbeat or two. They had no idea I was gone for a minute. My truck-based Internet service is my also my business back-up internet service, without an installation hole in the Oliver! 😂
-
No, not at all, would be my answer! After buying our Oliver used, with OEM "upgraded mattresses" after discarding these from our Oliver, we kept one in our lower level, for our son's overnight friends and the other went on Craigslist FREE STUFF. It sat on our curb for nearly a month prior to the city pickup and dozens of contenders thought, sorry no-thank-you! We bought these, the 10" model and just this summer, I will soon cut the 16" radius for the lower outer corner by hand (post coming soon): Dreamfoam Essential - RV (rvmattress.com) Most owners acive here hav worked a creative, less expensive option here, including carving a simple Costco foam mattress for even less $$$!
-
Finally! My Batteries and Inverter Now Run My AC!
jd1923 replied to Spike's topic in Ollie Modifications
Yeah, while prior to an inverter upgrade, we should ALL work an A/C upgrade first! Why in the world do RV manufacturers buy anything from Dometic? I will NOT ever, even for a $10 part! Replace the whole unit first and save the $10. Dometic is like government, less is more! 🤣 -
“Golly Shazam” you can, yes you can teach an old dog new tricks! At least some of us ol’ dogs that must be self-taught, and that’s you and me for sure. Happy for you cousin! You gracefully watered-n-nurtured that old set of original batteries for 8 years. My guess is with your conservative touch, you got these for a lifetime. God Bless and Godspeed my friend. 😂
-
I had that question and Tech Support at MobileMustHave replied that Parsec suggests no smaller than a 2" turn radius on their antenna cables. I had to push that number a little tighter on my install since the cable had to come down between the cab and bed and turn 90. The Icotech @rich.dev suggested will just make that 2" radius but installing it on an Oliver is not simple. Think HARD about which cable management device you select. Many are overkill and require a large opening. Models suggested here require square or rectangular openings. It's a whole lot easier, 2 minutes with a hole saw, than drilling four corners of a rectangle and using a jigsaw through two hulls. I had to go with the flat square model in my application, but cutting this square hole with the backseat of the TV removed is more straightforward. And nobody will ever see the couple of scratches made in cutting this, unlike the roof of your Oliver.

-
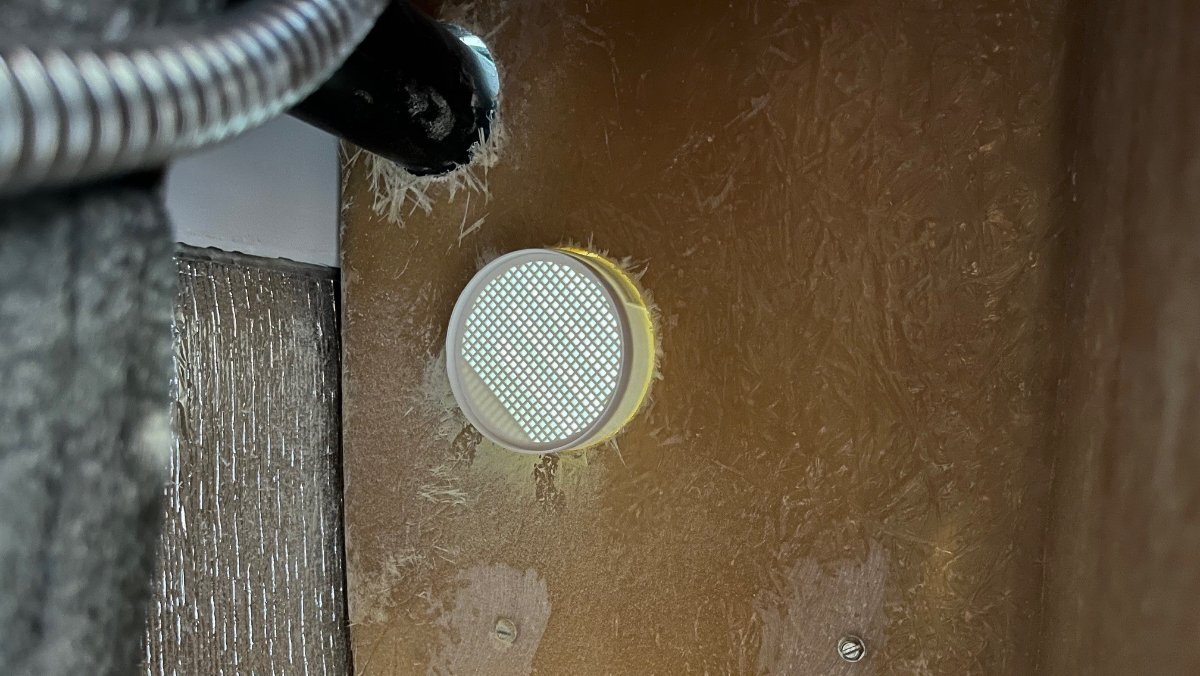
Going through the closet you have more room for router and antenna cables. I would plan from the closet side where you want the antenna cables to enter and drill an 1/8" hole up through the roof for positioning, then drill down for the proper size hole. For wiring, I would run a pair (+/-) of automotive grade (stranded) 12 or 14 AWG from the 12V fuse panel, follow the drain plumbing all the way to the bathroom vanity. From there you can see how the plumbing vent goes through the closet and up to the roof. I just drilled from closet to vanity to add a 3" vent. Check my picture and you can see the gap to run these wires along the 2" black vent pipe. You could install the router just above the closet door, tie the antenna cables to the ceiling of the closet (see the taped mounts I used in my install thread, no drilling required) and you can use the closet day after day and never see the installation without sticking your head in the closet. It also would not take any otherwise usable space (like in the kitchen cabinet).
-
Full time might even be more a reason to have it in the tow vehicle, unless you plan to trade the TV in often (but who would with your TV). You are always near your TV and not always near your TT.
-
@rich.dev so where will you install the router? (kitchen cabinet?) Unless you can disconnect the awning wires, it may be difficult to drill that opening wider. Those 7 antenna wires are close to an inch diameter. You want the router the right distance from the antenna. The cables on my Parsec were 7 FT long and you don't have room to coil them up anywhere. If I was mounting to the front awning, I would drill straight down into the closet, and yes use an Icotech cable system. There is room for extra antenna length along the ceiling and walls. Then you would need 12VDC and add a closet vent too. Still think my idea was better. Great reception while driving or streaming back to the television (in fact over 100 FT around the campsite or at home). And when we travel during the day, we have our Internet with us, not back at the campsite.
-
And yes, our hull has check valves and restrictors on the Fresh Tank and City Water lines (see pic). You may not need the following detail for a summer plumbing project, but when I am winterizing, I run air into all four (4) water inlets. First air into the City Water to drain both sinks, the toilet and outdoor shower. Then the Fresh Tank inlet for a few seconds. Then I connect to the rear port, after turning water valves to boondocking position and run air in for a few seconds. Lastly the toilet rinse inlet. Except for the first step that drains all the internal plumbing via the City Water connection, the other 3 just take a few seconds of air to clear those short inlet lines. You can bypass the HWH for a plumbing repair, but when winterizing, I bypass it to clear the hot water plumbing with the air and at the same time I pull the anode plug to drain the 6-gal HWH tank as well.
-
The check valves do not allow reverse flow out the hose which would lose pressure in the plumbing. So you would be blowing air in the allowed direction, into the hose inlets. I do it all the time since we travel on and off all winter and when home on the mountain it often gets in the low 20s overnight. It’s part of my winter return trip process to blow the plumbing dry while we’re still in the driveway!
-
2023 and newer Nightstand Top: How is it attached?
jd1923 replied to Steve Morris's topic in Ollie Modifications
We have 3 removeable, all Velcro attached tops; the nightstand top, below the pantry and the counter above the fridge/below the microwave. -
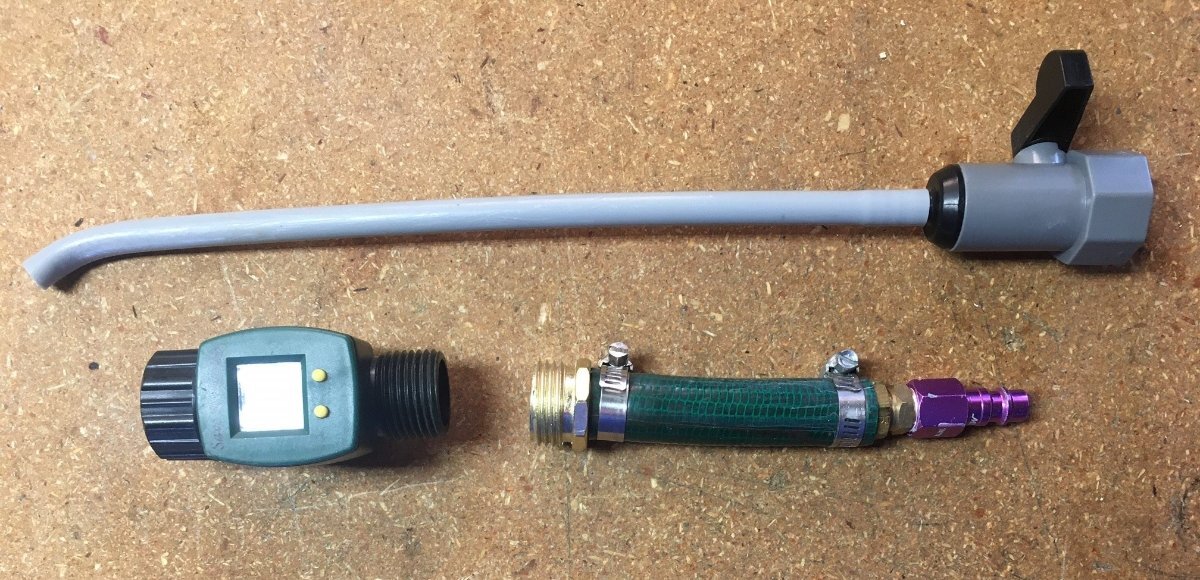
@rich.dev No low points here and don't forget hot & cold plumbing to the outdoor shower. The only way to drain all lines is to blow air through the hose inlets. Set your compressor down to about 40 PSI and make yourself this kind of tool (bottom-right in picture). I use it for winterizing too instead of the pink stuff.
-
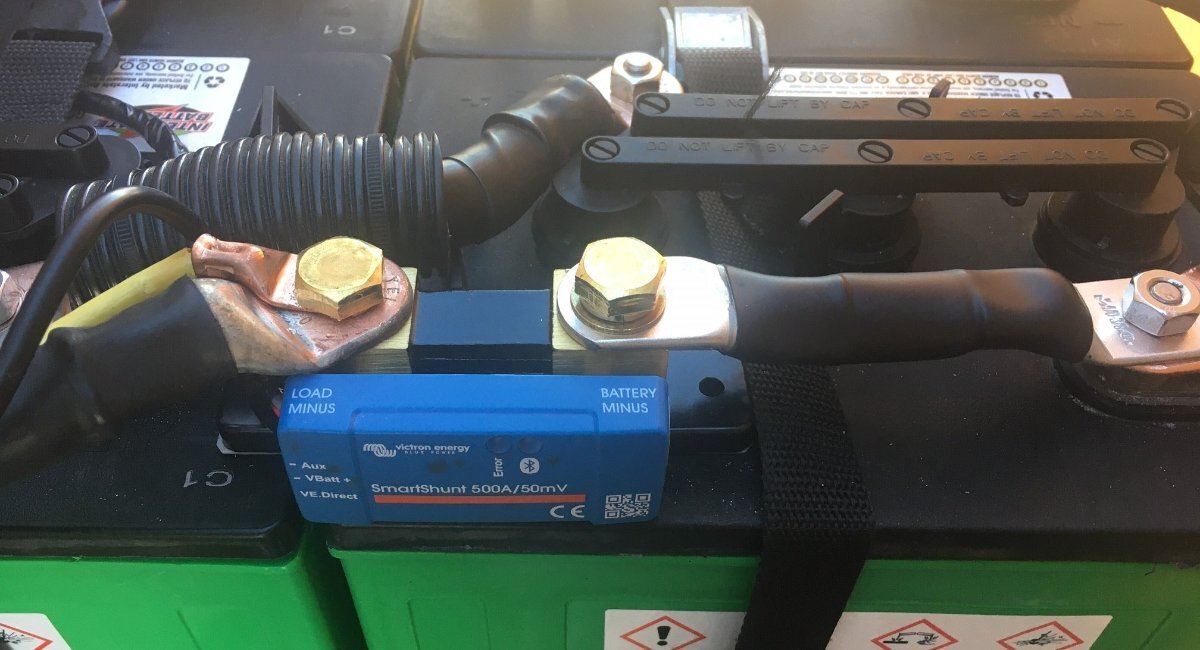
My Victron SmartShunt install is simply sitting at the negative battery terminal. Nothing gets -12V ground unless it goes through the shunt.
-
Have you seen the dude? Personally, Chris and I are not beard people, don't get the big beard thing, let alone a naming your battery company as such. Beards, tattoos, piercings, young people needing a good bath and shampoo... I'll stop there. I would say that if there is a new viable battery company, producing great product in Athens TX (not just a website, would want to know of the manufacturing facility), I would support them. I prefer the small co vs online reputation. We have driven through Athens TX, a cute East Texas town like many others, a good half dozen times traveling from Georgetown TX to UT Tyler TX for Adam's tennis tournaments during high school and college. Love all the great small towns of Texas! In East Texas they have a local burger chain named "Jucys." Hey @Jason Foster what do ya know about Jucys? Can you FedEx overnight me a 3/4 LB butter burger with fries? (make that 4 orders!) Jucys Hamburgers | Best Burger in East Texas
-
It appears today most models are inverter/charger. Please allow us to understand your reasoning. I can see an inverter failure in an inverter/charger combo unit could keep the charger from working as well. But they should be designed to run and fail independently. Do you have other reasons. This is a good thought to consider and we're all here to learn. Also, it appears given your older hull number that your Dometic is the 13.5K unit? Good to hear it runs OK, so my limiting factor is the LA batteries that almost immediately go down to near 12V with the 1800W demand. Thanks
-
The picture on this page, showing the Big Beard battery standing up got me thinking... You can fit four (4) of these bad boys standing up in the Oliver battery bay! (no tray of course, for the off-grid crazies out there) Big Beard Battery 12-Volt 300AH 3600 Watt Lithium Battery | Big Beard Batteries
-
Chris, the measurements shown here are for the Dakota 280AH battery. The 320AH battery is 15.06" long. Two times 280 = 560AH is not a bad number either, if the sliding tray is important to you. Given the battery comparison doc @topgun2 shared yesterday in another thread, there are other good options. The best value is Epoch, two 300AH batteries at $1,099 each, will fit in the OEM battery tray. The downside is they are likely manufactured in China, though deemed dependable. It appears Dakota and Battleborn are Made in USA. However, a 100AH BB makes no sense today, as it might have just a couple years ago. Not when you can get 300AH in one battery at a slightly larger footprint. When I upgrade to LiFePO4, I'm removing the OEM tray for sure! I want more AH to fit the 24x18" size vs. the 21x14" tray size. It also gives 3" more in height w/o the tray, so you can physically get your arms in above the batteries. The true purpose of the tray is for watering LA batteries and after a LI install you can just forget about them for years and you're not going to use the sliding tray. I'm going for ~900AH when we upgrade. Without the battery tray you can fit 3 of the Dakota 320s, three of the Epoch 300s (for way less $$$), or you can three of these. Love this new Texas company that I just learned of yesterday, at $2K per 300AH (vs. $2400 for the Dakota 320AH). Two will not fit in the tray, but 3 will fit w/o the tray! Big Beard Battery 12-Volt 300AH 3600 Watt Lithium Battery | Big Beard Batteries
-
I rotated mine last year, only because I had the wheels off to do bearings. No other reason, except for why not, but yes otherwise it's just a waste of time. Keep this a secret though! You would not want to start an argument with a trained sales associate at Discount Tires. 🤣 They might want to invalidate your warranty.
-
Ours too and it will sit back there, hopefully never needed.
-
If you want to run it via inverter, say for testing purposes, you merely have to trip the 20A breaker for the air conditioner. The KISEA will sense no shore power voltage and connect the inverter to the A/C load wiring.