All Activity
- Past hour
-
@DanielBoondock Do you plan on re-using your Dexter OEM shackles and wet bolts? If not, why not? They should in good shape since your mileage is low. If you are, then use the Dexter torque values (30 min, 50 max), as the design is different. Also wanted to remind you to re-use the dished washers from your Monroe shocks for the opposite side of the rubber bushing from the Bulldog washer. This will support the rubber bushing better and last longer, provided they are not overtightened.
-
@DanielBoondock or anyone. I don't have time to trudge thru all this, and I may have mentioned it somewhere in here, but before attempting to remove your old U-bolt nuts, or any, CLEAN the heck out of the visible threads on the bolts. So clean with a small wire brush, then penetrating fluid for a while. I did have one of my first nuts seize up on us, and it was a 30 to 45 minute stressful event to get that sucker off. We did remove it with a LOT of impacting, but man! What a fight and a half. Good to have an Impact and a couple charged batteries. I did have a Ryobi impack drill, a must have (any good brand). I just added to my tow vehicle tool build-out, the Ryobi 3/8" ratchet drill (again, pick your fav. brand). There were a few spots the ratchet drill would have fit better than the bulky impact drill. The ratchet drill is NOT necessary, but a good first-world tool to make some things easier. When that nut got stuck trying to remove it, I wish I had a grinder. That's my next tool to add to the truck. I now carry everything in my truck to do just about any job. No, I'm no expect, but I know a good bit more now than I did before doing two Olivers' leaf springs. Oh, VERY Important. If you are not in good shape with a strong back. Please God, think twice before doing this. I was laid up for a few weeks, but that's my own damn fault for being a computer IT guy for 35 years. Now I'm working out and stretching to make my soon-to-retirement (Dec 31st) a better experience. 😉 Lastly, there may have been questions about the 65 ft-lbs of torque on the hanger wet bolts. I will be inspecting my buddy's Oliver this weekend to see how his hanger look after two years of traveling a good bit. More to come on that with pics hopefully. I don't have much mileage on my Oliver since I did my springs, but I will check that too.
- Today
-
I'm looking at these Vatrer batteries now myself. Can't beat that price for 900ah for what seems to be a decent quality brand.
-

Made in USA leaf springs
DanielBoondock replied to Mountainman198's topic in Mechanical & Technical Tips
Thanks for the encouragement! Good tip on the impact wrench, that’s the tool I was looking for. I already have a DeWalt mini vac and a leaf blower for the trailer so will add the mid impact wrench and 3/4” thin walled protective socket, plus a general impact socket set for using on the trailer AI is helpful here to pull out the tips from the forum, here’s the ones that stand out Make sure the shackles point up when assembling or it’ll have to be redone Do one side (driver) completely both axels first, then the other side, so the opposing side is aligned and secure Tighten U-bolts in a criss-cross Align the wet bolts with the grease holes horizontal, and seat the splines (e.g. rubber mallet) before final tightening Shocks Leave the compression strap on the Bulldogs until assembled and on the ground, then clip off to uncompress Be careful about compressing but not squashing the shock end bumpers Torque Bulldogs to 40 ft-lbs and the rest to Alcan specs (provided) Do all final torque settings while the trailer is on the ground and ‘loaded’, not hanging in the air Use the impact wrench only for loosing and spinning on the nuts, always use a torque wrench for final setting. Don’t use the impact wrench on the wet bolts -
Thought some might get a kick out of this video clip my wife shot in our back yard and set to music last rutting season. 4 bucks.mp4
-
- 3
-

-

- Yesterday
-
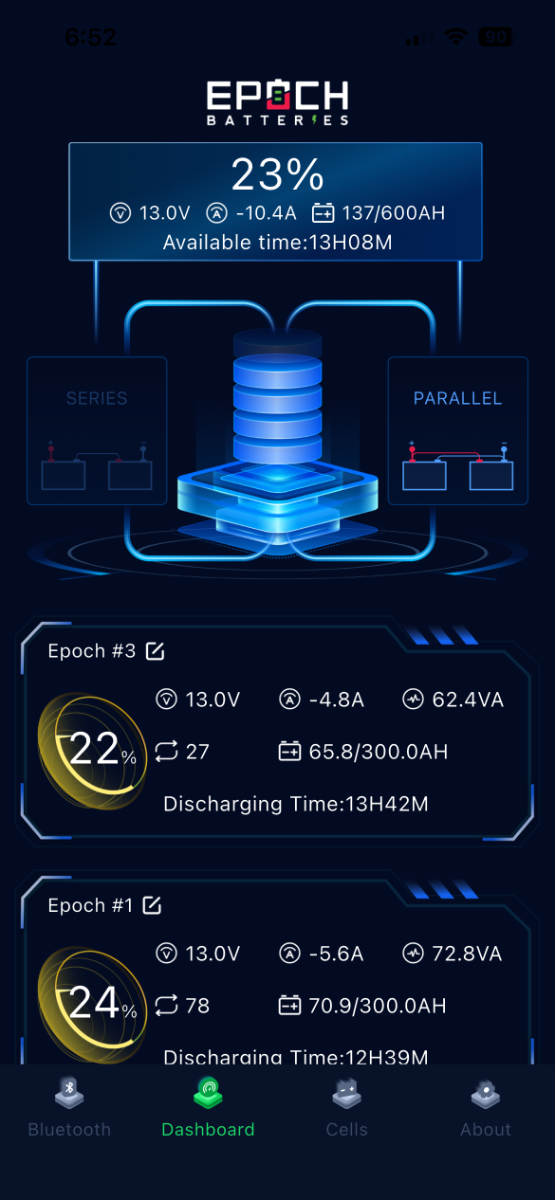
We just spent 4 overnights between Flagstaff and the canyon. Not exactly the desert SW at 7600 feet but it was the week of July 20th with highs in the mid-to-high 80s, everyday up there (116F in Phoenix). Two of 4 nights we had monsoon rains and we had to cook indoors using a pressure cooker one night and Emeril oven another (microwave removed for the Emeril). We often use a portable induction cooktop but not this trip. We had the A/C on 24x7 in fear of overnight rains, when generally after dinner we would open windows. A couple nights the old Dometic 3-way fridge had the "Check" (LP) light come on, likely from the altitude, so we also ran the fridge on batteries for about 60 hours over the 4 days. With the Victron MP2 inverter/charger we can run the Chill Cube A/C, The Emeril Oven, the fridge, the TV and soundbar, etc. all at the same time without worry as to what we can or cannot run on electric. Coffee every morning with an 1100W electric kettle. With 900 Ah LiFePO4 batteries we have power to spare. I can see what you're saying, but of course with the old Penguin A/C you're not running A/C at all when unplugged. The P2 would bring 300 Ah down to ZERO in 2 hours. I thought we had all the power we needed to run A/C for 4 days straight, and we did but had not counted on running the fridge on electric too, which hour after hour takes quite a bit of Ah. The picture shows our remaining Ah on our 4th night at 7 PM. Epoch #2 was below 20% and it stopped showing up on the app (notice the pic shows 600 Ah total since it cannot see one battery). By morning SOC was 18% and when we got home late afternoon SOC was 43% with battery #2 again reading, recharged from the DC-DC charger. SOC of 43% might not sound too good, does it? But keep in mind 43% of 900 is 387 Ah. Instead of driving home, if we had driven to another campsite we'd be back in business for another couple days. I'd give up our 900 Ah right along with my right arm! 😎 But if you have no interest in upgrading your A/C and running it off-grid then 300 Ah is good enough. Those who go from 300 to 600 Ah can get down to 50% SOC and be at 300. If you have small Ah capacity, you always need it full. Having greater capacity allows you to run at lower SOC%. We were able to run A/C for 100 hours straight, including when towing, with our setup! And if you're always running near 100% SOC, the DC-DC charger will get lonely with no work to do! 🤣

-
On the 18th day after crossing the Canadian border at the beginning of June, we finally got some sunshine and things returned to normal, electrically. Our array of 600AHs recovered nicely from 19 & 21% the next day. I was beginning wish I had a 900 setup. 300 would be too little for us for the amount of boondocking we do. And we do not power the A/C from battery power. So far it works for us :) John
-
I don't understand the need for 900 Ah. Without getting any charging, 300Ah easily covers us for 5 days. With good sunlight our batteries are pretty much topped off every day. Can you run your air conditioner and microwave? do you run an electric induction stove top?
-

DC-DC Charger Installation - Oliver LE2 and RAM 1500
Geronimo John replied to Grizz000's topic in Ollie Modifications
First, great write-up. Saved it to my DIY file. We also travel long and far, and having a Victron DC to DC has been wonderful. Sadly ours is only the 30 amp verson. But when it fails, I'll be digging out my saved DIY of your efforts. So thanks in the future a second time. I too am open to roof mount solar, some day. Just don't like the look or their potential MPG impact, especially out west with high speed limits. I'm hopeful that future surface mount panels will be made to allow "full" covoerage of our roof. Specifically from the low outter sections to the main middle section curves. Current surface mounts that I have looked at don't have adequate bend radius to cover all three areas fully. Besides the power benefit, it would sure make waxing Ollie's top a LOT easier. Thanks again, GJ -
Did a CP control panel reset. No joy.
-
 Called 8/16 (better late than never!) and got a reservation. Campground said they had several cancellations, so if you're on the fence and thinking you won't get a good site...you just might get a nice site! After watching Jason's YouTube on some of the plans...that convinced me we need to return. First rally we attended was 2023 and it's time to see the new Oliver's and meet more owners! Plus...great time of year...October in the 'Bama Mountains!
 -

Girard remote battery removal
srthomsen replied to Kathy Tewart's topic in Mechanical & Technical Tips
Took ours apart to install new batteries and could not figure out how to reassemble it ! -
 Nice shower! Being a man, and given our usual boondocking spots, I'm out there showering in underwear without a curtain. Chris showers inside but I'm outside whenever possible so I don't get the entire wet bath wet! When I do shower inside, I empty the room and then end up hosing the entire wet bath clean too! Most people do not realize dumping grey water is allowed in the National Forests wherever dispersed camping is allowed and when 200 ft from a water source (see USFS Dispersed Camping publication). I'm not certain, but I apply this rule to BLM lands as well. The high desert critters and bugs eat it up and by the next day you wouldn't even know it was there. Drain slowly so not to cause erosion, and an outdoor shower is a small amount of grey water let go slowly. 😎 USFS Dispersed Camping_stelprdb5196126.pdf
 -
You probably already know this but that error code relates to fuel or power supply issue. The suggested remedy is a system reset.
-
 This is great. I remember you telling me about your shower hose modification, and would love to know more about that element as well. Does the longer hose fit well? What is it made of and how hard was it to change out? What does the suction cup mount for the hose end look like?
 -

Aloha from Hull #1730
Happy Hour is 1730 replied to Happy Hour is 1730's topic in Introduce Yourself
Thanks, we appreciate that! We feel like kids at Christmas. Thursday can't get here fast enough. 😁 -
Aloha from Hull #1730
Happy Hour is 1730 replied to Happy Hour is 1730's topic in Introduce Yourself
We live in Maryville, TN. (next to Knoxville) -
Aloha from Hull #1730
Happy Hour is 1730 replied to Happy Hour is 1730's topic in Introduce Yourself
Sorry - no Ukelele - but I do play music and I have been known to make a Mai Tai on occasion. 🙂 -
Happy Hour is 1730 changed their profile photo
-

Made in USA leaf springs
Tom and Doreen replied to Mountainman198's topic in Mechanical & Technical Tips
It's not a complicated job to do on your own but will take a bit of time and it helps if you have someone to help. I replaced all of my springs and associated hardware as well as the shocks last spring by myself out of necessity, (one of my springs broke on my previous trip). It helps to have a good impact wrench with associated impact rated sockets. In addition to using the Olivers jacks it helps to have a couple of bottle jacks for supporting and manipulating the axles (when lining things up). I also had a couple of jack stands on hand for additional security but luckily didn't need them. Just take your time and you'll be fine. -
Hummers in Prescott.MOV
-
Made in USA leaf springs
DanielBoondock replied to Mountainman198's topic in Mechanical & Technical Tips
Thanks JD, yeah been busy, sandwich generation stuff … Thanks for the reminder about your post, taking notes, I’ll probably PM you once I’ve compiled them if you don’t mind correcting my homework That sounds more like it! I don’t mind doing it, shouldn’t be hard for old engie’s like us but I’m getting pulled in ten directions at the moment so just wanted to pay somebody. Anyhow I’m mooch camping supporting some family again in a couple weeks so I’m thinking I’ll just do it then. Yeah at this point it’s been enough effort spent talking to people I’m ready to call it sunk costs and just git ‘er done. I’ve got a couple good jacks, stands, a DeWalt torque/breaker bar, and as JD says there’s the rear trailer jacks. And hey saving myself $400/$900 I can pop for another tool or two for ‘free’, hmmmm …😅 -
Alcan quoted me $145/hr, 2-3 hrs max for installing entire D52 axle assembly, springs, shocks, equalizer, erc. Lots of folks have stated they were in and out of Alcan around 2 hours, with rave reviews about quality of service. I too am a retired engineer and I plan to do this myself first chance I get, because I don't plan to go to Grand Junction CO for maybe a year or more. Saves money, aggravation, is not difficult, and does not require any special tools. I look on the bright side and consider these tasks kind of fun. I’m just going to do the Alcan 4-leaf springs, U-bolts, & Bulldog shocks for now, I’ll replace the axles later when I need brakes. I am re-using my Dexter Shackles and wet bolts, and may keep the EZ Flex too if it’s in good shape. I already replaced bearings with Timken.
-
Welcome back, Dan! Too bad the fires kept you away from getting to Grand Junction! Wow, labor cost more than the springs themselves! I did the axles too which makes it a different process. Doing one spring at a time should be easy enough. PLEASE don't let anybody here tell you not to use your rear jacks to lift the Oliver! Then use one jack stand on the axle end where you are working. Have the Oliver hitched to your tow vehicle on as level a spot as you have. I know Art @MAX Burner did his, springs only, first but I could not find his post. Best wishes, JD
-
Made in USA leaf springs
DanielBoondock replied to Mountainman198's topic in Mechanical & Technical Tips
OK, so I ordered the springs in springtime and made an appointment in July when we’d be in Utah near Grand Junction. But then they got a series of wildfires all throughout that area, my wife has PTSD from us going through them at home, so we cancelled the trip. Alcan wanted steep fees for holding on to them until we could come again next spring, no good (I had already paid for the springs per their requirement when you order). So I paid to have them shipped out figuring a local trailer suspension shop would have no problem with it. Wrong - they won’t install ‘customer supplied parts’. They want to sell you the parts themselves, sigh … OK so then I’m trying my local garage, near where I store the trailer with easy access. Great folks, used them for lots of stuff, but they don’t normally do trailers. Gave them all the information, they thought it looked doable for $1500, but I should check if they’re ballpark. AI search of this forum gave more like 300-500 or so. He said $900/minimum at a upcharge for (again), customer supplied parts and wouldn’t do it for less than four hours @ 250/hr. Grrrrrrr There’s another shop I can try locally, or I could take them BACK to Alcan next year, but I’m getting frustrated and thinking about just installing the damn things myself. I’ll troll the (38 page!) thread for DIY install. Anyhow feeling down at the moment, looking for advice thanks - Last week
-
 DCmomma joined the community
 -
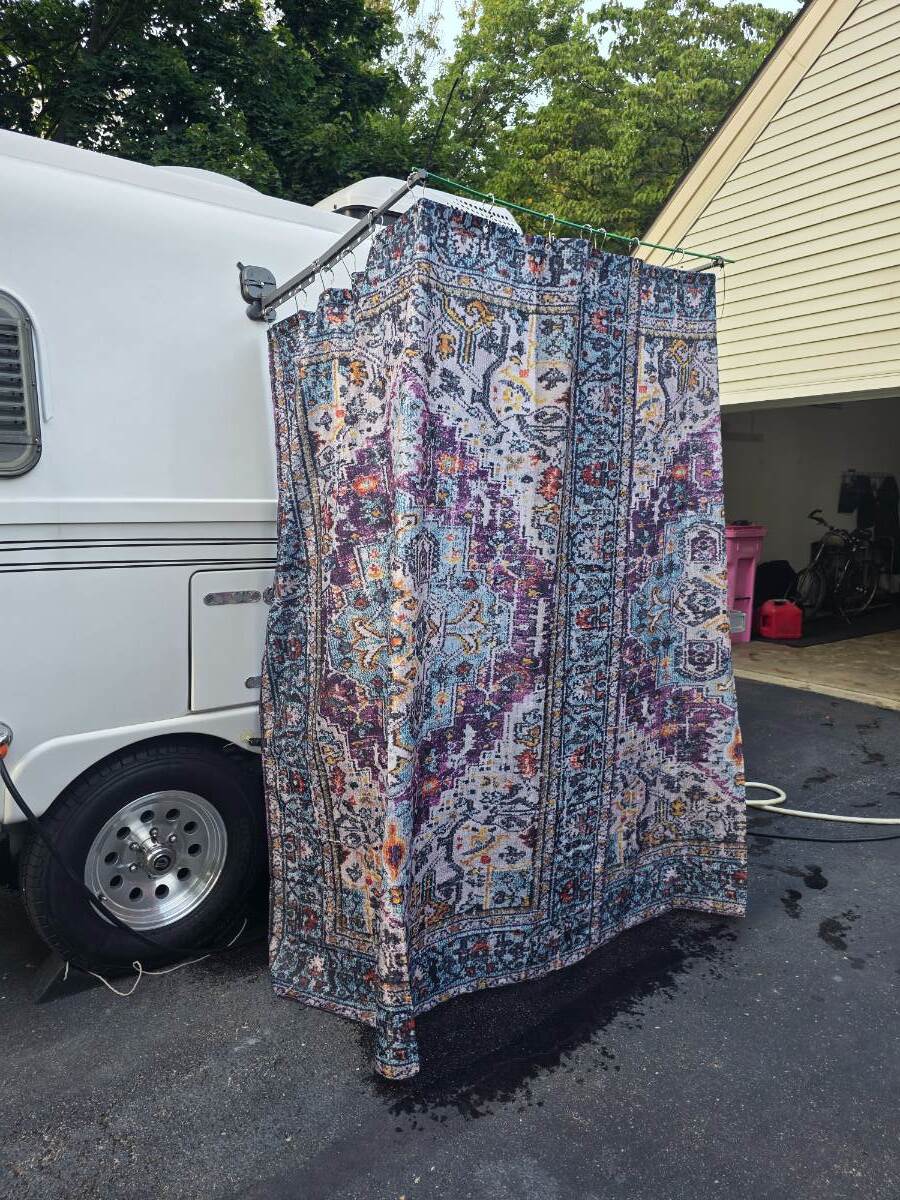
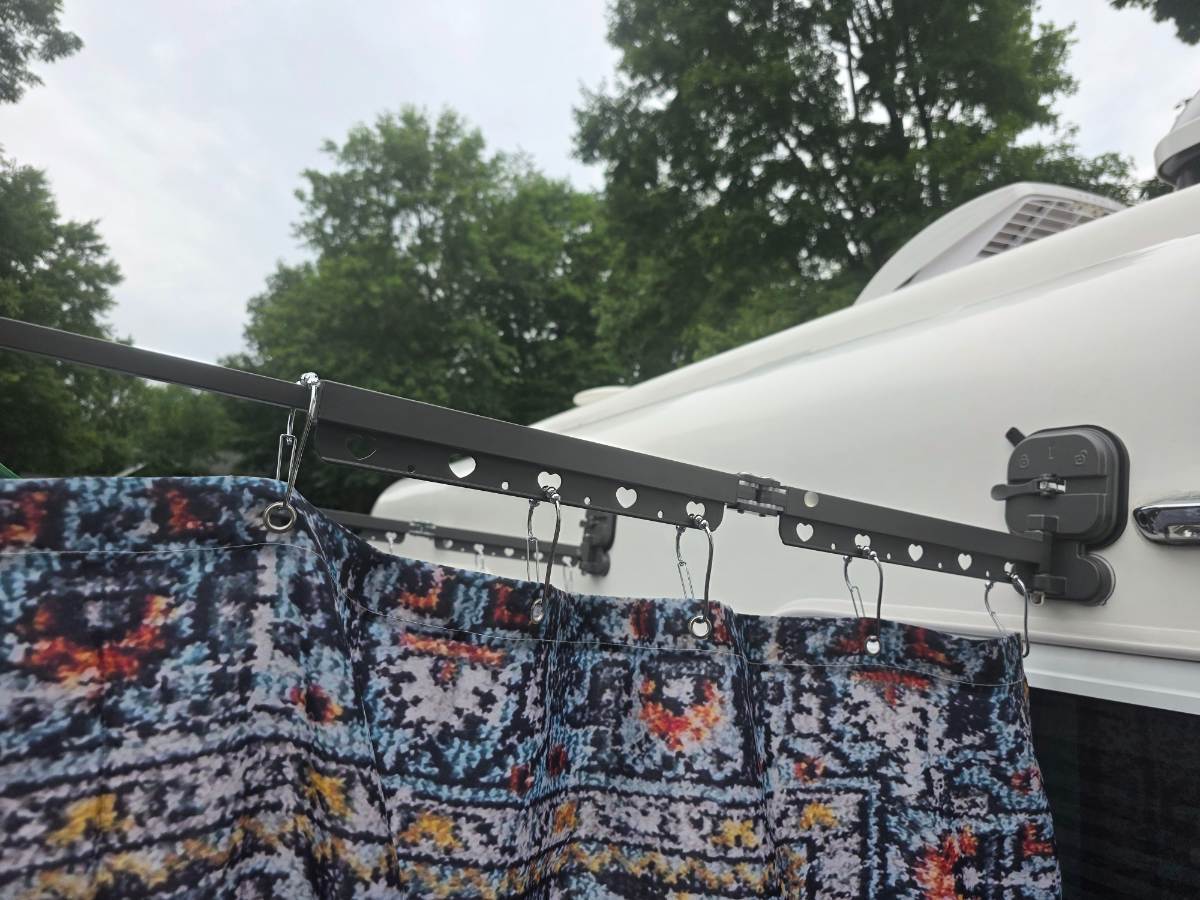
 Hi Oliver Family.. It’s been quite a while since I last posted around here, but I just finished a quick little mod for the exterior shower station on the ILOVHER. I do use and absolutely love my wet bath inside the trailer! But before the forum gray-water police sound the sirens: having managed a National Forest campground for five years, I promise I know the rules about gray water and where it belongs. I know there are plenty of places out West that actually permit surface gray-water disposal (and, funny enough, with the wildfire season we're having, the ground could probably use every stray drop). For this upcoming trip, I'll be boondocking in a private field for 12 days, and the owner doesn't mind me showering outside. I'll be using organic, biodegradable shampoo, and with no dump station for miles, keeping gray tank fill to an absolute minimum is the primary mission here. I considered one of the standard pop-up privacy tents, but having used a bicycle tent for camping, I could already envision the poles, stakes, folding/unfolding and general tent wrestling that would be involved. I was looking for something much simpler — something I could put up in a couple of minutes and take down just as quickly. I also wanted to avoid the usual problem of routing the shower hose into a privacy tent. You either have to run the wand through the main zipper opening, which can make the entrance/exit awkward, or start modifying the tent itself. Then I stumbled across these ratchet-style suction arms, and I immediately started thinking, "Oh, I can do something with these!" They reminded me of the SeaSucker-style mounting systems, and the Oliver's smooth, gelcoat fiberglass seemed like the perfect surface for them. I was so excited about the idea that I put the whole thing together and actually showered in my driveway last night just to test it out. 😂 And honestly, I think these are going to work perfectly! The Setup: Ratchet-style suction arms: I found these folding rack arms on Temu. Say what you will about ordering direct from China, but the mechanical ratchet suction on these things locks onto the fiberglass extremely well. They’re designed to hold weight and, so far, they’ve been remarkably solid. DM me if you want the link to the product. Curtains & rings: I used standard shower rings through the cutouts and repurposed heavy shower curtains I already had from a previous project and the bar that goes between the mounts is a simple tomato stake zip-tied tight to the ends. (I may reconfigure that at a later date with tool clips) No modifications to the Oliver: Nothing is drilled, screwed, glued or permanently attached to the trailer. The whole thing takes less than two minutes to set up, packs down flat, provides total privacy (other than wind, LOL) and gives me direct access to the Oliver’s outdoor shower faucets without having to wrestle with a tent or poles. I even have a suction mount for the shower wand. Please note that I have replaced the original ss shower hose with one that is 120" on my ILOVHER. Attached are the suction arms mounted to the Oliver and the full enclosure deployed. I’m pretty pleased with how simple this turned out!


.thumb.jpg.e34bf01ef7f7d5e99ad31856d45afbeb.jpg)