All Activity
- Past hour
-
I can neither disagree with your theory or info. There are a lot of engineering factors that go into making the best ride possible. If the theory is correct, then their are more questions : 1. According the the tire manufacture info I believe that the pressures should be 45 PSI due to the weight of the trailer. I try to run between 45-50. I use to run around 55psi more of a safety factor in my mind since I do't use TPS system. I would think the stiffer tire would create less heat, but could also cause even wear. I just changed the tire this year, due to age and not wear, 25K miles. I old set didn't show any abnormal wear and still looked almost like new My tires also only see the sun 60-80 days of sun sine a year. When in storage my tires are on concrete, I am planing on putting the Oli on Jack stands and getting most of the pressure off of the tire. I was reading that with large vehicles sitting in one spot for long periods in hard on the tire, causing flat spots in the belts. 2. The Ez-flex probably needs to move as it was designed to move freely. I don't know what is the latest from Alcan for the torque specs for the wet bolts. But the way the Dexter should bolts are made to allow Fairly free movement of the Ez-flex coupling. 3. The leafs. We know that the Dexter 4 leaf was under sprung in their design. The next question would be is Alcan 5 l-leaf the proper leaf spring, or would it be the Alcan 4-leaf or the Dexter 2200 lbs. I personally have the Alcan 5-leaf and like the ride. there is still movement but it minimal. Last Item: I know this is your mod thread, but should this be posted in the mammoth thread on leaf spring that might get more attention? This could end up causing several more pages of posts.
- Today
-
 I am working the same issue with my hot water heater. It works on 120V, but not on 12 volts. The light indicator on the switch does not work. It appears to have died the same time that the hot water heater would not work on gas. I'm thinking I have either one or two issues. Light Issue: My assumption is that all of the indicator switches need a yellow wire (ground) and in this case the orange and reds are the 12 volt power to the switch and then to the hot water heater. If this is the case, then the fact that there is not a yellow ground connected to the switch would for sure result in a no indicator light condition. Likely the ground is buried in the mess of wire up there. Will go snipe hunting on it later. Power to 12V Side of Heater: My second assumption is that the rocker switch red and orange wires are switched on/off by the rocker and provides power to the water heater mother board to turn on/off the gas heating. Does all the power for gas operation flow thru this switch? If so, a bad switch would either fail open or closed, causing the gas side of the heater to either run or not run accordingly. If this is the case, just jumpering the red and orange terminals at the switch should cause a light off of the gas side of the heater. Correct? Is the above logical? Thanks GJ
 -
Speaking of agree/disagree, I initially disagreed with Alcan but came over 100% eventually. On tire pressures it was opposite, I started as receptive but have concluded the opposite. Here's why with I think a reasonably accurate technical assessment of road vibration absorption in the suspension You can think of the vibration in frequency bands, low/mid/high. In the clip above you can see mainly low. Little hard but there's a few places with a gentle change in the road and there's a corresponding response in the leaf springs of something under a 1/2hertz say. It bounces basically. This is all in the 1-20 Hz range according to research I've read. The leaf springs job is to absorb this, and from watching I can see they're doing the job. Up from there it's mostly short impulse bumps like a pothole. I'll try to upload a video of that. This comes from transit time over a pothole, say 1' wide hole (big 'un) @ 50 mph. The two edges of the hole are approximately at an 80 Hz low band frequency from the tire transit time over the hole. This is probably the highest frequency you'll see on the road. So we're talking 0-100 Hz (rounding up) frequency band that the suspension needs to manage. Note this 1' pothole is an extreme example to find the boundary, going 50mph over one would not be fun. Consulting research on tire under inflation performance and getting an AI summary of the research. The point of this is that So the point is but going with lower inflation's you're simply shifting the frequency response around, at the cost of higher wear, lower mileage and greater tire stress. A higher inflation damps 50+ Hz (e.g. potholes), lower inflation's shifts it 50- which is exactly what the leaf springs and Ez-Flex are for. From watching on my trip I saw the Ez-Flex only engage on serious potholes, so that system is designed for the higher band. But what about the highest frequencies? Clearly the suspension isn't going to help with 50Hz up, what does it? A higher inflation tire. In summary ... Consulting sources then here's our lineup 0-10 Hz Leaf springs 10-50 Hz Dexter Ez-Flex (per their spec) 30-100 Hz 40 PSI trailer tire (various internet sources and AI summary) 50-250 Hz 65 PSI trailer tire (note a healthy high frequency band not covered elsewhere) So that's all I'll say on it. My position is that going with a lower inflation level of say 40 Hz is simply giving your Ez-Flex a break. I run at the factory 60-65 psi you can see above, and that inflation level shifts the frequency absorption to a region not covered by the rest of the suspension. In addition to the wear/mileage/stress, a lower pressure is counterproductive and leaving the higher frequencies free to transmit to the trailer, exactly what you don't want. I went down this trail to find out what I was seeing, which was at my 65 psi I saw little to no vibration in the trailer and the suspension system handling it all. Again I'll try to provide some clips to illustrate this. No need to go over what's been said before as I've studied those threads, but I'd love to hear a counterargument
-

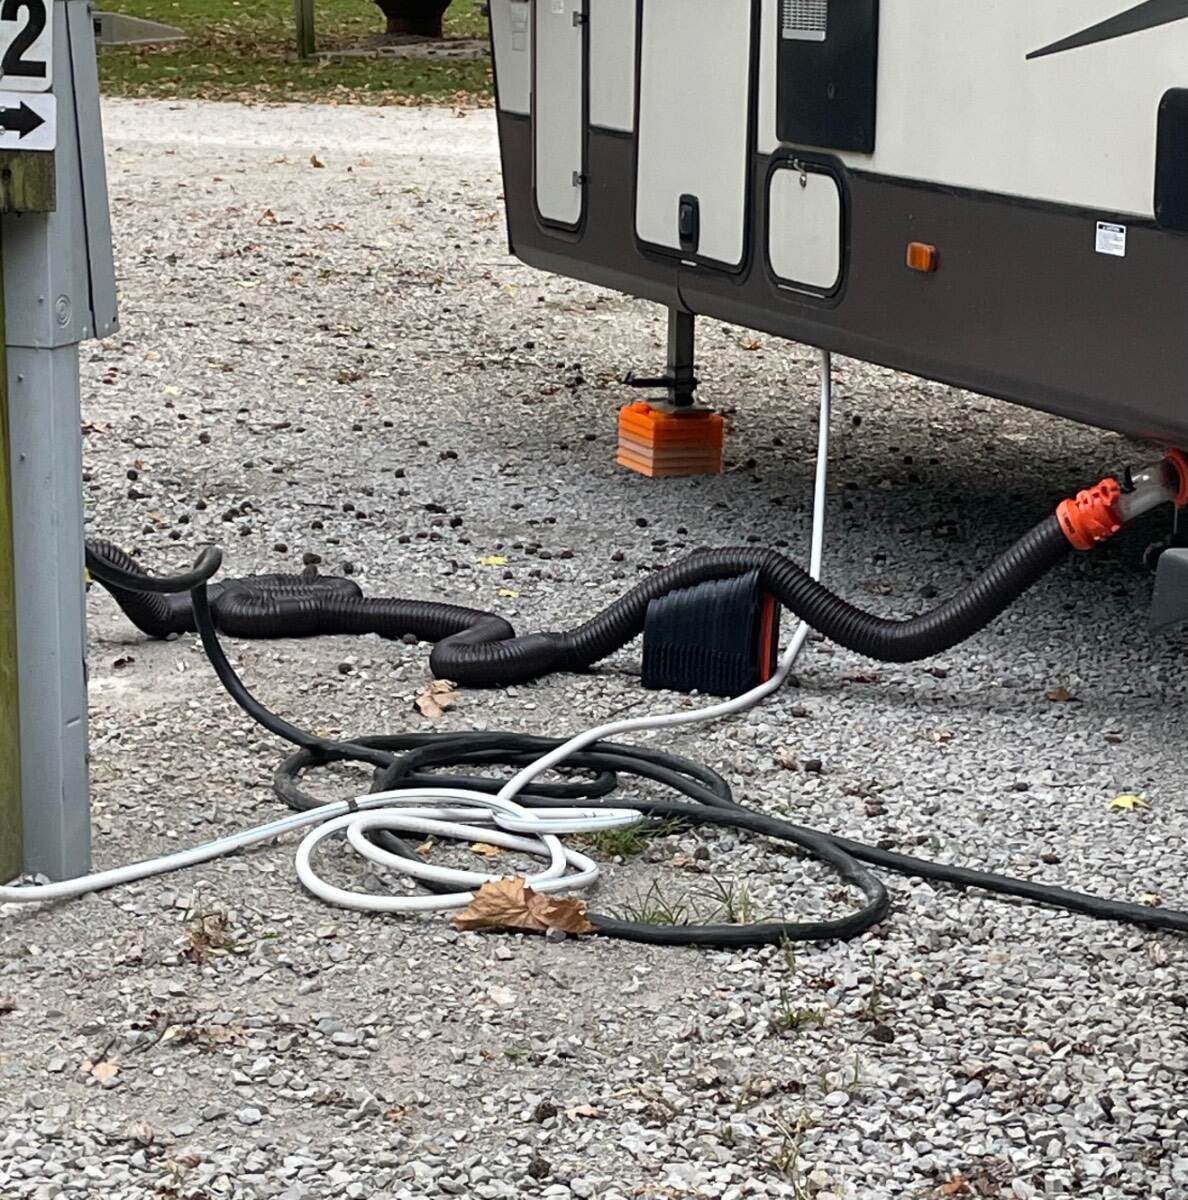
I’ve been using my sewer hose support wrong
Townesw replied to Townesw's topic in Mechanical & Technical Tips
There are only (3) rules of plumbing: 1. **** flows downhill 2. Payday is on Friday 3. Don’t bite your fingernails Bill 313 -
For fun here's a clip of the suspension. Unsteady cam as I was hand holding while driving. Most of the trip was like this, pretty uneventful. Like I mentioned it took a good hour of keeping my eye on it for a pattern to emerge, which is the suspension is doing it's job, but it looks undersprung. Also when there is a pothole it just rattles the heck out of the suspension and over all there appears to be very little making it to the trailer. Not seeing any flex or vibrations in the panels. Taking my last trip with the Dexter this week before I install the Alcan. I have a mount setup I think and will try to catch some 'money shots' 😅 SuspensionClip.mp4
-

I’ve been using my sewer hose support wrong
topgun2 replied to Townesw's topic in Mechanical & Technical Tips
So? What's the "problem"? They got the water hose OVER the electric cord, they got the sewer hose positioned such that it has a "P" trap. Everything is nicely coiled so as to reduce tripping hazzards. -
 You've lost a ground connection! There are several yellow "home-run" ground conductors in the space behind the master switch panel. Each of them splits off to feed various circuits including a ground wire to each of the switches for the LED indicators. It's a tangled mess of yellow wires and splices in that space, and the loss of one of those ground connections could cause all the symptoms you described. Start from a switch where the LED is not working, and trace its yellow wire to the multi wire splice. Use the ohm or continuity setting on your multimeter to verify there is continuity to ground. See the post titled "I was awakened by flashing blue lights!" to see a picture of those ground splices, and to see how each switch has a yellow ground wire for the LED indicator. Also note that some of those ground splices are jumpered together. If you fed your LevelMate (+) from the hot side of the awning switch, then I assume that you probably tapped into one of those grounds for the (-). If that's true, then that splice would be a prime suspect! Hope that helps! Cheers, Geoff
 -

I’ve been using my sewer hose support wrong
Rolind replied to Townesw's topic in Mechanical & Technical Tips
Well yeah! I can only imagine what is going on at the dump station! -
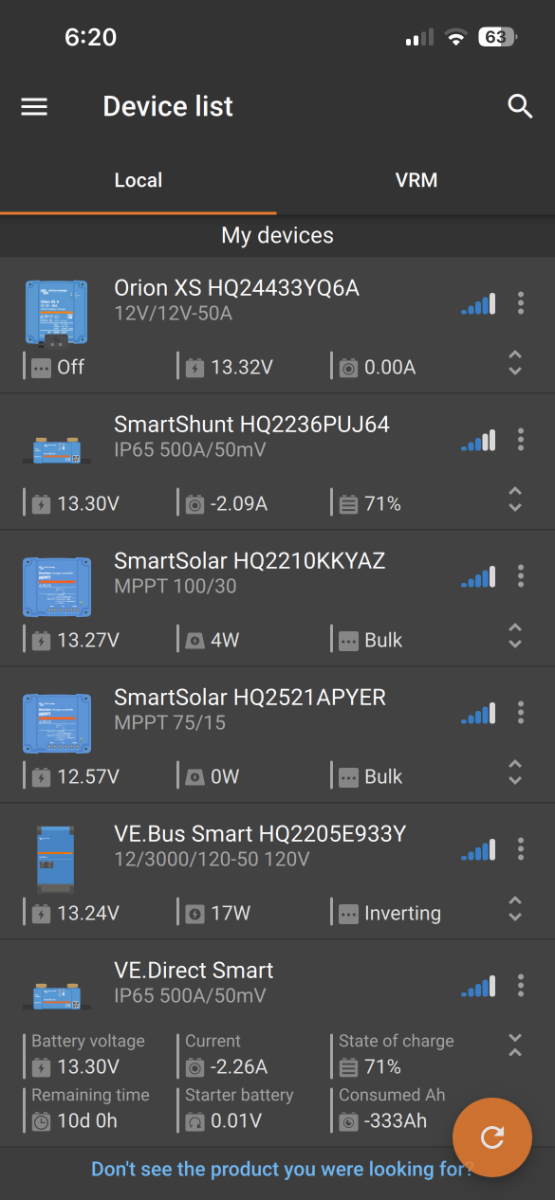
Complete Victron, yeah! 😎

- Yesterday
-
Apparently this is how you’re supposed to set up a sewer hose support Bill 313
-
Chris, I wrote about this in my install thread. You can keep the tray if you remove it first and machine cut the steel back wall off the tray and reinstall. The inside battery would hang an inch off but I believe Steve told me they added a longer base sheet inside the tray. Either way 3 in line will just barely fit inside. Notice the change in direction of the straps to hold three together on the tray. Too bad they didn’t show this part of the installation in the video. I was going this route but after removing my old tray, the sliders were crusty and the tray itself weighs 30 LBS. I prefer it without the tray which allows for 2-3” extra height too. I can check/tighten the bolts and remove the main ground as they sit on 3/4” rubber and foam insulation surround. With the tray, it has to be rolled out for battery post inspection or disconnect.
-
I see Steve was able to fit three 300ah batteries into his tray. Didn't you have to remove yours to make them fit? Different size trays, or did battery dimensions change?
-
 It’s easy to test for voltage on either side of the awning switch. Your LevelMatePRO has been working, so it should be wired to the right side. Where is the LevelMatePRO grounded? You have an odd set of lights out, others working. I don’t believe they’re wired like Christmas lights! See if a ground came loose common to all dead circuits. A ground that’s open will not blow fuses and your fuses are good. Good luck with it and let us know.
 -
 Copy/pasting reply from FB Thanks John. We’re only out for a few days, so I’m going to wait until we get home to try tracking down the fault with my good meter instead of the $10 travel one. I know the fuse is good, because the other lights on the circuit work. Yes, the blue indicator light are what I’m referring to, plus’s the upper cabinet lights. It’s most likely a wire disconnected somewhere. I had the switch panel by the door out, and the access port behind. Tugging on wires didn’t result in anything loose, but it could also be a bad switch. It’s just odd that some indicator lights work and others don’t. And on that the indicators that don’t work, the device they operate do function correctly except the upper cabinets. They all worked two days ago, so something bounced loose or failed while on the road.
 -
Yes, and they just look better in white!
-
Welcome to the Big Boy club! 🤣 Three (3) Forum members now have 900 Ah Epoch (one with 920). 🤠
-
 AI response
-
Three years ago I wired my LevelMate Pro to the always hot Street Awning switch, and that has worked fine until yesterday. After a drive to our accommodations for the weekend, the LevelMate wouldn’t power up. But the awning did. So apparently, I hooked into the indicator light terminal on the awning switch. Then I realized that several of the switch indicator lights didn’t work, nor did the lights in the upper cabinets. But other indicator lights do work, as do the closet outdoor, and cabinets lights and other interior lights. So, I figured a wire on the indicator light circuit pulled loose, but after pulling out that messy jumble of wires behind the switch panel, I can’t find anything loose. And that wouldn’t explain the cabinet lights not working. The fuse is fine, and is the same fuse as the other cabinet lights. This led me to the possibility that either the indicator lights, the upper cabinet lights, or both, are run in series instead of parallel, like on those impossible to fix Christmas tree lights. The wiring diagrams I have do not go into that detail. Has anyone had upper cabinets light or indicator light problems, and can steer me as to where to look? It isn’t trip critical; just an inconvenience. I’m rewiring the Level Mate to the other leg of the switch. Thanks for any suggestions
-
Finished the coating, looks great! In the long tradition of 'you learn how to do it when you finish' the bottom half is the best job. The mistakes were all in applying the coating. You have to be really careful applying this, constantly rechecking for any high spots that didn't get rubbed out. Looking from different angles for reflections is the only way. And don't underestimate the flashing off period, its hard to wipe off good coating that hasn't cured but the longer you wait the harder it becomes. The problem is this stage is at the end when you're the most tired. I've got a number of mistakes on the top half. I also was super braindead on the street side bottom and just compounded with Cutmax 06 04 and a microfiber pad, instead of EX 04 06 and a foam pad. The numbers refer to cutting power (e.g. Cutmax 06 XX) and polishing (Cutmax XX 04). Microfiber pads are more aggressive. Anyhow that evening I realized my goof, boy was that upsetting but you know what? You can't tell. They're sending these out now with mirror finishes and the polishing stage doesn't visibly add much of anything to the compounding. I'd still do it as its an easier step, but fortunately with this combo it doesn't matter so fuggit about it! So fixing those coating mistakes on the upper half, today I'll work on that. Gemini recommends using the Sonax EX 04 06 on those, alcohol wipe and reapply. Nobody else will notice or care but I'd like to do the best job I can so will work on that today. And upside is now I'm experienced enough to do my truck. Fiberglass is really forgiving so that was a good platform to learn. I'm saving $10k probably doing it myself for truck/trailer, and I'm doing more than any shop (all the extra bits), so time well spent. Good muscle workout and I enjoy being out with the trailer as it's a lovely storage lot next to State Park.
-

Complete change-over to Victron equipment
Mike and Carol replied to ScubaRx's topic in Ollie Modifications
Steve, quite an impressive install! Mike -
Steve, cool vid. So glad to refer you to Easton at Inverter Services and he got you all taken care of. He handled all your upgrades exceptionally well. As previously post, Easton installed the same outstanding and comprehensive Victron system on XPLOR Hull # 634 after we returned from our 54-day trip to Maine last fall. Nothing like a super clean professional upgrade/install. I highly recommend Inverter Services and Mr. Easton sure knows his way around Olivers!
-
Try THIS THREAD for more info on colored Olivers Bill
-
If that were the case then Glacier would not be full either. They got a bunch of those furry creatures up there - at least everywhere we went both inside and outside the Park. Bill p.s. enjoy the heck out of that area - it's special
-
For those that have never had the chance to see the interior of the Outlaw Oliver, be sure to look around during this short video. Steve and Tali have switches for switches and extra "lifts" for the beds that increase storage room a bunch. Bill
-
Also - do you have solar panels? Do you have a solar panel cut-off switch? do you have an inverter? Is it on or off? do you have a fridge that runs off DC power (i.e. a three way fridge)? If yes then what setting is the fridge on (a/c, d/c, or propane? Bill





.thumb.jpg.e34bf01ef7f7d5e99ad31856d45afbeb.jpg)