All Activity
- Past hour
-
Thanks for the help everyone. I unplugged the rj45 plug behind the white connector and plugged it back in. Then I did the same to the one under the heater, The two wires going into the splitter and the one going out. Then I did the same to the rj45 connectors in the overhead behind the control panel. Turned the power switch outside back on. Ensured the switch on the heater was on. Turned on the control panel, went to settings, and reset. Still does not recognize the heater or hot water. I placed a ticket with Oliver.

- Today
-
I had Suncoast Designers rebuild three of my windows several years ago and they did a good job. They remove the entire window, completely disassembled it, disassembled the individual sections, fixed the seal, and reassembled everything and put the whole assembly back in the trailer. They rebuilt both the fixed and the movable sections in order to provide a complete lifetime warranty. Complete disassembly of the frame requires the astragal to be removed by drilling out the pop rivets and replaced with gaskets and pop rivets again. If only the moving panel needs to be fixed, that is easily removed by removing the plastic/rubber track material first then the window just lifts out. After they removed, rebuilt and replaced the windows I had to reseal the frame to trailer myself. Not inexpensive but at the time I had mine done they had a lifetime warranty. If you can rebuild them soon, before any etching takes place between the panels, they can reuse the original glass. They have a fairly large parking lot and nearly every spot has electricity and water so that you can stay in your camper. Also, there used to be a guy at Quartzsite during the big tent rv show that would rebuild windows but you had to remove your own windows and deliver them to him. I have never met him but I know of a couple of Oliver owners who have had windows fixed by him.
-
Probably talking about this place- Suncoast Designers. Haven't used them myself, but I have heard good things about them. They provide a lifetime guarantee to the original owner too.
-
I wonder if the 2022 models can be fitted with the 2027 windows...
-
I Just recently had CGI do the annual touchup on my camper and they told me about a new service they are offering. It is a durable protective gloss film that they apply to the front of the camper. Might be a nice thing to have if you like getting off the beaten path (gravel roads, ALCAN Hwy, etc.), it would help protect the gelcoat from chips and make it easier to keep clean as well. Lasts 5-7 years or more typically and is generally easy to remove/replace. Not cheap but makes life easier and protects your investment. Short video link: IMG_8147.MOV
-
- 3
-

-

-
For the water heater w255w indicates the outside switch is off. w255h could simply indicate there’s no power to the furnace. Check your fuses and circuit breakers.
-
Most window shops will not handle RV windows. This happened in a bad way to the Bigfoot we had, where the vacuum seal between the pains had shrunk, cracked and moisture got inside clouding it up. I found a shop in Mesa AZ that specialized in this, but sold the RV before I had any work done. Yes, the entire window assembly is removed. Then they disassemble the frame to remove the glass sections and strip the seals along the edges, between the panes. They clean the glass thoroughly, seal the two glass pains, rebuild the window assembly and reinstall. At the time 4 years ago they charged $90 a panel which is a great price if you only have a few, but gets expensive for a lot of panels. Between Mesa and Apache Junction AZ is one of the RV capitals of the country. There are several hundred RV dealers, 100s more service centers, parts distributors, etc. RV business is big here. Maybe unlikely to have this kind of service company in Maine and other small markets, but worth asking at some of your local RV shops. I'll locate their contact info if anybody is coming out this way next season and is interested. I did replace the glass on our main living room window on the bigfoot instead. Bigfoot service gave me contact info to the window manufacturer and I was able to buy glass panels, the fuzzy liners, rubber borders, etc. Maybe Lippert service with the ID tag Bill showed, replacement panels and parts can be purchased. You must remove the blinds, then all interior screws to remove the interior section. Then the window is removed from the outside. Get some putty knifes under the outer lip to cut and loosen the butyl. Once the entire window assembly is removed, you will find small set screws holding the frame together and the stationery glass in place. It's a bit of work. Of course, have the parts or a way to reseal the double pains first. Take pics as you go. Clean everything in and out. Reassembly should be straightforward using new butyl for the main seal.
-

Entry steps steel rod, broken weld
trekhard replied to Olive2Roam's topic in Mechanical & Technical Tips
We had the same thing happen. I called service and got a spare but this was last year. I would try asking again. -
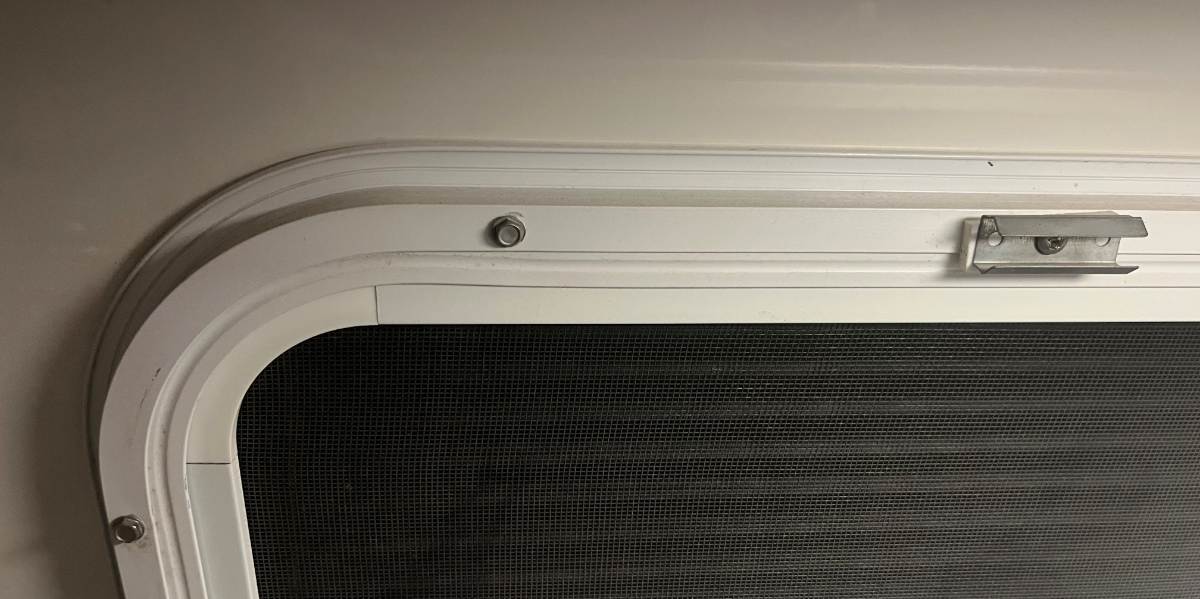
Oliver windows, how I hate them let me count the ways. Like others here I am now searching for replacements for the original windows. The only good thing I can say about them is they let a certain amount of light in along with an equal amount of water when it rains or snows. Otherwise they are a relic out of the early part of the 20th century. Just spent part of the last week cleaning and disassembly only for it to rain the next day with leaks galore coming into the cabin. Pipe cleaner wicking had no effect whatsoever. New mattress was soaked. Imagine buying a $100K car or truck and having to deal with such nonsense. I don't have a solution yet but am searching. To the OP I imagine one would have to completely take the entire window assembly out of the cabin to remove the stationary portion of the window. Surely a local window and glass business could repair one of the components if taken out of the Oliver and delivered to them? Good luck @dewdev with your repairs.
-
First thing I did was to replace the TV with a 32” 4K monitor, sound bar, and Blu-ray player in the attic, all Samsung, my brand of choice. Love your thrift store finds! We use the Furrion for occasional FM radio, CDs and Bluetooth. I disconnected the HDMI from Furrion to the TV. When it goes, I should make the space into a cabinet since ours has the huge cutout for the older DV1200 model.
- Yesterday
-
Additional information on our 2015 LE2: Contacted Oliver and they said my window is a Lippert brand and they gave me this link: https://support.lci1.com/8800-series-windows Here's a photo of one of the identification tag on one of our windows: Started searching on the Lippert website, if I find good video for window removal, I will post it.
-

Furrion Stereo Upgrade: A Sound Choice
Galileo replied to Snackchaser's topic in Ollie Modifications
We had the Furrion DV1230 in our LE2 and it failed after about three seasons. We mostly play DVDs as we’re often in no-signal areas. Basically, the CD/DVD drive failed. Founds an exact replacement on Amazon (where all good things come from) and dropped it right in. With the full-sized remote, it seemed like we were back in business. Passing through some town a few months ago, we found a complete 8-season DVD set of the West Wing at a church thrift store in Pagosa Springs, CO. While I wasn’t a rabid fan, it looked too good to pass up. $10 for the whole 30+ DVD set(!) We enjoyed the whole first season in about 4 days. We had a small about of skipping and drop-outs that I attributed to scratched or dirty discs. Hitting season two - I couldn’t get any of the discs -except- the “special features” ones to play at all in the Furrion. That was true for all the remaining seasons. My brain started working. On a hunch - we visited another thrift store in Washington, UT and bought a used/donated Sanyo Blu-Ray/DVD player for $7. Another $2 bought an HDMI cable. Hooked it up to an unused HDMI port on the ROKU/OON television we replaced the original on with. EVERY disc played perfectly! Verdict: If you didn’t’ have enough to dislike about the Furrion DV1260 - add to it that it won’t play some DVDs. I’m guessing this has to do with the “multi-layer” technology of some high-capacity DVDs. The Sanyo Blu-Ray player now resides in the cabinet above the television. The remote even works through the translucent cabinet door. Cool! Im debating mounting the player under the cabinet above and to the left of the television. That will make changing discs a lot easier. I can likely use 3M “Command” strips to mount it without drilling and keep it damage-free. -
@dewdev , I have a different reason to remove the glass, but have the same question on how to remove the glass. Believe the previous owner might have put darker tint on Ollie's windows, now they have etched window spots. I'm thinking about replacing them. Thanks for starting the thread!
-
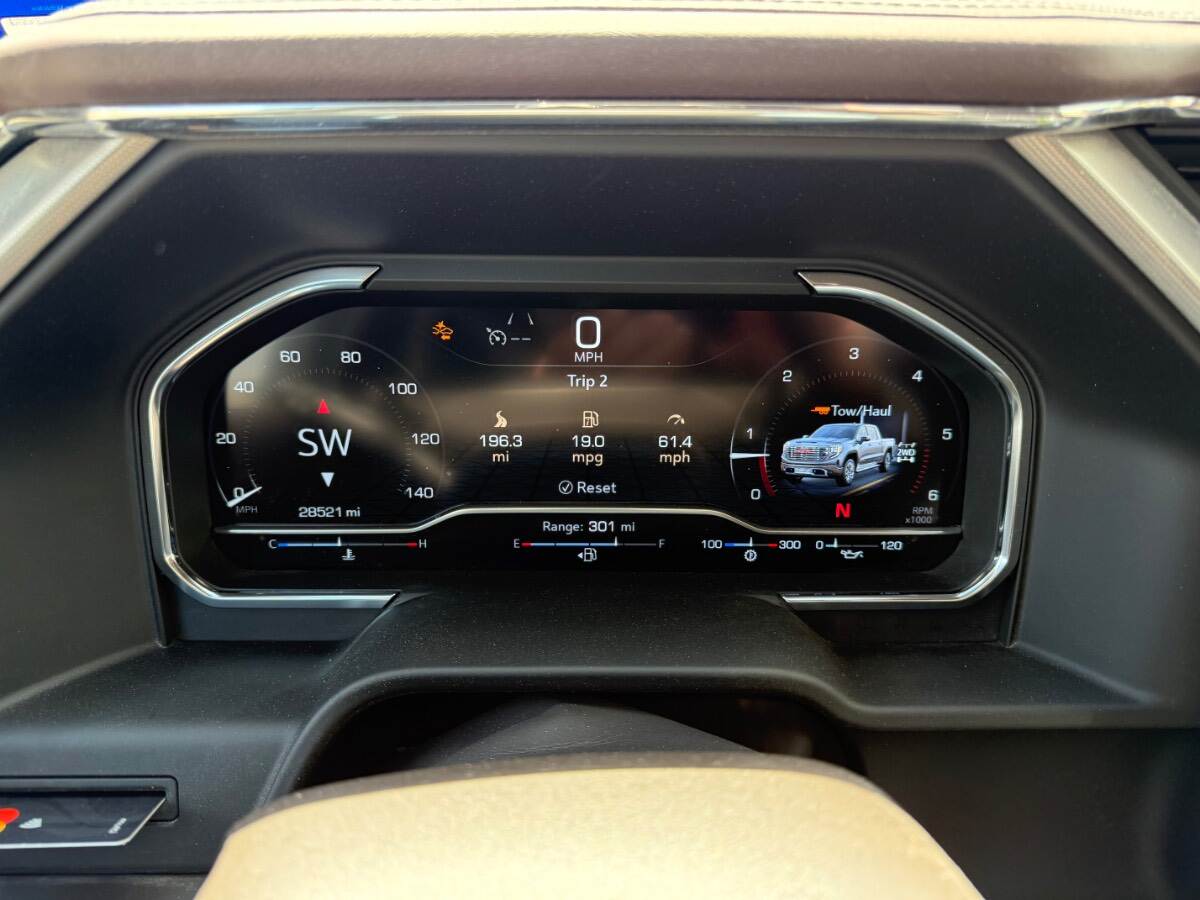
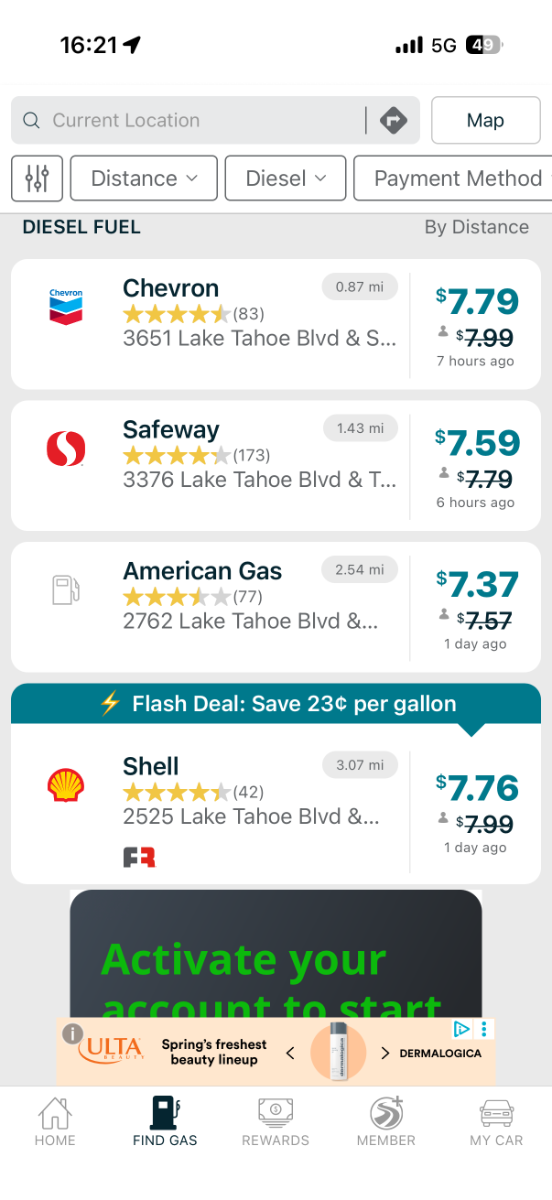
Looks like the RAM REV 1500 (Range-Extended EV) or whatever they’re calling it this week - won’t be hitting the dealers until closer to 1Q27. I was hoping to have an option for when I’m ready to trade in the 2025 Sierra Denali. I like to trade vehicles while they’re still worth something. Though - seems the rig I have is still the most efficient one available - and I’m getting great mileage. Which is nice thanks to the $6+ a gallon diesel. (Considerably higher in touristy areas!)
-
Try a PM to SeaDawg. I know that she had this issue and a "local" (Florida) place solved the issue for her. Bill
-
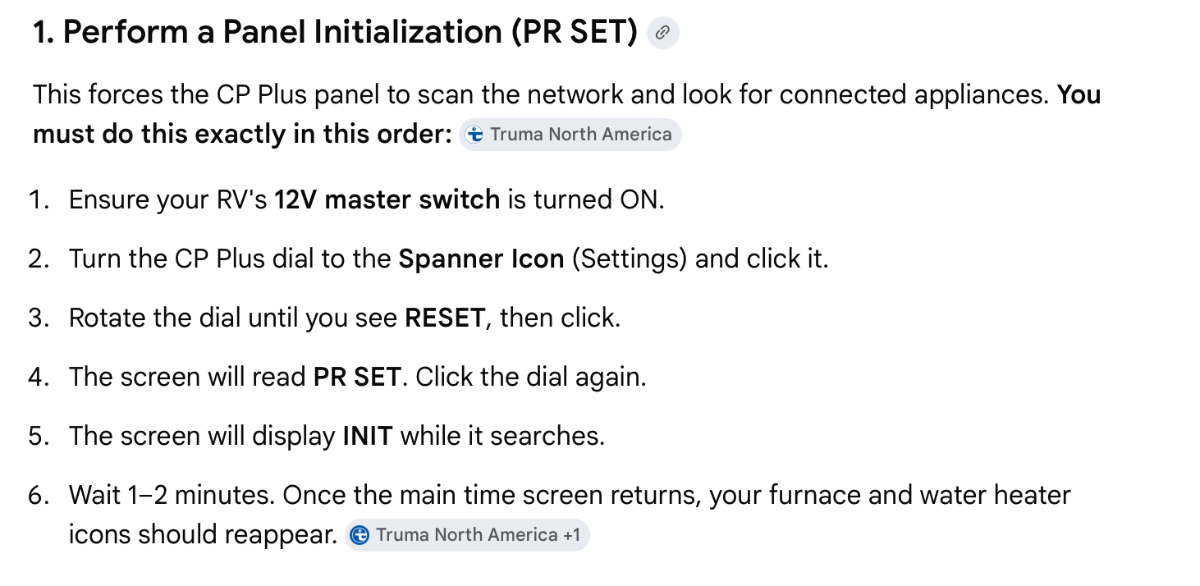
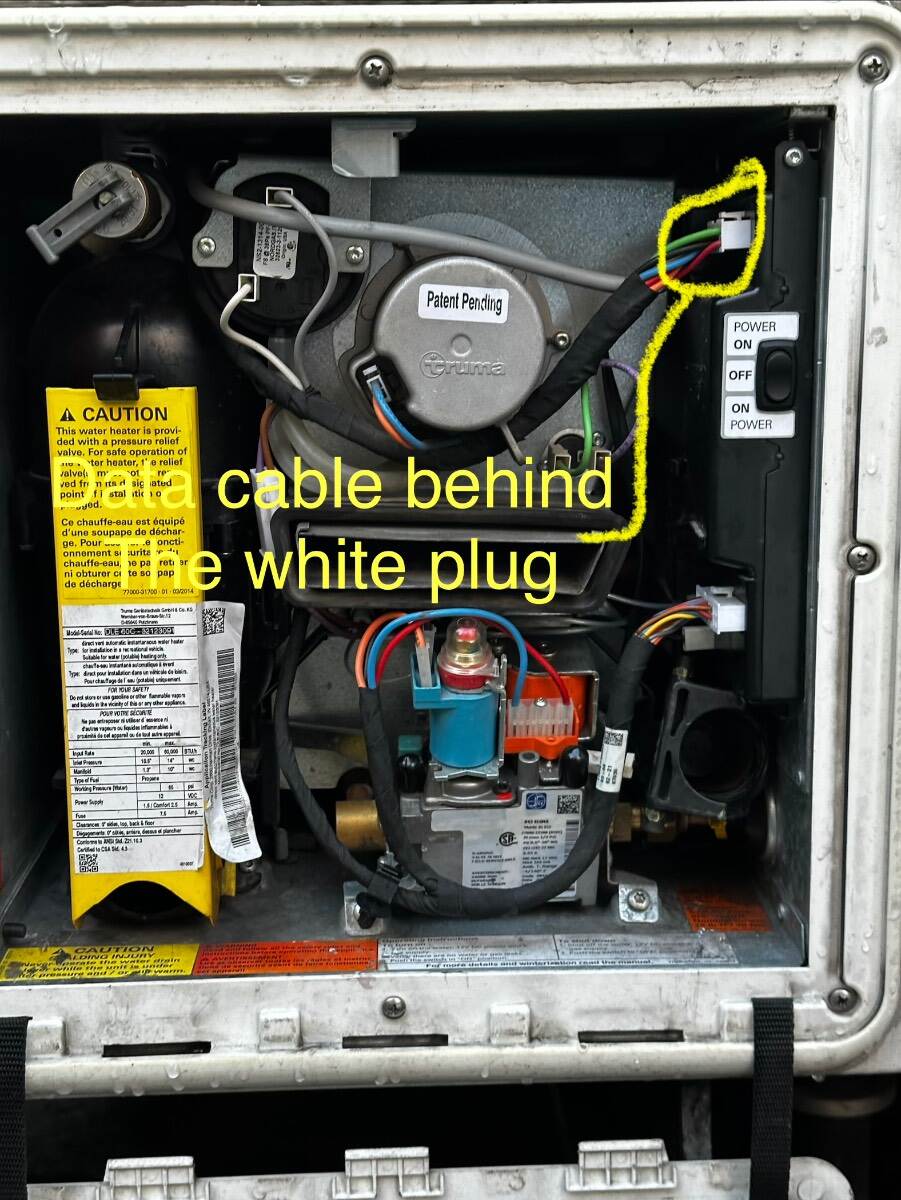
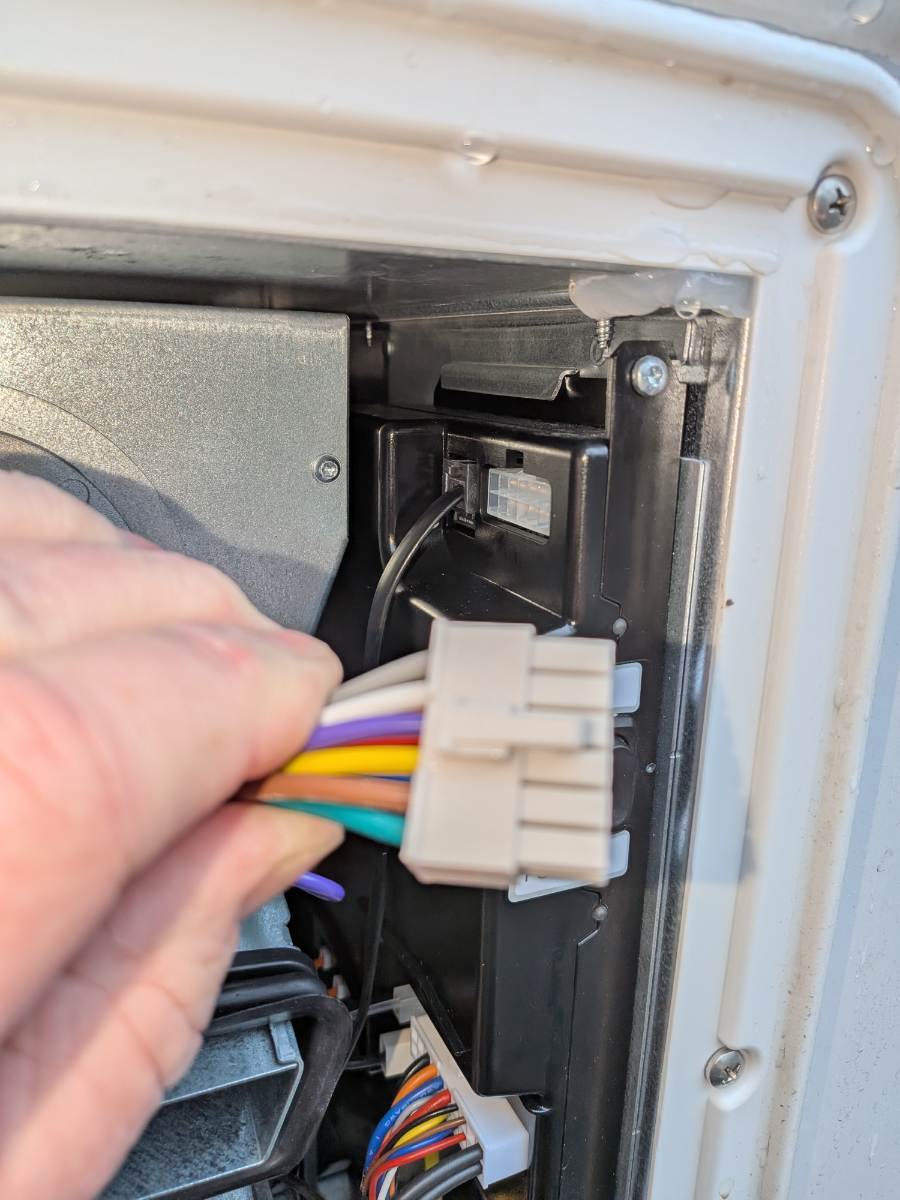
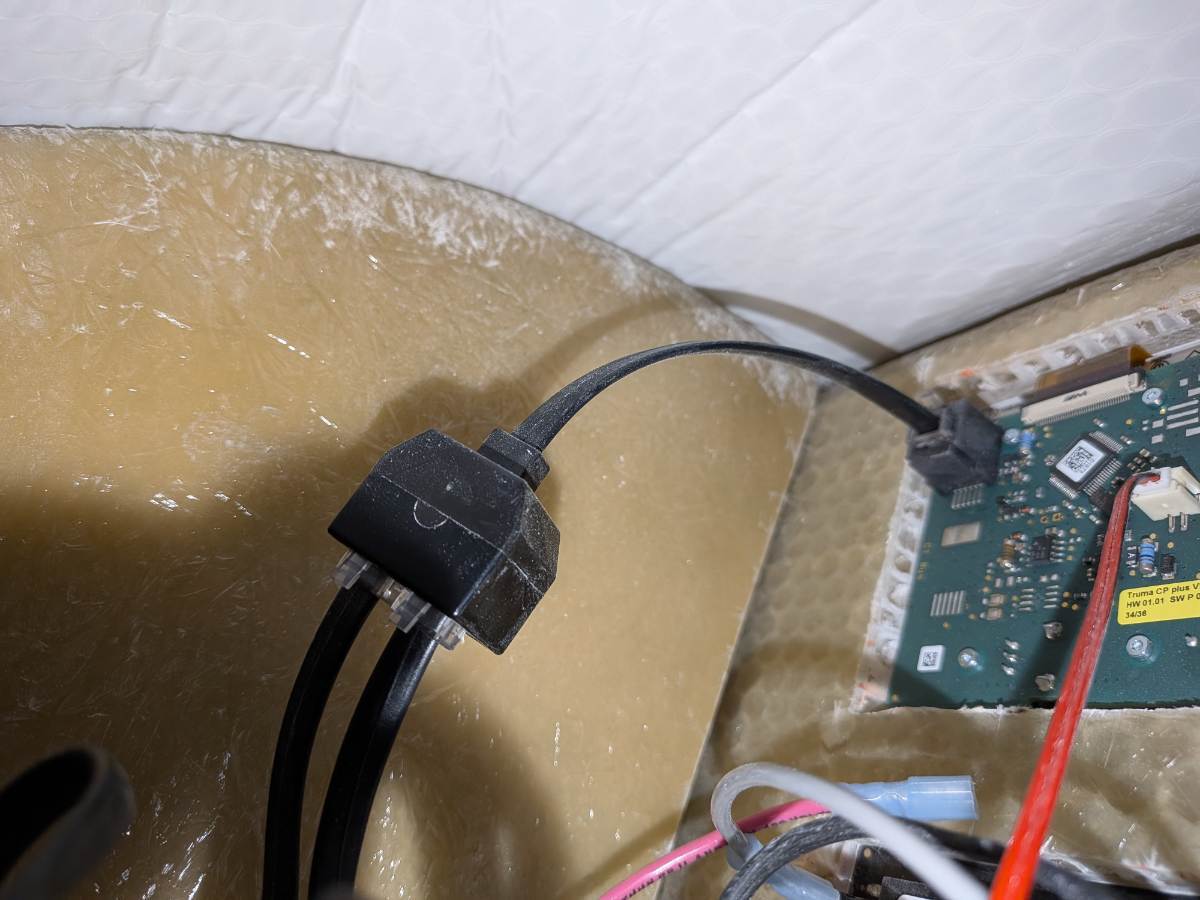
There are a few places to check the data connections: 1) Behind the water heater power connector as show in the video. 2) Under the curb-side bed there will be a junction connector where the data cable from the furnace and the water heater data cable are connected (see photo below). 3) The back of the display unit In terms of re-initializing the system, I found this: Note: I believe that there is also a power switch on the furnace itself that is accessible under the curb-side bed, on the furnace itself near the wall by the gas connection ( if I remember correctly).
-
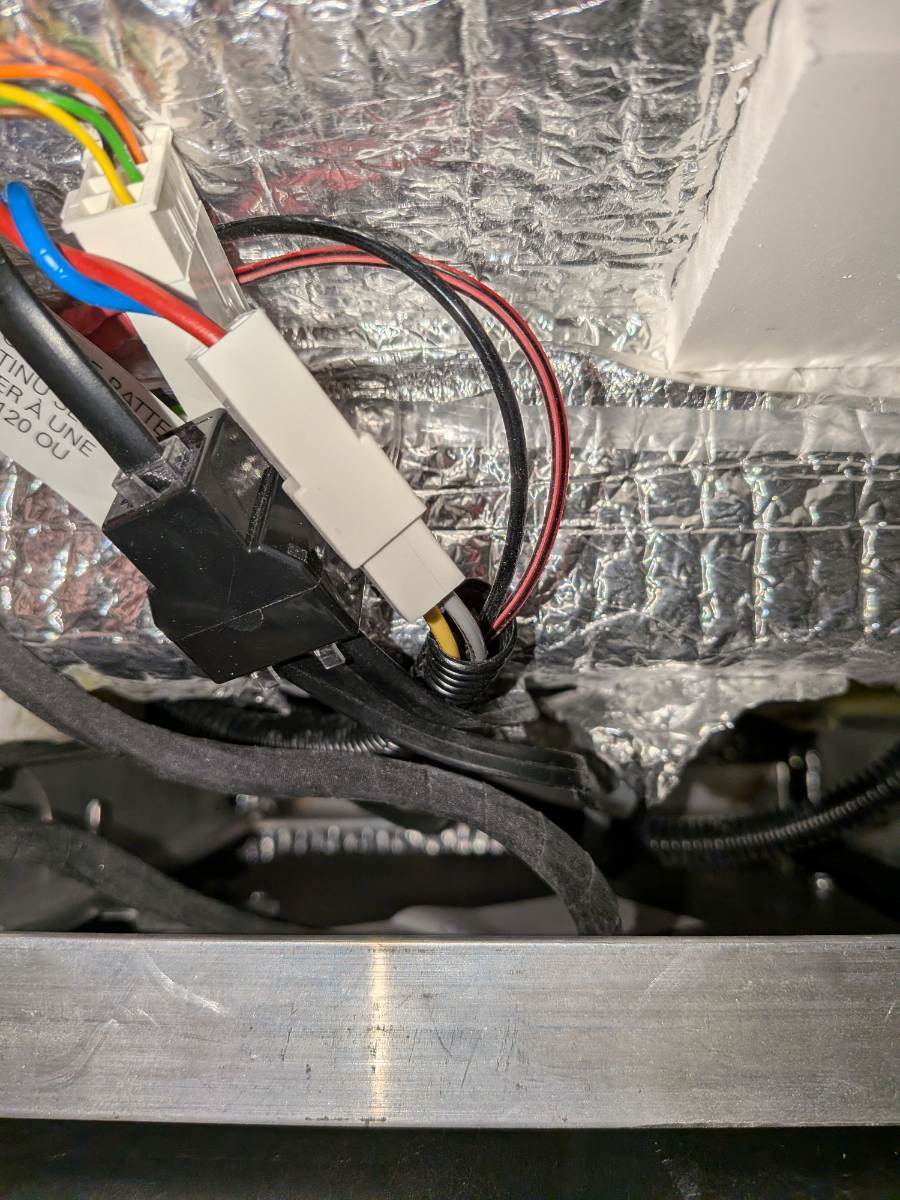
Disclaimer - I have zero knowledge of these units, I 'm just going on basic trouble shooting methods. If you did a factory reset on the CP, then it probably needs to be re-paired with the devices (furnace, Water Heater, and AC ... assuming that the AC is also a Truma). Start by going into the CP setup/pairing mode to see what devices are connected and/or available for pairing. It could be that the furnace was never paired during initial setup. The manual should have instructions for this. If the Furnace is not listed, then check the furnace fuse because it needs to have power to talk to the CP. Next check the LIN cable as @Galway Girl showed in the video, only it's the one for the furnace not the water heater because you said the water heater was working fine. Look closely at the pins on the LIN cable, they could be bent and not making proper connection. If the furnace end is fine, then check the CP end. Last but least likely, the furnace board might have issues. This is a good start, but there could be other problems to. Hopefully someone with more familiarity will chime in. Good luck and let us know what you find
-
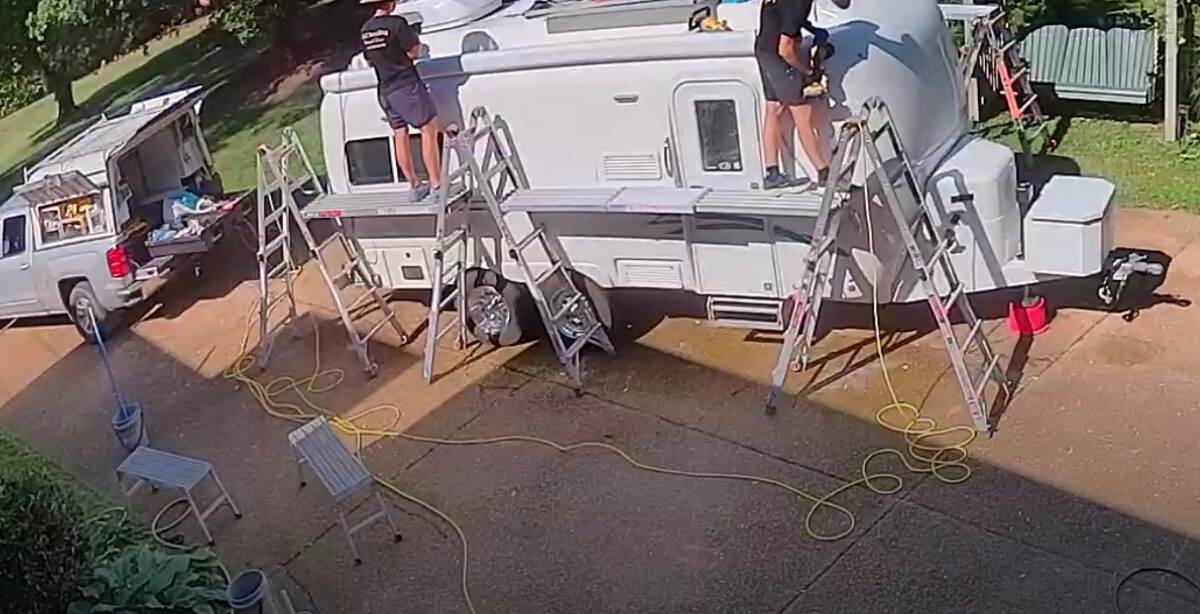
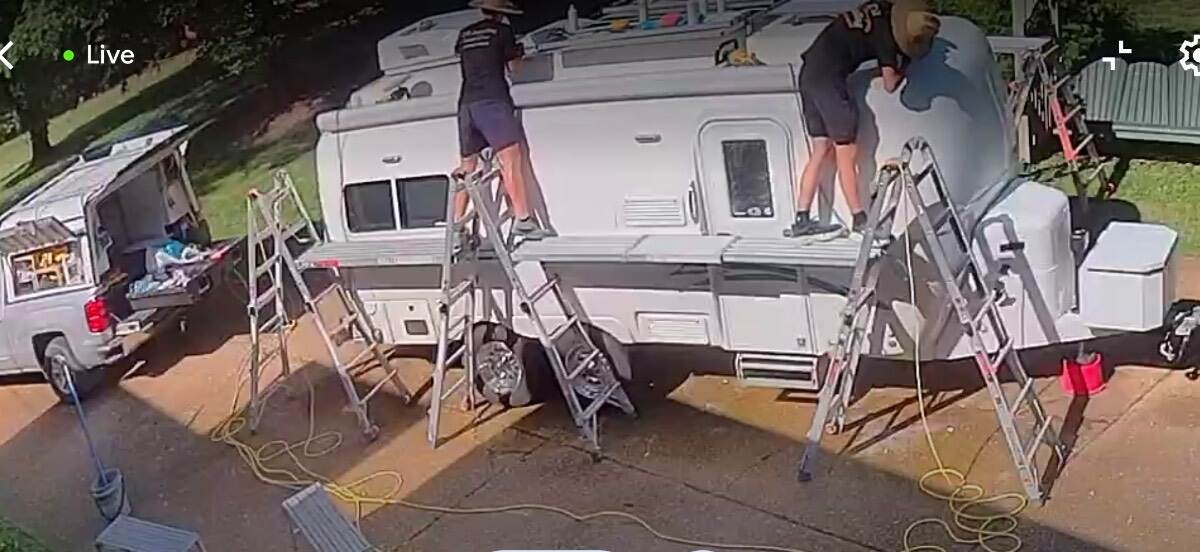
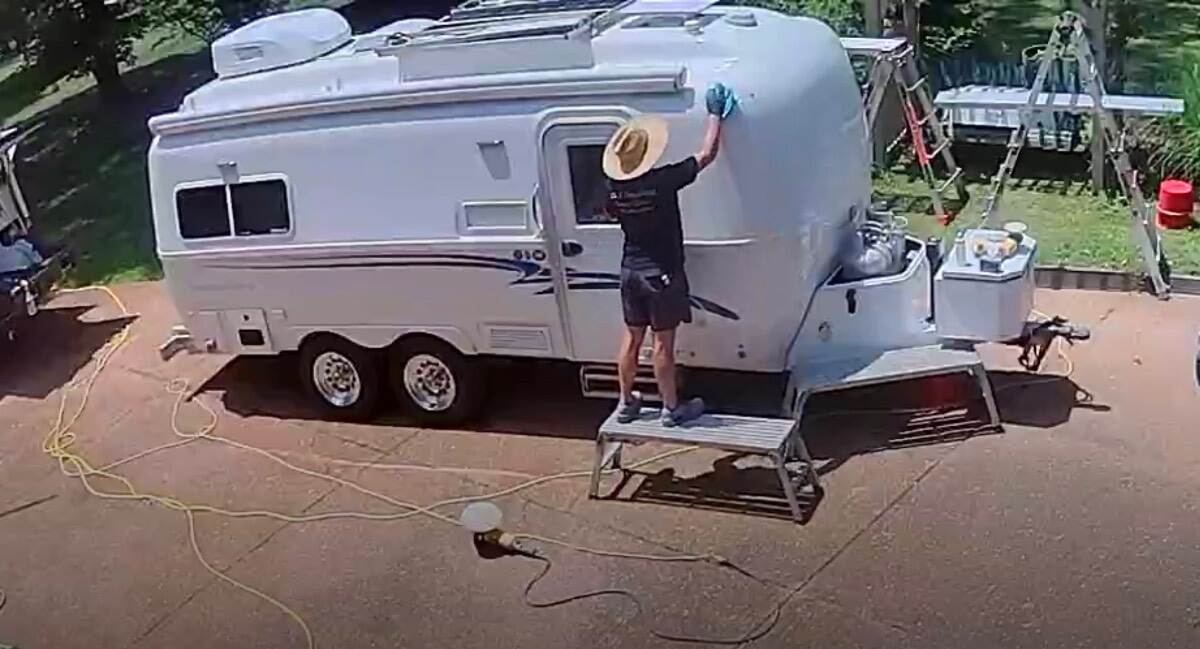
Collin and Gavin (CGI Murfreesboro, TN) did a superb job on my camper right before they left for Maine. I always tell them, “It looks better than new.” Worth every penny for the annual job. If I lived in Maine and owned an Oliver, I would definitely take advantage of their skill set while they are there.
-
I know there has been a bit of discussion on replacing window glass in hte past, but the search function did not find what I was looking for, so I would like some input from those in the know. One of my fixed (not slider) window thermoglass panes is clouding between the panes. I am guessing there is a break in the seal between the thermopanes. Has this happend to anyone? Has anyone been able to have just the glass replaced? How would I get this fixed window removed to take to a repair shop? Can any glass shop do the replacement? Thanks
-
For truma communications between devices on the inside controls they use a data cable with network or phone style connections. There should be one plugged into the right side of the water heater looking from the outside above the power switches and behind the larger white cable connector. If it’s plugged in then check the other end at the control panel. IMG_7831.mov
-
I just picked up my new LEII on Tuesday and stayed at Oliver for 2 nights to test everything out. Had no issues and headed back home to western NC. It was cool in the mountains this morning. I realized that I did not try the heater while at Oliver as it was in the 90's so I tried to turn on the heat. On the truma control panel, I hit the camper symbol and turned the dial to heat and set to 80 degrees and pressed the dial to confirm. The fire symbol showed up above the line but no heat and no fan. The hot water heater was working fine. After researching I found the warning triangle on the screen and pressed it and code W255H came up. In the manual it show this as a warning that the control panel is not communicating with the heater. I turned everything off then turned the control panel off. Then turned the Xantrex off (was running on battery. Turned Xantrex back on then Truma CP back on. Tried again and got the same error. I hooked to shore power and tried again, still nothing. Read the manual more and then decided to reset the Truma CP. Probably not a good idea. Now I have no symbols on the CP for heat or hot water, only AC and Fan which both work. I posted on facebook and here to see if anyone had any suggestions. Then I called Oliver and did not realize that they close at 11am on Fridays. Hopefully someone here or on Facebook will have a simple fix for me, if not I will reach out to Oliver after the holiday weekend. Happy Memorial Day and please remember all of those who gave us the ultimate sacrifice.
-
No, not at all, please allow me to explain! No detailer includes ALL the prep work, at least the way I see it! First, I removed all the silicone caulk around the windows and everywhere else. This is something detailers work around, CGI included. I removed the brackets for the awning, the surrounds on the taillights, the faces of the HWH and furnace, and every piece of trim on the doghouse and spare tire cover (see before/after pics) and so much more! Why? When something as little as the awning mount is screwed into the body, CGI or any detailer must polish around the item, never getting the fiberglass right close to the trim part. They must stay clear of these parts when using a power buffer. Remove two screws in two minutes and they can use a buffer machine over the full body panel vs. working around it. Meanwhile, I'm cleaning and detailing all the trim parts, replaced some with new parts, so the end result is far better. CGI is not doing this and nobody would expect a detailer to do so. I know the end result on Hull #113 came out WAY BETTER compared to merely "dropping her off for ceramic coating." I know the difference, but most people will not take it upon themselves to do this work. I even removed the Dometic Penguin, plugged the opening, and did not install our new Chill Cube A/C until my guy polished every bit of the roof, right up to the 14x14" hole! The gelcoat shines, even under our new A/C. It is apples to oranges, but not in the way you were thinking.😎 With my experience in auto restoration projects, it would be like me taking a car in for paint with all the trim still bolted on. Not my car! The painter would have to mask everything that should not be painted, might as well "go to Maaco! Years ago, when my '59 Chrysler 300E went in for paint and detailing, every single trim piece; lights, mirrors, stainless moldings, bumpers, etc. were all removed. The bumpers were re-chromed, the stainless straightened, dings removed and polished, taillights fully restored with NOS lenses, the list goes on. Afterwards, she won People's Choice awards at a few car shows. IMHO, $3000 is just too much to pay, though I've heard of shops that charge even more. Considering travel costs and the condition of our hull, the CGI price "starting at $3,000" would total even more. Once they advertised +$400 for their service at distant locations. We don't have that kind of money just to be pretty! Chris said once, "Why does an Oliver have to be shiny." Love that woman, for her common sense and everything else! October 2024 at the Texas Rally, I observed the CGI work on a few hulls. No question, they do very good work. Our hull was still pasty at the time. I was taking my time working mechanical and electrical mods first, waiting for when I could do this right. My extra efforts along with detailing work of equal quality together produced a superior result. At Quartzsite this year, there was not a better optioned or better looking hull. 😎 Not only IMHO, but from the comments of several other Oliver owners attending. I spent 2 years getting our Oliver optioned better than most and now our Ugly Duckling has turned into our Beautiful Swan. My latest restoration project is just about done. The pictures to follow show just one small example of the work required to fully restore a 10-year-old hull which had, and will still have, a whole lot of sun exposure! Glad we have the local guy who worked extra hours to get this right. Cameron will see our Oliver again, every year or two for a going over. I won't need to do all the work I did the first time. With his help Hull #113 will look good another 10 years!
-
 Tim - Note that Jason Walmsley is more of an IT guy and as such he wears a bunch of different "hats" at Oliver. In addition - this Jason (W) does not really "monitor" the Forum on any set schedule and/or continual basis. Therefore, it may be even weeks before he sees your message. The person in management that is responsible for Sales and Service is Jason Essary and can be reached at the email address that I provided above. While this Jason (E) (nor any other employee at Oliver) does not monitor our Forum, a direct email should be replied to fairly quickly. Bill
 -
 Thank you, I've written to J Walmsley, but he hasn't read my message yet. Tim
 -
Nope - there were no acorns or twigs in the awning. I use a little step stool and a Dewalt 12v blower prior to rolling them up to remove any tree trash that might have fallen. I think it was just a little of stretch in the fabric. After a small adjustment with the limits, all was fine.


.thumb.jpg.e34bf01ef7f7d5e99ad31856d45afbeb.jpg)