All Activity
- Past hour
-
That's a new one. It certainly was designed to just lift the license plate and remove the big nut. The cover can then be removed with the spare tire still attached to Ollie. Kindly post a picture. GJ
-
I learned something today. You have to take the bumper off to remove the spare tire cover. I sure am glad I am home on a cool sunny day, and not on the shoulder of I40 in the rain.
-
 I have another question related to upgrading to Lithium. My 2020 LEII came with a Xantrex Freedom XC 2000. Can the Xantrex Freedom XC 2000 be used with lithium? The 2000 watts has been sufficient for our life style although I would like extra capacity with the batteries that lithium would give.
 - Today
-
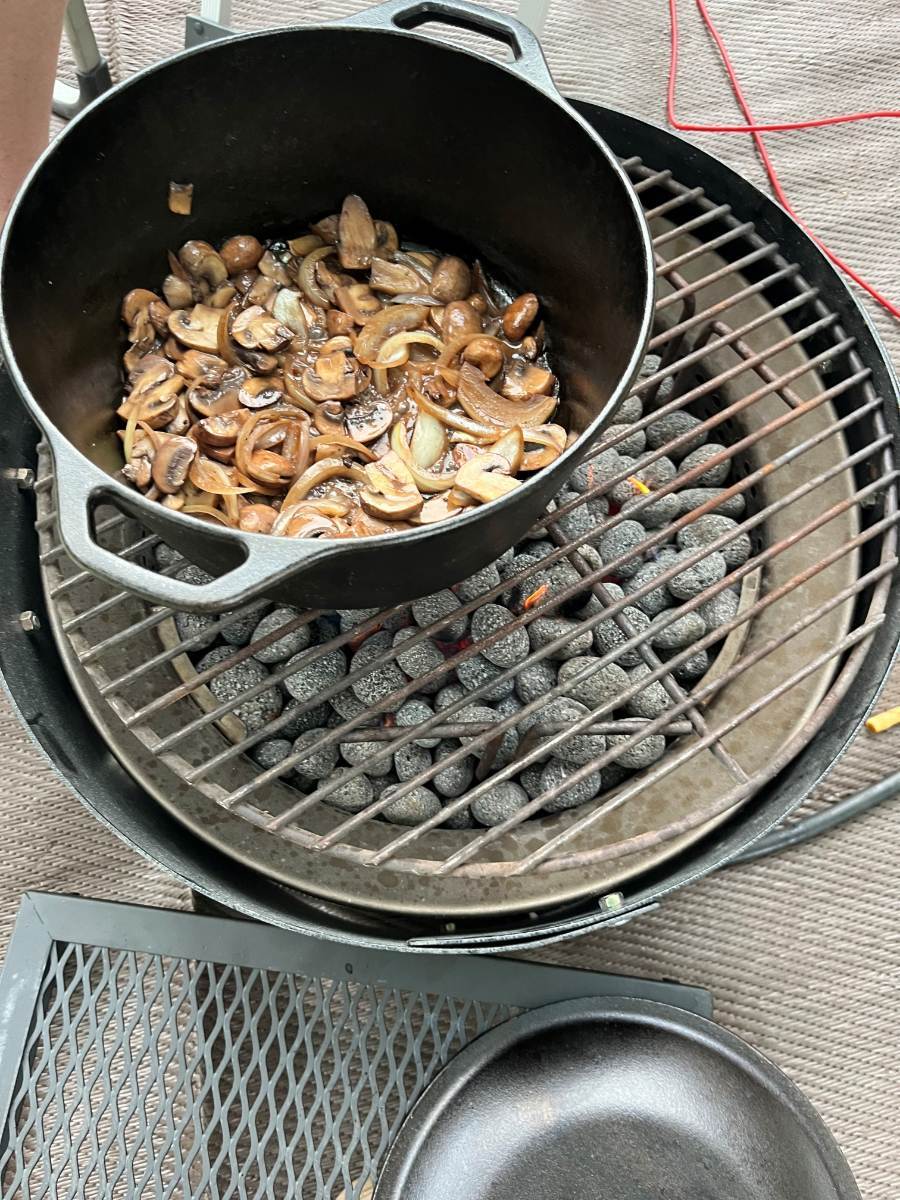
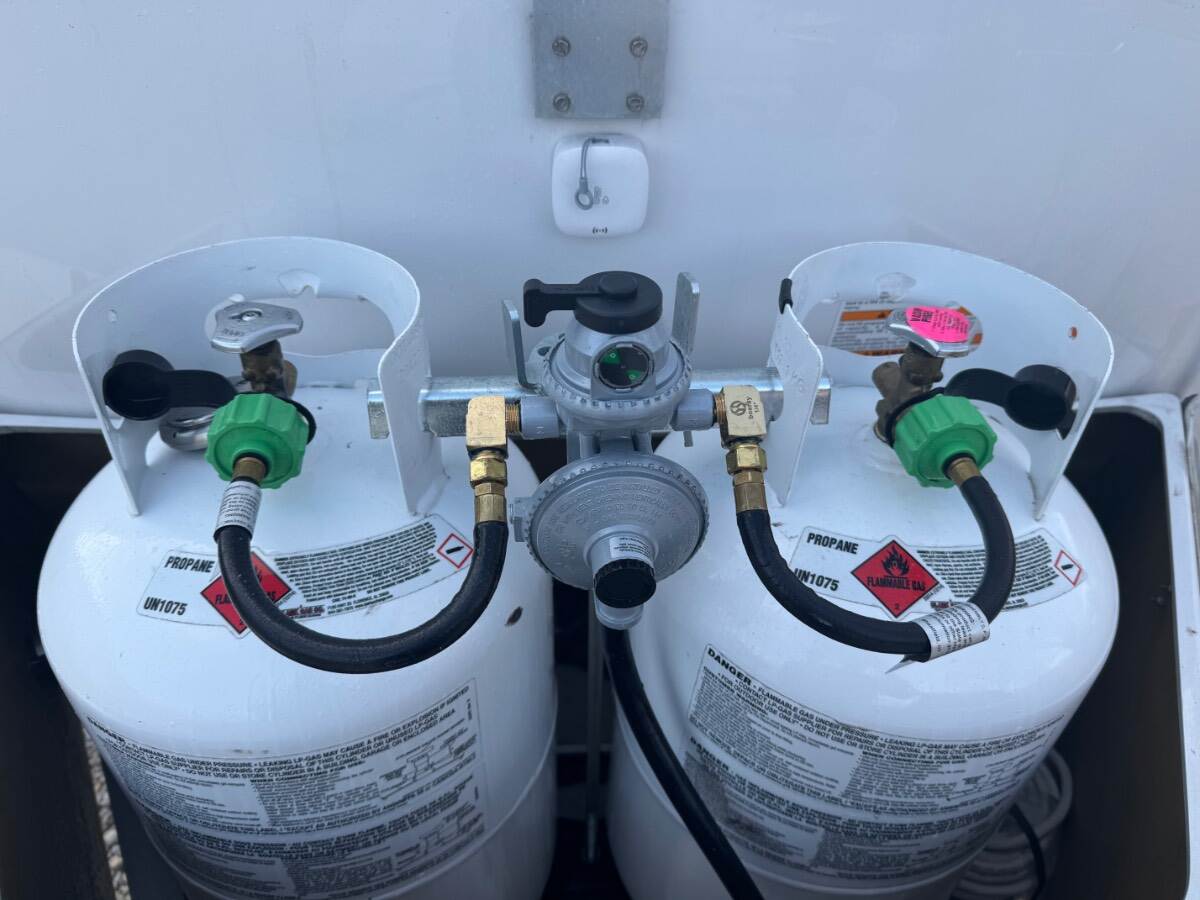
Sounds like a great setup! You do need high pressure if you want an outdoor cooktop requiring high pressure. I thought about adding a high pressure outlet, side-by-side to the OEM LP outlet front of the Oliver, but realized we don't need a high-pressure cooktop. For our Napoleon grill, or the Weber Q many use, Blackstone grills and our fire ring that we use everyday it's a simple plumbing fix to remove the regulators from all this equipment, then use the Oliver LP plumbing as-is. Chris can cook almost anything on the fire ring. That's a good use of LP, since we run it anyway for campsite warmth! I built a steel surround for the fire ring to allow it to run well in the wind and we have a grill top for high heat and a taller tripod to simmer foods (see pic). We replaced our OEM installed Marshall Excelsior MEGR-253 in January with the suggested Fairview model that I believe OTT installed in later hulls. This regulator failed immediately! First trip out it made whistling noises. Second trip out, making noise again, it shut down in some odd way. The fire ring kept burning, but no indoor appliance would start (HWH, furnace or cooktop). Then after 20-30 minutes, we could see the fire ring burning weaker and weaker. I had to disconnect both tanks and do a sort of pressure reboot and fortunately we did get the furnace and other appliances to work for a couple days to get back home. I wasn't going get stuck again, so I re-installed our original regulator for our next trip. I had trouble finding Marshall Excelsior products online except for Amazon, so I contacted the manufacturer. They suggested an authorized reseller that would back the 5-year warranty named Tweetys from Bulverde TX: https://tweetys.com/marshall-excelsior-megr-253h-excelaflo-automatic-changeover-regulator---high-capacity.aspx I went with the Marshall Excelsior MEGR-253H model, H for high output. Their tech support explained there is nothing wrong with running the H model and it would allow for running more LP appliances simultaneously. This is a well-built regulator and the one that's been working 10 years is now my backup. I tossed out the Fairview model since warranty claims on a $50 part is not worth my time, the return shipping costs and I would not want to chance installing a replacement. On occasion having a rear connection would be helpful. OTT installed one, but why in the bumper?! I'm not going to lower the bumper, push the waste hose out of the way to use it. We only open that at the dump station! I thought of moving it so to be accessible, but so far not worth the effort. OTT should redesign this, mount it like they did the front outlet. We added a 12' LP extension hose with a Y-adapter to run the fire ring and grill.

-
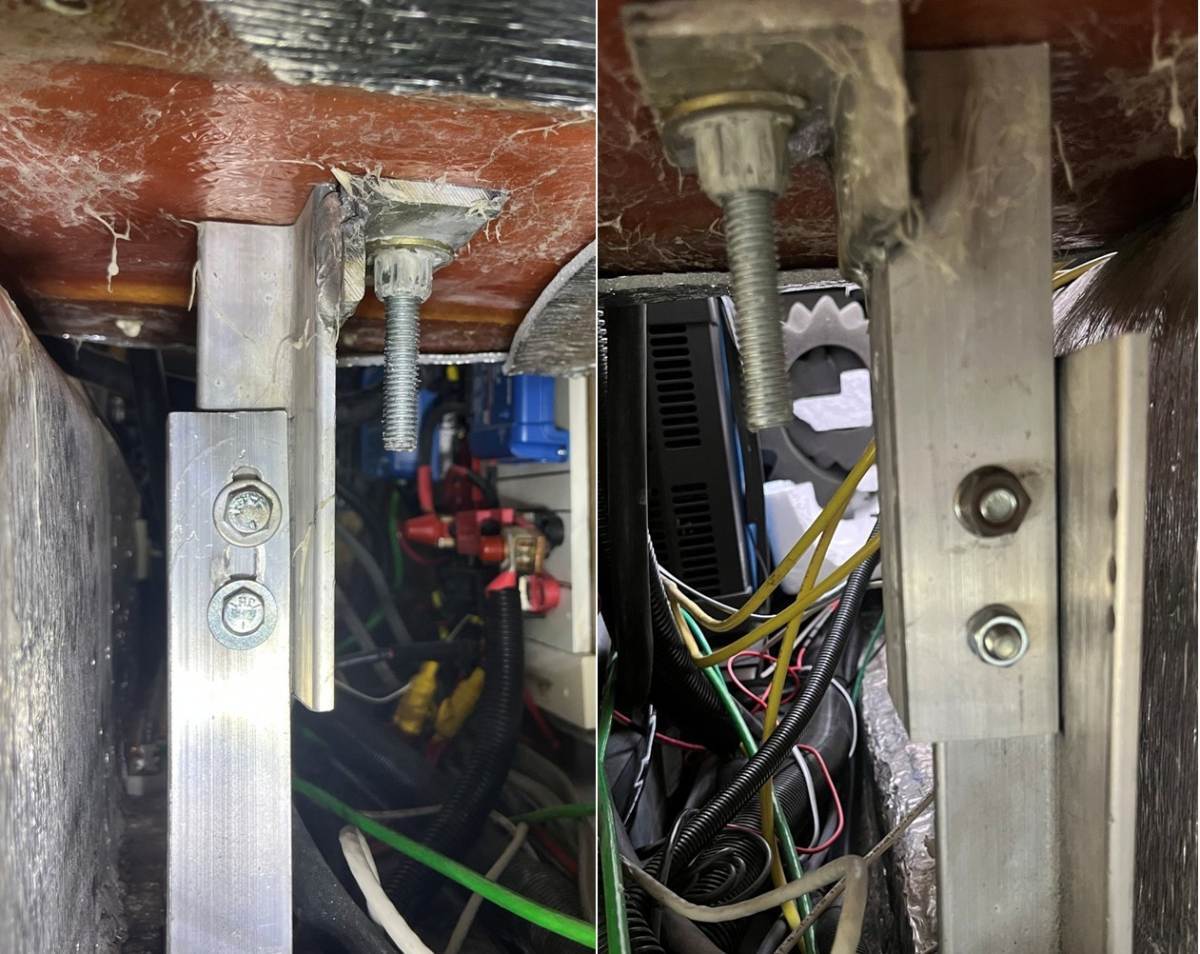
Highs in Prescott are 65F this week. Most of the year I can be outside working. I understand the East has been hammered this year. I hope spring comes early for y'all this year! 😂 Spent the whole day getting everything straight that I noticed during our recent trip, while getting ready for our next trip to St George UT, just 4 weeks away! I corrected the battery support issue and installed our new LP regulator. I did a full inspection of the battery post. The single bolt was in place, the nut was there but loose, with only one thread showing. The two angle-irons seemed to be aligned at a good angle. The base mount has two bolts screwed horizontally and firmly into the frame. The two large upper bolts holding the battery platform were solid. The battery base is square, the door flush, and everything looked good. I decided there was no need to raise the post, since the one bolt at the bottom of the grove was were it was when installed 10 years ago. The original bolt is a 5/16" bolt 1/2" head and since the groove was wider, I added a second 3/8" #5 bolt 9/16" head. I drilled about 3/8" below the top of the groove which would allow for raising the mount if ever needed. Drilling though both angle-irons, with a sharp drill bit, drilling slowly took some patience! Then Chris held a ratchet with a double-long socket extension under the streetside bed opening, as I tightened from the rear dinette opening with my favorite DeWalt 3/8" impact! I first tightened the original bolt, with a short burst of the impact and it now has 5 threads showing. It certainly was loose, still hanging on! Then we tightened the other bolt which has thread sealant and a Nylok nut to boot. This is done now, likely no need for future maintenance! 😎
-
@jd1923 if I can get a weekend that's not freezing and I'm not working, I'd love to get started on that fix. I agree with everything you said.
-
Great post, Craig!
-

Inspectable Item: Propane Area
Steve Morris replied to Wayfinder's topic in Mechanical & Technical Tips
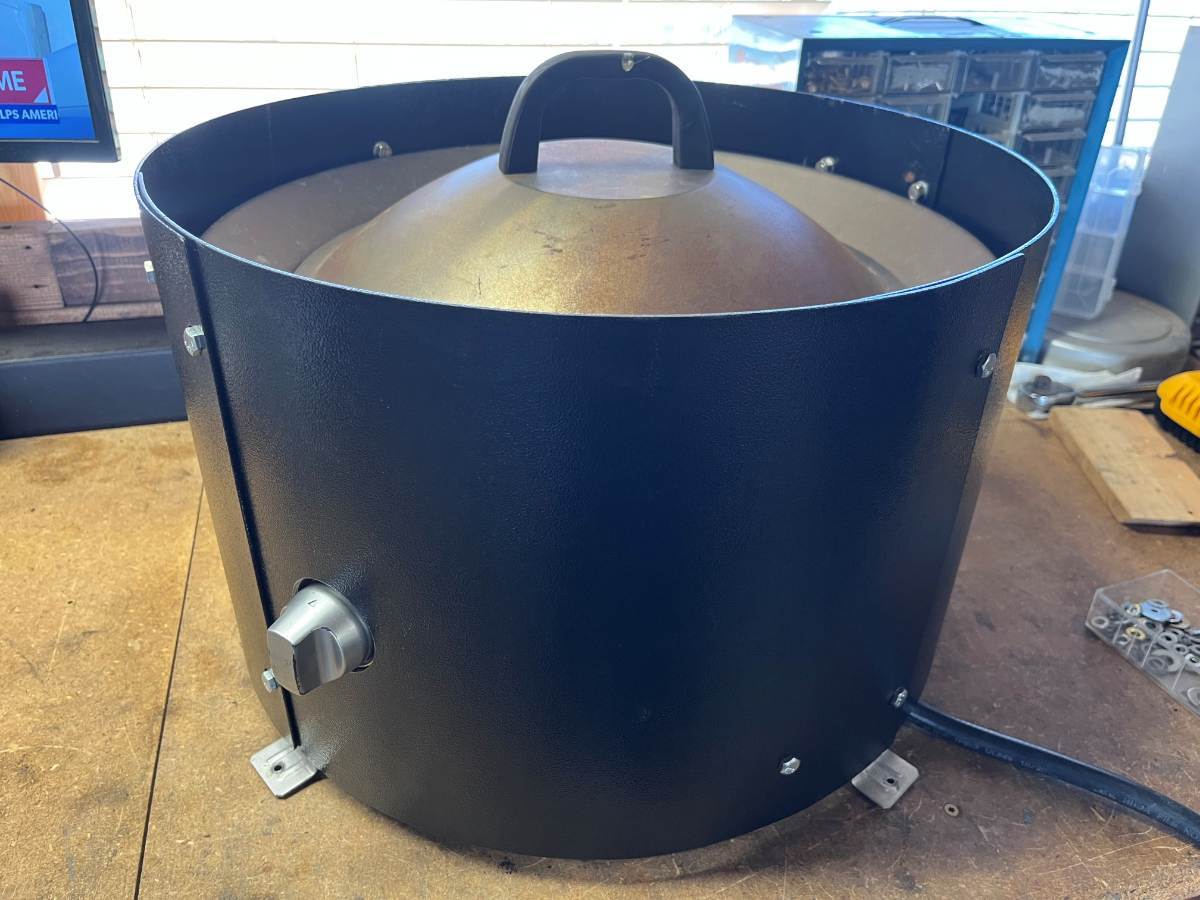
Hank White has made some fabulous modifications to their Oliver, including the propane setup. He’s mounted a block on the inside wall of the housing where a manifold and regulator are located. Stainless covered hoses go to each tank, eliminating the need for the OEM regulator mount on the threaded rod. Low pressure gas is sent to the two LP ports, and two full pressure lines go out; one to the Oliver’s interior and one to a high pressure port for devices that have inbuilt regulators such as a fire pit or grill. I didn’t take any photos… -
I spliced a male cigarette lighter plug to my Tiretracker signal booster. When I tow, I just plug it into a 12 volt plug in the rear of my tow vehicle and temporarily attach it with a piece of adhesive velcro. One could also plug it into one of the 12 volt receptacles in the trailer. When I am finished towing I unplug it, lift it from the velcro and store it away until the next trip.
-

Inspectable Item: Propane Area
Ollie-Haus replied to Wayfinder's topic in Mechanical & Technical Tips
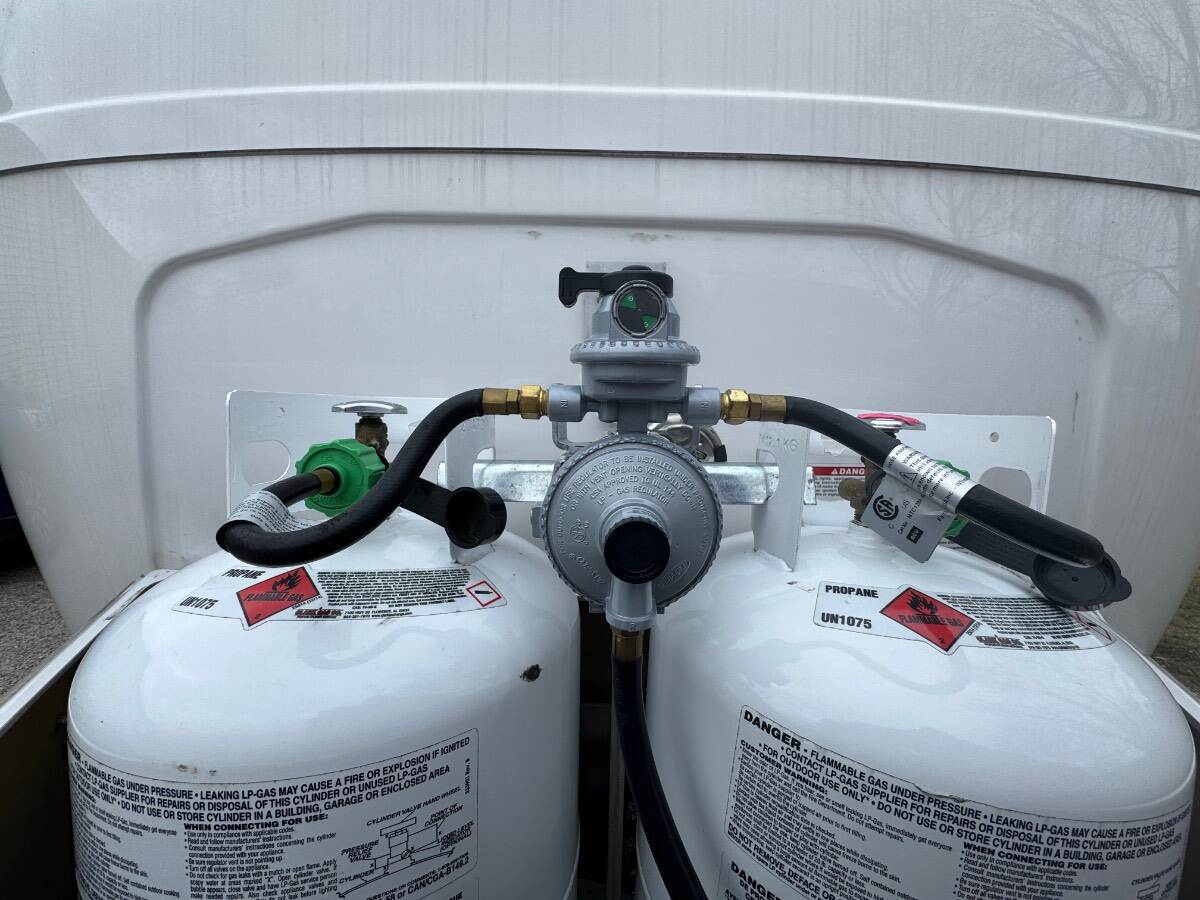
Well we had a “warm” day today so I decided to do one final upgrade that several others have previously done to their propane systems. I got the right angle fittings for the regulator connections a few weeks ago and finally decided to install them. It only takes a few minutes to do in place. The adapter fittings that come on the regulator have check valves built in, so I purchased standard 1/4” street elbows and reused the original adapters to make the connection. One little trick to make the installation easier, with the cold temps, the hose is stiff and feels like it will split if you try to reshape it into the new configuration. If you take the hoses into the kitchen and immerse the rubber part in a pan of boiling water for a minute, the hose will naturally straighten out, and while warm can easily be installed on the tanks and regulators with little tension in the process. There’s a much gentler bend in the hose when completed that should make the hoses last much longer. Before: After: Thanks to everyone who previously made this upgrade and for sharing on the forum.
-
Additionally you may want to consider replacing your valve stems to the metal variety as opposed to rubber. Rubber ones can fail when sensors are attached.
-
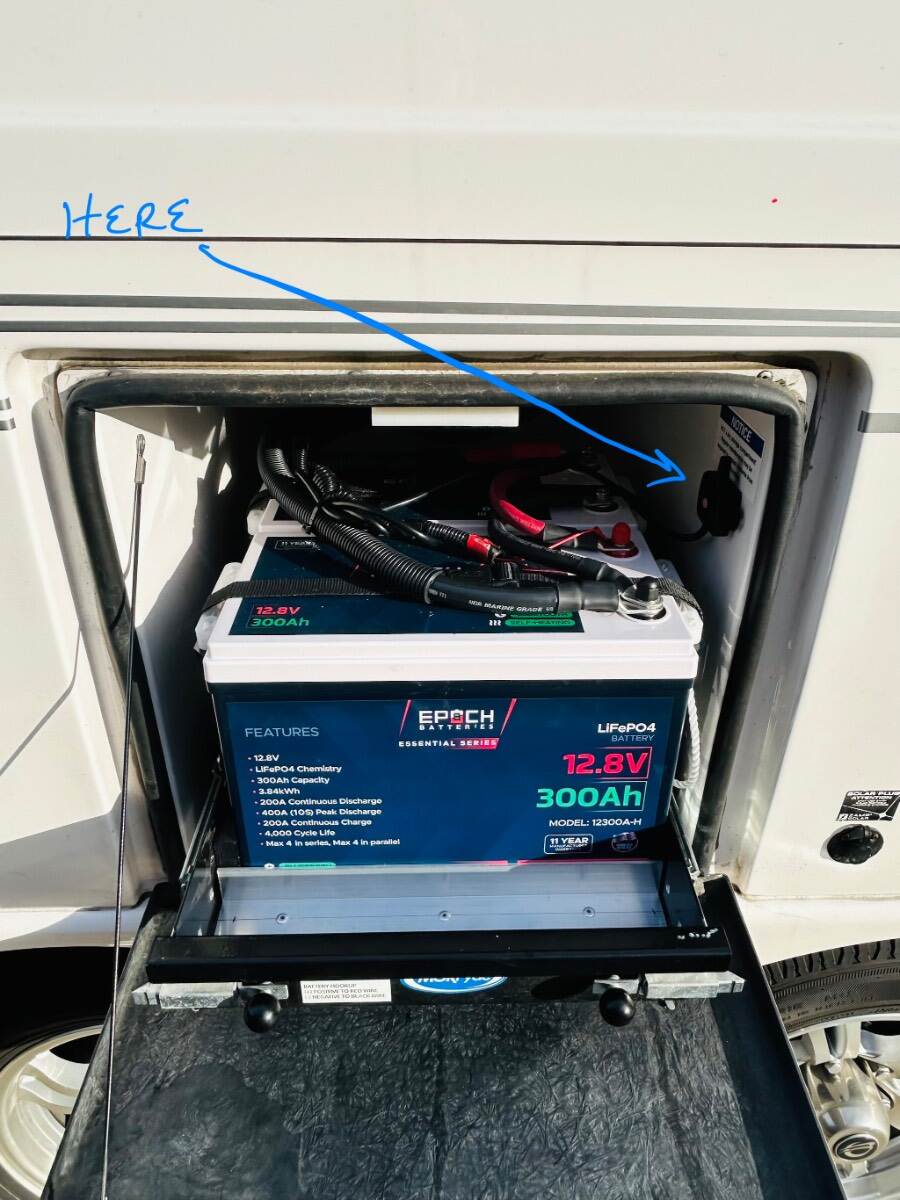
@Against The Wind We have been using a TST TPMS for several years. I opted to mount our TPMS relay out of the weather and UV exposure inside the main battery compartment with tiny strip velcro. It has worked flawlessly since installation. All I did was attach it to my battery terminals. Keep in mind this relay creates a very low parasitic draw on your house batteries. Not an issue in my case, as XPLOR is parked at home and always plugged into 30 amp. Have fun and mod On! Patriot 🇺🇸🇺🇸
- Yesterday
-
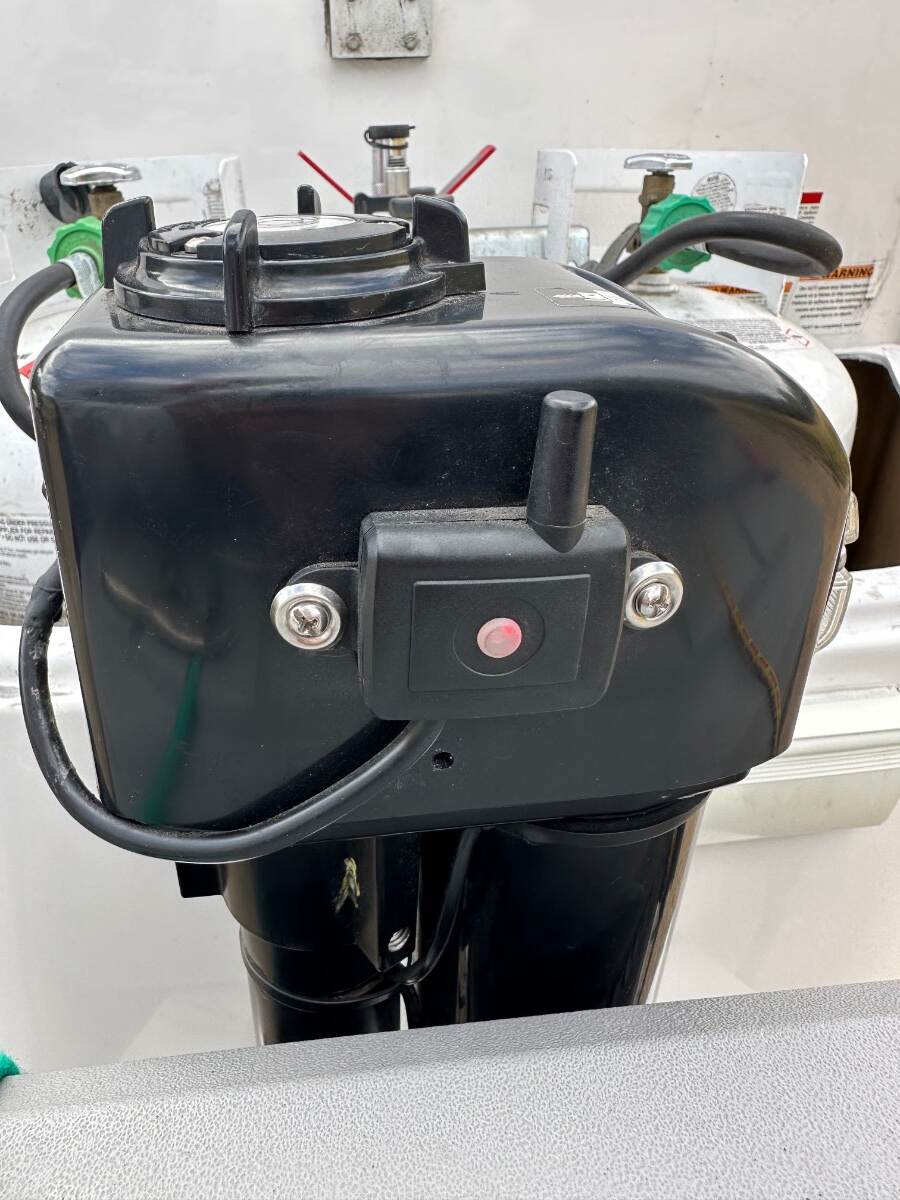
Saw this post from another user...quite detailed. I mounted the sending unit for our system (not Tire Minder brand) on the outside of our front jack power head. You can easily pull 12V from the inside of the power head and decide if you want/need an on/off switch for the circuit. * I just leave mine on all the time...as the draw is minimal.*
-
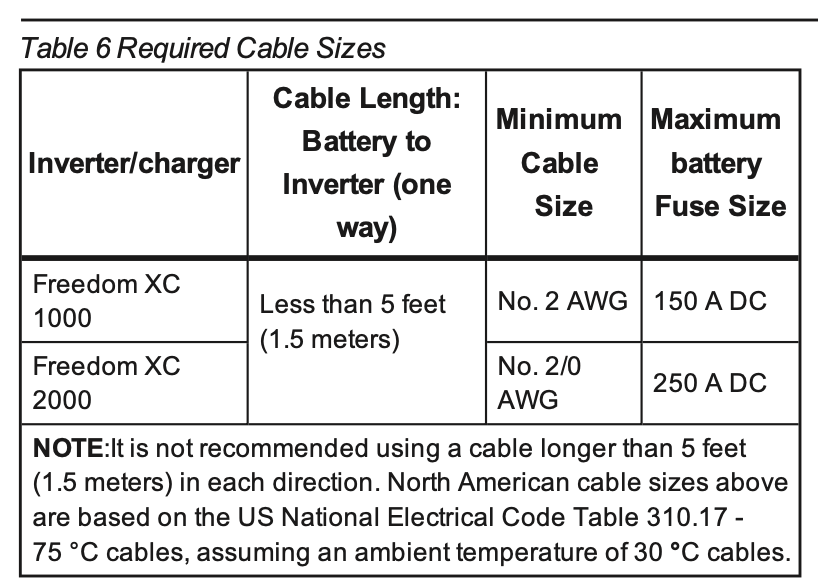
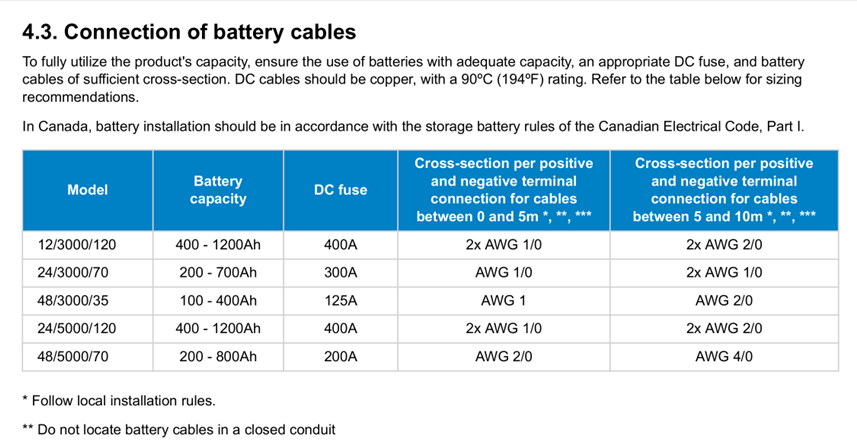
For those with the Xantrex Freedom XC2000 inverter here's that same table. These XC2000 was the unit used put through 2024 with the lower tier battery configurations. Also these units don't allow running the AC off DC. (So these are configurations other than the "Platinum" or dual 320AH Lithionics)
-
If you’re referring to the little device that relays the sensor signals I installed mine in the front jack housing, there is power in there and room for the module. I repurposed the switch that controls the jack light so that I can turn the module power on and off.
-
The picture below is from the Victron Multiplus manual. The first row is for 12V systems that need heavier AWG wiring than higher voltage systems. I and other Oliver owners have the Victron 12/3000/120, which translates to 12V / 3000VA inverter output / and 120A max charge rate) inverter installed. The inverter powering a microwave using 130A, a Dometic Penguin A/C or an 1800W blow-dryer (both about 150 DC Amps) takes more battery power than anything else. The 2KW inverter requires a 250A fuse and the 4/0 AWG wiring is overkill, very safe will never overheat. It can run the microwave, borderline on the blow-dryer which is generally only run for a few minutes. Borderline/not recommended to run an A/C unit as inefficient as the Dometic model, but fine for new inverter or variable speed A/C models. Victron suggests a minimum of 400 Ah in battery capacity (many have upgraded to 600 Ah and we recently added another Epoch 300 for total 900 Ah). Not sure why they call for 2x AWG 1/0 wires (maybe smaller wires are more easily routed in boats?), but cross-sectional surface area of 2x AWG 1/0 wires is just under, basically equal to one 4/0 AWG wire. The combined length of B+ and B- wiring must be less than 5m = 16.4 FT or larger cables are needed. In our hull the two cables add up to less than 12 FT. I replaced the 250A fuse with a 400A ANL fuse as spec'd in this chart and the OEM wiring OTT installed is just fine! 😎 I made the error of having our hot water heater turned on by electric, not realizing this I turned on the Dometic, no shore power, all on the Victron MP2 inverter. It ran for 10 minutes before I realized what I had done. The Victron output was over 3400W the entire time. It's rated at 3000VA but produced 400 more (there is some technical difference between VA and W which I do not yet understand). I believe they spec the 400A fuse so it can go over spec for short periods of time. The Victron MP2 is a beast!
-
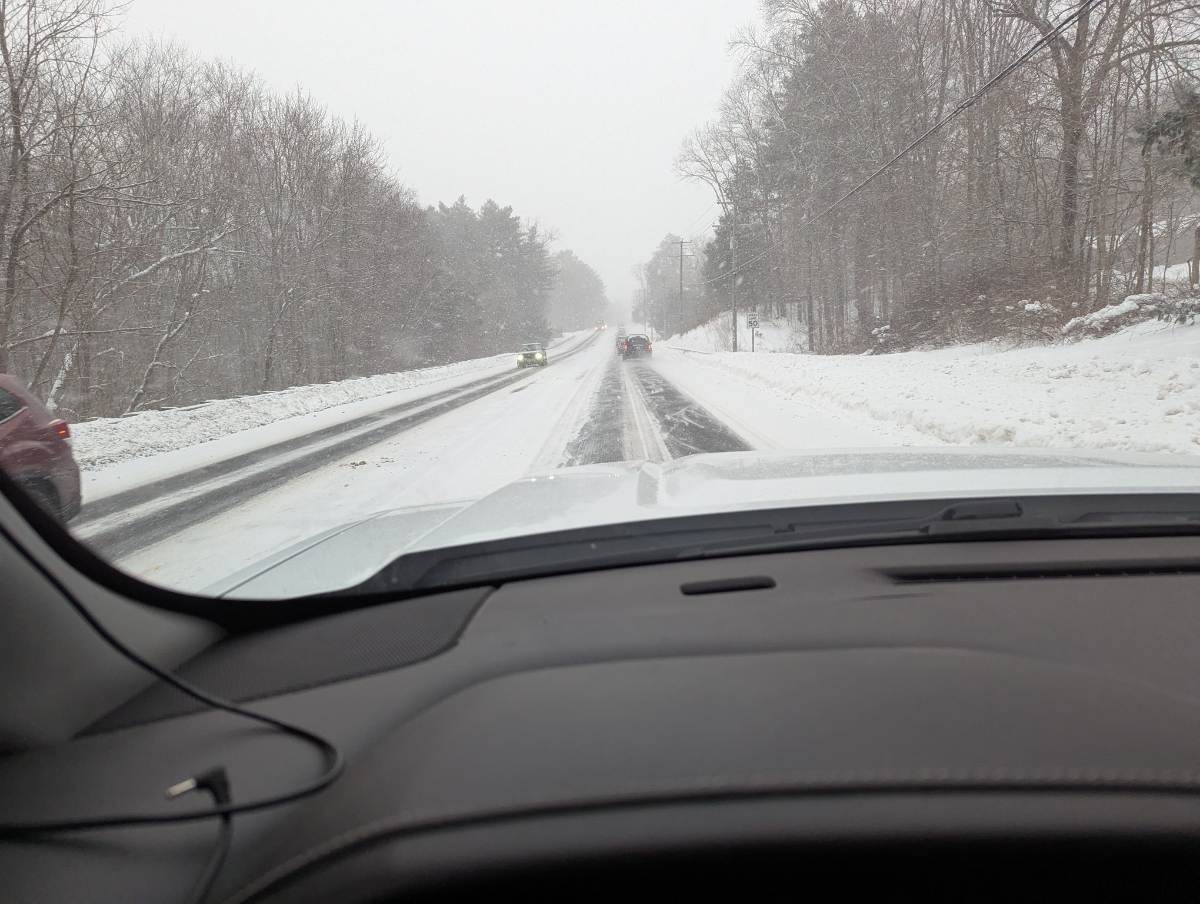
I just finished cleaning up after the blizzard and this is what I was looking at this morning. It's getting old. On a serious note, there was a fatal accident after the storm when someone was trying to pull out a stuck snow plow with a tow strap attached to a hitch. The hitch broke off and whipped into the cab of the truck from the tension on the tow strap. Most hitches aren't designed to handle the forces involved in a hard pull between two large vehicles. Just a reminder to be careful out there.
-
Hello Friends, We got a Tire Minder i10 TPMS for Christmas and after reading over the installation instructions, I feel they have catered to our neighbors who have a battery outside their rig instead of like ours where the batteries are enclosed. I’m looking for some technical advice as to where I can access a reliable power source to power my TPMS. As always, your good advice is always coveted.
-
We saw that through TN, AL, MS, LA, and into TX. One of our usual COE stops was closed because of all the trees down in the campground. It was an eye opener.
-
While editing my above post, I thought again about this statement that I just wrote. Until I was educated by Alcan staff, I didn’t realize wet bolts should be torqued when doing maintenance. I’ve not noticed this in a service manual. I always thought a wet-bolt with a Nylok nut only had to be there, not overly tight nor loose. I remember having a suspension lock up in a flat bed car hauler. The mechanic at a trailer shop, merely loosened the bolts on the center link and the suspension dropped into place! I never torqued the wet bolts on the original suspension, though it was REALLY loose when I removed it. Thinking now that @Patriot has the right idea on this one. Crawl under your trailer once a year, lube the Zerks and check the torque on the wet-bolts and U-bolts. I also like removing the tires every so often, removing all gravel while inspecting, looking for punctures, clean the inner rubber. With the old-style bearings, pack them. Spin the drums and set the self-adjusters that do not always adjust adequately so the shoes are just rubbing. Im taking the wheels off anyway!
-
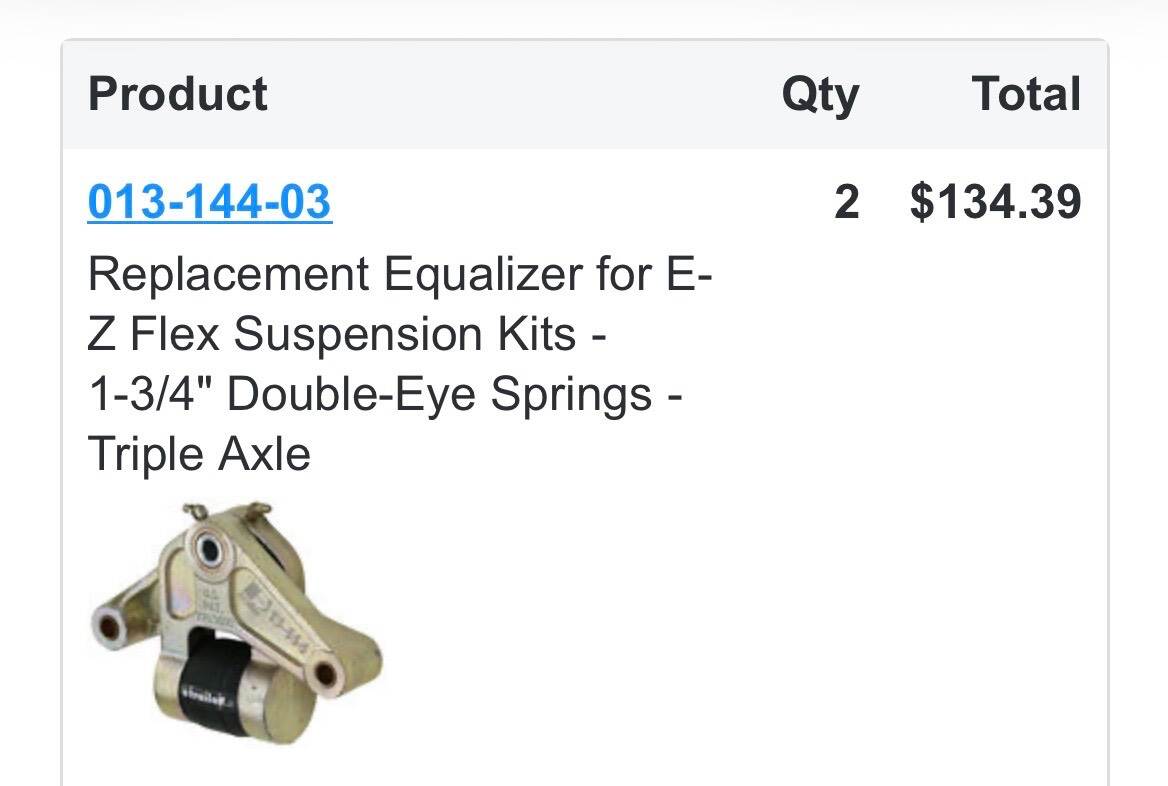
When I added the 45-degree Zerks, I tightened them down one-finger tight. Several of them at their set point were not at the optimal direction to clear the tires. When I lube, I loosen those Zerks a half turn to get a better angle, pump the grease to fill, then lightly tighten them back into place. Also, regardless of whether your Zerks are mounted inside or out, some may not want to take grease. Using the stabilizer jacks to lift the tire, take weight off, may help. If not, you may have to loosen the wet bolt, apply grease, then retorque the wet bolts when finished. Time to retorque all suspension bolts anyway. In my experience, this happens to 1-2 bolts each time. Check with Alcan ahead of time. They may not stock these parts, and you can always bring parts with you. BTW, given the age of your hull, if you’re replacing axles and springs, you’ll want to replace the EZ Flex center links too. Many have brought these parts with them too. Alcan will be happy to install them. Since you’re replacing the main components, replacing ALL parts at the same time makes best sense (see pic, I purchased 2 of these from eTrailer. The following thread is where I documented my DIY axle/spring installation:
-
For most tents, stakes they would work fine. But for our awnings and higher wind areas, I would consider increased diameter and length. Love the 20V impact to drive them idea. For our OTT awning, we carry two milk crates. One in the basement and the other in the basket. For high wind areas, we primarily rely on them with "locally sourced" rocks as anchors. One lesson learned is to emply quick disconnect so that in emergencies one disconnect and retract quickly. I have some ole D-rings that are over 100 pound rated and use them with mil-spec 550 cord as the connection means. Additional weight for two is less than a pound or two. GJ
-
The Oliver battery bay is designed to hold the weight of 4 LA or AGM batteries. Given you still have 4 AGMs proves this point, as it’s been holding for 10 years. I see real issues with the picture you shared, that you truly should investigate. Two bolts are certainly required to hold two support beams together. One bolt allows for the angle to bow, two will not. It’s that simple. Looking at your picture, the lower beam doesn’t look square to the floor! Is it still connected to the frame? No added gizmo will correct for a failed foundation. I’d be pulling up the insulation around the base to verify if the support base is still welded or bolted to the frame. Then do the work that David showed above. We’re traveling again in 4 weeks and the support lift/2nd bolt addition is top of my list. We will NOT travel again until this issue is corrected! But we all do what we want in this life…
-
 Scott Ward joined the community
 -
We were in Hohenwald today, and signs of how severe this storm was are everywhere! We came into town from the east on 412, and saw broken trees and power poles by the hundreds. There seemed to be a pile of debris collected along the road every quarter mile or so, some as big as cars. Then we left to the north on Rt 48, and it made the eastern side look like a teaser. Thousands and thousands of downed trees for miles! The worst ice damage I’ve ever seen. Hopefully, no one was injured and folks are somewhat back to normal now.
-

Removing shelf under bathroom sink for plumbing access.
jd1923 replied to Mroth's topic in Ollie Modifications
I would be fine with a better installation, ease of use and longevity of the cable over a larger storage space. I believe this is a good example of OTT improving their design through the years! In our Oliver, Chris uses this space for storage, a small pressure cooker, yes TP and paper towels, extra coffee and a whole lot of dog food and treats!