Leaderboard


Popular Content
Showing content with the highest reputation on 05/19/2019 in all areas
-
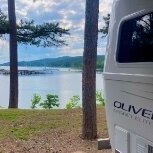
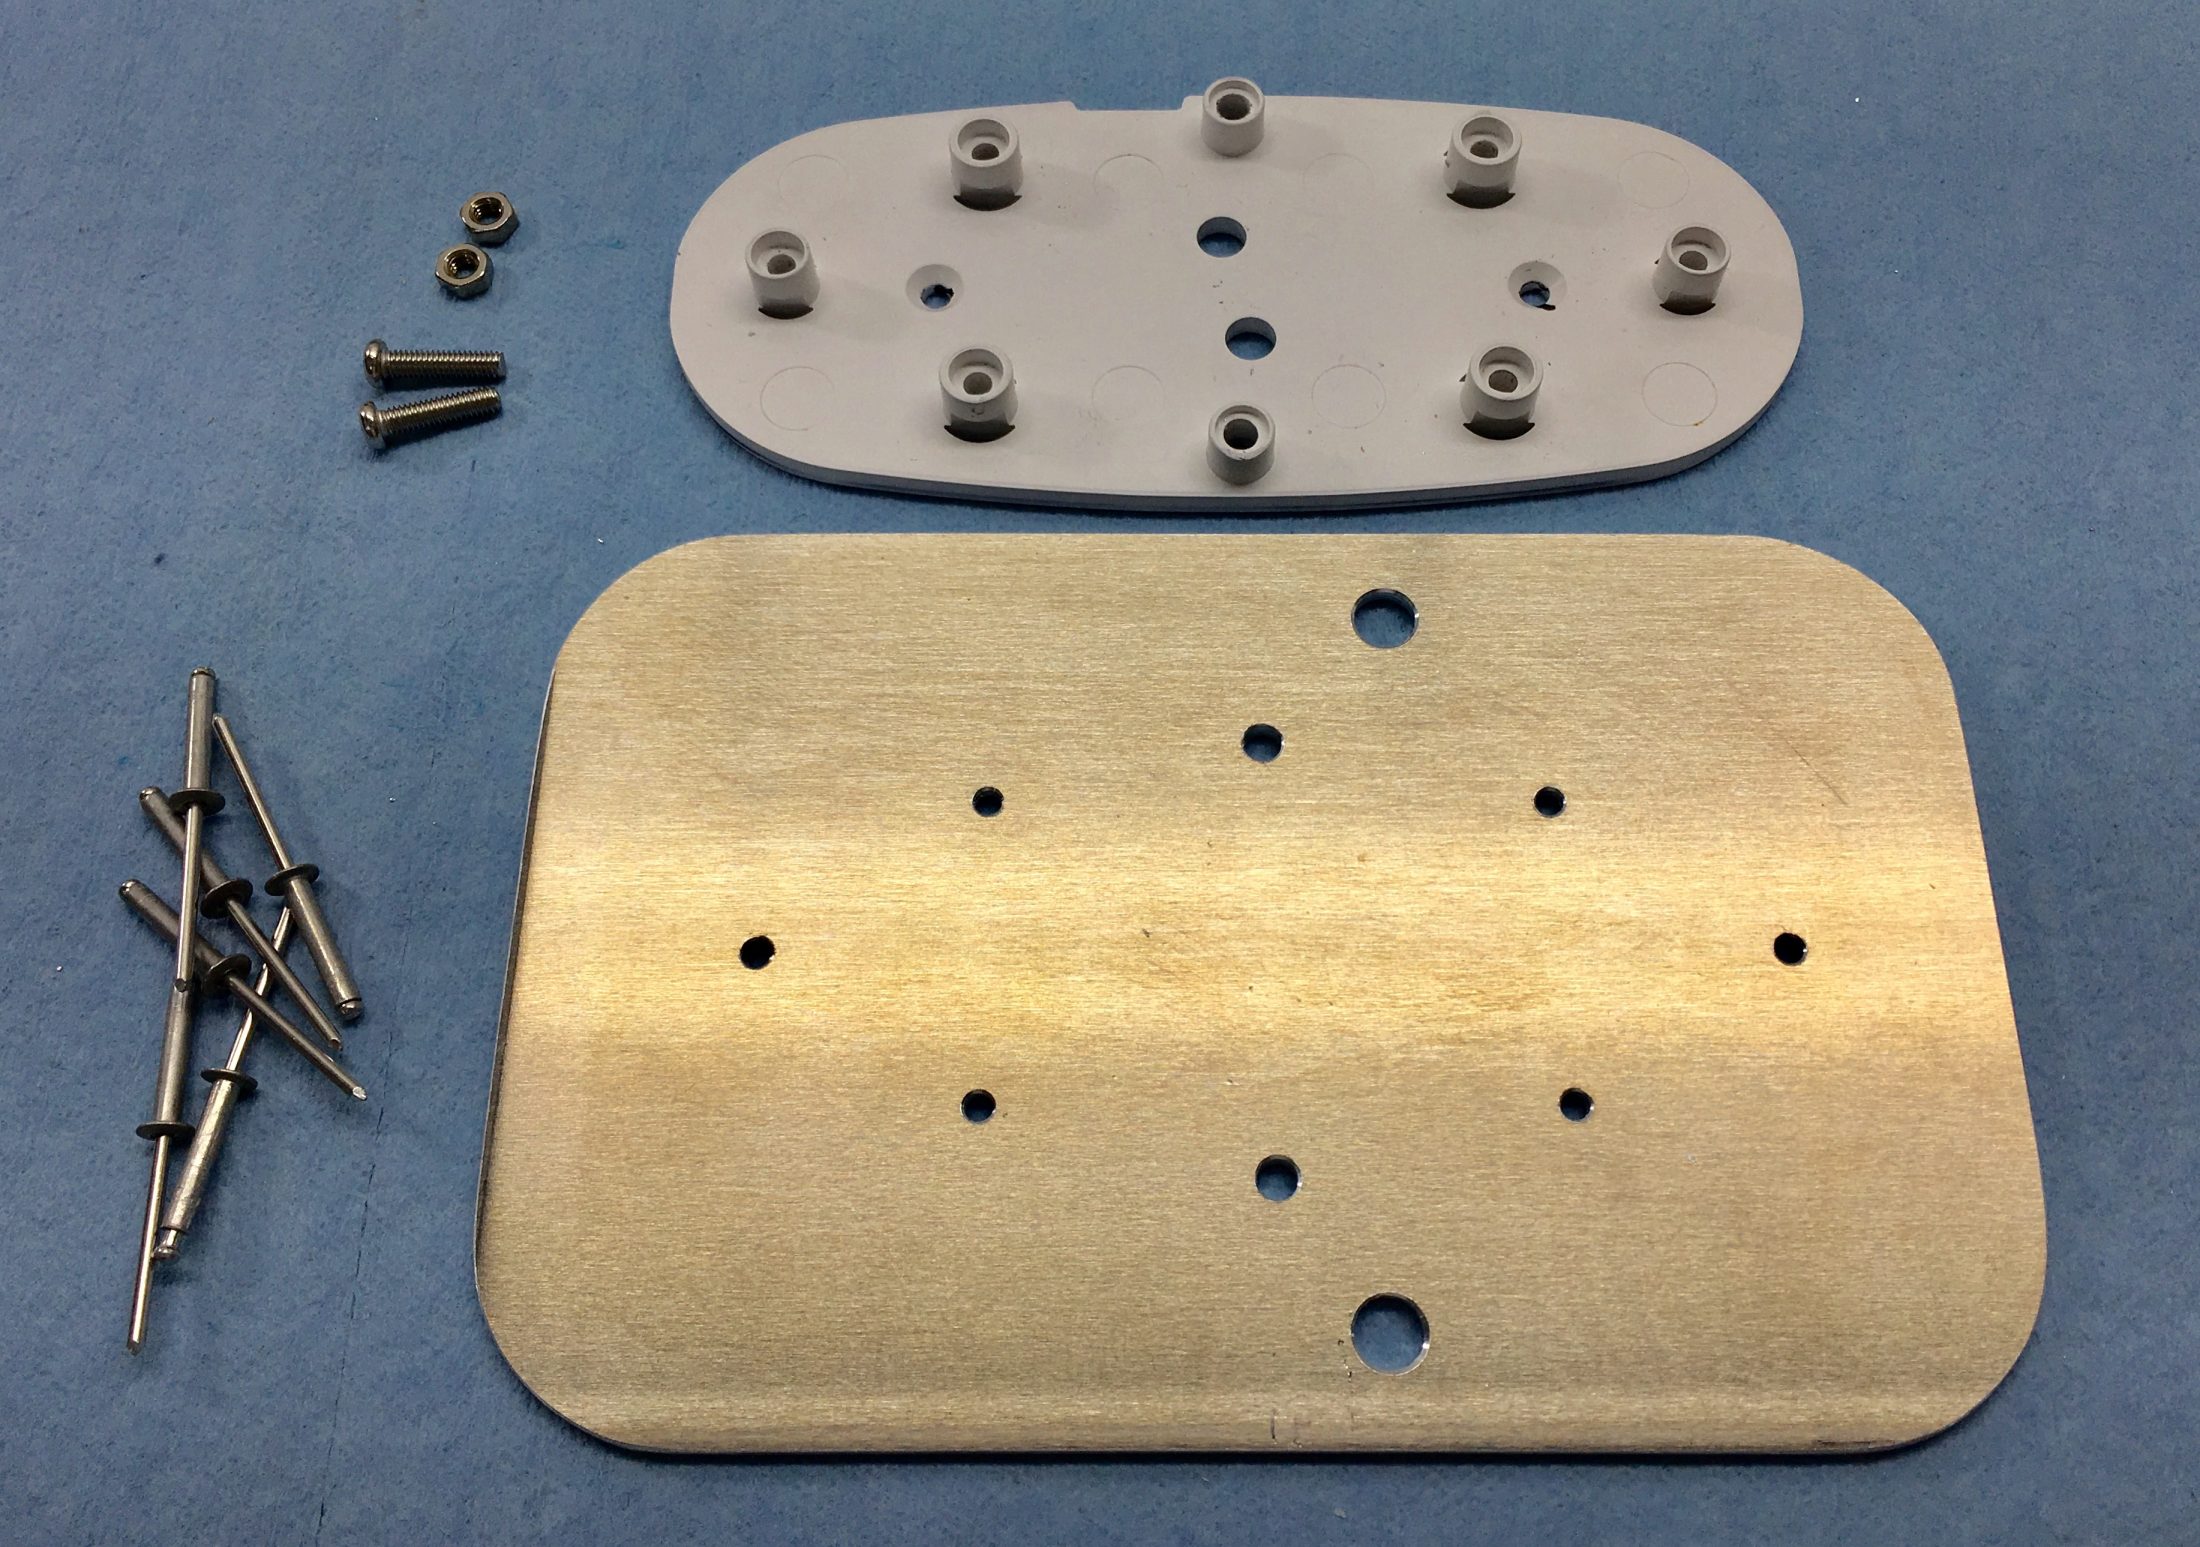
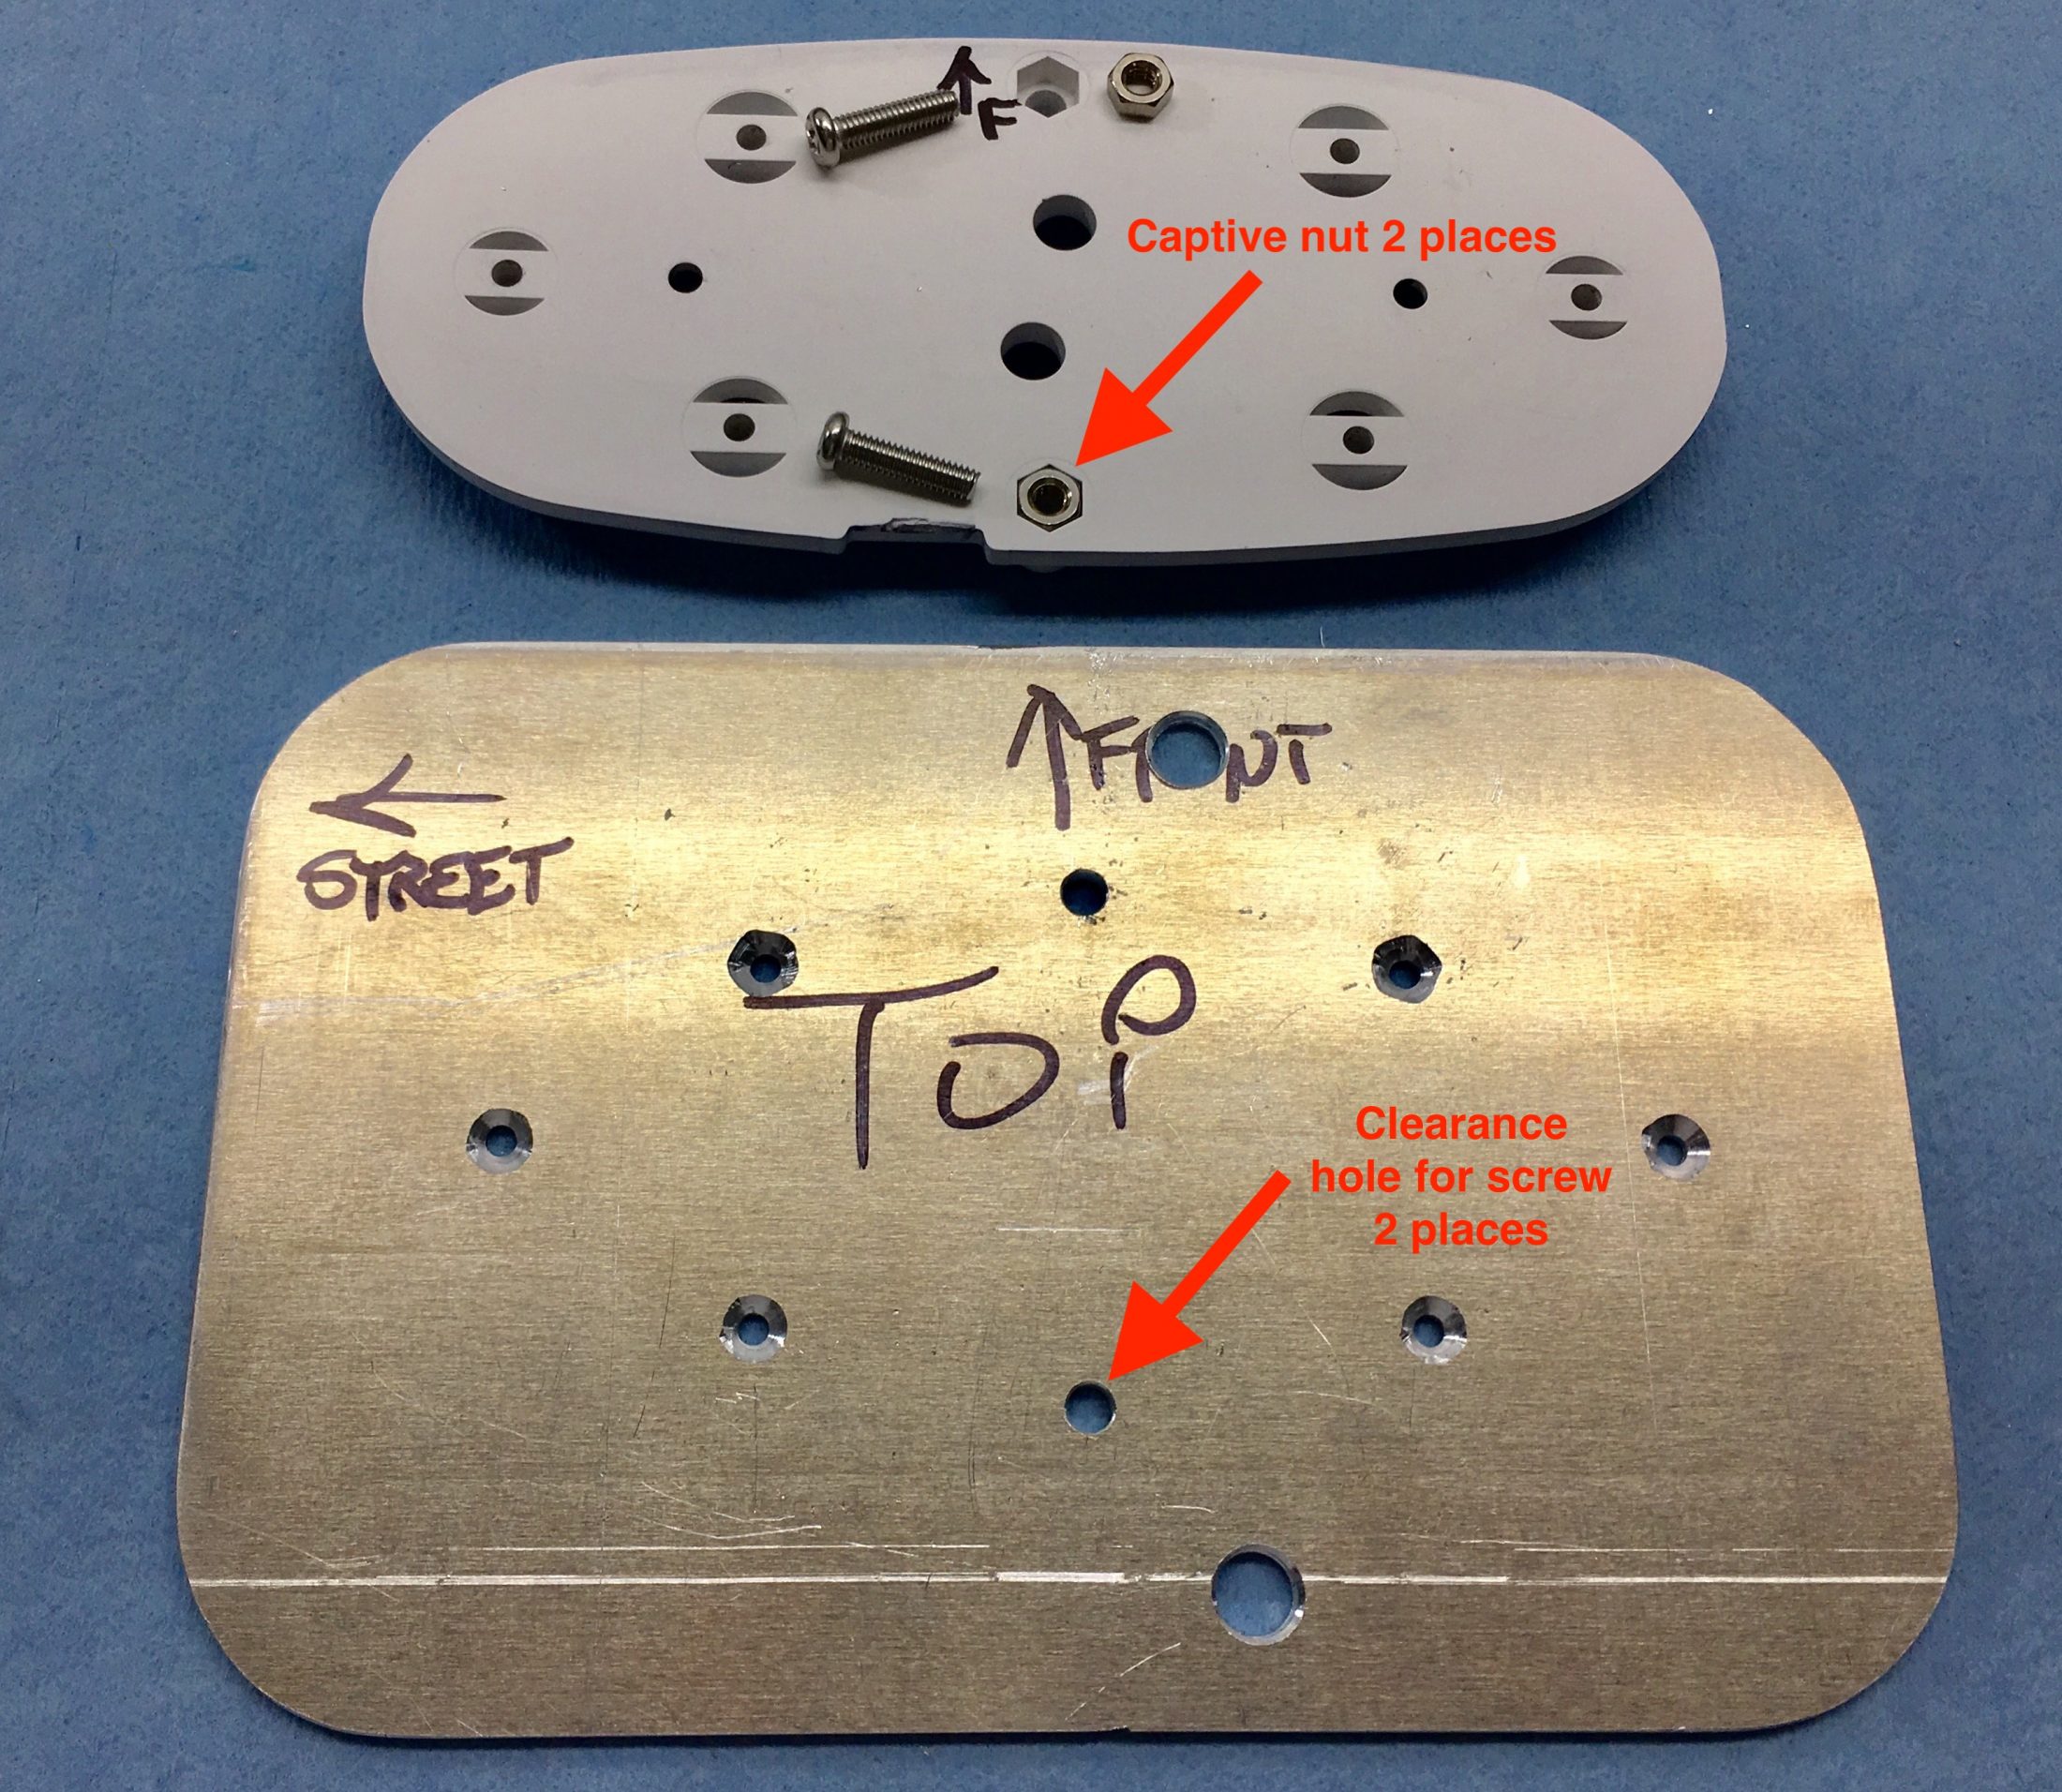
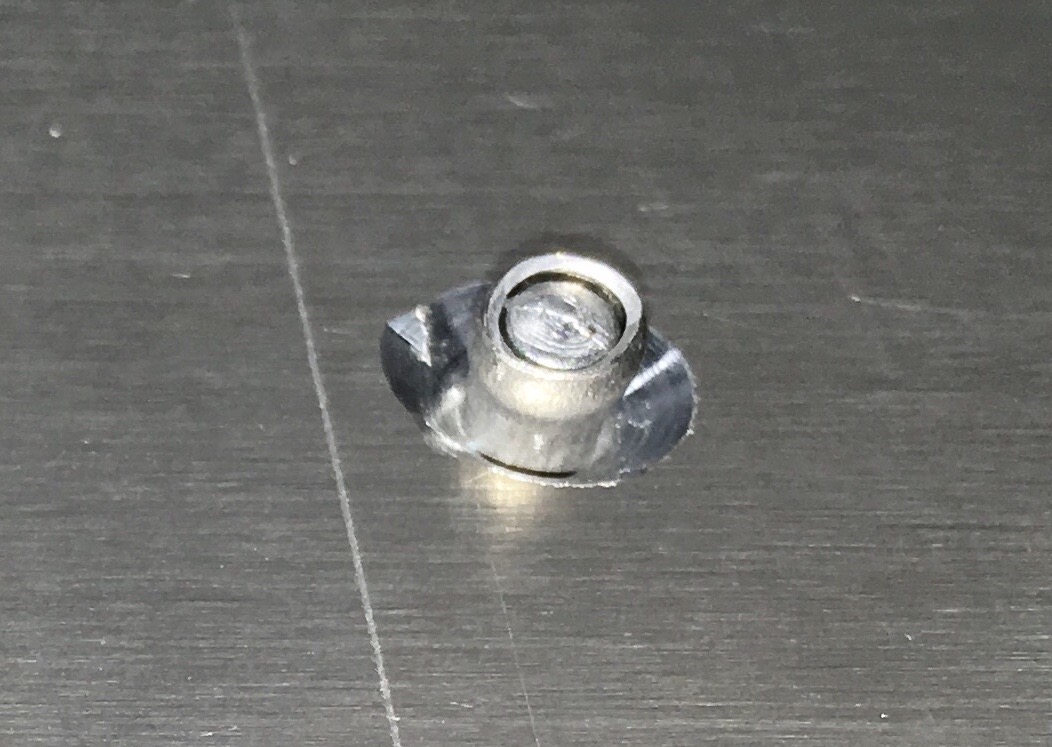
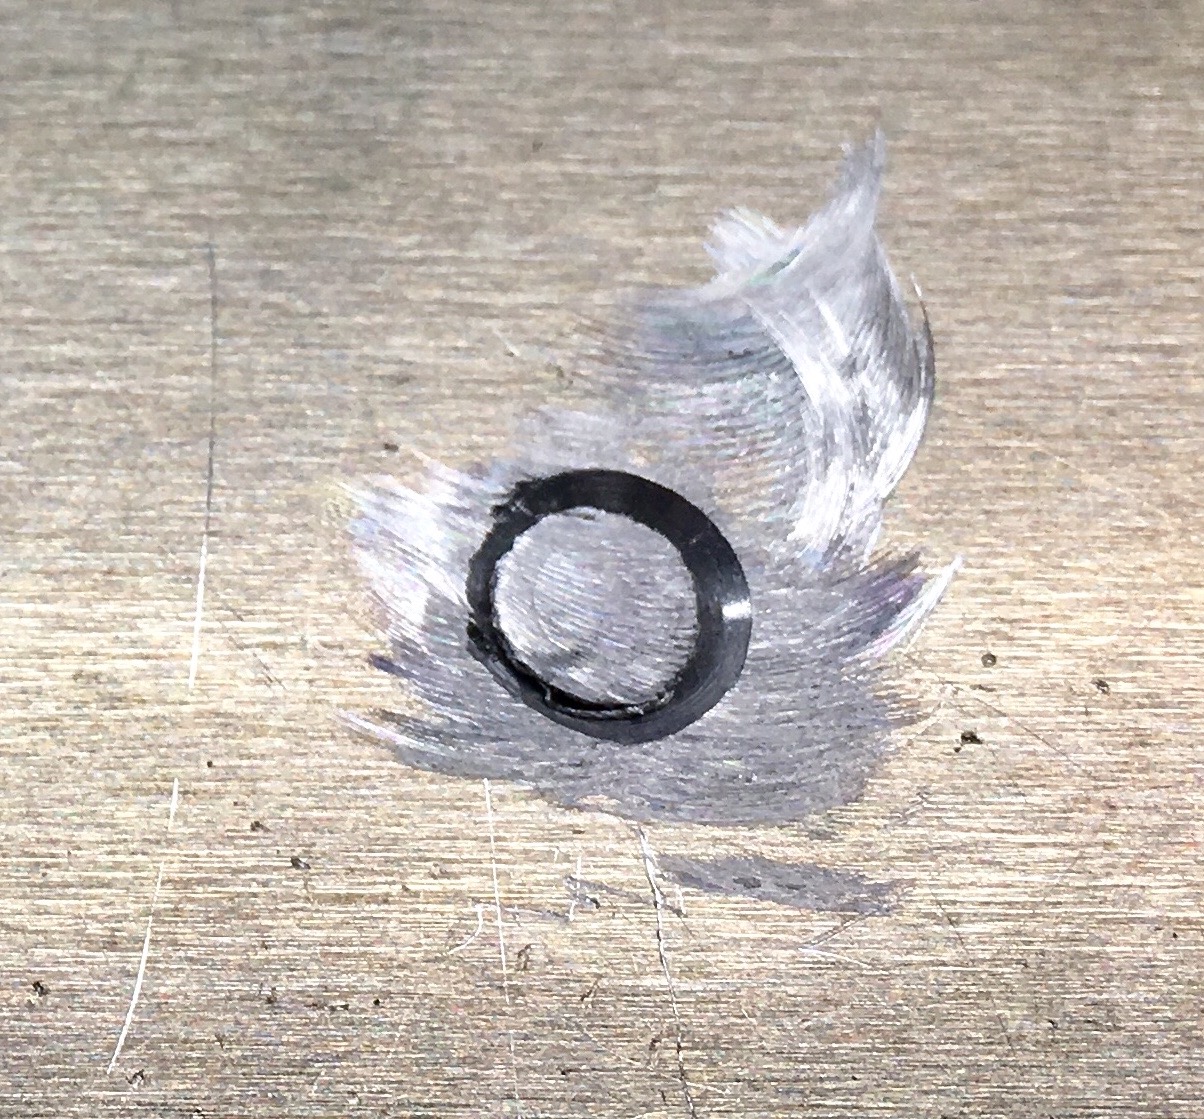
I had been using a 120 volt desk top Vornado fan (which was very effective, though a little bulky) but I wanted a built-in one that used less power and did not require continually running the inverter. This is the well regarded Caframo Sirocco II, made in Canada. The price varies a little, I bought it when it got down to $100. https://smile.amazon.com/gp/product/B01LDY4TE4/ref=ppx_yo_dt_b_asin_title_o04_s00?ie=UTF8&psc=1 It has three speeds and a "time delay off" function. Amp draw from the small DC motor is very minimal: Low: 0.12 amp, Medium: 0.22 amp, High: 0.35 amp (at 12 volts). Max airflow is 140 cubic feet per minute on High. That is not nearly as much as the Vornado on Low, but it is plenty adequate. I had already removed the fixed TV and mount from the back curbside corner, so I mounted the fan there. Since there were already 4 big holes, plugged by the original screws, I did not want to drill any extras. I made a plate out of 6061-T6 1/8" thick aluminum plate, attached the fan mounting plate to that with rivets, and bolted the plate to the bottom of the cabinet using two of those big screws.A future owner could remove the fan without leaving behind any extra cavities... and the location is good for sleepers and does not get in the way when folded up. The fan mounting bracket is designed to mount to a flat surface, then you slide the fan sideways onto the plastic studs and secure it with two long machine screws. I used common long 1/8" diameter aluminum pop rivets. Because each rivet head was down inside a cavity, I added a teeny nut to the shank before pulling it. The back side of each rivet hole was countersunk most of the way through the material: I used a small flat pin punch in the vise and a bigger one on top of the tail to drive it into the countersunk part: And ground each tail flush using a little Dremel grinder with a sanding disc: By grinding the tails flush, they would not damage the nice gelcoat of the overhead cabinet. Here is the assembly screwed in place: John Davies Spokane WA
 2 points
 -
Sure, I’ll take a few and post them in the rally thread. Definitely not going to make it to 3pm. Probably not even 2. I’m at 26% now and just got a low battery warning from the inverter. There must have been a brief dip in voltage that set off the alarm because after shutting down it came back on after a minute or so.2 points
-
Don: Here’s a list of what you’ll need for each fastener. The coupler, spring shackles, and EZ-Flex pivot will require two wrenches. A socket on the torque wrench for the nuts, and some other type to apply opposing torque to the bolt heads so they don’t rotate. This is critical for tightening the shackles and EZ-Flex pivot. I’d recommend standard chrome (non-impact) 6 point sockets as specified for each fastener. Bulldog Coupler: 3/4” socket and a 3/4” combination wrench. OTT says 80 ft lb. Lug nuts: 3/4” DEEP socket with a short (3-6”) extension. Dexter says 90-120 ft lb. Spring shackles: 11/16” socket for nuts. Use a 13/16” socket with a breaker bar close to the same length as your torque wrench to hold the heads. You may need a deep socket to clear the grease fitting. Dexter says 30-50 ft lb. EZ-FLEX center pivot (assumes at least one wheel removed): 7/8” socket with the short extension for the nut. The same 13/16” wrench you used for the shackles to hold the bolt head. Dexter says 65-75 ft lb. The chain hardware, auto, big box home, or farm supply stores all carry decent quality tools at competitive prices.2 points
-
Not much going on at the rally today so I thought I’d unplug the trailer and do a little experiment running the AC just to see how long the batteries would last. We don’t travel much in AC weather so this is really the first time I’ve had a good chance to test the limits of our system. I started at 10am with 100% charge. AC set at 72 and we’re in full sun with no clouds. 640 watts of solar and 400 amp hours of battery storage. I’ll plug back in when the batteries hit 20%. Any guesses as to when that will be?1 point
-
The Oliver rack and receiver is completely custom, they make them from aluminum in-house (or maybe subcontract it). I don’t think you will find an aftermarket steel one that will just bolt on. Have you considered asking the factory if they could make you a 2” one out of aluminum, with the understanding that it might void the warranty on the rack? If not, a local custom fabrication or machine shop could easily build you something if you unbolt the 1.5” receiver and take it to them. Steel is acceptable for a replacement as long as you are careful to put some insulating material between the steel and aluminum parts to prevent dissimilar metal corrosion. Plus it will rust where the bike support enters, and that can be unsightly if the stain runs down onto the rack and bumper... I think Oliver bolts the receiver down because if it wears out that would be way easier to replace than a welded on part. The ubolts appear to be the same ones that they use to secure the cargo tray to the tongue. John Davies Spokane WA
1 point
-
We did order the bike rack on our new Elite II, at the price they sell them for I should have made my own like John did, but wife wanted the bikes to go with us and time just wasn't there to make one. It looks to me (haven't picked up trailer yet, July delivery) like you can just replace the hitch receiver with a 2" one, they just bolt on with U bolts, etrailer sell them in short lengths, 6"/8" which would just bolt on and replace the 1 1/4" one. I'm sure the reason Oliver is using the 1 1/4" receiver is to control the weight load on the rear, many with a 2" receiver would overload the rear, try to pull another trailer, whatever owner would think they could get by with, just my 2 cents worth. The 2" to 1 1/4" adapter bar should work, it just moves the weight farther out on the rear which is not to my liking. John also said that the factory mount 1 1/4" would work just fine, adding tie down straps would tighten up the bikes and all should be ok, so I will check it out when I get the trailer, plus I have a bike rack with the adapter for both sizes. trainman1 point
-
There is a 1.25" male to 2" female "conversion receiver" google it. Around $25. May be the interim answer to your concern.1 point
-
Welcome to the forum. In spite of being a 2"x7" tempered aircraft aluminum beam, the rear bumper is actually non-structural, it can't support a heavy vertical load. It is fine for whacking into a tree. It has two small hinges at the bottom to allow it to rotate down for access to the stinky (waste hose) compartment. The frame mounted Ollie factory bike rack is the only current off-the-shelf solution. The little receiver is there to limit how much stuff you can hang off it, the load limit is 100 pounds of rack and bikes. You could replace the receiver with a 2" one but you would be on your own and have no rack warranty. There were a couple of previous versions and some of us have built racks of similar materials. For bikes it is essential to guy the trays forward to the frame to eliminate as much sway as possible. The rear of the trailer is a fairly violent place to carry stuff, with lots of vertical motion. Look here: ... http://olivertraveltrailers.com/topic/how-to-move-the-factory-cargo-tray-to-a-rear-rack/ John Davies Spokane WA1 point
-
I really can't thank Jason enough. We took our rig in for annual service and ended up getting a flat tire on the TV while in the process of getting the brakes on the Oliver to work properly. It was at the end of the day, after dark, in March COLD, when as luck would have it we got the loss of tire pressure alarm. We were inside the gates at the Oliver Factory and Jason helped change the tire. In truth he did most of the work. The next day before we got on the road to head back to South Carolina my wife and I went back to thank Jason and to tell his boss how much what he did ment to us. A really great group.1 point
-
Fellow Oliver Owners: Interested in camping outside Yellowstone at the Yellowstone Edge RV Park? It's a premium park, 30 miles outside Yellowstone NP on the Yellowstone River. There is an open spot from 30 May to 6 June if you call pretty quick. I booked these about 11 months ago, so it may be a good opportunity for ya'all. Due to the left two wheels flying off my Ollie and subsequent repairs, etc., the trailer won't be repaired for a few weeks, minimum. So, this lovely RV park, comes highly recommended from my awesome Aunt Linda, has openings. One closed door may open some camping opportunities for one of ya'all. I have cancelled my reservation 30 minutes ago and got a partial refund, so i'm just offering this up, as camping around Yellowstone this quickly, at such a nice RV park is kinda rare. The opening may fill up quickly, I don't know. They have full hook-ups and super nice bathrooms and laundry. Cool, thanks, Lanham1 point
-
It can be very hard to understand the interaction of systems that operate off both 12 volt DC (the battery bank) OR 120 volt AC. When you are not connected to shore power it is best to switch everything you can to propane (the fridge, water heater and cabin heating), then manually select what else you want to run off the now-independent AC power supplied by the generator, by disconnecting unused circuits using the breakers under the dinette. If your generator can only supply 15 amps of 120 volt AC current (1800 watts) continuously (not peak current, which is always a little higher) you need to decide if you want to run the air conditioner only, or a combination of outlets and converter. The air con draws too much power to allow you to run other stuff simultaneously. How depleted your trailer batteries are in the morning determines how much AC current the power converter is using to recharge them. Understanding how much generator power your stuff consumes (and what time of day) is important; you can run the outlets, microwave and converter (to charge the batteries) in the morning when it is cool outside and you are making your morning coffee and toast, and switch over to just the air conditioning in the heat of the day. Use too much AC power at once and your generator will go off line, telling you to reduce the electrical load. It won’t hurt the generator, that is how it is designed. Having solar really helps because you don’t usually have to worry at all about recharging the batteries, that is all transparent and very efficient if there is any significant amount of sunlight. In dark times (shaded site or rainy day) you have to be much more careful of your power management. This is why some owners like to carry a big generator, so all the 120 v stuff can operate at once. That is a big plus, but whether it outweighs the many negatives like higher cost, fuel consumption, weight etc , is up to you to decide. Did that help? Labeling your circuit breakers with a sharpie will help you to find the right one to switch on or off when running the gennie.... observing the amps reading of the remote display of the surge suppressor is very educational. ... http://olivertraveltrailers.com/topic/how-to-relocate-the-surge-suppressor-remote-display/ If you are hazy about amps, watts and features, there are a bunch of generator FAQs for you to study. Picking the right size and type of generator is very important. John Davies Spokane WA1 point
-
Forgot to include the axle u-bolts. Use the same 3/4" deep socket as for the lug nuts. Dexter says 70 ft lb.1 point
-
In mind of John's suggestion: I'm not sure about other brands of 1/2 ton trucks, but, the Ford F-150 will let you chose which trailer you are towing (if there is only one then there is no choice given and the process is automatic) and then the truck's computer automatically tracks the mileage driven with that trailer. No "alarms" can be set to note when maintenance is due but it is very easy to simply scroll through the various dashboard screen. And, each time the trailer is connected you are automatically taken to that set of screens on the dash. Bill1 point
-
I transferred our tool kit from our previous Oliver Elite to our current Elite II. Rather than try to tell you what you need I'll tell you what I carry and you can make your own decision as to whether you might want to also. Misc. screwdrivers (flat and phillips) Misc. pliers, wire cutters/strippers/crimping tools, vice grips, hemostats Hammer, rubber and regular Multi-Meter A full set of metric and SAE wrenches A full set of metric and SAE sockets Two DeWalt 18V cordless tools (drill/driver and Impact) A full set of 64 drill bits The 18V batteries also fit a DeWalt Vacuum and flashlight An 18 inch long 1/2 inch drive breaker bar with a 5 inch extension bar An 18 inch long 1/2 inch drive torque wrench A dedicated 6pt socket that fits the lug nuts on the Oliver and Truck A dedicated 6pt socket that fits the anode in the water heater (mostly in case someone else needs it) A 12 volt air compressor Tire plug kit, Pressure gauge, Non-Contact Infrared Digital Thermometer (for hubs and tires) A collection or stainless steel screws, bolts, nuts and washers Extra fuses Flashlights, butane lighters Misc. crimp type wire connectors and terminals, roll of electrical tape Duct Tape, WD-40, Silicone Spray, several rolls of that green Velcro that's used to tie up plants etc. (just cut off what you need to secure cords or what-ever), scotch tape Tube of White Caulk Misc. hose fittings such as Y's and cut-off valves, extra rubber washers Two complete sets of wheel bearings, races and grease seals as well as grease in a NEW, CLEAN grease gun Jumper Cables (these will come in really handy if your converter/charger ever fails - guess how I know) 30 amp to 50 amp converter, 30 amp to 15 amp converter, 120V extension cord Clear Elbow for hooking up the sewer hose when full hookups are available or at a dump station Water purifier Misc. wooden blocks to put under our jacks Misc. bungee cords, para-cord 120V extension cord This is the bulk of what we take, it sounds like a lot of stuff now that I've written it down, but with the exception of the wheel bearings and tire plug kit, we've needed each of these at one time or another.1 point


-
Recent Achievements
-


")


")