bhncb
-
Posts
467 -
Joined
-
Last visited
-
Days Won
6
Everything posted by bhncb
-
The object is to raise the normal axle that has the unflipped shackle in order to draw the equalizer away from the spring eye on the flipped axle. This increases the distance between the equalizer and spring eyes until the flipped shackle rotates near the horizontal position where the spring pressure will force it overcenter. Any method that significantly raises the normal axle will work. The jack method isn't lifting the weight of the trailer but. on the road, use whatever you've got. One of the Andersen style levelers will work.
-
Fast reflexes and manual trailer brake control would be your only chance for mitigation. This sure makes a good case for the expense of a Hensley / ProPride hitch. I had a similar experience involving a passing tour bus doing probably 85-90 down a hill near Park City UT. It was only a twinge of sway for the LEII but enough to get my attention.
-
The General Manager of Houghton responded to my questions with the following: Thanks for reaching out with your queries. To answer your questions regarding the Houghton A3400 and A2801: 1 – There is no option or modification available to collect condensate and direct it to an internal drain. 2 - There is no option for stopping the inside fan when the compressor has stopped in Cooling mode. We do this very deliberately to maintain air flow over the return air temperature sensor. This ensures that the unit will respond appropriately to the cabin temperature. If the fan is stopped then the unit is no longer sensing the true air temperature of the living space and may not turn on again until the space is unacceptably hot. We have used this arrangement in the Australian climate for many years. Our northern states are hot and tropical, similar to Florida, and our units have excellent performance in these conditions. However, we are aware that this arrangement is not typically what you encounter in the USA market. I am very interested in better understanding your concerns about the inside fan remaining on once the compressor has stopped. Can you help me to understand the source of your discomfort?
-
What's interesting is why Oliver changed the duct routing, apparently when they reversed the furnace and hotwater heater locations. The routing changes Bill and Nancy made, as described and shown in the two pictures, is exactly how it used to be. ]
-
Houghton Retrofit Process & Questions
bhncb replied to Geronimo John's topic in Mechanical & Technical Tips
First off, I’ve edited my earlier post with regard to the material DIYvans uses for their roof adapters. I was having a hard time resolving their price versus material and fabrication costs with HDPE. Turns out their adapters are actually machined from UV resistant expanded PVC, which obviates another question I had as to color availability. (Any color you want as long as it’s black). Also, I'm changing some terminology to reflect Houghton parts list names. The idea for a modified design of the DIYvans roof adapter is still in the back of my mind, but this issue doesn’t concern me enough to justify the cost to produce. If Houghton comes back with “Oh yeah, we have a fix for that”, I’d probably redo my installation however. As I mentioned previously, capturing just the larger drain holes would only provide a partial solution. Assuming the size and shape would even work, mimicking the Penguin II by attaching four of those drip pans would involve modifications to the Base for fasteners. It would not be as simple as just running in some self drilling screws. But there's more.... The biggest problem I see with your plan to use an additional roof gasket is the difference in mounting schemes, Dometic versus Houghton. The Dometic A/C is soft-mounted with a foam seal establishing a cushion between the fiberglass roof and metal base pan. The A/C fasteners are tightened down to compress this seal until a specified clearance between the roof and A/C is achieved. Adding the additional seal from the drip pan kit just increases this dimension. In contrast, the Houghton uses a hard-mounting scheme in that the Roof Mount bracket directly contacts the fiberglass roof (sealed with liquid sealant) and the A/C Base is compression-sealed on top of the bracket. The A/C fasteners are torqued to a specified value that ensures sufficient clamping force between all three components. If the Roof Mount bracket was isolated from the roof with a compliant foam seal, the required clamping force would be near-impossible to achieve or maintain resulting in an unreliable compression-seal. I'm not sure this scheme lends itself to your broken ruler scenario but enlighten me. If you were really committed to pursuing the Dometic drip pan solution, I suppose you could cut a riser for the Roof Mount bracket out of one-inch HDPE and notch the top for the drip pan tubes. Sealing for leaks might be iffy though. Might give you something to think about though. Regarding Shims: I cut nearly full length pieces for each side of the Roof Mount bracket and adjoining end pieces to-length as required. Lengths and widths are actually just short of the bracket flange dimensions so edges would be concealed by silicone sealant. Stock thickness would be as-required, 0.010 or 0.020 maybe? I’d recommend checking each installation first though because there could be enough variation between Oliver’s upper shell moldings that shimming wouldn’t be necessary. As far as runoff, I have both awnings and this issue is no different than when the Penguin pans would occasionally overflow. Condensation just rolls off the sides and down to the awnings, which channel it to the rear corners aft of the windows. I suppose some of that stick-on window guttering might work for situations without an awning. Be sure to include pictures.👌 -
New generator Champion 3500 duel fuel
bhncb replied to Vic and Wanda Shumate's topic in Ollie Boondocking
I think error C will come up in any mode if the batteries drop low enough. Also, with a 3500 watt generator it shouldn’t be necessary to change the inverter setting. Something else is going on. -
OK you wore me down. Sent Houghton an email asking about the evap fan control and option for internal condensation. We'll see how responsive their are.
-
Do we really need another fool’s errand to go along with adapting those Dometic drip pans? Ouch! Watch for it.
-
You're closest. 😀
-
2019 f250 stock halogen headlights are the worst ever!!!!!
bhncb replied to taylor.coyote's topic in General Discussion
My 1991 Toyota pickup requires removal of 4 screws for the parking lamps, 12 clips to remove the grill, and then 4 screws each to remove the headlight bulbs. The newer F250 may use a few more modern fasteners but the degree of difficulty doesn't look to be any worse. At least the job can be accomplished while standing up. -
Airmissioner
-
2019 f250 stock halogen headlights are the worst ever!!!!!
bhncb replied to taylor.coyote's topic in General Discussion
I’ve seen improvement switching to Sylvania SilverStar Ultra bulbs in a number of different vehicles. Beyond a replacement style bulb swap, there isn’t much you can legally do to improve on the factory lighting. Make sure they’re adjusted properly for the max load you’re likely to carry and keep them clean and polished. Stay away from the aftermarket vanity bulbs, specifically anything blue. -
I posted about my experience with upgrading to a 28" TV in the thread linked below. Take a look at the pictures and my description of the issues I encountered. Your biggest concern is going to be the overall height dimension of the 32" you're considering. You'll. have to determine if the case will interfere with the overhead cabinet when it's down in the viewing position., and whether there is enough clearance between the window shade when it's folded up. My sense is that any 32" will be too big. There is some adjustment of the mount but it trades one direction for the other. Relocating the mount any appreciable amount would be a major operation. https://olivertraveltrailers.com/forums/topic/4188-television/#comment-41664
-
Houghton Retrofit Process & Questions
bhncb replied to Geronimo John's topic in Mechanical & Technical Tips
Okay. I think of them as spacer blocks. The shims I was refer to are necessary between the support bracket and Ollie roof to keep the bracket from rocking side to side, and for establishing a level surface to prevent the bracket from flexing when the unit is torqued down. I though the Houghton instructions noted this but can't seem to find it now. For me, it was just best-practice. The pressure I was referring to is the negative pressure created by the evap fan circulating inside air up and through the evap housing. This negative pressure would cause a draw on the larger condensate drain holes, restricting the flow. I believe the series of smaller holes are intended to reduce this effect. If only the larger holes are captured by your scheme, there is still a potential for some drainage through the smaller holes. So my question would be: What's the point? The roof adapter by DIYvans is I suspect machined from a sheet of expanded PVC HDPE aka Starboard. They are cut specifically for the 3400 outline, with the bottom surface contoured to match roof curvature. So, it should be no different than if the unit were resting directly on a flat roof. Since the support bracket rests on top of the roof adapter, the underneath clearance for the unit will be the same .4 ". I would argue that any adjustment from "level" are best left to routine attitude adjustments made during unhitching and setup. If drainage slope were factored into the installation, one could easily exceed the maximum operating inclination of the unit. I keep a supply of PVC shim stock around for general use. This is available in various sheet sizes and thicknesses but I have .010 to .060 in four increments. Most of my materials, i.e.stuff like this, are ordered through Zoro.com. If/when you do buy one of these, put it on your bench and pop the hood. Compared to the Penguin II, the Houghton is a stunning piece of work. -
Houghton Retrofit Process & Questions
bhncb replied to Geronimo John's topic in Mechanical & Technical Tips
All the holes I circled are open to a drainage trough under the evap coil perimeter. Since the coil is contained in a sealed housing, the fan tends to creates a negative pressure environ so any air leakage should be outside in. It seems to me however that the 8 larger holes at the corners are primarily drains for condensation with the remaining smaller holes providing pressure equalization. Since the entire evap assembly is enclosed, there won't be any intrusion by rain or snow. For the exposed section of the unit, drainage is provided by the multitude of holes around the entire perimeter and a few others strategically positioned in the base. As far as the support bracket: Your dimension are correct. I'm not sure what you're referring to as being "four black shiims". The black bracket is a single flat piece and should be shimmed to account for the not-quite-flat roof of the LEII, but there are no shims provided with the unit.. I cut strips out of PVC shim stock but I'd have to do some digging to tell you the thickness I used. If you wanted to raise the entire unit, I'd look here for a solution. Remember though, your .5" drain tube is ID so figure on 5/8" minimum plus. The tubes would have to pass under the support bracket and achieving an effective seal might be tricky. Nothing else comes to mind. The standard flex duct that connects the plenum is good for a roof thickness up to 85 mm, so no issues there with this minimal height addition. -
Houghton Retrofit Process & Questions
bhncb replied to Geronimo John's topic in Mechanical & Technical Tips
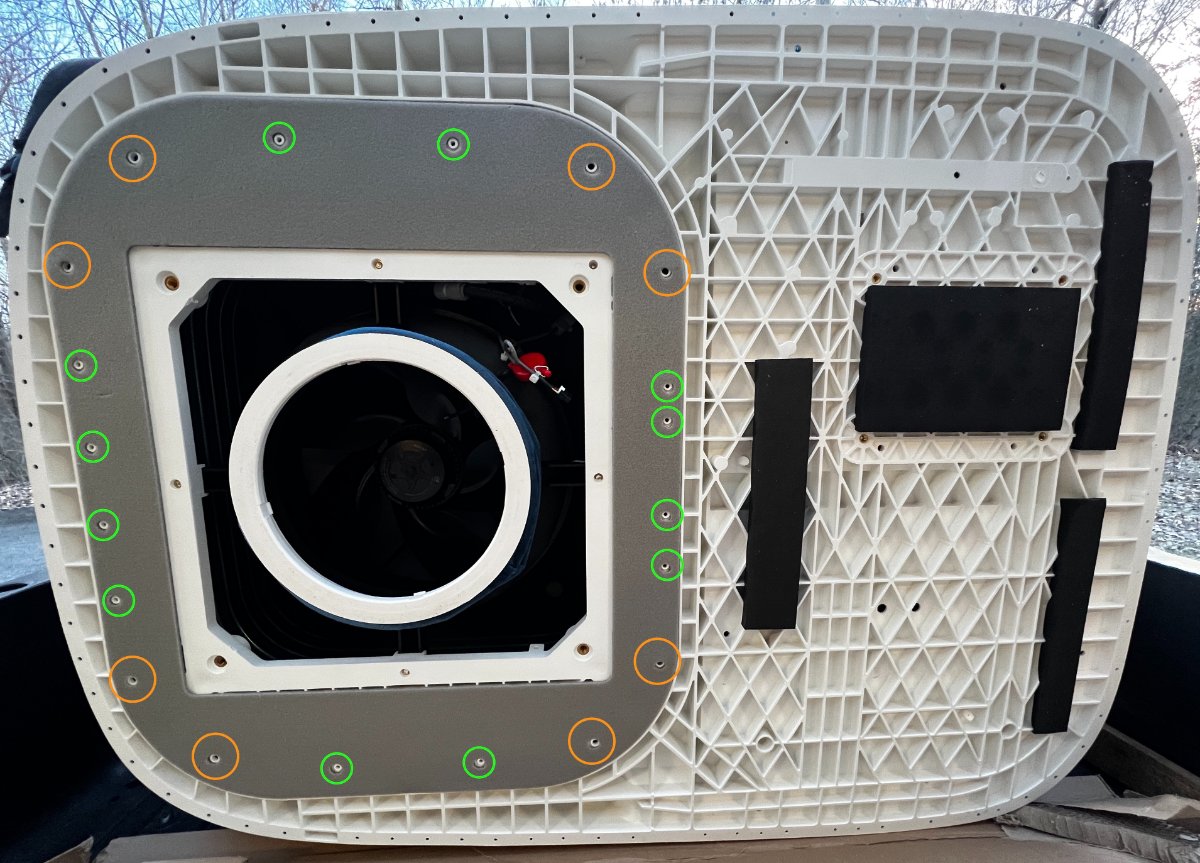
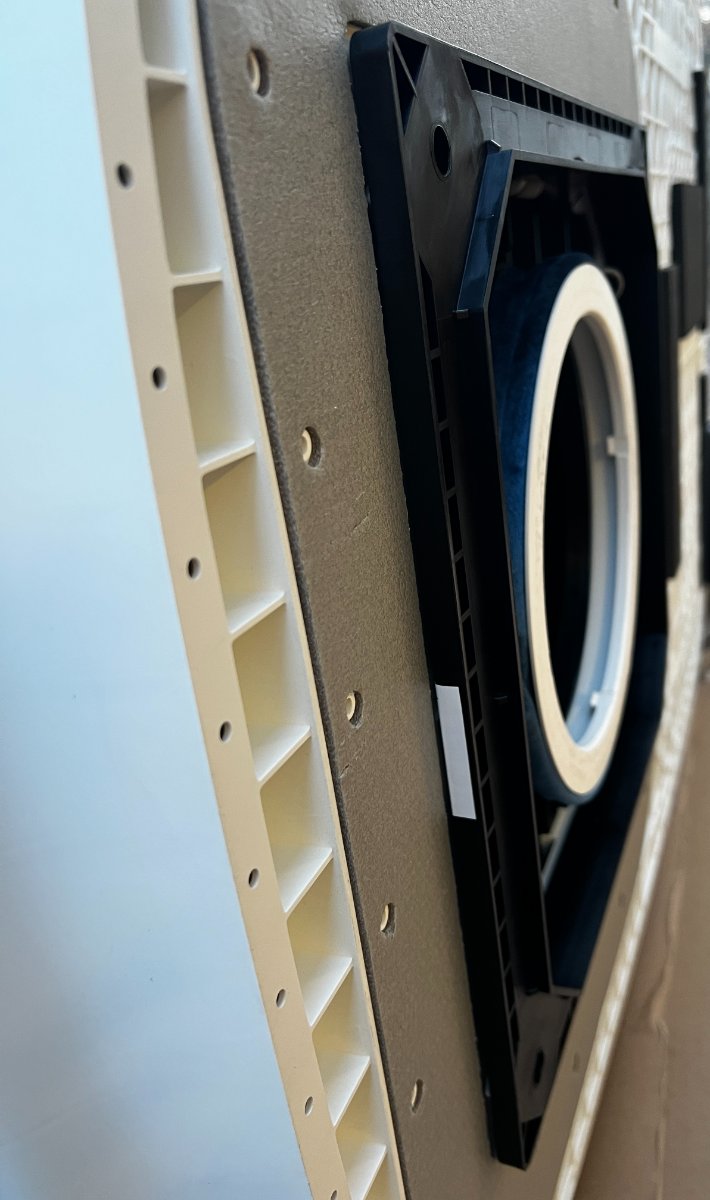
Here are a couple of pictures to help you. I'm afraid it's not going to be as easy as you'd hoped. On the first picture, I've circled all the holes below the evaporator coil. The orange in the corners are maybe 8mm while the green ones are probably 5. As you can see, the entire bottom pan is structurally molded "plastic". Looking at the parts breakdown may also help you. The second picture shows the height of the roof support bracket. At best it's 10 mm so there's not a whole lot of space underneath the unit. The support bracket has an integrated foam perimeter seal, and compression-seals to the bottom pan when it's torqued down. Elevating the unit would be much more involved than just using a "spacer gasket". This particular 3400 is a sacrificial unit I was using, primarily to address your concern. Originally my thinking was to adapt a mini-split condensate pump but the juice didn't seem worth the squeeze. There is a company in OR that fabricates mounting "adapter plates" for these, primarily to accommodate the curvature of Airstream roofs. I thought about contacting them to come up with a design that also incorporated a drain pan system to connected with the Oliver's internal drain tube. My mental design started to get really complex so I haven't pursued this idea any further at this point. I've been using the 3400 on my LEII for about three years and don't find the way this unit drains onto the roof to be a big issue. I do tend to avoid high humidity however.
-
Here's the piece I ordered to relocate mine. Pay attention to the rivet material and recommended hole size. The fiberglass here is a very thin layer. If the hole is slightly oversized and/or the rivet has a steel mandrel, the rivet will likely pull through when set. To reattach, you should rotate the lamp base about 45 degrees from the original position and drill two new holes. "It's never easy"
-
Is this a municipal supply of deionized water?
-
Thetford 42061 Aqua-Magic Style II RV Toilet Low Profile - White with sprayer. It is also available without the sprayer but you’d have to check the Thetford website for the model number. It hasn’t been fastened down yet but it’s ready to go. I had to replace the broken flange and buff out the gelcoat because the Thetford base is slightly different/smaller and the Dometic wore a faint ring in it from being loose. Then I got sidetracked by other interests yadayada. i haven’t ever had a Thetford break. Routine maintenance is easy and the parts are readily available. The whole flush pedal business is a much sturdier design and the pedal won’t bottom out directly on the beveled edge of the raised fiberglass base. Sure as you read this though, someone will counter with a different opinion.
-
GJ: Yes that's the original from my 2018. They may have decided to just assign a different model number to the 310 instead of referring to them as standard and low profile. Does your label say Dometic or Sealand? Yours may be what was available during the brand name changeover. I decided to go with the Thetford because: 1. I have a long history with them in the marine environment. 2. They are more serviceable from a replacement parts prospective. 3. The lower height will be more comfortable for us since I've decided to nolonger use my teak shower pan insert. 4. It's not a Dometic.
-
It's my understanding that the 310 and 311 use the same porcelain bowl but with different height polymer bases. Here's a picture of the sticker on my 2018 311. It measures 13 inches from floor to top of bowl rim. I'm replacing this with a Thetford Aqua-Magic Style II low profile. It is about an inch shorter however.
-
I think this is a misconception that likely arose because some Dometic thermostat models have an option for a remote temperature sensor. The CT model used in Olivers do not offer this capability and the temp sensor is integral. Also, I made an edit to my previous post to clarify the DPDT switch operation. Strongly suggest this. Heat pump is the way to go for all-season usage.
-
I think it's important to understand the context of this "solution". My (mis)understanding is that Bill & Nancy's solution was to determine the point of failure, which it does quite effectively. If it is implemented as a permanent workaround for a component failure, the original problem still exists and there is an absolution of responsibilities. While a separate battery powered thermostat is most likely a better way to control the furnace, there is no need for the implementation to maintain furnace control by both thermostats via the DPDT switch. Simply wiring the battery powered one in to control the Heat signal would also allow simultaneous use of other A/C functions, like heat or fan, while the furnace is operating.
-
If financial compensation is the primary objective, yes. Otherwise, a competent DIYer can retain their sanity by just fixing it and moving on.
-
The circulation pump runs continuously in antifreeze mode. That's probably what you're hearing.