Leaderboard


Popular Content
Showing content with the highest reputation on 08/28/2019 in Posts
-
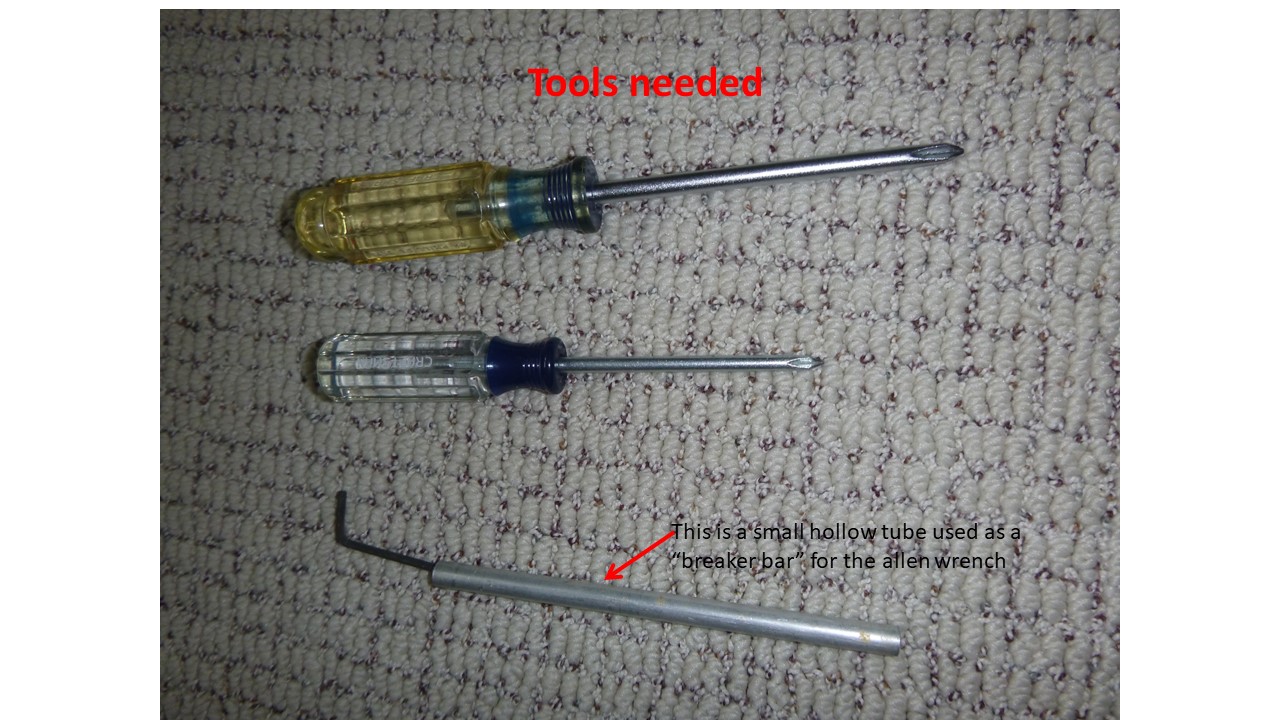
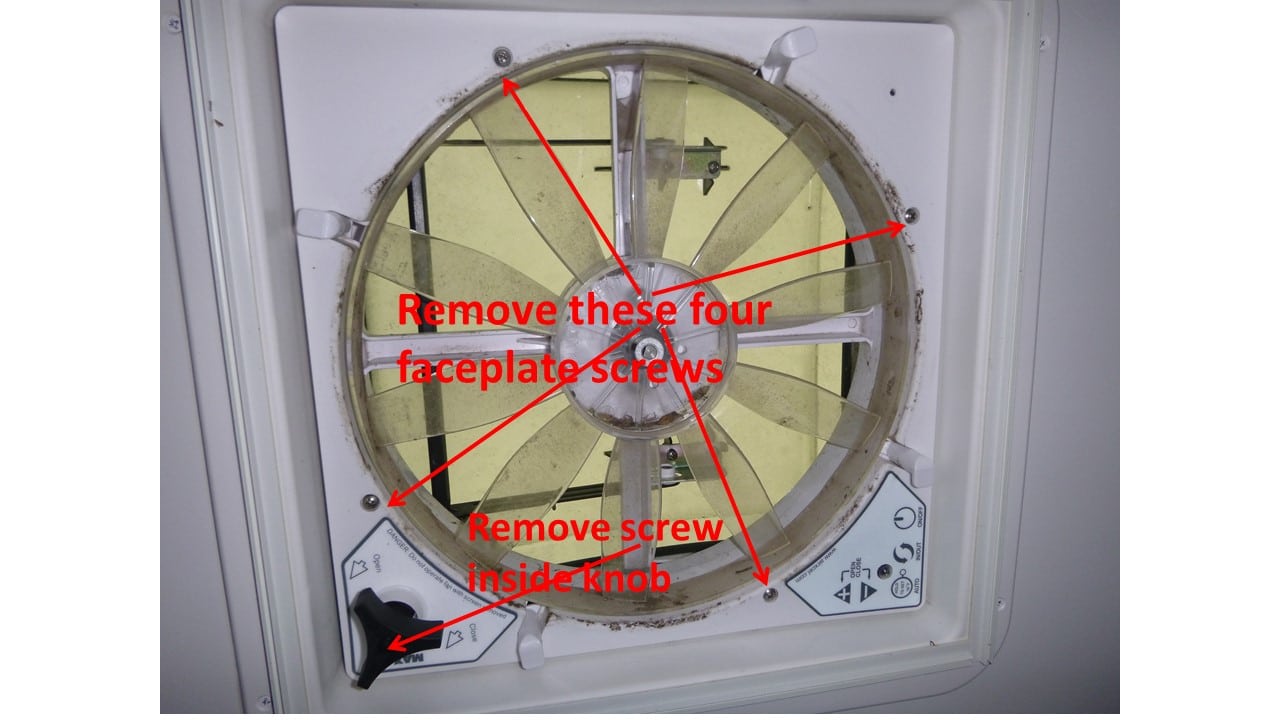
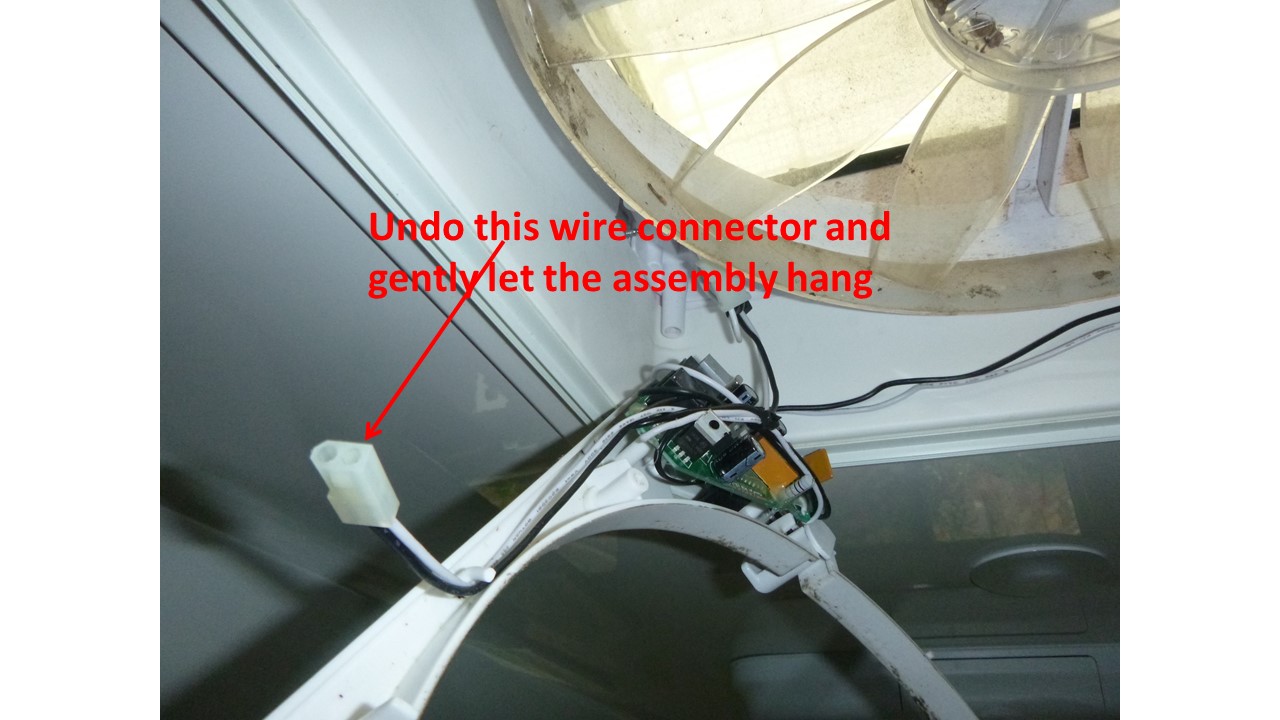
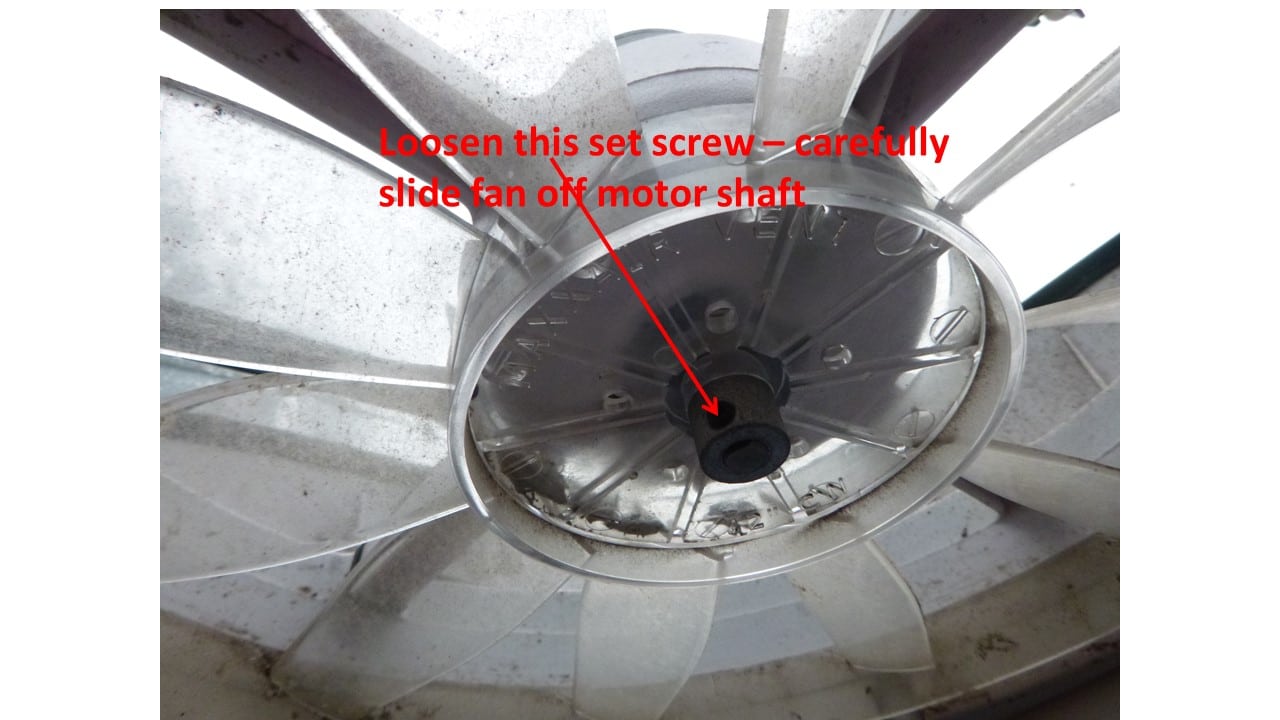
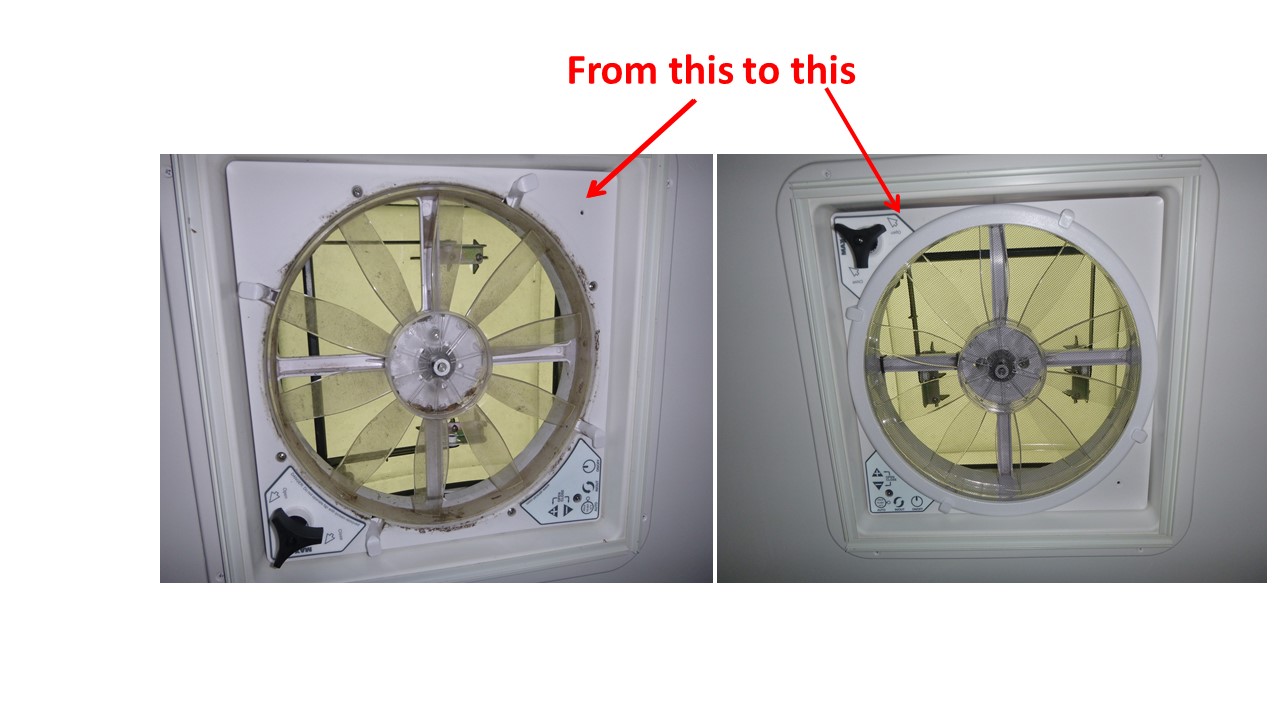
Sometime ago I presented a Mod where I installed a black filter material on the MaxxAir Fan in order to reduce light transmission into the interior of my Oliver. I thought an added benefit of this mod was that the filter material would keep the fan somewhat cleaner than it would have been otherwise since normally I only use the fan on the exhaust setting. While in Montana this year I noted a "couple" of insects that were trapped on the other side of the filter material and a few days before heading home the fan developed a ticking sound - particularly at slow speeds. So, I figured I'd remove the filter, fix that ticking sound and clean the interior of the fan for the first time in four years. Upon removing the filter material, I was totally surprised with the number of dead bugs and the nastiness of the fan. Since the MaxxAir frame is caulked into place (along with four screws) onto the inside shell of my Oliver, I proceeded to remove what I could of the fan without a total removal. Here is how I did it: 1 – Remove the screen by turning the four plastic “tabs” 180 degrees either to the right or left. 2 – Remove the inner face plate – the one with the controls and knob that is used to manually open the exterior cover (see picture) by removing four screws plus the screw in the center of the black knob. Disconnect the electrical connection noted in the picture and gently let the faceplate hang in place. 3 - Remove the fan using an allen wrench (3/32 I believe). In my case the set screw holding the fan to the motor shaft was either put on by a gorilla or had a bit of corrosion which caused the set screw to be difficult to loosen. I put a couple of drops of “Liquid Wrench” on the threads of the set screw, let it set for a few minutes and then used a small piece of tubing as a breaker bar as a help with the small allen wrench. Be a bit careful here with the force applied - you do not want to strip the inside of this set screw. Also be careful with all plastic parts in that they are easy to break. 4 – Clean and dry screen and fan. I used “Simple Green” cleaner and a soft brush to clean both the screen and the fan. The fan was then wiped down with the same mixture I use on the interior of the Oliver – 4 parts Duragloss detailer with 1 part Duragloss liquid wax – in order to give it a nice clean shine. 5 – Clean the inner face plate and clean all other interior surfaces of the MaxxAir. Again, I used this Duragloss mixture. 6 – Re-assemble all parts in the reverse order. Note that when re-installing the fan on the motor shaft, the fan set screw should be tightened against the “flat” surface on the motor shaft. Do not over-tighten any of the screws that go into plastic! Snug is sufficient. Don’t forget to re-connect that electrical connection that was disconnected in step 2 above. When re-installing the screen, if the four plastic “tabs” were originally turned 180 degrees then the screen should easily slip back into place. These four tabs can then be turned back to the original position into the indent on the face of the plastic on the screen. Do not force these plastic tabs, they are snug but finger pressure is all that is necessary if they and the screen are positioned correctly. 7 – Turn the fan on to make sure that all is well. For what its worth, the “ticking” sound was caused by a little label (serial number and model of fan) becoming partially un-stuck from the interior side of the fan housing. As the fan would rotate, the blades would hit this label causing the noise.
 3 points
 -
Hobo glad it worked out for you. You may want to also fill your fresh tank and let it drain out through the tank drain valve.You should be ok i think every thing gets sucked in the first time you use the pump. Please call service and let them know they will want to hear about it, Thanks2 points
-
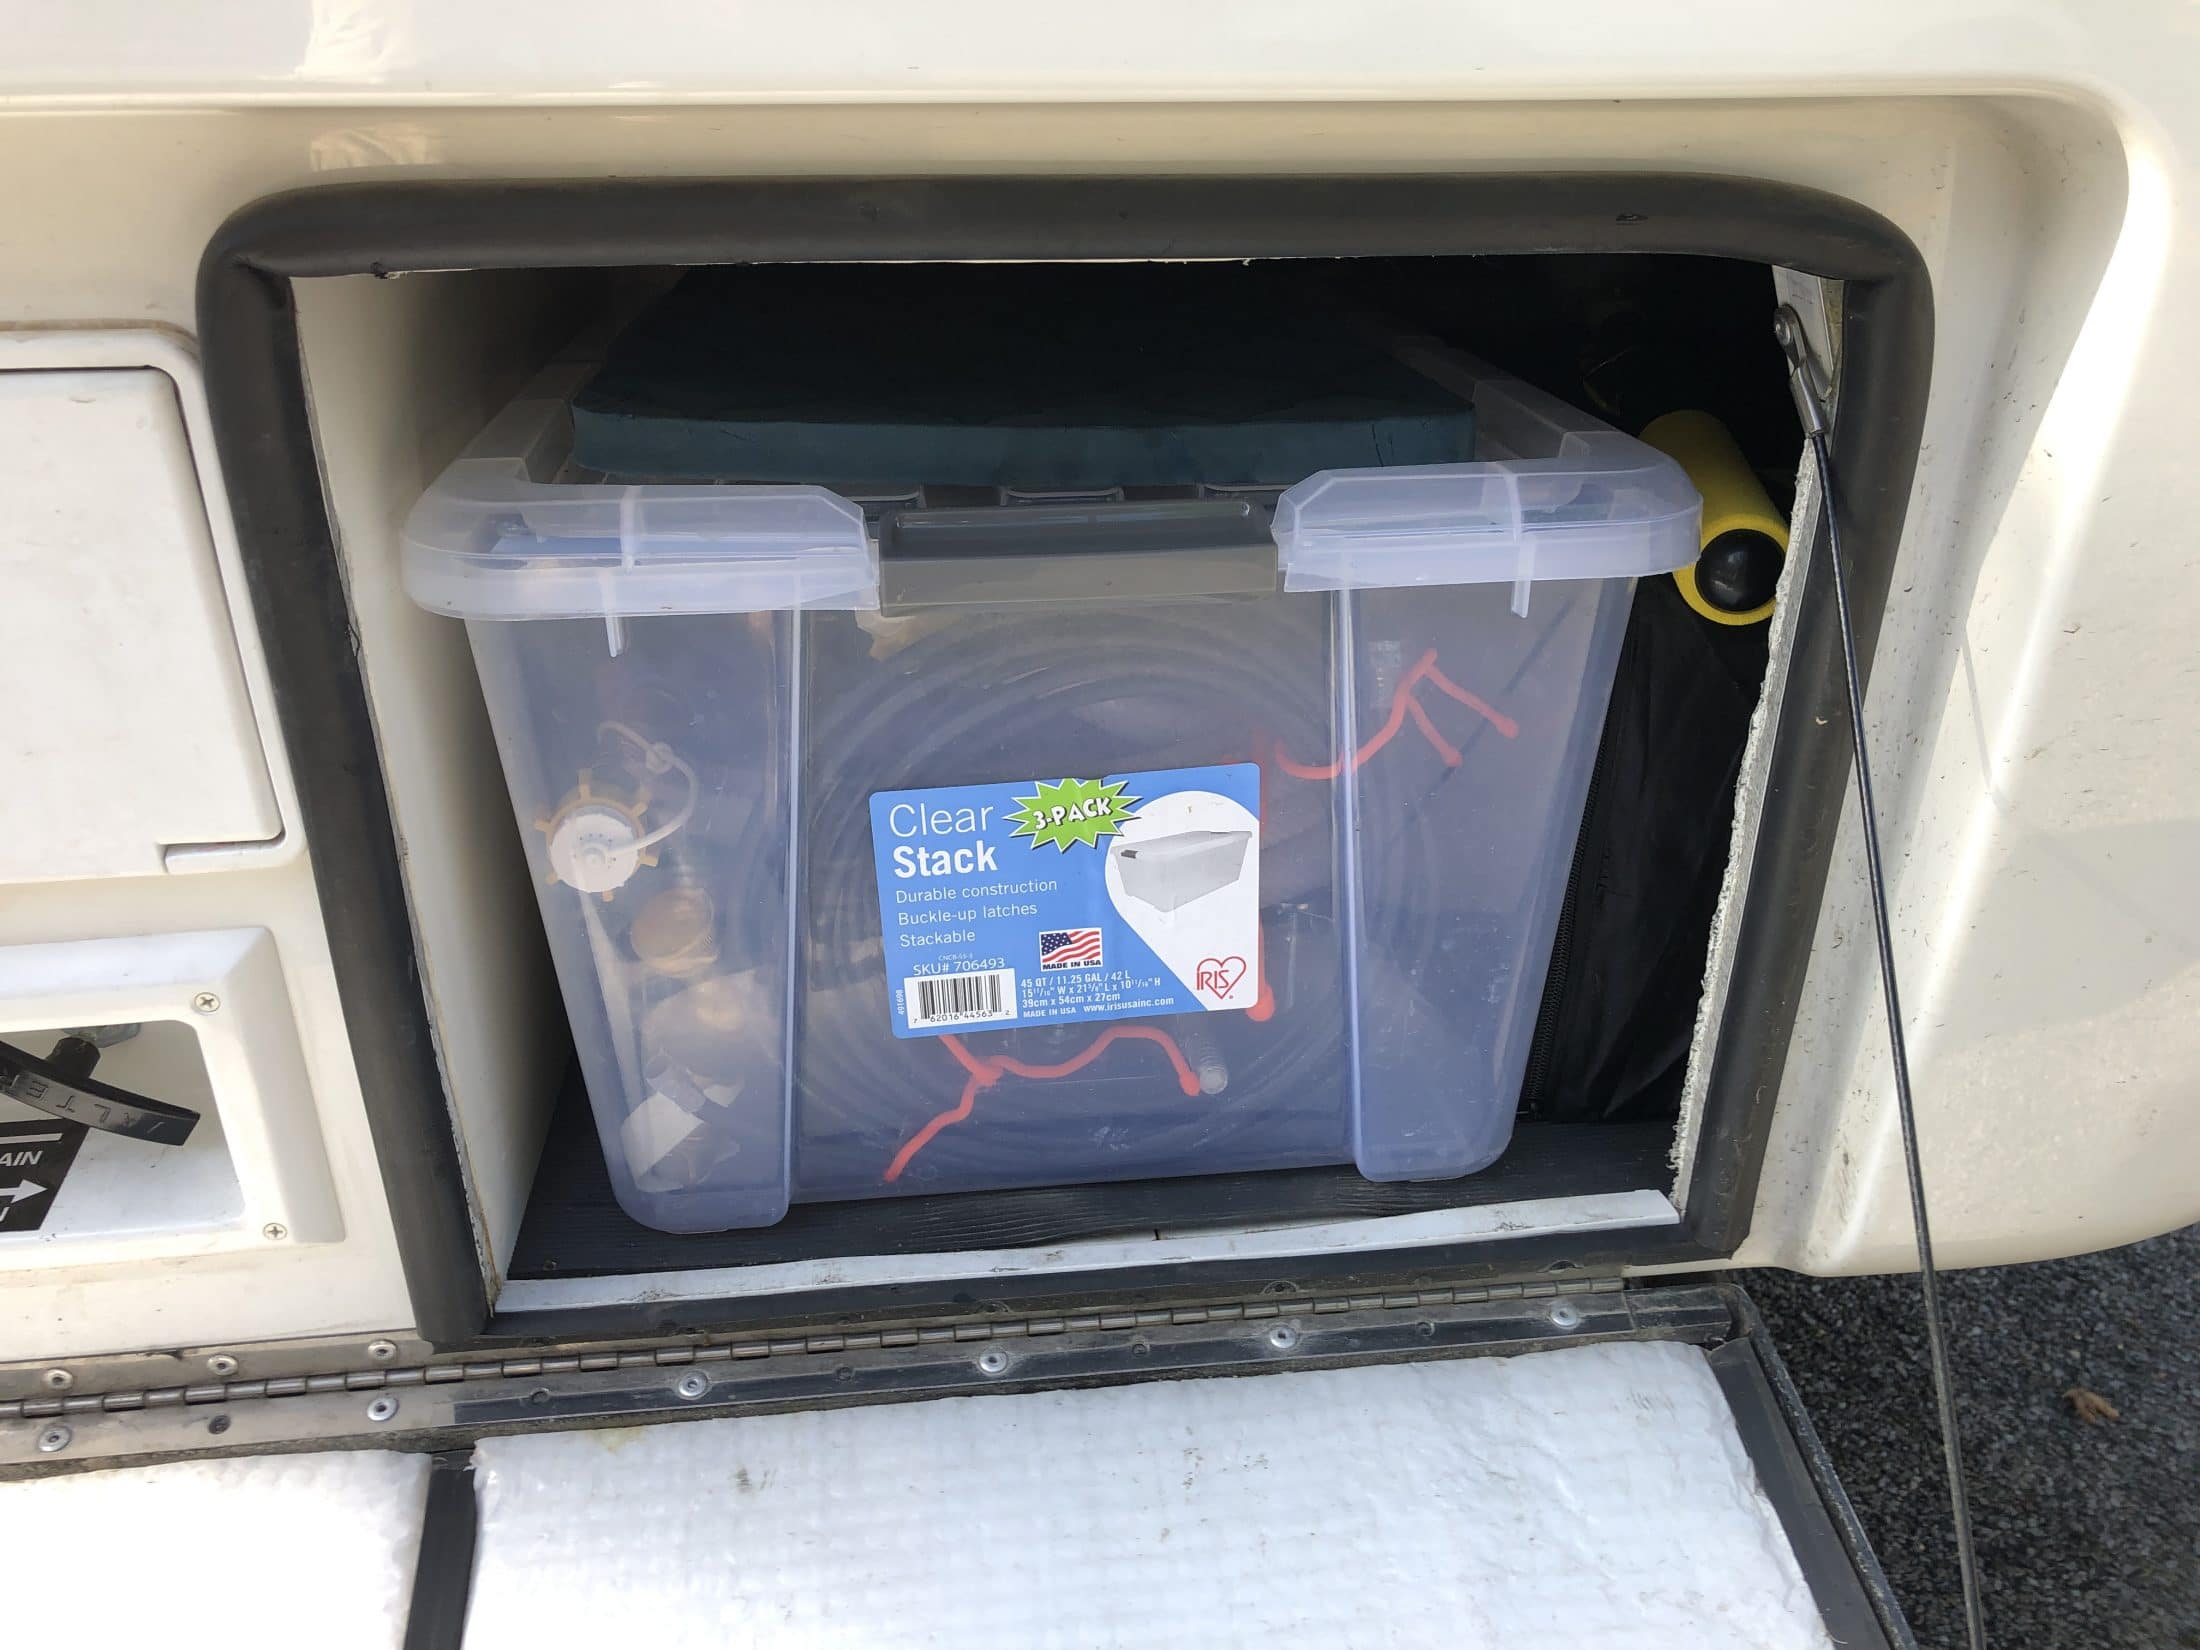
Based on what I read on the forum, initially I got a bunch of 12 x 12 milk crates to store things in the basement. However, I found that the 12 inch dimension was constraining. My specific complaint was that I had to coil the hoses very tightly so that they could fit in the 12 inch container. I also needed multiple boxes to store the essential items, and the space in the boxes was not used efficiently. I have now purchased a larger plastic storage box, 15 11/16 wide x 21 5/8 long x 10 11/16 high. I think this size box is widely available; I got mine at Costco. I like this box for several reasons. 1) It is much easier to coil my hoses to fit the 15 inch dimension. 2) The 15 inch width fits perfectly through the basement door. 3) The 21 inch length puts the box right up against the wall that is the side of the night stand for my Elite II Twin Bed model, maximizing space usage. 4) The box is large enough that the one box can hold all of my most routinely used items: water hose, water filter, 2-way garden hose splitter and pressure regulator, 30 amp electrical cable, circuit/voltage tester, and my X-chocks. I also have a coaxial cable in the box, but we have used it only once. There is still room left that I could use for other items. This one box holds all of the things that I need most frequently. Additionally, the size of the box makes it easy to put all of these items into the box.
2 points
-
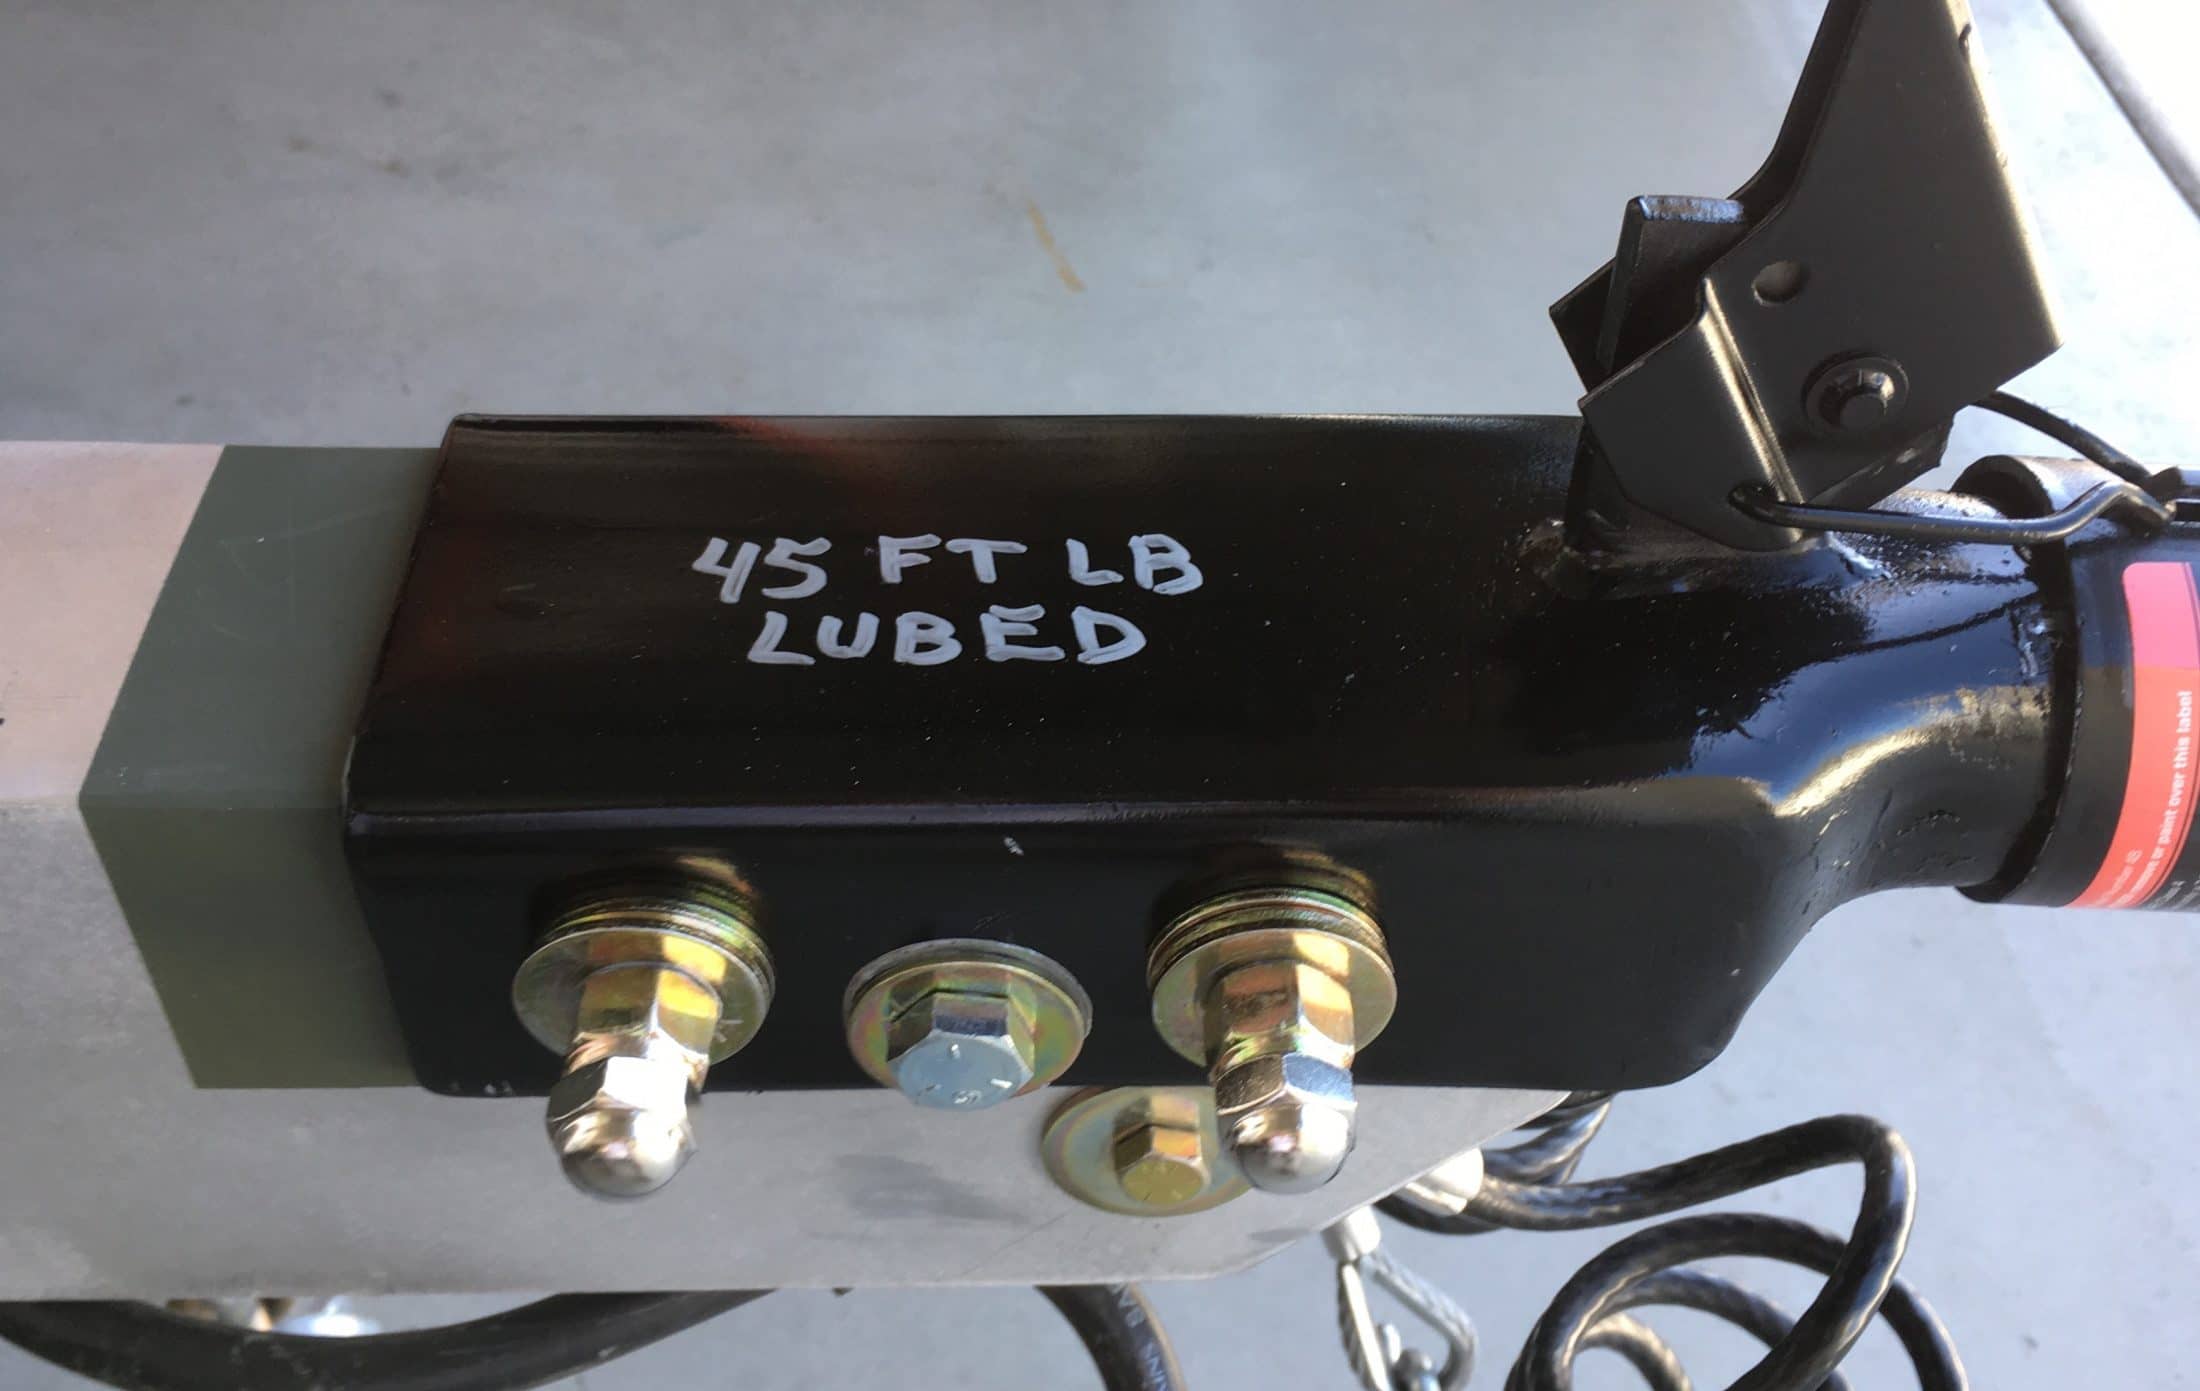
Oliver uses these exact bolts at the factory, the hardware was not an upgrade. Some of their installations, like mine, did not have enough washers under the nuts. I only replaced like for like. But my relacememt nuts had enough washers. I did contact Bulldog, and they said that Grade 5 was plenty good, Grade 8 was also acceptable. I reworked mine with Grade 5 bolts (and Grade 8 washers and nuts) since I think one issue is that when the poorly formed sides of the coupler are squeezed together, they do not mate perfectly with the tongue, and the nut and bolt head experience a bending force. The one that did not snap showed NO signs of distress or stretched threads (which would have indicated over-torquing) but it did have a slight bend at the threads. I added two more short bolts with the nuts inside the tongue. I reduced the torque value by 20% due to the discussion here, but I do not think that was the problem in the first place. I can't recall the last time I busted a bolt or stud during installation.... I'll start a new thread about this mod when I get the time. I do think that additional hardware is a good safety factor, that might prevent a call to AAA if you have a failure on a trip. Thanks everyone, for your patience and participation. I have sent Oliver Service some pictures for their examination. Maybe they will consider adding a third sleeve and through bolt. And bigger would be better... John Davies Spokane WA
2 points
-
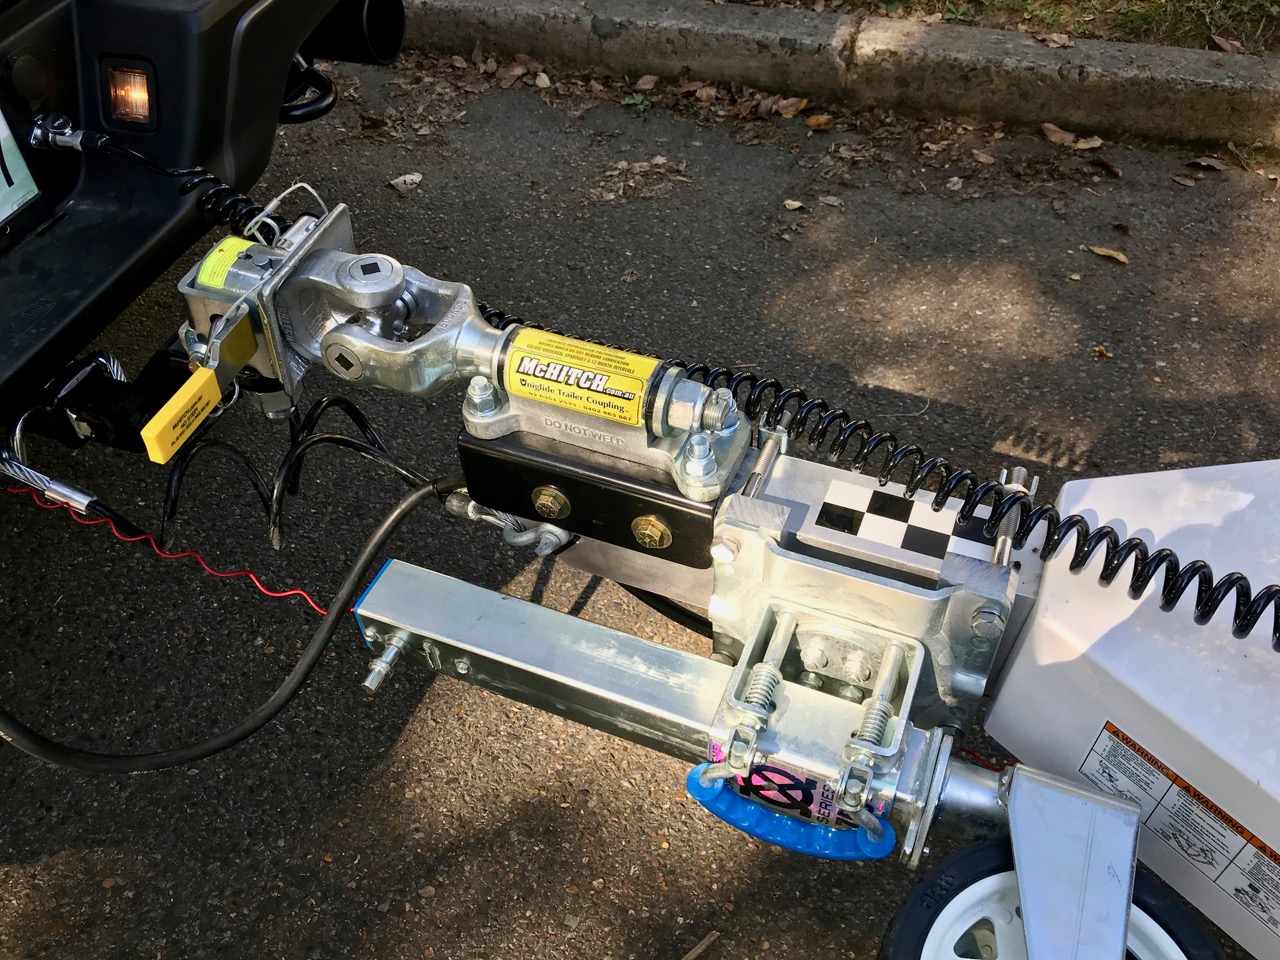
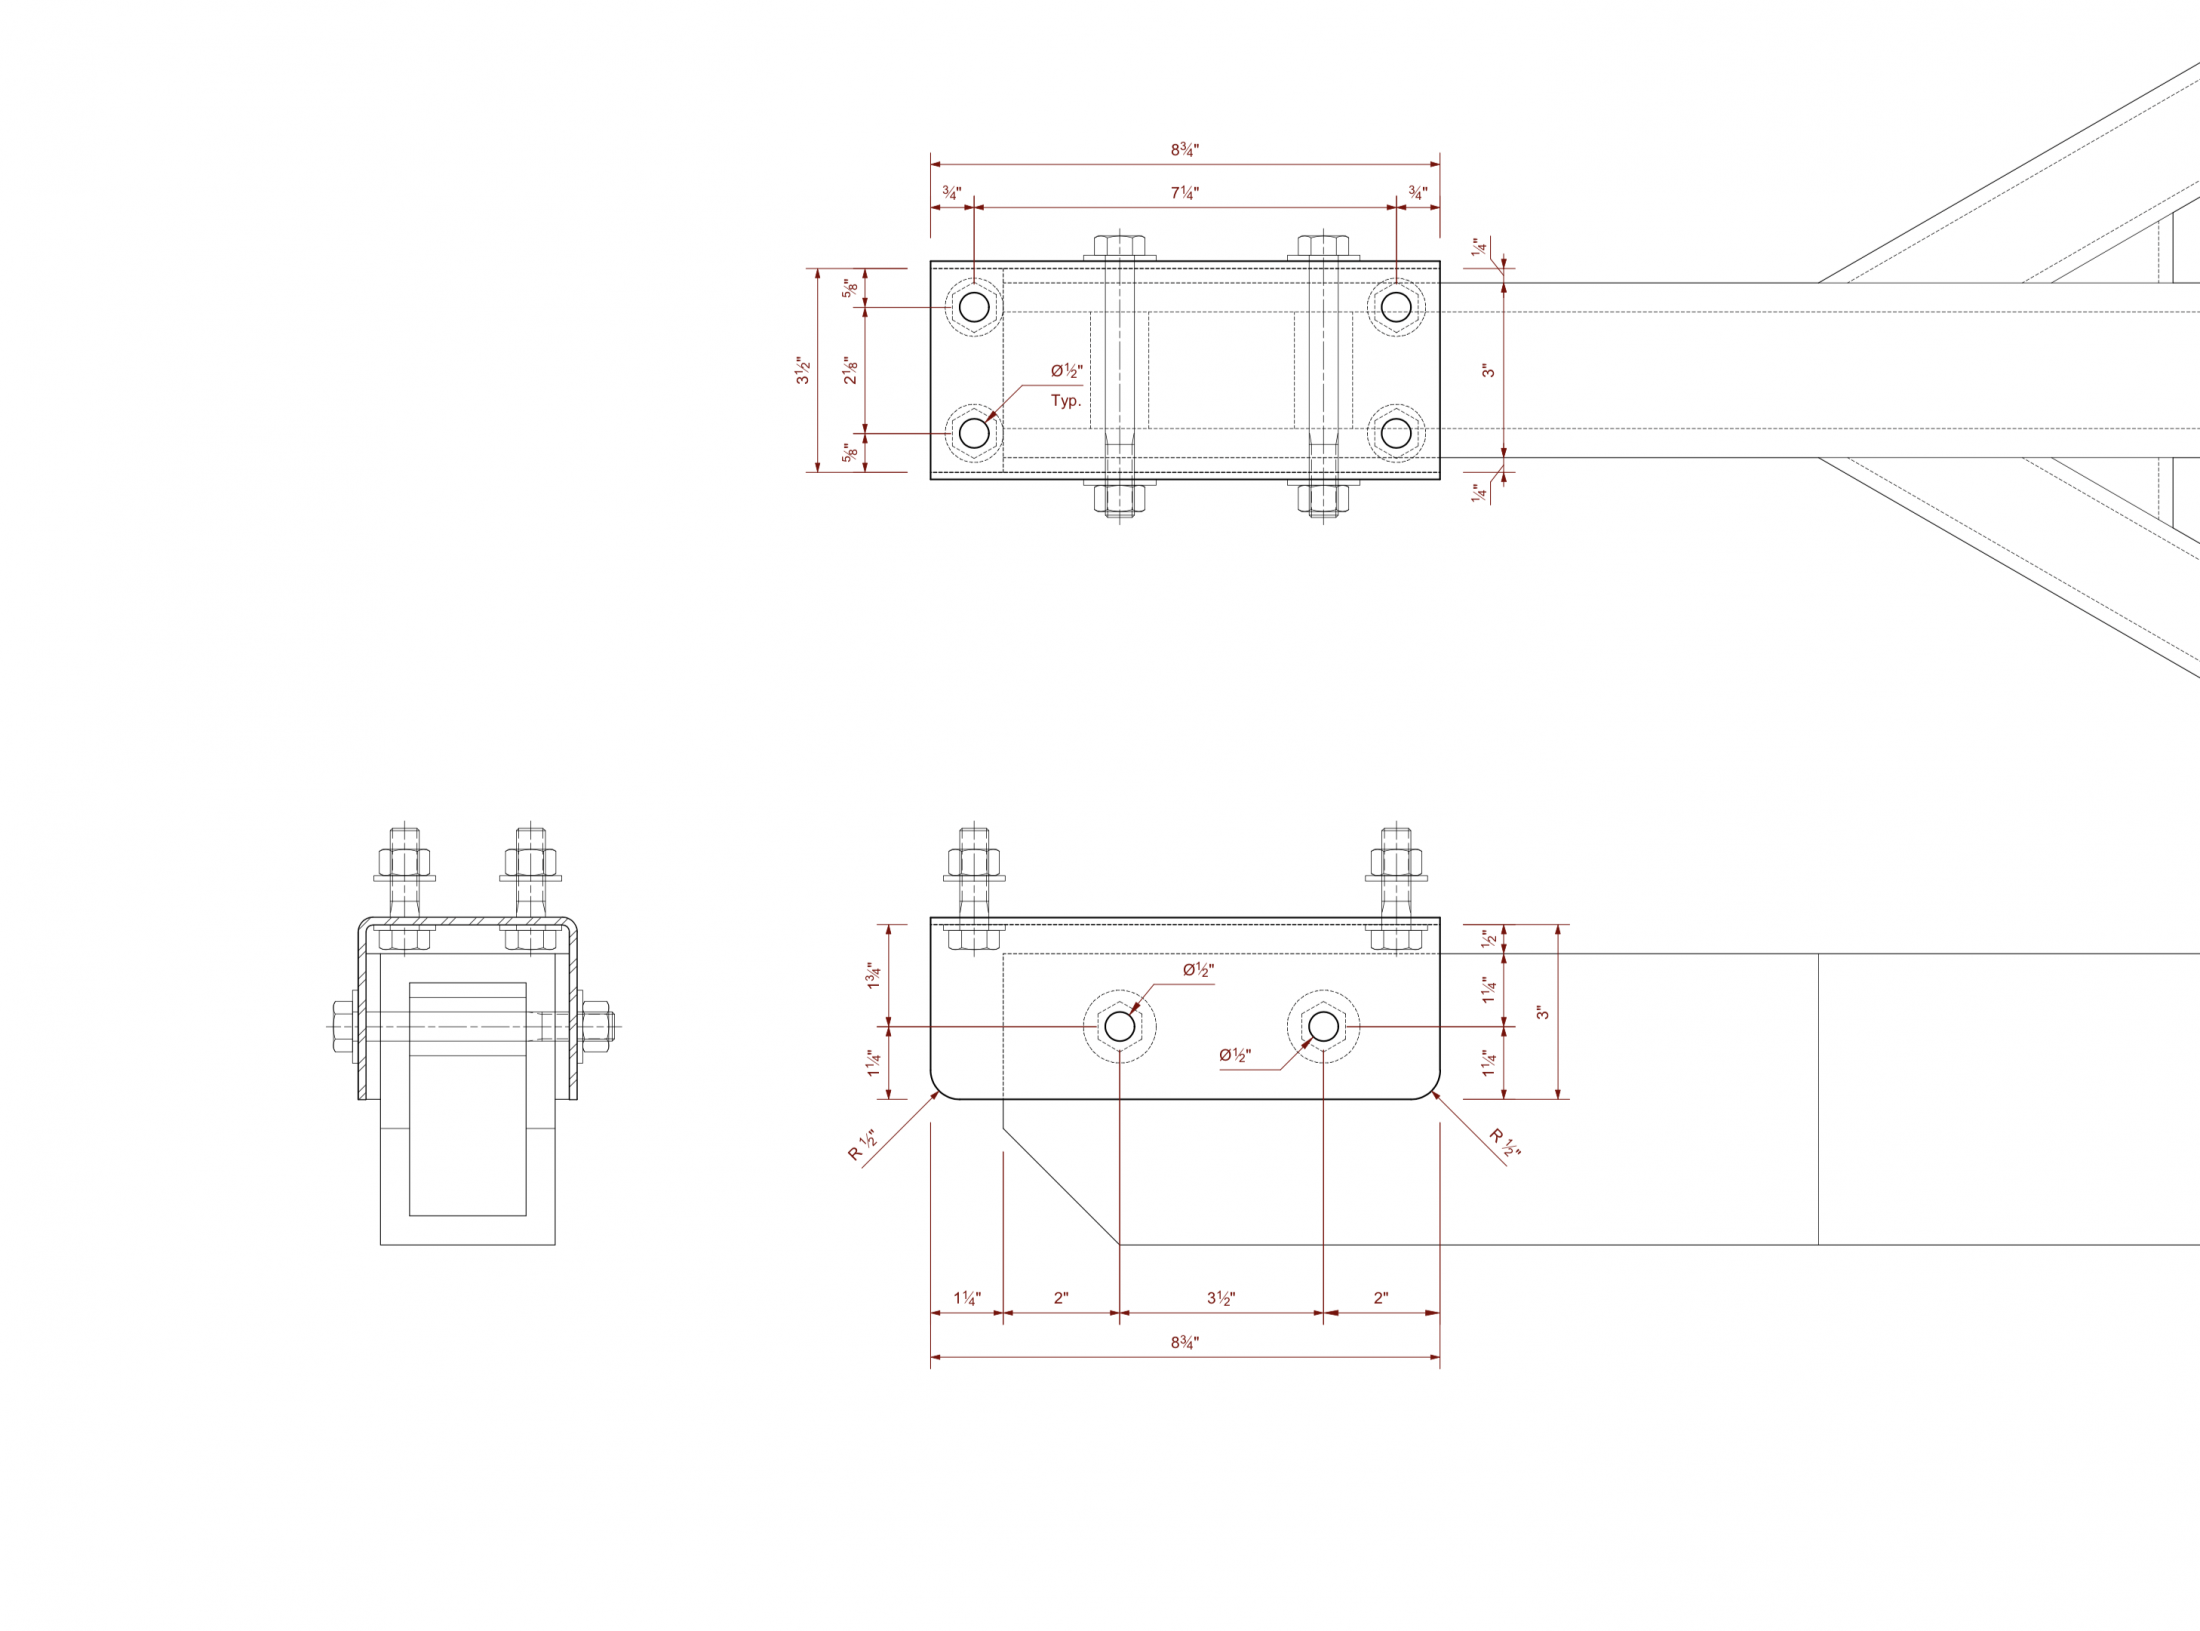
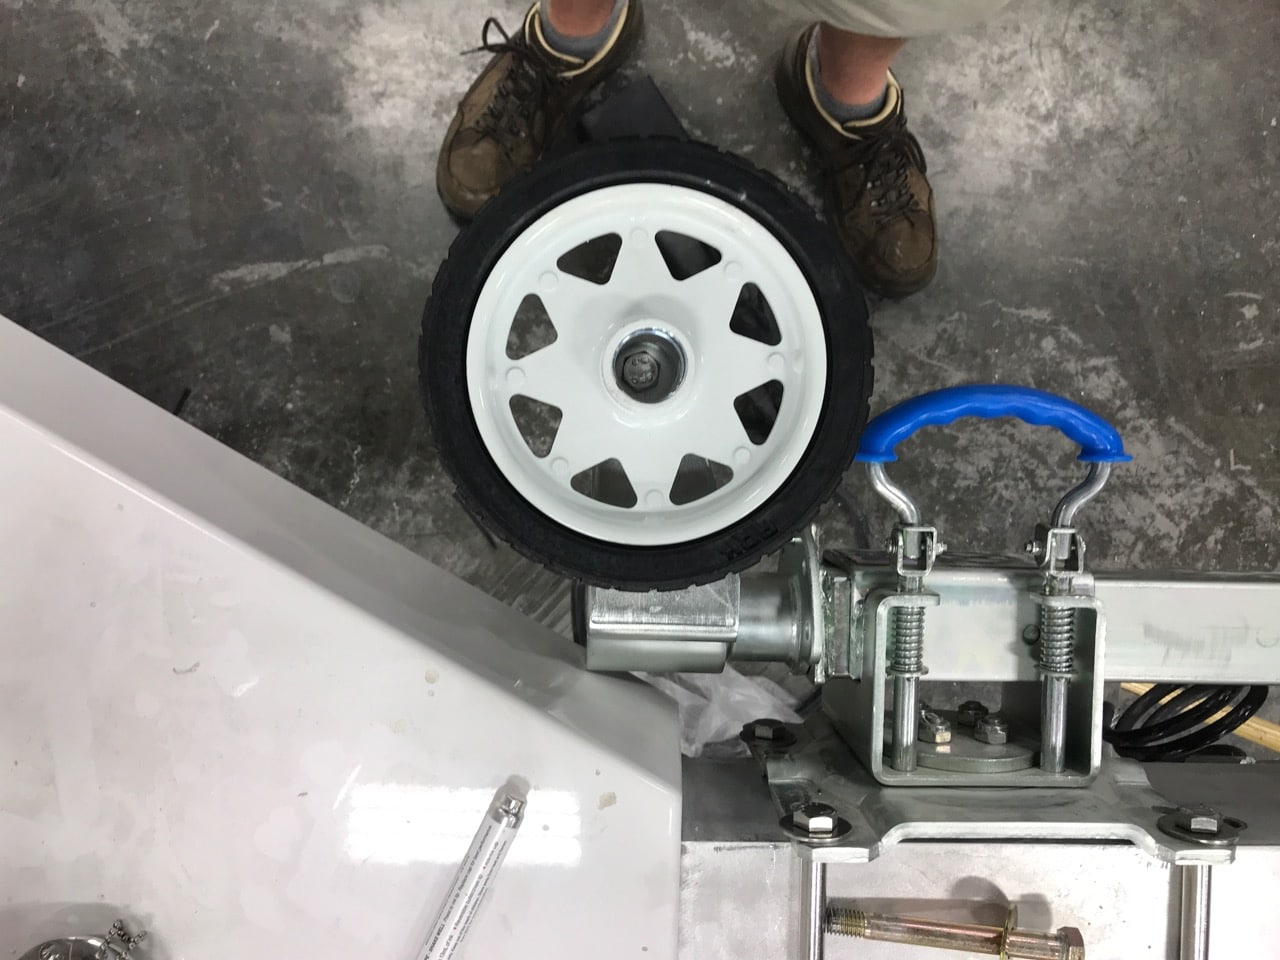
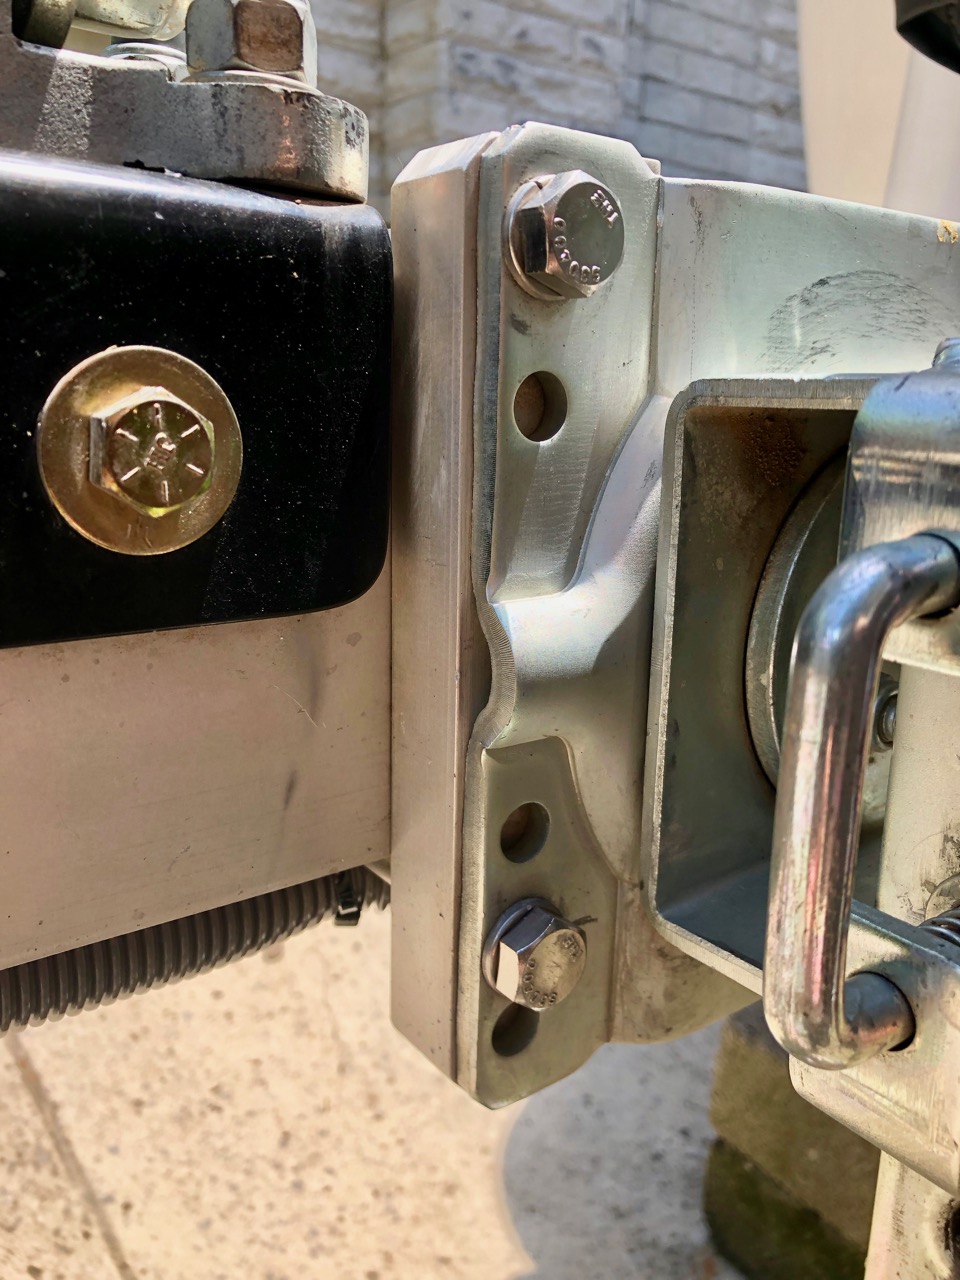
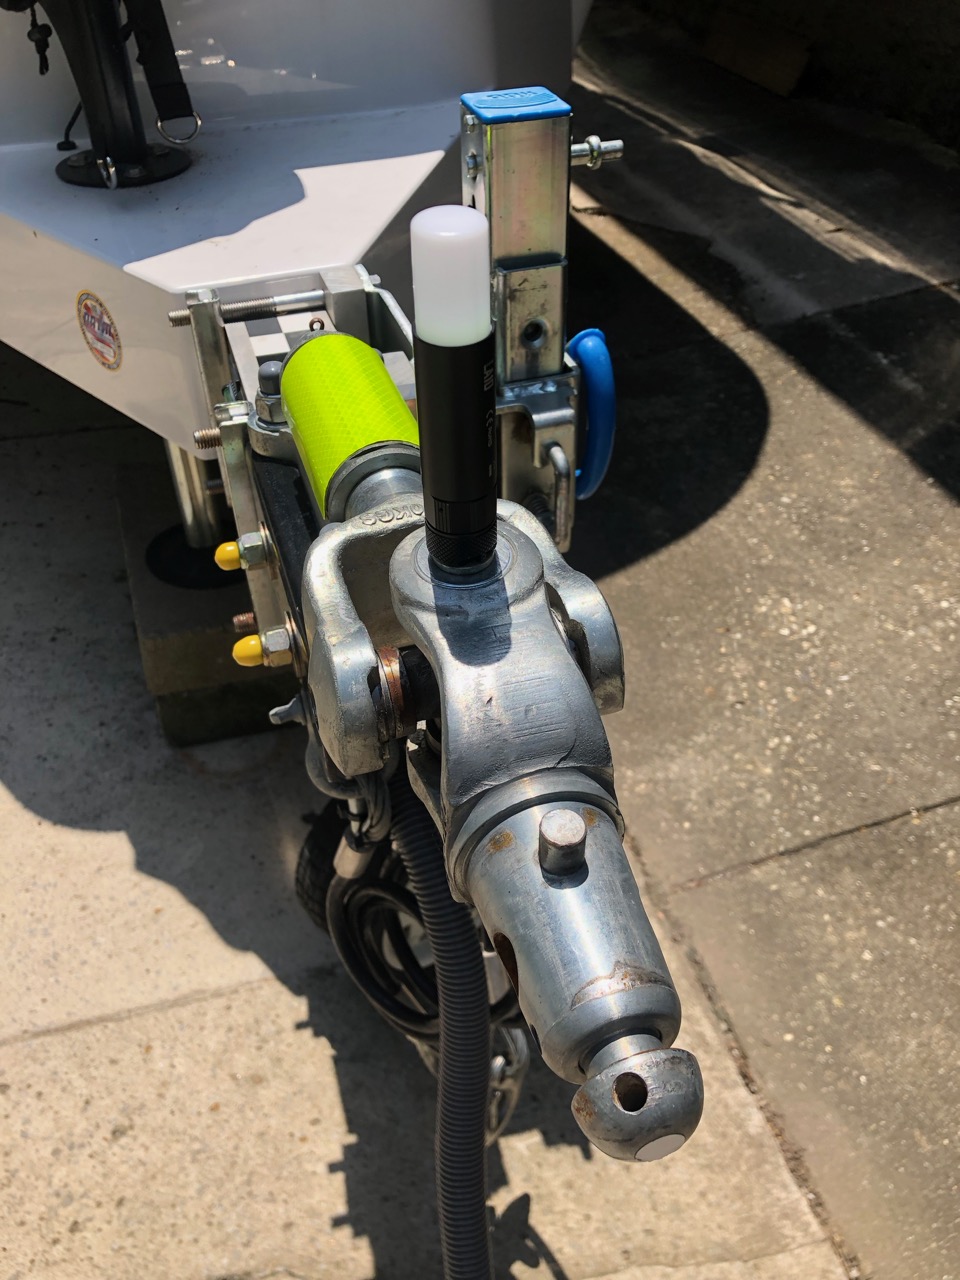
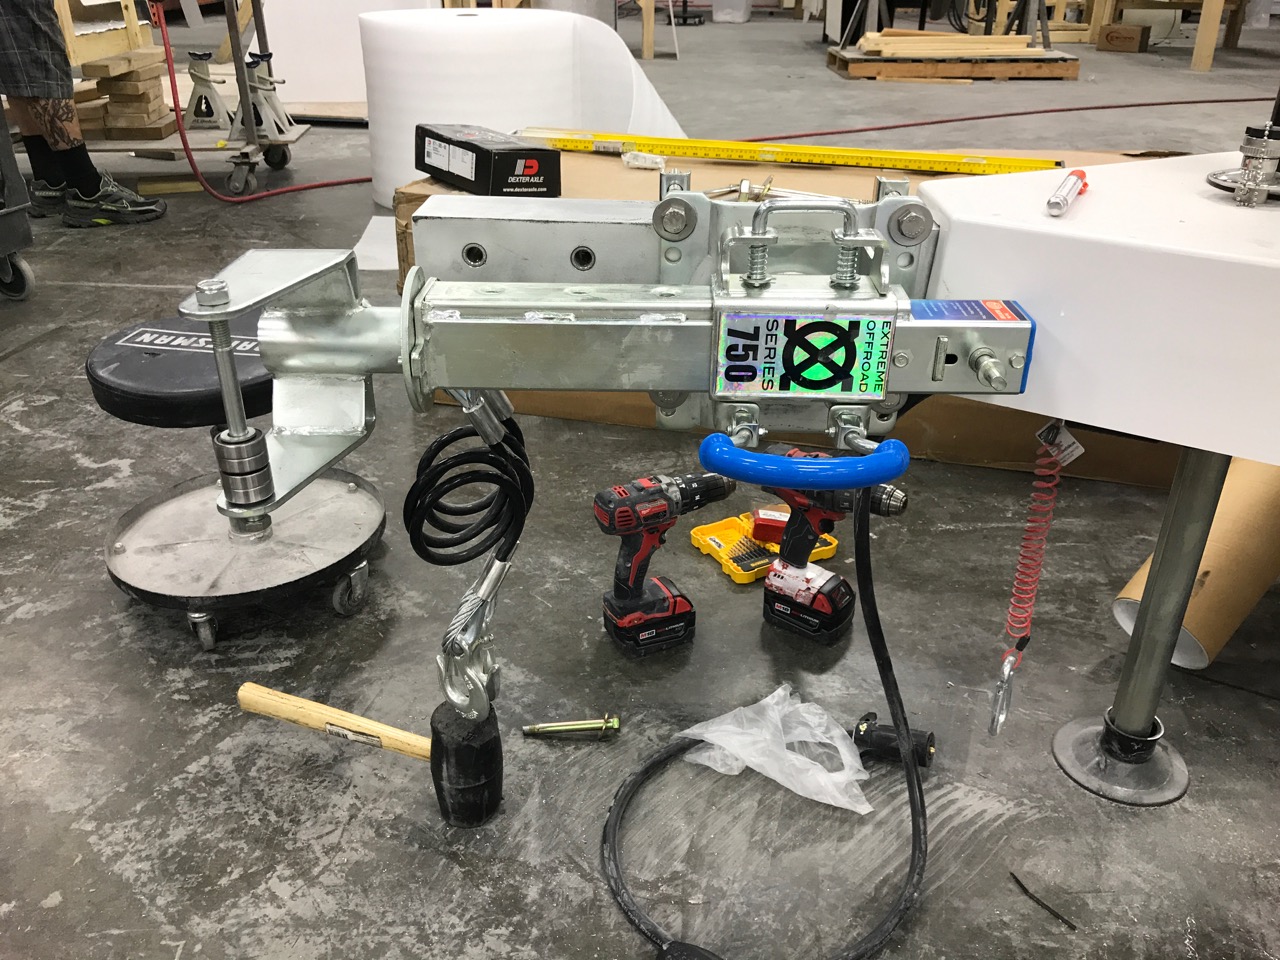
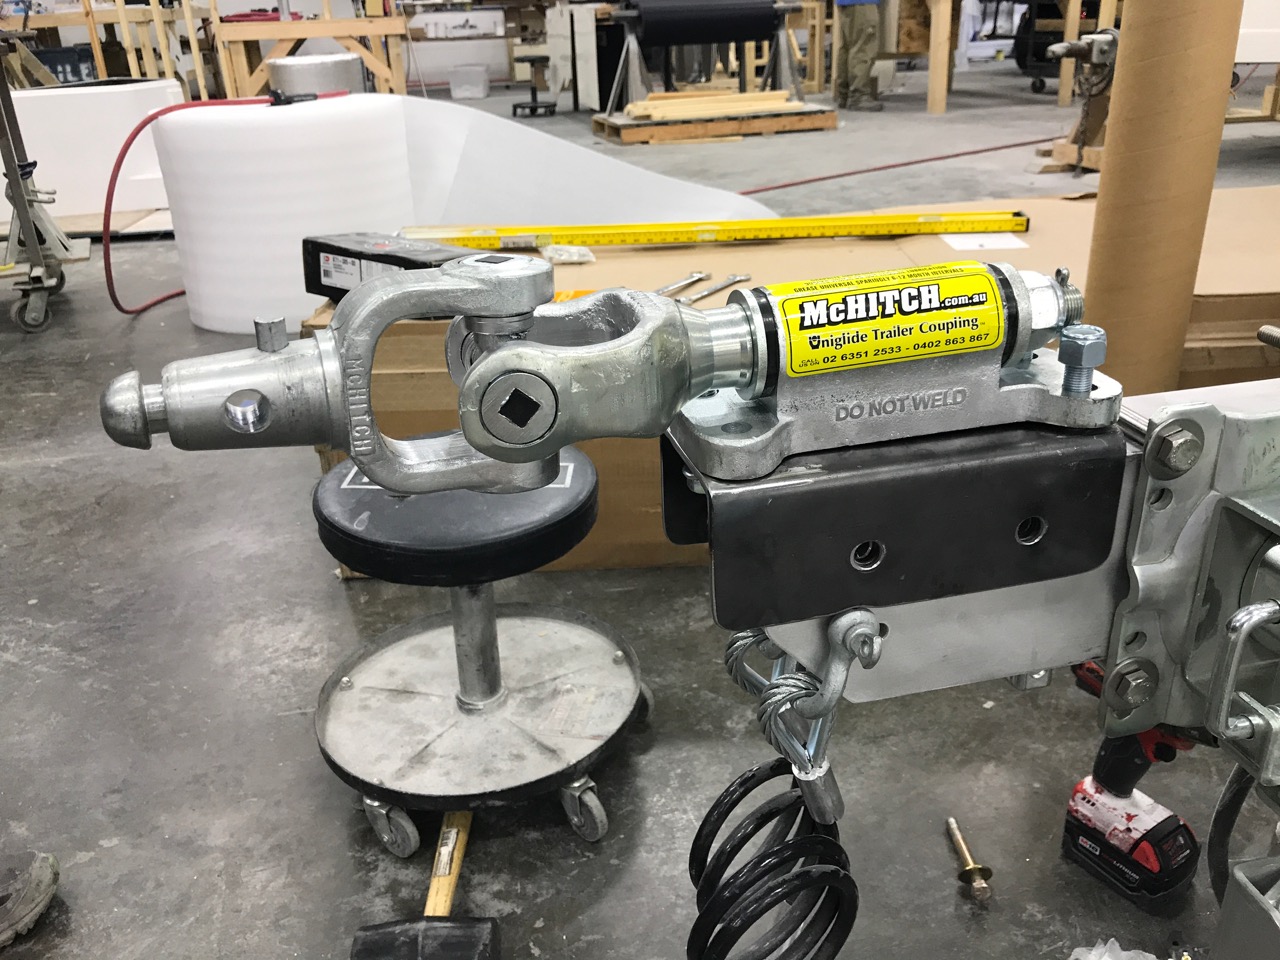
So most are probably aware that I've had these since delivery, but I've never posted about them - much to the concern of some (lol). The hitch, as advertised, is from McHitch in Australia. It's one of their automatic hitches in the 4.5 tonne (of the metric sort) version. The jack is an XO 750, also from Australia. You have to buy the hitch directly from their factory, but you can find the jack here in the US. The hitch was $750 shipped; the jack, $250. (The hitch price may have been Australian dollars - I can't tell from their invoice.) To attach the hitch to the Ollie's tongue, you'll have to have an adapter made, like this: The hitch bolts into the adapter and the adapter bolts into the same two holes on the tongue as the Bulldog, making them interchangeable. The female portion of the hitch will mount directly to any ball mount. The jack also requires a bit of work. The bolt spacing on the jack's mounting plate actually aligns quite well with the Ollie's tongue, but if you mount it directly to the frame, then the wheel just doesn't quite clear when folded: And there's no room to scoot the jack forward. You can fold it back the other way, but then the wheel is far enough forward to hit the truck in a tight turn - So you have to make some spacers, or if the guys in service are still as unbelievably nice as they were when mine was being built, maybe they'll make some for you. The ones they made for me are cut from 1" aluminum: So that's what we're talking about and how it attached to the trailer, but people are probably thinking - What again? Why did you spend money on this? The hitch, first: a multi axis hitch allows much greater articulation between the truck and trailer when going off road. Dips and twists in the road that would otherwise bind up a standard ball hitch are no problem with a multi axis hitch. There's also zero possibility of the trailer coming loose from the truck, thanks to the safety pin. The typical problem with these hitches, however, is that most designs are very difficult to align, and as such are commonly only used on small trailers that can be manipulated into place by hand. The McHitch fixes that problem by being largely self aligning. All you do is line up the hitch laterally when backing up to the trailer, then adjust the trailer height to match the truck's, then back into the hitch and it locks itself in place. The McHitch has two locking mechanisms: the first is the lever bar that drops into the groove on the main pin. That both holds the pin and lets you know that it's attached. Then you slide in standard locking pin a safety. Here's a video of how it works: It really works as advertised, and I actually enjoy hooking up and unhooking because it's so dead simple and quick. The u-joint on the hitch is from a Land Cruiser, so it's easy to source should it ever start to wear out. Maintenance is just greasing the u-joint once a year and keeping the locking bar greased so that it moves freely. I was a bit worried when I greased the u-joint that the pin would droop, making it difficult to hook up. But so far the u-joint has maintained it's stiffness. And it gets so little wear relative to what it was designed to do that it may never loosen up that much. You can get a WD attachment for the hitch if you want - I don't have it, and so can't comment on how easy or difficult it would be to attach to the Ollie's frame. There's also a keyed lock for the safety pin. The caps on the u-joint mounts are magnetic, so I use the top one to hold a little Nitecore LA10 flashlight/lantern when hooking up in low light - The XO jack serves three purposes. First is that it absorbs the bump from when you back into the McHitch. The Ollie's jack isn't designed to take that kind of force, so over time, either the jack or its mount are likely to get damaged. And of course if you were to bump the trailer particularly hard, then you might just destroy the jack or its mount in one go. The second purpose for the jack is that it provides an easy way to line up the trailer vertically with the truck, which I'll explain later. And the final purpose is what it was designed to do - allow you to recover the trailer if it's stuck, or maneuver the trailer while not attached to the truck. The jack is very stout, and strong enough to support the trailer while being winched. I haven't yet gotten the trailer stuck enough to use it like this. (I've gotten it stuck once, but was able to use traction mats on the truck to get both it and the trailer back to dry land.) But I have used it to maneuver the trailer around in a tight campsite, and it works perfectly in that situation. Here's a video of the XO jack in action: Obviously, you want to use extreme caution when using the jack in that way. It doesn't take much of a slope for the trailer to get away from you. Likewise, you need to use caution if you use the jack while hooking up or unhooking your trailer. I leave the safety chains attached until I've fully unhooked the truck from the trailer and placed the weight of the tongue onto Oliver's jack. The bonus to using that method is that the XO jack remains set to the truck's height, ready to be hooked up again. When it's time to hook back up, you just lower the tailer down until the XO jack is taking the weight, and you're all set to hook up. In cases where you have to lower the trailer's tongue to level, then I first raise the tongue, then swing the jack forward or lift it using the height adjustment pins, and then lower the trailer down to level. Hooking it back up would then be the opposite of that.
1 point
-
John Davies: Got it. Makes sense. Will use side bolts. John Shkor SailorsAshore1 point
-
It kills me that those plastic shavings are still a problem. Will someone please donate a vacuum cleaner to Oliver?1 point
-
John, I like your way of adding two extra bolts. It is better than only one on top and you avoided the pinching problem on the tongue by using two short bolts instead of one long through bolt. Nice job.1 point
-
Bill, I had the same question about jacking up the Oliver, so I purchased the Andersen kit that included a red plastic Rapid Jack. It allows you to drive up on with one tire while lifting the other tire. I thought I had it figured out until we attended the 2019 Rally and Dexter cautioned against the use of such devices. The concern is that the W shaped spring shackle will "flip" down and you might have a real problem getting it back into place. My solution was to purchase a new Ford "take-out" bottle jack on E Bay. It is compact, has a 4 ton capacity, and a shaft that telescopes to about 17 inches. I mounted the jack and its cradle on a board and store it in the basement. I had to use it once and it worked great. John1 point
-
Bill - With all other RV's I've owned until the Oliver, I carried a small bottle jack. Along with the jack in my truck I was always able to do what was necessary to fix any problem I encountered. Back when I purchased my Oliver it was still permissible to use the onboard "leveling/stabilizing" jacks for this purpose. However, the Factory now recommends NOT using these jacks for any purpose other than to "stabilize". I recently noted that on new Olivers there are even decals placed down near the frame which show places where frame jacking points are located. Certainly I'm not in a position where I can tell you what to do with your Oliver. Nor can I foresee all circumstances in which a jack might be necessary. However, in the rare times I've needed to raise my wheels (one side at a time only) off the ground, I've used my onboard jacks. I believe that I'm aware of the risks in doing this and my Oliver is no longer under warranty. Bill1 point
-
Well, I was hesitant to join a forum until I saw the conversations you guys were having. Been looking at the Black Series HQ15 but decided its gonna be too much work to make it worthy of our shoulder season elk hunts here in Montana. Came across Oliver and am strongly considering the double axle. We spend 90+% of our time off road. I wouldn't say that we're full on overlanding through rivers and crazy articulating obstacles, but we intend to test the lifetime warranty. I've gone through multiple RV's over the years and I'm trying to justify the Oliver's price tag on the fact that I can be done swapping trailers every few years before they fall apart completely. I'd love to get some feedback from you guys if you've got the time or desire. Either way I'll check out some of your past posts so I can limit asking you to repeat yourselves. Thanks for all the info, glad you guys are here.1 point
-
Hobo If you still have low water flow at the sink. And you found white plastic in the pump strainer. You’ll need to remove the steal braided line going into the pump. Use a coat hanger and run it through you should find it packed with plastic chips. Once its clean you should have normal flow and your shower head should stay on when you use the spray. If it cures the problem let service know.1 point
-
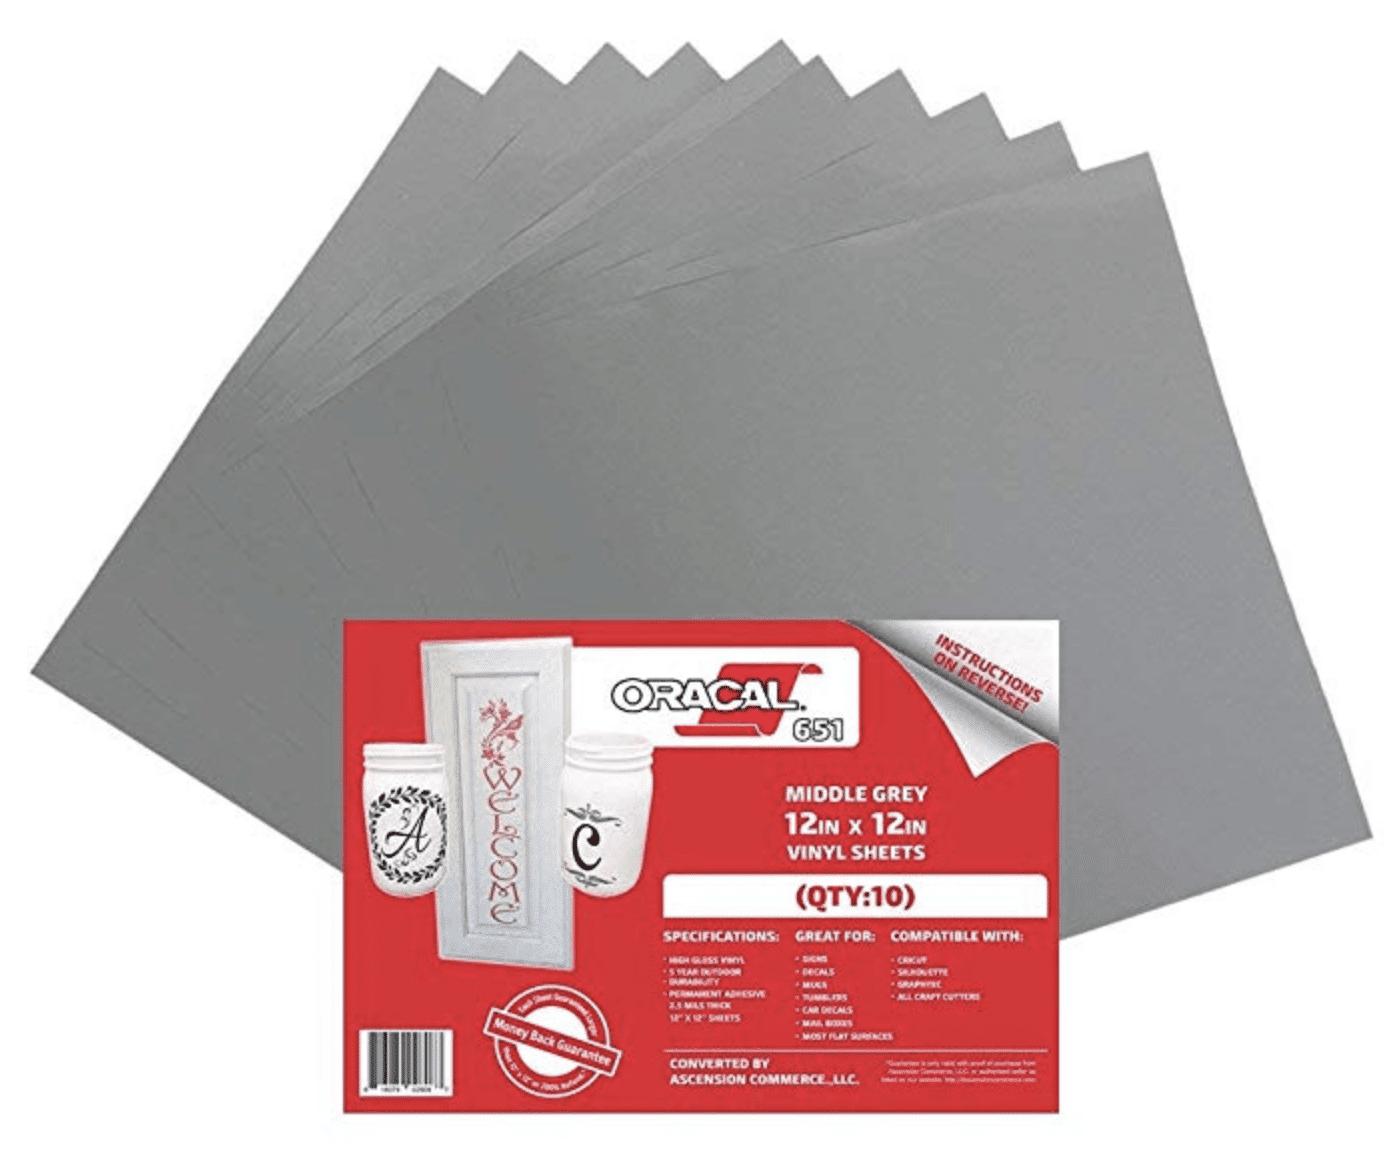
Here's the link to amazon for the Oracal I used. https://www.amazon.com/gp/product/B071W2CVJB/ref=ppx_yo_dt_b_asin_title_o00_s00?ie=UTF8&psc=1 Amazon sells it in sheets or rolls. I chose sheets as it fits exactly in our Cricut machine. I've learned to only use fonts that are a bit wider and be careful to use a new blade and set pressure to 5-6 (high). Then to remove the letters in one sheet, it's easier to push them through the cuts, leaving them on the cutting mat (removing the bulk of the material). After that it's easy to use remover sheets on the top of the cutouts. I've also added this using the Middle Grey color on the back tire cover for our future travel v/blog page.
1 point


-
Recent Achievements
-


")


")


")
