Leaderboard


Popular Content
Showing content with the highest reputation on 10/24/2021 in Posts
-
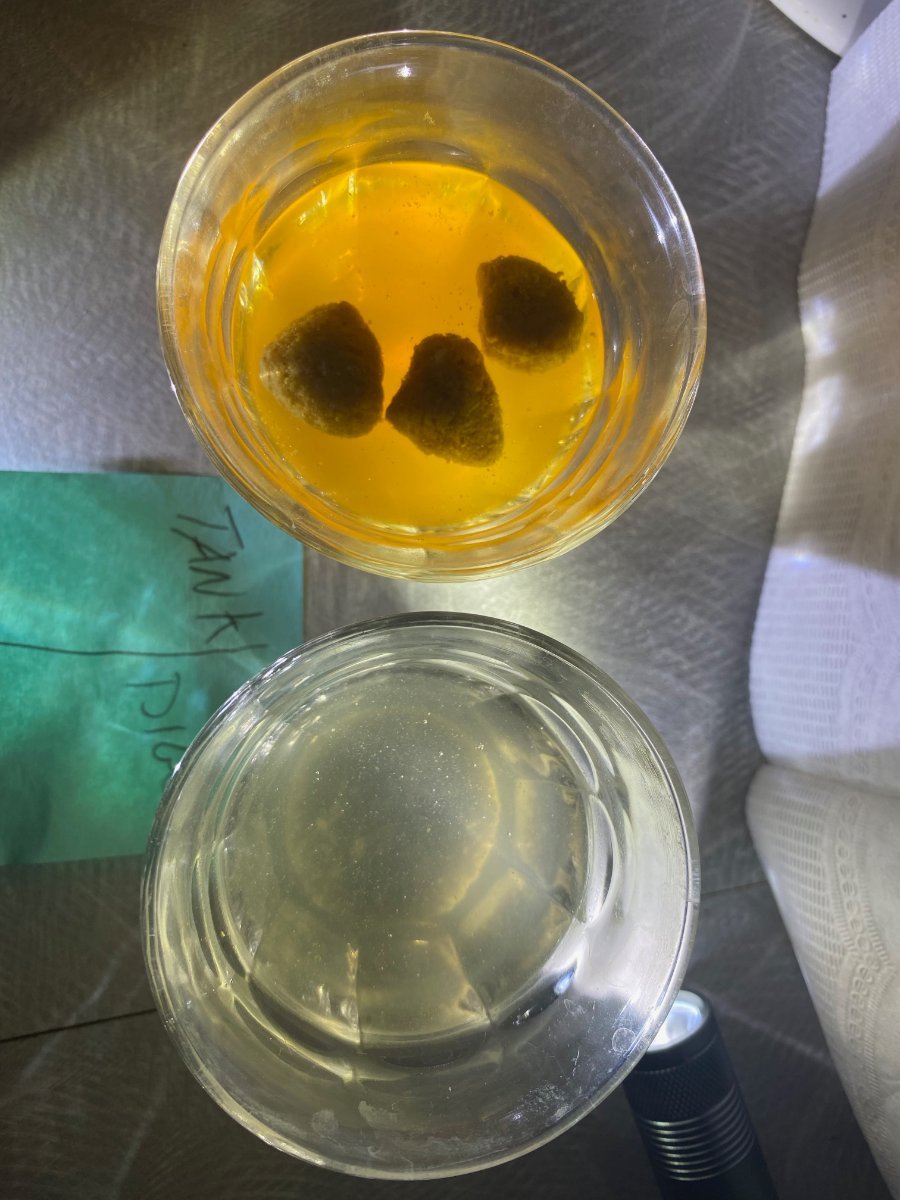
A few years ago, I conducted a similar experiment (and posted it on the forum), comparing black and gray water tank treatments using dog poop. In that experiment, TankTechsRx came out the winner over the other product (I’m sorry, I no longer remember that other product’s name), as it did a much better job of reducing the odor. I recently encountered another treatment with very good reviews, so I bought a bottle of it—Unique RV Digest-It—to compare with my TankTechsRx. The experiment was this: I mixed a capful of each product with water to nearly fill a small glass, and then I placed five pieces of small dog food kibble in each glass and let them sit. The photo showing the glass with the brown colored liquid is the one with TankTechsRx product, which is naturally brown. Result: Within 12 hours or so, the Unique RV Digest-It had reduced the kibble to a sludge at the bottom of the glass, whereas the glass with the TankTechsRx still held solid chunks of kibble. The odor was also different, with the TankTechsRx glass smelling a bit funky, while the Unique RV Digest-It glass had a faint, but rather pleasant, almost floral, smell to it. I will be using Unique RV Digest-It from now on in my gray water tank. We have a composting toilet, so we don’t use a black water tank. However, we have been spraying a mixture of water and TankTechsRx in our composting toilet, which has seemed to help with the composting process and odor control. I will now be trying the Unique RV Digest-It in the same way, expecting good results. I would surmise from my experiment that Unique RV Digest-It would work well in a black water tank and accomplishing what it advertises: 1. BREAKS DOWN SOLID WASTE INSIDE TANKS. Liquifies human waste and all brands of toilet paper. Digests residual sludge from years of build-up. Works in black and gray tanks. 2. ELIMINATES TOILET & TANK ODORS without masking. Extra strength activated cleaners eliminate odors at their source without covering them with overpowering perfumes. 3. HELPS PREVENT SENSOR MALFUNCTION. Cleans and removes solid waste and paper before it can cling to sensor probes, preventing misreads. No, I have no association with either company. Yes, I suggest others give Digest-It a try.
 2 points
 -
Seems like last I checked a full set was around $700.2 points
-
Good review, Jeff. I’ll have to check out the Unique stuff. We usually don’t use anything in the gray tank while we’re traveling and add Happy Camper when we get home. Black tank is a detergent pod and a capful of Calgon water softener which probably wouldn’t be good for a composting toilet! Mike2 points
-
Same situation with my 2021 model. I was greasing the chassis this week and took one of the nuts off. Only the top of the shock has this problem, the lower end is fine. No serious cracks in the rubber yet. Perhaps some heavy duty fender washers between the rubber and the brackets would improve the rubber life.
2 points
-
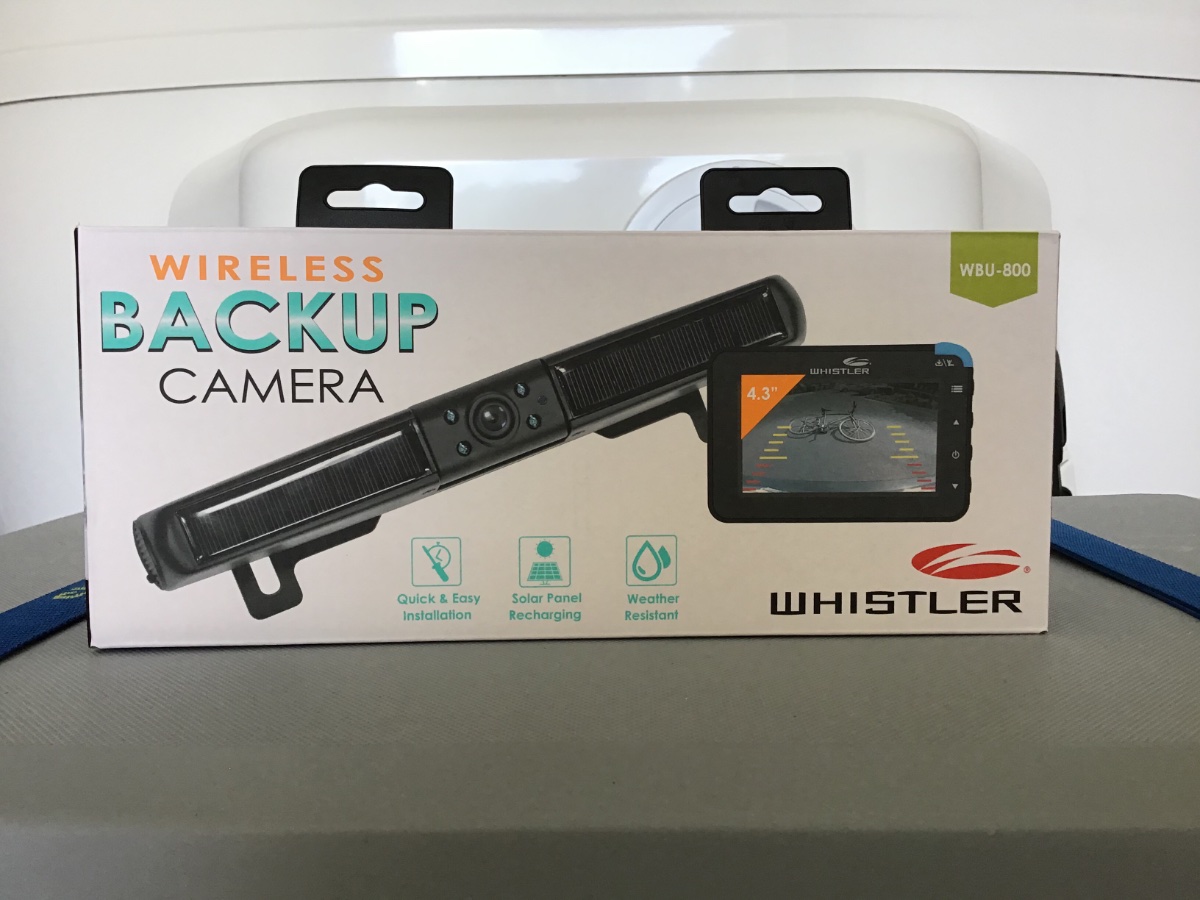
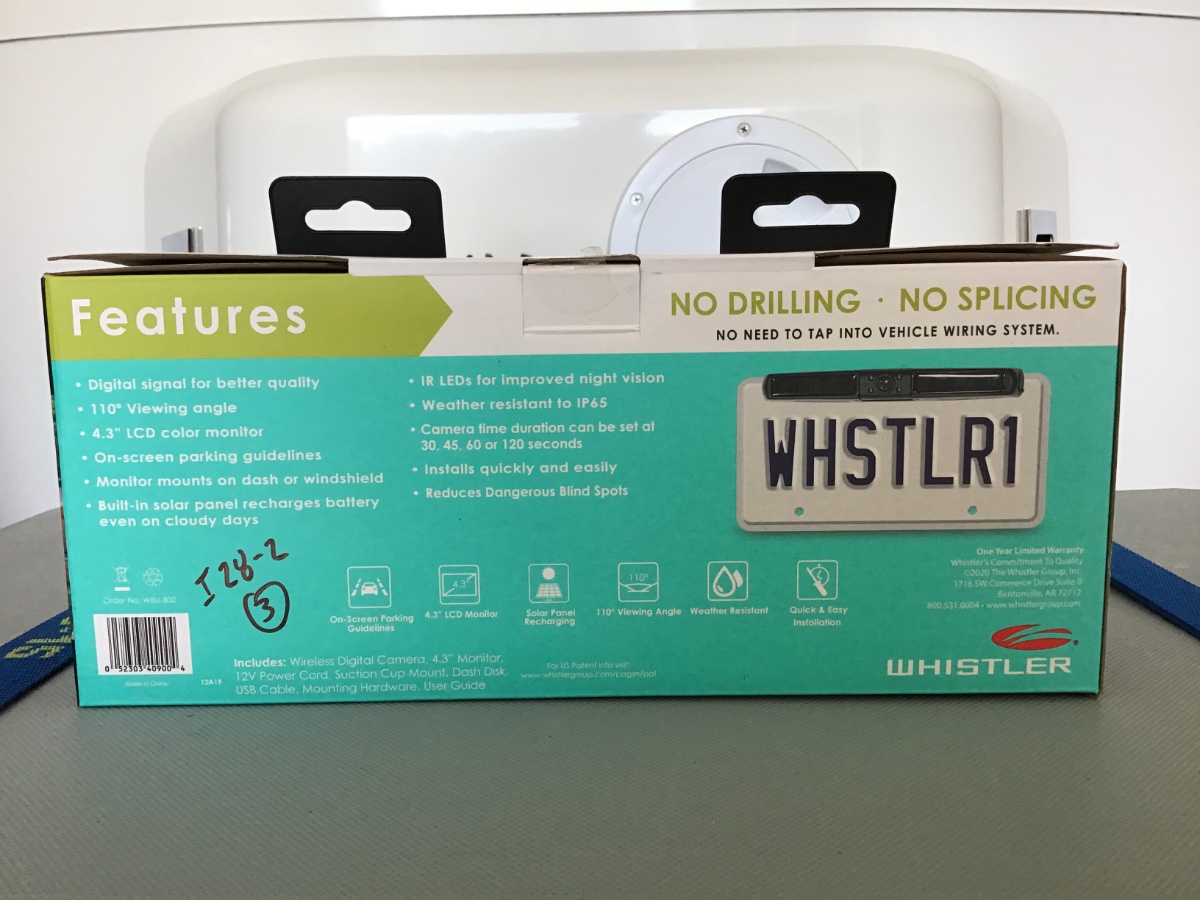
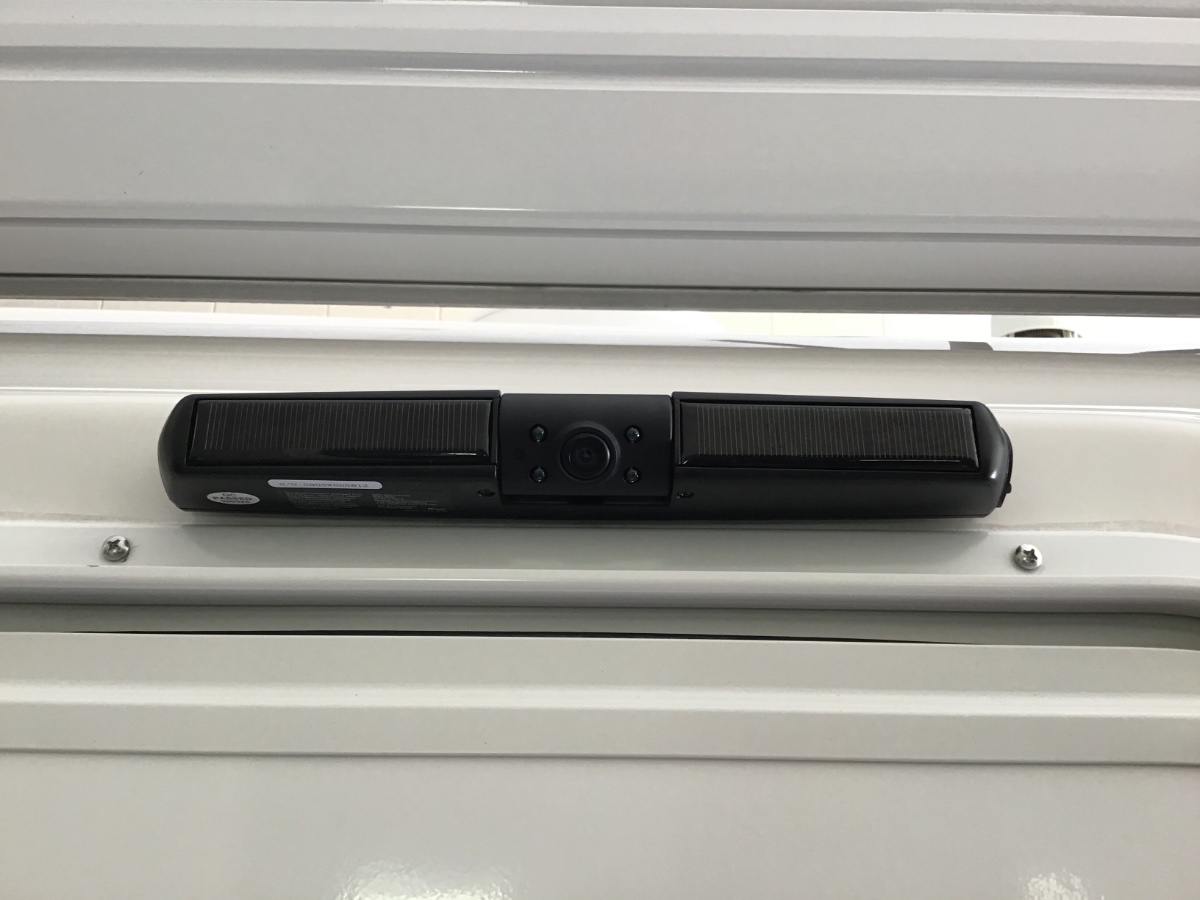
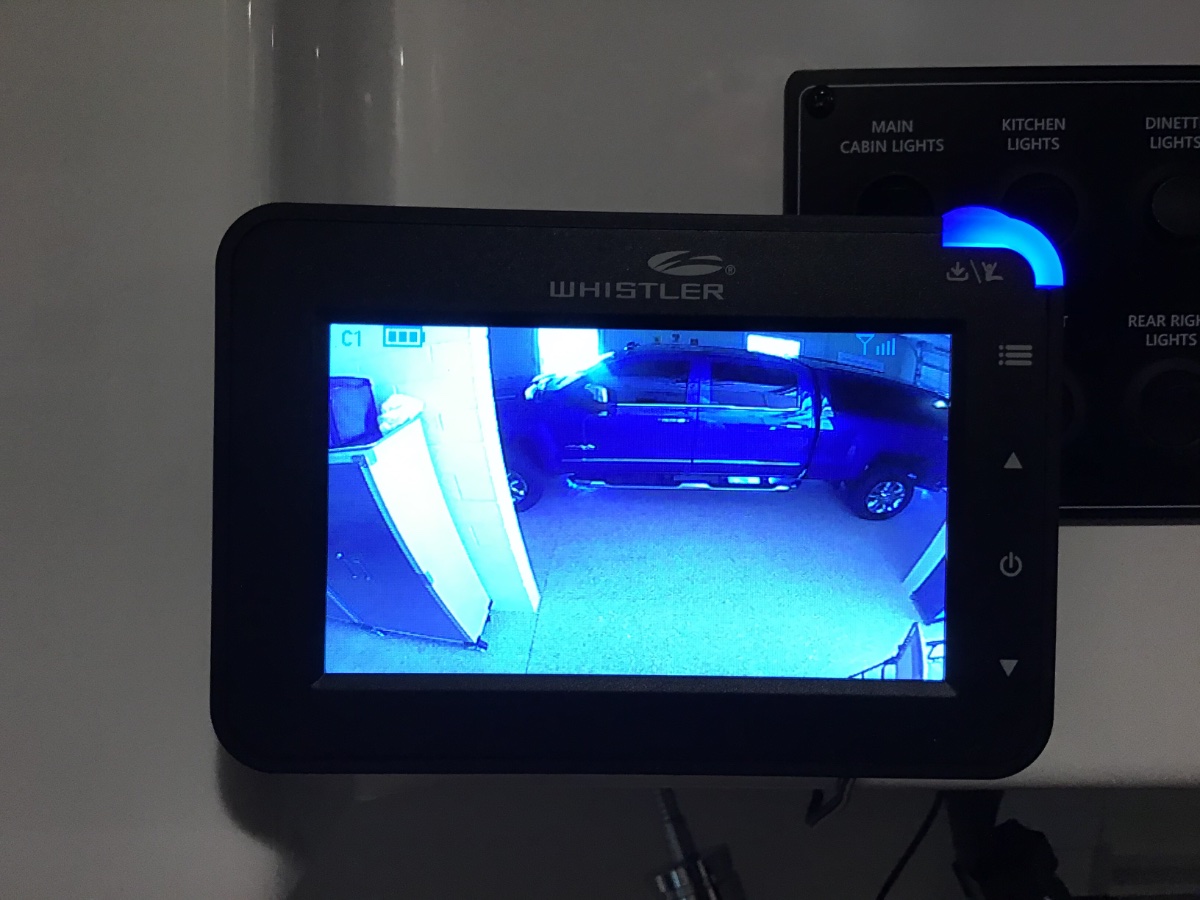
I’ve been looking for some time to have a security camera above the entry door. Most wireless cameras are not wireless they still need a power wire. I also didn’t want to drill holes and fish wiring though the hull. Roaming around Walmart I spotted this back up camera by Whistler. The camera is totally wireless and once fully charged via USB it has built in solar to keep the battery maintained. The monitor is 4in and plugs into a 12v outlet. With a suction cup mount. Looking at the picture on the box it looked like it would be a perfect fit above the entry door. The purchase price was $100,00 I rolled the dice if it didn’t fit perfectly it was going back. I did a Amazon check it appears this model is only sold at Walmart. The reviews on the whistler models were mixed good and bad. Once the camera was charged I turned on the monitor within seconds the picture appeared. Very nice color image it has inferred for night time haven’t try it yet. Very few features it is not a continuous on you can choose 20 sec to 120 sec on then auto off plenty of time to see who is outside your door. Also no audio or recording capability. Simple setup no frills. Mounting the camera I used Scotch outdoor heavy duty Velcro very secure. Very happy on the looks of the camera attached to the hull above the door it looks like a factory installed option. The Big question?? Will it last, does anything these days? It’s the $100.00 question. We shall see I'll give a review in 6 month’s the warranty is good for one year. attached are the photos of the install.
1 point
-
A sad day in that I had to put my Elite II to sleep for the next couple of months (at least). Fall is in full swing, the leaves are changing and falling and the temps have been above normal. However, next week has at least a couple of days of rain forecast plus the temps are going to finally take a dip. Added to the changing weather is a full schedule of appointments for the next two weeks. Is there some medical name for feeling sad because the camping season has come to an early end? ☹️1 point
-
Have read and heard good things about Happy Campers. I may buy some and try an experiment comparing it to Unique. I haven't tried HC yet because it seems they don't have a liquid form, and I preferred the idea of using liquid rather than solid, especially because I liked mixing the TankTechsRx with water in a spray bottle for the composting toilet and putting a few drops in the drains to cover the drain traps when the trailer would be sitting for a while, which I will do now with the Unique product.1 point
-
I found the following discussion that seems almost the same situation that you describe. The RV owner contacted Progressive Industries and troubleshooted it over the phone...they sent him a replacement control board. https://www.loveyourrv.com/update-to-progressive-industries-ems-hw30c-surge-protector-review/ Update to Progressive Industries EMS-HW30C RV Surge Protector Review 1) I was able to break it! I was messing around with one of my Champion 2000 watt generators during a recent boondocking adventure and decided to try and see if I could fire up the 13,500 BTU Air Conditioning unit. This is most definitely at the extreme max of the generators performance specs and was very unlikely to work. But that didn’t stop Captain Curious. So I fired up the generator, went inside and turned on the AC’s fan, so far so good. Now time to hit compressor on button. A big groan could be heard from the AC unit then a loud Click! Click! Click! from the location of the surge protector. EMS-HW30C Surge Protector Installed in my trailer My wife Anne looks at me and asks, “What was that”!? Oh I just overloaded the circuit and blew the surge protectors breaker. No biggie. Then Anne gave me the look. Guys who do a lot of fixing and tinkering will know it well. Actually it was a biggie because my little experiment rendered our brand new Progressive Industries EMS-HW30C RV surge protector stone dead. I could not even see the error light lit up on the control board inside the unit. I had heard that Progressive Industries had great warranty service. I figured this would put it to the test. I emailed the tech support detailing what had happened, that I had no power, no display and even the error led wasn’t lit up. They replied the same day saying the control board was at fault and they would send out a new one free of charge. Then I had to send back the dud within 30 days. But we were boondocking and far from home? No problem, they just shipped it to the nearest postal outlet. I was relieved that I would have my surge protector back functional again soon. The board swap was very simple, just unscrew the top, unplug the the board connectors and then one screw that holds it in place. EMS-HW30C Surge Protector1 point
-
I think it's called depression Oliveris Storagis. I suffered from a bit yesterday, when we talked about winterizing. We're still planning to camp another week or three. Today was flat beautiful here in WNC, which makes it even harder to put the camper up for winter..
1 point
-
Believe later hull # LE2s have different size rear window than earlier LE2 hull #, but don't know Hull # when rear window size changed?1 point
-
A generous forum member in the Florida panhandle posted a full set for free, but you have to pick them up.1 point
-
Polyurethane replacement bushings although stiffer are much more resistant to deterioration. A package of four is $4.75 here: https://www.suspension.com/9.8101 . I would check all the dimensions before purchasing replacements.1 point
-
Oliver purchases the galvanized steel suspension sub-frame. I believe it is from Dexter or some other third party. But it still may be Oliver’s problem if the subframe is being built by the third party to Oliver’s specs. Oliver manufactures the main aluminum frame in-house.1 point
-
That configuration is definitely wrong. The emergency breakaway cable should go directly from the breakaway switch on the trailer to the tow vehicle, usually attached to one of the slots or metal loops on the hitch receiver on the tow vehicle. As yours is currently configured that would likely do absolutely nothing to activate the trailer brakes if the trailer came unhitched.1 point
-
It is not on the university but on the knowledge base. That can be found going through the Sales and Service site. Here is the link (I hope it works). https://support.olivertraveltrailers.com/portal/en/kb/articles/lithionics-battery Please PM me if you want any of the information I have on the Lithionics batteries. Mike1 point
-
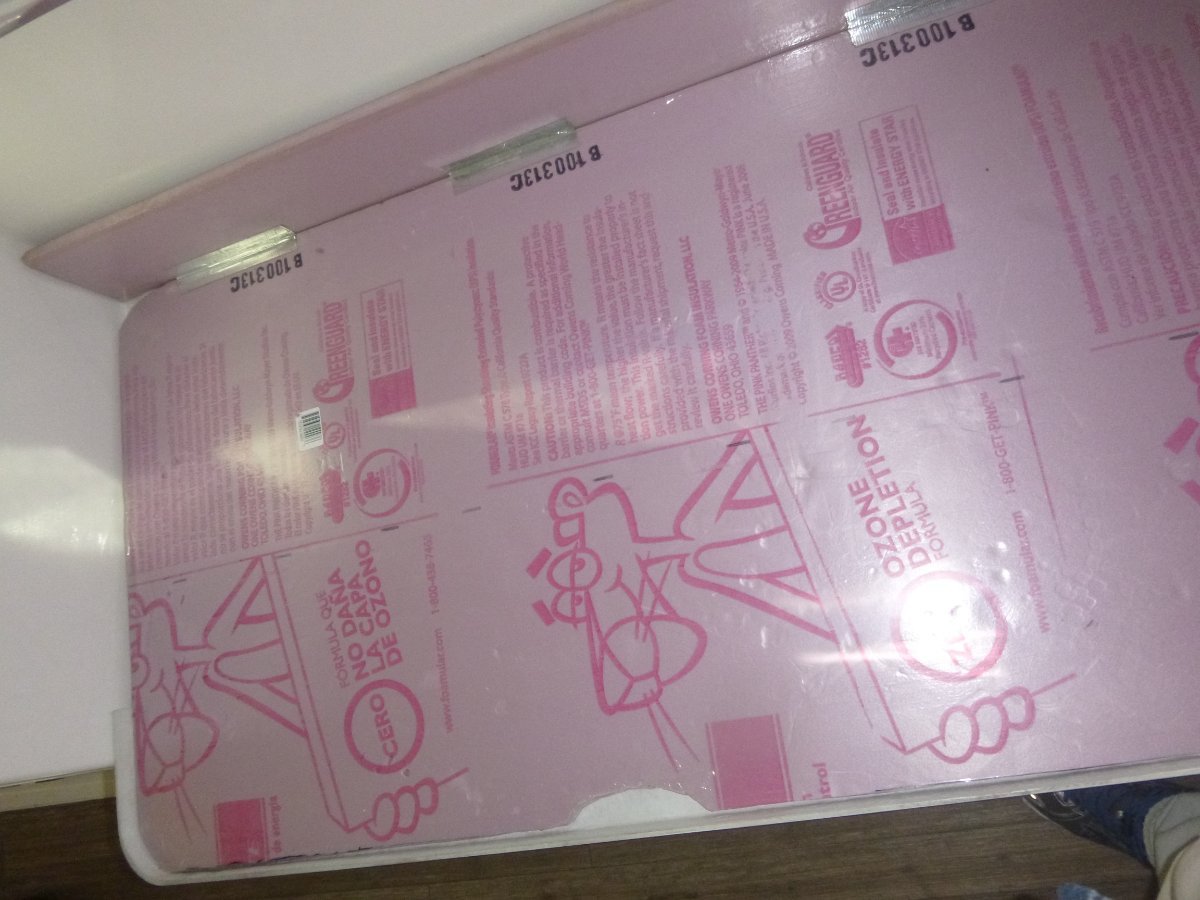
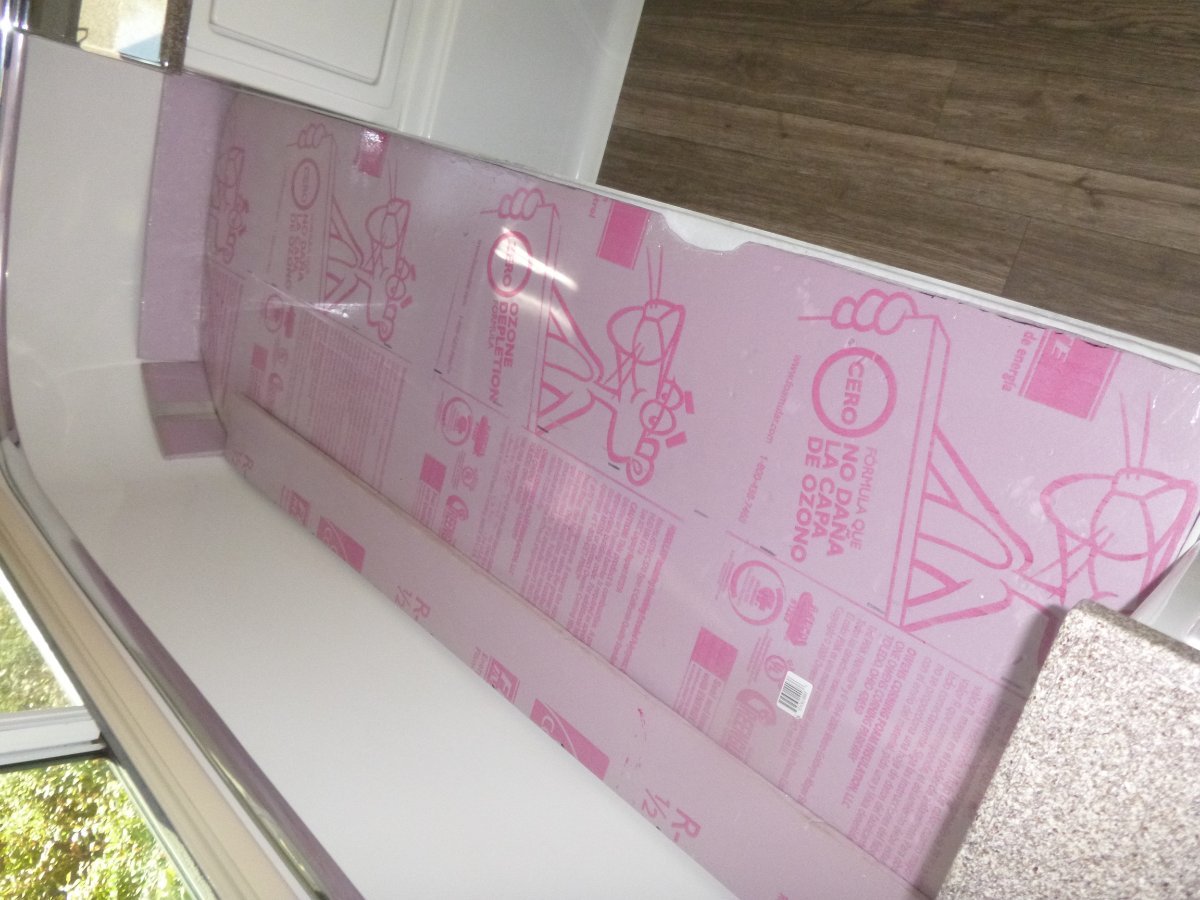
As promised - here are a couple of pics of the foam board installation. Bill
1 point
-
Thank you for your responses. Everything suggested seems logical to me. I have a hard time with the Hypervent and Den-Dry products as they seem expensive for what it is. I read on Fiberglassrv that the material used is nothing more than stucco rainscreen or waterway drainage material but doesn't come in small rolls. I think I'd like to try some other materials first to see what works as I feel like everything 'Oliver' ends up being over a $100 mod. I really haven't had any moisture UNDER the mattress, just on the streetside 'side'. I put a 200w mini desk heater in the basement last night just to see if there was improvement and there was ZERO condensation this morning. This leads me to believe that that side of the trailer is more exposed to the cold since the water heater and furnace are on the curb side. I looked inside the basement and I'm baffled as to why there are partitions blocking any heat transfer to the vulnerable areas of the backside plumbing lines and streetside. I wonder if I should cut them away a bit so heat can move to that side more freely. I've seen the mod to the furnace where ducting was added and laid on top of the plumbing however, I think this beyond my skill level. The question about moisture is a good one for all travel trailer owners and I had my share from the single pane windows in my Casita. I guess I thought double pane would somehow not fog up this much, but I will definitely vent more in the future. I have decided not to pull the inner trim ring from the window as I don't want to create more problems. I think I'm going to plug the lower screw holes with something like caulk or rubber plugs to just prevent dripping out of them. I really like the idea of the pipe cleaners for wicking out of the weep holes and will add them to my arsenal. I want to study more real world cold weather camping as that's why I bought this trailer ..to extend my camping season in the Northeast. Condensation is probably a fact of rv ownership but I'd like to reduce this and protect my investment and custom mattresses as much as possible. Any other suggestions are always welcome! Thank you!1 point
-
As you probably already know - our trailers are reasonably prone to condensation, particularly in areas near moisture producers such as "humans". This topic in various forms is fairly common. A few years ago there were owners experiencing moisture buildup beneath and to the sides of their beds. The "solution" for this was to purchase what I though was a very expensive "breathable matt" similar to the one that Oliver currently sells as an option. Since I happened to have some "foam board" like THIS I decided to give it a try in order to reduce the temperature variation between the bed and the other surfaces. Now, six years later, I can say that I've never had a single moisture problem either under or on the sides of the bed. I cut one piece of the board to fit the area under the mattress and cut two more such that they would run along the straight sides of the mattress and come to the top of the mattress. Finally I cut three relatively short pieces the same height as the last two and taped them together such that they would conform to the radius of the curved section of the wall. If anyone is interested in a picture of this I can post one tomorrow. Bill p.s. If you decide to do this mod then don't forget to cut a small place in the edge of the foam board where you can get your fingers/hand under it so that you can easily grab it to get access to the hatches.1 point
-
Spent about 3 hours restringing my wounded window shade this afternoon. I used 1mm shade cord, ordered 30’ which was about right to restring the top (screen). It looked a bit overwhelming at first, strings going everywhere... The diagrams and photos in this post were helpful. I also took pictures as I disassembled to help with the reassembly. Once you have it apart it’s interesting to see how it works.1 point


-
Recent Achievements
-


")


")


")


