Leaderboard


Popular Content
Showing content with the highest reputation on 12/20/2025 in Posts
-
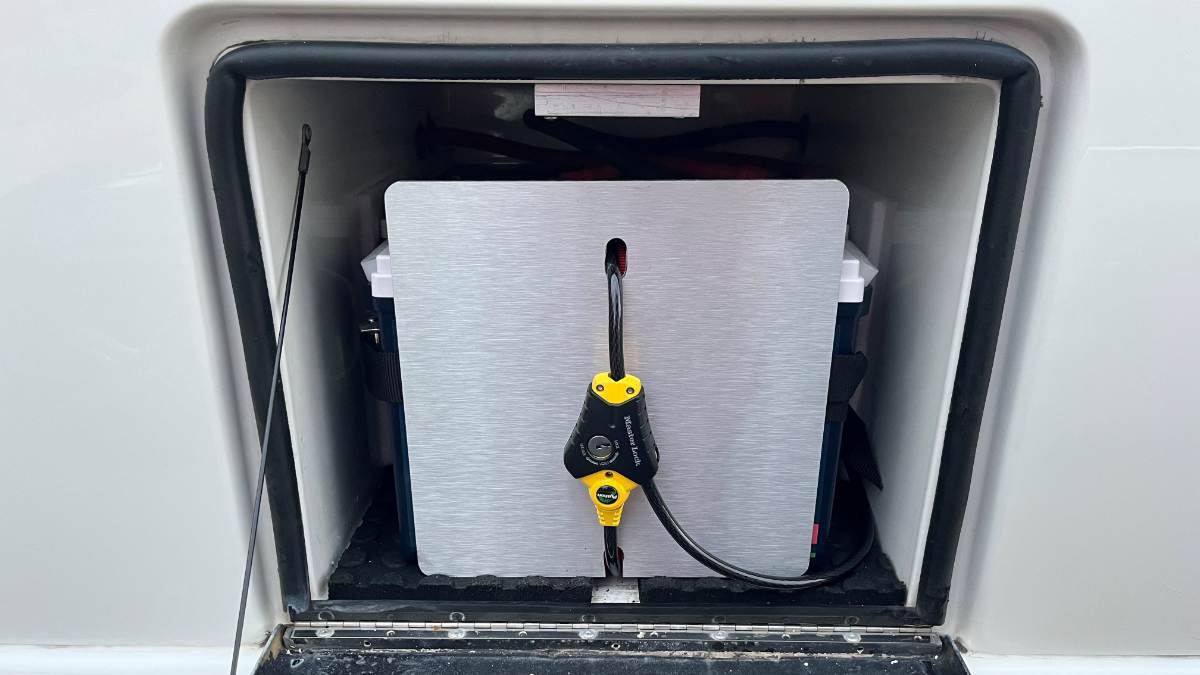
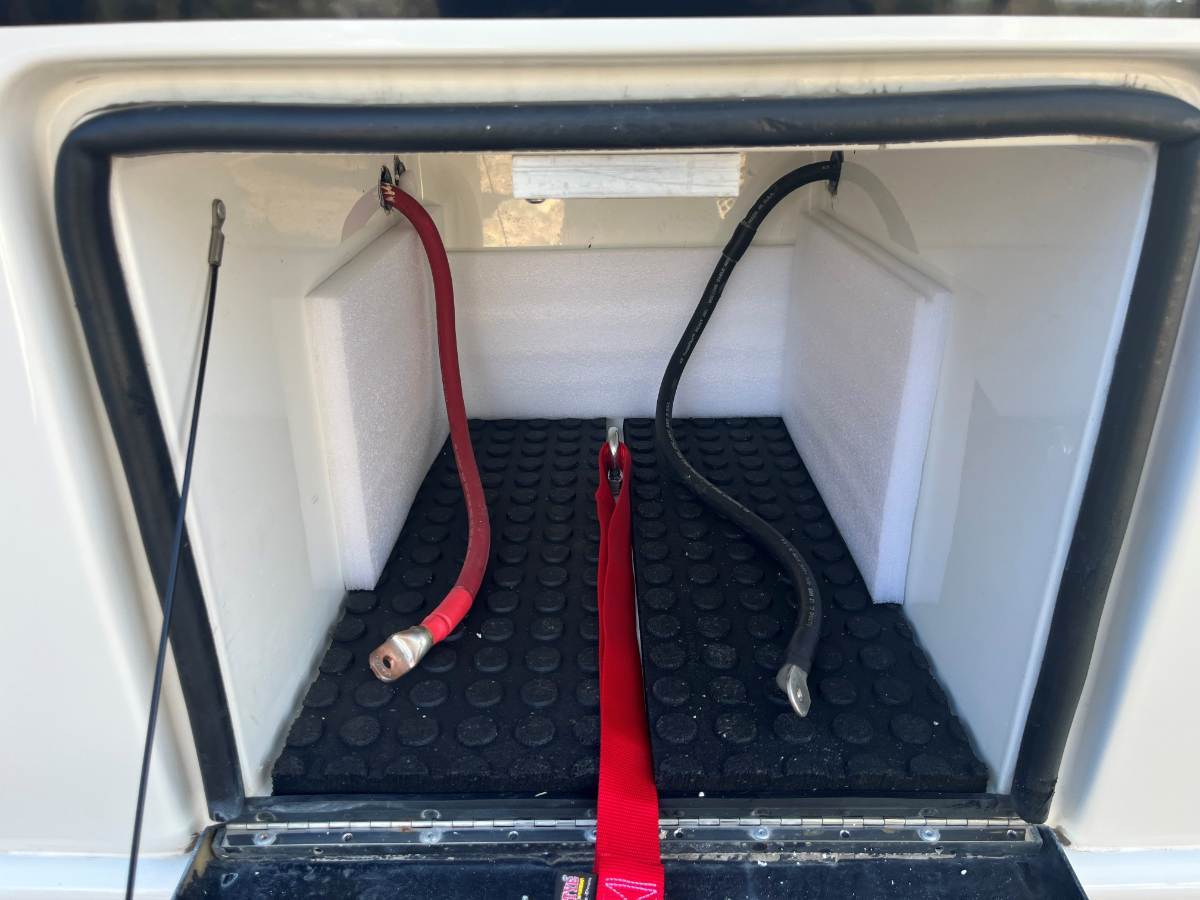
Once I got to this point, I started thinking a thief could possibly undo the battery cables, loosen the straps and even with cable lock in place, slide out the outer battery, then steal them all. Oh No! So, I had a 12x12x1/4" sheet of aluminum left over from another job and it became the perfect solution. Now besides a taking a crowbar to the battery door, a thief would have to cut the 3/8" hardened steel cable. Now these expensive batteries ain't goin' nowhere! I'll cinch down the straps and cable lock again, after putting on some miles... Ya gotta love the new look of our Epoch app! 900 Ah - Priceless! 😎
 6 points
 -
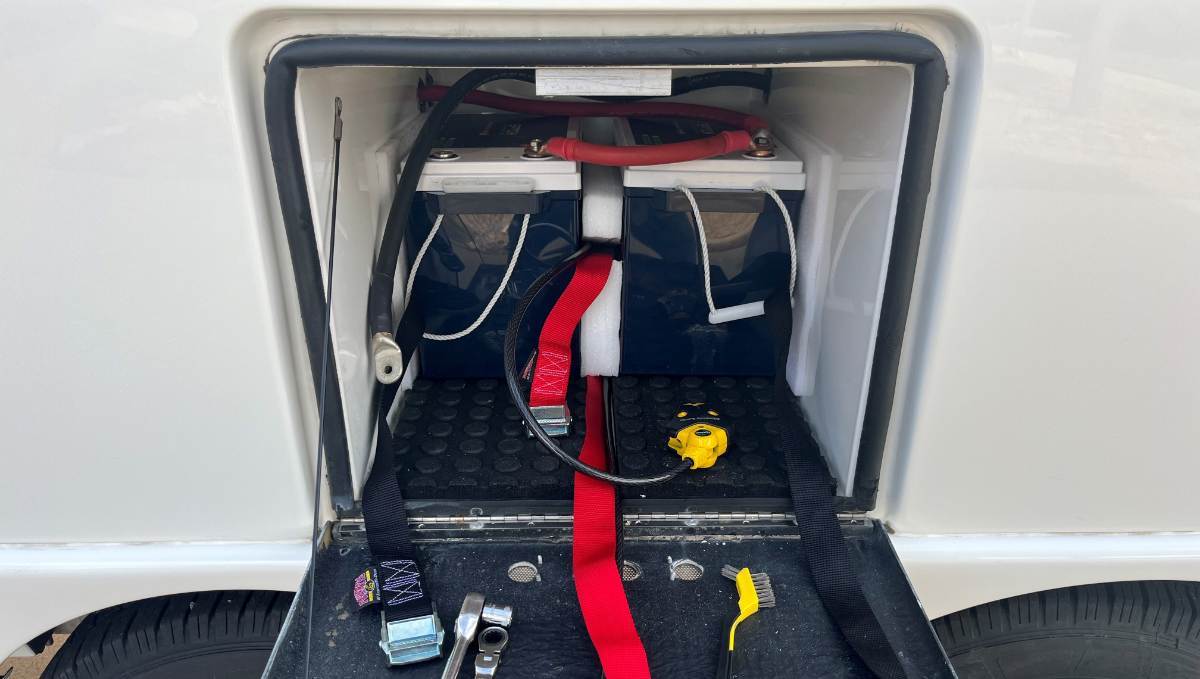
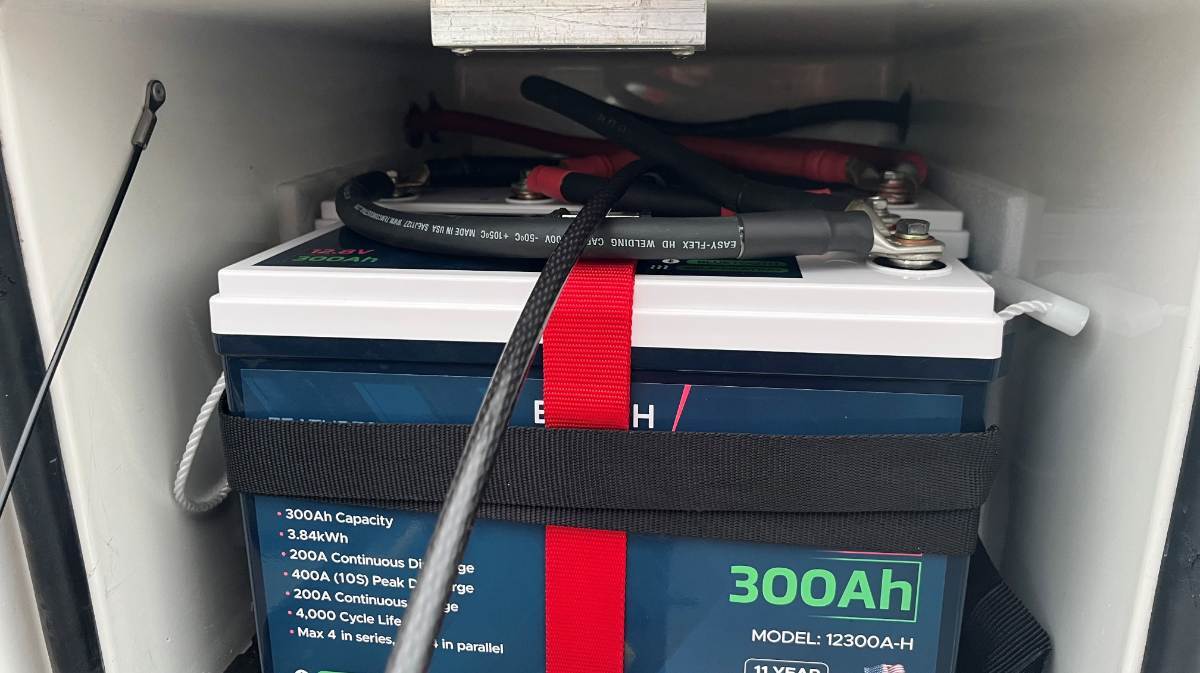
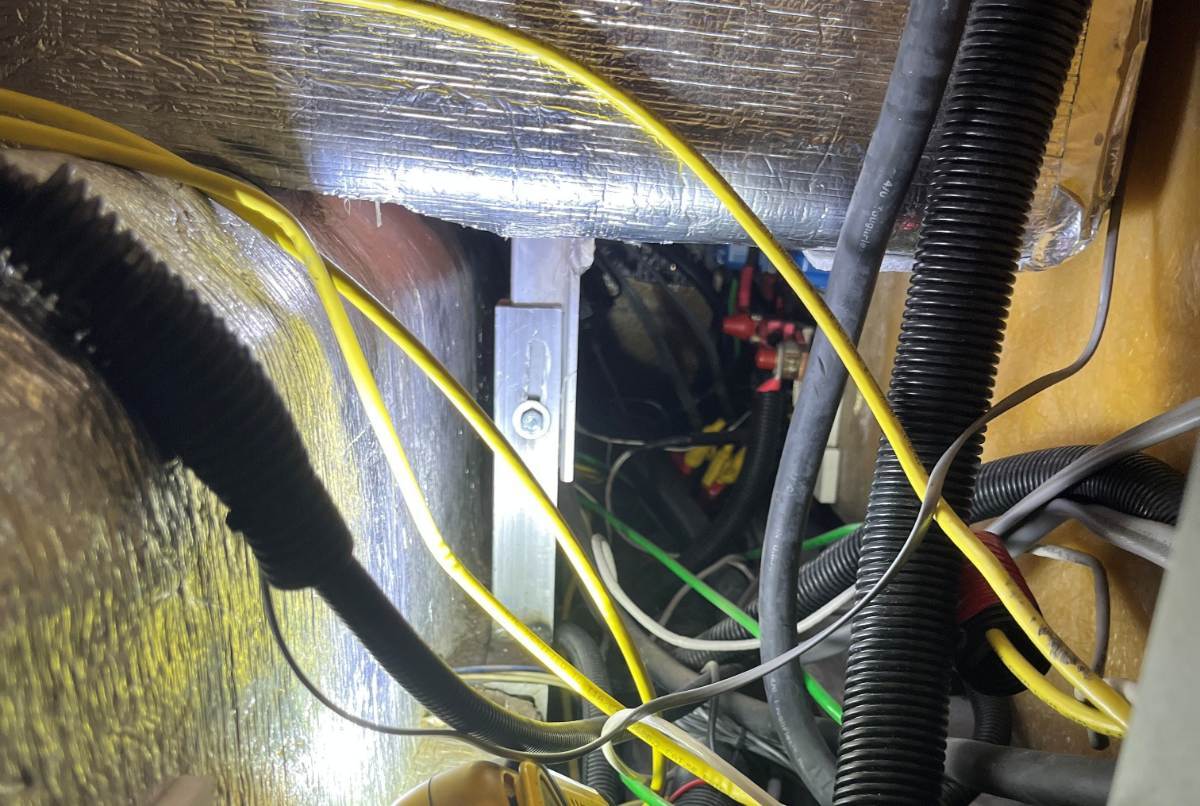
I found this great supplier of Made-in-USA cam-buckle straps and tie-downs: https://www.amazon.com/stores/PowerTyeMFG/page/66AA148A-1600-4E0D-A1AA-AEA3A1050247?lp_asin=B017BYSJ7I/ I purchased this cable lock to secure the batteries: https://www.amazon.com/dp/B00006407M/?th=1 I turned the eyelet bolt on an angle so that the cable lock and strap would fit nicely. I placed foam around and between every side of the batteries. I put 2" of foam between the 2 inside batteries to give the eyelet space, keep it from rubbing. I have an 8-ft cam-buckle strapped tightly around all 3 batteries and these cam-lock straps cinch nicely! A 4-ft strap and the cable lock go through the eyelet to pull the outer battery inwards. I also had to make two more 4/0 battery cables. I planned the layout so the main ground is convenient right-front. And now without the battery tray, I can reach all the way in, over the batteries. I tightened all 6 battery terminal bolts after all 3 batteries were tied down, so these can be easily checked and tightened when needed.
5 points
-
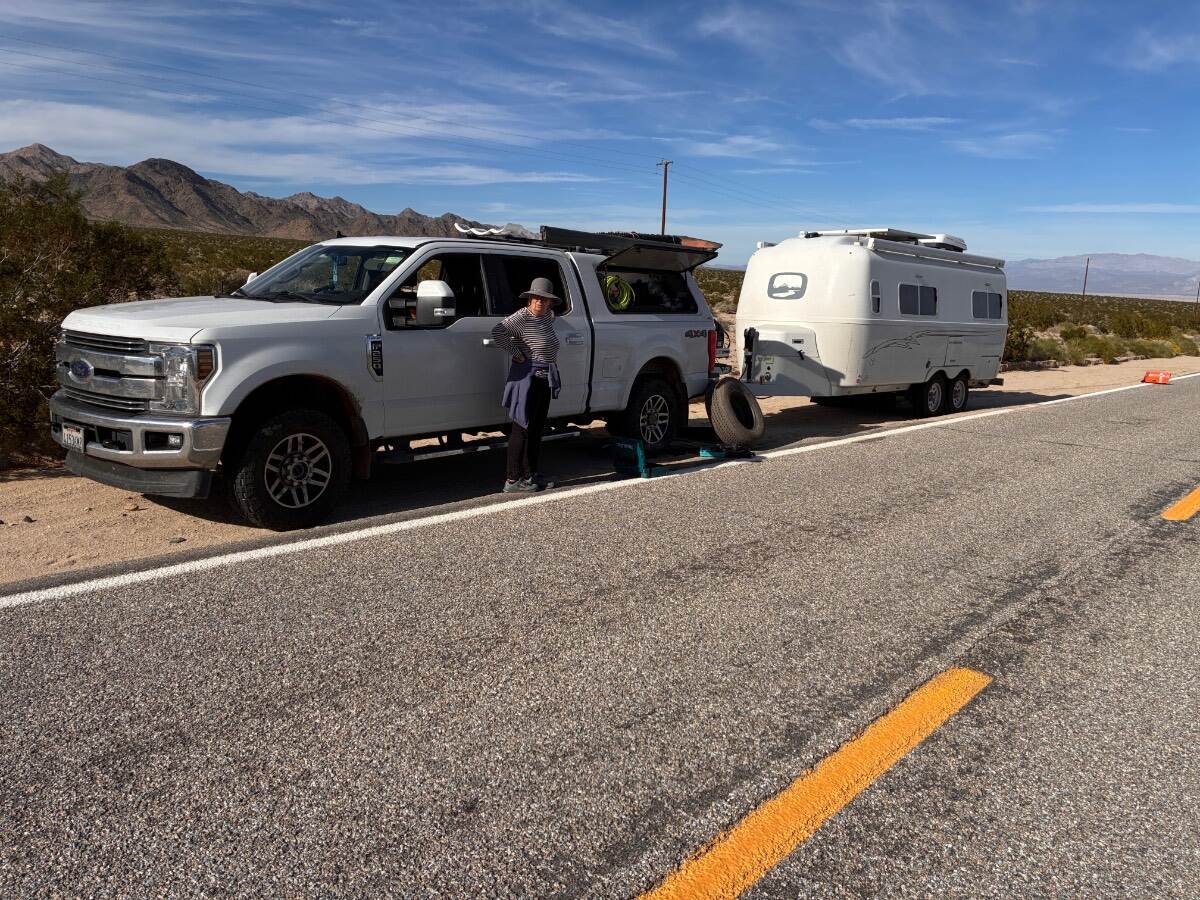
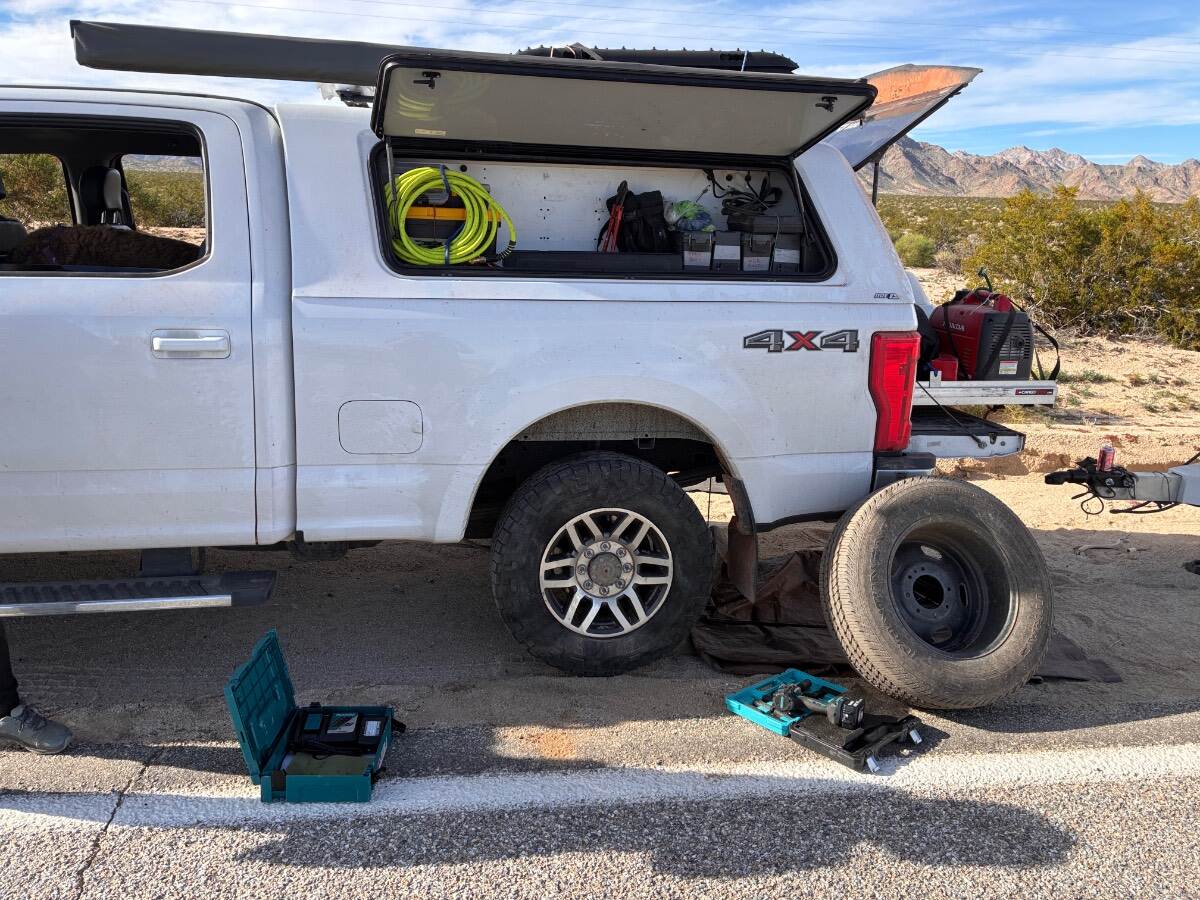
it was our turn to change a tire in the wild. good news, we carry all the tools (impact wrench, bottle jack, impact socket set, gloves, torque wrench, on board air compressor and maybe the most important tool were my knee pads). All good, all lug nuts off, jack the wheel up for clearance and X!!!@!!, the aluminum wheels are bonded to the steel hubs, electrolysis in action). I kick, got a strap through the wheels and yak and they don't budge. I need a heavy hand sledge and a block of wood to bang the wheels loose from the inside of the wheel. The sledge is the only tool I don't carry. The good news we were not off the grid in the back country for the first time all week. Many of you may know AmBoy road that runs between Route 66 and the 29 Palms / Joshua Tree. Still remote but it didn't take gps cordanates to find us. We had to call a tow service just for a heavy hand sledge. Took about 2 minutes to knock the wheel loose... back on the road and my wife will be getting a hand sledge for Christmas. You may want to check your tool inventory for a hand sledge if you have aluminum wheels.
5 points
-
JD "Resident Chamber of Commerce"😎4 points
-
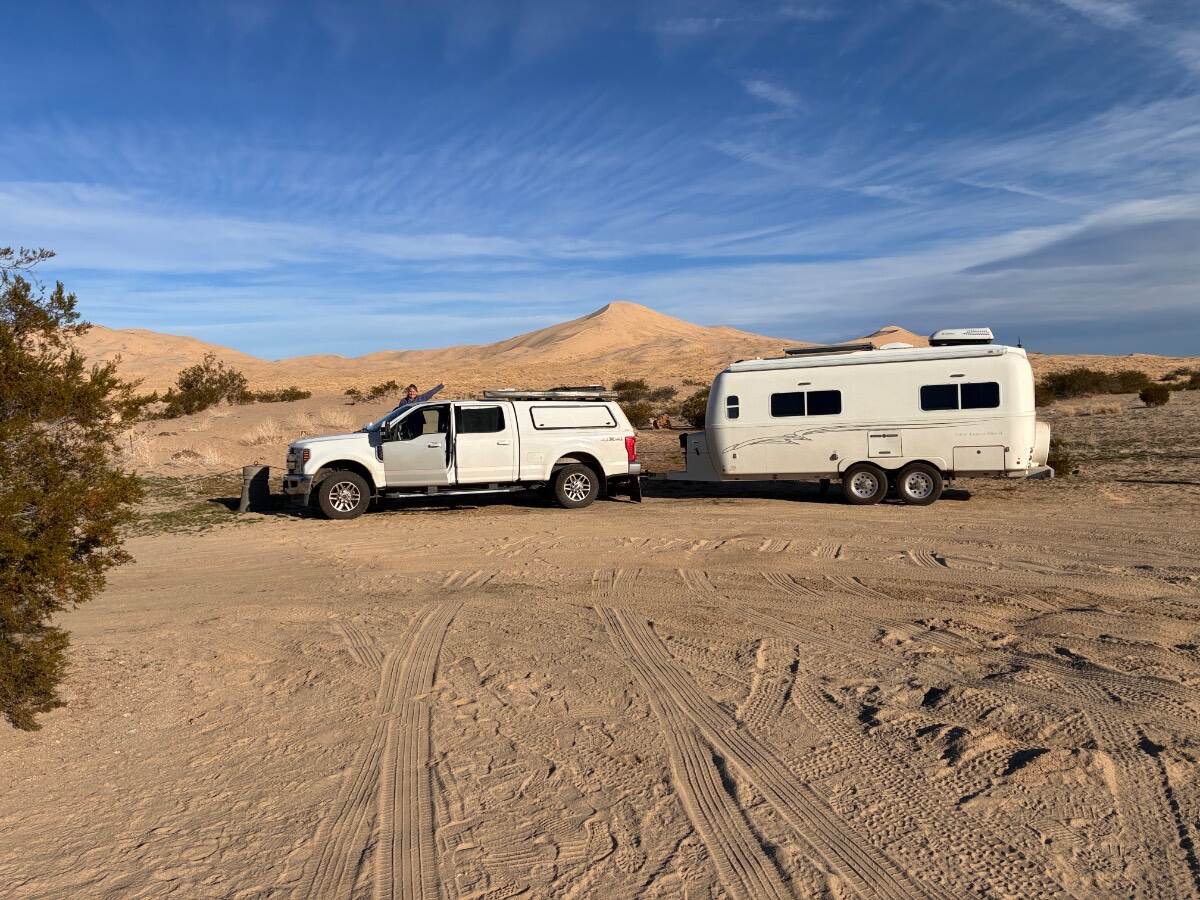
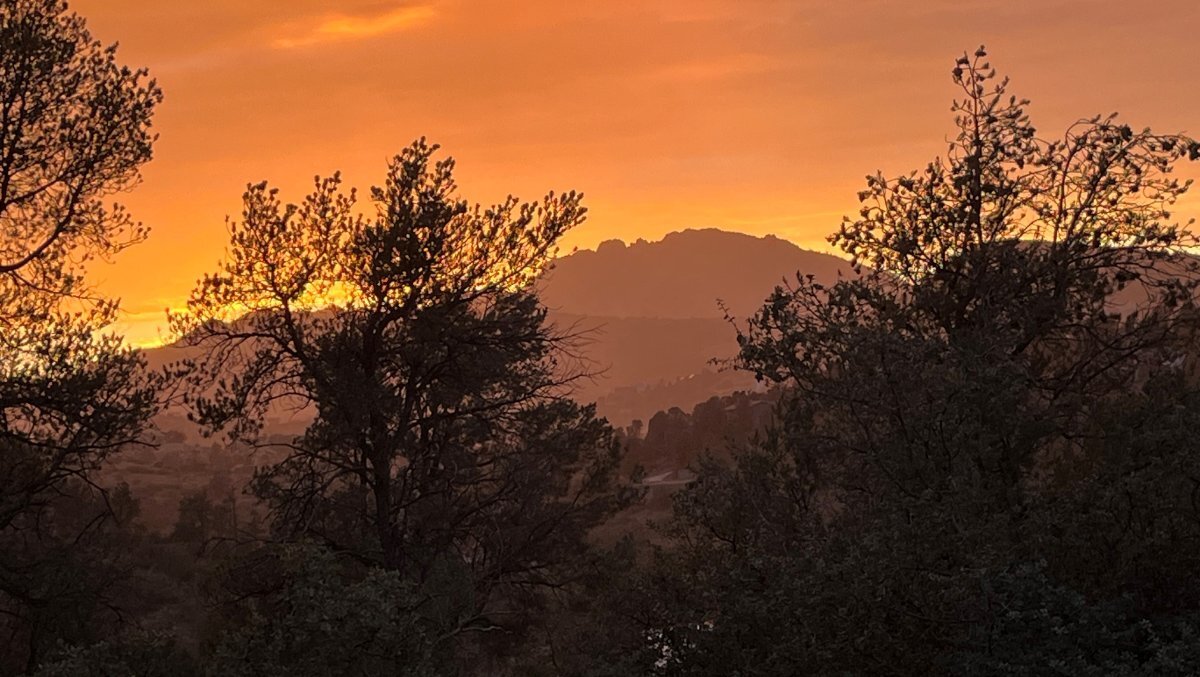
Leaving camp at Kelso dunes in the Mohave Desert. the road is in poor shape due to storms In mid-November but the slow go is well worth this place for a nice overnight spot.
4 points
-
Loved it when we did it. Shaeffer Trail isn't very far from there, and it's even crazier! 🙂3 points
-
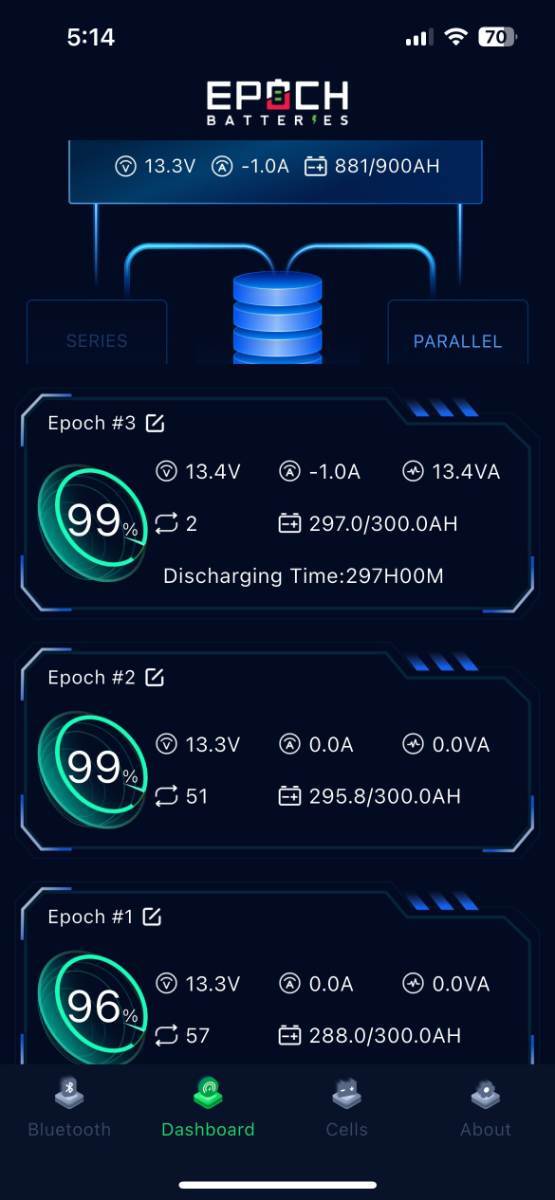
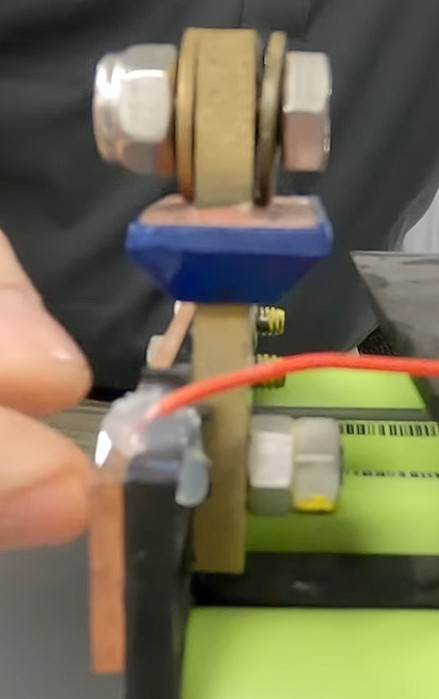
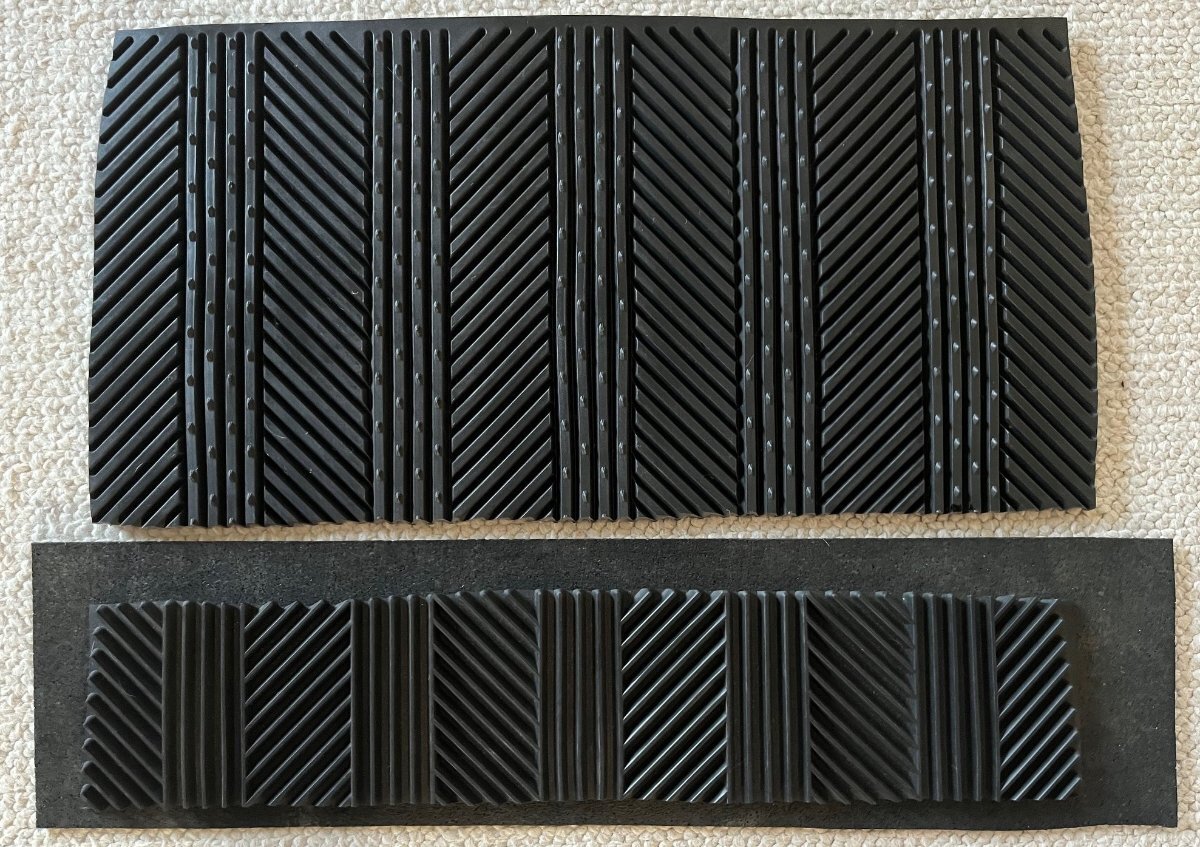
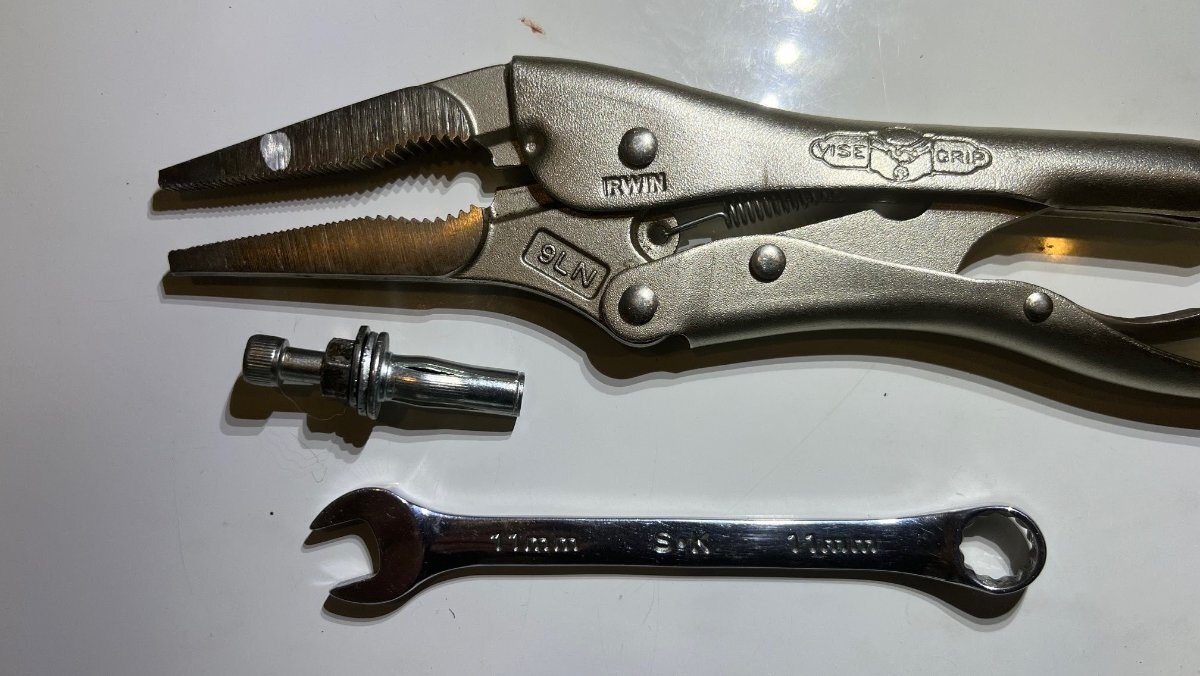
Epoch batteries were on sale again for Black Friday and I'd been thinking about adding another one. Our 600 Ah system has been great, all we needed for the last year+ (MP2 Inverter always ON with many AC appliances running). Since we're adding an efficient A/C this will allow us to run air long enough on those hot afternoons! We're tired of having to be in a campground on hot days! I was back and forth on spending the money, so I asked Chris and, in a heartbeat, she said "Do it!" I've finally let go of the RV owner's syndrome known as SOC-Worry! I'm now just fine when it gets under 50%, but it worries Chris some. Hopefully, NOT anymore! Two Epoch 300 Essentials fit nicely in the OEM battery tray. I knew adding #3 meant a custom installation. First to-do was to remove the battery tray. Would you believe that alone weighs 30 LBS! Then cleaned up the bay and filled the mounting holes. I had scrap rubber from the TSC stall mats I used to line my truck bed (the wheel-well cutouts) and after trimming them a couple inches shorter they fit perfectly! I kept looking at that big bolt in the center of the bay, and wondering why OTT would have done that!? Our friend @mountainoliver gave me a heads up on that and I got under the streetside bed and found the support beam the other end of the bolt (pic2). I started thinking I could somehow secure 3 batteries using that bolt. After sleeping on it, I thought of replacing the bolt with a 1/2" eyelet bolt and use it to strap and lock the batteries down!
3 points
-
Thank you @tallmandan and @CRM and other forum members for the 👍! @rideadeuce was my inspiration. Mike installed 920 Ah Epoch back in April 2024. He purchased two of the Epoch 460 Ah Elite Series that come with Victron Comms, upgraded internal components and special cases. I didn't need the extras and preferred the lower price point of the Epoch Essentials Series. They call them Essentials, but they include the app, built-in heaters, internal protection, temp sensors and alarms. Even their Essentials Series batteries are industry leading! Two Epoch 460 Ah Elite Series batteries just barely fit in the bay (see Mike's post linked below). Two Epoch 460 Ah Essential Series will NOT fit! The two side-by-side would be an inch too wide (the Elite Series batteries are much taller). Too bad, or I would have gone that way to begin with. I didn't see that Mike secured his batteries into the bay. Likely they are so big/heavy, sitting on rubber, and since they fit wall-to-wall they would not budge! I felt the 3 smaller batteries should be strapped into place and I was also able to add a locking mechanism which minimizes theft worries. At 900+ Ah these are surely forever installs! 😎2 points
-
Wow JD! You've gone an one-up'd those of us that have installed the 2 300 Ah Epochs. Very impressed and good to know that this can be done. I've been very happy with my upgrade to 600 Ah with the these two Epoch batteries but if I ever decided to upgrade to the 3000w inverter and try to run off-grid a/c then this would be the way to go! Thanks for sharing and thanks again for all the help and advice you share on this forum.2 points
-
And Merry Christmas to you! 😂 John, your original file worked fine for me and is much appreciated. I’d say, if you’re still on Office 2010 it’s time to spend $99 a year for Office 365! 🤣2 points
-
John Davies has a wealth of modification knowledge in his list. I can download the list but can't open it due to using an older version of MS Word (2010). As I think I posted in another thread, I found all the links went to the same article. I also found it difficult to find what I was looking for since each subject is only shown in the URL. So, I downloaded the page and modified the links so the subjects are easier for me to read and opened to the correct thread. I've attached my edited version of John's list as a text file. If anyone wants to use it, just change the file suffix to .htm and it should work just like a web page. John E Davies -HOW TO threads and Tech articles LINKS - Copy.txt And I thank John for all the help he's posted! Tony2 points
-
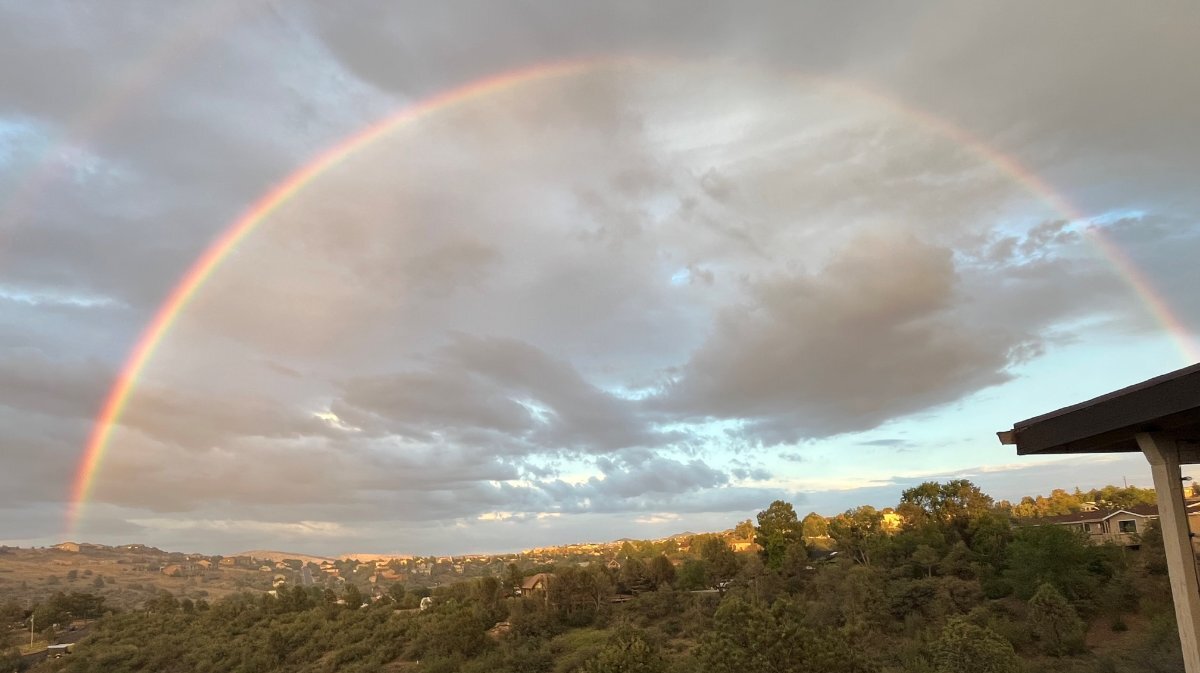
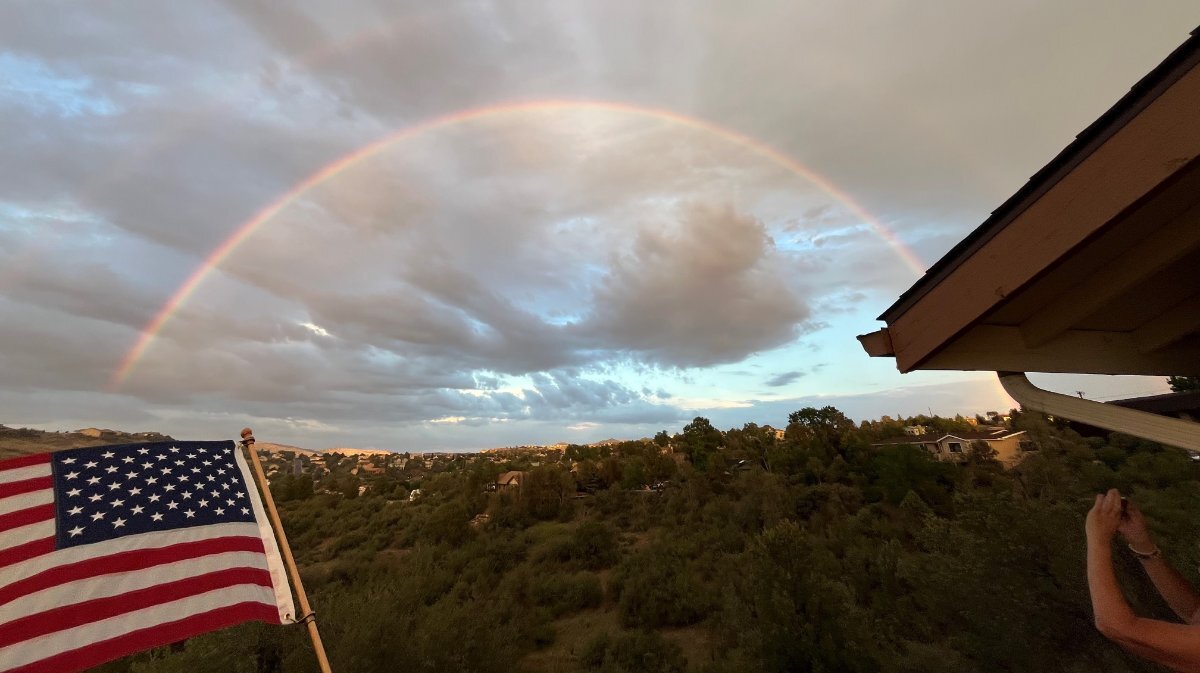
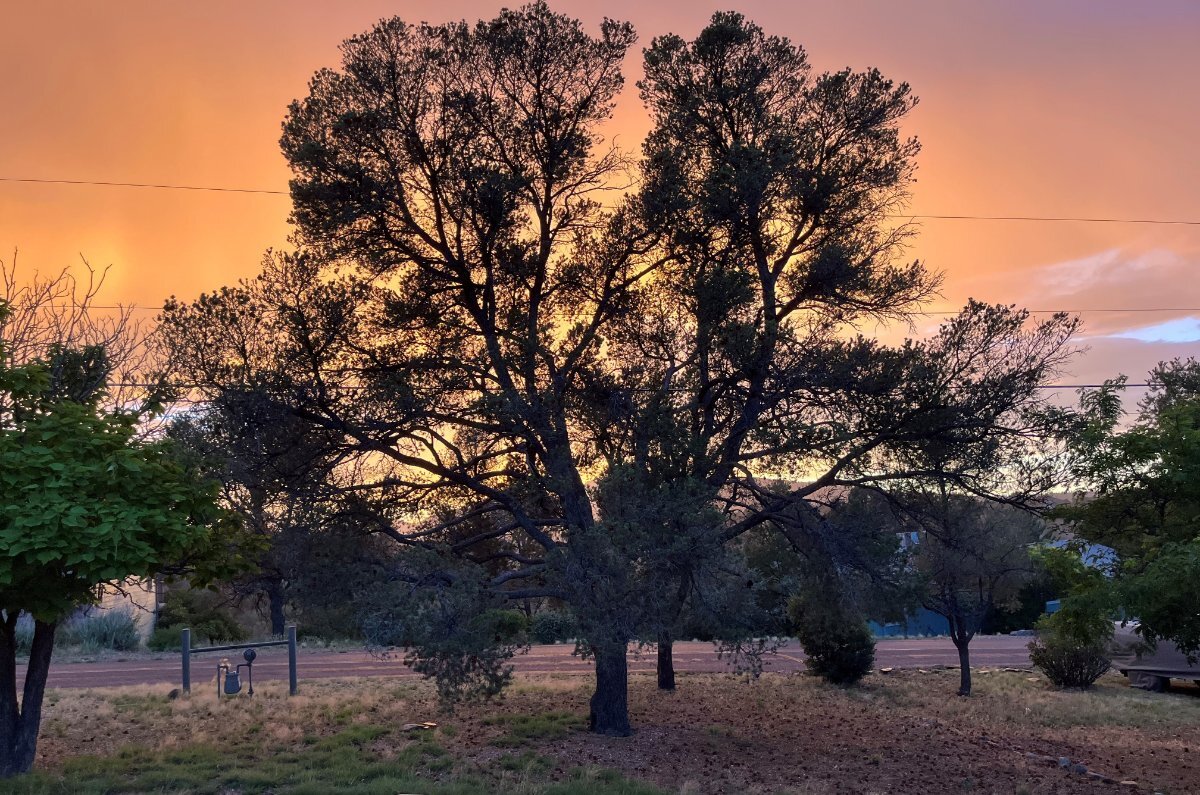
Never posted in this section of our Forum before, yet after reading the topic it seemed appropriate for this post! After what you will soon learn we enjoyed a breathless day today. In a way it's about our story, how we found Prescott AZ some 30 years ago on weekend side trip, off my regular Motorola business trip to Phoenix, and we had a great weekend! Fast forward 10 years later and our family did a 3-week car trip west to find a new place to live somewhere west, leaving comfortable surroundings of Northern Virginia. We left VA heading to Houston and had Christmas with Chris' daughter. The rest of the family left to San Antonio, the Alamo of course, Sante Fe and Taos NM, other stops and had a New Years HomeAway rental for a week in Flagstaff. Flagstaff was cold, sitting on I-40, a transient town for those to-n-from California and visitors to the Grand Canyon. We did day trips to Sedona of course, Cottonwood and the Verde Valley and it only took one more day in Prescott to know it is the place. Closed on our N VA home in Hamilton VA, June 2005, and moved to Prescott. I thought of living west most of my life. Attending High School in DuPage Co IL and all there was to do was drive west through miles of flat cornfields, with nothing to do, nothing to see. Our friends here and elsewhere come back from trips to Italy or South America and say, you got to go! Others ask, why are you not out on the road more in your RV (or now the Oliver)? When we lived in Chicago, everybody had to leave the city as often as possible. "Escape to Wisconsin" and "Say Yes, Michigan" were the local sayings, meaning "get outta Dodge!" We moved from the city to North Barrington, IL. 50 miles out! I started liking staying home on weekends. Actually LOVED doing yardwork, of all things (though I'm a weedwhacker and not a planter). I felt bad for the people who needed the escape to Wisconsin, as where we then lived, we were halfway there. Hmmm. Why do I want to leave a place as great as Prescott AZ? It is the greatest small city in Arizona, carefully selected over time. It is the ONLY city of any size in Arizona not on an Interstate. Think about that fact!? Literally 50 miles SE to I-17 or 50 miles north to I-40 and I-10 is a whole 110 miles away. You got to want to go to Prescott to drive by here. It's not Phoenix or Tucson, thank goodness and it's not the desert valley, nor the snowy higher elevations. We had an amazing day today. Played pickleball and won 5 out of 6 games. Adam joined the club today and he met many good people. Always do a spa after sports. For 6 years, I've been trying to figure out how to mod a camper with a hot tub. 🤣 Drinks on the deck and we cooked dinner together (I'm in charge of drinks, Adam and Chris are very good cooks). We have GREAT weather up here. I'm going to end with pictures from our night, all from tonight. It was spectacular, most are from our deck, and a few are front of house. Monsoon season started early this year, and we will have another dozen crazy evenings over the next few months! Many of you would pull your Olivers for days, to experience such a camp as we have right here at home. PLEASE COME VISIT as all of you that I know here are certainly always welcome. We have partial hookups too! I promise to pry my older fingers off the weedwhacker and the other tools I love, just long enough to get 45 days away in the Oliver during our upcoming 2024-2025 season. Hope to meet many of you during the October Texas Meet. God Bless y'all on this Sunday.
1 point
-
I received an email from @rich.dev yesterday and he sent me a link to this video. Thank you Rich! Chris and I enjoyed it after dinner last night. It shows Arizona's Christmas City from an RVer's point of view. The couple are kinda goofy, but it's fun. 😄 BTW, when you come to visit there are infinite camping locations (you don't have to stay as far away as Congress AZ as they did)! Unless there is a special event in town (which is often, e.g. the annual mountain bike race during April: https://mbaa.net/racing/prescott-punisher/) you can camp at designated sites on Copper Basin and Thumb Butte roads which surround the town, climb up to over 7K ft, and just 10 minutes back to the Prescott town square. The close perimeter around Prescott is designated camping only (still a lot of campsites and campgrounds), though as soon as you get 10+ miles out of town there is boondocking everywhere in the Prescott NF! Get the Motor Vehicle Use Map: https://www.fs.usda.gov/r03/prescott/maps-guides The second video is from Living in Arizona Now, one of my favorite YouTube channels for AZ travel. Hope to see y'all in the New Year! 😂 Merry Christmas to all!1 point
-
Clean install. In the planning stages of adding solar/lithium and it's nice to know that 900ah can fit in the battery box.1 point
-
Temperature tags or something similar may be a good idea for both batteries, too. Like the idea of being able to check battery temps with the smart phone. Here's my current plan to monitor the 100AH BB temperature connected to the load, subject to change, will see. We have two 100AH BB connected parallel in our Ollie. Since we have one Victron IP65 Bluetooth SmartShunt, going to connect the + BB battery terminal to the Shunt temperature sensor that the + load/charge cable is also connected to. We don't have an inverter or factory installed solar. Battery charge comes from a Progressive Dynamics 4045 converter/charger or our two 100W solar suitcases. The reason I installed a Victron IP65 SmartShunt in the battery compartment is because it's waterproof. Here's a Q&A on the Victron forum about connecting the IP65 SmartShunt to the Victron temperature sensor splicing to the correct IP65 wires: https://communityarchive.victronenergy.com/questions/213907/temp-sensor-with-smartshunt-500a-ip65.html1 point
-
Mossey, you have both BB and Lithionic batteries? Yep! I bought the BB's in 2020. I won the Lithionics battery at the 2025 OTTO's Rally. I haven’t installed the Lithionics battery yet, because my onboard charger is not approved by Lithionics. A MP2 is a future project. Mossey1 point
-
It looks like the issue is the bolt inside the BB that conducts (and resists) all of the current. A plastic spacer separating the internal buss bar from the terminal prevents direct connection of the two. The external terminal connections on the BB as well as the Lithionics do not rely on the bolts as part of the circuit. For both designs, the battery cables are held directly against the battery terminals when properly connected. There's much more surface area contact between them than just an 8mm bolt.
1 point
-
We will be there with possibly another Oliver Owner in tow. Leaving here 2nd week in January. Expecting arrival to coincide with the opening of the big tent.1 point
-
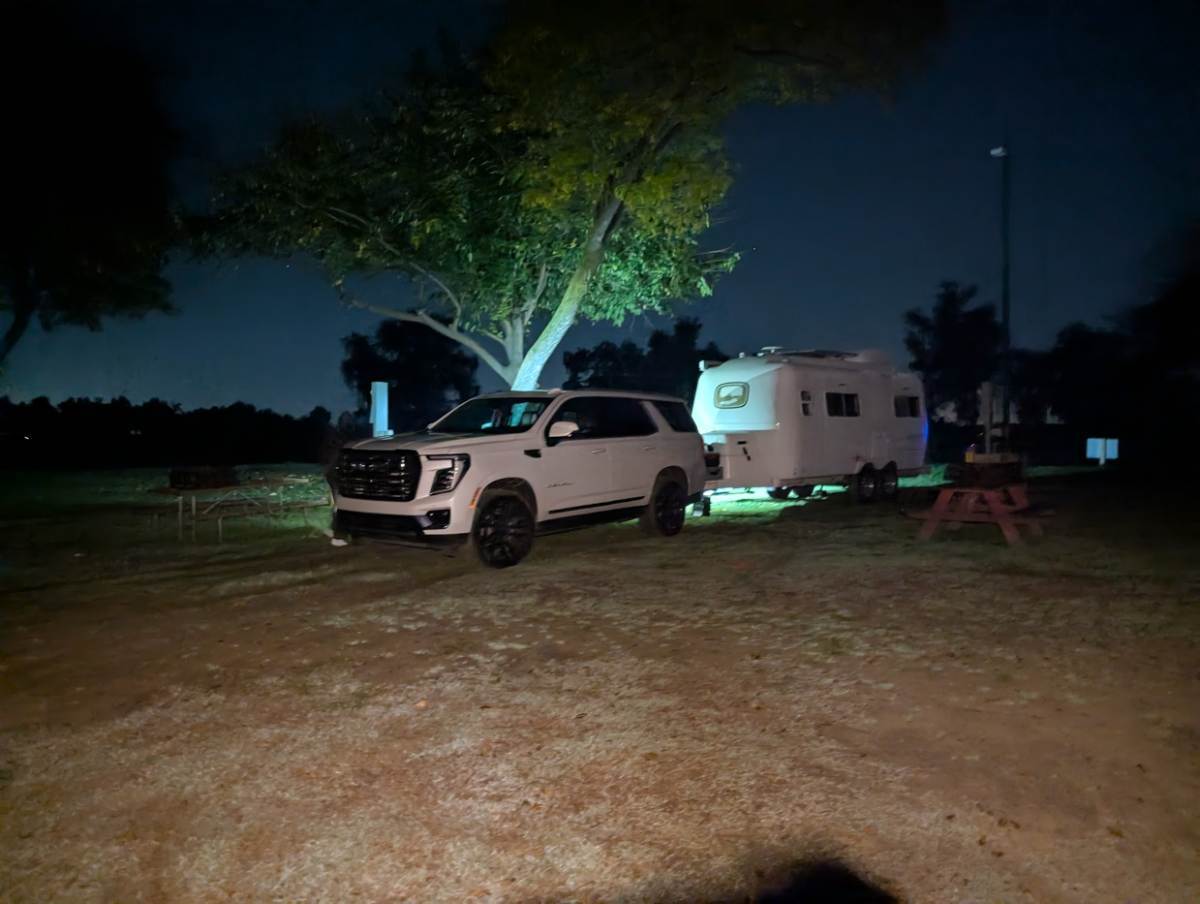
I towed with a Yukon and it pulled great. No issues. Ours was newer but we never had any issues with it. When I bought the trailer, I picked it up a few hours away from home and didn't tow it back with the weight distribution connected. Towed fine. On longer trips, I did pull it with the wdh and never had any issues either way.
1 point
-
We continue westward and are camping in the Mojave Desert at Kelso dunes. A very warm afternoon and beautiful sunset
1 point
-
In my eyes, John Davies was a pioneer in DIY efforts. I have often referred back to his wisdom and approach when doing my own. Sadly I have neither the tools, equipment or skills as this great craftsman. But I sure can gain insights on how to do things in our trailers from his efforts. Attached is a list I "Borrowed" from his posts. Saving a copy as a MS Word document lets me easily search his DIY Library. I hope it is useful to you. When you do, say a thanks to John D. It would be good Kama! Geronimo John John Davies Posts Index (April 2023 Version).docx1 point
-
Browsers may or may natively not open a text file. Sorry, it looks like I left out the step where you download the file to your device then change the suffix from .txt to .htm. When re-labeled as an .htm file, it will open in your browser. I'll add the .htm version as an attachment to the post. John E Davies -HOW TO threads and Tech articles LINKS.htm This should open directly in a browser. If it doesn't, please let me know. Tony1 point
-
Look up Moki Dugway.It's a road in UT.. the most amazing road I have driven. It climbs 1,300 feet in 3 miles, hanging off a rock face overlooking Valley of the Gods. Valley of the Gods is spectacular but an afternoon drive to the top of Moki Dugway will make a little vertigo set in. and see if you can find Ollie in the below image..
1 point
-
I'm a late comer to this party but I have copied many of his ideas and upgrades that has improved my rig and enjoyment.1 point
-
Nan, given you’re a female alone, we certainly understand. If you want to visit Arizona, come to Prescott and see us first! 😂 The Q is only worth going to see other Oliver Owners (otherwise there are 100s of better boondocking sites in AZ! Slow response on this thread! Hey @ScubaRx, if you’re coming, dinner is on us this time! Hey @MAX Burner, it’s perfectly OK you have a new TT! Love to see it. i started this thread to poll those who frequent our great Forum. We have 3 weeks off and if the Q is a bust, we’re going to head towards Tucson, get there asap to tour the SE corner of Arizona. Didn’t want to go that way for a while, but the boarder is secure, god bless. Hope to see y’all! 😎1 point
-
Would love to visit, but am a little afraid to travel that far by myself, well with the dogs, but they are not much help.1 point
-
We are not going to be able to do Q this year. Family situation is keeping us close to home for the foreseeable future. ☹️1 point
-
Me too. Maybe the slides or installation were just better on some older hulls. Talk about hijacking a thread! I started this thread. The original purpose was (read the title again). This went from a comment on needing a battery strap to all this! We do have enough posts on drawer strap mods. I read the one from John E. Davies when I first joined the forum. Personally, I would replace the slides or remount them very slightly uphill vs. all that! 🤣 Back to the subject at hand. I did weave a simple strap through the openings on the battery tray and over the batteries. Not that they need to be held in place, as they're not going anywhere, just to reduce vibration. This strap should just stay in place for years.
1 point
-
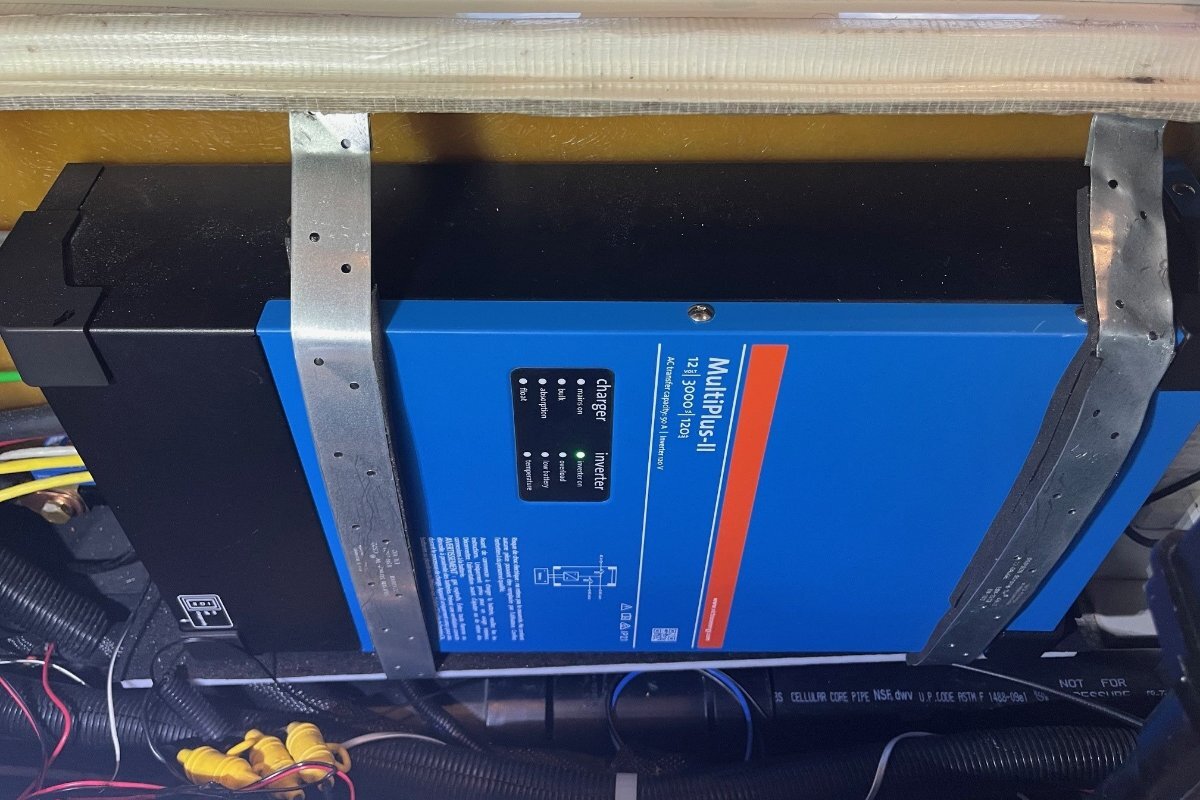
Another item on the mechanical installation. I used some rubber to cushion the inverter on the bottom and backsides. The thin rubber was cut to 6x24" the size of the HDPE board and I used carpet tape to keep it in position. The thick rubber cushion was cut from a truck rear floor mat, just laid in position and the strapping should hold it nicely in place.
1 point
-
Time to strap down the MP2. I used ¼”x20 Plus-Nuts that I learned of on a thread that @Frank C wrote on replacing the bathroom vanity cover. There is a heavy-duty interior lip that allows for this without exposing screws to the interior. I knew of this HD lip from last year, when the curbside I mounted brackets for our motorized ball valves for the plumbing system. Not easy to get these started without the special tool but I was not going to spend that money for two bolts! A long-bolt-nut concoction and needle-nose Vise-Grip did the trick. Doubled some rubber tape for a tight fit. I got sloppy on the rear-side strap allowing the drill bit to catch and it pulled the strap in a spiral. Had to straighten it out the best I could because replacing it would be a pain. I’ll add to this post soon to explain programming, both configuring the MP2 and updating the Blue Sky SC for LiFePO4 batteries and more usage data. Ran our old LOUD-dog Dometic Penguin II for 4 hours today while strapping down and finishing up. The inverter was supplying ~1600W and the SC about 200 (cloudy day) for 1800W total. The batteries were close to full and read 37% when done, but 100% SOC is not yet set so these may be off. Finally, thanks to Mike @rideadeuce for leading the way on Epoch batteries and the MP2 installation.
1 point
-
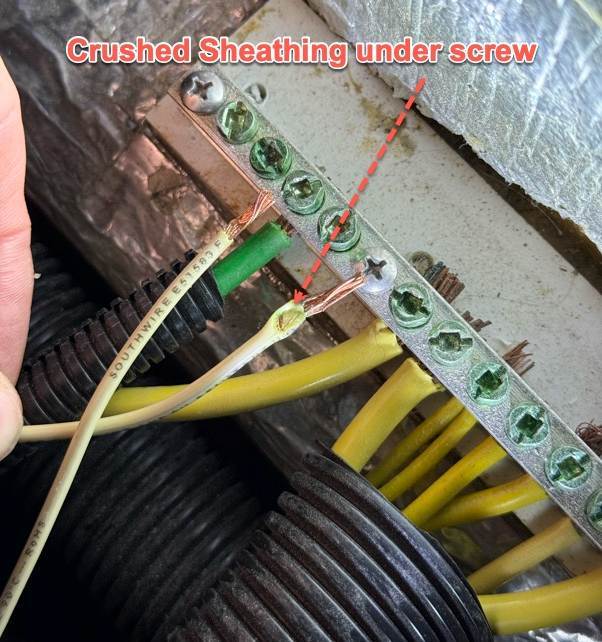
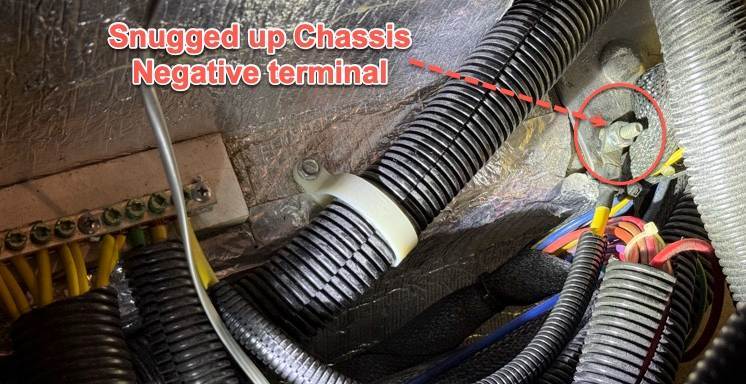
Well, I cannot believe it took me this long to find the issue with my intermittent brakes after Oliver failed to put on new axles for me last year. Since then I've been dealing with my RAM disabling the brakes periodically. No rhyme or reason... (known to me). At least three or four of you folks here would have found this sooner than me, I'm sure of it. As suggested by some, I verified all ground wires going inside the trailer from the brake bundle on the drivers side (only for snugness). I have even replaced all brake bundle connectors, some I did twice just to be sure (today). But the good thing is I learned a great deal, and I found a ton of wire connector corrosion along the way. Even the 7-pin connector (now replaced) was not looking good. But what I DID NOT check was the actual copper wire condition going INTO the negative/ground bus-bar inside the trailer. Well, after checking, re-checking, re-checking again all brake connectors today, and verified voltage to all brakes, I think I found what someone at Oliver had done. See, when they initially removed my axles from #110 last year, in hopes that the new axles would fit my frame (that's another thread), they slapped my old axles back on, and hence re-ran the wires back into the trailer (creating the new issue). Sure I checked for snug negative screws, but I never actually pulled out the wire from the bus-bar. Look what I found today. After fixing this "mess", and ensuring the sheathing was not inside the bus bar, my third test drive for the day was a success, but who knows, I've driven four hours in the past, before my truck was bitching about low voltage for the brakes. This had to be the issue, I hope. I was also able to snug up the main nut to the chassis ground, although I know that was not the primary issue. Sigh!
0 points
-
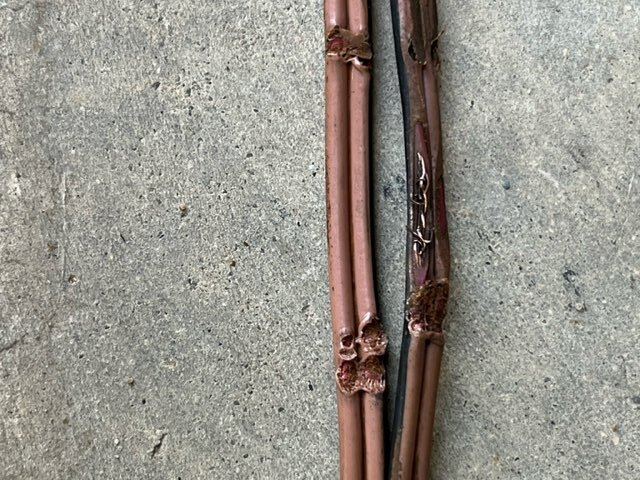
To All, Mine were abraded somewhere within the axle tube in the middle between the hubs. There was about 12' of wire stuffed in the axle between the hubs. Mike T. & I were in discussion, as we both had this issue at overlapping times. I believe I was just further in the process when we discussed. I will include pics (of both dbl. insulated wires) of where abrading exposed to the bare copper within the two insulations. I did not remember to label front & rear. It was explained to me that the during the forming of the axle tubes (and this may vary depending upon manufacturer) the inside of some may get a robotic welding, as well as the outside. the outside of course is smoothed off and painted. The inside, depending on the process may get a smoothing, however most of them are left with weld spatter inside so the axle tube on the inside resembles a concave wood rasp... just what we do NOT want to house our brake wires. Mine actually look like they were somehow pinched, or maybe during the shorting out process heated up enough to melt(?) the insulation near the abrasions. So I went straight to a previously read article by Prof. JED, Emeritus, which dealt with replacing the brake wiring. I ran my newly purchased (NAPA Shielded Brake Cable) wires outside the Axle Tubes, putting them thru a loom at about 9 o'clock (to the rear) to protect from rocks or other strikes. Using butt-splice connectors from the Shielded Brake Cable wires to the leads going into the brakes, then buttered the connectors up with adhesive-sealant to further protect connectors from moisture. I have some ZIP TIES (I've been told, like the ones 'LE' uses on your wrists...) which are 1/2" wide and abt 1/8" thick, and used those secure the loom to the axles. At least that was my approach at the time, as I wanted to get back to camping. The Brakes have worked as they should. B~Out
0 points


.thumb.jpg.e34bf01ef7f7d5e99ad31856d45afbeb.jpg)


-
Recent Achievements
-


")


")