Leaderboard


Popular Content
Showing content with the highest reputation on 04/19/2026 in Posts
-
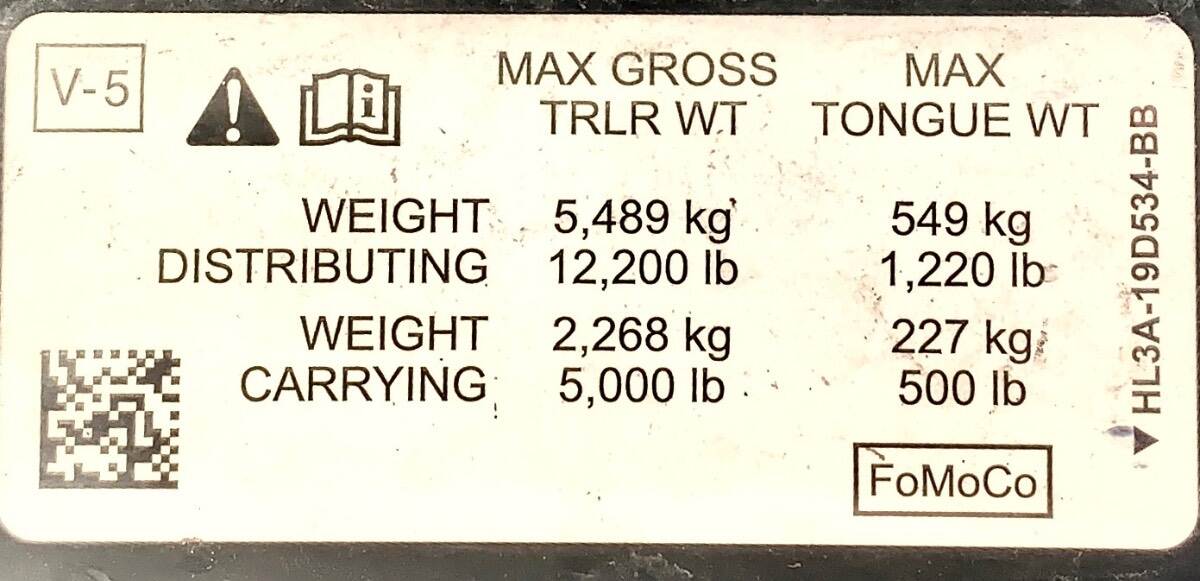
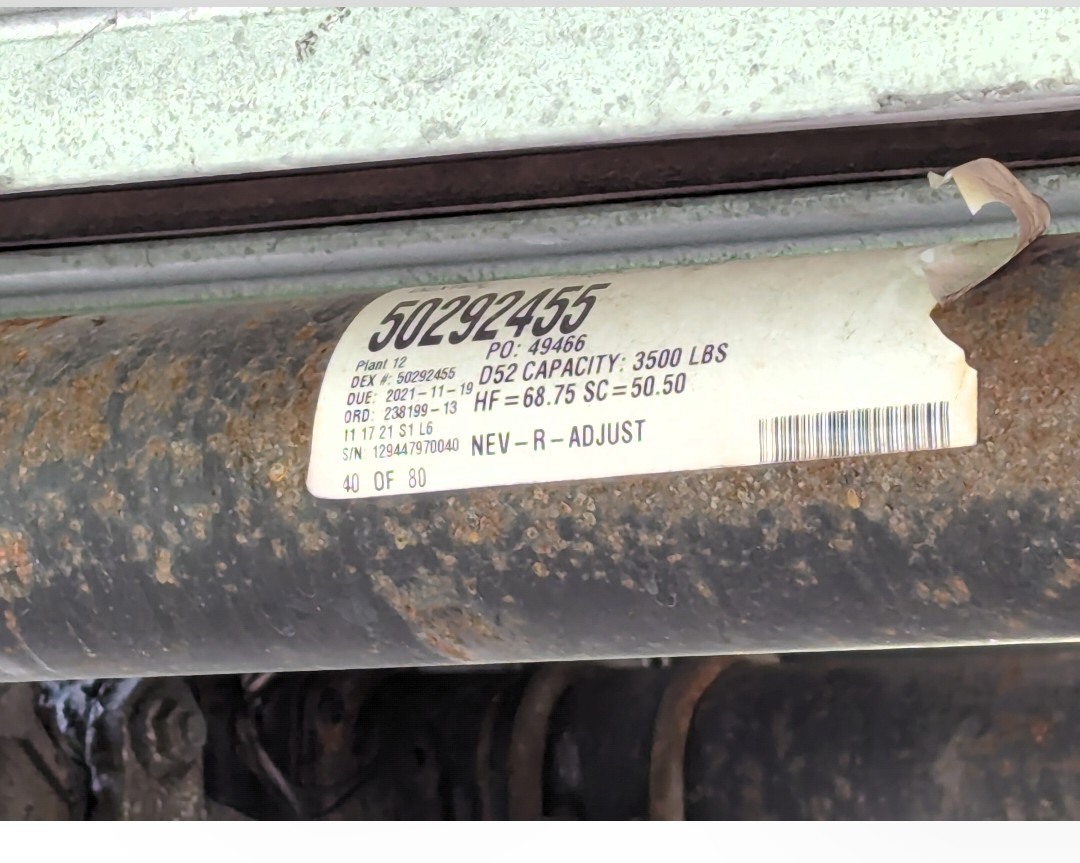
Usually the 1/2 Ton Trucks are limited by the 'dead weight" or weight carrying capability. The receiver unit on the truck you have should have a sticker like this one (from a 2018 F150) either on the actual receiver hitch or on the door frame. Notice that on this unit the max Tongue weight capacity is 500LB. (Weight carrying the case where you don't have a WDH and is essentially the dead weight from the trailer tongue down on the ball.) An Elite II tongue wt when loaded is easily above this 500lbs, and requires a weight distribution hitch to be safe and legal. In this F150 case, once a weight distribution hitch is applied, the F150 can then handle up to 1220 Lbs of direct tongue weight. The towing guides for most vehicles state the method for determining how much adjustment is needed from the WDH. Most have you: 1) Measure the unloaded truck's front wheel well height through the center of the front wheel. 2) Measure the wheel well height after loading the unit and attaching the trailer. In most cases the amount of weight distribution needed is set to bring the front end back down by at least 1/2 of the total difference in those two measured heights. Example: Unloaded measures 37" Loaded measures 41" (4' total rise). Apply enough WDH force to lower that front measurement by least 2" ....or 39" when loaded. Each manufacturers towing guide states specifics by vehicle make and model. CS
 3 points
 -
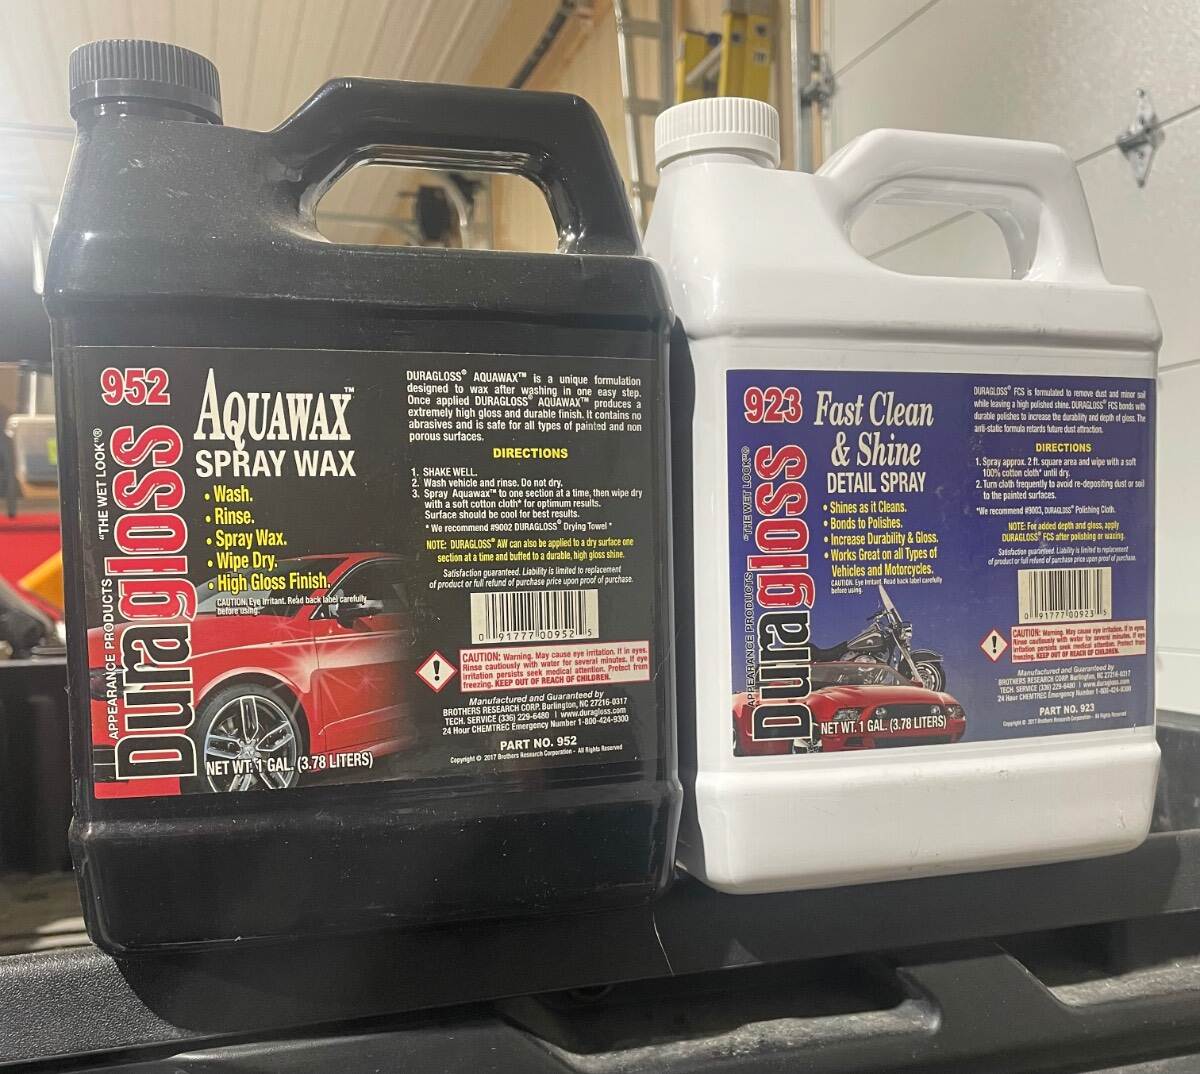
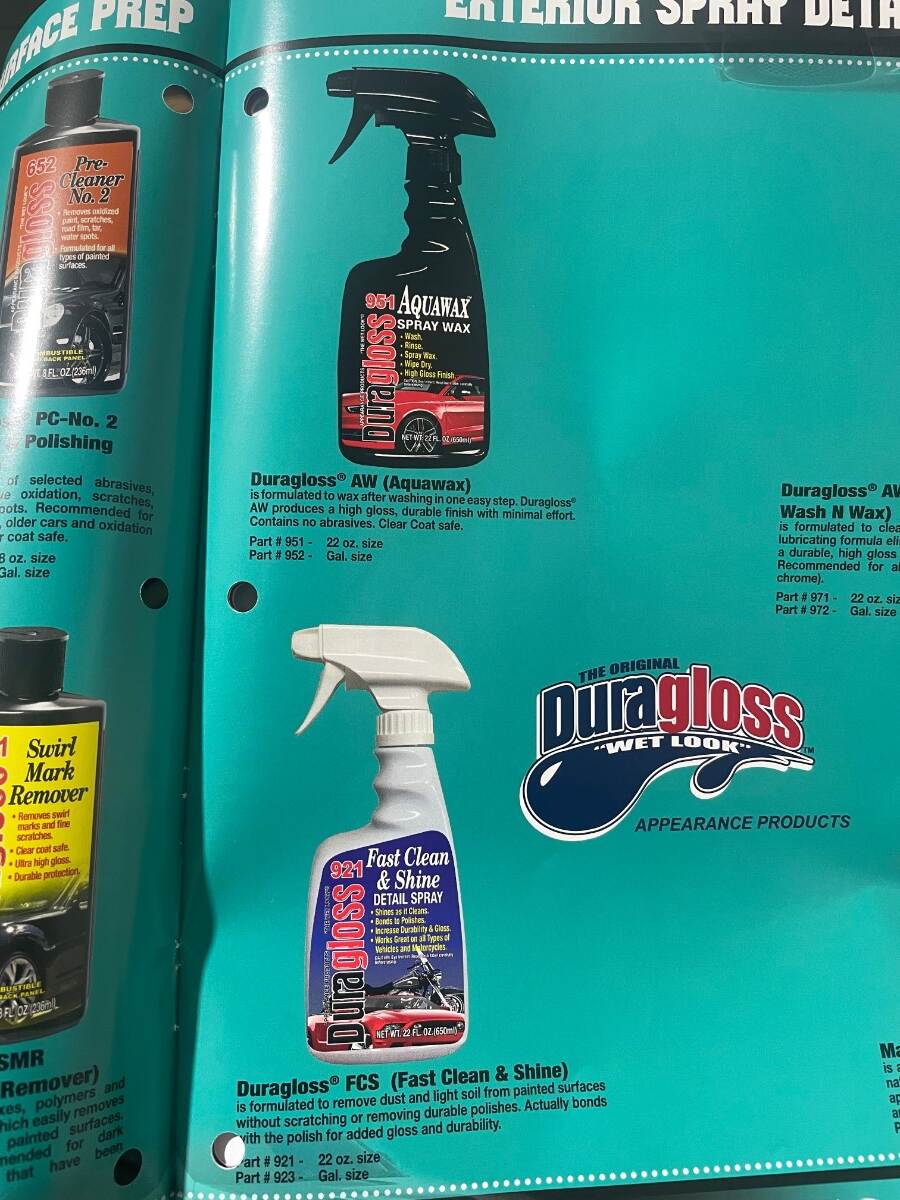
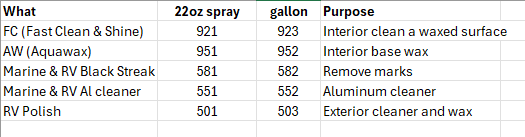
@Boudicca908 921 is 22 oz bottle, 923 is 1 gallon jug https://www.duragloss.com/wp-content/uploads/2021/07/921-DURAGLOSS-FAST-CLEAN-SHINE.pdf 951 is 22 ounce bottle, 952 is 1 gallon jug https://www.duragloss.com/wp-content/uploads/2021/07/951-DURAGLOSS-AQUAWAX-SPRAY-WAX.pdf
3 points
-
Unaware of any issues on the 5200 lb. Axels since Oliver switched to the 5200 lb. axels. After 5 years we are replacing shocks and having Alcan 4-leaf springs installed. The place that services our suspension said they noticed a slight flattening of the springs. The Alcans just arrived.2 points
-
HERE is a new video from Oliver featuring Aaron Wolters. Bill1 point
-
That's a smart move, John, I'm glad that you're replacing them! I was assured by the Oliver guys at the last rally that I didn't have to worry about my springs, 2023 build with D52 axles, because there were no problems with newer trailers with D52 axles. Well..... I have a broken spring set, passenger rear, with the remaining sets flattening. Needless to say I'm not a 'happy camper' regarding this. I have replacements from Alcan but haven't had time or decent weather to do the repair as yet.1 point
-
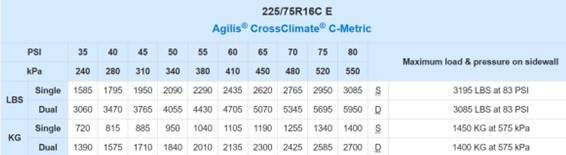
You can follow the 80 PSI MAX spec on the Load Range E LT tire, the 65 PSI rating OTT prints on their DOT label (they used to print 80), or the PSI recommended by the tire manufacturer, based on actual GTW on their load/pressure tables. I/we, most of us, follow the latter. I use any PSI over 45, less than 50, to set them all equal in that range. These numbers allow for 7,800 to 8,360 LBS GTW. On long trips, we carry max 6,600 LBS, so in this range we have spec plus a 20% safety margin. If you run at 65 or 80 PSI, you will cause internal damage to your Oliver. Regardless of brand, LT 225/75R16 tires will all be very close to the numbers you see here. I understand new hulls to have 15" wheels, so get a table for your size. I must have posted this table 6 times now...
1 point
-
Yes.... Given a 3/4 ton truck ditch the Anderson. Have to mention for folks using a 1/2 ton that you need to read your manual very carefully. Most half tons will require a WDH if the trailer weight is over 5k lbs. Hopefully no one finds themselves on the wrong end of a lawyer trying to take their house, but if you do... you'll be glad you had the WDH installed. Quack Quack! Oh no.. wait... I got the Alcan springs. Scotty1 point
-
I get that, but the axels should be 5,200 on all Oliver's starting in 2022. Maybe I misread what he said. He said he has D35 axels, when it should be D52, rated at 3,500.
1 point
-
Your experiences may be different after more miles on your new hull. Ours waddled greatly and porpoised when not using the Andersen WDH. Awesome towing with the 5-leaf Alcans! 😎 Same leaf springs, given the D35 rating. Many Dexter 1750 LB leaf springs have failed with time. Keep an eye on the arc of your main leaf springs! When one starts to flatten, replace them.1 point
-
Sorry those are tired old myths. You know ICE engines lose efficiency as they age? Everything loses efficiency, including us meat engines 😅The source of the myth comes from the old Leaf batteries. They just air cooled those things. So you'd drive on the freeway (heat the battery), stop for a charge (no airflow), and fast charge (heat the battery). It hammered them, and they aged very quickly. All modern EV's have HVAC water cooled systems that carefully manage the temps, and the batteries last forever. So much in fact they have second lives, when people are done with their cars in ten years they repurpose the batteries for grid use. Same thing with solar panels. Also these generally don't use LiFePO4 chemistries, they're several generations beyond now and have greater durability and resilience. Point being, yes they do lose some performance but so the heck what? Look if a 10% or even 20% performance loss is a problem, well better batteries/trucks/panels are now available. And for panels, the cost is almost all in the labor - sound familiar? That was the lions share of the bill, maybe you've seen this if you ever worked with an electrician. If I ever wanted to replace my panels it would be a simple rooftop swap and wouldn't cost much. And that all obscures the fact that even if I decided to replace these panels after 20 years of free power generation, well I still got X years of printing money.1 point
-
Sorry not sure what you're saying, out West the charging is an issue? I live in California, it's the EV capital of the US and the highest density of charging. The one and only exception is Hwy 1 North of SF, but as my truck loves the windy coastal 'highway' and range isn't an issue. There's plenty of Level 1 charging but no DC until you get to the bigger towns up north. Yes it does actually. I did a full accounting including the time value of money, of course the upfront costs and other factors, it paid for itself very quickly. It's due to a couple of factors, one is electricity cost is ruinously expensive in California like everything else. Two is the generous NEM1 policy which lets me use the grid as a battery. True up is once a year where I pay something around zero, or get a small check in return. Three is peak shaving, where they really get you is between 4PM-9PM (the 'duck curve'), so I had my grid designed to take advantage of that time, and we 'power down'. So I earn at peak rates, and use at off peak rates - make sense? Finally you have to look at the bigger picture. We each have an energy budget, NG, electricity and transportation. ICE drivers are forced to have those three buckets, but I have one bucket. I converted my house to electric (e.g. induction cooktop). So now with one energy bucket that I can be an energy provider for, the economics seriously changes. How much do you pay for gas on a yearly basis? For me that's bundled in to that single bucket. Further with free charging, that also feeds into my energy bucket. I'm fortunate to have a DC fast charger at work for free. So I pull in some 160 kWh about on a bi-weekly basis. Since this is fungible, meaning free charging is the same as generating it via solar, that drives the cost down. And free charging is everywhere, half the time we charged at campgrounds, or public service charging elsewhere (e.g. rest stops). Technical discussion but no, absolutely I can show you the data that indeed my system is paid off.1 point
-
A little confusing but they have two numbers for the 22oz spray versus gallon. Here's the current products and numbers They had these for sale at the factory service as mentioned, Here's a factory tour where he talks about Durawax (time stamped) Was at the trailer yesterday and checked the instructions on the Fast Clean and Shine (921/923). This is meant to clean a previously treated surface without removing the treatment. So I think the idea is to wax it, then clean up using this so as to not remove the wax base layer. That's an interesting idea, combine the wax plus the cleaner. There's a bunch of products that take this kind of approach of a simple one step clean & wax. I like futzing so I think I'll do a wax, then use the FC for cleaning thereafter. Being interior it shouldn't need much reapplication of the wax.
1 point
-
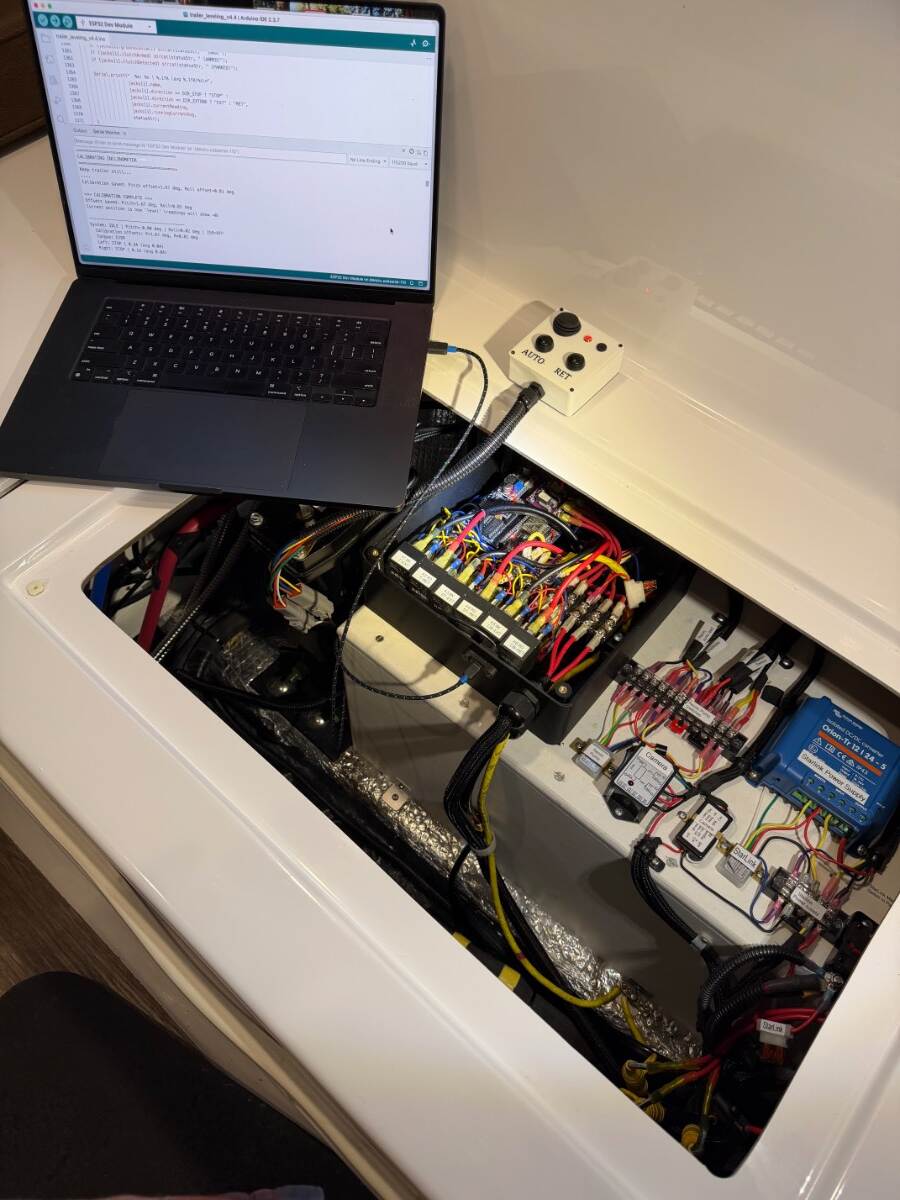
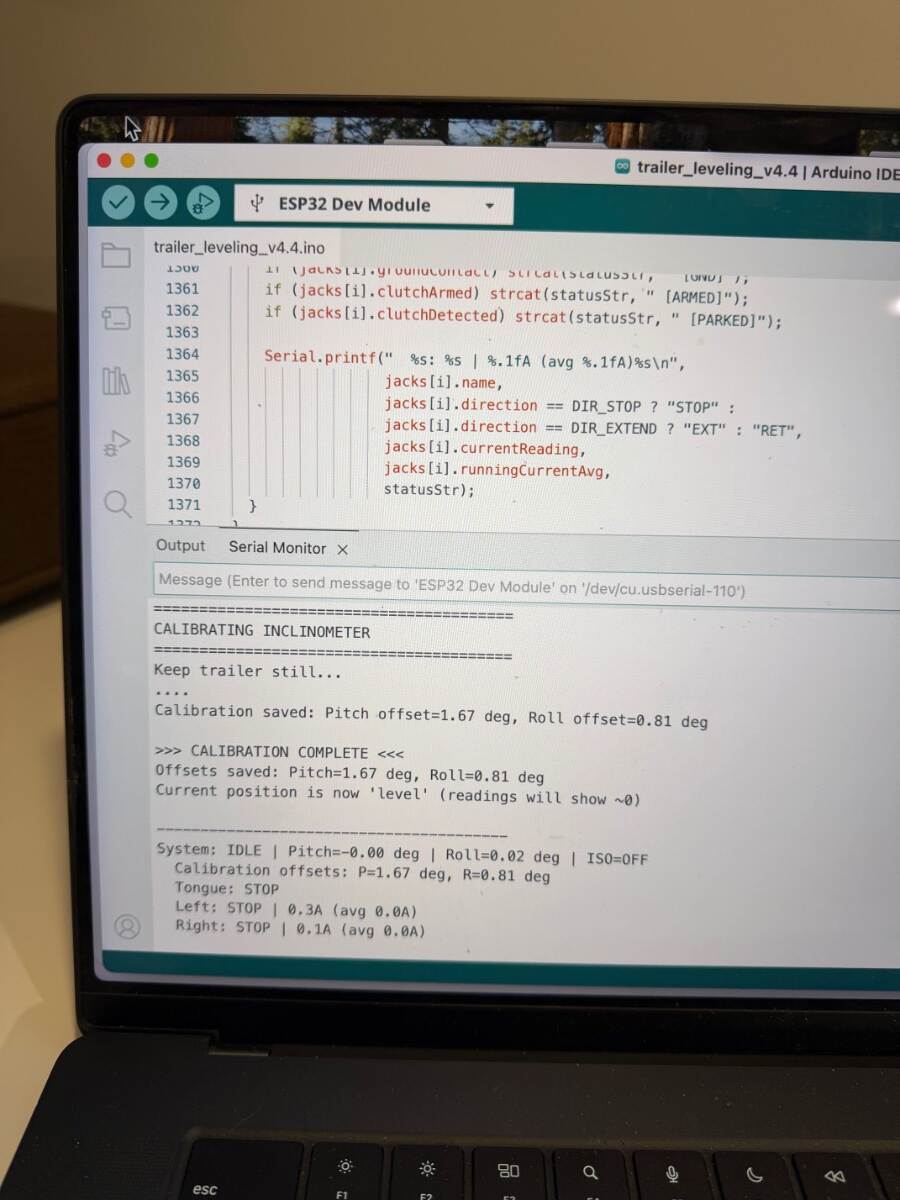
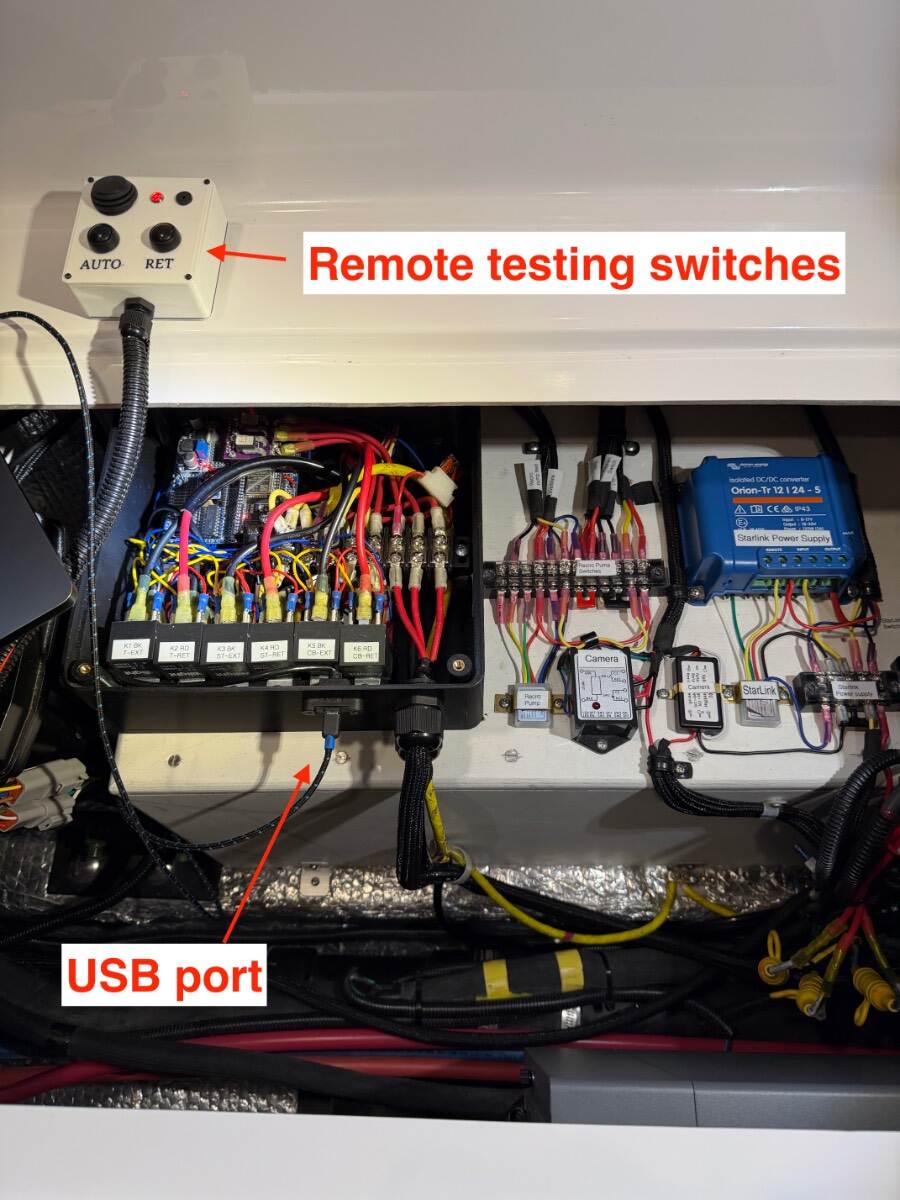
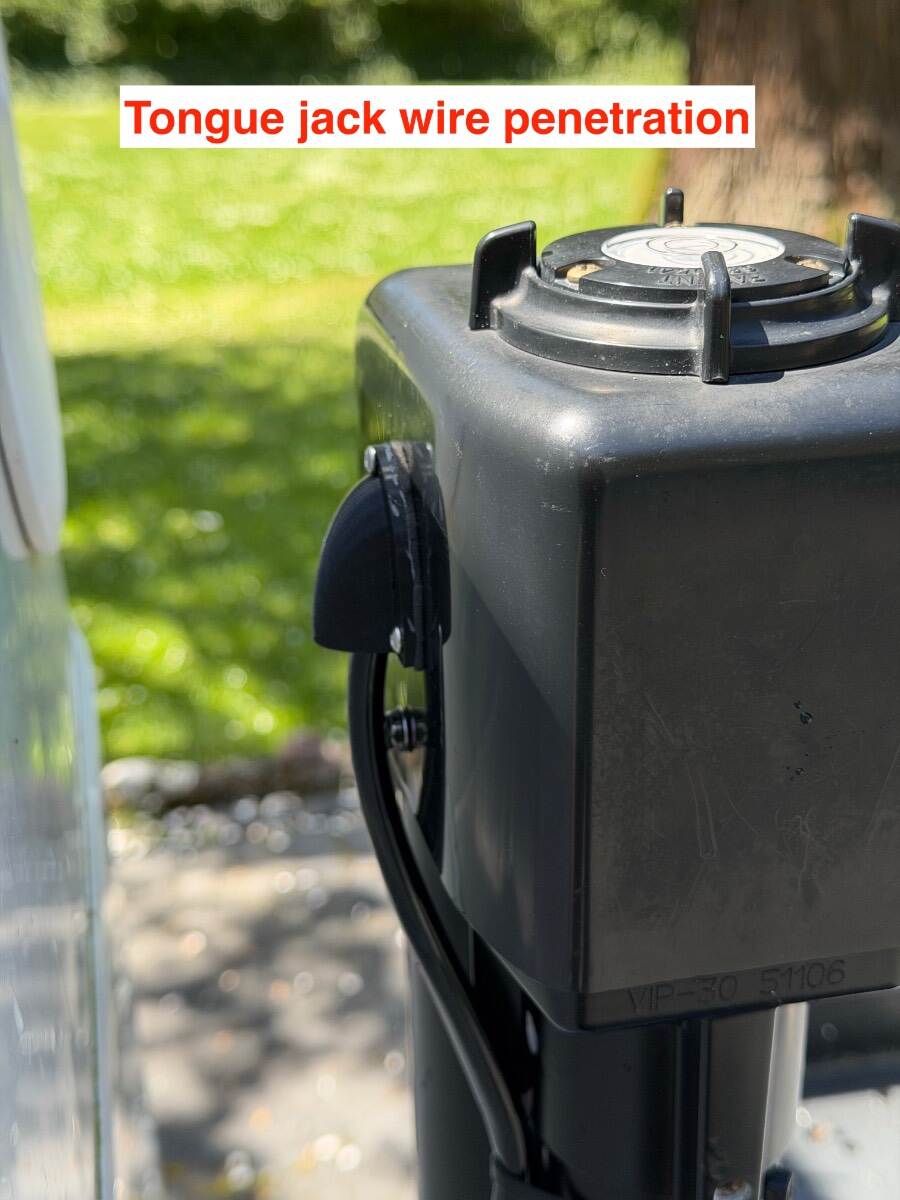
Custom Automatic Leveling for the Oliver's Barker Jacks Part 3: I skipped over a lot of detail to keep this project interesting, and it’s probably still too much information. But some might be interested to hear about some of the background work that was involved. After the test board phase was complete, and everything was working well on the bench, the system was installed in the trailer for real-life testing. This was an anxious time because it had only been tested with simulated current, and I had no idea how it would react under real current conditions. Things went south immediately! I started testing with rear jacks because they were easier to wire and much more complex than the tongue jack. I didn’t want to run the tongue jack wires if the whole project could end up in the trash bin! I came up with a test procedure to verify each function in different scenarios of operation, and that required manual jack operation. That’s when the problems started! I was blowing the 30 amp jack fuses and couldn’t figure out why. I first focused on the H-bridge relay wiring as the problem. Then I suspected that the ESP-32 or driver outputs were miss-wired during transition from the test board. They had been soldered together one wire at a time under magnification, and back tracing the bundled wires was a nightmare. I couldn’t find the problem and came close to scrapping the whole project. I was so confident in the design, and overly focused on wiring, that I completely overlooked the obvious. There was a major flaw in the way the auto-leveling system was isolated from the manual jack switches. I had used a high-amperage relay that closed to a common ground only when the H-bridge relays triggered, which broke the short circuit path when the manual switches were used. However, I hadn't considered that the pole-reversing function of the switches created a different ground path through the hot side of the leveling system. The solution required major re-work, replacing the single ground isolation relay with six 30/40 amp relays that isolate the manual switches from both the ground and hot side. Although there were two spare Darlington driver channels capable of handling two relays each, there weren't enough channels for six new relays and a second driver was added. The system now runs 12 relays from 9 driver channels — six H-bridge relays and six isolation relays, two per jack. All the components were installed in a 12” project box that was limited in size by the 3-D printer capacity. So the relays were stacked 2 high on a stepped base to save space, and a elevated terminal block helped with wire congestion. I was able to mount the current sensors directly on the PCB with the ESP-32 and other modules. It’s tight, but nicely compact too! The switches for the leveling system are mounted on a 3-D printed control panel inside the outside storage garage. The panel includes flush to the surface push-buttons to safeguard against accidental activation, one for “Auto Leveling” and the other for “Retraction.” There is a master On/Off switch, status LED, and a Piezo Electric buzzer for the status tones. The entire panel is also recessed to protect it from cargo. The system can be shut down with the On/Off switch, or by re-pressing either momentary switch. The systems parasite draw is near zero when on, but it’s normally off when not in use. The existing freshwater control system was incorporated into the lower part of the control panel due to space constraints. It has a 4-way water pump switch for the outdoor shower, with indicator LED. There is also a 4-position, 6-contact, rotary switch that controls motorized valves for the four freshwater configurations; Normal, Freshwater Tank Drain, Boondocking, and Winterizing. The LED indicators show configurations other than normal. A printed weather proof hood was used for wire penetration into the tongue jack head, and a terminal board was used to splice into the rear jack wiring. This was a useful addition for quick disconnecting and troubleshooting. Those were the only modifications made to the trailer, other than enlargement of the existing switch panel cutout on the garage wall. All the custom components used in this project were designed with a free on-line CAD program called TinkerCad. Some items were 3-D printed from PLA filament, a plant based plastic. Other pieces were printed from ABS plastic for better durability, or TPU — a rubbery filament. Automotive Deutsch style plug-in connectors were used to connect the switch panel and control box, and they allowed me to connect a remote switch box that was used to operate the system from inside the trailer during testing. There is also a panel mount USB cable port for a laptop connection to view the serial monitor or update the software. The system needs a one time calibration that is done with the trailer perfectly level. Both momentary switches are held for 5 seconds until the Status LED quickly flashes three times and the audible calibration tone indicates satisfactory level. The software determines the pitch and roll off-sets from absolute level, and sets them as the new target level +/- 0.2 degrees pitch and 0.3 degrees roll. This equates to about 1/4 to 1/2 inch tolerance. The end result works great! There will probably be more software fine tuning in actual camping conditions, but it will be easier to do that in the future. I’m just finishing up a Bluetooth App for the automatic leveling controls, and it will include setting adjustments for tolerance, ground contact pressure, clutch runout, leveling step durations, and more! If you made it this far, I hope you enjoyed the project! Cheers! Geoff
1 point
-
Sweet! I see a new mattress in "theOrca's" future.1 point
-
Yeah, we have a their Cali-King in the master plus a queen at home, two singles in the Oliver! The factory is in the valley west of Phoenix. We drove down with a flatbed trailer for the king (solid frame hybrid model), but the foam models are rolled up and shipped at the quoted price, always 25% OFF! I was guessing a custom shop in CA would be $$$! We got 30x75" mattresses, pulled the stitching on one corner and I trimmed the radius with an insulation knife after cutting a cardboard template. Tacked the corner together in a couple spots and the mattress pad holds it nicely together. We got the 12" for more comfort, but it's a bit too tall if you like to sit back there (we don't). The height also makes the window blinds too close when laying down. But the good news is the extra height keeps our old Springer off the beds! 🤣 Two 12" mattresses for under $1000 shipped to you door, and they have 6-8-10-12" heights. Less height is more firm and less money. https://rvmattress.com/products/brooklyn-chill?variant=462066491393991 point
-
I bought a gallon when Bill suggested it last time, June 2024. Amazon says unavailable today. We keep a small spray bottle with other cleaners in a tub behind the toilet. If y’all were nearby, I’d fill a bottle for you. We’ve only used less a pint so far! https://a.co/d/0gKeh4Do Also per Bill’s suggestion, got some 303 protectant. Use it more on our trucks than the Oliver and it does the job! https://a.co/d/0hAiMh3M1 point
-
Toni - Sorry, but, the last numbers that I have for interior detailer and Aquawax are 923 and 952 as mentioned above. I'd suggest to either call them at 336-229-1303 or email them at info@duragloss.com They have always been very nice and I'm sure that they can tell you which of their products are equal to the interior detailer and Aquawax. Hope you are doing well! Bill p.s. just went to the Duragloss site and did a search for both 923 and 952. Both came up as 921 and 951 as you mentioned. But, in looking at the picture and description of the product it appears to me that both are the same as they used to be at the different numbers. The 951 is still labeled as "Aquawax" but the 921 is labeled as "Fast Clean and Shine".1 point
-
Eleven years ago while at my first Oliver Owner's Rally a former owner showed me a mixture of Duragloss products that has kept the interior of my looking like it just came off the showroom floor. I believe that Duragloss may have changed the numbers of their products - but - here is the receipe that has worked all these years: In a small spray bottle (I got mine at the Dollar Store) mix four parts Duragloss interior detailer (923) with one part Duragloss Aquawax (952). While I do not use it on the floor due to not wanting the floor to be slippery, I do use this spray on everything else - counters, stove, microwave, stainless steel, all fiberglass (walls, ceiling, bathroom), the mirrored cabinet doors, the mirrored bathroom door, everything. Take a microfiber cloth and fold it, wipe the spray with one side, turn the cloth over and wipe again with the other side and I'm done. The interior detailer cleans and the small amount of wax contained in the Aquawax leaves just enough was on the surface to help dirt to not stick to the surface. Bill p.s. Duragloss can be contacted at: www.duragloss.com1 point
-
I have a 2020 model with the Norcold. I have attached some service manuals I found that might be of help. I found them back when I changed out a power board. Hope they help. I never tried doing what you are doing. Norcold board diagnostic.pdfNorcold board diagnostic.pdfNorcold board diagnostic.pdfNorcold board diagnostic.pdf Norcold Service Manual.pdf Norcold power board changeout.pdf1 point
-
I'd agree with this if the bottom leaf was an overload type that didn't make contact with the leaf pack until a certain weight was exceeded. With the Alcan springs the bottom leaf is arced and looks to be always adding stiffness to the pack. Could be wrong.. Good question for Alcan.1 point
-
I must be missing something on the 4 vs 5 spring decision. My physics-fu tells me that the spring return rate is set by the longest one or two springs. You chose the spring length, material and temper to set that rate. You then add more (and shorter) springs to take up more load (if needed) for the same rebound rates. What is gained by taking away the shortest spring???1 point
-
Some people are really smart. @Snackchaser You sir, are really smart.1 point
-
Interesting! Are you starting a waiting list for your production model? 😁. Mike1 point
-
I can pump 35 gallons of diesel and go pee inside the trailer while Tali walks the dog, goes inside the station for a snack and uses the bathroom and be back up to speed on the interstate in under 15 minutes. I’m then good for at least another 400 miles or until one of the three onboard bladders gets full again. I have no idea how long this would take with an EV and no desire to find out.1 point


.thumb.jpg.e34bf01ef7f7d5e99ad31856d45afbeb.jpg)


-
Recent Achievements
-


")


")