Leaderboard


Popular Content
Showing content with the highest reputation on 04/27/2026 in all areas
-
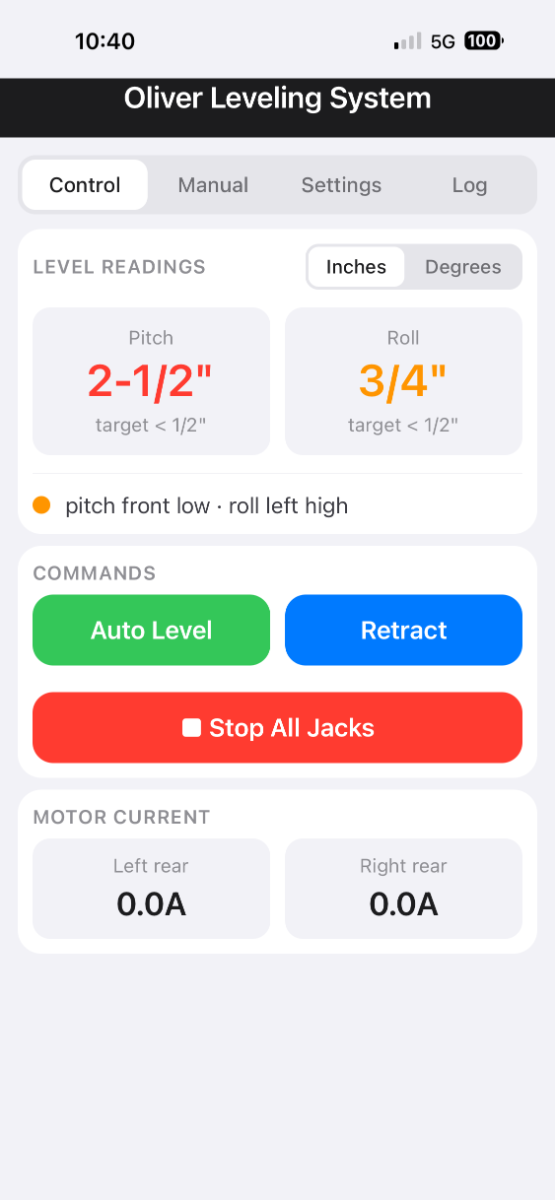
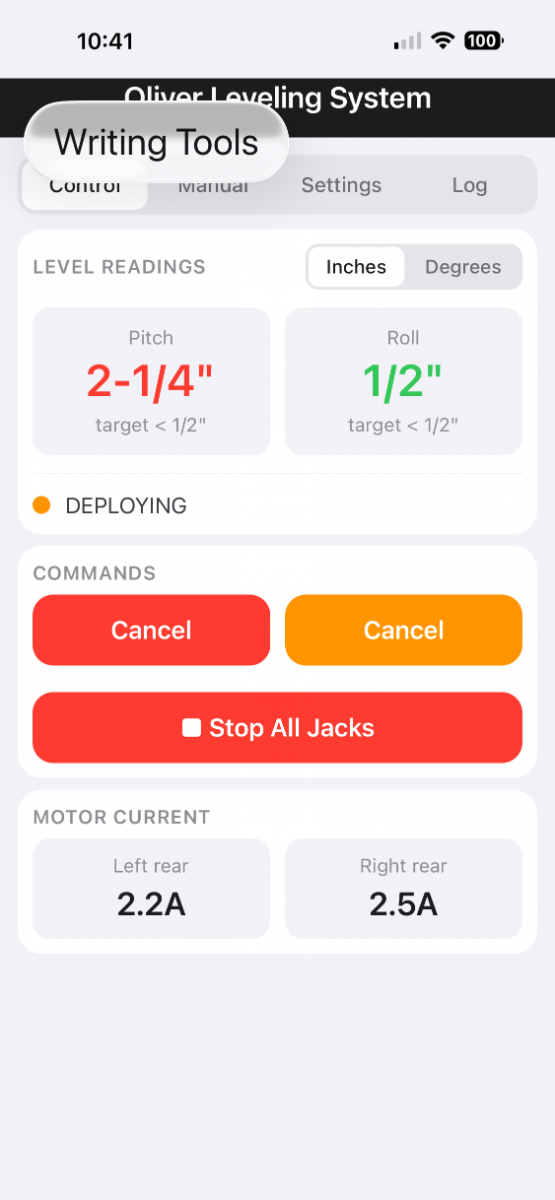
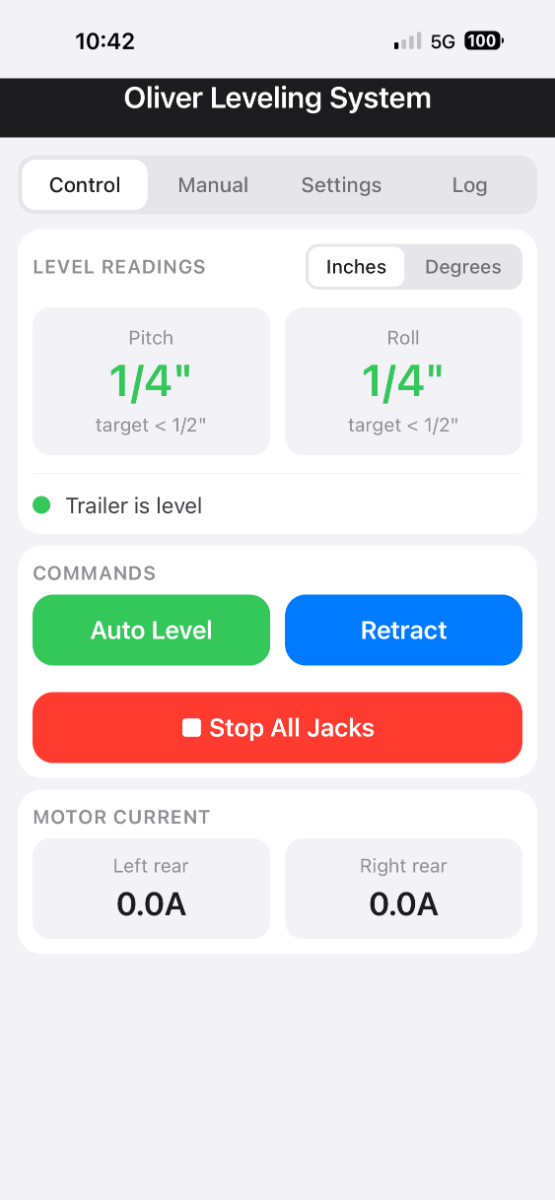
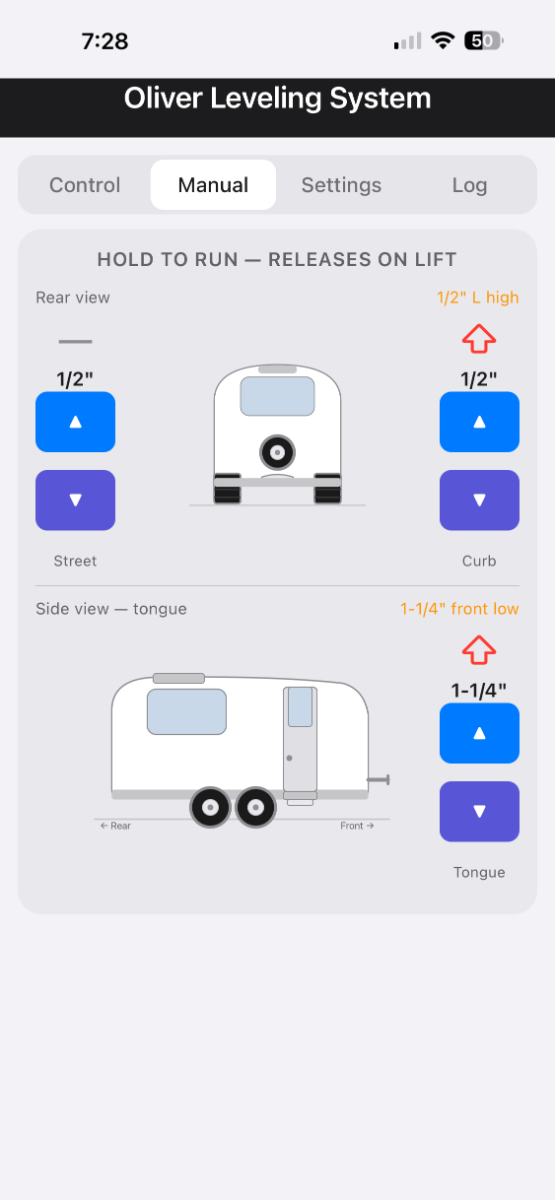
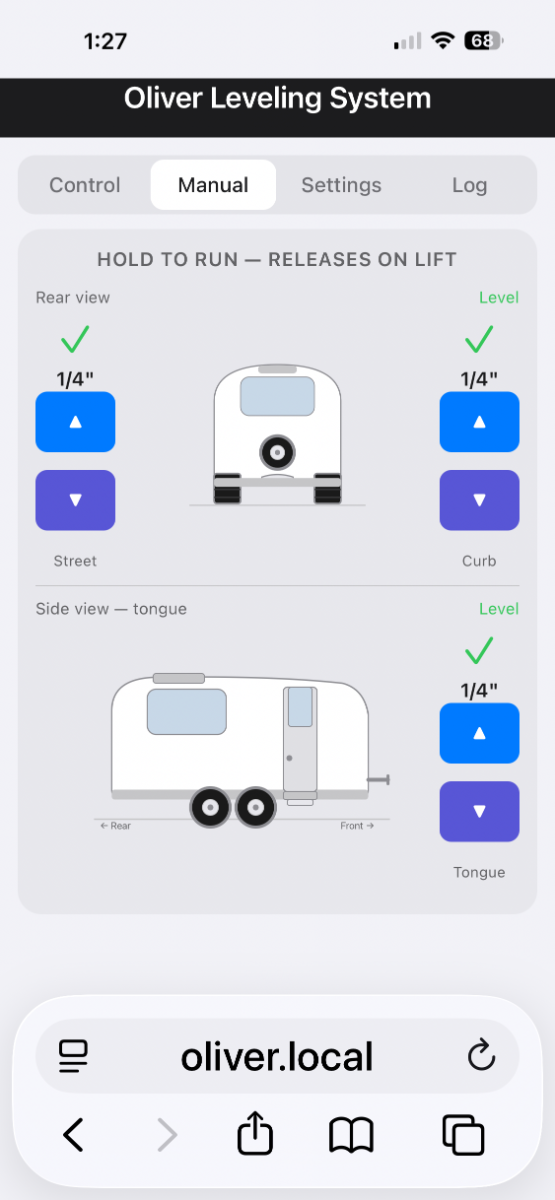
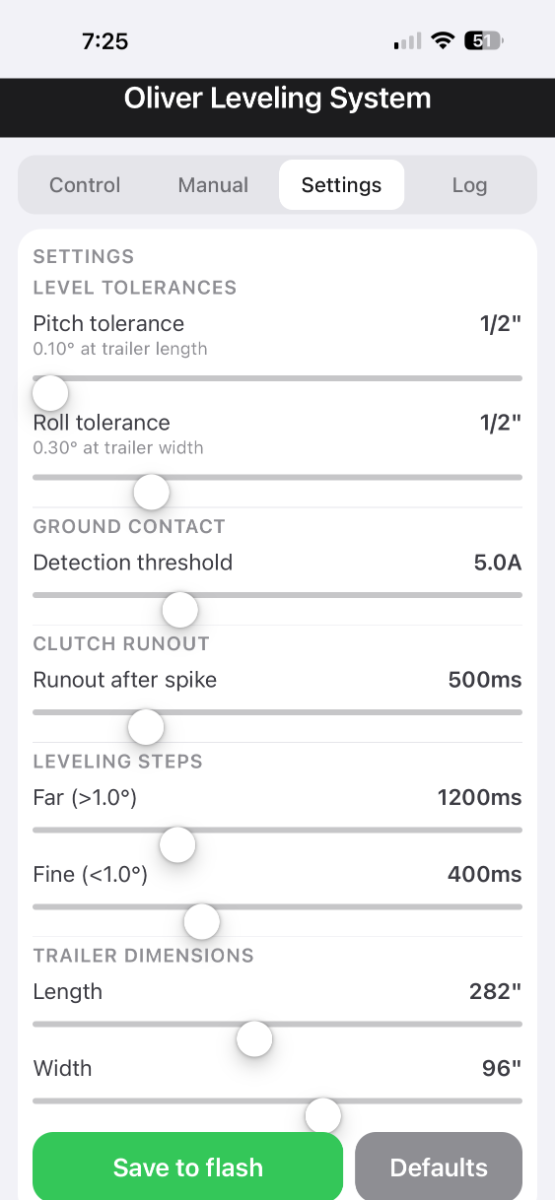
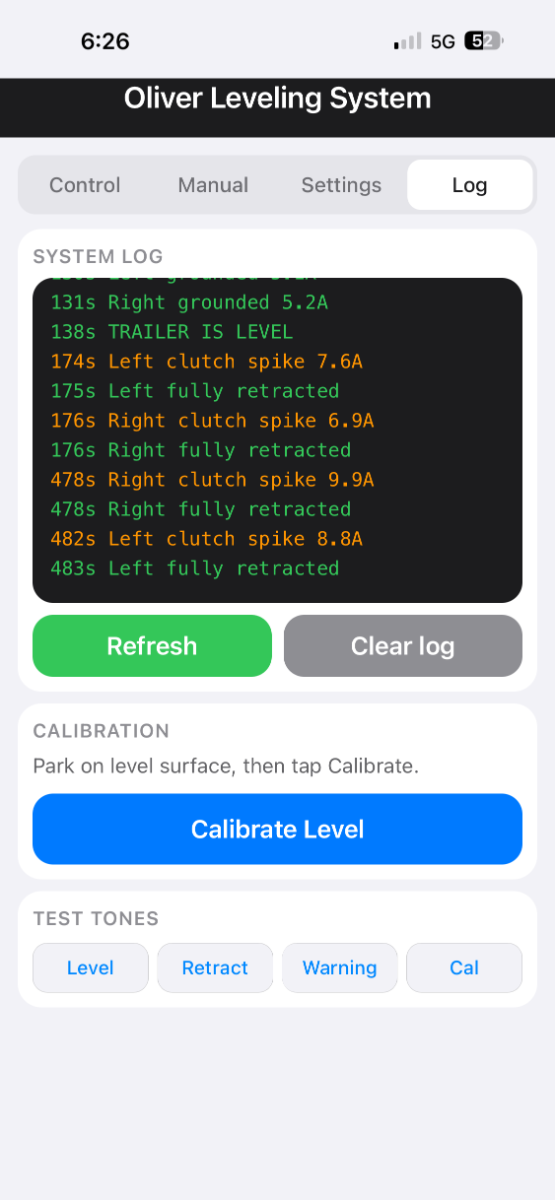
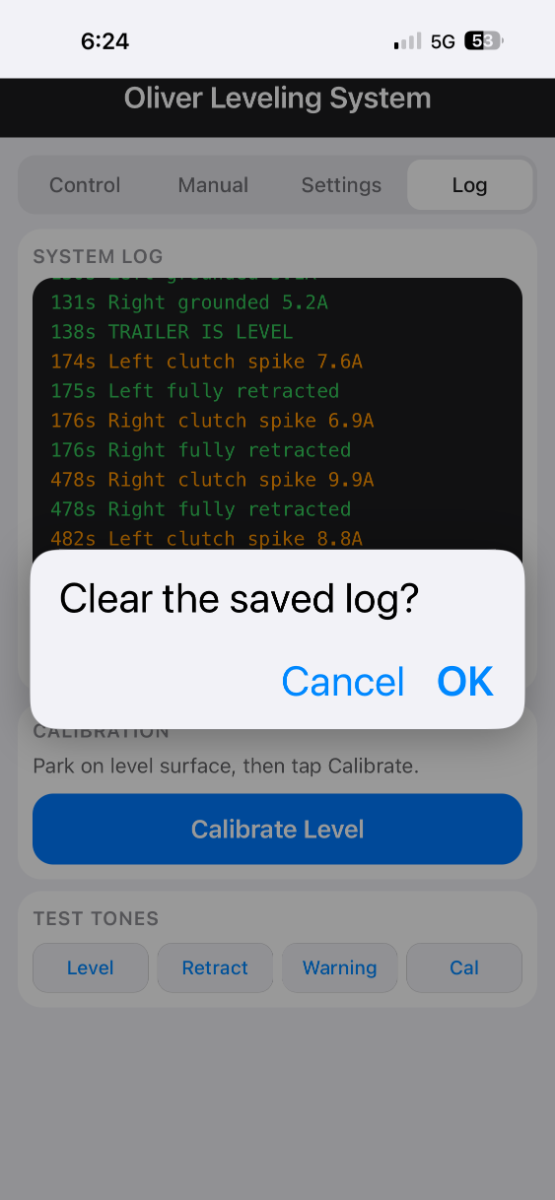
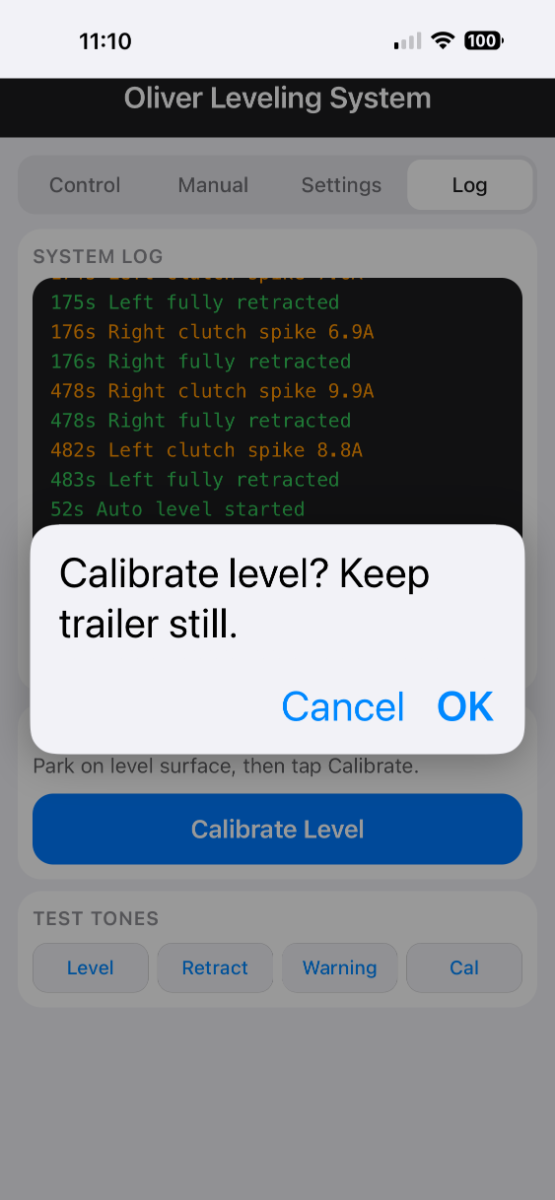
Part 4, Custom Automatic Leveling — now with a phone app! The automatic leveling system is finally done, and it works fantastic! Although it was convenient and satisfying with just the control board switches, I made it even better with a phone app. The app works with the ESP32 microprocessor’s built-in WiFi, rather than Bluetooth, and the range is excellent. Besides better range, there were advantages of using WiFi over Bluetooth. Primarily for ease of development. An iPhone Bluetooth app must be developed with 3rd party software and managed through the app store. It’s tough for a hobbyist, especially with custom graphics and controls. With a WiFi app, it lives in the ESP32 firmware and it’s fully customizable with AI help, and easily revised. The app consists of 4 tabs, or pages, with the primary controls on the main page. Extra controls and features are in the other 3 pages. The pages are laid out as follows: Control — This page has the main Auto Leveling, Retract, and All Stop buttons. To prevent accidental activation, the buttons must be touched and held for 3/4 of a second (except the All Stop which is instant). The as-left readings (variance from target level) can be viewed in either inches or degrees, and the tolerance can be adjusted on page 3. The jacks motor current is also displayed with the idea that it could indicate jack degradation, but that feature is going away in the next revision because it’s too hard to correlate. Manual — This is an awesome feature on its own! The screen is similar to a LevelMate with graphics of the Olivers back and side, only it has manual jack controls too! The touch and hold buttons will raise and lower the jacks while showing the distance from level. I’ll probably use this feature a lot, especially for uneven terrain or if messing around with leveling blocks. Settings — This page contains settings for fine tuning. Any changes are temporary for the current session, but they can be flashed to the memory. There is also a reset to defaults button with a protective confirmation step: Pitch and Roll Tolerance — when set to 1/2” tolerance, the level usually gets to within 1/4” Ground Contact Detection Threshold — this determines how firmly the jacks are footed on the ground for stabilization. Default is 5 amps which closely matches where I used to set it by ear Retract - Clutch Runout — this shut-off delay determines how many clack-clacks are heard when jacks are parked. It’s set at 1/2 second, which is two clacks Leveling Step Durations — sets the jack’s incremental run time during leveling. It has 2 adjustable steps that decrease as the trailer nears level. This is important for accurate level sampling and coasting. Too little time increases timeout risk, while too much impacts accuracy. Finally there is the trailer width and length setting that’s used in the conversion formula for level degrees to inches. The longer pitch default distance from bumper to ball requires a wider tolerance than the width. Log — A summarized log of the Serial Monitor shows which jacks were activated and the different steps of automation. A Test Tone legend plays examples of tones for successful leveling, retraction, unsuccessful leveling, and calibration, although the tones are obvious and don’t really require a legend. This information has limited value and may get cut in next revision. The most important feature of this page is the calibration button. It has a secondary confirmation to prevent unintentional calibrations. This is used to reset the target level after maintenance, or if the front needs to be higher for tank drainage, etc. This concludes this project and I hope you found it interesting! Cheers! Geoff
 3 points
 -
CGI Detailing: We’re planning our trip for this June to attend the mini-Oliver rally in Boothbay Maine and have some openings for a few more coatings after the rally. If you are in the New England area and your Oliver is due for ceramic coating maintenance, new coating treatment, paint protection film or oxidation removal this is the easiest time to get on our schedule without making the trip to Tennessee. More information about how pricing works while we travel and what areas we are covering is available on our website; there is also a contact form you can fill out if you would like us to contact you. If you’d rather bring your trailer to us in TN, we have openings in July! Oliver Ceramic Coating Travel Schedule www.cgidetailing.com2 points
-
Mr. Jim Oliver told me personally that the frame was engineered to support 3X the GVWR. He stated that it was good to 21,000 pounds. Actually Oliver's GVWR of only 7000 pounds is due to their continued use of the underrated four leaf spring pack (the same ones that are breaking). This causes the otherwise 5200 pound Nev-R-Lube axle to be de-rated to 3500 pounds each.2 points
-
I agree with you. That fifth spring is not very long. I am not an expert on springs, but I am more concerned and happy that Alcan went with the overlap on the first two longer springs. My logic, maybe flawed, says that the short fifth spring is not as important as those first two longer ones. John2 points
-
Wow. The first three statements encapsulate my position of opposition for 90% of OE2 owners to the 3,000 pound springs. For most owners they are "Over Sprung". But the 1750's for all of us running in the 6,000 pound class I have advocated long and hard that those springs are "Under Sprung" as they are loaded 100% of the time and are failing. For a new trailer, I would monitor the rear ends of the OEM 1750's and push their replacement out 4 or 5 years. If you see any flattenng of the rear ends, time to replace them. Also as a 50 Year Mechanical Engineer here and 3 independent Dexter Tech's determined that the middle ground between the 1750's and the 3,000's... The 2400 Dexters was a logical choice. They have been doing just fine for the last 20K miles or so..... WIll be putting another 9K this summer. For every one, it is wise to inspect your springs at the end of each season. If any flattening is observed, you would have the off season to replace them as you see fit. GJ2 points
-
Hull #435: I have had intermittent power issues with my front tongue jack. Many times getting ready to leave a campground and the darn thing just doesn't have power. It always started working again?? It seemed like after manually raising or lowering it all the sudden it was working again. I have checked the fuse, changed the switch, and still kept getting the intermittent issue. I assumed it must be an electrical short issue (which is always hard to find). With some help from my nephew who is an electrician I have finally solved the problem. The whole time it was a poor ground connection. I believe the ground connection was made through the metal tongue jack being bolted to the frame as the ground wire was coming from the top of the motor assembly. I ran a new ground wire and it now works perfectly. In fact the motor runs better than ever and the light is brighter! My last step will be to weather proof the hole I drilled for the wire to keep water out of the motor.
2 points
-
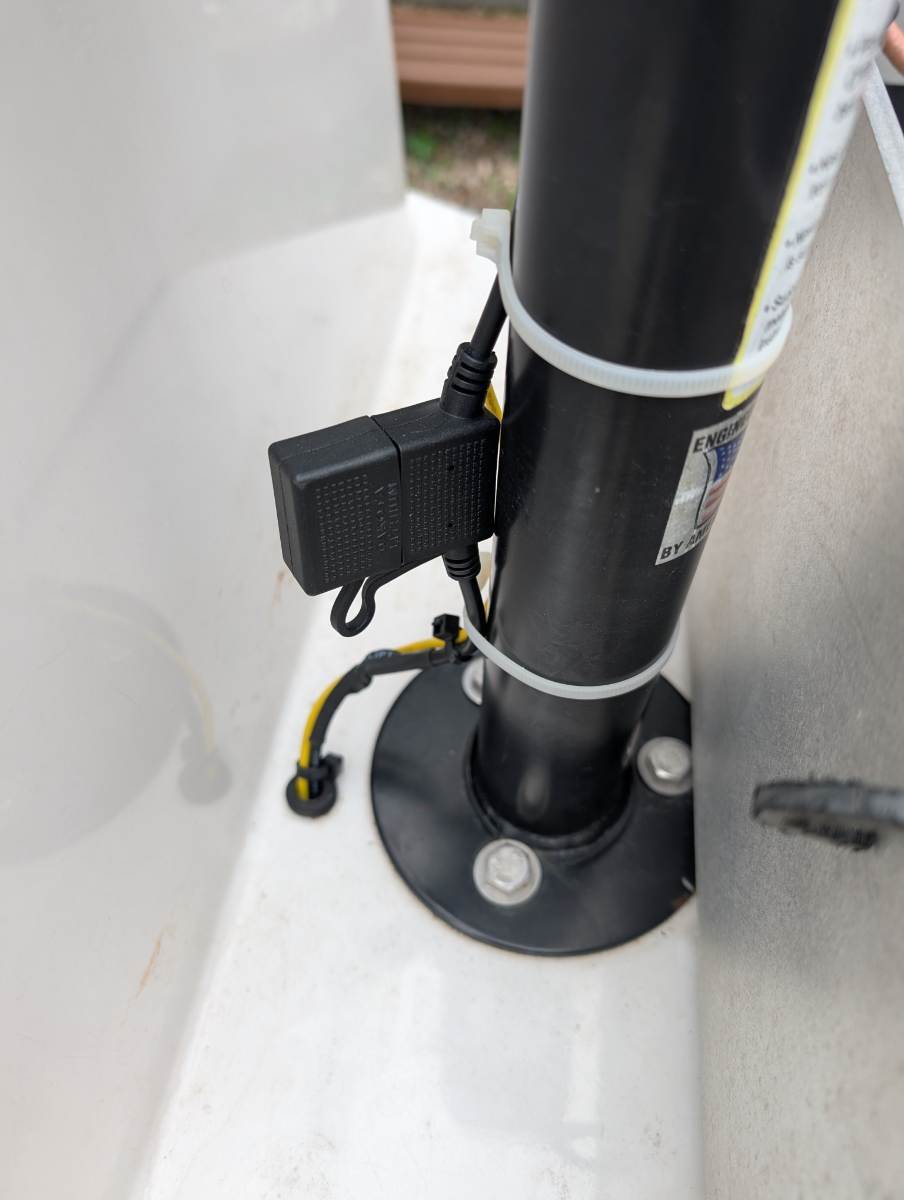
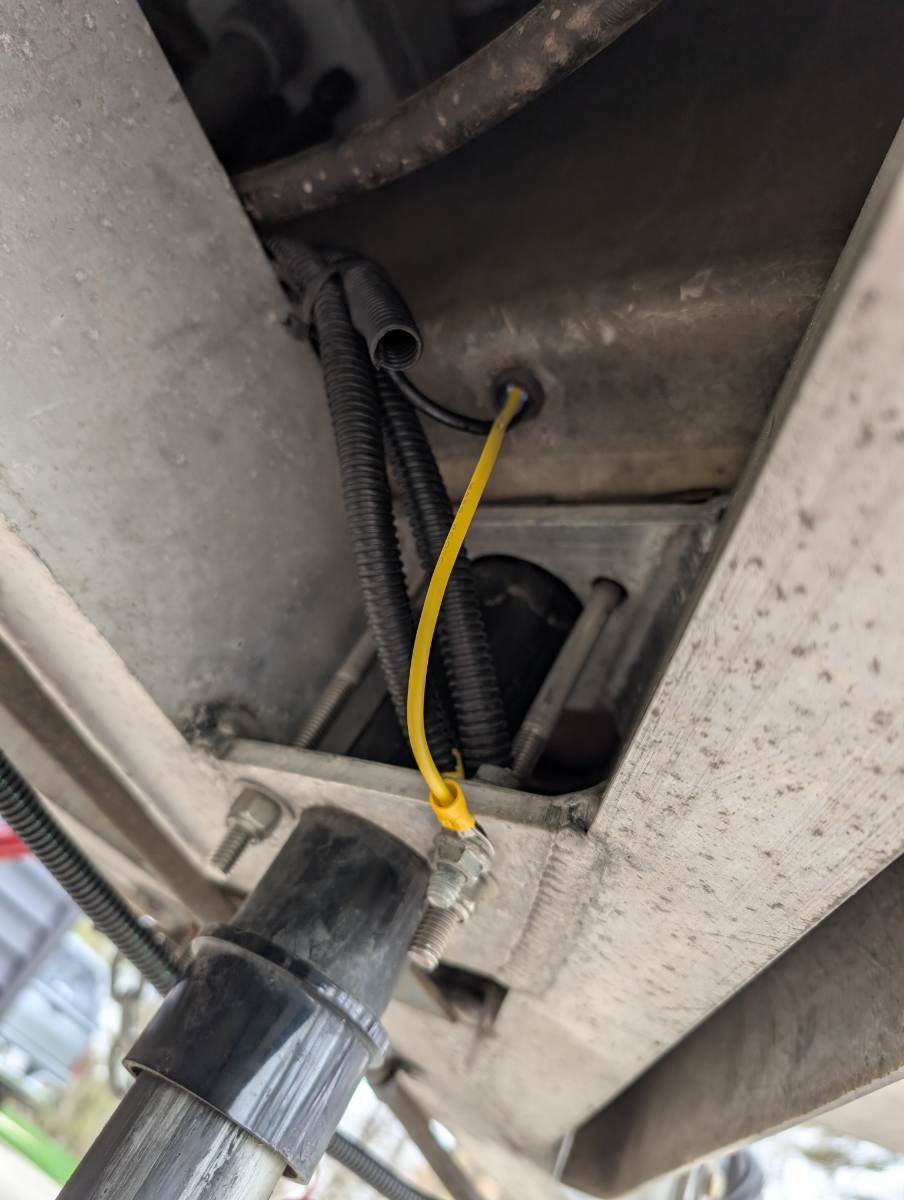
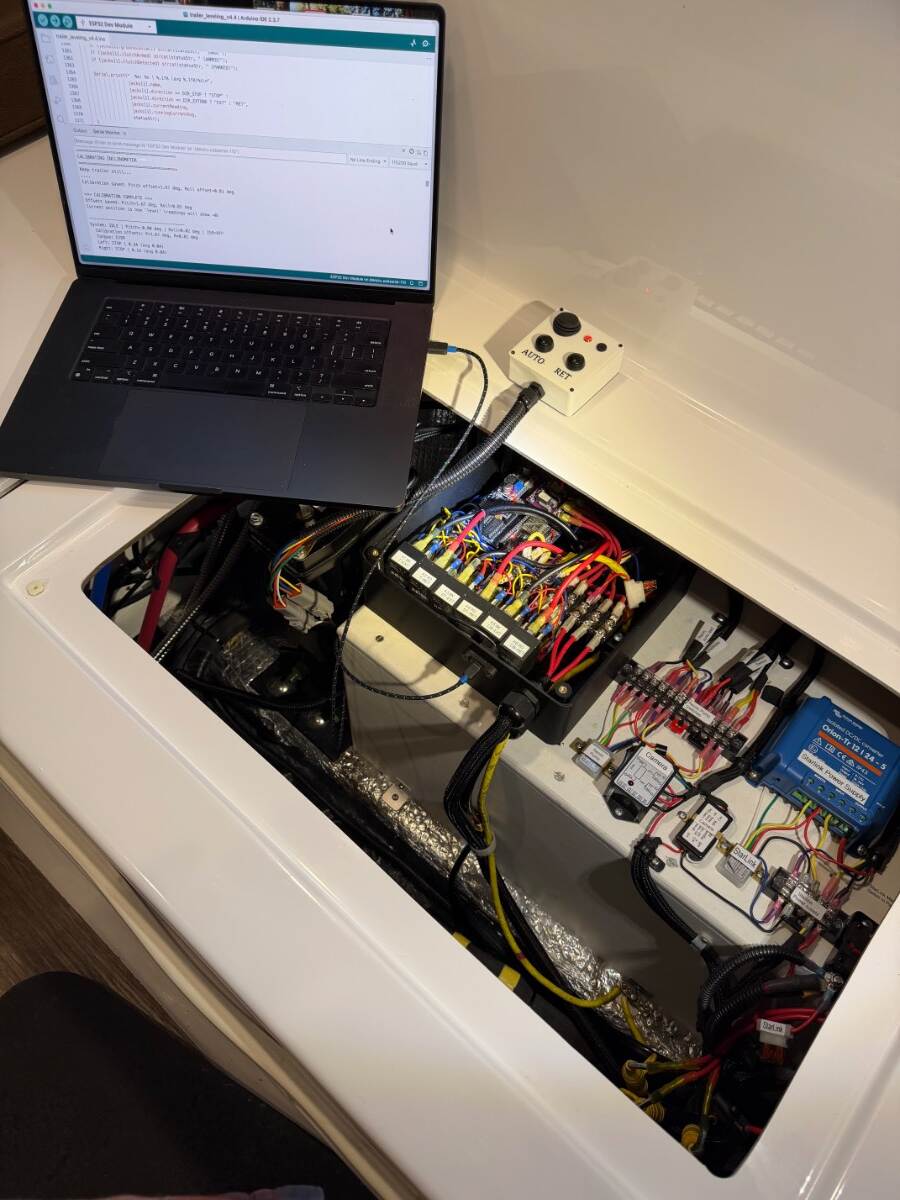
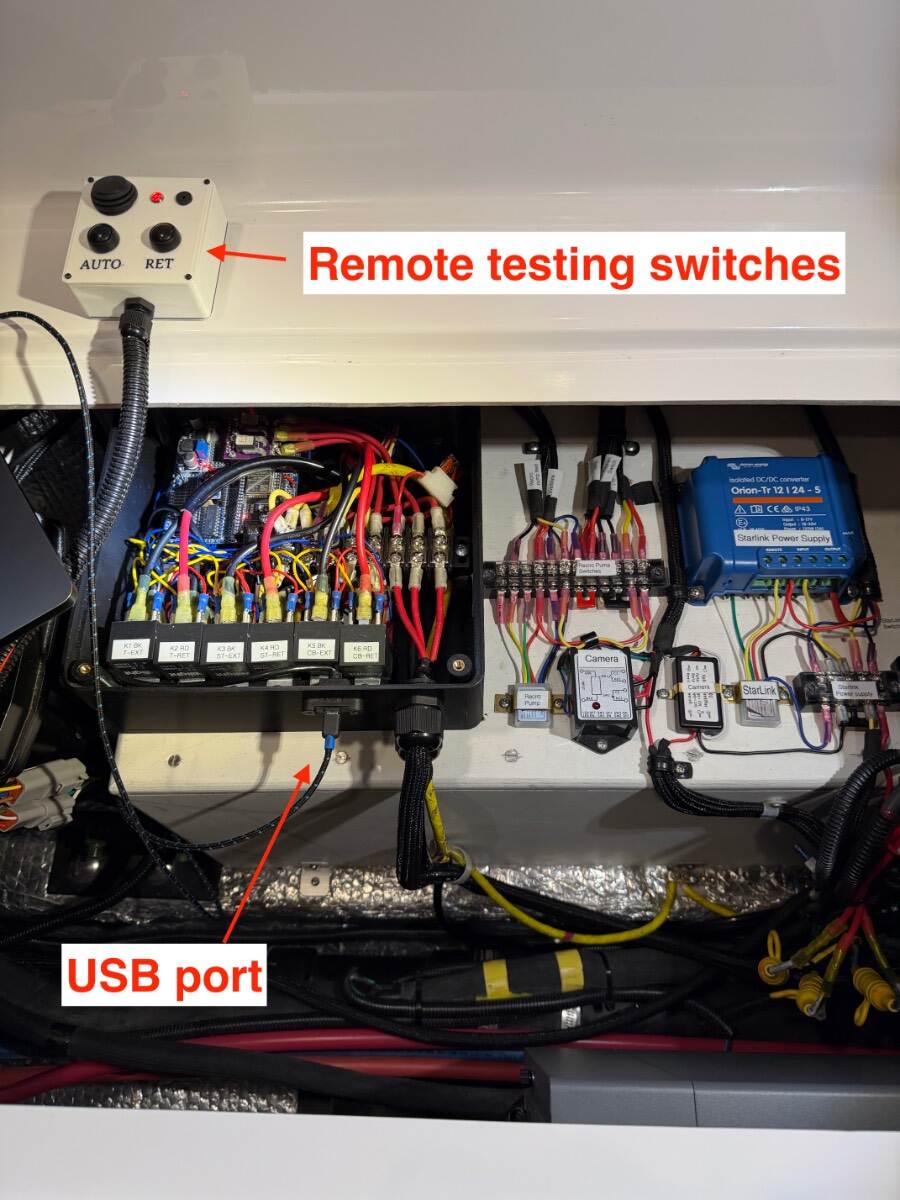
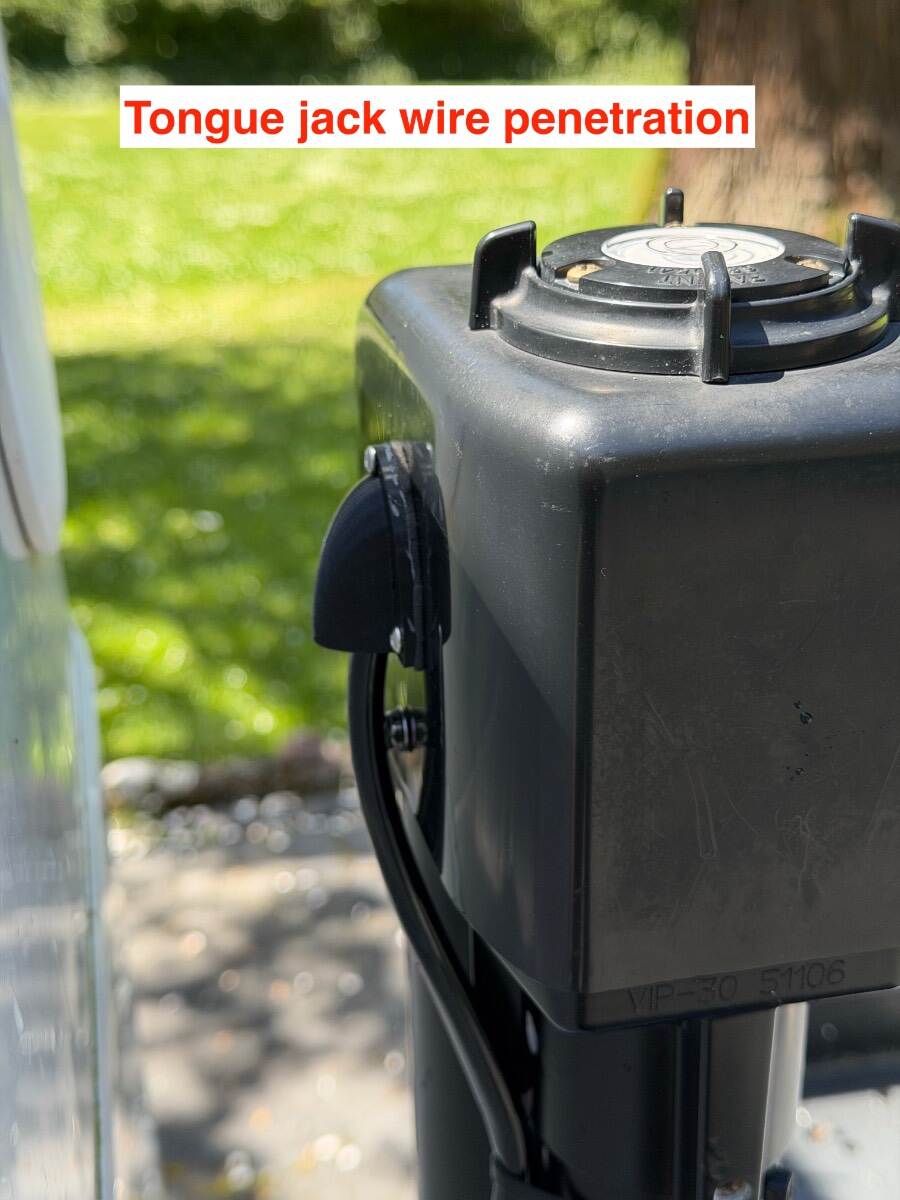
Custom Automatic Leveling for the Oliver's Barker Jacks Part 3: I skipped over a lot of detail to keep this project interesting, and it’s probably still too much information. But some might be interested to hear about some of the background work that was involved. After the test board phase was complete, and everything was working well on the bench, the system was installed in the trailer for real-life testing. This was an anxious time because it had only been tested with simulated current, and I had no idea how it would react under real current conditions. Things went south immediately! I started testing with rear jacks because they were easier to wire and much more complex than the tongue jack. I didn’t want to run the tongue jack wires if the whole project could end up in the trash bin! I came up with a test procedure to verify each function in different scenarios of operation, and that required manual jack operation. That’s when the problems started! I was blowing the 30 amp jack fuses and couldn’t figure out why. I first focused on the H-bridge relay wiring as the problem. Then I suspected that the ESP-32 or driver outputs were miss-wired during transition from the test board. They had been soldered together one wire at a time under magnification, and back tracing the bundled wires was a nightmare. I couldn’t find the problem and came close to scrapping the whole project. I was so confident in the design, and overly focused on wiring, that I completely overlooked the obvious. There was a major flaw in the way the auto-leveling system was isolated from the manual jack switches. I had used a high-amperage relay that closed to a common ground only when the H-bridge relays triggered, which broke the short circuit path when the manual switches were used. However, I hadn't considered that the pole-reversing function of the switches created a different ground path through the hot side of the leveling system. The solution required major re-work, replacing the single ground isolation relay with six 30/40 amp relays that isolate the manual switches from both the ground and hot side. Although there were two spare Darlington driver channels capable of handling two relays each, there weren't enough channels for six new relays and a second driver was added. The system now runs 12 relays from 9 driver channels — six H-bridge relays and six isolation relays, two per jack. All the components were installed in a 12” project box that was limited in size by the 3-D printer capacity. So the relays were stacked 2 high on a stepped base to save space, and a elevated terminal block helped with wire congestion. I was able to mount the current sensors directly on the PCB with the ESP-32 and other modules. It’s tight, but nicely compact too! The switches for the leveling system are mounted on a 3-D printed control panel inside the outside storage garage. The panel includes flush to the surface push-buttons to safeguard against accidental activation, one for “Auto Leveling” and the other for “Retraction.” There is a master On/Off switch, status LED, and a Piezo Electric buzzer for the status tones. The entire panel is also recessed to protect it from cargo. The system can be shut down with the On/Off switch, or by re-pressing either momentary switch. The systems parasite draw is near zero when on, but it’s normally off when not in use. The existing freshwater control system was incorporated into the lower part of the control panel due to space constraints. It has a 4-way water pump switch for the outdoor shower, with indicator LED. There is also a 4-position, 6-contact, rotary switch that controls motorized valves for the four freshwater configurations; Normal, Freshwater Tank Drain, Boondocking, and Winterizing. The LED indicators show configurations other than normal. A printed weather proof hood was used for wire penetration into the tongue jack head, and a terminal board was used to splice into the rear jack wiring. This was a useful addition for quick disconnecting and troubleshooting. Those were the only modifications made to the trailer, other than enlargement of the existing switch panel cutout on the garage wall. All the custom components used in this project were designed with a free on-line CAD program called TinkerCad. Some items were 3-D printed from PLA filament, a plant based plastic. Other pieces were printed from ABS plastic for better durability, or TPU — a rubbery filament. Automotive Deutsch style plug-in connectors were used to connect the switch panel and control box, and they allowed me to connect a remote switch box that was used to operate the system from inside the trailer during testing. There is also a panel mount USB cable port for a laptop connection to view the serial monitor or update the software. The system needs a one time calibration that is done with the trailer perfectly level. Both momentary switches are held for 5 seconds until the Status LED quickly flashes three times and the audible calibration tone indicates satisfactory level. The software determines the pitch and roll off-sets from absolute level, and sets them as the new target level +/- 0.2 degrees pitch and 0.3 degrees roll. This equates to about 1/4 to 1/2 inch tolerance. The end result works great! There will probably be more software fine tuning in actual camping conditions, but it will be easier to do that in the future. I’m just finishing up a Bluetooth App for the automatic leveling controls, and it will include setting adjustments for tolerance, ground contact pressure, clutch runout, leveling step durations, and more! If you made it this far, I hope you enjoyed the project! Cheers! Geoff
2 points
-
Carrying this thought out in comparison, Alcan to Dexter Leaf Spring packs: Dexter 4 leaf-OEM1750 LBS x 4 = 7,000 lbs (-20% = 5,600 LBS) Alcan 4 leaf-pack 2250 LBS x 4 = 9,000 lbs (-20% = 7,200 LBS) Dexter 4 leaf-SW4 2400 LBS x 4 = 9,600 lbs (-20% = 7,680 LBS) per @Geronimo John Alcan 5 leaf pack 2750 LBS x 4 =11,000 lbs (-20% = 8,800 LBS) Keep in mind besides this 20% “wiggle room” there should already be safety margin in the manufacturer’s spec capacities. But I like the additional 20% per Alcan! 😎1 point
-
Of course, when towing fully loaded, run the specified PSI listed on the DOT label which is calculated to be safe at the full GVWR. But for example, when driving a pickup around town, no cap installed and empty bed, and I know I won't be towing or carrying a load for days on-end, I’m certainly not running the rears at 80 PSI! I'll bring them down to 60-65 PSI so the rear axle won't be bouncing down the street without a load to carry! On my sports cars, I run higher pressures, because I like a slight skid into a hard turn! I owned a 1975 Alfa Spyder during my 20s, through my 40s and learned over many miles. Now I run my 1992 Lexus SC400 a few LBS over spec and the car handles like a dream. 😎 There is a reason tire pressure is adjustable! And Yep, we air down our AWD GX470 when we have a bit of weather or washboard dirt to travel. But on this truck, I upgraded the OEM P-rated tires to LT tires C-Load Range. (didn't want the harshness of E-Load tires for this application). The DOT label states 32 PSI, but LT tires don't stand up nicely at pressure this low (also 32 PSI is below the lowest level on the Cooper load table for this A/T tire). For around town and highway driving, I chose to run 44 PSI, but we air down as low as 24 PSI for a day out playing in the dirt. I put a bit of thinking in what works best for the situation. Engineers and manufactures often wrongly use the "one size fits all" approach, and when lawyers get into the mix, they just throw physics right out the window in lieu of Indemnification! 😒 The DOT label on our relatively light TV, a 2WD long-bed capless truck is 55/80 PSI at 8800 GVWR. Our 2WD truck is hundreds of LBS lighter than its 4WD counterpart. After we setup camp, the truck is only 6800 LBS with all passengers and tools. Add all our camping stuff, the 35-gal tank full of fresh water, the bed fridge pretty full, plus 580 LBS measured tongue weight and we’re still 500 under the GVWR, fully packed for a long trip! I regularly run slightly lower than the GVWR at 52/72 PSI for our combination of state and county highways, dirt and gravel roads. At 80 PSI, when our TV rears hit the bottom of a dirt wash (think 2WD), they could spin some, but less likely with a little less pressure. When we traveled more on Interstates, like our Minnesota trip last summer, I increased the rears to 78 PSI, while 80 PSI is the stated MAX. Dan, I do agree that engineers should speak their mind. I too often get accused! 😎1 point
-
Good to know To be fair - says the forum (Disclaimer: see blow). The manufacturer says differently. Handwaving arguments about Oliver having been wrong before, went overboard initially with 80 psi, this and that are not evidence that their recommendation today is wrong. I spent an hour looking for current documentation from Goodyear and couldn’t find it - have a link? There’s an old 2017 pdf, and a couple tables of indeterminant provenance that get reposted. I suspect Goodyear is not posting this information anymore and leaving to OEM’s. So having some tables isn’t convincing to me. I did find a lot of engineering common practice information which warns against too low a pressure for safety reasons, not too high. Low pressures are commonly used for low speed offroad traction use cases. I’m not seeing it done to avoid jounce. Does anybody here lower their TV pressures? Why not? I don’t understand why it’s OK for our trucks to be at specified pressures, but not our trailers. Or our cars. If your wife complained about a bumpy ride would you drop her pressures in half? Think about that for a second, now it becomes a safety issue. But this is me handwaving now. As it happens, today I’m mooch camping for a family thing (poor me writing from my Ollie tonight 😅). I didn’t take measurements because I needed my phone on the way out. One the way back I’ll definately be taking measurements and analyzing. Specifically doing a spectral power density and comparing it to some example charts. This won’t be definitive - nothing is definitive. But it will be a demonstration of how much of the road rumble makes it past the suspension. Little point discussing it more until we have data - that’s for sticking with me *********** Disclaimer: I’m an engineer and for 40 years have been arguing technical points with others as a part of the job, just business as usual and no feelings involved. Take this discussion in that spirit - a search for best practices and not a keyboard warrior food fight. I’m happy when others disagree, I don’t claim to be always right, but through a healthy discussion can perhaps get somewhere. Reality is the final arbiter as my EV 6k trip proved, and I’m planning on doing the same here and will be delighted to find if I’m dead wrong. With the springs discussion for example you saw me switch sides (pending data) ***********1 point
-
I had the same issue with my Honda 2000 generator blowing. Like @Tom and Doreen said you can change the setting on your Xantrex to lower the draw. Here is a link to the generator topic with instructions on how to adjust the setting.1 point
-
Couple comments from your observations. Alcan weight rating (capacity) is 2,750 for 5 leaf and 2,250 for 4 leaf. Weight rating is the designed weight at which a spring pack fails. As the same top four leafs are utilized in both 4 and 5 leaf versions, spring rate (a.k.a. “Ride”) remains largely the same even though weight rating is different. Spring rate is amount of weight required to deflect spring 1” when at ride height. While unable to locate any documentation from Dexter as to “buffer” capacity for their springs I was able to locate documentation from LCI (Lippert) which states that there should be a 20% weight capacity buffer between the total weight capacity of a set of their leaf springs and the curb weight of a fully loaded trailer. Reason stated for maintaining this buffer is to accommodate travel over uneven roads, curbs, potholes, dips and other occurrences which could temporarily increase the actual weight on a spring pack. 7,000x .8= 5,600. My trailer weighs 6,200 ready to travel. I chose the 5 leaf Alcans for my trailer and have been quite happy with their performance. I know a few others have chosen the 4 leaf versions and they seem happy with their choice as well. Either choice is a huge upgrade from the RV industry standard (dexter).1 point
-
Yeah, they are expensive. I paid about $1800 for the pair delivered. Natural latex is significantly more expensive. I didn’t want to mess with cutting and sewing. I figured buy once, cry once.1 point
-
I'd agree with this if the bottom leaf was an overload type that didn't make contact with the leaf pack until a certain weight was exceeded. With the Alcan springs the bottom leaf is arced and looks to be always adding stiffness to the pack. Could be wrong.. Good question for Alcan.1 point
-
I must be missing something on the 4 vs 5 spring decision. My physics-fu tells me that the spring return rate is set by the longest one or two springs. You chose the spring length, material and temper to set that rate. You then add more (and shorter) springs to take up more load (if needed) for the same rebound rates. What is gained by taking away the shortest spring???1 point
-
Thank You. I have time to decide. Our 2022 LE2 has the 5,200 lb. axle. I can do 4-leaf and add the 5th leaf later, or have the 4-5 leafs in the basement when we decide to sell.1 point
-
We recently upgraded to the 5200 lb Dexter axles, purchased thru Alcan, and chose to use the 4 leaf Alcan springs to match the weight of the trailer. We also purchased the Dexter EZ flex and wet bolt kit from etrailer, replicating the stock setup, since we preferred to use step bolts. In addition, we replaced all four shocks with new factory style Monroe shock absorbers. We performed the installation ourselves. Our tire pressures are set at 45:psi which we monitor with our TST tire pressure monitor. We’ve had excellent results, the springs are noticeably firmer, both when towing and when set up for camping. We find that the ride is not unduly harsh and we haven’t had any issue with items coming loose or things falling off. Time will tell if the Monroe shocks will work well long term. We are very happy with the setup and our interactions with Alcan Spring.1 point
-
Great question. Such focus on weight alone makes NO allowance for the quality of the steel nor the quality of the heat tempering.1 point
-
We went 5-leaf since Alcan designed it this way specifically for the Oliver. They installed a few 4-leaf springs only due to Oliver owner requests. I would guess over 95% of us have installed the standard 5-leaf system. I've had to go over a lot of speed bumps lately. My truck suspension, being so tight, bangs hard over speed bumps, but the Oliver suspension glides over them so nicely! Looking through the sideview mirror, you can see each tire articulate up and down without affecting the other axle, while the hull does not budge an inch! I should buy Alcan leaf springs for the rear of our tow vehicle! 😎 We always tow with a dog bowl half full of water. The water stays put, and never had a drawer open. We did have items jostled in the Attic and hanging clothes fall in the closet once in the first few miles. Once I worked the first required torquing of wet and U-bolts, we never had another issue.1 point
.thumb.png.fbbde3486e933f990ff511bff8d6bda0.png)


.thumb.jpg.e34bf01ef7f7d5e99ad31856d45afbeb.jpg)


-
Recent Achievements
-


")


")


