Leaderboard




Popular Content
Showing content with the highest reputation on 09/29/2026 in Posts
-
I too made the migration from a 1/2 ton truck to 3/4 ton for the reasons of more power and payload. What's the saying, "Buy the right tool once, buy the wrong tool twice". The Oliver is very obedient behind anything (within reason) you tow with. You just might be finding that you want more. However, I may be the contrarian when it comes to hating on the Anderson hitch. It made hooking up easier. I would place the ball about two inches behind the bulldog coupler, attach the whale tale (with chains attached) then lower the coupler onto the ball. Pull forward and the chains would pull the ball and coupler into alignment and the ball would drop in with a reassuring clunk. These days without the Anderson, I seem to spend much more time maneuvering the ball under the coupler to get it to drop in. And I have a camera looking right down on it! 🫤2 points
-
I too just upgraded from a 2020 RAM 1500 Limited with RAM airbags to a 2024 Ford F-250 FX4 Lariat with stock springs. I'm not in love with the comfort level for the F-250, that's for sure, compared to having RAM Air, but I needed the payload. We really can't have both TOTAL comfort and payload. For those who have never driven a RAM 1500 Limited with RAM Airbags, it really is comfort. I also no longer run with the Andersen Weight Distribution Hitch (WDH) and I don't miss it at all. I switched over to the Shocker Hitch with the riser ball mount option to ensure trailer is completely level while towing. It does make a huge difference on both truck and trailer when hitting bumps, having the Shocker hitch. I also like doing really tight U-turns when needed, can't quite do that safely with the Andersen WDT nor with a storage box on the front of the trailer. I'll never have one of those either. I will also be adding a cap to the truck soon adding even more weight to my truck since I also have a DECKED drawer system full of tools and goodies. With the cap I will be carrying more common parts I seem to need on the road to help folks.
 2 points
 -
We've been camping at Stone Mountain State Park NC. The weather was fantastic allowing great views on the Blue Ridge Parkway and we got plenty of hiking in at Doughton Park on the BRP. There was also a Carolina Casita Rally happening here too, we met many nice fellow fiberglass RVers. Woolly Worm Weather Outlook: https://www.thoughtco.com/woolly-bears-and-winter-outlook-34445222 points
-
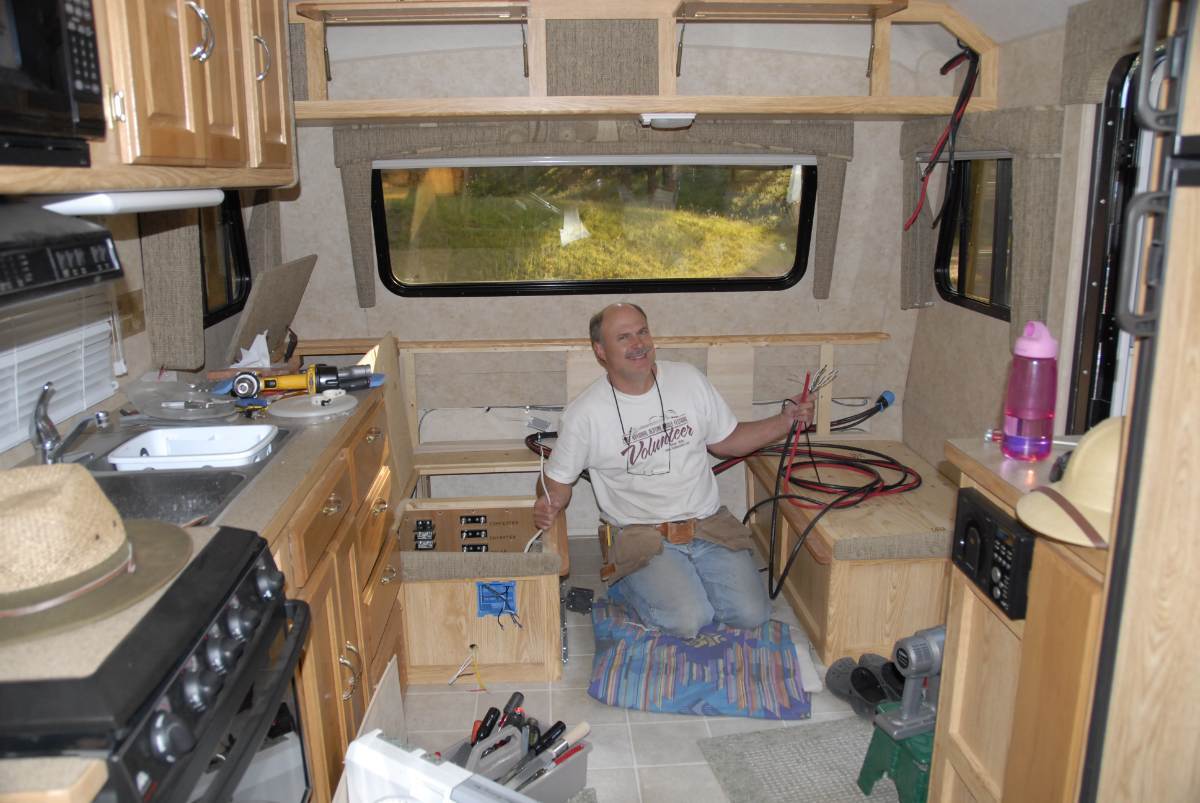
Thanks for sharing your Bigfoot camper information. We owned a 2006 Bigfoot 21RB for 18 years and sold it a few months ago. I installed solar panels, an inverter, and a battery upgrade back in 2008 after buying it used—photo of me working on that install is below. We purchased this Oliver used in June of this year, so RV solar isn’t new territory for me. Right now, the biggest challenge is simply the physical layout and mounting of all the components. Fortunately, I’ve been a woodworking hobbyist since I was a kid, and HDPE Boat Board machines just like wood, so all my shop tools are perfect for this project. After learning from nearly every mounting‑related post on this forum, I will definitely be installing the inverter on a pedestal. Below is a photo of the original Xantrex mounting board, which looks similar to what others have posted. Oliver’s glue works when the board is pressed firmly into the fiberglass, but like many have experienced, mine wasn’t—and it had broken loose by the time I bought the trailer. Initially, I wasn’t planning to upgrade my Xantrex 3000‑watt inverter, but since it needed a complete remount, it made sense to upgrade to the MP2 now. I’ll make the inverter removable (very good suggestion) so the gray‑tank waste valve can still be replaced if needed. I also purchased Wago pluggable connectors for the two AC lines, which will make disconnecting the inverter much easier. I’ll be installing components under the dinette seat as well. Oliver glued a panel there to hold the surge‑protection hardware. That board is solid and can’t realistically be removed, so I had to come up with a clever way to integrate it into a larger mounting panel. Much more to come in a new thread once the project is complete.
1 point
-
Bosker - Wow - that surely is tight in there. No way your Dad could have gotten that thing in there. Thank goodness he had Larry around to help him.😇1 point
-
Thank you Peter, I took all of the drawers out and removed the sink faucet and sure enough the clog was due to calcium deposits. I cleaned it all up and everything is working great again. Little by little, we are resolving all the little bugs that come with a new camper. I am hopeful that if I fully drain the gray tank, close the valve and seal the shower pop-up, we may mitigate future shower backups, fingers crossed. Ron1 point
-
DBL-R, I also have an early model LE I (2008 - #14) with the same plumbing configuration up front and for years, I dealt with the potential back flow of grey water into the shower pan if the handle for the valve on the back wall of the shower was not adequately closed before travel and the spring actuated foot valve was open. Then, many years ago, a good friend, Larry Gamble, of Little House Customs, fixed the issue by installing a HEPvO valve and magically solved the back slosh issue. The HepvO valve is a one way valve which closes like a duck bill and prevents the grey water from backing up into the shower during nose down or deceleration while braking. Now that handle on the shower wall is always in the out position, allowing water to drain from the pan into the tank and the HEPvO precludes it from making the return trip. I've removed the foot actuated drain plug and replaced it with a small sink screen to catch any small items and prevent them from gumming up the HEPvO valve. Larry said the clearance to install the HEPvO was very tight, but with his skill he managed to get it done anyway. He's retired now making music instead of bending wrenches, but there should be some skilled RV mechanic you can find to make the same modification on your trailer. Good Luck, Pete1 point
-
Hey Ron, After seeing this picture, I realized you must have a 2015 Elite I, the single-axle baby Ollie! You should add a signature line so we realize that more quickly. Calling on @SeaDawg, @DavePhelps, @bugeyedriver and others with an older EI to advise! Most of us have the dual-axle larger EII with furnace right rear and there's so much different to which us EII owners would have no clue. Best wishes, JD1 point
-
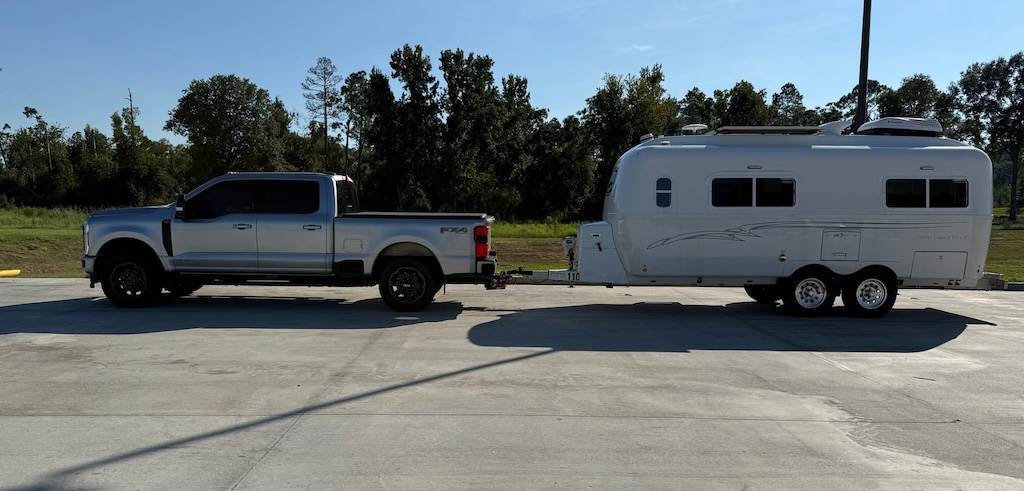
We have towed Ollie (LE2) with 5 different tow vehicles. Found a new 2024 F-350 6.8L (gas) on the lot last summer (2025) and got a super deal on it, lower price compared to many 1/2 ton pickups with an old school normally aspirated gas engine. No weight distribution hitch to worry about and no worry about running out of payload capacity when loading for trips with Ollie connected. Olivers are known for how stable they are when towing, but with the longer wheel base of our Heavy Duty pickup our rig is extremely stable. I used to modify 1/2 ton pickups rear suspension to get rid of rear end sag with either airbags or Timbren systems, not needed with our current rig. Installed a Diamond back bed cover, but we have enough payload capacity to install a fiberglass shell if we chose one, a little over 4,000lbs payload. Heavy Duty pickup trucks have heavy duty brake systems and heavy duty cooling systems for towing in the mountains, too. Best Regards, Bill1 point
-
Since we started using our 2024 Oliver Legacy Elite II, the gray and black tanks won't drain fully unless we lift the front as high as it will go. If the camper is fully level, the gray only drains to about 40%. Anyone else have this issue?1 point
-
Well you could pull the toilet and the base gasket off and use a flexible inspection camera and see if the tank does in fact curve with the hull. Or perhaps fabricate a feeler gauge out of a clothes hanger and follow the front corner of the of the tank top and determine if it is a sharp or round corner. Even if I really had to know, I’d probably wait until I needed repair the toilet flange! Mossey1 point
-
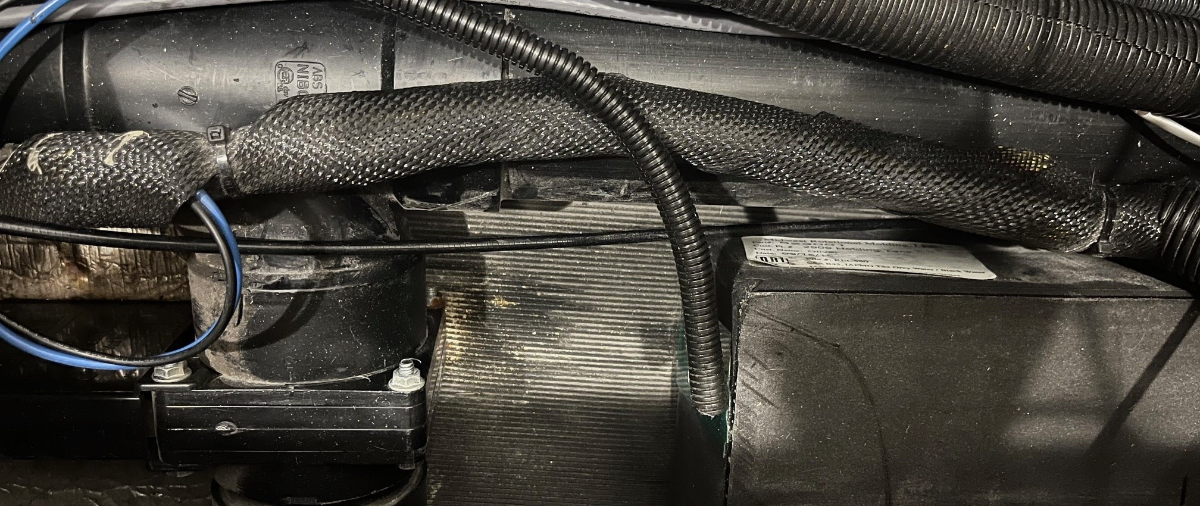
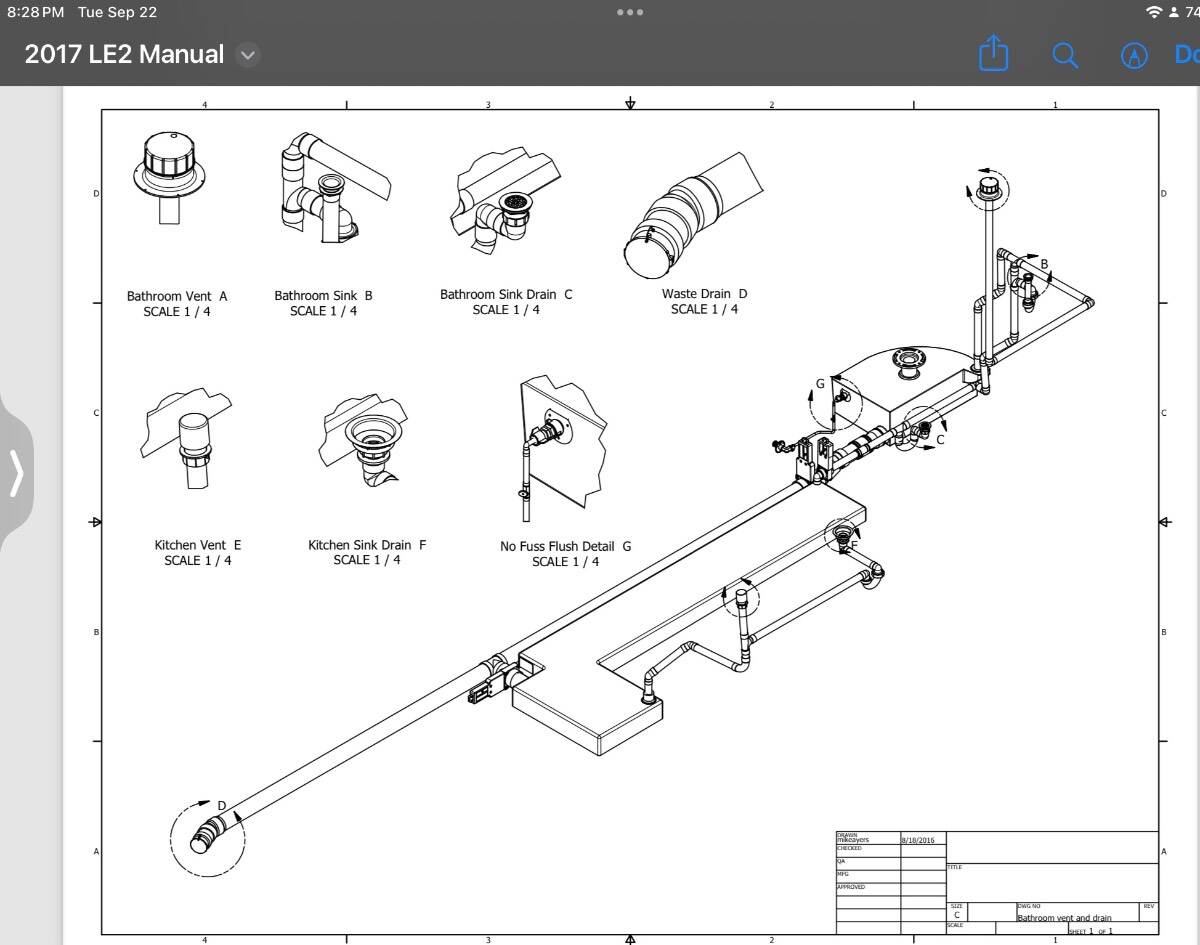
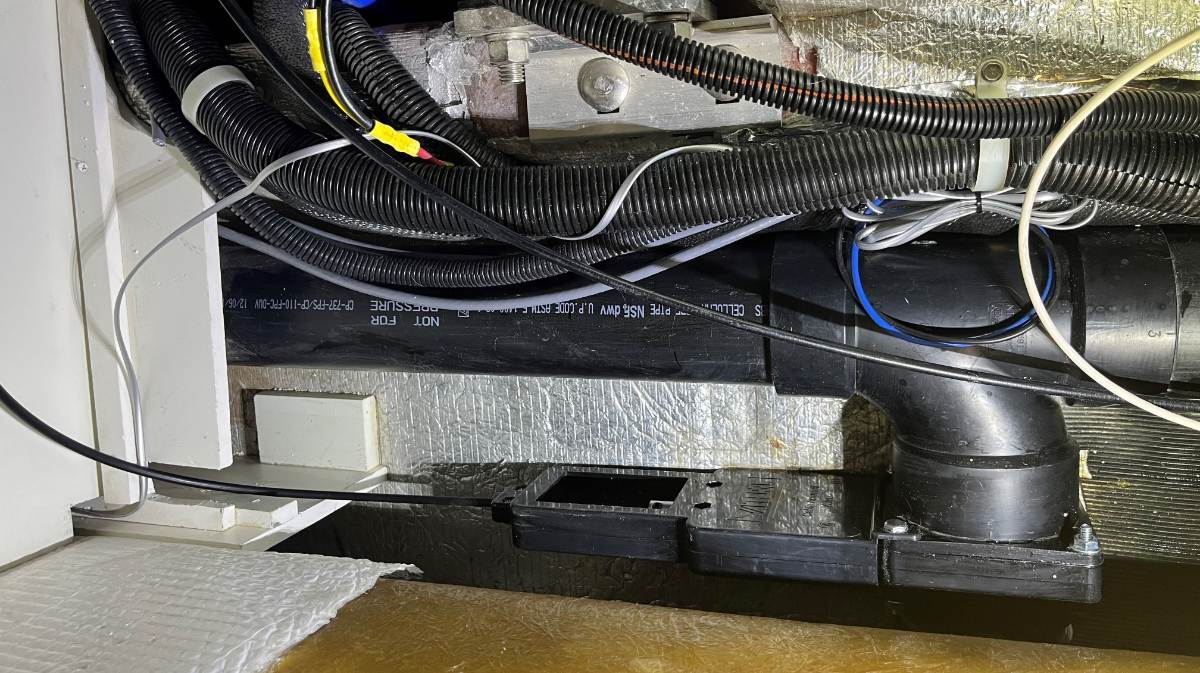
Here's a picture of the service end of the Grey Tank. You can see the drain and waste valve on the left and the edge of the tank with label and SeeLevel sensor on the right. The space in the center is where I installed 1 of 2 footings for my inverter shelf. Across the top of the picture you see the 4" waste line, where far off to the right is the black tank and to the left is the drain at the rear bumper. Looking at the schematic Mike supplied, you can see that if the curbside of the trailer is lower the grey tank could still be 20% full when it stops draining. Does the black tank really have that 1/4-radius shape? I guess it makes sense but there's no way to see up there! 😎
1 point
-
Right you are! Mossey
1 point
-
I always dread a dump station that aims my rig nose down.1 point
-
What JD said. I'll have to try lifting the curbside of the trailer next dump. But I will say that because of all the afore mentioned design characteristics of the Gray tank, it is very slow to drain! Aren't the gray tanks also "L" shaped?? Which is why a curbside lift is a great idea to help things along. One thing I do is to open the back flow valve in the bathroom to help let more air in the tank when draining, I don't think there is a trap on that drain, seems to help. Dave1 point
-
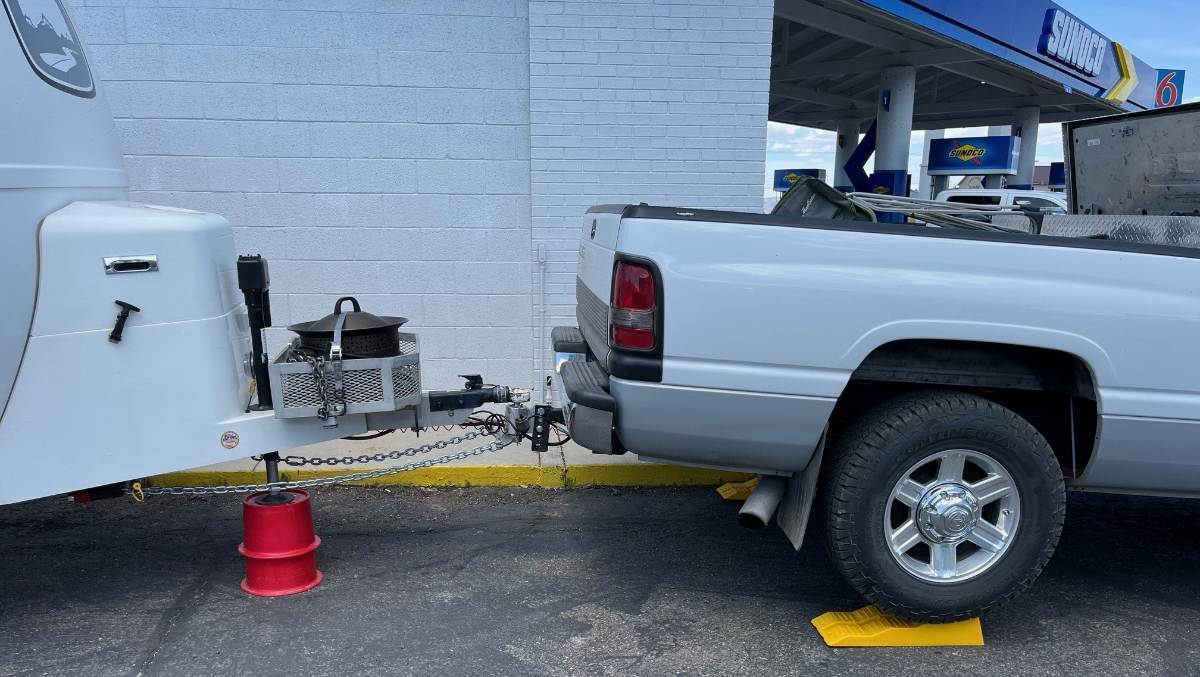
Lifting the front jack is a MUST at least 2-3" high. We read the LevelMatePRO app to know. If there are two ways you can pull into a dump station, enter to be driving uphill whenever possible. This should get the black tank 98% empty. The black tank is a taller tank and if nose up it should empty fully. The grey tank is another story. Besides nose up the grey will only fully empty when the curbside is also up 1-2". This is because the 4" waste line exiting the grey tank heads out from the rear of the tank towards the streetside (pic1). If the curbside is very low, the grey tank could be half full and not able to empty. Every time we dump, I'm taking our two 8" Andersen Blocks out of the truck bed, one under the front jack and one under the curbside jack, often lifting the curbside wheels up in the air. I lift the front up first and then pull the black valve, then I raise the curbside and pull the grey valve in this same order every time! Lift before you open the valves so that the waste water runs out most quickly. We had an extreme situation at the Sunoco in Cedar City UT. You had to back into the dump station which was uphill. It took all this lifting to dump effectively! 😎 (pic2)
1 point
-
Totally agree with Bill. Your readings seem high, but we always have to raise the nose when dumping. If we don't, we often have 6-12% left in the tanks (according to our monitors).1 point
-
OK - I think I've got it. The reason that you have to raise the front of the Ollie to drain the tanks is common to all Olivers that I know of. This is because of the basic design of the tanks - they are fairly wide and long - but - not very tall since they have to fit between the inner and outer shells of the Oliver. The good news is that this design helps lower the trailer's center of gravity and more evenly distributes the weight of the tank's contents from side to side and front to back. In addition, the location provides protection to the tanks from sources outside the outer shell of the Oliver and given that in colder temperatures the area between the shells is somewhat warmer as compared to outside. Unfortunately, the downside to this location and design is that in order to completely empty the tanks, the front of the trailer must be elevated such that the liquid contents flow more completely (and faster) towards the outlet which is basically at the rear of the camper. Your 40% seems a bit on the high side but that could be a sensor issue (again, it really doesn't take all that much of a mis-placed sensor and/or the degree of level of the trailer to have a fairly dramatic effect on the reading). I think that most of us develop an idea/sense of when and how long we can "go" before these tanks need to be emptied and or what our readings really mean. But, in virtually all cases if we want to really empty these tanks, the nose of the Oliver must come up. Bill1 point
-
It is from the internal display. But the readings seem relatively accurate, since it shows as 40% when level, and as we raise the front of the trailer, a lot of gray water drains out and it reaches zero on the display after it finishes.1 point
-
How/where are you getting your percentage readings? The tank sensors can be inaccurate and/or in need of adjustment. Bill1 point
-
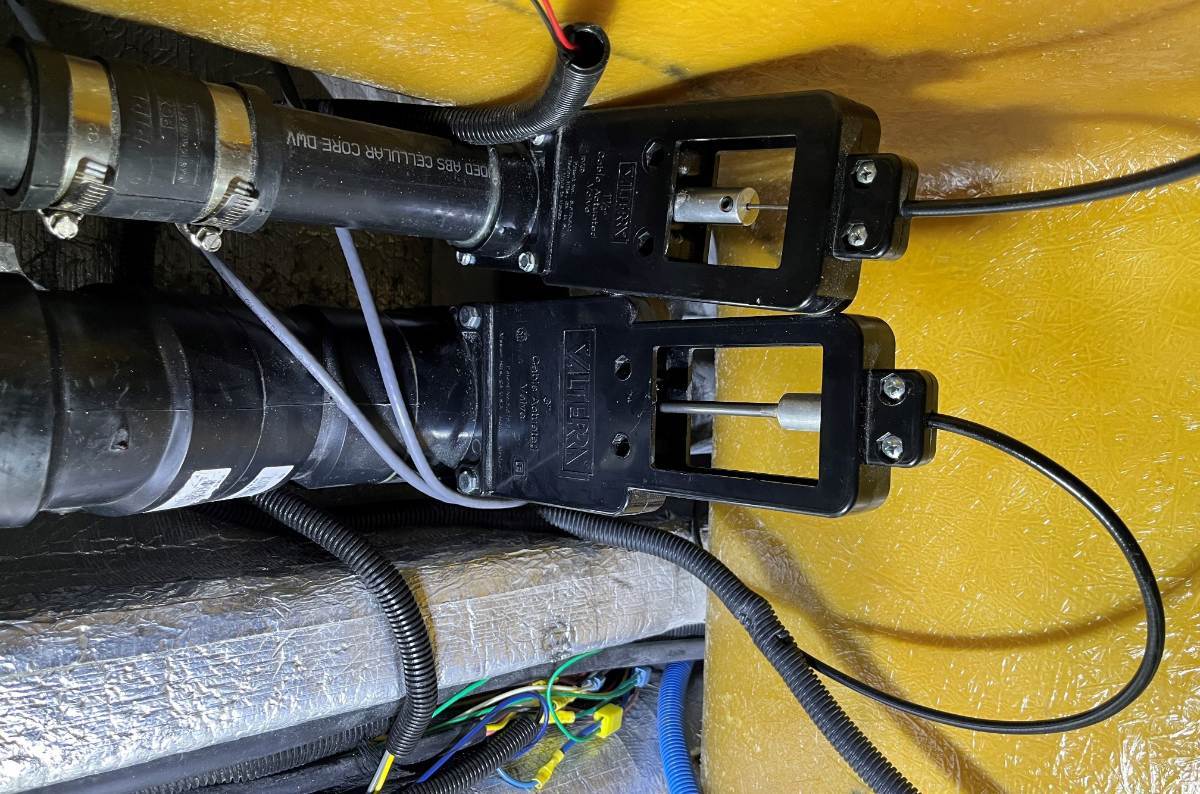
You're welcome, Ron. Ours was too and there are a few reasons... The pull cable is very short and it turns 90 degrees. It's in an awkward place to pull, whether standing outside the bathroom, sitting on the can or wherever, you can't get a straight pull! And a gunked up waste valve blade will make it worse. You can remove the waste valve, clean and lube the blade, lube the cable and it could help. You can't change the 90 degree cable run and the awkward location of the pull handle. We love the new electric one! Without the cable, push the button and I can hear it open or close in just a second! Check my thread linked above if interested.1 point
-
I agree with JD's thoughts and recommendations. The rear gray water valve is a bear to take apart. But it appears that your problem likely is the vent valve up front. I would add that if the valve is not closing there could be two causes. The valve is partially clogged. That can turn into a mess for sure to also deal with. I would approach it this way: Step 1: First try servicing all your cables as in the below DIY. Such a DIY is long overdue for your hull 99. Mine was and it is 342. That process may result in the valve clog getting mushed and then flow down to the dump station. If that does not fix the try Step 2. Step 2: At a dump station, from inside, flood the gray water lines with a LOT of water. Use your pump hot water at both sinks. Then try max flow with the pump and a garden hosed flowing into the bathroom sink. Suggest having a watchful eyed helper. Step 3: Send a garden hose with the end cut off it from the rear of the trailer to see if you can clear it that way. Be sure to open the gray valve outside to clear the pathway. Step 4: Consider getting help with a camera inspection. Hope this helps. GJ DIY - Sanitary Drain Valve Cables.docx1 point
-
Hello Ron, with the 2015 hull #99, very nice! 😎 There's not a plumbing diagram that would help. My understanding is if the waste valve is closed the pop-up shower floor valve really doesn't matter. If you want to replace it anyway, maybe somebody here knows the make and part number or inquire with OTT. You know, if you close the "back flow" valve when the Oliver nose is down, there would be grey water in the plumbing that would then come out when towing. Make sure your front jack is lifted when you're closing. We use the LevelMatePRO and always have our front up 1/2" or more when camped. We close the bathroom valve before releasing the jacks to tow. During travel, I use the kitchen sink to wash my hands to leave that valve alone. If you open the valve with the nose down with Grey Tank on the full side, water can back up to the plumbing under the shower that you may see later. Given all this, if it's still leaking on the shower floor, your waste valve could be jammed up, not closing fully. With the tanks empty, remove the valve and give it a good cleaning and lube. Under the front dinette seat, it's the 2" line at the top of the picture. The 4" is the black water drain and you might want to service that at the same time. The main Grey waste valve is under streetside bed, jammed against the floor where the two lower screws are VERY difficult to remove. I serviced ours last year since the pull handles were getting very hard to pull. This thread may be of interest. Best wishes, JD https://olivertraveltrailers.com/forums/topic/10711-waste-valves-restoration-and-upgrade/
1 point
-
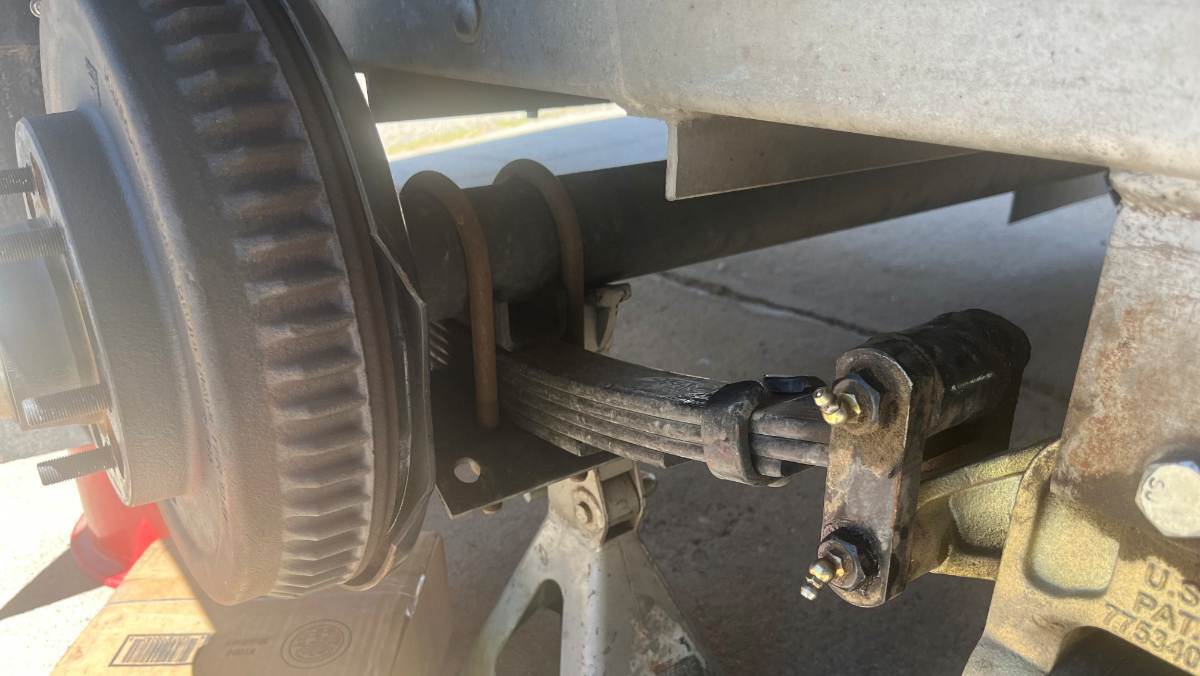
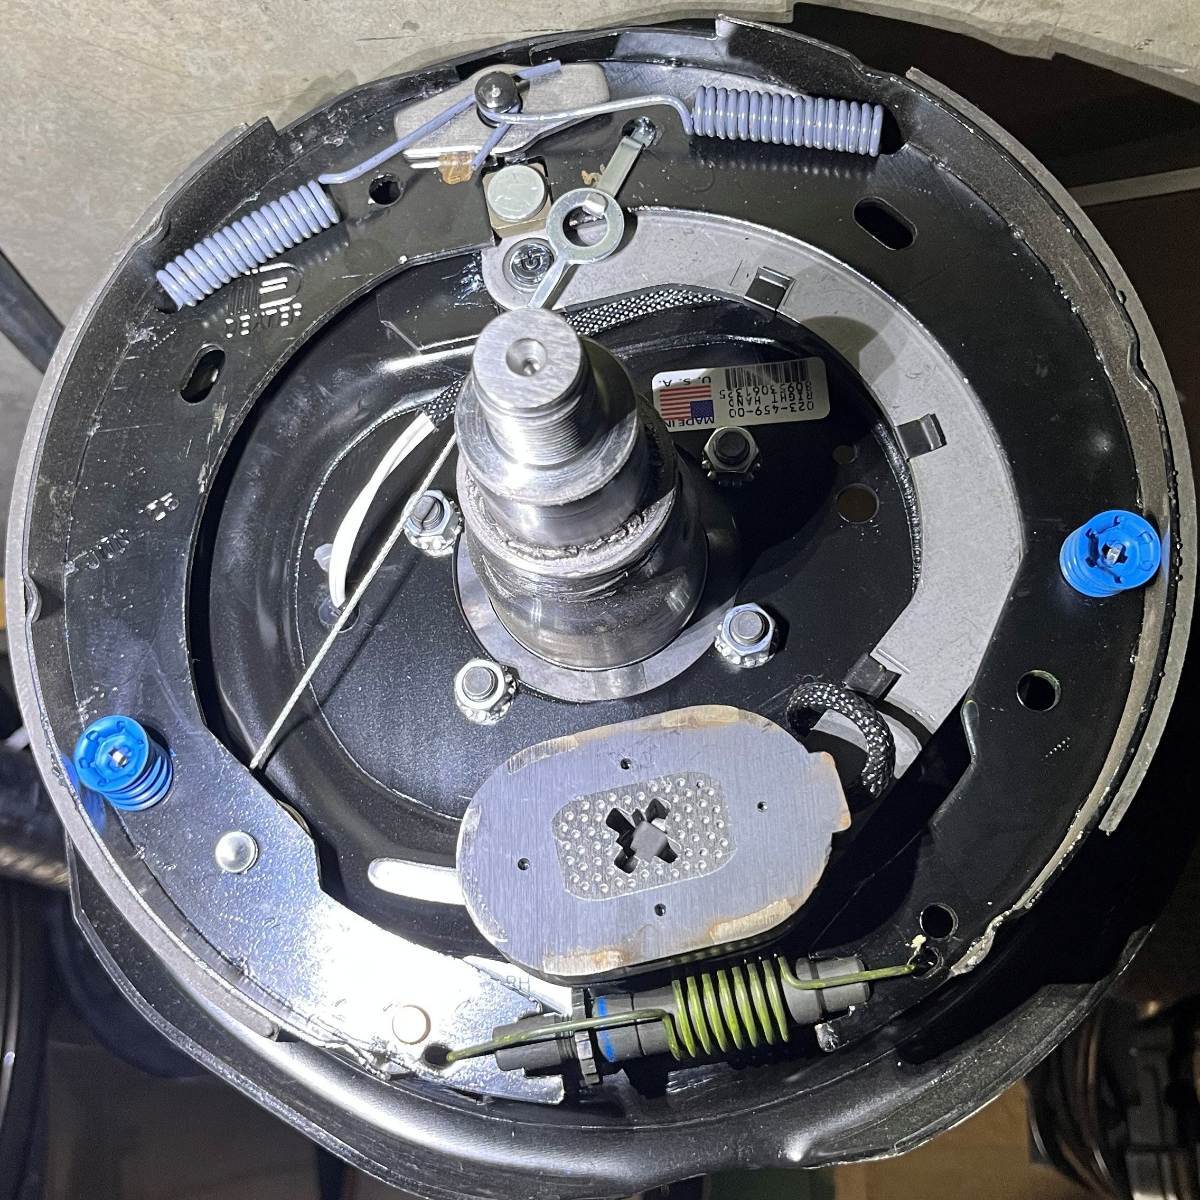
This maintenance can be completed in 2 hours (by the young experienced mechanic), or you could take most of the day! Have fun and pride in your Oliver! Take your time. I did the curbside yesterday and did the other side today (not young anymore, like splitting tasks across days). The second side went very fast today, done in only 90 min having the tools out and ready. This is just how I worked our suspension maintenance, in how it made sense to me, based on my automotive experience, not Dexter nor OTT approved! IMHO this maintenance should be conducted annually, or perhaps bi-annually for those who tow 10K +/- miles in a year. Some may work this routine every two years. Following is a suggested 10-Step Suspension Maintenance procedure: 1) On level ground, jack up one side of the trailer, using the rear leveler jack, while the Oliver is hitched to the tow vehicle (mandatory for safety). 2) Spin each tire to see if it rolls freely. Listen carefully for any unusual sounds. Try to wobble each wheel left to right (3-9 clock positions) and top to bottom (6 - 12) to observe any free-play. There should be no observable free-play with the Nev-R Lube bearings. 3) Remove the lug nuts on both wheels with impact (no impact, loosen with tires on ground). Place a jack stand under rear axle, close to wheel, for safety since your body will be under the trailer to do some of this work (see pic1). 4) Grease all six (6) wet bolts, plus two (2) grease fittings on the EZ Flex. Use a power grease gun if available with a LockNLube coupler attached. Add just enough grease to see some ooze from an edge. Wipe up all excess grease. A straight-blade screwdriver helps to remove old grease from recessed areas. Wipe grease fittings before and after and place caps back on (I don’t use caps). 5) Torque all suspension bolts to Alcan specs. 90 ft-lb for U-bolts, 80 ft-lb for the EZ Flex center bolt and both end-points, and 65 ft-lb on the shackle wet-bolts. The U-bolts will set at some point where they will not need further tightening. They rust into place and once this occurs, they’re done and you will not need to check again in future service (not true for the wet-bolts). I go lighter torque than Alcan specs on the wet-bolts, 70 and 58 ft-lbs which is an eighth (12%) lighter. The 80 and 65 numbers seem high to me. 6) Check drag on the drums. They should contact the shoes ON and OFF when spinning (shoes installed are not perfectly round). If they do not drag at all, the self-adjuster is not tightening properly (see pic2 brake assembly, adjuster at bottom). Mine were all dragging just right on like-new axles. There are two inspection ports on the backside. Unfortunately, there is no way to reach the gear to adjust it, due to the Oliver wide leaf/shock absorber plate. If adjusters are not working, the hub/drum must be removed (see step 8). 7) Pull the trailer emergency brake switch and turn the drums until they stop (to ground magnet). Check amperage draw at each wheel, placing amp meter clamp around ANY single wire behind wheel. Amperage should be 3A +/- without much difference between wheels. My LF wheel was 3.1A and the other three all read 2.8A, the two main brake wires coming out of the streetside Oliver hull read 6.1A front and 5.8A rear. These numbers look good enough to me! 8] Now the question is, do the brakes need a full inspection? I would say no for the first 2 years, then later with enough miles towed (>25K miles). Perhaps work a full inspection after 3 years. Then skip year 4 and do another full inspection year 5. Something like that! Clean brake dust without internal inspection: Use compressed air to blow through all openings of the braking plates to remove all shoe dust from the interior of the brake drums. Wear safety glasses and stay upwind from the cloud of brake dust. Blow throughout until you see only clean air. Full inspection of trailer brakes: Remove the bearing dust cap, the small outer circlip and spindle nut, then slide the drum off. Use compressed air to remove all brake dust (Brakleen spray unnecessary). Make sure shoes are clean, free of grease, clean if necessary (sand shoes lightly). Check shoe thickness, There is not much material there to begin with (Dexter shoes new have only 0.18" or 4.5mm material). They will look thin but when wearing evenly should be good for many more miles. Check the action of the shoes by pulling the magnet to see all is working as designed. Replace shoes if necessary, or replace the entire braking plate assembly, which is bolt-on and economical. If you have enough miles to replace shoes, the drums should be turned or replaced. Replacing shoes without doing so would result in poor trailer braking performance. Drum assemblies with new bearings are very expensive! The Nev-R Lube bearings are warranted for 5 years or 100K miles (our hull will not clock 100K mile in the next 10 years)! Some who tow a lot may replace bearings every 5 years. I will carry replacement bearings and tools with me to replace as needed, as they could fail at any time or last many, many years. Then replace the drum, washer and spindle nut. To retorque, mount the wheel, lower the tire to just touching the ground and torque to 155 ft-lb. Then replace the circlip and dust cap. Remove wheel again to mount center caps, though many of us go without center caps so that hub temps can be checked at stops while towing. 9) Remove gravel from the tread of both tires, using a thin flat-blade screwdriver, while inspecting for tread wear, tire defects and foreign objects. I do this with All of our vehicles, every time wheels are removed for any reason. I’ve found many screws and other sharp metal objects in tire treads, sometimes causing slow leaks that can be fixed now vs. getting worse on the highway. 10) Mount rims, lower hull to get rim close, making it easy to place wheel on studs. Use impact on light setting and snug up lug nuts evenly. Lower hull to sit on wheels, remove leveler blocks, and torque lugs to 90 ft-lbs. Repeat all 10 steps on the other side of the trailer. Let me know if I missed something or other suggestions! 😎
1 point
-
Share and Enjoy !Shares Traveling with an RV is a great way to explore the open road and see all that this beautiful country has to offer. But before you hit the highway, it’s important to make sure your motorhome is stocked with all of the essential items needed for your journey. From medical supplies to survival gear, having these items on hand can help you be prepared for any unexpected situations which could arise while you’re out on the open road. Medical Supplies Having medical supplies on hand is incredibly important, especially if you’re planning a long trip where access to hospitals and doctors may be limited. Be sure to include items such as prescription medications, bandages, antiseptic wipes, and any other items that you or someone in your party may need during an emergency. Additionally, it’s always a good idea to have some form of health insurance identification available in case of an unexpected medical situation while on the road. Survival Gear No matter how prepared you are, there’s always the chance of an unexpected situation occurring while on the road. That’s why it’s important to have some basic survival items in your RV, like a compass, whistle, and water-purification tablets. Additionally, if you plan to explore more remote parts of the country, it may be worth investing in a satellite phone and basic first-aid kit for extra security. Portable Water Filter Water is essential for any RV trip, so it’s important to have a portable water filter in your motorhome. This will help ensure that you and your family always have access to safe drinking water no matter where you are. Additionally, if you’re traveling in an area with limited resources, this can also be a great way to conserve water. Personal Care Items When you’re on the road, it can be easy to forget some of the personal care items which are essential for a safe and comfortable journey. Make sure you’ve got plenty of toiletries like toothbrushes, toothpaste, soap and shampoo as well as other grooming items such as razors and shaving cream. These may not seem like emergency items, but if a situation does occur and you end up on the road longer than expected, you'll be glad you had them stocked. Automotive Care Supplies No matter how well you plan, there’s always a chance that your RV may run into some mechanical issues while on the open road. To be prepared for any situation, make sure to keep an extra set of automotive supplies in your motorhome such as oil, coolant fluid, tires, and jumper cables. Additionally, it’s always a good idea to have an emergency roadside kit in case you end up stranded. Flashlight & Batteries Having a good flashlight inside your travel trailer is essential, especially if you’re traveling at night. Be sure to have some spare batteries in case the light suddenly goes out while using it. Additionally, it’s a good idea to bring extra lights that you can use for exploring in the dark. Having a few headlamps on hand is also a good idea in case you need to work on your trailer at night and need both hands to do so. First Aid Kit You never know when an accident may occur while out on the road, so it’s important to have a well-stocked first-aid kit in your RV. Items like bandages, gauze, antiseptic, and tweezers should all be included in your kit. Additionally, if anyone in your party has any allergies or chronic medical conditions, make sure you pack the necessary medications and equipment for those as well. Emergency Blanket & Extra Clothes Having an emergency blanket and extra clothes on hand can help significantly if you’re ever stuck in an unexpected situation. The blanket can provide extra warmth and comfort, while the extra clothes can help protect against any sudden changes in weather or temperature. Plus, if you're out on the road longer than you expected, having clean clothes to wear will make the experience much more enjoyable. Water & Non-Perishable Foods Having water and non-perishable food items is essential for long trips away from campgrounds and convenience stores. Make sure to stock up on items like energy bars, dried fruit, canned tuna and other protein-rich snacks that will offer you and your party the necessary sustenance while in an emergency situation. Fire Extinguisher It may seem unnecessary, but having a fire extinguisher nearby can be lifesaving if a sudden flame occurs in your RV. Make sure to check the expiration date on the extinguisher and replace it if necessary. This is also helpful if your campfire gets out of hand and you need to put it out quickly. The last thing you want is to start a forest fire, so having an extinguisher nearby is always a good idea. Tools & Necessary Fluids Having some basic tools like wrenches, screwdrivers, and a tire pressure gauge can help you in case of a sudden mechanical problem with your RV. Additionally, having essential fluid replacements for your vehicle on hand is also a good idea, as this can help keep your engine running in case of an emergency. Portable Generator A portable generator can be incredibly helpful if the power goes out suddenly at your campsite. Having a backup source of electricity available gives you peace of mind that you won’t be left in the dark if any unexpected issues arise. Physical Maps & Directions to the Nearest Hospitals When you're out camping, you'll often be in situations without cell service – which means you won't have access to Google Maps. To make sure you’re always prepared, it’s a good idea to store physical maps and directions to the nearest medical center in your RV. That way, if anybody needs medical attention while on the road, you know exactly where to go for help. Final Thoughts Having essential items in your RV is a must when out on the open road. From medical supplies, to emergency blankets and tools, stocking up on these items can help ensure that you and your family are safe in case of any unexpected situations while traveling. Additionally, having proper survival gear and non-perishable food items is always important for longer trips away from convenience stores and campgrounds. Having these items at all times will provide you and your family with the necessary safety and security while out on the open road. Share and Enjoy !Shares The post Emergency Essentials to Keep in Your RV appeared first on Oliver Travel Trailers. Read the Full Article1 point











-
Recent Achievements
-