Leaderboard


Popular Content
Showing content with the highest reputation on 07/09/2018 in all areas
-
I always take the sliding window completely out. Then you can really do a great job with the gaskets and the trough in the bottom of the window frame. Before replacing everything, I spray the gasket with silicone.3 points
-
Yep, the window wells are a pain to clean, but a very necessary part of maintenance and keeping water from overflowing the wells and into your trailer. After trying a few methods, this is what I have settled on. 1. Completely remove all the exterior gaskets. Don't get them mixed up between windows. 2. Remove interior bug screens. You may have to remove shades as well to completely remove the screens. 3. Open windows as far as you can. 4. Remove as much of the rubber slotted track as you can from the window frame. IIRC, the bottom track goes under the sliding window and is captured, so I pull up as much as I can. 5. Then with shop vac and a duster brush (3" paintbrush) I remove all the debris, brushing it into the vac. I find doing this dry is way better than trying to clean with water and washing out the debris that way. It just turns into a gunky mess with water. 6. Once all the major junk is out of there, I'll finish cleaning the frame with a damp rag and Citrisolve (or the like). 7. Last step! While all the gaskets and rubber track are out, I clean them as well with the damp rag and cleaner and finish them off all sides (once dry) with a good wipe down with 303 Protectant before re-inserting. The 303 makes the windows slide real easy and also protects the gaskets from UV degradation. Seems like a lot (and it is) but that's what I do once a year. My trailer is a 2015 so not that old, but the windows haven't leaked and the gaskets look new. YMMV depending on the roads and environments you travel. Hope I didn't forget a step. A lot of the work becomes apparent as you move along through the process. If someone knows a easier way to do this I'd sure like to hear about it! I'm with you though about finding the ultimate RV window. Maybe the frameless types I'm seeing on the new super rigs out there? Not sure how they function though, or if they don't have their own issues. Happy trails! Dave3 points
-
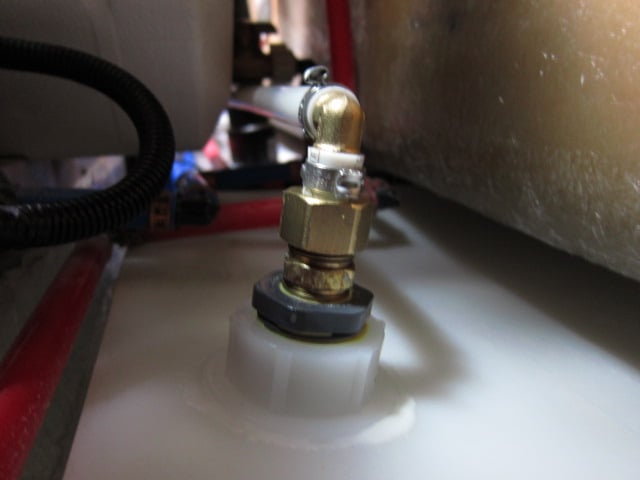
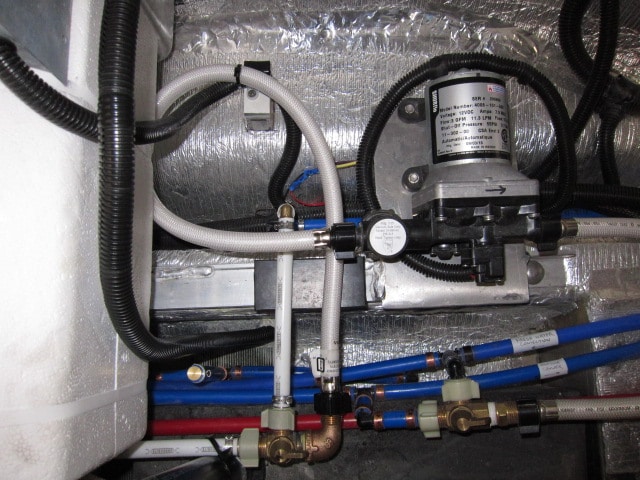
Well I may be kicking a dead horse here, but I finally got around to adding the siphon tube to my Ollie's FWT. Thanks to Raspy and Reed and all others for their input which was of great help to me. I modified Raspy's design just a bit by using a PEX suction tube instead of copper. Don't know if one is better than the other but they do have some subtle installation differences I thought I'd point out. The heart of the setup is the same, the 1/2" brass compression fitting that has been carefully drilled through with a 5/8" bit to remove the internal stop so the copper or pex tube can be pushed through the fitting. The important difference here with PEX is not to use the brass compression ring, but a nylon ring made for that purpose. Here's a pic of the siphon tube setup with all the fittings: Of course the part that gave me the greatest worry was spin welding the fitting on to the tank. I used the same HD fitting that Reed used and I bought 6 of them so I could practice on a piece of scrap plastic I got at a local tank factory (they gave me the scraps). I bought the fittings and the driver from here. They have all the fittings and drivers for that particular fitting that you need, and are very fairly priced. I oversized the fitting and also got the HD version for strength. I oversized because I wanted to screw the brass compression fitting into a bushing and not directly into the spin weld fitting as a hedge just in case! Did I need to? Maybe not, but I felt better doing it. The difficulty on my Elite is that it is crowded down there in between the hulls! I'm no stranger to routers, they are powerful, can impart tremendous torque, and things can go South in a hurry if you don't respect that. Reaching down in there with the router was dicey. My grip was tenuous at best, I needed an extra elbow! I could get a reasonable hold and turn it on, but had to change my grip for the critical turning off stage!! I did not want to change my grip with the router running and court disaster. So finally I put two short extension cords together and had my wife at the ready to pull them apart when I yelled out to her. We practiced a few times until we both felt good about it. Four seconds of terror later the job was done....perfect weld! For those used to using routers with wood and who know what can happen, I would say that spin-welding plastic fittings is pretty easy and forgiving. Timing is the most critical factor. I was glad though that I did a few test tries first, and at only .35 cents a fitting, it was cheap to do so. The rest was easy. Since using a PEX suction tube, I did not cap it but cut out 2 tabs on the bottom on my table saw to keep the tube 1/4" above the tank bottom. Everything else was just as Raspy and Reed did in their video. Here's the pic of the installed suction tube. It's actually straight, camera was tilted a bit. Here's a pic on the pump side: The pickup tube came out just next to the water heater where I strapped it to the drain pipe to the GWT. You can see the brass pulg in the old pickup tube next to the water heater. While down there, I added a brass elbow to the valve on the left for the flex line to the input side of the pump. Originally, there was none and the flex line was badly kinked having to make such a tight turn: So all is well now. Instead of loosing prime at 36% full. The pump just barely makes it to 6% full. That's a lot of water! Things are looking up! Dave
 2 points
 -
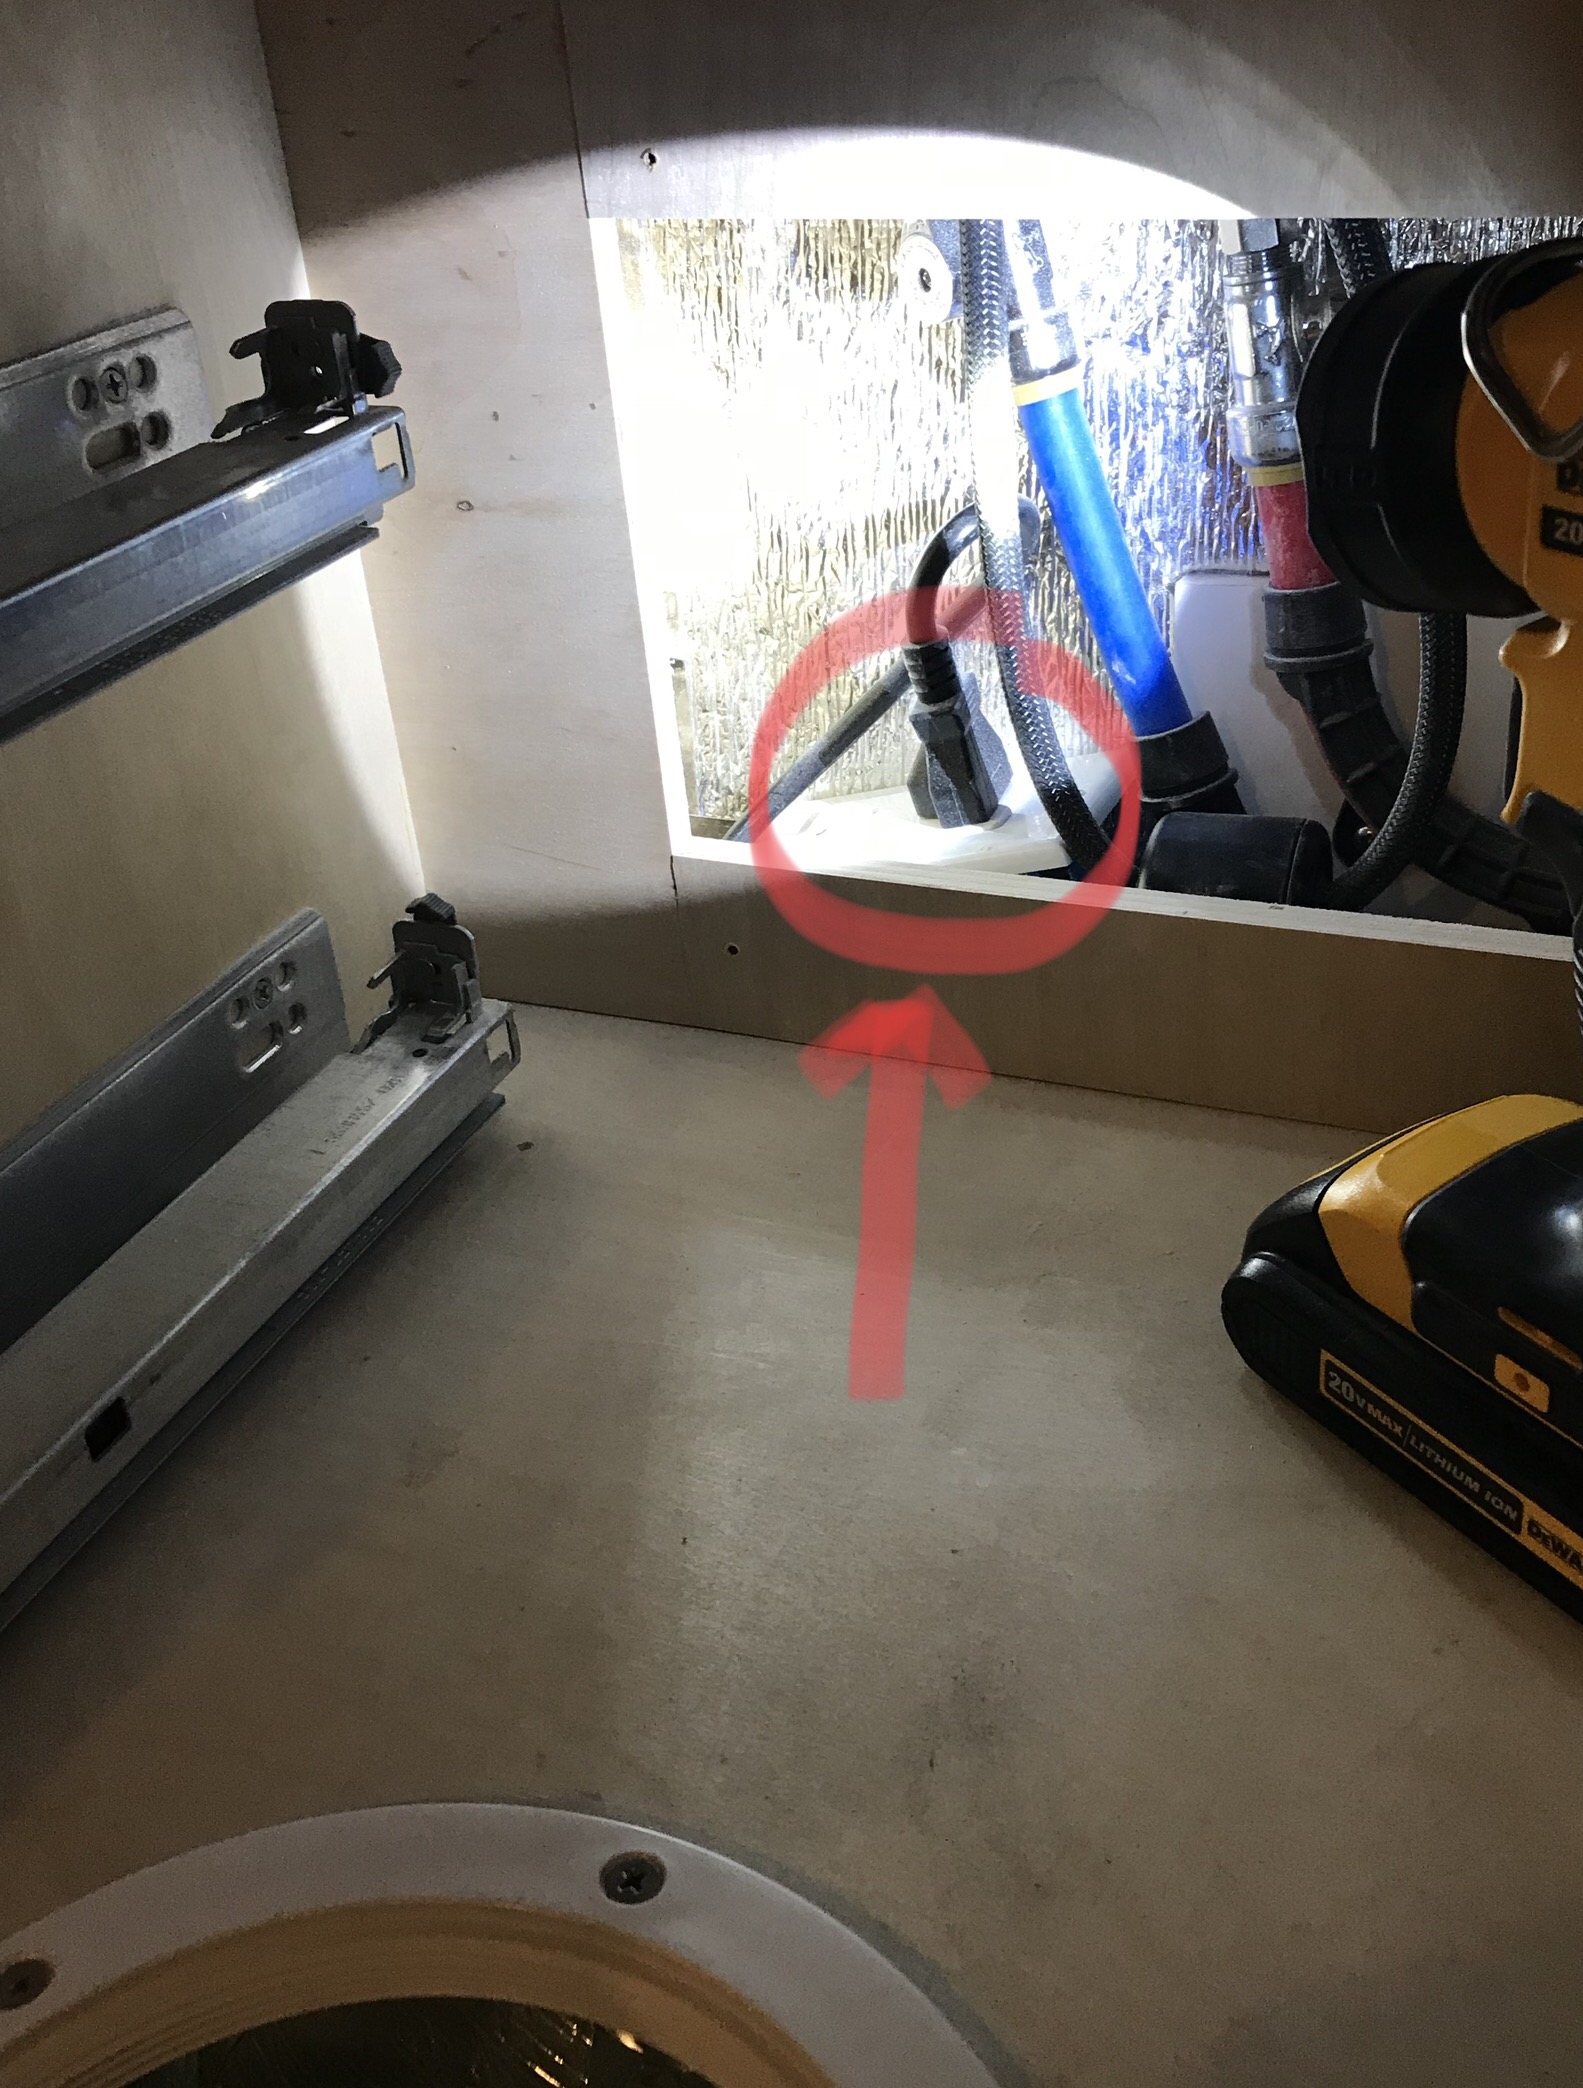
Thanks, guys. Here's what I found: CE4340AC-C134-48BE-B5C3-1A9F901862EC Note the black weight attached to a cord that assists the extendable faucet nozzle when it retracts back into the faucet. This weight swings like a pendulum within the space behind the drawers and likely smacked my fridge plug enough times that it eventually knocked it out of the electrical socket. Fridge works fine on AC once it's plugged in. Duh. I moved the "pendulum" to the other side of the sink drain pipes and wrapped it in a spongy foam material. Sad that it took me this long to figure this out but I mistakenly assumed that I was getting power to the fridge because the front diodes all lit up. I was getting power....D.C. Power. Bob G2 points
-
Here is a picture of the plug.
2 points
-
Pull the gasket completely out all around, top to bottom. Push the slider until it’s nearly closed and it will pop out of the frame at the top.2 points
-
Our smoke alarm went off in the middle of the night last month. We had windows open with a nice breeze. The reset button wouldn’t silence the thing so I just took out the batteries. I tried putting in new batteries and the thing went off again 10 minutes later. Once we got home I brought it in the house and replaced batteries one more time. No change. Ordered a new one off Amazon (also noticed Walmart has them). In the reviews there were many complaints that these First Alert detectors don’t last too long. Ours was dated Nov ‘15 so it was less than three years. Mike1 point
-
Greetings from Grand Prairie, Alberta! This is my third year up in Canada and I have found it to be a breeze (except for the Quebec Province where all of the signs are in French and some store personnel look at you like you're from Mars) Border crossing with a passport or border card is easy . . . bring NO firearms or ammo!! ATMs are all over, just like the states and will gladly give you Canadian dollars for a nominal fee, just like the states. The exchange rate is close to 1CND = .74USD. You'll quickly get used to the colorful paper denominations and coins that are similar in size to their US counterparts. Cell phone service is widespread. Check with your provider about coverage. I have a Version plan that includes Canada. Although my data plan is unlimited, after a lot of use, to may "throttle down" for the rest of the day. No biggie. All town libraries have great, high speed data flow, as do many fast food restaurants. Best of all . . . it's not as hot up here.
1 point
-
I blow out the channels on all 5 windows with compressed air after each trip. That includes lifting the thick black rubber weatherstripping to clean under as well. We’ve been in some pretty bad downpours and haven’t experienced any leakage yet. Mike1 point
-
I've had good luck with mine so far, just cleaning from the outside like Randy does. I did inspect the inside after reading @john-e-davies thread on dust control, and only found a thin film of dust in the rear window track and nothing to speak of in the others. That's with only 9 months of use, and 12,000 miles, so take it for what it's worth. I suspect that it's luck of the draw whether you get a well sealed set of windows or not from the factory, and I also expect that over time mine will worsen. In the meantime I'm just trying to keep the gunk out of them. I should probably keep some sort of protectant on them as well. I do wish it were an option to have a fixed egress window on the back (meaning not sliding but obviously openable with the emergency latches). That seems to be both the dirtiest and the least used in our case and a single pane of glass back there would make for a better view anyway. I believe at some point in the 200 hull numbers, before mine at least, Oliver switched windows to something that was supposed to either seal better or be less susceptible to the drains clogging. You can tell the new ones since they only have slits at the bottom and not the top.1 point
-
The only time I've removed the windows and gaskets was after I returned from the red desert sands of Utah, that stuff got everywhere.. otherwise I find that just hosing the frame work, from the outside, works really well. I hose around the window and then directly into the drain holes and back and forth until it runs clean. I haven't seen any water get inside the trailer. I've inspected after the process to see how it did and it worked reasonably well enough, obviously not like removing the windows and wiping it all out but I now think that is a once a couple years maintenance issue.1 point


-
Recent Achievements
-
")


")


