Galway Girl
-
Posts
779 -
Joined
-
Last visited
-
Days Won
25
Everything posted by Galway Girl
-
 John, Lowe's in Monroe WA has 5 in stock...they can be drop shipped to a Lowe's in Spokane or your house. CS
 -
Just FYI here's my explanation of our Lithionics Upgrade ...may be useful for those reading this thread. https://4-ever-hitched.com/ggs-blog/f/lithium-battery-upgrade Craig - Hull 505 - Galway Girl
-
In the 2019 the wiring for the 2000 W inverter only is connected to the outlets and the uW outlet. It is not connected to the AC which is on it's own circuit. If you want to have a 3K inverter to run the uW then you would have a rewiring project ahead of you...and you may want to ask the Oliver Service about how you could accomplish the 3K inverter wiring. Craig
-
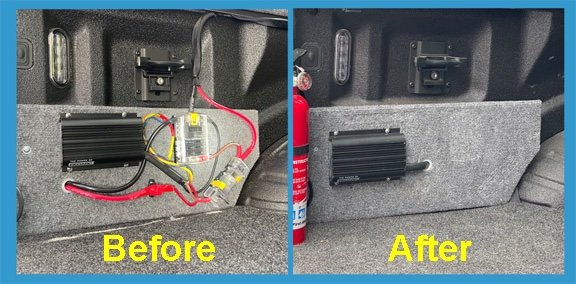
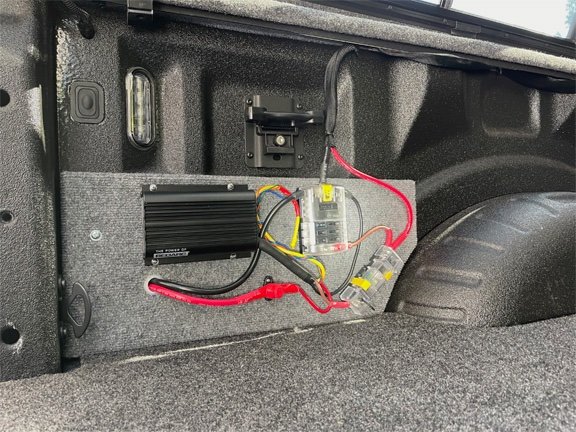
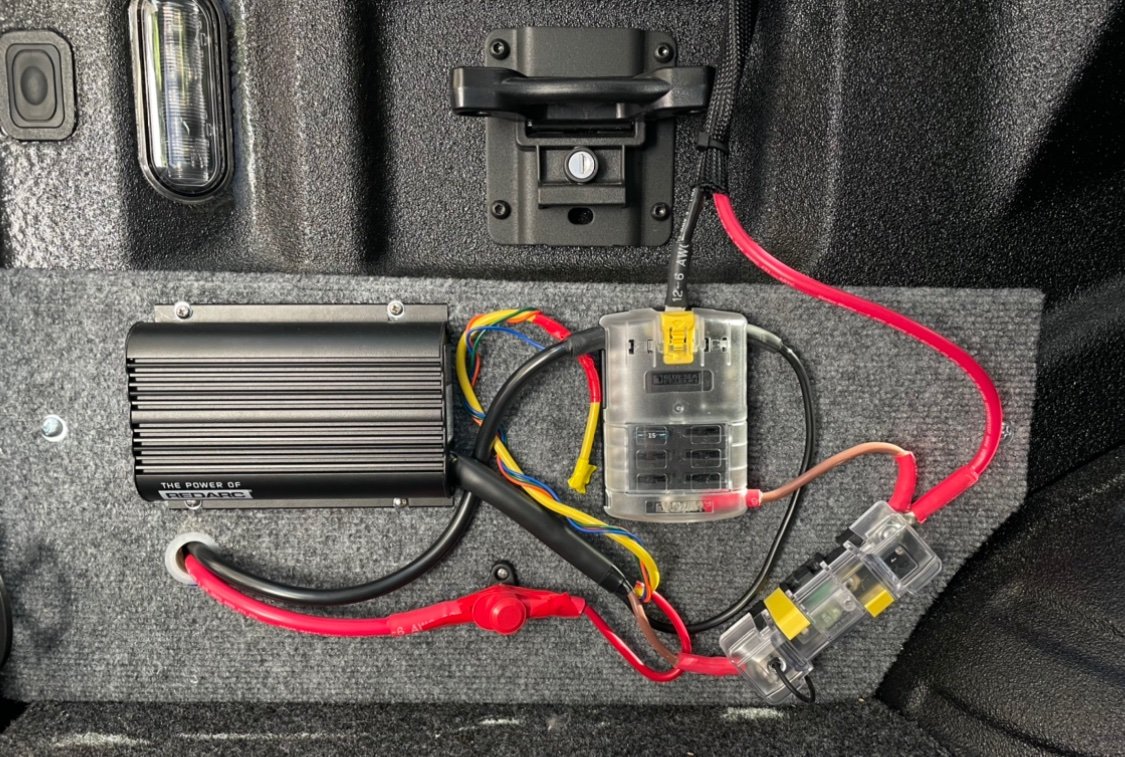
Based on great feedback, I've made a change to the way our fridge wiring is hooked up. After some reflection and trial an error I completed the project to bullet-proof and protect the wiring that is part of my truck bed 12V system. 1) Moved all the loose wiring onto the back side of the mounting board where it can't get snagged by items in the truck bed. 2) On the back side, I tied down the longer wires with wire clamps. 3) Added standoffs behind the board to allow some space for the components moved to that side. 4) Ran the main 12V wires to the bottom edge of the bed securing them under the bedbug. 5) Did the same for the 12V wires running over to the ARB Fridge connector. 6) I left the Redarc visible on the front of the board so I can see indicator LED's and where it has good airflow. The unit flips out with the removal of 2 mounting screws if I need to do any service. Here's a before and after shot. Thanks again to Geronimo John for the inspiration to ruggedize and clean up. Tomorrow I'll put a shelf across the top of the area to keep anything from dropping down into the space behind the mounting board.M My next project to build some shelving in the front of the truck for our various gear boxes. Craig Hull 505

-
Geronimo-John: Fantastic improvement ideas! After having lived with it for 6 months on the road, many of the things you suggested were in the back of my mind. Based on your ideas, I think I'll "rework" that area in the bed to make safer, more rugged and cleaner. I also want to put some shelving in the front of the bed for better storage, tie downs and control of items in the truck bed. There was far too much stuff moving for my taste on the 6 month road trip. Once I finish the next phase I'll repost the re-design of the electrical, and the new storage upgrades. Again, thanks for the inspiration to improve the design for safer off road use. Craig
-
Planning a trip that is Westbound following route 66 in October. By November we would peel north from Santa Fe, up to Southern Colorado, then across to the Mighty 5 in Utah and Grand Canyon. (See proposed route below.) Our current timing has us in the Colorado/Utah & GC the first 10 days of November. I'm starting to experince campgrounds 'winding down' by Mid Oct. *(no water, no electric). Some are just closed. Are the first 2 weeks of November too late in the year "weather wise" to hit those Natl Parks? My main concern isn't as much the cold....but I don't want to be towing in snowy conditions in the mountains. Our backup plan would be to stay on the old 66 route through to Flagstaff, pop up to the GC then back down into Palm Springs area all before Nov 1. Advice/Thoughts? Craig - Hull 505
-
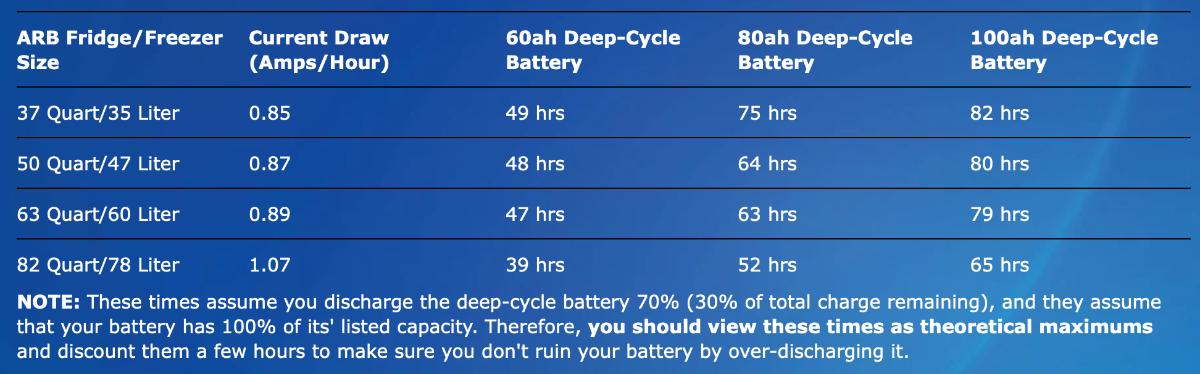
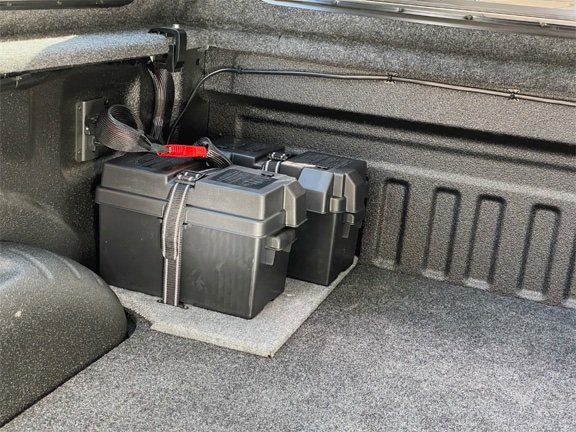
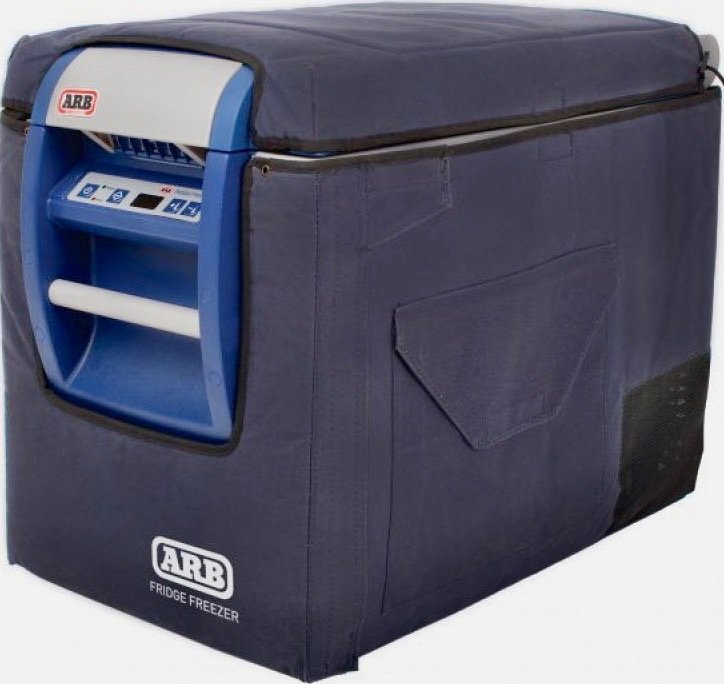
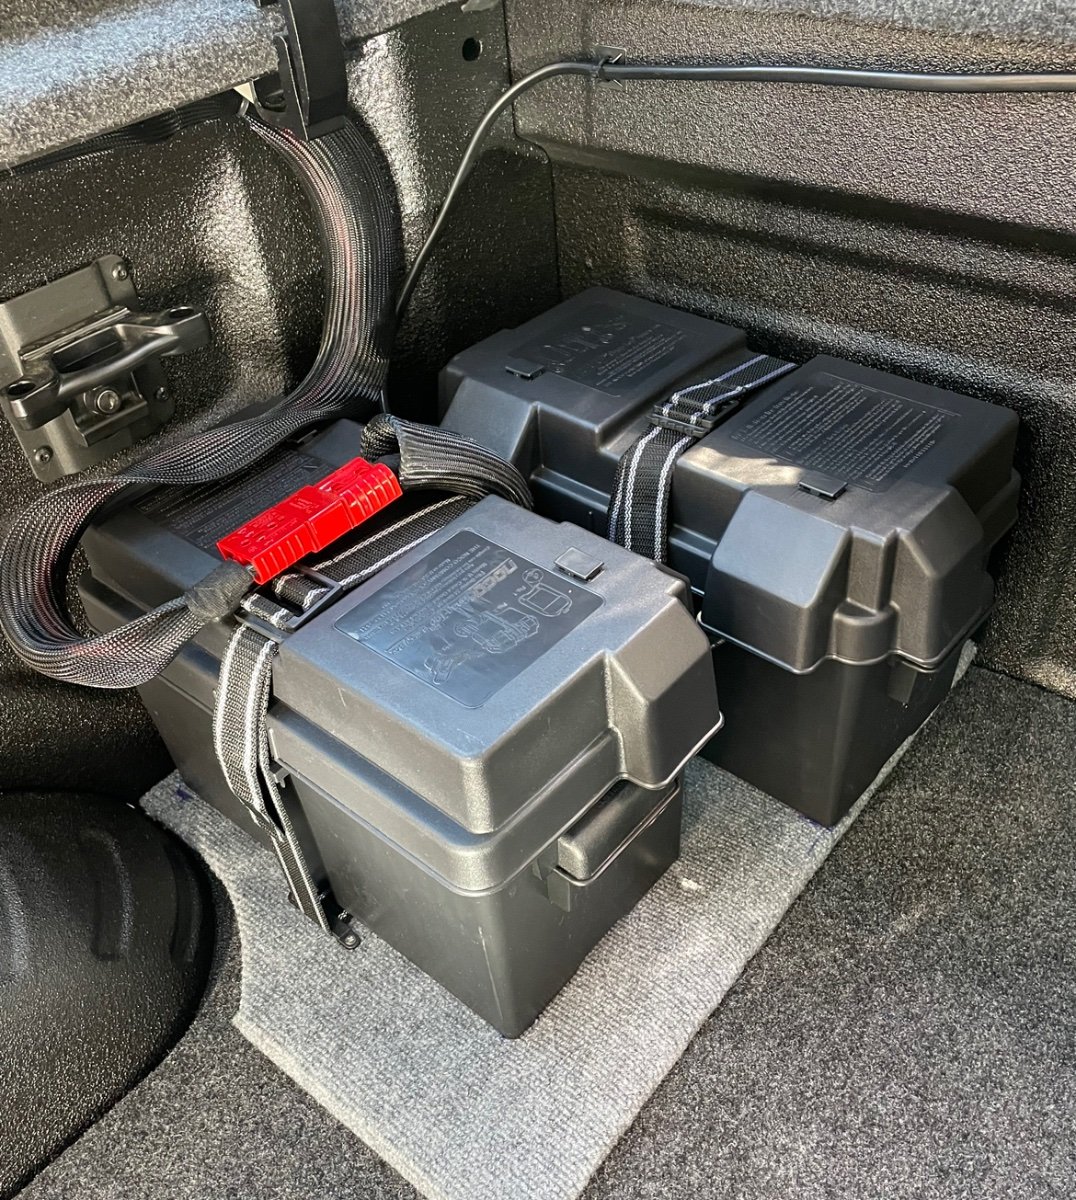
We have an ARB 63 Compressor Fridge in our Truck. It's been bulletproof so far. We use it for any trips over 2 weeks to extend storage of vegetables, dairy and beverages. We've just returned from a 6 month road trip and found that was a great companion for the fridge in the Oliver. Here's some data showing the current draw on various ARB fridges and how many hours various size batteries would last. For my ARB 63, I've put in 2- 100AH batteries in the back of my truck that are charged by a Redarc DC/DC charger. In our recent trip, we never had the batteries drop below their 50% point even after 4 days of use off grid. My plan for longer term boon docking is to add solar onto the roof and have it connect to the MPPT input on the Redarc. For more on our installation see the pix. Above: REDARC DC/DC charger keeps the 2 - 100AH AGM's full charged while driving. Dual 100AH AGM's are the current power source for our ARB Fridge.
-
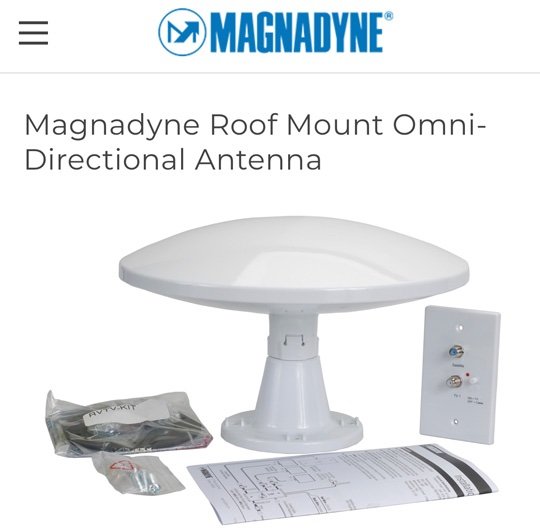
Update on Hull 505 - Factory antenna replacement. The "direct replacement" antenna from Magnadyne airrived. I cost about $70.00 including shipping. Be aware the newer models from Magnadyne with a more secure base only are available in Black. The newer models base attachment system is a positive engagement groove and twist lock followed with a set screw. Note's below on the existing base bayonet connection. Antenna Removal, Test and Re-Installation: To take the antenna head off I was told by the Magnadyne Engineer - Mark Jones - to simply twist off the top part of the antenna. . Leave the base behind. The new antenna can re-fit onto the old base. I left the old base in place as it was the least work and I didn't have to break roof seals. *In a follow up from Jason Essary - You need to be on top of the antenna and Push DOWN hard before turning the unit...otherwise the latch fingers get messed up. Disassembly On Roof: 1) Twist the Top of the antenna clockwise until it popped out of the latches. (That worked fine, it took some force but it went as planned.) 2) Pull the antenna head up and the coax and fm cables should follow. (There was a bit of tugging but both the cables came out as desired.) 3) Disconnect both cables. ( Coax is a screw thread, FM is a bayonet so just pull off.) In Trailer: To Test Cable Run 4) To check that there's no short in the actual cables - turn on the amplifier in the attic, if the red light stays lit, it confirms the antenna head was dead. (If it didn't stay lit it would have been a bad cable or just the connector was shorted at the antenna head. In my case the light stayed red so the antenna head was at fault. 5) Turn off the amplifier. On Roof then back inside trailer to test new antenna head: 5) On roof connect the cables to the new antenna head. Just leave it laying on roof for now. 6) Go back inside trailer and turn on Amplifier. The red light stayed lit and indicates the new head is functional. Turn off AMP before going to roof. On Roof: 6) Reassemble antenna head to base by reversing the process....connect cables, feed down into stem and then pop the top back on. (A bit of a jamming process to get cables down the stem but they both fit.) 7) Press hard on antenna head to push down until the shaft clicks in place. As mentioned by Mark...it's unlikely that you'll get the latches on the new head to click in as it's been a known issue for that design...so push down as far as possible then put in screws on 3 sides of the shaft. 😎 Next, insert 3 short #6 stainless screws (5/8") around the stem to secure head to steam. Add a dab of sealant on each of the screw heads. Note - Don't use screws > 3/4" as they could go through the center shaft and penetrate the coax or fm cables. In Trailer: 9) Turn on amplifier in attic, turn on TV and run a channel scan. 10) Checked on the channels found an had a very clear picture. Project Completed. Old Antenna Autopsy: The antenna head had 4 rubber plugs on the underside that I removed to reveal the 4 Philips head screws. Removing these allowed the antenna head to be split in half. I removed additional screws to disassemble the head which included: 1) Configuration - The circuit board includes all inputs and outputs for the antenna and the amplifier for the UHF leads. It has lead wires coming from both the Amplifier in the Attic (Coax Wire) and from the FM Antenna Lead to the Receiver. The board also has connections to both the FM antenna element (red wire) and the UHF Antenna Disk. 2) Function - When you push the button on the amplifier in the attic, 12V is applied across the COAX lead to the circuit board in the antenna head. This turns on the "in antenna" amplifier for the antenna system. If this coax lead is shorted out on the board, then the amplifier in the attic automatically shuts off the 12v supply to protect the amplifier. 3) Malfunction - In my case the Coax connection on the board had degraded and shorted to ground. I also found that the actual connector to the UHF antenna disk had separated and was loose. So either way my Antenna was dead. If the antenna fails again, I'll likely replace it with a different type of antenna ....or simply use a transportable antenna that I plug into the side of the trailer. Craig Short Hull 505 - Galway Girl
-
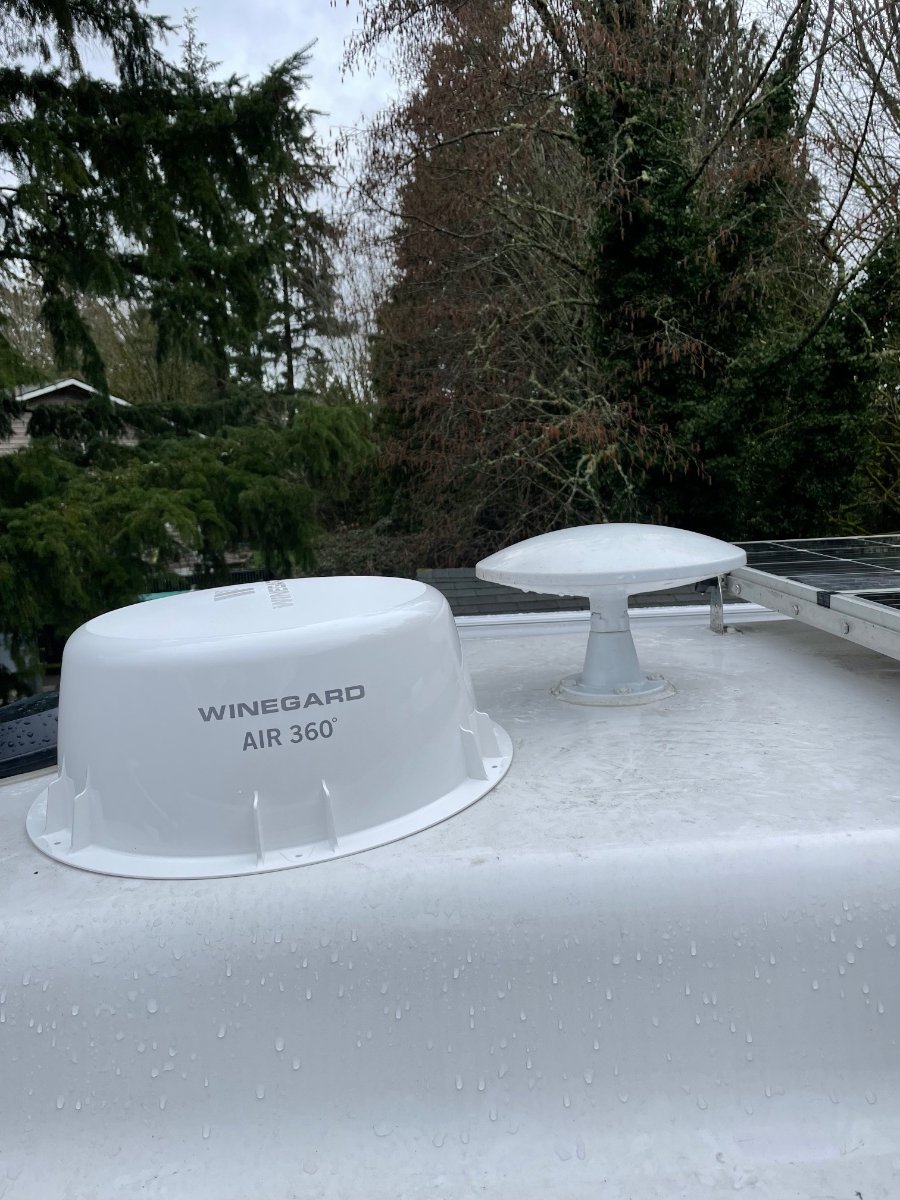
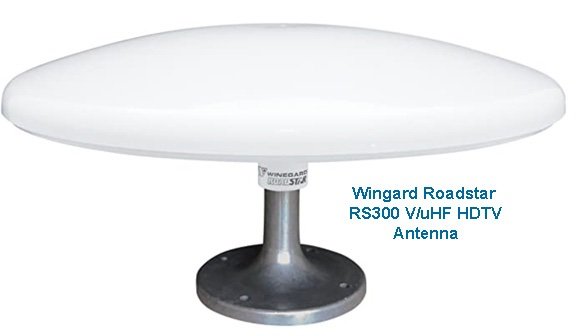
I've been on the road for the last 6 months, and about 2 months ago our HDTV antenna failed. I did some troubleshooting and even called Winegard who helped me troubleshoot the issue to either the actual Antenna Head...or...the cable to the antenna head. The symptom appears on the POWER amp head in the attic. When you turn on the HDTV antenna by pushing the switch the light stays on a fraction of a second and goes off. This means the power unit isn't working so "no TV signal". The manual indicates that light going off indicates a short to ground on one of the three amplifier leads or the antenna. So I removed all leads, turn on the AMP...light stays on. Try again with each lead - and the one to the on roof HDTV antenna made the light go off. So the issue is either at the antenna or the lead from the antenna to the amplifier. In this case, as part of the call Winegard graciously sent me a replacement antenna, but since they didn't have the Original Roadstar RS3000 the sent me a very different Winegard 360. The unit has sat at my house until today when I started preparing for the repair. I unpacked the new Wingard Air 360 Antenna and went to look at the installation difficulty. Here's what the new unit looks like laid next to the old unit. This was when I noticed that the actual antenna I have doesn't resemble the Wingard RS3000 as listed in my manuals...but instead I have a Magnadyne RVTV-W2 ....which wasn't installed until the 2020 model year. (So I must have had one installed in place of the RS3000). WINGARD ANTENNA - no Plastic Shroud on bottom: The Magnedyne appears to be what I have on my roof: So, I called Magdadyne and found they only have a few of the WHITE model that was originally on my trailer in stock. They stated their antennas had a 1 year warranty, so I would need to double check that it's not a cable issue (like a screw through the jacket) first...but likely I needed a new antenna. The Magnadyne rep told me they don't carry that older model because they've redesigned how the base connects and it now has a set screw on the mounting shaft and a floating cover. But he also said they don't carry them in WHITE, only black. So...I went ahead and ordered the exact match for the one on my trailer. White with the plastic shroud. The rep told me that the unit detaches by twisting the top (very hard to do he says) and the plastic retainers will unclip. Then reverse the process to put on the new antenna....(or simply unscrew the 4 screws that hold the base down on the original unit and reinstall sealant.) Once I receive the new Magnadyne unit, I'll start the project and add the process photos to this thread. Craig Short Hull 505 - Galway Girl
-
Minnesota Oli : Our 2019 (Hull 505) also has a 10Amp fuse installed. Thanks for the heads up.
-
This time of year costco has in store only...Grey RV mats that are 6x9, lightweight, made out of spun recycled milk jugs and we just recycle each year. They cost about $13
-
Ford Ranger XLT - any owner use this vehicle?
Galway Girl replied to VFI Vacations's topic in Towing an Oliver
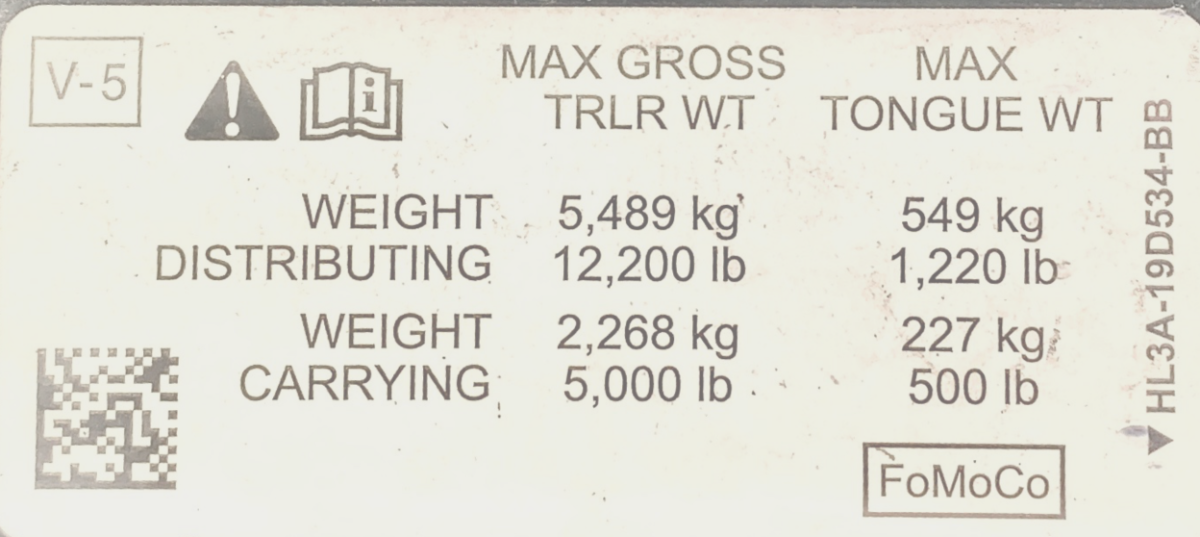
Data: Average Elite II Tongue Weight will be > 500 lbs. And can range from 550-750 typically loaded. Our Hull 505 at the factory on pickup day with all options and Full Dual 30 Gal Propane was 585 lbs. As I've used a tongue wt. scale I've found that it's been as high as 750 lbs and typically at about 675 lbs. because we also have a front basket, and dual 30G propane tanks. The Ford Ranger Receiver bolted into the frame will have a sticker stating two weights it can handle : Weight Distributing, and Weight Carrying: Here's the example below from our F150 Hitch: The Weight Distributing number is the "MAX" you can have as a tongue wt. while using a wt. distributing hitch. The Weight Carrying number is the "MAX" you can put on the hitch as 'dead weight' while not using a wt. distributing hitch. As a practical matter, we upgraded from an F150 to an F350....not because of 'Towing Capacity' but because of the Payload Number. Our F150 had a door jam payload sticker rating of 1557 lbs and a tow rating of 12,700 lbs. We found after subtracting the Tongue Wt of our trailer we only had about 800lbs payload left for people, tools and cargo in the truck. The Ranger would be able to tow with a WDH, but the bigger concern may be stopping safely, and towing drivability and safety for you and your passengers. Hope that data helps you a bit. C Short Hull 505 - Galway Girl
-
Will try disconnecting from shore power to see …the sound is intermittent, and only is on for a few seconds. I’m suspecting oscillation on a circuit board the goes away when energy drops. Sound is loudest up by the Maxxair Fan above stove.
-
We’ve been experiencing a very high pitched squeal above 10 Khz and can’t isolate the source. location: the sound seems to comes from the ceiling area around the maxxair fan We have turned off all items including the tv, radio, fans, water heater, furnaces etc. to isolate the source. at random times the squeal comes back. Anyone else had this issue?
-
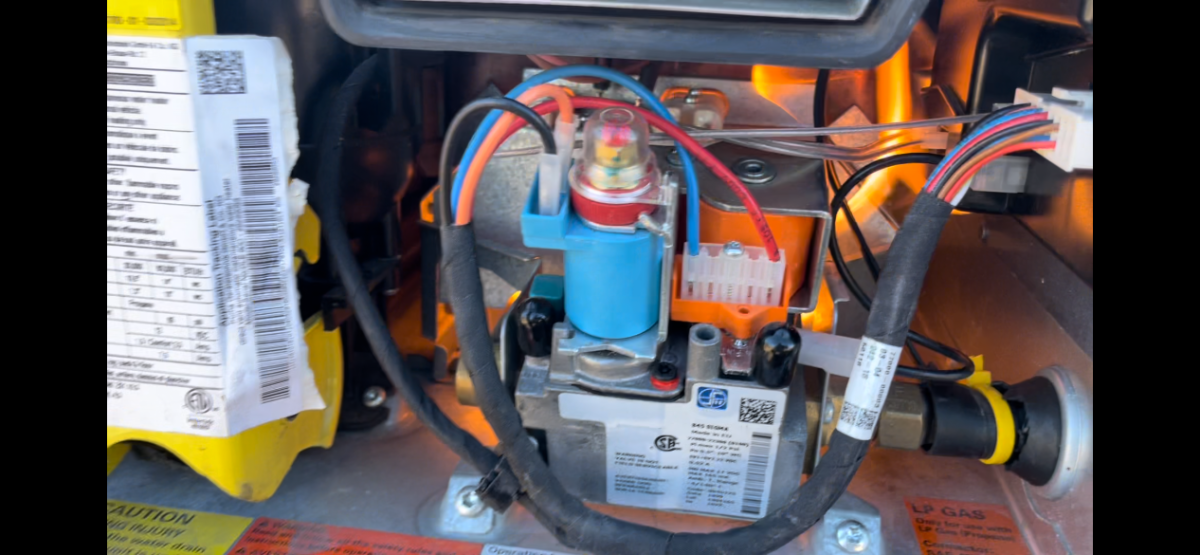
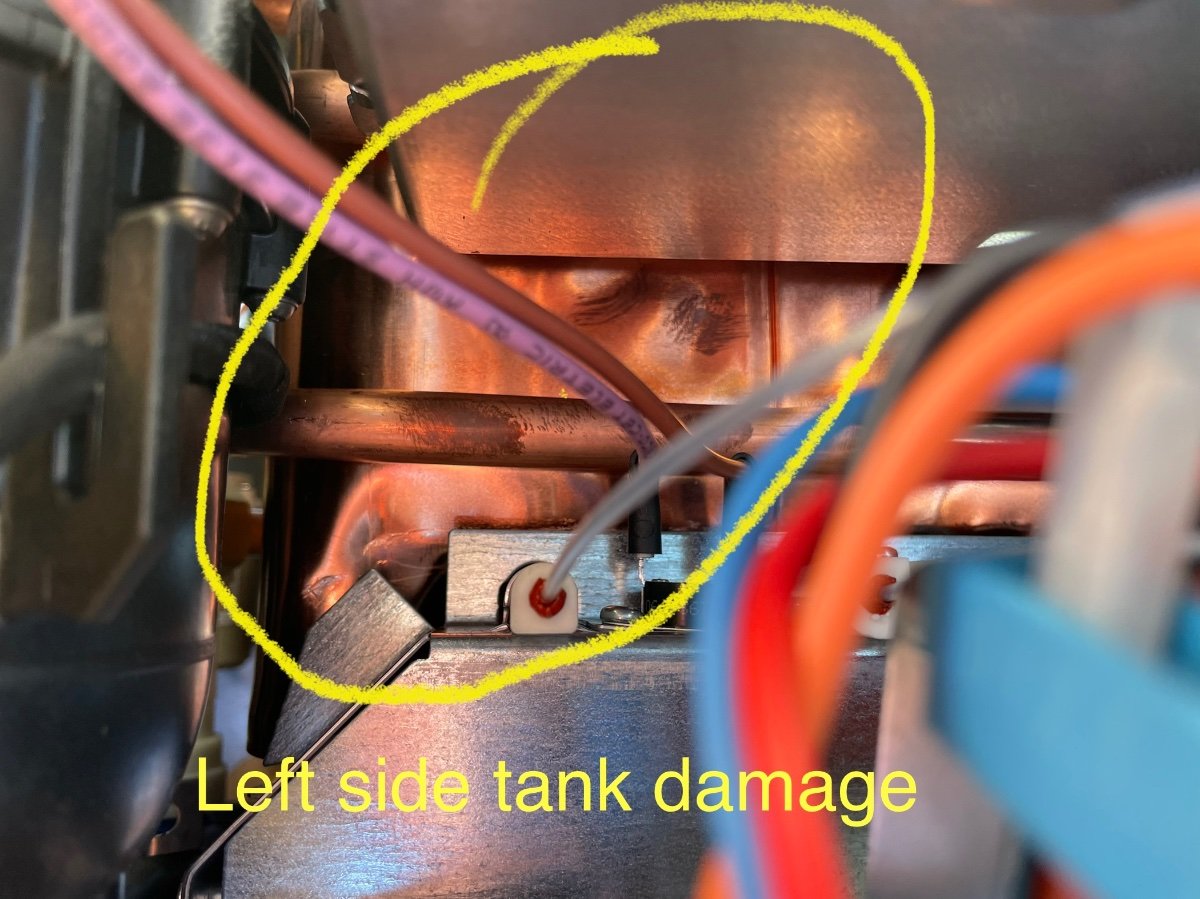
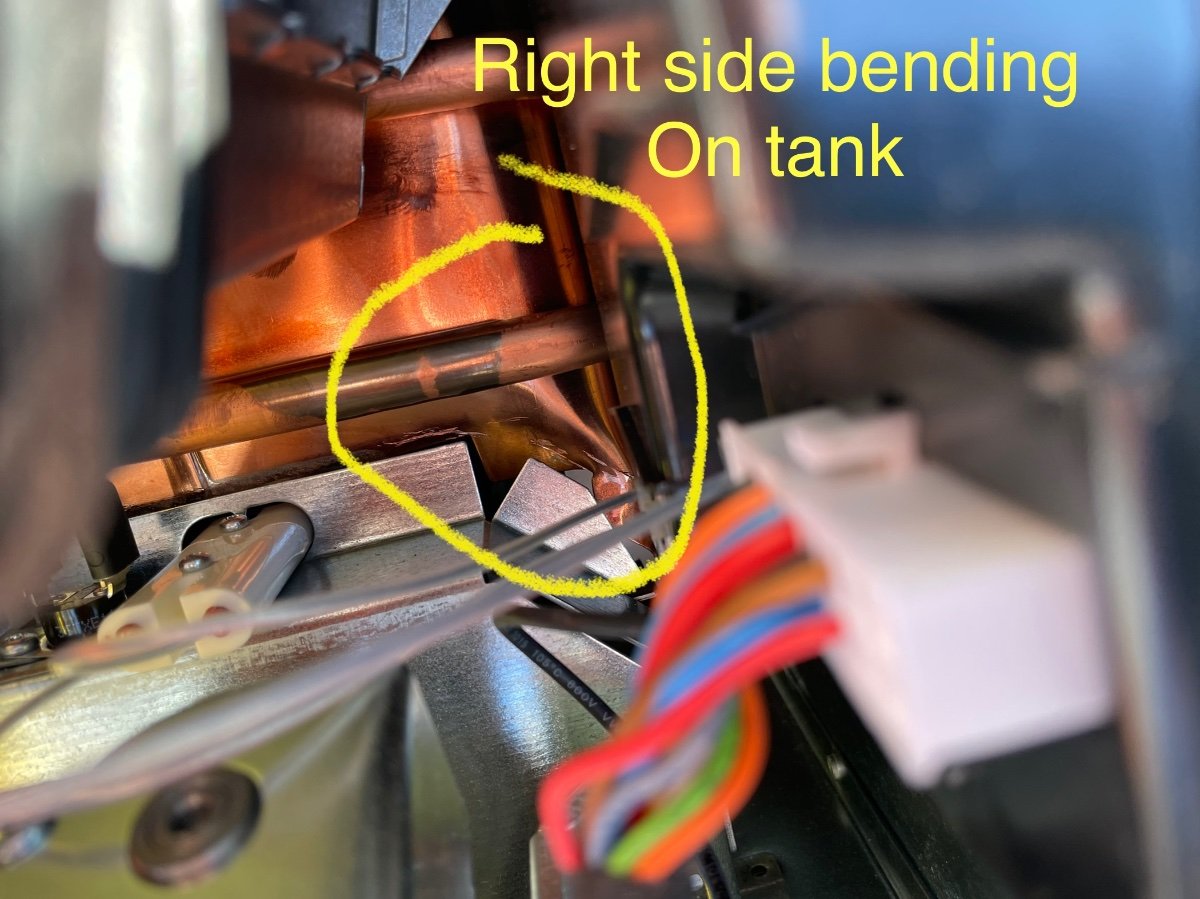
Update: PSA - Truma Water Heater Situation: On our Hull 505 -Elite II the Truma water heater failed with fire coming outside the box and starting to melt wiring etc. (Pix attached) Symptoms: When the Truma was igniting we heard unusually loud huffing noises followed by a loud whoosh. Every so often there would be a loud whoosh and a pop. (Blowing itself out.) On one incident I went outside, opened the door and saw flames outside the burner assembly engulfing controls. I turned off unit and flames stopped. Cause? It appears the burner and the copper flue box may have gotten out of alignment after 13k miles on chassis. Given the plastic smell I decided to replace the whole unit. Truma response: 1) stated it’s past warranty, so no $ for replacement, but they asked I ship the unit back to them for post mortem. 2) Cost $110 to ship back. 3)They said they will cover shipping. Replacement: A new replacement unit was sold and shipped to us by Oliver Service. (Great response). Removal and replacement was a 3 hour job with a mobile tech from our adjoining campsite helping where we are staying at Desert Hotsprings CA. Checked gas pressure at unit before installing and all was correct. New unit working well. After removal and visual check I couldn’t see any obvious defects in the old unit, other than the lower edges of the copper burner box were slightly folded inward. Maybe Truma can see something when they tear into the unit. As soon as I hear any resolution from Truma, I’ll provide an update. I plan to file with NHTSA after the Truma update.
-
Greetings from new owner in Washington State
Galway Girl replied to Landsplash's topic in Introduce Yourself
Welcome from Hull 505 in Everett Wa our blog features many NW campsites https://4-ever-hitched.com/trip-to-oliver-factory -
We have a pair of AGM batteries and a dc/dc charger in the back of our truck. One battery would run the fridge for 5 days, 2 gets us 10 days. That’s without bothering to start the truck. I’ve thought about putting a solar panel on our truck but we’ve been on the road 6 months and never ran the batteries down.
-
I’ve been using both my hand and recently my laser temp reader. I pour a cup of hot water on the tank and scan down the side until the temp drops and stays solid. Works well.
-
Example pix in survey. 1) One concern we shared is that for shorter people that puts the Conv/uW too high for safely taking out hot foods. 2) We would be fine with an under counter compressor fridge as it has little more cu ft than the existing fridge. 3) We carry a ARB ac/dc compressor chest fridge in the back of our truck for extra space and it’s been a great combo on our 7 month road trip. 4) As to the quieter a/c would be great in hot locations. Doubt if we would upgrade immediately, long way to Hohenwald from WA.
-
Update: Jan 19, 2022 Due to a shipping damage issue a second replacement unit is on its way by Jan 24. It appears the packaging was not adequate protection for the unit and the case was bent in a way that the burner box punched into the tank (copper). When we remove the old unit next week, I’ll take detailed removal pix and of the failed components as possible. Truma has now requested that I ship the failed unit back to them directly. They are in discussions with Oliver and wanted another failed unit for dissection. Truma service said they’ve only seen this on Oliver trailers…and are trying to see if there’s a mounting change required. The current mounting method seems pretty sturdy.. At this point I’ve paid Oliver for a replacement unit as the Truma is past warranty. Truma said they would refund shipping costs for the defective unit. After their assessment, then we can discuss any refunds from Truma. More as it transpires. Winegard DtV Fail: On another note, my Wingard DtV antenna failed at the antenna head (shorted main board) and Wingard sent me a new style antenna as a lifetime warranty replacement no charge ( I will do a separate post on that when I do the repair in March.
-
Update: Flame out I’m getting great support from Oliver. This has happened a few times, the burner supports break and drop down causing the flames to direct outside the burner box enclosure. we smelled plastic and flipped off the outside switch on the unit which shut down the gas supply and the flames stopped. I now notice the door fins are warped from the heat. Oliver will ship us a full unit for field replacement, then ship back old unit for inspection by Oliver and Truma. I will discuss extended warranty claim with Truma as this shouldn’t be a wear out failure. More as it transpires. Craig
- 15 replies
-
- 11
-

-

-
FullSizeRender.mov Our hull 505 in service Aug 2019 has a major Truma burner fail at 29 months. (2 yr wty) The burner box no longer contains flames on startup and we smelled burning plastic before we shut it down. Pix from video shows symptom of flames engulfing wiring and controls. We will try to get a whole new unit for install and send dead one back to Truma for analysis. I’ll be asking Truma for some adjustment to warranty. we are lucky this happens while daylight and I could take action immediately.Any one else had the same promlem? Is it a design flaw? Doesn’t seem like an Aging type of failure.
-
Our Winegard Omni HDTV antenna has failed. Symptom: when turning on the amplifier the red led blinks on then off. Winegard tech support had me disconnect the antenna lead to the amplifier and press the on button. The amp stays on. So they said the fault is in the coax between the antenna and the amplifier. For now I’ll live without the hdtv off air antenna as I’m on the road and can’t fully assess the issue. There is a note in the antenna installation manual that says: “Warning: Once the head and pedestal are connected, the head cannot be removed without incurring damage.“ When I get home in February I’ll repost the end of this story.
-
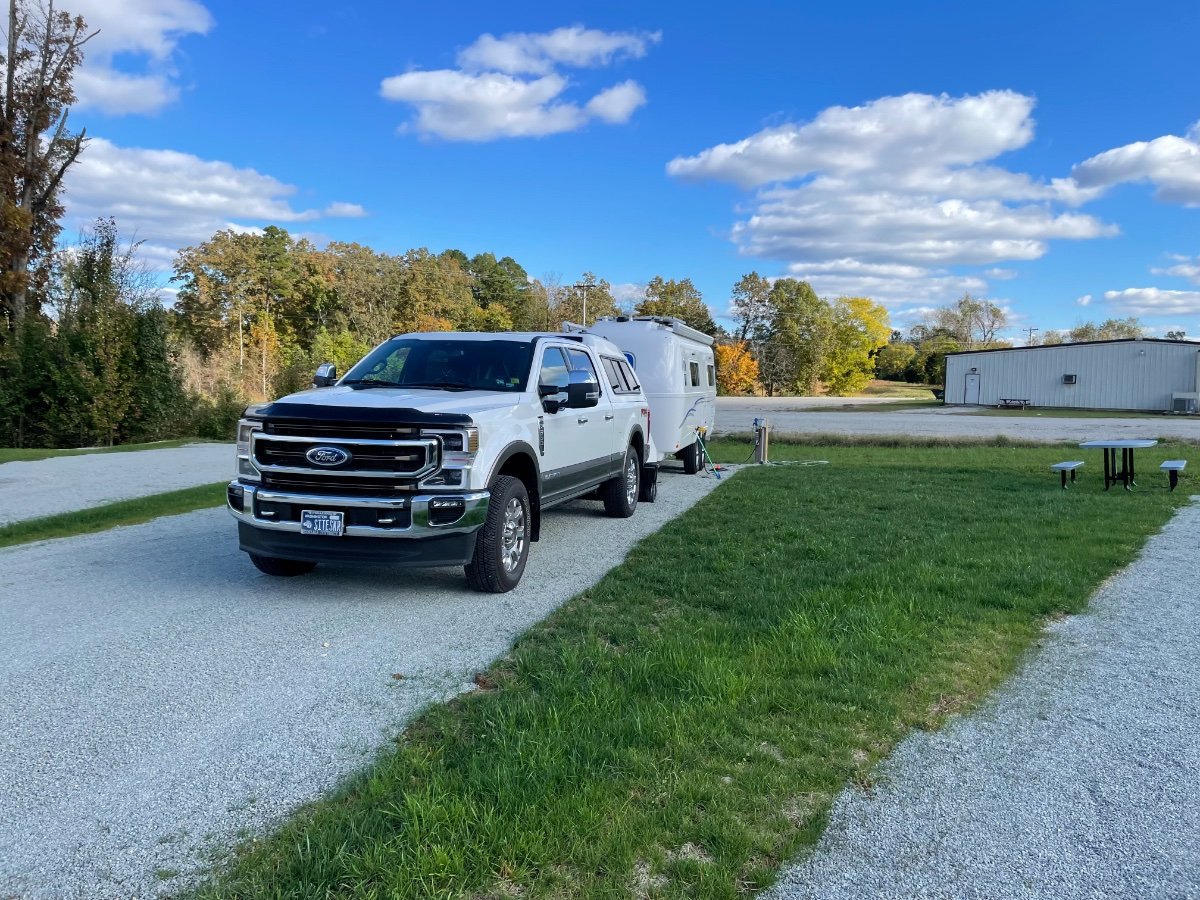
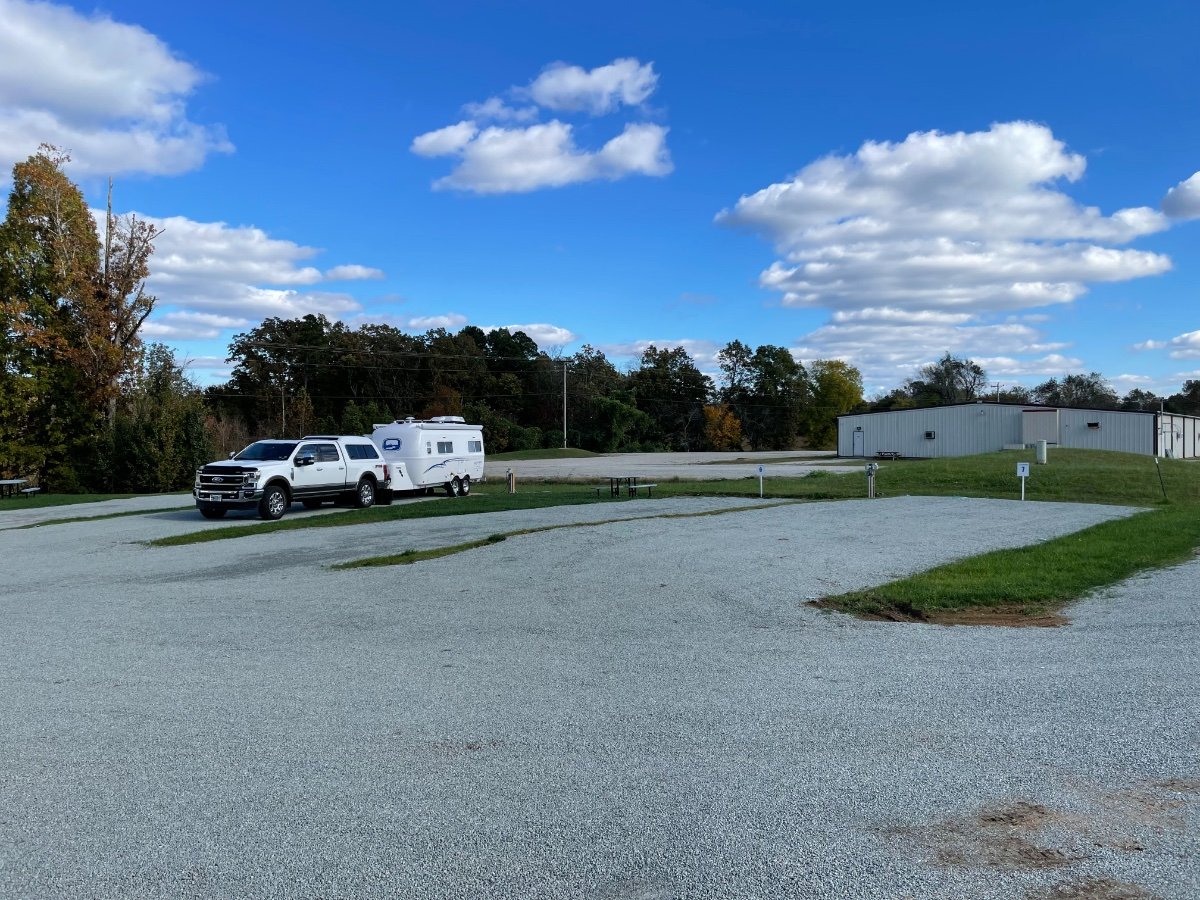
They are the delivery units for the week. Pix was on a Monday. We saw 4 delivered in the 2 days we were there.
-
Yes they are. The camping spots are very level with crushed gravel topping.