Galway Girl
-
Posts
750 -
Joined
-
Last visited
-
Days Won
24
Everything posted by Galway Girl
-
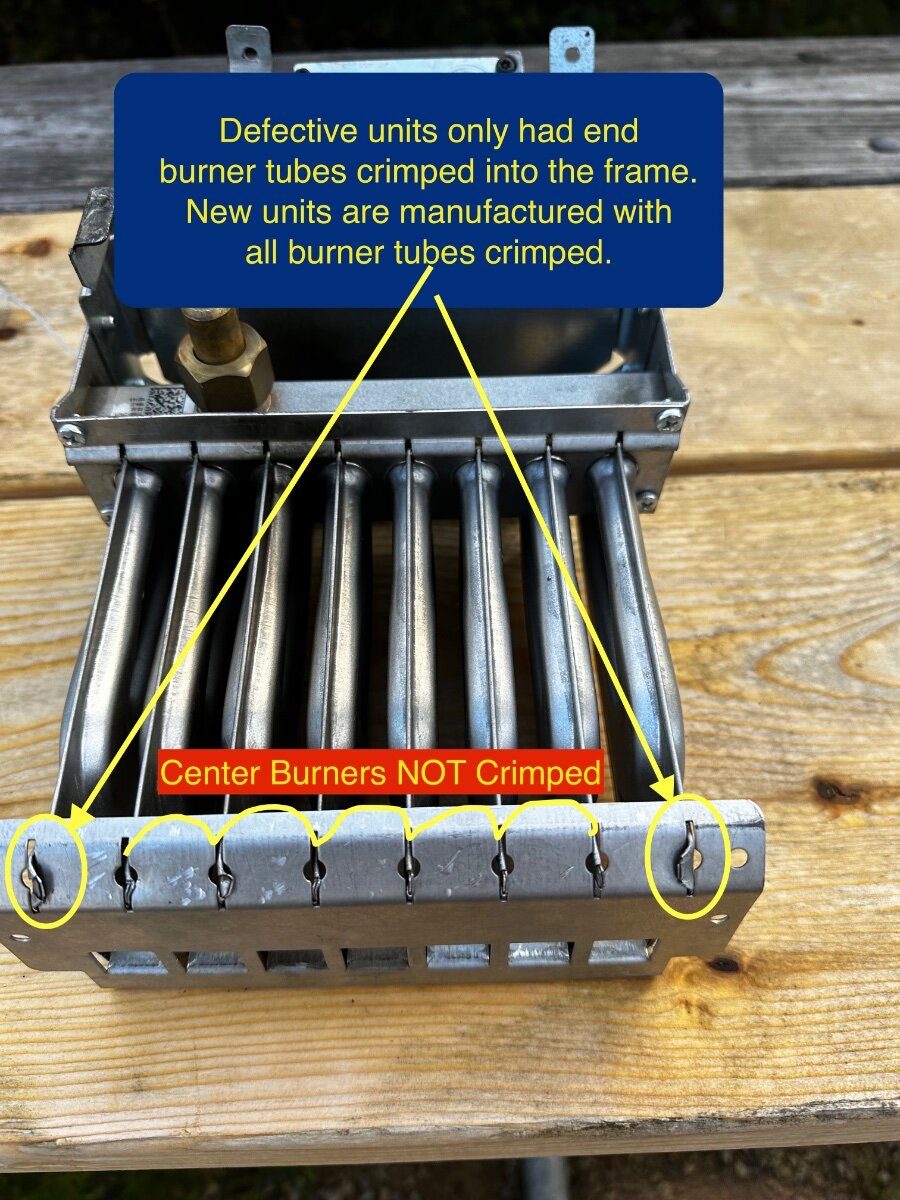
I'll repost this picture to illustrate the purpose of the recall. The recall is for water heater burner assemblies manufactured in the date range of the recall. Those burner assemblies only had the two END burners crimped to the frame. (See below pix.) The result is after many miles of vibration or less on rough roads, the burner tubes are susceptible to falling out out of the frame. When that happens, gas from the feed orfice that is no longer aligned with a burner tube pumps gas directly into the burner chamber. On ignition you'll hear an explosive (whoosh/pop) type of ignition. Most commonly that ignition also blows out the burner...and then the unit recycles as it try's again to light the heater. Owners of units in the recall range should carefully listen and watch for unusual ignition events...which is a sign that a burner tube has fallen off the frame. All new units being manufactured have ALL the burner tubes crimped in place. The recalled units are replaced with newer burners with all the burners crimped to the frame. Oliver is getting units from Truma but at a rate of 10-15/month...so patience is required for repairs. Follow instructions in the Oliver Recall to get your unit repaired. They can only send replacement burners to qualified repair centers. For the curious, here's a pix of an actual "ignition event" when a burner tube has fallen off: As you see the flame is rather large and extends outside the burn chamber.

-
David and Gail: Welcome and happy travels. Here's our web page https://4-ever-hitched.com/trips-overview showing our trips for inspiration and ideas and well tested gear for your Oliver. If you ever come out west let us know. Craig & Rose Hull 505 https://4-ever-hitched.com/trips-overview
-

Greetings from Northern Virginia, new owner of Hull #1056
Galway Girl replied to EurekaJ's topic in Introduce Yourself
Welcome and happy travels. Here's our web page showing our trips for inspiration and ideas. If you ever come out west let us know. Craig & Rose Hull 505 https://4-ever-hitched.com/trips-overview
-
I sent a message asking the folks at RV Trip wizard if they had a feature to overlay multiple trips on one map...and they said no but to try exporting to Google Maps and using layers....here's a result as an example of what's possible, I'm still learning. So Google Maps allows direct import of the .gpx files that are output by RV Trip wizard. Normally the .gpx are used to load into Garmin devices, but Google Maps reads them as well. I started by opening up a new map in Google Maps created "My Map" as a BASE map with the first 2019 trip where we picked up the trailer, and added a layer for each subsequent main trip. I found that 6 is the maximum number of individual layers you can add in Google Maps. There are controls to change the type of marker, color, line width etc. There are also controls to turn on/off the titles for each stop. To create more graphic maps, Google enables embedding photos by geotag into the maps as well. I'm considering adding pictures of each campsite for each stop to see if it's at all useful. The map below lets us see big holes in our travel...so we've still got miles to go before we sleep! Craig & Rose Hull 505 - Galway Girl
-
I'll close this topic with the following update: We used the EZ Pass that we ordered through the mail via the NY Tollway Authority website. We mounted and activated the transponder when we crossed in the US from Canada at Toronto/Buffalo and it worked like a champ all through the eastern states and Florida. We never had to worry about the trailer as all the drive thru sites correctly tolled our setup. Now that we're back on the west coast...not sure what to do with the Transponder. We probably need to de-register or something as we'll not be using it for quite a while. Craig Short Hull 505
-
Probably sometime in late March as we're not traveling right now (at least with the trailer) and I want a bit warmer weather before I tackle the project.I've already ordered the tracing paper, and the Oracal Vinyl in our trailers colors to cut out the stripes to match our existing door and I'm just waiting on weather. After I tear out the old door, I'm going to try disassembling it to see if it would be possible to simply 're-skin" the inner door lining as someone has suggested. If that's possible I may very well re-skin it and keep it as a backup door. Craig
-
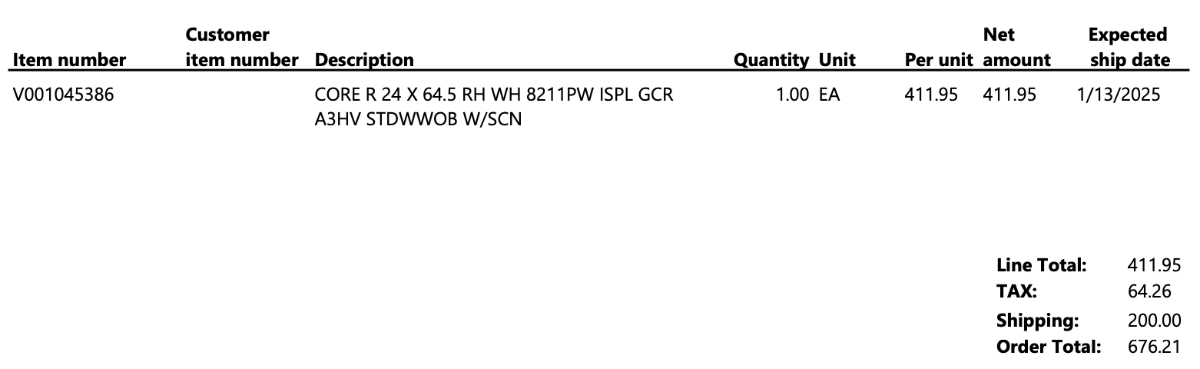
Topgun2: About $672.00 for the DOOR CORE, (not the frame and hinges). Read on for more details of part number, price etc. Our door failure...as reported elsewhere and here for convenience. Note - we added the friction hinges (not shown) before the failure happened...but i bet the door frame was already weakened due a wind event and flexed enough that the door inner panel slid out of the narrow track and then cracked and buckled. Temporary fix with white Gorilla Tape after massaging the inner lining back into the frame slot. I was told by Mike at Service that a new door cost is $1600.00 installed at the Service Center. (NOTE: Mike was including the whole FRAME and Door replacement as that's what they have on hand.) I checked with Lippert and they said you can just replace the door CORE which includes the window and standard manual handle. So I went with that and ordered the door, which by the way is custom order, non-returnable, non refundable. Here is a PDF of the specific door core replacement instructions. Requires 2 people for for best install, and about 45 Min including swapping out handle for keypad lock. Door Core Replacment Instr.pdf HOW TO Order a Door thru Lippert: Contact at Lippert: Alicia N. Care Center Customer Service Representative P: 432-LIPPERT | f: 537.534.7161 E: customerservice@lci1.com Lippert Alicia has configured a special part number for the Oliver EII door core only, this does not include any hardware for the door. Once you contact Lippert they set pricing and provide you with a quote, this usually takes around 48 hours. The door arrived in about 4-6 weeks ARO. V001045386 - CORE R 24 X 64.5 RH WH 8211PW ISPL GCR A3HV STDWWOB W/SCN [Core Only - Does not include any hardware for the door] ccd-0006252.pdf They also can provide a quote for the complete door replacement which includes removing the frame and threshold. V000629008 - 8070R 24 X 64.5 RH FW WH 8211PW ISPL GCR A3HV STDWWOB WSCD WKP NT OPSLD [Complete Door Replacement] After the snow melts here and the sun is out and warm, I will do the replacement project and post an update. Craig Short (Galway Girl) Hull 505
-
I had the thought that adding the two friction hinges was the cause of our problem, because it took a lot more force to open the door....but I think our door had been flexed by wind events in the past and that may have started the problem and over time it just got worse. So my question and asking folks to vote: Do I put the door back on A) WITH" or B) WITHOUT.... the friction hinges.
-
Our original AGM's lasted about 2 years (with 1 year warranty) from the battery maker. They were OK until we drew them well below the 60% point a couple times. After trying multiple ways to bring them back to life, a friend of ours (who worked at Interstate Batteries local HQ) had me bring them in for testing. All 4 - 6V AGM's were toast. That's what triggered me to go do the Lithium Conversion. All that said, given a Nov 2024 purchase date, you should be within some warranty either with the battery maker or with Oliver. Start with Oliver with a service ticket and see if you can get them replaced via some warranty. Also here's my blog page on the conversion from AGM to Lithium with more details: https://4-ever-hitched.com/ggs-blog/f/lithium-battery-upgrade?blogcategory=Electrical+Upgrades Sandman - if you have a chance, please update your signature page to include details about which trailer you own and which options you have installed. That way we can look at the signature and see more quickly how we might help answer questions.
-
From what I've seen so far: Oliver has reported this to NHTSA and is self recalling for their own units as an extra precaution. The NHTSA and Truma appear to still be in negotiations about a larger industry wide recall. CS
-
pix may help clarify Burner unit shown below only has end 2 tabs bent to crimp unit to frame. This is the old design being recalled. Newer units (being replaced in recall service) have all tabs crimped.
-
Also ---- here is our post on the 3rd failure we had with Truma ...this one is the exact problem outlined in the recall. (The lack of burner tubes crimping.) SO for Truma two issues so far: 1) The first issue was that the BURNER assembly feed tube connection wasn't properly torqued at the factory. This would cause the feet tube nut to back off and eventually spray out fuel like crazy. This was fixed by a tooling change at the truma factory. In our case that repair process is to remove the burner assembly and tighten the nut. 2) The second issue is that the burner assembly tubes were not crimped on all 8 burners only the end 2. That's been fixed by Truma and all new units meet this spec.
-
For those not able to read the NHTSA report here's an excerpt of the timeline of events leading to the recall. All new burner units are shipped from Truma with all 8 burner tube tabs crimped. (Ours literally fell apart on the road at one point so I did a self repair of the assembly.) ******* NHTSA Recorded Chronology : 2/17/22 Truma (Steve Bayne) reported during a OEM Baseline review approximately over the scope of 300 units, 8 units (2.5%) have experienced burner issues. Two warranty units with burners coming apart were| picked up during this onsite visit for return to Germany for evaluation. 2/17/22 - 12/31/22 Additional 4 customers reported burner failures. 7/18/22 Oliver request Truma's investigation reports from two units evaluated in Germany. 11/21/22 Truma (Mark Howlett) notified Oliver Travel Trailers (Paul Cameron) Germany made a design|| change to the burner assembly February 2022. Revision included the burner assembly tabs changed from two to all eight tabs folded. Truma concluded the safety features incorporated into the system, risk and severity is low. Safety factors include a) flame recognition sensor b) burner over temp switch and c) the housing contains a thermal event. 11/28/22 Oliver modified the support for the water heater and installed water heaters with only two of the eight tabs folded. On 4-Apr-24 these two units were reported in warrany for burner bracket assembly failures. 2/8/23 - present Oliver has installed Truma water heaters with modified burner bracket assemblies with eight tabs folded, no failures for the burner assembly has been reported to date. 1/3/24 - 7/17/24 Customers with water heaters containing burner bracket assemblies with two tabs folded replaced under warranty experienced repeat burner bracket failures. 11/13/24 Oliver Travel Trailers determined to replace all Truma water heater burner assemblies with two tabs folded to the confirmed eight tabs folded retention feature. ******
-
There is now a recall from Oliver on this burner assembly. Effected hull numbers should be getting Oliver issued recall letters. ***** text from letter showing SN range of effective water heaters (full letter below) ***** Dear Valued Customer, This notice is sent to you in accordance with the National Highway Traffic and Motor Vehicle Safety Act. Oliver Travel Trailers has decided that a defect which relates to motor vehicle safety exists in certain 2016 – 2024 Legacy Elite I and Legacy Elite II travel trailers manufactured between April 25, 2016, and February 8, 2023. WHAT IS THE DEFECT? The Truma water heater burner bracket assembly may become loose. **NOTE by Craig - The effected burner assembly tubes were not ALL crimped in place during manufacture, only the ones on each end were crimped. The TRUMA Mfg line has made a mfg line change and now ALL tubes are crimped in place. New burners for the recall will meet this standard.** EVALUATION OF THE RISK TO THE VEHICLE AND OPERATOR(S) RELATED TO THE RECALL. Legacy Elite I and Legacy Elite II equipped with a Truma water heater with a loose burner bracket assembly may allow ignition failures, wire damage, and risk of a brief flame discharge, increasing the risk of a fire. HOW DO I KNOW IF MY TRAVEL TRAILER IS PART OF THE 24V876 RECALL? 1. Find the water heater serial number located on the front cover. (see below) The water heater with serial number less than DLE60C-33096055 is nonconforming. 2. If you are unsure, call 1-888-526-3978 or email us at ottwarranty@olivertraveltrailers.com to confirm that your Truma water heater is one in the population of recalled units for Recall 24V876. WHAT IS THE REMEDY? Your Legacy Elite I or Legacy Elite II was manufactured within the affected period using this component. Your unit must be inspected to ensure the Truma water heater is not within the recall population as identified by the Truma model-serial number. The remedy will be the replacement of the water heater burner assembly, free of charge. The replacement water heater burner assembly will be sent with instructions to complete the installation by a qualified RV technician. The replacement should take approximately one-half hour to complete. Oliver Travel Trailers will cover the cost for the remedy repair. Water heater burner assemblies can be replaced at an authorized service center. WHAT IF YOU HAVE PREVIOUSLY PAID FOR REPAIRS FOR THIS PARTICULAR CONDITION? If you have already paid for a repair that is within the scope of this defect under recall, you still need to have this recall inspected and/or performed to ensure the correct parts and procedures were utilized. Additionally, you may be eligible for a refund of previously paid repairs. Refunds will only be provided for repairs performed within the scope of the defect under recall. Please send the service invoice to the following address: Oliver Travel Trailers Atten: OTT QUALITY MANAGER 609 Swan Ave. Hohenwald, TN 38462 Phone: 1-888-526-3978 Email: OTTWarranty@olivertraveltrailers.com Below is attached it the NhTSA report on the topic. RCLRPT-24V876-7998.PDF Below attached is the generic recall letter from Oliver...when mailed to you it has your VIN # inserted. RCONL-24V876-1556.pdfRCONL-24V876-1556.pdf Hope this is useful info. I'm still waiting on a reply from Oliver on when/how I can get the parts for repair.
-
Propane Tank Connector Ratings Question
Galway Girl replied to carnivore's topic in Mechanical & Technical Tips
Thanks for the tips and questions. Here's a good overview video on the topic.- 1 reply
-
- 6
-

-

-
Recall on Truma Water Heater - From Oliver
Galway Girl replied to Galway Girl's topic in Ollie Modifications
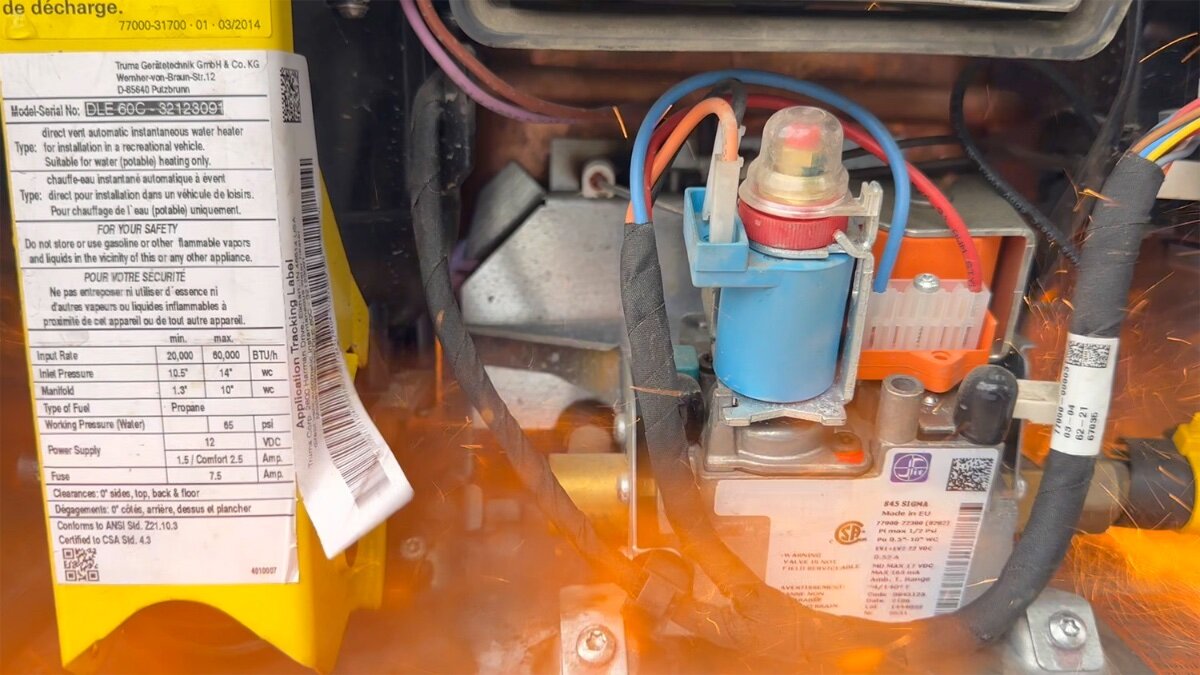
In our 2019 Hull 505 the discharge port points to the left wall of the unit. That is a threaded opening so I suppose a hose could be attached to direct the stream to another location.
-
As some may recall we've had 2 separate water heater fires in our 2019 EII. In the first case, the water heater was swapped out and the failing unit shipped to Germany for teardown by Truma. The second unit was also defective and had the same behavior after a year on the road. Oliver and the NHTSA have collaborated with Truma on a recall for Truma Water Heaters. Individual Notices to owners are going out in December and January, and I received a letter last week which explains the issue and repair strategy. Attached is the NHTSA Summary Report including the chronology of events. RCLRPT-24V876-7296.PDF The issue has been determined to be inadequate crimping of the burner assembly in manufacturing. This enables the burner tubes to rattle loose and eventually lead to fires in the firebox from tubes that are no longer contained. The manufacturing process has been changed to crimp all the tubes into place and new burner assemblies are being supplied for recall that meet the newer manufacturing process. The recall covers Truma SN less than DLE60C-33096055 (In my case the production patch SN was DLE60C-32123091) Here is the template letter from Oliver to consumers. The specifics of each trailer are unique so you may want to read this generic one to see the Serial Number range for recalled units and compare it to the Truma in your Hull. RCONL-24V876-1556.pdf Oliver will work with you on getting the repair completed. Craig Short Hull 505 - 2019 EII
-
I sent you a PM if you want to discuss. Coming from Tyler you could start by going up to Lake Thunderbird State Park just before OK City, then head on the highway west. One stop in Oklahoma that's a nice museum is the Stafford Air & Space Museum. (Also a harnest host site). If you like horses, Amarillo has the American Quarter Horse Museum along side I40. They have parking outside large enough for trailers and many folks have horse trailers in tow. The midway point for the route is here - 301 I-40, Adrian, TX 79001 You can pull off the highway before and then rejoin I40 to continue onward. Just before the town of Holbrook on I40 is the Petrified National Park. Location: 35.06768055675693, -109.77800719186772 Worth a 1/2 or Full day visit and perfectly doable with the Trailer in Tow. We've stayed at Holbrook KOA which is just after the NP and found them very friendly and a good stopping point for an evening. Next up is Winslow , and very near to Winslow is Homolovi State Park. Depending on how far you want to drive you can go as short as 150 miles...and see a lot...or 300 and see major sites. Contact me on PM if you want to talk through. Merry Christmas. Craig
-
Our EII Hull 505- 2019 had been having some weird intermittent USB action on the street side of the trailer. When I checked for continuity across the 20A 12V Fuse (Street Side) in the rear attic it showed all OK. I removed the 4 screws that hold in the radio, pulled it out and checked the voltage on the connectors for the USB plug leads and read 2V. I went back, pulled the fuse and measured a resistance that was pretty high and noticed discoloration in the fuse body... It turns out that fuse has partially blown. I replaced the fuse and measured voltage at 13.4V and when the power and ground reinstalled the USB ports came alive. Upon re-installation of the radio I noticed the bottom right of 4 screws was not actually going into any fiberglass. The hole cutout for the radio wasn't a clean rectangle and that bottom right screw is floating in air. I'll be trying to find some c-clips to use as a backer for that screw. Craig - Hull 505 2019 EII
-
- 8
-
-
-
Update: I was able to work directly with Lippert to order a "door core" which is just the door including the window. (The door frame, hinges, and threshold all stay in place, and only the door core is replaced.) The factory wanted $1600.00+ taxes for the replacement, and direct order cost is $676.21. ($1k savings) The installation is like replacing a pre-hung door so I feel confident I can do this repair at home. Hope this helps anyone else who requires a door repair. Be careful to look at how your door hinges are attached as they have changed from older models to newer models. When I do the replacement I'll repost with photos. Lippert Part Order Detail: For Hull 505 (2019 Model Year) Lippert Custom Part : V001045386 -CORE R 24 X 64.5 RH WH 8211PW ISPL GCR A3HV STDWWOB W/SCN $411.95 + to my location shipping $264.26 = Total $676.21 Lead time is 5-10 business days for production + transit. Shipping is calculated specific to end location at the time of ordering. To place an order please call 432-Lippert (432) 547-7378 The installation instructions they sent for removal of the door core: ccd-0006252.pdf
-
Last tear down of our 5 sided clam we made a mistake and somehow ended up during the next setup having the clam partially "inside out". I'd never saw that happen before. We ended up releasing a few legs from the pockets and and worked sequentially around the perimeter getting the clam rightsize out. That was quite an an origami project. Once setup again I noticed one of the front door braces had lost it's "top corner bolt" and may have been the culprit for getting it turned inside out. We've also ordered a 4 sided version for shorter trips.
-
I'm in touch with Lippert about the door. They are going to provide me a quote for the "door CORE" and a separate one for the whole door assembly. The door CORE would not include hinges, door frames and jamb (which is already attached to the trailer) or the latch. I would unscrew the existing door from the hinges, take it off and replace with a new core and re-use my latch/lock assembly. Once I get the quote and part numbers I'll amend them to this post. Craig
-
Just retraced the route from Oklahoma City into California 2 weeks back. It was pretty chilly at nights on that whole route. From our 2022 adventure: https://4-ever-hitched.com/route-66-2022 Craig
-
I heard recently from Jason Essary : "Just an FYI, Rodney is transitioning over to a new position within the Oliver companies and I will be taking on his role here. \He has already started training in his new position and will be here in a limited capacity the rest of this year."
-
Yes, in our new fan it is hard to open because of the stress. To open we have to push the black release button and the opposite side of the handle at the same time. The new fan has a different sound from the original. A bit louder l think.