Rivernerd
-
Posts
966 -
Joined
-
Last visited
-
Days Won
18
Everything posted by Rivernerd
-
Wow! That is very different from the brackets installed in our Hull #1291. Ours are steel, not aluminum, and appear to me to be robotically welded angle "iron" (steel). See photo below. Given the significance of the difference, and the impact on jack stability, maybe this last part should be broken off into its own thread. Maybe "Aluminum vs. Steel Jack Brackets"?

-

Truma Lamella Furnace Vent Covers
Rivernerd replied to Rivernerd's topic in Mechanical & Technical Tips
Interesting suggestion. I just installed three of the 4" Valterra vents as return air vents in Hull #1291. I agree that they are "tough as nails and very nice looking." 2" to 4" adapters are readily available, for well under $20. https://www.amazon.com/Woodstock-D4250-4-Inch-2-Inch-Reducer/dp/B00AX5I9DM I have no idea what increasing vent size from 2" to 4' would do to the dynamic balance of the heating system. But for now, given the ease and relatively low cost of swapping out the Lamella vent covers, I am inclined to see how they hold up over years of use, then decide if it is worth investing the time and $$$ required to make the switch to the 4" Valterra vent covers. Also, I would not be surprised if, after Truma gets lots of failures like ours, better quality Lamella vent covers become available in the near future. Thanks for the idea!
-
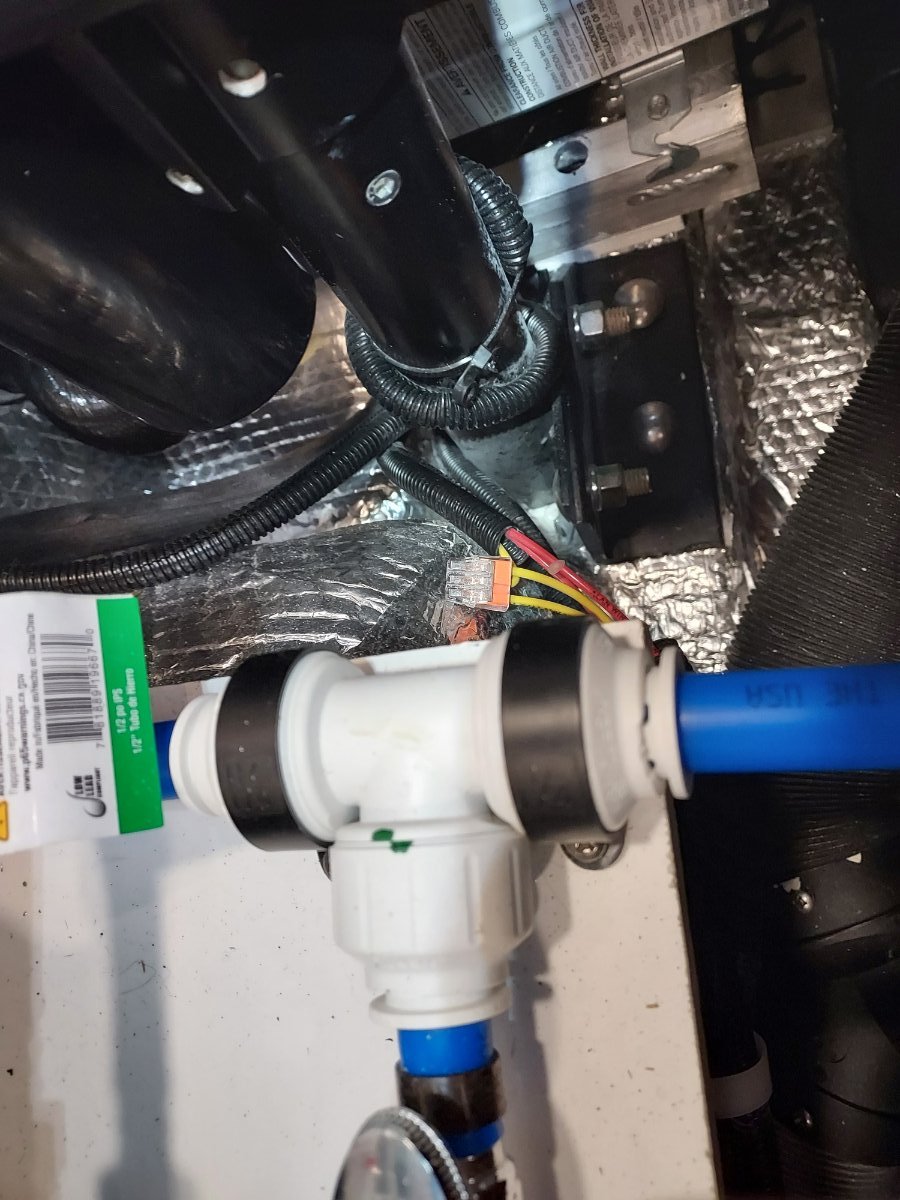
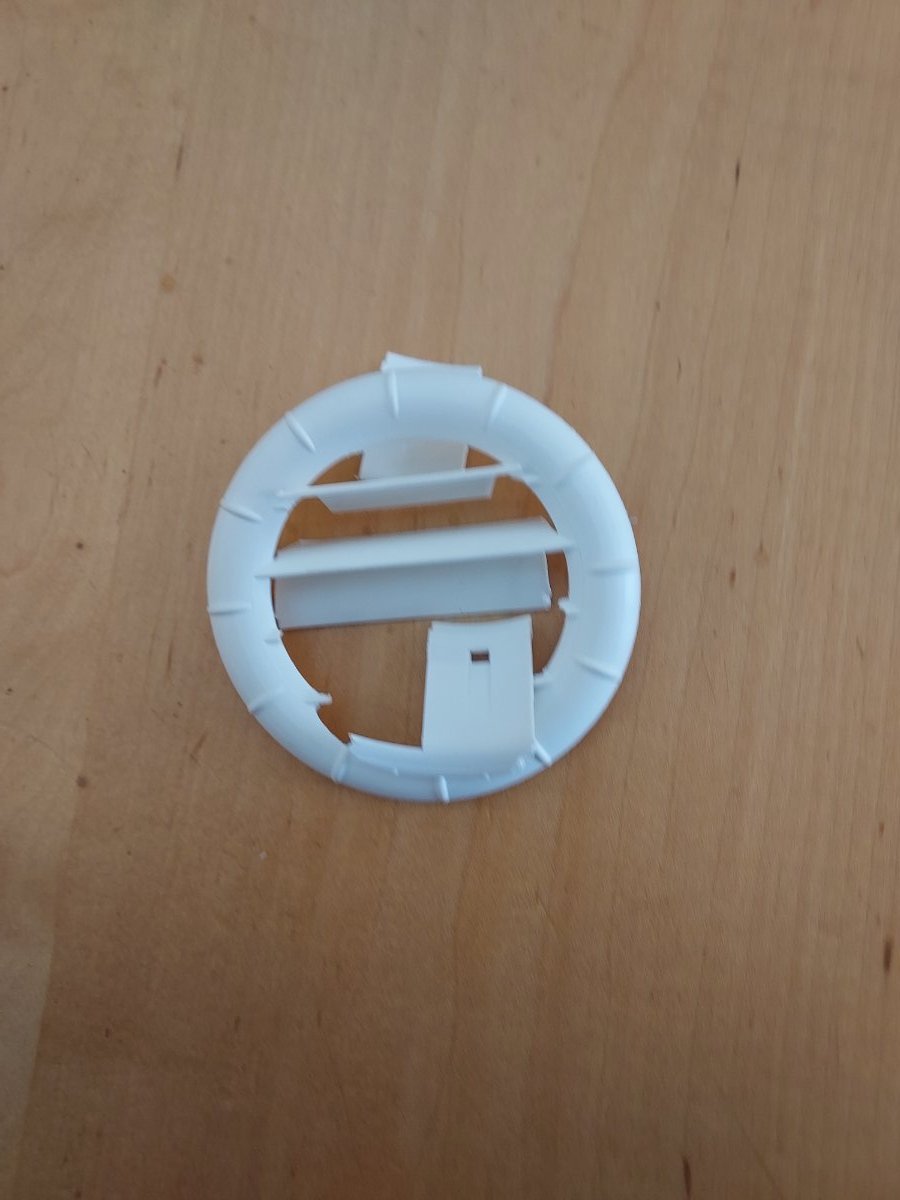
The vent covers Oliver is installing with the new Truma Varioheat furnaces are called "Lamella." One of the louvers on the Lamella furnace supply vent cover below the galley sink in our Hull #1291 broke on our way home from Hohenwald to Idaho. See photo below. I recently submitted a warranty service ticket to Oliver, and received a prompt response. I was advised that Oliver had to order a replacement vent cover from Truma, then forward it on to me. I received the replacement Lamella vent cover yesterday. I applaud Oliver for their prompt, and effective warranty response. When removing the original vent cover as gently as I could with a plastic pry bar today, it broke in more than one place. See photo below. The replacement vent cover was easy to install; it just clips in. After inspection, I concluded that the original Lamella vent covers are quite thin, and made from brittle plastic. One light bump with a shoe toe is enough to break a louver. But, they are easy to replace, and inexpensive to purchase. Once the Oliver warranty expires, the Lamella covers can be purchased directly from Truma for $3.47 each, plus shipping: https://shop.truma.net/collections/home/products/lamella?variant=39711296880734 We are pleased with the performance of the Truma Varioheat furnace. Although I would recommend to Truma that a more robust, and pliable, plastic be used to make the Lamella vent covers, occasional replacement is a reasonable price to pay for the improved heating system performance provided by the Varioheat.
-
I would also like to see a photo of those welds, so I can compare it to what I have on our Hull #1291.
-
Is the external battery heater switch on top of the batteries still in the "On" position? If so, is your Oliver still potentially exposed to below-freezing temps? The external battery heater system is thermostatically controlled to keep the temp of the batteries above 41 F, using 12V battery power. When ambient temperatures drop below 41 F, the heater turns on. That could be the source of the 12V power draw that is reducing the state of charge on your batteries. In this case, the solution is simple: plug the shore power back in, and keep it plugged in until there is zero risk ambient temps where your trailer is stored will drop below freezing. All three of your batteries should stay fully charged to 13.7V, and protected from freezing, by the constant supply of power to the batteries, and so to the external battery heater. If your external battery heater switch is "Off," (and if so, your trailer should be stored in a temperature-controlled environment), then there must be other 12V power draws on the system. If that is the case, report back so other solutions can be discussed.
-
Which lithium batteries do you have? Lithionics installed by Oliver? If so, see this Storage Procedure published by Lithionics: Lithionics Storage Procedure Rev.7-1.pdf If you have the Lithium Platinum Package, this procedure applies directly to you. If you have the Lithium Pro Package, Oliver installed an external heating pad under the batteries, controlled by a red switch on top of the 3-battery bank. You can connect shore power, leave the red switch "on," and walk away for up to 3 months. The external heater will keep the batteries charged and protected from below-freezing temps, using 12V battery power. The batteries are recharged over that time by the Xantrex Inverter/Charger using shore power. After 3 months, Lithionics recommends discharging, then recharging the batteries, as described in the Long Term Storage paragraph of that Storage Procedure document. Then the batteries are o.k. for another 3 months.
-
Enjoy that 15 MPG towing an LE II with your third-generation 2022 Tundra. We tow our LE II with a second-generation, 2019 Tundra. It tows smoothly, but we only get between 8 and 9 MPG on the interstate.
-
The fact that AGM batteries are sealed is what sold me on them for use with my CPAP machine years ago. I now use LiFePO4 batteries because they are so much lighter, and last so much longer. I had to replace my AGM batteries every 3-4 years to be confident they would not let me down when I most needed them. Of course, flooded batteries last no longer than AGMs, because both use lead/acid chemistry. You don't have to pay $1260 for 400 Ah of AGM batteries. See: https://www.renogy.com/deep-cycle-agm-battery-12-volt-100ah/?gclid=EAIaIQobChMI1Oykr8qE_QIV7AGtBh1NkAFVEAQYASABEgIaWPD_BwE Four of these 100ah batteries would cost about $800. I don't know if these Renogy AGM batteries will fit in the Oliver battery tray, but if not, I'll bet you can find AGMs that will fit for a lot less than the amount you were quoted. And, whatever you buy, ensure they are fresh. All lead/acid batteries have a 3-5 year life from date of manufacture, whether they have sat on a shelf for 1-2 years before sale or not.
-
Agreed. But, one reason I understand Oliver chose Lithionics for its LiFEPO4 batteries is the built-in Battery Management System, which includes "shut down curtain technology" designed to prevent thermal runaway. The Lithionics website says it this way: "Lithionics Battery® uses an organic Lithium-ion Iron Phosphate chemistry in all of our lithium battery models. This naturally safe chemistry is paired with an internal shut down curtain technology inside each lithium cell, preventing any flame or explosion from thermal runaway events." I once had a lithium-ion cell phone battery heat up and expand to more than double its original size. That scared me. LiFEPO4 is one kind of lithium-ion battery, but "ordinary" lithium-ion batteries (like those used in cell phones and laptops) are not LiFEPO4. LiFEPO4 chemistry is much safer, and is not prone to explode, like a laptop battery can. I sleep better at night knowing that the much larger Lithionics batteries in my Elite II are not only LiFEPO4, but have the shut down curtain technology built in.
-
Yes. Once the Xantrex 3000 has been reset to 15A, it its my understanding it can properly handle the 120V, 15A input from your home electrical system. Presuming, of course, that you have the proper 30A locking female to 15A male adapter, like this:
-
No. "Equalization charge" occurs when the Lithionics batteries reach 99% as reported by the Lithionics app. It can take a couple of days connected to shore power. Thereafter, Lithionics does not recommend a "reset of the SOC." But, Lithionics does recommend that when stored, a discharge down to Low Voltage Cutoff (which Donna and Jim Y have just done by leaving the batteries without shore power connection for a couple of months), then recharge back to 100% State of Charge (which they are now in the process of doing), at least once every 6 months.
-
Your Lithium Pro Package is the same one we have in our 2022 Elite II. The "blue lights" are not internal heaters; they are the "On/Off" switches for the batteries. The rings on the switches glow blue when they are on. The "on/off switch that is connected to a red wire that runs above the batteries" controls the external battery heaters that Oliver installs with the Lithium Pro package. The fact that your Lithionics batteries "did turn on for me just now" suggests that they had turned themselves off when they got to the Low Voltage Cutoff point, but that they had sufficient reserve power available so you could turn them back on. Given that fact, I am puzzled by your report that the Lithionics app lists all three batteries in the 81-83% and 12.1-12.2V range. They should not have turned themselves off until the State of Charge got much lower than 80%. More believable is the 25% state-of-charge report from the Xantrex FXC Control app. Regardless of the wildly different state-of-charge numbers between the two apps, the safest course is to recharge before applying any power draws (like the jacks). With the batteries above 32 F, you should be able to recharge them with your generator, as you report is your plan. Monitor the charge level with the Lithionics app. Once the state of charge gets above 90%, it should be safe to operate the jacks, and move the trailer as needed. Once you have access to shore power, I recommend recharging the batteries to 100% state of charge for a couple of days, so the individual cells within the batteries can rebalance. Then, please report your results. Your experience is very helpful to those of us who have that same Lithium Pro Package.
-
Where did you install your Blue Sea 350A switch in your Oliver?
-
I concur. I would check battery voltage with a multimeter first (red lead to positive terminal, black lead to negative). If they are below 12V, the safest method is to charge the batteries with an external charger back up to 12.6V before using them. But, but don't try to recharge your Lithionics batteries if the ambient temperature is below freezing. If you can't wait for above-freezing temps, remove the batteries from the trailer, take them to a warmer place, give them an hour or two to acclimate (to be safe), then attach the external charger and recharge to 12.6V. You will need a charger that has a "lithium" setting, or even a dedicated LiFePO4 charger. If you don't have one, it is time to buy one. Such a charger could be plugged into your generator. Because LiFePO4 batteries require specific charging algorithms, I would not recommend attaching your generator directly to the Lithionics batteries, like you could with lead-acid or AGM batteries. It is much safer to use a lithium-capable charger, plugged into your generator as the 120V power source. It would also be helpful to know which Lithionics package you have. The Platinum Package includes batteries with internal heaters. As noted above, without an external power source, those batteries can self discharge in cold temps trying to keep the batteries above freezing. If you have the Pro Package, Oliver should have installed a 12V external battery heating pad, with a red "on-off' switch mounted on top of the batteries. If that switch was left in the "On" position, and you supplied no external power but left the trailer in a cold environment, then those batteries, too, would have shut down when they ran out of power. Next time you store your Oliver with Lithionics batteries in cold temps, either: (1) supply 120V power so the battery warmers can keep them above freezing without draining the batteries or (2) remove the batteries from the battery box and store them in a temperature controlled place. Any other choice could significantly shorten the life of those expensive Lithionics batteries. Good luck!
-
Observing the remarkable efforts documented above to add solar panel brackets, I am compelled to renew John Davies' recommendation that you consider flexible solar panels. I mounted an 11-watt flexible solar panel on top of a Pelican 1600 case 20 years ago to recharge batteries on extended river trips for my CPAP machine. I still use it. To increase my solar capacity, I added a second Pelican 1600 case, with a somewhat smaller, but more powerful 20-watt solar panel, last year. Flexible solar panels have gotten better and less expensive over the past 20 years. They are commonly mounted on fiberglass boats. If I were in your shoes, I'd be considering large flexible solar panels that can simply be screwed to the outer hull, rather than standard solar panels that require brackets. Below is a link to one option: https://www.renogy.com/350-watt-solar-flexible-kit/?gclid=EAIaIQobChMImNHpxvf5_AIVXjKtBh3qrQMFEAQYASABEgLXR_D_BwE
-
dewdev gets the credit for the suggestion. I just shot the photos!
- 24 replies
-
- 2
-

-
- 7 pin
- tail lights
- (and 2 more)
-
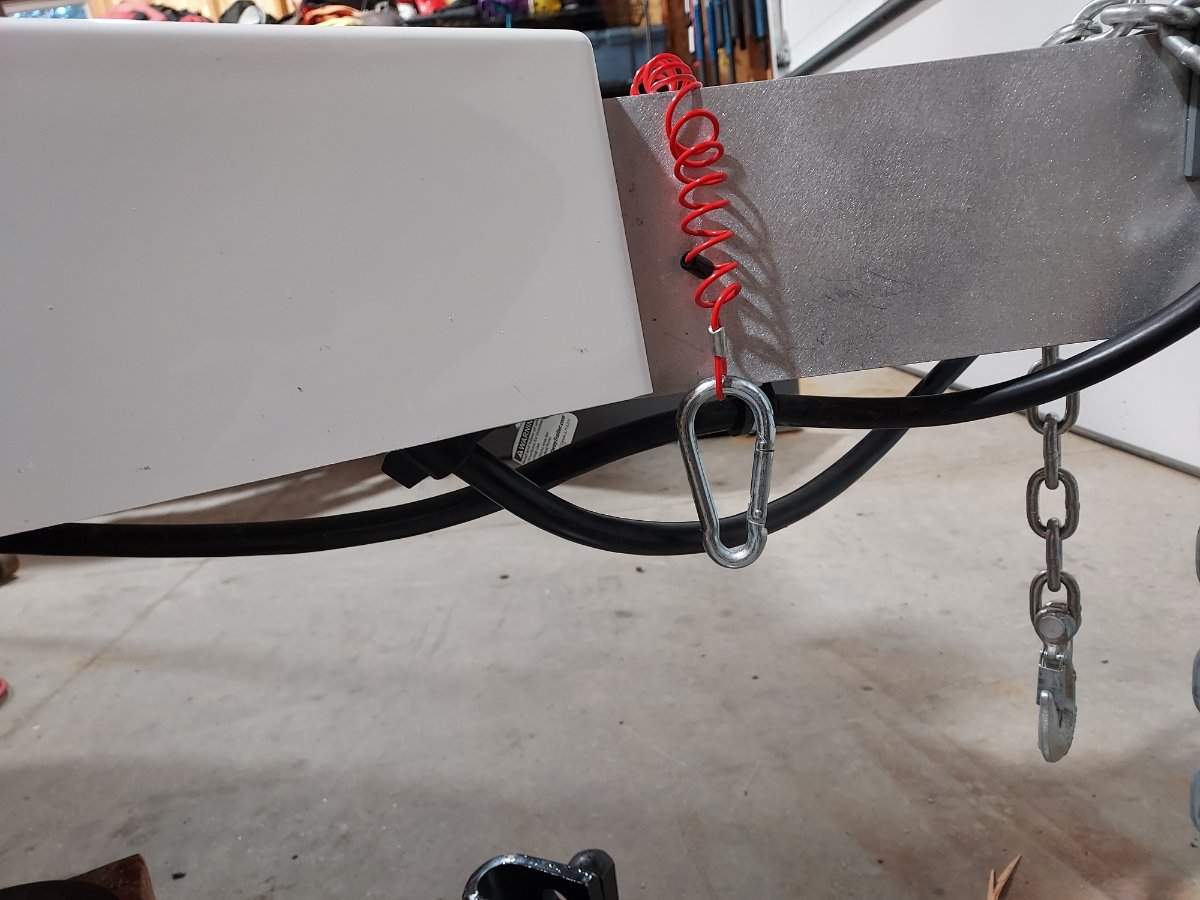
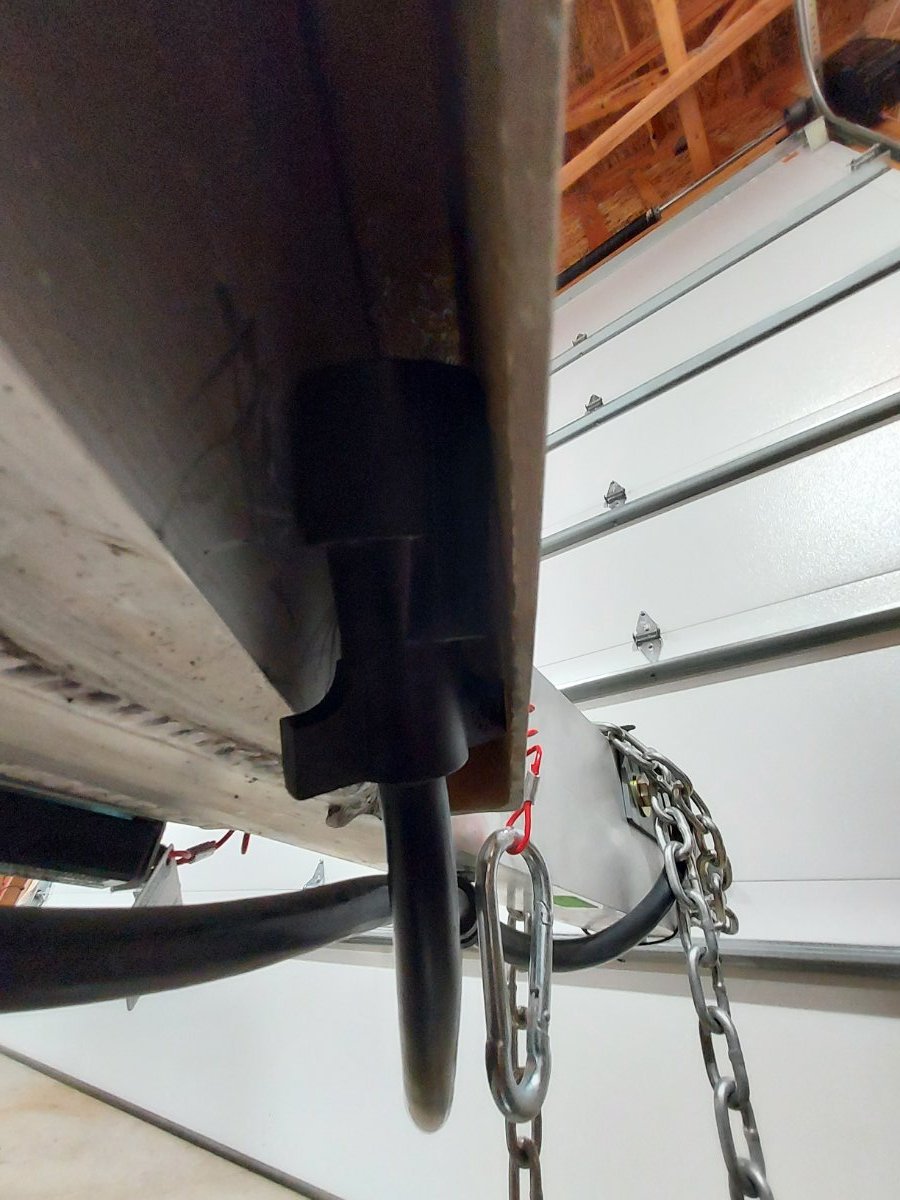
See attached photos. The first was shot from the side of the trailer A-frame. The second was shot from underneath.
- 24 replies
-
- 3
-

-
-
- 7 pin
- tail lights
- (and 2 more)
-
After further review, the 2018 IRS letter ruling referenced above may not apply after passage of the Inflation Reduction Act of 2022. It is arguable (but far from crystal clear) that this new legislation changed the status of batteries installed with solar panel systems eligible for the Clean Energy Credit, so the 2018 IRS letter ruling referenced above has been rendered moot by that statute. Take a hard look, or another look, at this article referenced by Steph and Dud B above: https://www.solar.com/learn/how-getting-a-home-battery-affects-your-federal-solar-incentive-tax-credit/ It also appears to me that the 3kw minimum, whenever it applies, is not relevant to Oliver owners who have at least 250ah of battery capacity included with their installation. At 12v, 3kw= 250ah. So, our Lithium Pro Package, for example, with 390ah of battery capacity, more than meets this minimum. I welcome other input on this issue. Again, this is not tax advice! You must consult with your own tax professional, or attorney, and make your own decisions when and if to claim the Residential Clean Energy Credit. But, I hope it helps you obtain reliable and informed advice from your tax professional.
-
I read that provision differently. It is arguable that qualifying batteries installed during 2022 are not excluded from the credit. See: https://www.solar.com/learn/how-getting-a-home-battery-affects-your-federal-solar-incentive-tax-credit/ UPDATE: SEE POST BELOW SUGGESTING THAT 2022 LEGISLATION MAY HAVE MADE THE INFORMATION BELOW MOOT. But, of greater concern is the apparent requirement that, for battery costs to be eligible for the credit, 100% of the energy used to recharge the batteries must come from solar. See: https://www.taxequitytimes.com/2018/03/residential-solar-storage-eligible-tax-credit-subject-100-cliff/ It seems to me that our Oliver trailers can't meet the 100% requirement because the inverters can, and do, charge the batteries from either shore power or solar. So, it appears to me that regardless of the installation date, batteries installed as part of a solar upgrade in an Oliver do not qualify for the federal tax credit. I welcome contrary views. And, this is not tax advice! You must consult with your own counsel or tax advisor for reliable advice before filing your tax return.
-
You are not crazy. As an alternative to pink XPS foam, you could consider 2" foil-faced polyisocyanurate foam board. It has a higher R value than XPS, and the foil facing should blend in better cosmetically with the aluminum-and-white Oliver under belly. If you do add foam to the underbelly, please report your results, including how you installed it.
-
I expect we will never know. But, the clever trick posted by Dewdev above should enable anyone following this thread to avoid that issue in the future: just tuck the 7-pin female connector between the aluminum frame and the fiberglass housing!
-
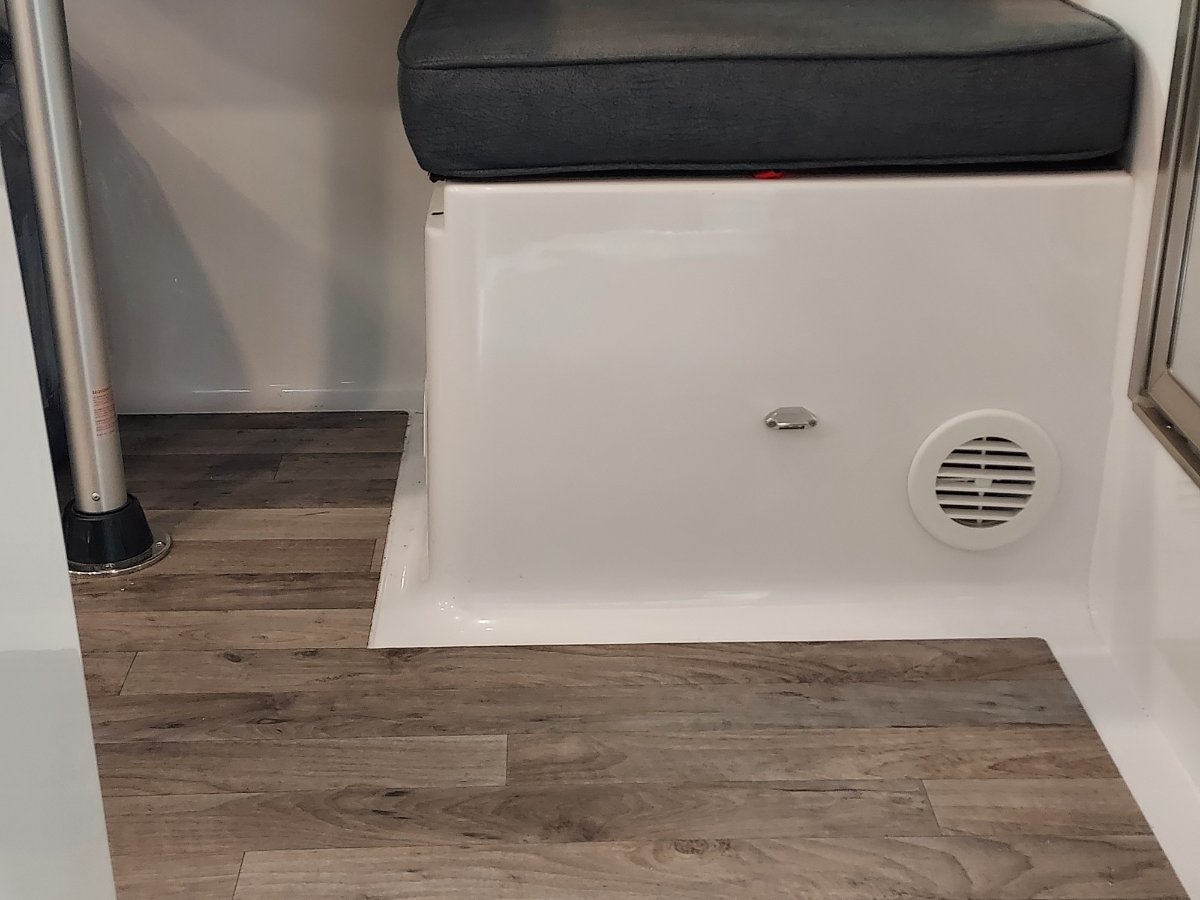
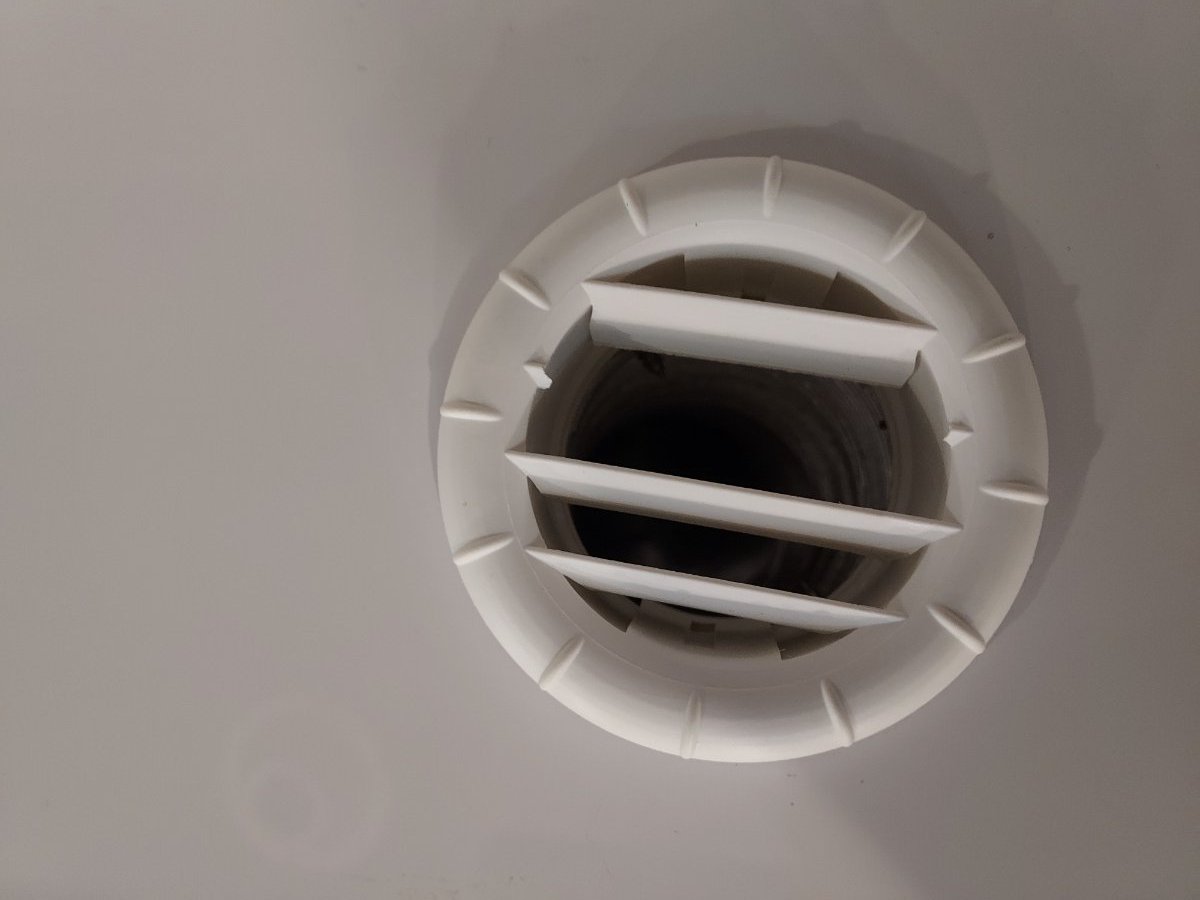
I just added two 4" vents, one high and one low, to the closet in our Hull #1291. It cost me about $20 (I already had the necessary 4" hole saw and cordless vac) and took about 1.5 hours. We wanted to better heat the closet in cold temps, and to increase air flow to limit mold and mildew formation when in moist environments (like one of our favorite vacation spots, the Oregon coast). My tests yesterday confirmed much better warming by the furnace in cold temps. We expect the better air flow will also help prevent mold and/or mildew formation when we visit the Oregon coast this April. Worth the limited investment of $$$ and time to me. See this thread:
-
That depends on which side the gas tank of your tow vehicle is on: driver or passenger. Our Tundra tow vehicle has a gas tank on the driver side. Our Subaru Outback's gas tank is on the passenger side. Oliver strongly recommends running an absorption fridge only on DC when on the road. I expect this is because a possible ignition while in a gas station could have a very bad result. It would arguably be like smoking at a gas station. Does anyone know Oliver's position on running the furnace while on the road?
-
Hello New Friends: Picking up Hull Number 1335 Next Week
Rivernerd replied to RichM's topic in Introduce Yourself
How did the Anderson hitch ball fail? -
So, you pull into gas stations with propane-burning appliances, like the absorption fridge and the furnace, running?