MAX Burner
-
Posts
1,681 -
Joined
-
Last visited
-
Days Won
68
Everything posted by MAX Burner
-

G15 Rally Site at Lake Guntersville is NOT Available
MAX Burner replied to Gliddenwoods's topic in Events & Rallies
Just received a call-back from Guntersville Lake State Park office... We've reserved Site A-6. Planning to arrive 14MAY and departing 20MAY. We're stoked that we got at site, there's still 4 site available for that timeframe, FYI. The staff there are absolutely fantastic and accommodating - very helpful. Looking forward to viewing a sea of Olivers at the rally! Cheers! A & D -
G15 Rally Site at Lake Guntersville is NOT Available
MAX Burner replied to Gliddenwoods's topic in Events & Rallies
Will do, Bill! Just tried it again - goes straight to v-mail. I'll stay on it today... -
Hey, @Steve Morris: please keep us posted on how that plate light option offered by 1UP works out; we're thinking about doing the same because the rack pretty much lives on the back of "Casablanca." Thanks!
-
New Apogee Adapt-X 4x8 ft folding aluminum trailer.
MAX Burner replied to John E Davies's topic in General Discussion
Very cool set-up. Nice build-job! FYI: We just got back from a Pensacola dive trip last week - planned to hit the USS Oriskany about 22 miles south of Pcola at 180+ feet. But hurricane Idalia had other plans for us. We'll give it another shot next time. -
Great idea. I'm thinking the solar light/module can live on the actual pole and not on the sleeve mount, right?
-
G15 Rally Site at Lake Guntersville is NOT Available
MAX Burner replied to Gliddenwoods's topic in Events & Rallies
Yeah, I just called their office a few minutes ago and left a detailed voice message... I look forward to hearing back from them. We're looking forward to the possibility of joining everyone at the rally next year! Should be a blast... Cheers, Amigo! -
G15 Rally Site at Lake Guntersville is NOT Available
MAX Burner replied to Gliddenwoods's topic in Events & Rallies
Will do, thanks, Bill! -
G15 Rally Site at Lake Guntersville is NOT Available
MAX Burner replied to Gliddenwoods's topic in Events & Rallies
Hey @Patriot; FYI: Our schedule opened up for the 2024 rally timeframe... Do you know of any open sites or cancellations? -
has anyone tried the new Dometic fresh jet 2200?
MAX Burner replied to Roadlotus's topic in Ollie Modifications
Nice and quiet! You could actually hear your voice very well over the db's of the unit - impressive! Thanks for sharing this video... -
Thanks, Bill. It's passed all of the operational checks, so far so good - very happy with the performance of the new configuration. Played around with it a bit earlier today and remounted the (+) terminal bar and applied shrink wrap to the copper buss bar. Final Config: ...and newly installed location of the Renogy portable solar module input: Cheers!

-
New Apogee Adapt-X 4x8 ft folding aluminum trailer.
MAX Burner replied to John E Davies's topic in General Discussion
Sweet looking utility trailer - very functional and capable... -
That is a correct guess. The PO of our rig "sloppily" ran a 4-pin circuit underneath the OTT from the hitch to the bumper for bike rack lights - effective, but not a sanitary modification and we removed it. FYI: You can access the OTT 7-pin harness from inside the "garage" after removing the floor - easy to do. If you don't mind installing a "Clam" fitting or an Anderson connection - you can run your wiring through the hulls. We did this on our's to install additional LED lighting under our 1UP bike rack. You can find that post by clicking: LED Light Bar on Bumper... It follows @john e Davies instructions noted in Steve's post below. Good luck, amigo.
-
We've had the Battery Box on our radar screen since we purchased Casablanca back in March from its PO in TX. One of the Hull #226 selling points for us was that the PO had recently replaced the AGMs with 3 Battle Borns and added a Victron Smart Shunt. However, upon learning from the forum, the BB install by the PO was less than optimum - or at least to our understanding at the time. We were surprised that there wasn't a battery master "shut-off" switch. This fact was the main driver for this project - after looking into what we "really" had on our hands, the pervasive project "scope creep" showed its ugly head! Full Disclosure: Although we've had several RVs over the decades, never have we owned Lithiums. Thanks to these forums, learning about the nuances and particulars of LiFePOs, specifically, Battle Borns - and even more specifically, their application with the Oliver, has taken some time to digest. We didn't want to delve into the "fray" of "cleaning up" what was previously installed until our understanding of this particular system was at a high enough level not to screw something up. So, thanks to the forums, many of y'all's posts regarding the subject, and special thanks go out to @Geronimo John for his patience and guidance with what ended up being a fairly large scale re-design of Casablanca's DC distribution system. Initial Configuration and Issues: 1. A key indicator that there was an issue somewhere within the "DC system" was that the charge controller would never reach 14.4 volts; 13.6 was the max ever observed/measured. 2. The BBs were stacked in an unusual configuration on the battery tray. The rear two batts were aligned side-by-side facing left/right and the third "outer" BB was aligned 90 degrees off facing fore/aft. Several cables were too short not allowing full battery tray extension. Clearly not a neat/tidy or logical configuration. 3. The battery bank was not strapped down. 4. Although likely large enough for intended current, the three BB's parallel connections were made with 1/0 cables versus the 4/0 cables distributing the current into the trailer. 5. Several positive and negative connections were made directly to the battery bank without the use of any sort of terminal post or terminal bar even though the Smart Shunt was in place. These connections were bypassing the SS, not good - thus contributing to phantom current within the DC distribution system and not allowing the Victron App to capture all DC power activity. 6. One cable, a yellow 4 AWG, ran from a negative BB terminal to the wrong side of the Victron SS; this cable essentially paralleled the 4/0 cable from the same terminal to the shunt. This made absolutely no sense. 7. As stated above, no battery master switch. We've always had a master switch in previous campers - handy for longer term storage and eliminating phantom current. In case of fire, we wanted a "safety switch" located outside the camper and inside the battery box to quickly secure DC power after quickly exiting the rig. SUMMARY OF WORK PERFORMED: The closer we looked at the DC set-up the more questions and issues surfaced. There were other ancillary DC system "gripes" but the above list really paints the picture of what we were dealing with... After quite a bit of forum research, thought, and informative and lively discussions with Geronimo John; a clearer project plan developed. 1. We made an assumption that the PO didn't upgrade the "lead-acid" charge controller circuit board as part of the BB installation. This rationale would explain why we never observed more than 13.6 volts on shore power with the controller energized. Sure enough, after pulling the board, it was clear that the board was doing exactly what it was intended to do - charge lead-acid batteries; as it didn't have the Lithium micro-switch option. So, we ordered a replacement 45-Amp board from Amazon with the Lithium option - enter "project scope creep." Above pic shows replacing the LA charge controller with a Li-capable board. The lead-acid board is 100% functional and will be posted for sale on the forums. The new Li-board cranked right up and the BBs finally received the charge intended for a Lithium battery bank: 2. Disconnected and removed the 1/0 cables connecting the 3 BBs, labeled and stacked them sequentially from back to front. Sized cables to allow full extension of the battery tray and added nylon tie-down straps from Rangley. Cut, crimped, heat shrunk, and installed new 4/0 color-coded cables in parallel configuration: Made a terminal buss-bar from 3/16" x 1" solid copper for the Blue Sea Systems master switch (Amazon) which will be heat shrinked once it arrives. Contoured a poly board from an old cutting board to mount the switch, like many owners have done. Mounted a positive (+) terminal bar with the master switch to accommodate DC connections. In the new configuration, only 4/0 cables are connected to battery terminals - removed the various "added-on" connections and placed them appropriately between the (+) terminal bar and the Victron SS. Now, all DC (-) connections are made through the shunt so all DC power measurements are captured with the Victron Application. Peace of mind - priceless. While we were at it, we added an SAE solar input port for the 200W Renogy suitcase solar modules - more scope creep... HA! Not being an EE, I'm sure there's something left out, but in the end, we've got a clean set-up in the battery compartment, fully functional Victron SS, and the appropriate charge controller to manage the BBs. Time for a cold one. Cheers! A & D
- 8 replies
-
- 10
-

-

-
...or maybe you can acquire a set of ENVG III/FWS-I's!
-
Nice job, way to go. Casablanca will be need that job done soon as well - thanks for the posting! Very helpful.
-
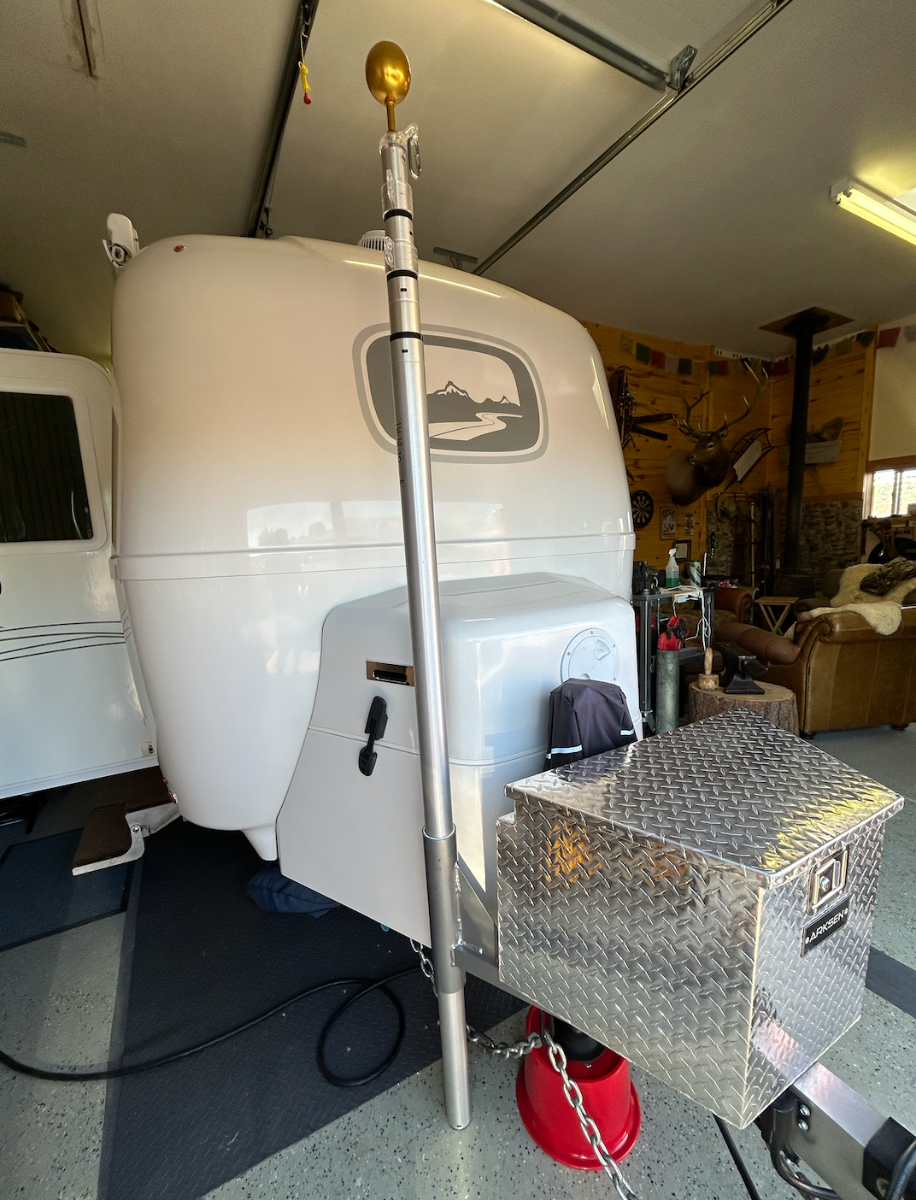
We originally bought a receiver hitch flagpole mount. What with keeping the 1UP bike rack attached to the OTT 2" receiver back aft, we came up with this modification to what @Ollie-Haus and @Patriot mounted on their cargo boxes... The inspiration is definitely from @John E Davies's original flagpole mount post from back in the day. This is a powder-coated aluminum sleeve that holds the flagpole in place. Used two 3/8" x 2.5" bolts with fender washers, lock washers, and nuts to fasten it to the bottom of the cargo box. The weight of the flagpole rests on the surface - the sleeve keeps it rigid. Rock solid. Just need a light for 'Ol Glory during hours of darkness. May need a locking pin through the sleeve/flagpole assembly so it won't grow legs and walk away, HA! Mental Note: "Take down flagpole before driving away." Cheers to all!
-
I'm liking the saddle clamps! Nice and clean mod, guys... great idea! Cheers!
-
Greasing Dexter EZ flex suspension.
MAX Burner replied to Ken_Judy's topic in Mechanical & Technical Tips
@Ken_Judy: John is spot-on regarding "loosening of ancillary running gear nuts." We recently serviced our zerks and decided to also perform preventive maintenance on the 3 jacks - only to find that the curbside rear jack head set-screw had loosened over time and the entire motor/head assembly rotated clockwise. Had we not found this condition before it progressed into something really serious, it could have been a major safety accident. Getting your eyes up/around/inside/down everywhere on the Ollie periodically really pays off. Just perform your inspections with good planning and forethought while doing it safely at the same time. My $0.02... Cheers! -
Suspension Rust on 2017 Oliver - a problem or not?
MAX Burner replied to Cort's topic in General Discussion
Same here... -
Ollie LE 1 on cover of QST magazine
MAX Burner replied to Ghostriderc227's topic in Events & Rallies
@gbergh - Hey, OM, FYI: SMPLX2M (ch-1) is 146.520 MHz, the national 2m simplex calling frequency, SMPLX446 (ch-2) is 446.000 MHz. You can most always directly reach fellow hams by transmitting “CQ CQ CQ followed by your callsign” when at higher elevations on this frequencies, especially 146.520 MHz. We monitor 146.520 MHz simplex all the time towing or otherwise. Some states, like NM, have a 2m "MegaLink" system which is really nice for making state-wide contacts on 2m! Cheers and, 73 de W0ABX -
Greasing Dexter EZ flex suspension.
MAX Burner replied to Ken_Judy's topic in Mechanical & Technical Tips
Sometimes it makes it easier to "crack" the torqued wheel nuts before raising that side - or Xchock those wheels after they're raised to loosen the nuts... -
Towing hook-ups - braided cables versus chains?
MAX Burner replied to Wayfinder's topic in Mechanical & Technical Tips
We've always had chains and never a problem - the smaller gauge curly cues on our Ollie are a bit awkward to connect, and I can imagine how the stiffer/larger cables on newer OTTs would be a bit of a drag to connect. -
...not good.
-
Towing hook-ups - braided cables versus chains?
MAX Burner replied to Wayfinder's topic in Mechanical & Technical Tips
QUESTION: I've noticed that OTT uses a heavier set of curly cables going from 2017 to 2018. Does anyone know why the factory moved from a lighter cable to a heavier one? What are the differences in the stress ratings between the two? Just curious - and would like to know if the smaller diameter cables are rated at 7k# each like these:
-
Suspension Rust on 2017 Oliver - a problem or not?
MAX Burner replied to Cort's topic in General Discussion
@Cort: Definitely take heed to John's earlier comments... "It's what you don't see that will bite you in the you-know-what." If you decide to buy this trailer be certain to use the apparent lack of preventive maintenance in your negotiation strategy and learn to spell, "Elbow Grease." Good luck!