Steve Morris
-
Posts
808 -
Joined
-
Last visited
-
Days Won
17
Everything posted by Steve Morris
-
All tanks empty with no bikes and rack folded. Tongue weight 525ish pounds.
-
I haven't been on here in about ten days, so catching up. We returned home from a family trip with my two brothers and their wives on Thursday, so Friday I finally remembered to check the tongue weight with and without the bicycles. I'm using this Simple Weigh scale, so it may not be as accurate as a Shoreline scale. We'd just returned home, so the tanks were as follows: Fresh: 13% Gray: 44% Black: 65% Almost everything else in the trailer was as it is when we're travelling, although we did take out the laundry and food from the fridge that doesn't stay in all the time. Results: Tongue weight with no bicycles and with the 1UP Super Duty Double installed and folded: ~550 pounds Tongue weight with two 50 pound bicycles and with the 1UP Super Duty Double installed and extended: ~450-475 pounds. This surprised me, as that puts me well under 10% tongue weight with the bikes on. Once I dump the tanks, I want to re-weigh, but it is likely going to be similar. I've towed almost 1000 miles with the bikes on the back, and haven't noticed any sway or lightness, although about 600 miles of that had a 20# propane tank in the front basket. That Andersen hitch really does its job well! I'm considering getting a Rubbermaid ActionPack 24 gallon container and moving some of the heavier items from the basement to the front basket. If really needed, I can add a 1UP Roof Rack and mount it across the rear of the front basket using J-hooks. That would take 50 pounds off the back and onto the tongue, which should help considerably. Thoughts? Edit: Empty tanks, Tongue weight with no bicycles and with the 1UP Super Duty Double installed and folded: ~525 pounds.
-

Easy and quick camping food items to keep in the pantry
Steve Morris replied to SeaDawg's topic in General Discussion
That sounds scrumptious! We just picked up some Ben’s pre-cooked jasmine rice today for our outing Sunday to Thursday. There’s a local Mediterranean restaurant here that serves filet mignon kabobs on jasmine rice and shredded red cabbage. Mmmm! We’re going to recreate it on the Skottle, but with sautéed onions and mushrooms instead of cabbage. -
Toyota Tundra enough truck for an Elite II?
Steve Morris replied to Beaver Pilot's topic in Welcome to the Oliver Forums
@John E Davies GPS speed and elevation come from the cell phone, not the truck. -
Toyota Tundra enough truck for an Elite II?
Steve Morris replied to Beaver Pilot's topic in Welcome to the Oliver Forums
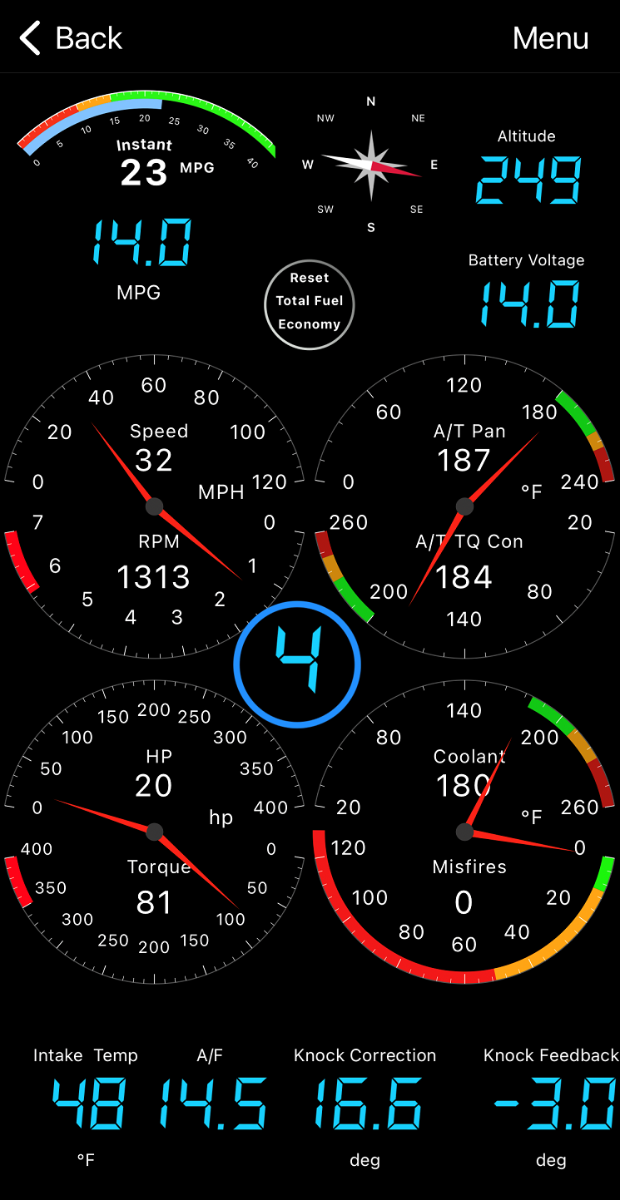
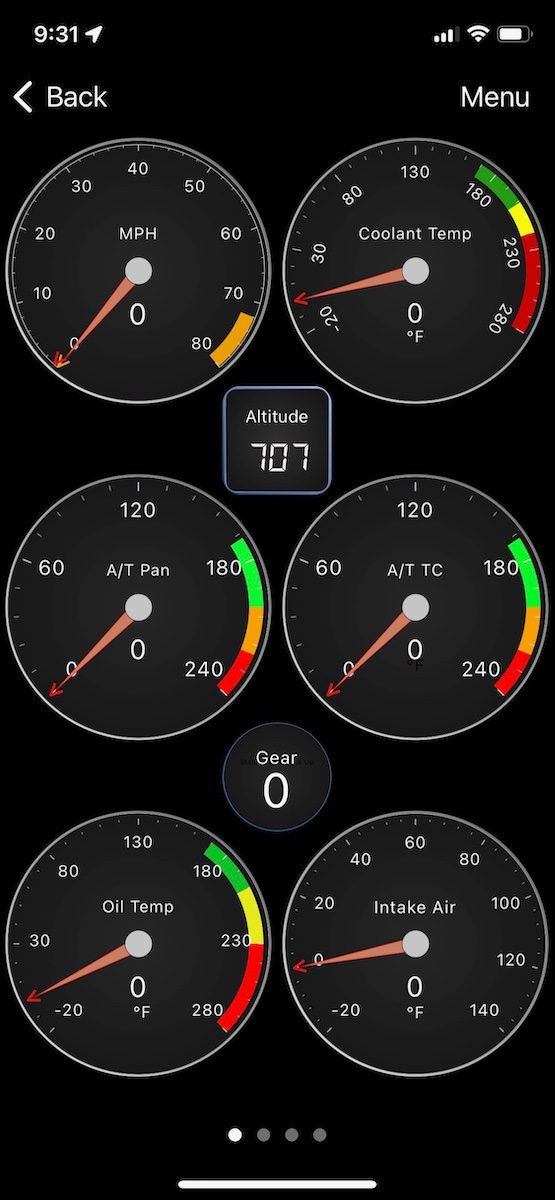
I bought the Carista OBD Reader around 2014, and at that time there was no subscription; buy the reader and get the app free. It still works without subscription today! The above display is from the OBD Fusion app. There is no need for a Carista subscription to use ODB Fusion. However, on top of whatever ODB Fusion costs, you'll need to purchase the $10 Toyota Advance Pack for all the sensor PID hooks. Here is a link to an extensive thread on MUD on how to do all of this. I found it very confusing. There are dashboards available to download from thread participants, but they do not scale. So if you have an iPhone 14 Max and the dashboard was made for an iPhone 8, things will look wonky. I spent several hours fiddling with modifying someone's dashboard to get the above on my iPhone XS. Some of the dashboards are quite extravagant! https://forum.ih8mud.com/threads/diy-smartphone-scan-gauge-obd-fusion.1269979/ I have OBD Fusion running on my phone on a vent phone holder, and my 11" iPad over top of the Toyota screen using Waze or Gaia for navigation.
-
G15 Rally Site at Lake Guntersville is NOT Available
Steve Morris replied to Gliddenwoods's topic in Events & Rallies
Yep, got it. We still need to get out together some time! October is SE Ohio somewhere? All we have is a Tearjerkers gathering at Mosquito Lake Oct 5-9, and busy the 17th. Otherwise wide open! -
That's why I'm selling my three scoots! At just a few weeks shy of 70, I don't want to have to deal with any broken bones or replacement surgery!! Nearly 60 years of riding without dumping a bike (other than dirt bikes in my teens), and I don't want some idiot on his phone ruining that streak.
-
Toyota Tundra enough truck for an Elite II?
Steve Morris replied to Beaver Pilot's topic in Welcome to the Oliver Forums
If the Tundra is like the Land Cruiser with the 5.7 V8, there is no transmission temperature gauge. I use a Carista Bluetooth OBD reader and the OBD Fusion app on my phone to monitor items that are not shown on the dashboard. On the "Gear" indicator, I have it set so that it adds a ring around the gauge when the torque converter is locked up. On my 8-speed, the top two gears are overdrive. On flat open road I can use 6th and keep the TC locked, but in any hills, I downshift to 5th. Long hills I use 4th to keep the RPMs up in the 3000 range to keep oil flowing though the transmission cooler. On the winding road up to Lake Guntersville, I was in 2nd! 🤪 So far, here in the east, I haven't had the pan or torque converter temps higher than around 220°. (Note that my colored indicator ranges and maximums are arbitrary, and not something from Toyota.)
-
It is such a neat place. Walk up the cinder cone. Your calves will hate you 😂 I have that same MotoFizz in medium on my Burgman.
-
Battery compartment door lock replacement
Steve Morris replied to StillGame's topic in Ollie Modifications
Currently zero in stock, so I couldn't add them to the shopping cart. -
Or, fortunately, for those of us who need some white noise to block out loud snorers. 😂
-
There have been at least two Tuareg TDi owners here. @donthompson who moved onto a different trailer, and a fairly active current member, who I can't recall right now. Hopefully, they will chime in. The vast majority of members here use pickup trucks, and recommend 3/4 or 1 ton models. But there are several large SUV owners who have happily towed many thousands of miles with them. A shorter wheelbase makes an SUV easier to maneuver in tight spots, but also makes it less stable on the road. But remember, it isn't just towing weight, but the vehicle's load capacity that comes into play, too. Occupants, tongue weight, and junk all add up quickly. My towing weight is 2000 pounds less than a V8 Tundra, but my load capacity is actually more than some models. Even more so since I took out the rear seats.
-
Especially when combined with the Level Mate Pro! I used the BAL leveler on our Hiker trailer, but it was a PITA to use. So I got an Anderson leveler, which worked great. If we wanted the trailer crossways on a site, we'd just rotate it by hand, and shove it onto the Anderson leveler until level. So when I ordered the Oliver, a new set was among the first things I ordered. I too have several of the Harbor Freight chocks.
-
I’d read all of the books remotely related to Justified. Now that there’s a new series, it is apparently very roughly based on City Primeval. Raylan isn’t in the book at all. The FX folks just took another Elmore Leonard book and dropped Raylan in as the main character. It’ll be interesting. I’ve read about a dozen Elmore Leonard books over the years, and every one has been thoroughly enjoyable. @SeaDawgWe have AT&T, but our daughter has Hulu, so we borrow it now and then. 😉
-
I believe Hulu has a TV series from the books. The second season is on now. We haven't watched yet, but it is on our list. He is the same author that wrote the Hoyt/Dewell books that were the basis for the Big Sky TV show. I just finished up another Elmore Leonard book (Kindle, not audio)
-
We’ve had two C-Gear Original Sand-Free Mats since 2017 (10x10) and 2019 (8x11) in orange/teal. The square one fits perfectly in our six-sided CLAM enclosure. They worked great in the teardrop, where it is too east to transfer dirt and grass inside. Now they’re perfect for the Oliver. They dry fast, fold relatively small, and work as advertised. They do tend to gum up with clay mud, but a good hosing off at home easily cleans them. I don’t know if it is still the case, as I don’t see it on their web site, but both of ours were made in the USA. The company started out making landing mats for military helicopters is sandy locations.
-
Yep, you'd added those in the thread where I was asking about support. I don't have top tubes, but could go to the seat posts. I'll take a couple of straps with me in case I need to add more support. Thanks!
-
Loaded up and ready to go!
-
Two of them just bought Escape trailers, and another has a Scamp from one of the new Escape owners. So fiberglass trailers are well represented. (Mostly older folks, so very few teardrops any more.)
-
We initially got a Brita water filter, but the filtered water tasted terrible. We even tried it at home, feeding it already filtered water from our home Royal Berky, and the filter added the bad taste. Same thing with a second replacement filter from a different package. We now have four one-gallon jugs that we use for potable water. We fill them from the Royal Berky at home and transport them in the closet. We use them to fill the Brita pitcher sans filter on the countertop. When we need additional water, I use our Lifesaver Jerrycan water filter to purify campground water, water from our fresh tank, or other water supplies to refill the one gallon jugs.
-
Thank you, David, and thanks for the call last night. As noted above, maybe my expectations are not what's normal in an RV. If it doesn't seem right after the weekend, I'll use the sealant and PPF option to be sure to seal things up well.
-
Thanks Robert! As this is our first RV of any kind with AC, it may just be that I'm expecting it to be similar to our home AC. I wasn't getting any condensate running down the side, but there may be some trapped behind the seal. I'll look later today when I hook up the trailer to the Cruiser. Thanks!
-
Thank you, Ralph! That's very helpful. We take off in the morning for a long weekend with the Ohio Tearjerkers group. If I still have concerns when we get home, I'll pop the top and take a look. Thanks!
-
Later, I bump the thermostat up to 71 degrees, and now it is 70 degrees in the trailer, and 88% humidity! Outside is 75 degrees, 68% humidity, and full overcast. It’s almost like the AC sucks the humidity out while the compressor is running, holds onto it instead of sending it overboard, and then dumping the humidity back inside when the compressor shuts off. Vert confusing!
-
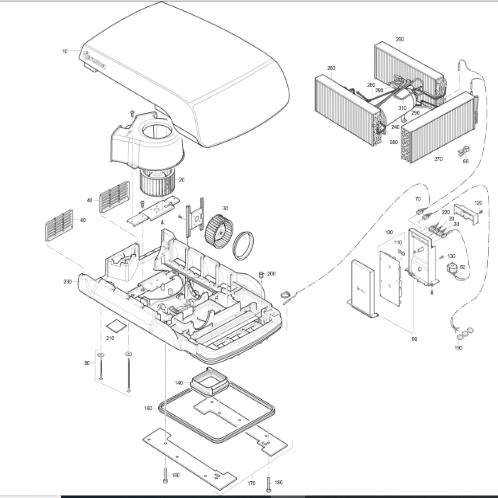
I’m still wondering if my AC is working properly. Today it is 75 degrees outside with 70% humidity and mostly cloudy. Inside the trailer it was 78 degrees and 72% humidity. I turned on the AC to medium, with the thermostat set to 68 degrees. 25 minutes later it was only down to 72 degrees and 65% humidity, with mildly cool air coming from the vents. I changed the thermostat to 60 degrees, and it finally had cold air coming out of the vents. It is now 61 degrees and 51% humidity about an hour later. Nothing has dropped from the condensate tubes, nor down the side of the trailer. It isn’t horribly humid, so I don’t know if it would, though. I’m still wondering if the fins on the condenser are blocked by the zillion tiny Linden tree flowers/leaves. They’re a good six inches deep under the tree, and the trailer is maybe 40 feet downwind. None have accumulated on top, but I had it running a lot early last week. Maybe it sucked some in? All that to ask if anyone knows how the top cover (item #10) is removed? The parts list doesn’t show any fasteners. I haven’t climbed up to look yet, wanting an idea where to look before doing so. Thanks