jd1923
-
Posts
3,533 -
Joined
-
Last visited
-
Days Won
267
Everything posted by jd1923
-
Bob, if you also feel this way, then you do not need to do all the following work (quoted below). They possibly have an LP-only model that could cost less too!
-
Bob, I haven't heard of anybody going this direction, but why not? It's usually moving from the 6-gal Suburban to an on-demand/tankless model. Given your experience and reading many other posts re the Aquago model, I would not want one and I agree that I would certainly replace yours asap with something else. As you know, this model is not reliable, and my understanding is anything Truma is not serviceable! This is based on their policy of "authorized service" only. They work OEM installations only, no aftermarket sales, hence NOT serviceable except in waiting forever for OTT or Truma to service months later. Those who DIY cannot even purchase repair/replacement parts, so certainly Truma products are not for me! Rob @routlaw very recently removed a Suburban for a Fogatti tankless. He could chime in on his reasons. I would also read some blogs on tank vs. tankless to fully understand the pros and cons. Lastly, I and others with 2015-16 models, hull #s up to 150, have run the Suburban 6-gal HWH for 10+ years. This includes @topgun2, @Mike and Carol, @rideandfly, @ScottyGS, @Wayfinder and others. I would say this defines Reliability. Others can chime in on Serviceability but in 3 years of ownership, all I have done is drain it, rinse the tank annually, did the vinegar treatment once (on all plumbing). Purchased 2 anodes, installed a new one and have another for backup. I've read something about blowing the dust out of the burn chamber, but I've not experienced any real service needs which speaks again to reliability! You'll always carry 6 gallons in the tank that can't be used. I really like the option to run on propane or electric. Use electric when plugged in and it runs quieter than hearing the LP burning. I often run it on electric when towing to a campsite, powered by our inverter of course, and the +40A we get from our DC-DC charger makes it a breakeven in power, arriving at the campsite with 6-gal hot water (unless we instead run the A/C, weather depending). LP tanks always OFF when towing. There is an AC switch under the cover that is awkward to get to, so we always leave that switch ON and turn electric ON/OFF using the circuit breaker inside. There is a separate switch to fire it up by LP. For this model feature you'll have to run new 10-12 (?) AWG 120VAC wiring and add a breaker in the 120VAC power panel. You'll also need an LP ON/OFF control switch if your tankless model does not have one. That's my take. Hope it helps! 😎
-
Thanks Scotty! I found their website and I ordered a FREE Sample Kit. Then found it on Amazon (links below). I'm wonder, what products have others used? I remember our friend @rich.dev ordered one product that would not straighten from a circular role, so wavy it was unusable. Prior owner of our hull installed a drip rail on the entire curbside up near the awning. We get no streaks on this side but a lot of streaks from frost melting or morning dew, condensate dripping on the other side. Request a Sample Kit | Trim-Lok Amazon.com: Trim-Lok Drip Rail, White – 1/2” Height, 25’ Length – PVC Plastic Rain Gutter for Cars, Vans, and RVs, Easy to Install Flexible Drip Rail Molding to Control Water Runoff, Durable 3M Tape Included : Automotive
-
Thanks Craig. I just checked my panel label picture, and we have similar labeling. I guess these only protect the circuits connected to the various fused circuits in the 12VDC panel. For a reverse polarity condition to occur, you'd have to connect your battery cables in reverse or rewire AND reverse the internal OEM 12VDC wiring to the panel. This could be cause here if the batteries were removed for charging and then connected backwards! 🤣 The 4/0 cables from the battery connect to the inverter first (when present), these reverse polarity fuses would not protect the inverter from reversed wiring. Inverters must have their own internal reverse polarity protection. More guessing until questions are answered...
-
Reset the GFCI outlet under the dinette when the other 120VAC outlets are not working. They are wired in series so the GFCI (Ground-Fault Circuit Interrupter) in the first position protects the entire circuit. @Buddhabelly has the opposite issue, "no power for 12 volts items." Do we actually have said fuse in the Oliver? Maybe on the charger circuit board? (I'm not generally AI trusting.) I guess he could have disconnected the batteries to charge them and then wired them in reverse polarity? (The only way this fuse would blow.) Because you're on shore power, or because your inverter is working? It always gets me when a request seems really important, "WE HAVE NO POWER!" Then the person asking for help doesn't login for the next 17 hours... We can only help those who help themselves! So much we do not know without follow-up questions answered! @Buddhabelly, your answer to @Steph and Dud B's question? And is your inverter working? (if you have one) And re another 12VDC item, are your stabilizer jacks working?
-
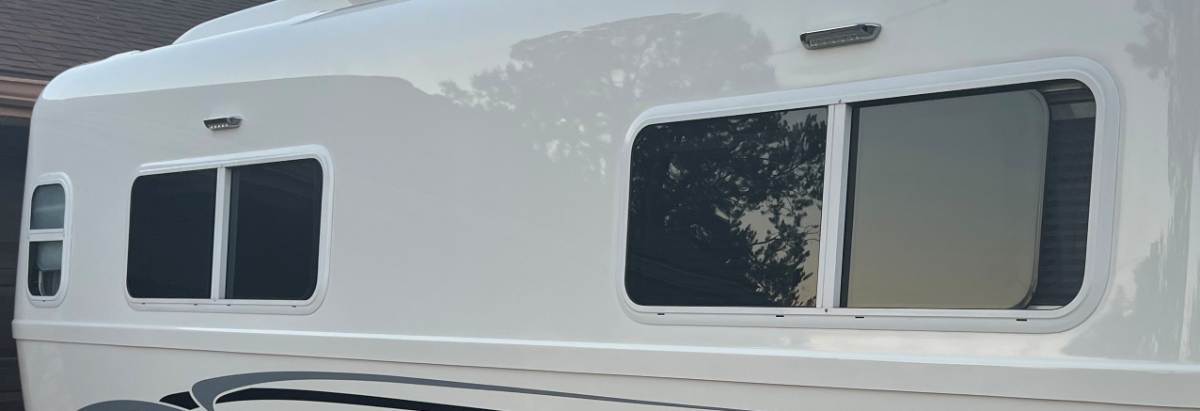
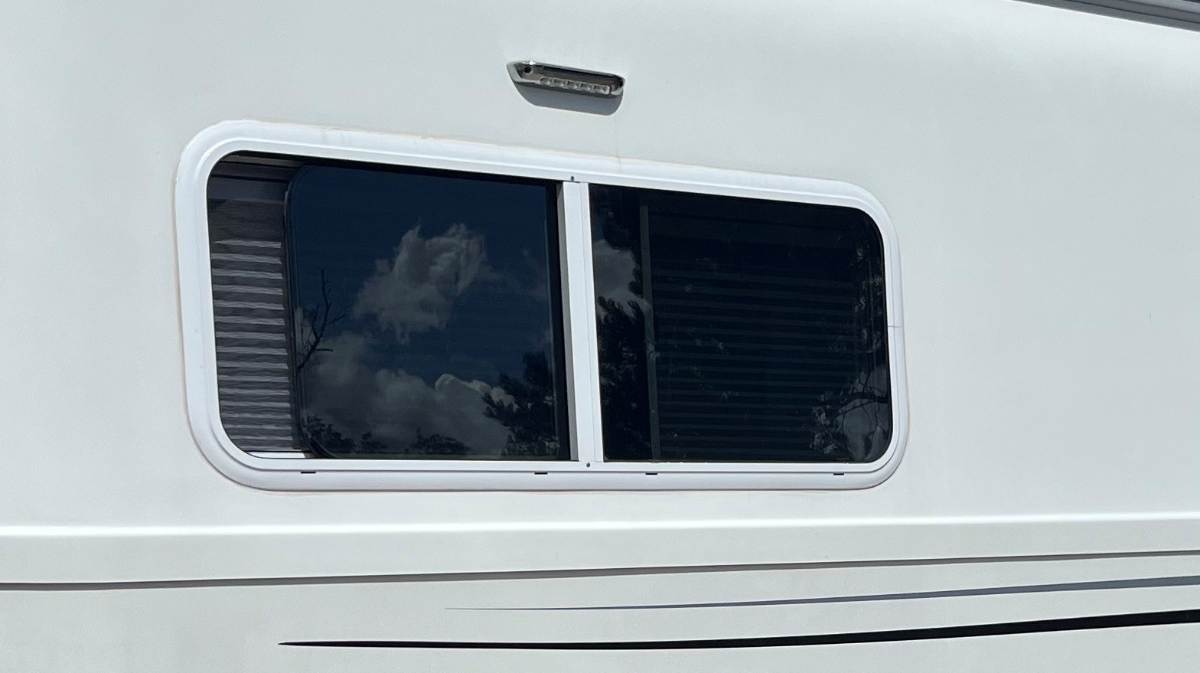
Wow! Select the 48x22" window on the Lippert website link I copied above, click Add to Cart, it comes to $230. This number seems very reasonable and what you were quoted for a custom 14x18" size seems outrageous! I wrote above "over $1000 to replace them all" when I was looking at the $230 number. $987 each would not be a direction worth going. BTW, ours are mounted in mirrored directions, left to right, moveable window to the rear, vents/weep holes always down. The outer frame must disconnect from the window assembly somehow to allow for this. Our windows are different from the time of hulls 70-75, to late 2015 when our 2016 model was built.
-
Better loosen up that bolt and asks the wasps back!🤣 (Now, I'm not touching mine!)
-
Wondering did Lippert 8800 windows change through the years? The windows installed on hulls #70, #75 vs. our hull #113 and much newer hulls? I posted a couple pictures of ours for reference. I do see top vents on Rob's and Bill's windows that are not on mine! Rob has leakage issues. Others do as well, but we do not. I'm thankful ours do not need repair, but just wondering what's different? Is it the top vents allowing water into the interior channels? I replaced the outer rubber (only). Replaced the white surround with black, sourced from Pelland, if I remember correctly. There was a 1" gap on the old rubber, likely from shrinkage. I cut the replacement rubber to fill the gap and made it 1" longer, cramming the rubber into place on a warm day, knowing it will shrink again in time. This rubber seal protects the moving half of the window from rainwater. I don't have time to handwash the Oliver except to pressure-wash when we return a dirty mess from boondocking. I'll hit the glass straight-on with 3000 PSI water and our pressure-washer is not a toy! Some dirt followed by a fast stream of water will pour out of the window lower weep holes. No water inside the hull ever in doing this a half dozen times. The first couple of times, I asked Chris to be inside, towel in hand, just in case. After twice taking this precaution, I don't bother anymore. If ours were leaking, I would replace the entire window assembly if available. I took a look here and our sizes are not listed. Wonder if they make the 8800 windows to size. Nominal measurements on our hull are 48x18" on the three cabin windows, 36x20" on the rear and I did not measure the bathroom window. I understand it would be over $1000 to replace them all vs. the cost of seals but you'd have a new window with warranty. Or time to get an awning window if you prefer that style! Lippert 8800 Series RV Window - Horizontal Slider | Lippert

-
Thanks Bill, good fix and repair tutorial. Your tabletop is quite secure now. This will get me to take a peek under ours. We've just left our table in place, knowing we wouldn't use the dinette as a bed. Maybe it hasn't been moved for 10 years, and I've never felt it move. But as I get older, I'm often leaning on things to get up! 🤣 And it's not safe if it can move. Tom, this sounds like a painful routine! Certainly, time to execute Bill's simple fix if you don't find a latch that will work.
-
 Yep, it does. I believe we're in sync now. Thanks, JD
 -
True Induction Stove Top will not turn on
jd1923 replied to Lamar's topic in Mechanical & Technical Tips
This should be @Lamar’s goal in negotiating. And for OTT it’s the right thing to do! -
Geoff, from what I've observed over the last couple years, you know more about electronics than most of us who posts on our Forum. There is electronics in brake controllers but NONE at all on the Oliver side brake wiring. I do not mean to offend either, but is there such a beast as an "Auto Electric Specialist?" Some believe in Bigfoot! 🤣 We don't have this kind of service in our area, so are you offering a solution? So, how does this point to a trailer wiring issue? Why not a bad ground or faulty controller on the truck side? Aren't you just guessing without at least touching the Oliver, running the most basic tests with multimeter or clamp ammeter in hand? The U-Haul rental idea was a simple binary test to see if the error would occur towing another trailer. If the error could be reproduced it would eliminate the Oliver wiring as cause. Of course, the rental trailer must have brakes and 7-blade connection. Only one U-Haul counter person thought the 7-to-4-pin adapter would fit the need! 🤣 Also, in trailer wiring the white wire is ground, the black is 12V+ which is why in the picture the black is fused in the junction box. Am I wrong on this? If there is a ground issue on the Oliver side and there very well could be but we just don't know that. If it was my issue, I certainly wouldn't spend more money on specialists, just replace the ground. Attach a new ground wire at the junction box, test for continuity to the ground on the 7-blade plug, then run the new wire directly to the main ground bus under the rear dinette seat. This would eliminate trailer ground as cause in an hour with 10 ft of new wire, a simple solution. There are only 3 places where a connections, positive or ground, could be bad on the Oliver: 1) the 7-blade plug and wire harness back to the junction box, 2) the connections in the junction box and Oliver brake (blue+) and ground (white-) wiring from the junction box back, and 3) the wiring to the streetside brakes and through the axles to the curbside brakes. I would do some current and ground testing in these 3 areas and replace the most likely culprit. The entire trailer brake wiring, on the Oliver side, could be replaced in a day with $200 in parts. However, simple current and ground testing would determine one of these 3 areas to be at fault. It could be determined the factory brake controller is defective or has wiring issues. Four (4) GM dealers already struck out in finding a solution here, too much money spent. If true, I would bypass the factory system and install a reliable Tekonsha P3. There are only 4 wires in this controller harness, install new wire with +/- connected directly to the battery. Yeah, it's "piece-meal" but simple. But I can hardwire all of this at home (or any trailer shop) with hand tools and when done count on its reliability for many miles to come! 😎 I don't expect we'll agree on this one and that's cool. When I do yardwork, the weed-whacker is my tool of choice. I'm not planting a new flower bed. It's just not me. I know you like electronic switching systems, and you have demonstrated some great ones! Very cool, but some are a bit too complex for my liking. When I restore a used vehicle, like our Oliver, with factory or prior-owner aftermarket additions, once again I reach for the weed-whacker! Love your work, Geoff. 🤗
-
True Induction Stove Top will not turn on
jd1923 replied to Lamar's topic in Mechanical & Technical Tips
Yep, by design a cooktop is basically for quick meals on a skillet. Of course, the more Ahs available the longer you can cook. But as you well understand, all campers should know the limitations of their rigs. You're welcome, Lamar! My goal was to provide you with correct information for your decision making. I'm always very happy to help and this forum is the best! 😎 Steve, I agree with the points you made, but you may be giving OTT too much credit in your first statement. It was stated as more of a "1750 watts with a 2000-watt inverter" simple comparison without full understanding of the dynamics I presented. I would love the be the fly on the wall as @Lamar explains induction cooking usage to OTT Service! 🤣 OTT and all RV manufactures wire microwaves to 2KW inverters all the time along with the 110V wall outlets. My wife uses a blow-dryer after washing her hair. The 1800W blow dryer pulls a hard 1800W which is the same load as the Dometic P2, or FreshJet 5 for that matter. You can't keep the dumb from being dumber, but those of us who are experienced would simply know, don't use the microwave when blow drying! 🤣 Of course, that's with a 2KW inverter. Perhaps Lamar could parlay this poor customer service situation into getting OTT to remove the 2KW Xantrex for a 3KW model. Then pull out the oversized Lithionics and the unnecessary sliding tray and the EI battery bay could house 600 Ah in two 300 Ah Epoch Essentials. Then you're ready to wire your A/C into the inverter circuit as well, and you could do induction cooking with the A/C running. But if you need to run your A/C for more than 3-4 hours, you'd have to scrap the inefficient FreshJet (spec 15A on 115VAC) for an efficient inverter or variable-speed compressor A/C model. Add a 3rd battery and you'd have the system I installed for hull #113, but two 300 Ah batteries is all that would fit in an EI. Now I'm having way too much fun, but it's food for thought! 😎 -
True Induction Stove Top will not turn on
jd1923 replied to Lamar's topic in Mechanical & Technical Tips
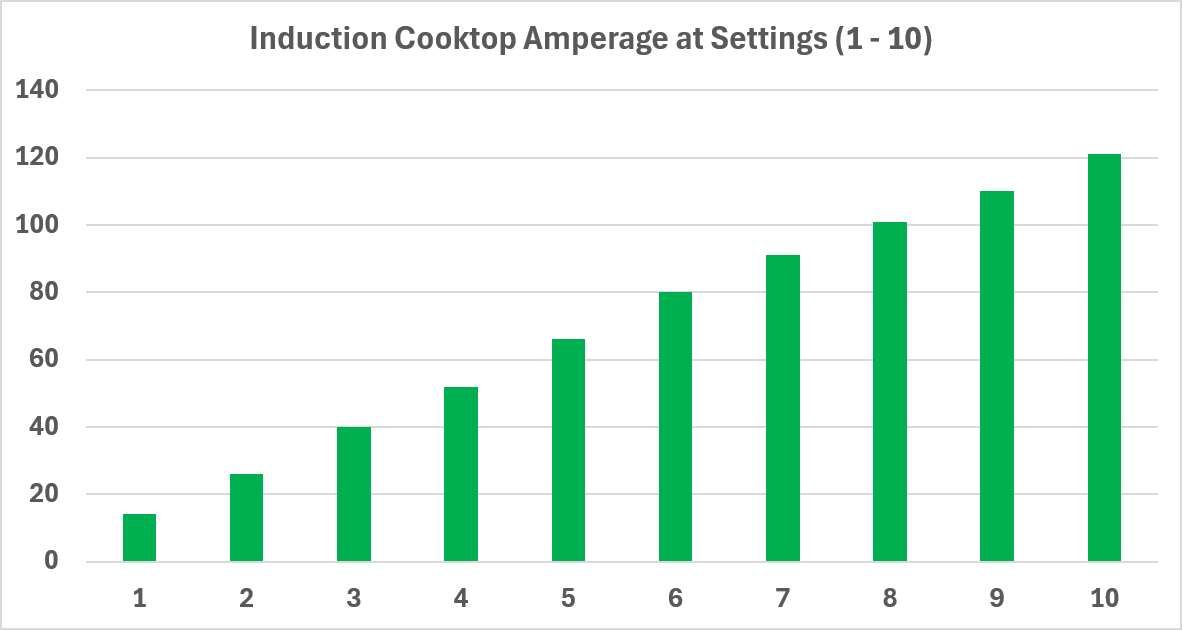
Oh, boy... I'm going to attempt to explain how "the engineers" in drawing this conclusion are naive! A trained and experienced engineer should know there is much more to this than a simple comparison of data sheet specs. 🙃 Please allow me to explain. You could have used your True Induction cooktop every day on your trip, if only they had wired it correctly to the inverter. Your system is just fine for occasional induction cooking. I was hoping you would have rewired it on the road, it's what I would have done, but I do understand the warranty ramifications. I cooked bacon and eggs for breakfast this morning using a 10" Smithey skillet on our 1800W DUXTOP induction cooktop. It cannot be much different than your 1750W built-in unit, meaning the numbers I will present will be relative to your True Induction cooktop, 2KW inverter and 260 Ah batteries setup (your solar may vary). This induction burner starts at the medium #5 setting and within seconds the bacon started sizzling, so I turned it down to 3.0. After the bacon was done, I increased the setting to 4.0 and cooked a batch of scrambled eggs. I did not measure cooking time but maybe about 12 minutes total, I'll use 15 minutes to be conservative. You'll be amazed how many actual Ahs it takes to cook a simple bacon-n-egg breakfast or boil a pot of water (wait for the punchline). 😎 Reading such nonsense from "the engineers," the engineer in me had to prove them wrong! So tonight, I went out and plugged in another DUXTOP that we keep in the Oliver to run an amperage use test. When it turns on at the 5.0 setting it quickly ramped up to 68A (DC amps) which comes to 816W (W = 12V x A). Your Xantrex 2KW inverter can handle this with just a low hum. I tested the induction cooktop at all settings (1 - 10). Here are the results! (I'm an IE and used to do this kind of reporting professionally for 30 years.) The first row shows the induction cooktop settings (1 - 10). The second row shows Amps produced by our Victron MP2 inverter, read from the Victron Connect app. The third row shows Watts calculated (amps x 12V). The fourth row titled %Spec is the actual Watts used divided by the 1800W maximum. Note on FULL this induction burner pulls watts at ~80% of spec. We call that a 1.25x engineering margin, therefore... Your inverter will NEVER use 1750W! The actual maximum will be closer to 1400W on FULL which can boil a 5-qt pot of water in just minutes. I could not read actual amps out of the inverter for any setting less than 5.0. For example, at the 3.0 setting the amp reading ramped up to about 60A for a second and then wound down, then repeated this pattern. I believe the heating element is not capable of a lower amp setting, so it would turn ON and quickly OFF to some timed algorithm. More OFF time than ON as the settings go lower. This is likely why the unit starts up at the 5.0 setting. In the table above, the amp readings in BOLD are actual readings, the lower numbers calculated. There is an obvious linear relationship, so I used a graphical extrapolation method to calculate amps for settings 1.0 through 4.0 which looks like this: Let me tell you how many Ahs I used to cook breakfast this morning! Estimating 15 minutes cook time, half of that at setting 3.0 (40A) and half at 4.0 (52A), so on average I used 46A for 15 minutes. Isn't it amazing, the technology where it is today, that I used only 12 Ahs to cook breakfast! (46A x .25hr = 11.5 Ah) On the #10 setting, you cook boil a large pot of water for pasta in say 10 minutes. This would use 20 Ah of your 260 Ah batteries. You could simmer a red sauce, chili or any fresh made soup for 2 hours on the 1.0 setting using 28 Ah. Sorry, you're under powered to get into the food truck business, but quick meals 2-3 times a day, np. Our 10-year-old less efficient 320W rooftop solar nets +12A when mostly sunning. This means an hour after breakfast in our hull SOC / Total Ahs would be back to where it was just before we cooked breakfast. Your 2K inverter and 260 Ah is just fine for your "Baby Ollie." We couldn't live on it, but I demand induction cooking while Chris toasts bread in the Emeril Oven and we stay cool running the Chill Cube A/C, on our 3KW inverter and 900 Ah. Please don't retrofit to an LP burner. Induction cooking is FAST, well measured, it's just GREAT! In our home kitchen, Chris now uses a single-burner induction cooktop regularly while our GE 4-burner natural gas cooktop sits idly by! 🤣 She can't be without it, now that she knows it. Just ask @Ollie-Haus, who convinced me to buy ours! Just get OTT to rewire your circuit breakers so that induction cooking and everything else is on the inverter circuit except for air conditioning (or have any electrician do it). Thanks for allowing me to learn with you tonight. It was fun "engineering" again! Going into this study, I had no idea the numbers would be this good! 😎 When we need advice, our forum is the place, great collective knowledge here! We thank OTT for providing us this platform. We should expect the company to continue manufacturing the best fiberglass hulls in the travel trailer marketplace, no doubt! 🤗
-
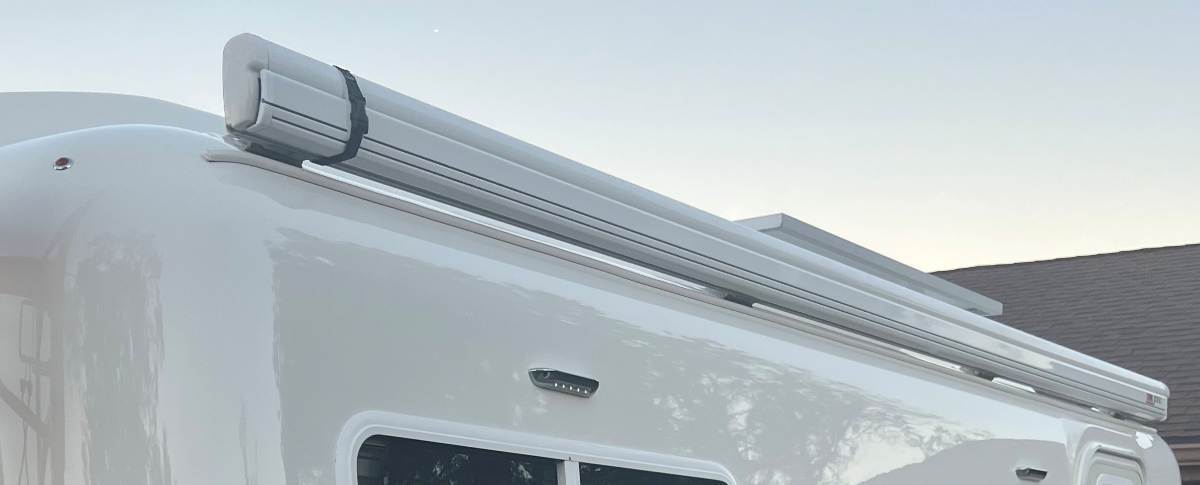
Exactly like ours but not sure for how long. Don't think I used it the first year we had our Oliver and once I did it would not close completely on the rear. We use a rear strap as pictured. Anybody know it there is an adjustment? Mike, good work as usual. You've been first on many great Oliver Mods! 😎
-
Yes good thought, but 3 1/2 years OK, not your issue.
-
Thanks Scotty, this is very helpful and adds a new twist! The Oliver has LED lights for brake, reverse and taillights. The low amp draw of LEDs may not register with the factory brake controllers, cause for the error codes. @Boudicca908's truck is GM vs. Ford but could still be the same issue. This is worth a try! If true in this case, there could be nothing wrong with the factory brake controller, nothing wrong with Oliver trailer wiring, just the factory controller not playing well with LED trailer lighting, wow! Learning this, the U-Haul trailer test I suggested would not be conclusive! If U-Haul trailers have standard automotive incandescent lights the factory controller would not show error with the U-Haul but only trailers like the Oliver with LED lighting. Yesterday U-Haul failed to rent a trailer with brakes and 7-blade connection. I would try this $30 device asap and scratch the U-Haul idea for now. At some point, if you're able to tow a second Oliver and the error messages go away, that would be a viable test showing issues with your Oliver trailer wiring.
-
Reset 2.0 has started squeeking when backing up
jd1923 replied to DunnYet's topic in Mechanical & Technical Tips
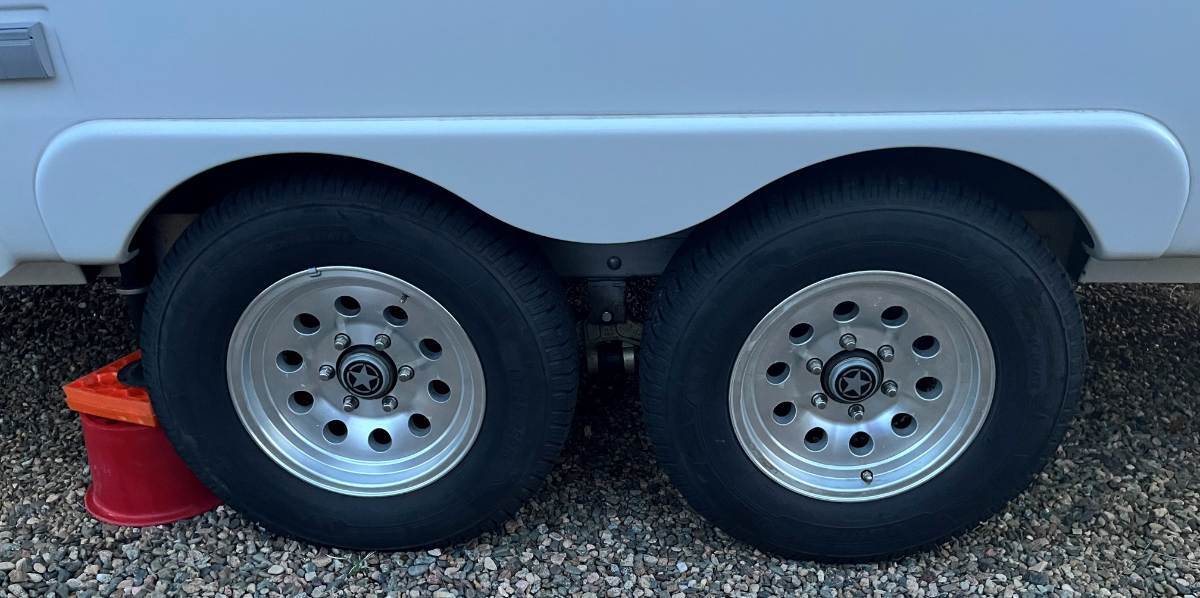
Hmmm! Squeaking one day backing up. RR wheel squeaking another day with the spin test. Spin test today all is quiet after 180 highway miles. Starting to sound more like brakes. They should self-adjust, so yeah issue "diffuses" as you wrote. In automotive issues it's always sound reasoning to think, "what did we work on last that might have caused this?" In your case it was Alcan Springs installation. They could have banged the wheel or dropped the axle on that side. Easy enough to do working on leaf spring replacement. Or maybe they noticed your brakes needed adjusting and tightened the self-adjusters which do not always adjust as they should. You changed your gain from 7 to 5 noting they were grabbing better. A lot of maybes... Try the spin test again on all 4 or... Forget about it until you hear something again when driving or backing slowly, like you did the first time. Enjoy your trip, maybe this was nothing. Two suggestions:1) If you do not have one... Get an Infrared thermometer digital laser gun. When you take a break after a bit of highway towing, asap measure hub and drum temps. Temps on all fours should be close to equal. One hub measures higher than the others, could mean a bearing issue. Higher temp on one drum (or lower meaning shoes not engaging) points to brake issues. You must remove your center caps to measure hub temps. Many of us have. You should like the Texas Star emblems stuck on my Nev-R Lube dust caps in lieu of those standard (big ugly) center caps designed to fit over the old-school bearings. I like Klien tools and purchased this model. It has saved me when my brakes faded coming down a steep range as my brake controller was acting up. I read temps on my truck front rotors up to 400F and waited roadside until they cooled to under 200F. Yeah, when you stop take temps on ALL 8 wheels! Amazon.com: Klein Tools IR1 Infrared Thermometer, Digital Laser Gun is Non-Contact Thermometer with a Temperature Range -4 to 752-Degree Fahrenheit : Industrial & Scientific 2) When you get home follow my how-to on axle maintenance:
-
Adding a Matching Rear Porch Light and some Front Lighting
jd1923 replied to jd1923's topic in Ollie Modifications
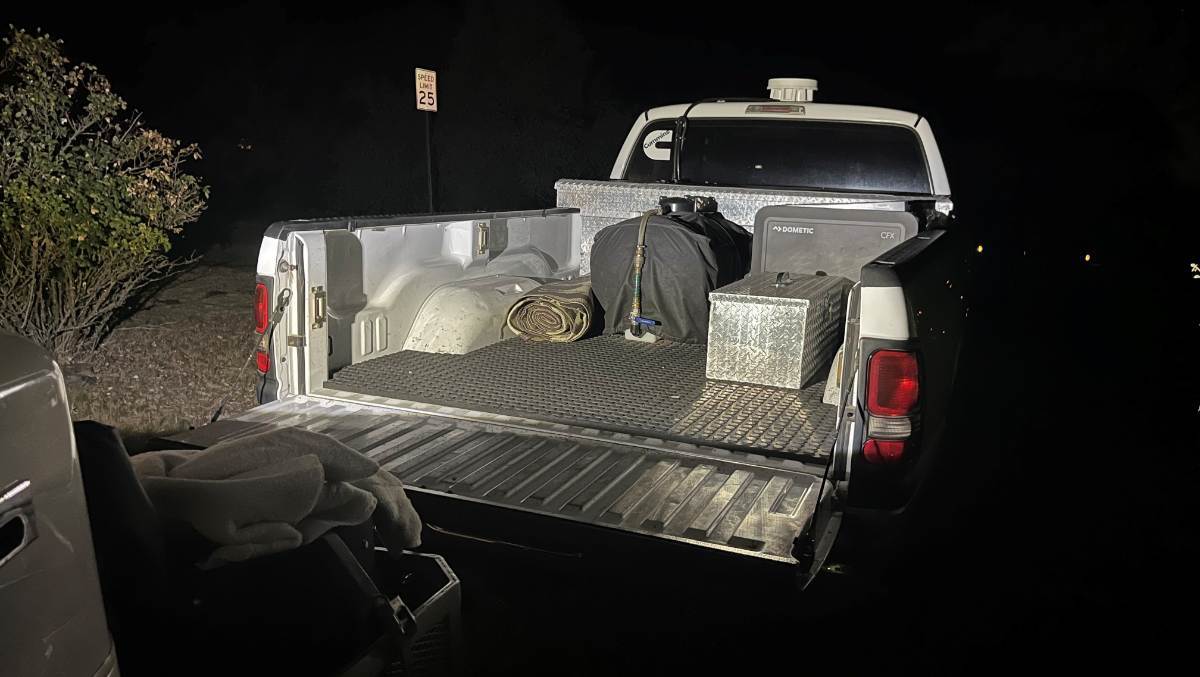
Let me first revise this statement a bit. Love the Rear Porch Light installation, which copies the design and same product used for the Entry and Side Porch Lights! 😎 Not as much love for my new front light, but it's finished and it's not bad. I made a new mounting bracket for the front light from a simple flat bracket. I chose this part since 6" is a good total length and it's 2mm thick. Many SS brackets are thicker which would make it more difficult to form into a U-shaped bracket. Amazon.com: 4 Pieces Stainless Steel Straight Brace (6.1 x 0.7 inch,156 x 18 mm) Flat Straight Braces, Straight Brackets, 24 Pieces Screws Included : Industrial & Scientific Not easy working stainless steel which is a hard steel. I measured the required 2 3/4" width at center. After applying rings of black tape to keep the SS from being marred, I clamped the bracket tightly into a vise at the marked point. I used a jigsaw to cut the groove, running the moving blade right against the vise to keep it in place. I'm not a metal fab guy, so this is the best I could do. I used a "heavy metal" blade, but it wore out after one cut, needing a second blade for the other side. The grooves I cut positioned the correct location and space for the bend. I also believe the heat from sawing helped in hammering a clean angle. Then the bracket was too wide, so I used a bench grinder to cut down the width in the upper portion where it connects to the light. Filed the edges and used steel wool to shine up all sides of the bracket. Sounds like a lot of work but was done in about 30 minutes, (after days of thinking it over)! 🤣 It looks much better now. It's shorter than my previous install and I moved it forward a little. It's visually more pleasing since it doesn't conflict with the lines of the belly bar. It lights up the truck bed fully without shadow. You can see shadow only on the tailgate, but when it's closed the light reflects down to see the trailer hitch and cables if needed. We're good now! But these LED lights are BRIGHT! Maybe later a mini hood attached to the light, so it doesn't hit your eyes when standing to the side. There's always something in the minds of engineers! 😎
-
Adding a Matching Rear Porch Light and some Front Lighting
jd1923 replied to jd1923's topic in Ollie Modifications
But not much room at all. I looked at this yesterday and there's about 3-4" between top of belly bar and the sink countertop. Measure thrice! -
Thanks Rich, his frank language is funny too! 🤣
-
Seeking New Air Conditioner for Hull # 145
jd1923 replied to ScottyGS's topic in Ollie Modifications
My friend Ron, of course you know! Our son Adam played a USTA Tennis Tournament in the very nice Houston suburb of Clear Lake 15 years ago. I remember sitting outdoors, large-brimmed hat on for the sun, I was drippin' wet just watching! 😎 The 16-year-old boys had drenched shirts before the first set was won. Traveling the west vs. the gulf states is night and day. Wish we had a forum member in the east with a Chill Cube for comparison. The Chill Cube condenser fan wets the condenser by design. To my knowledge, no other A/C unit has this feature (perhaps Furrion has a patent). The water-cooled condenser increases the overall cooling efficiency. In very dry climates (the spring is our windy dry season), the little bit of condensate it pulls out of the dry air quickly returns to the air (evaporates). I have yet to see any condensate drip on our hull. When greater cooling is needed and it's humid, the fan should create a visible mist blowing from the condenser coils. More mist means less drip. But when the volume of condensate gets large it would overflow the condensate trough and run down the hull. -
No, I’m agreeing it is likely correct because all the right wire colors are there for a trailer wiring harness. Blue wire is power to brakes.
-
Correct, 4-pin harness is for small trailers without brakes. 4 pins only connects turn signals and brakes lights. They’re wasting your time. You need a heavier trailer, large cargo trailer, car hauler, anything with 7-blade plug like your Oliver!
-
Reset 2.0 has started squeeking when backing up
jd1923 replied to DunnYet's topic in Mechanical & Technical Tips
Just two years old and squeak!!! 🤣 RE the gain on your brakes. My take is the old 1750 LB leaf springs were quite forgiving! The 2750 LB Alcans not so much. The old suspension would allow the hull to porpoise when the brakes contacted. The new suspension will not, so brake contact to road is immediate! More so because your springs have not had break-in time. Put your gain higher when you get back on steep mountain roads, maybe up to 6. And maybe you don't need 7 anymore. My older truck does not have a factory brake controller. The default gain on the Tekonsha is 6.0. I bring it up to 6.2 in the mountains and sometimes down to 5.8 around town. Looking forward to what you see from you inspection tomorrow!