jd1923
-
Posts
3,554 -
Joined
-
Last visited
-
Days Won
269
Everything posted by jd1923
-

elite 2 Extra portable electric dual burners instead of propane burners?
jd1923 replied to Gail Dean's topic in General Discussion
Good call Steve! I found the spec on this unit at 1760 watts. We run our 1500W Emeril Air Fryer all the time (installed in place of the OEM microwave). With a 3KW inverter and ample LiFePO4 SOC you're good. @Dennis and Melissa My only issue with cookers like this is storage space. At 17" L x 14" W x 11" H it will take up the entire space under the front dinette seat or more room in your TV once you store it in a case. Chris keeps a pressure cooker under the front dinette seat. A wonderful device, pot roast in a half hour, yet only about 8" dia and 10" tall. She also keeps dog food down there and several other cooking accessories. -
Lake picture?
-
I would do this. Take a length of the butyl. Roll it and stretch it like using Play-Doh when we were kids! If you can roll it up in a ball and stretch it out again and all the original lines disappear, you have good butyl.
-
Xantrex Freedom XC Pro 3000 Inverter Charger Noise
jd1923 replied to dewdev's topic in Mechanical & Technical Tips
Not sure about the term "breaker rating" but if you decrease the "charge rate" it may help. When you're connected to shore power overnight you do not need a high charge rate to get back to 100% SOC. @dewdev I believe the max charge on your model is 150A. If it is set at this rate, it will produce a bit of noise and for example it would top off 600 LiFePO4 batteries down to 50% SOC in just 2 hours! You could set the rate down to 50A and instead 50% will take 6 hours. Our Victron Multiplus II is rather quiet, though I sleep directly over our inverter-charger. I have our charger set at 100A so it can regain amp-hours quickly. Because of this, the charger kicks in when we first connect at a campsite in the afternoon. By bedtime SOC is normally at 100% and unit stops charging. There has been 2-3 times when it is still charging that time of night (e.g. when running our oven and other 120VAC during evening hours). When this occurs, lying in bed I open the Victron app, turn it off to go to sleep. I turn it back on first thing, and by the time we break camp we are back to 100%! Make sure all your battery settings are correct for your Xantrex. I don't believe this should occur with LiFePO4 batteries. -
Full Suspension Replacement - Alcan Spring and Dexter D52 Axles
jd1923 replied to jd1923's topic in Ollie Modifications
Is that a thing?! 🤣 Thanks, Bill. I thought about at least pressure-washing when she was up in the air, with old parts off! There is a slight chance of some shiny gelcoat down under! -
1UP Quik Rack With Oliver Standard 1.25" Receiver
jd1923 replied to Rivernerd's topic in Mechanical & Technical Tips
Front of TV makes the most sense! Why put more weight on the rear of the Oliver, when Olivers are already tongue light? There's a lot of bounce back there too! We don't carry bikes now, but I've thought some on bringing my dirt bike (240 lbs plus rack weight). A 1-up very light bike and rack, back of the trailer is OK. Going with something heavier, front of TV helps with the balance and both TT and TV! You have to get used to seeing it up there, but it's better than wondering about the rear or watching a camera instead of eyes on the road. -
Full Suspension Replacement - Alcan Spring and Dexter D52 Axles
jd1923 replied to jd1923's topic in Ollie Modifications
A couple 30 mile test drives so far. I've torqued everything 3-4 times now. 90 ft-lbs on the U-bolts, 80 lbs on end spring bolts, 65 on the shackle bolts. After 30 miles with very little trailer brakes, I manually tightened the self-adjusters the the point it was difficult to turn the drums by hand. Next test drive my brakes were 4x better. When any of you are going to Alcan for this service and return there to re-torque, I'd also ask them to tighten the shoes. Don't leave Grand Junction and tow any steep mountain declines until the shoes are properly seated. One of the rear stabilizer jacks started to slip with all the ups and downs doing this work. However, I maintain/strongly recommend using the onboard jacks for service and tire changes vs. the risk of damage using some aftermarket jack. My next Oliver project is restoration of all 3 Barker VIP 3000 jacks! 😎 With Nev-R Lube bearings and ALL new suspension parts, it's relatively carefree. Check the bearings/brakes every couple years. We don't tow as many miles as many of you do. I left the center caps off for now to check bearing and drum temps. I'm not carrying a spare set of leaf springs anymore. Since I have a drum/hub with bearing off the first axle set, I'll put it in my toolbox. It should just sit there in case. If I sell the other axles, I'll buy 2 Nev-R Lube bearings and I already have correct bearing press and tested its use. It's a good feeling towing a reliable trailer down the road and no worries about the next rocky Forest Service road either! Hull #113 doesn't waddle like a duck anymore when entering a service station driveway or crossing RR tracks on an angle, she's tight, she's done! 🤣
-
Full Suspension Replacement - Alcan Spring and Dexter D52 Axles
jd1923 replied to jd1923's topic in Ollie Modifications
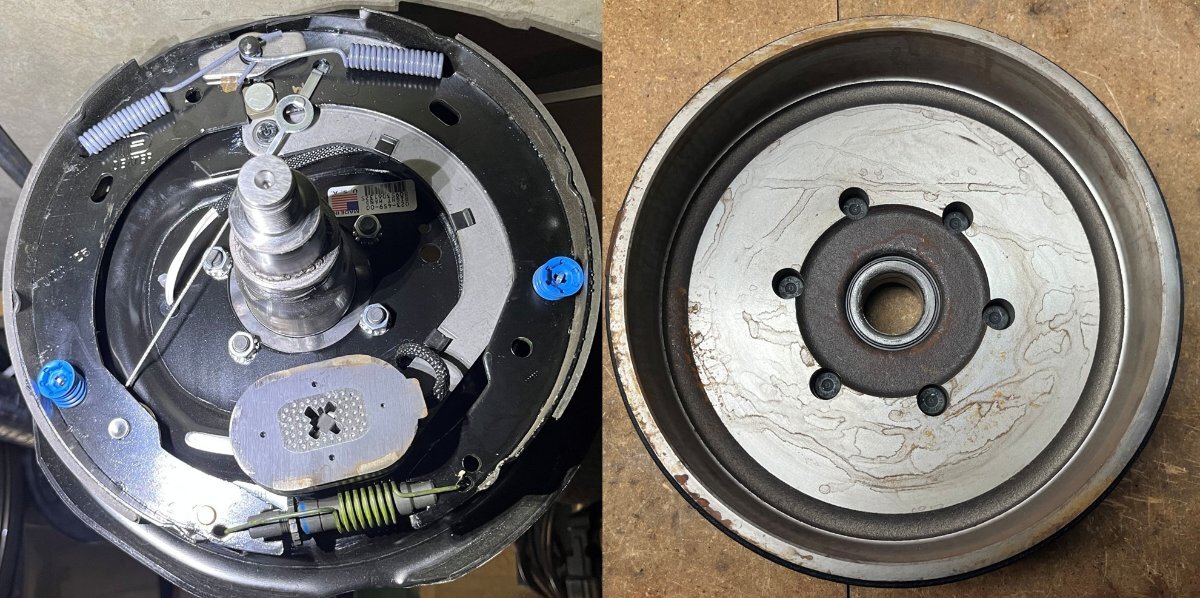
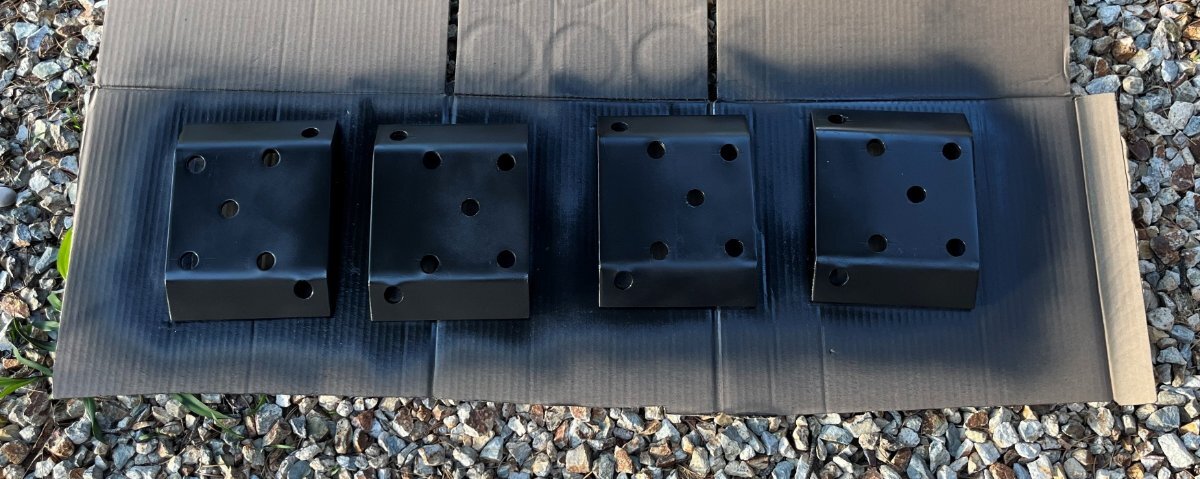
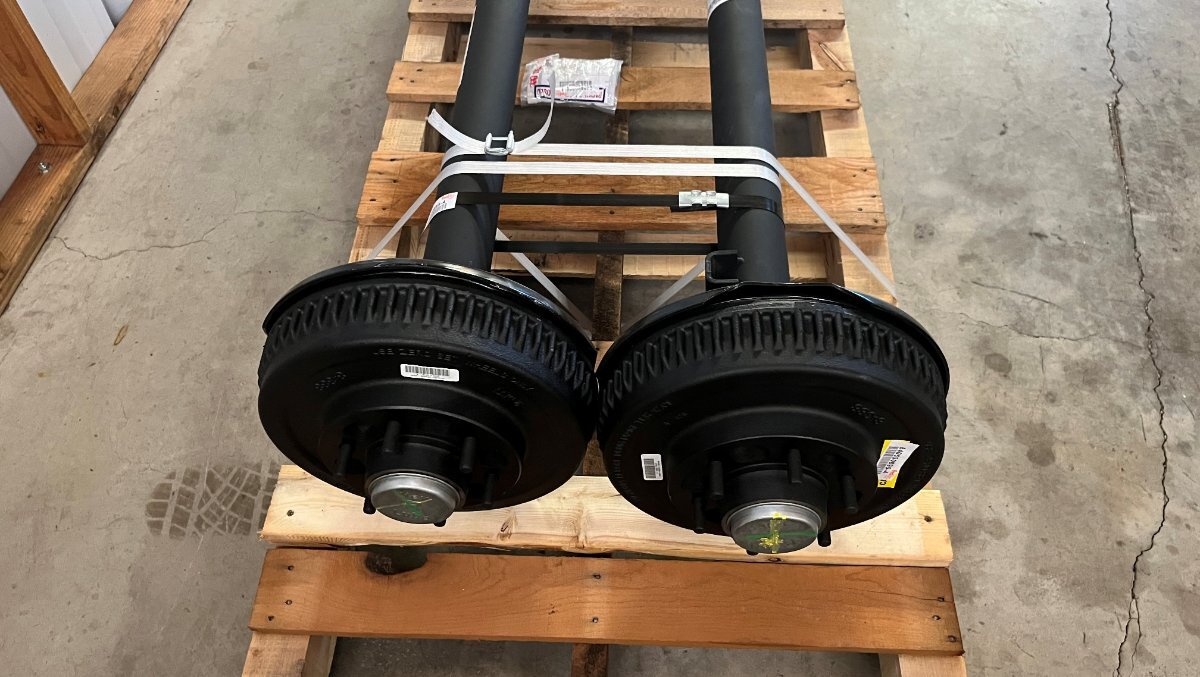
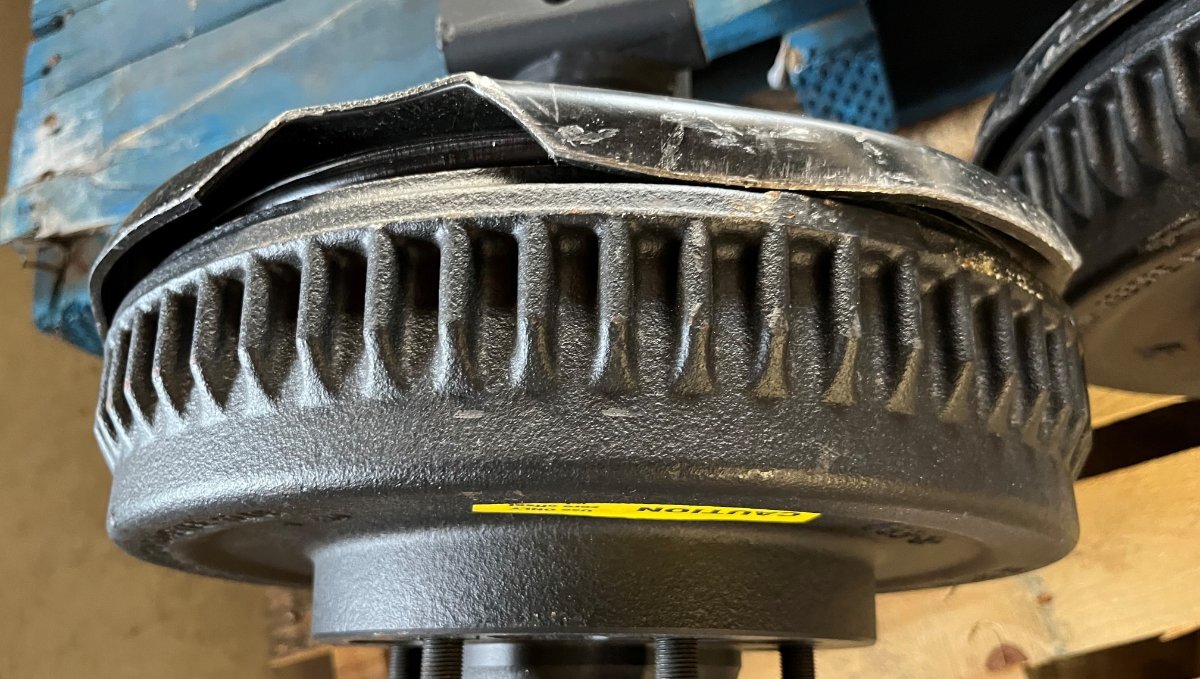
The Alcan springs are an obvious upgrade and the Dexter D52 axles as well. Tim at Alcan got Dexter to refund my shipping cost for the inconvenience of the damaged axles and another 2-week wait. I thought $200 to ship two axles freight was very fair, but I'll take free shipping in a heartbeat - thank you Alcan and Dexter! FedEx Freight contacted me re the 2nd shipment more quickly than I would have thought. I asked the rep, "Is this the return order?" She said she did not know of a return. Turns out Dexter did not want them back! So I have all the spare parts I need, 4 drums with Nev-R Lube bearings, 4 backing plate brake assemblies... Or perhaps I should replace the damaged brake assembly and this set would be good for another Oliver with 50" axles. There are only a few Olivers out there with the 1/2" shorter axles. The 12" brake drums are certainly more substantial, though my side-by-side photo does not do them justice since I made them the same size as the 10". Another photo shows the internals of the 12" Self-Adjust and Nev-R Lube setup.
-
Full Suspension Replacement - Alcan Spring and Dexter D52 Axles
jd1923 replied to jd1923's topic in Ollie Modifications
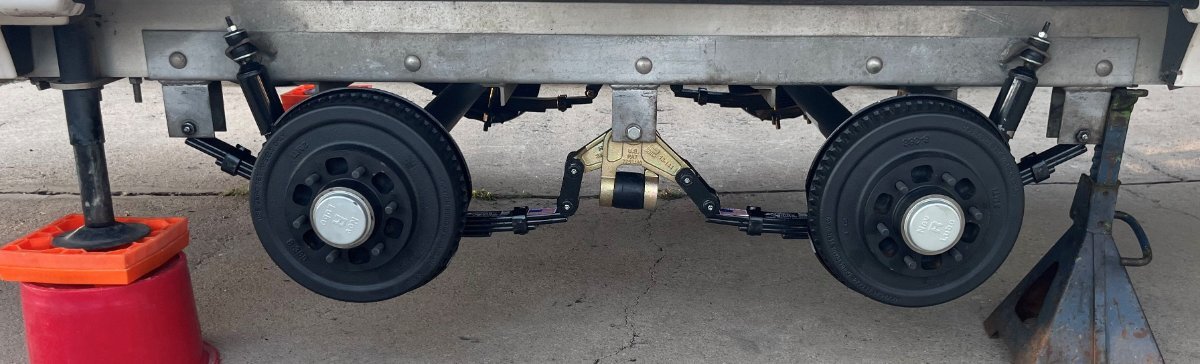
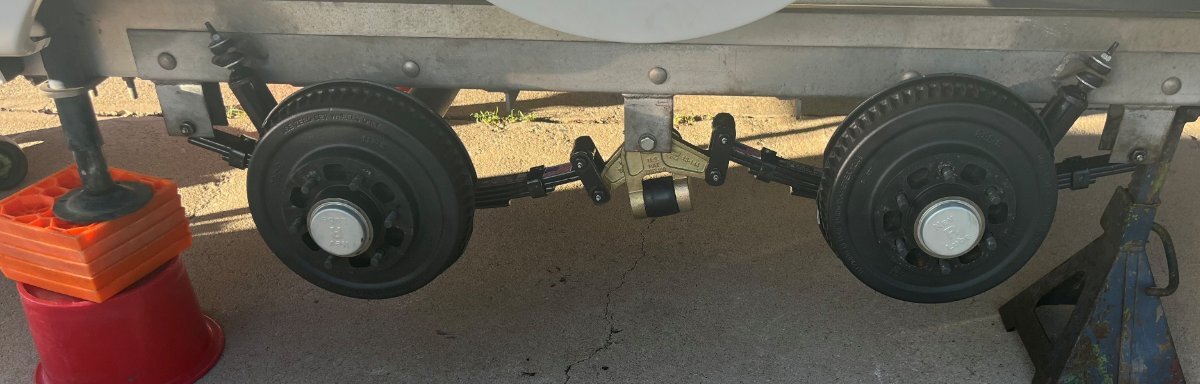
Next step is to build the new suspension. I made a mistake in assembly, then contacted Lew at Alcan and he got me straight in a minute! Notice the first picture, suspension jacked up, wheels removed, axles hanging. I thought I could mount the new leaf springs in the same manner, not true! Remember reading posts here about having to flip a shackle, after lifting the Oliver to change a tire or something? On the OEM, old weak and lose suspension, a shackle could drop down and you could drive over a curb and the shackle would flip back up. Not with the HD Alcan leaf springs. They must be mounted shackles up to start, as they are NOT going to flip! 🤣 This also means that when changing a tire after your Alcan upgrade you will not have to worry about the shackle falling, they will certainly stay up! Pic1 shows the original suspension, pic2 how I first installed it, pic3 shows the suspension corrected shackles up. It was not fun, nor easy to remove the wet-bolts to flip these shackles. You must have the Oliver jacked up evenly, front-to-back and side-to-side otherwise there is stress on these bolts keeping them tight. On our driveway, slanted downhill it took me a couple of hours on each side to get the leaf springs aligned to make this correction. BTW, if you want to change the equalizer by itself, that job would not be fun either. Replace the equalizer when you replace your leaf springs.
-
Full Suspension Replacement - Alcan Spring and Dexter D52 Axles
jd1923 replied to jd1923's topic in Ollie Modifications
Thanks Rob! It is a bit of work replacing the Oliver suspension. I will add though, when I completely restored the suspension on our tow vehicle it took much more work and knowledge of mechanics. The Oliver suspension replacement is basically bolt-on! 🤣 -
Full Suspension Replacement - Alcan Spring and Dexter D52 Axles
jd1923 replied to jd1923's topic in Ollie Modifications
I thought I should mount the leaf springs to the axles on my garage floor and then roll the entire assembly into place for installation. I wanted the leaf springs and U-bolts as square (perpendicular) as possible. I noted each leaf was basically 4" from the brake backing plates, so I found a 4" spacer to use for assembly. Also, the U-bolt tops should be 2 1/8" apart and I had a socket this size to gauge. Not sure how the pros do this. Do they just lose-bolt everything together and torque down after mounting? That would certainly be quicker (likely). Turns out i had to loosen the U-bolts on one wheel to get the hanger bolt to align and push it through. Then It took me an hour to realign the U-bolts to get them square again! You need to reuse the custom U-bolt ties, the lower plates with the shock mounts. I cleaned and painted them. The centering hole had to be drilled out some for the larger bolt on the new springs. I mounted each spring so that the Alcan label and Made-in-USA flag would be facing outwards. The left side of the axle is the side with the brake wiring. When torquing the U-bolts to 90 ft-lbs, I used a caliper to ensure thread lengths on either side of the U-bolts were close. I re-torqued them the next day prior to installing since it's easy while sitting on the floor. Several reasons why when you do this work for yourself it does take longer! When remounting these tie plates, I switched them left-to-right. This allowed me to mount the shocks to the bolt-hole on the other side that had not been previously used. You may be able to see in the picture that the bolt-holes used over the last 10 years were somewhat oval-ed from use. Nice, eh? 🤣
-
Full Suspension Replacement - Alcan Spring and Dexter D52 Axles
jd1923 replied to jd1923's topic in Ollie Modifications
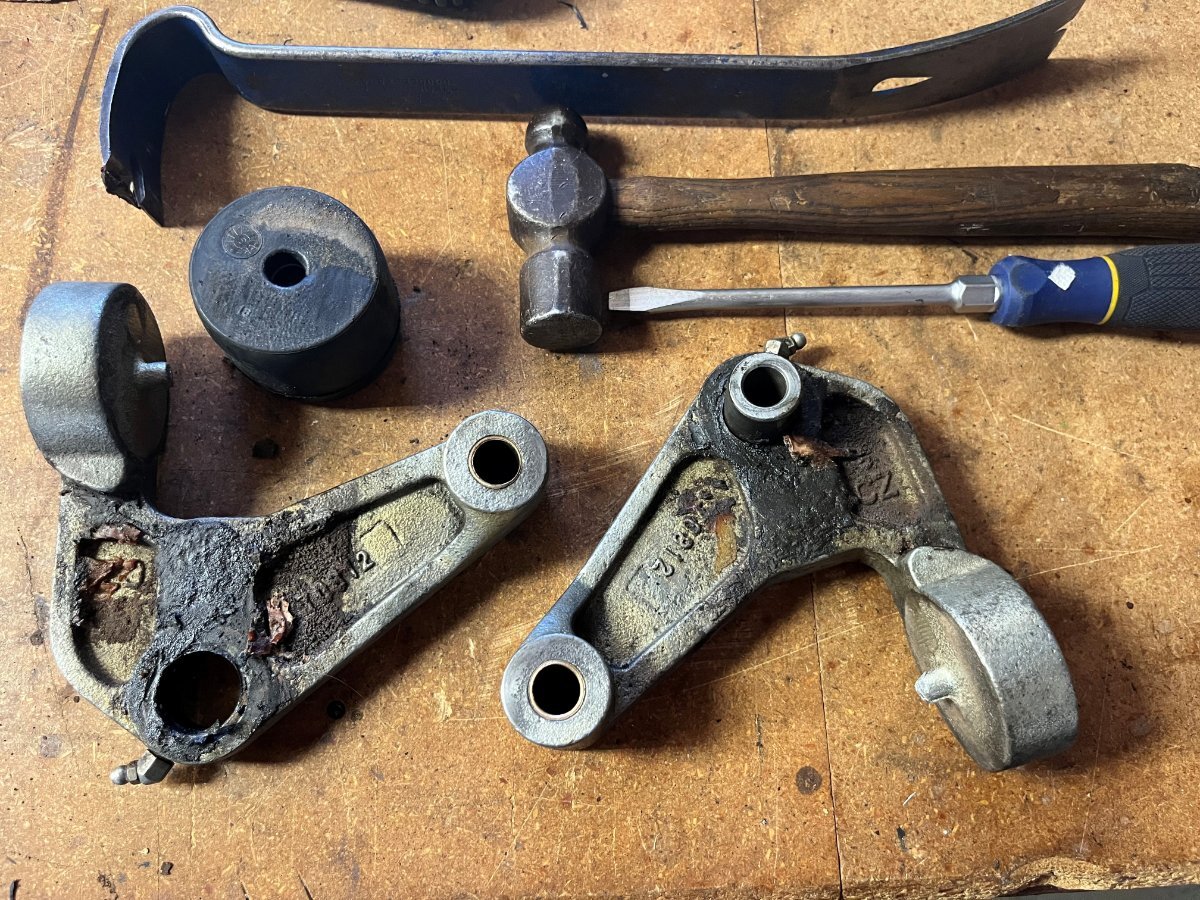
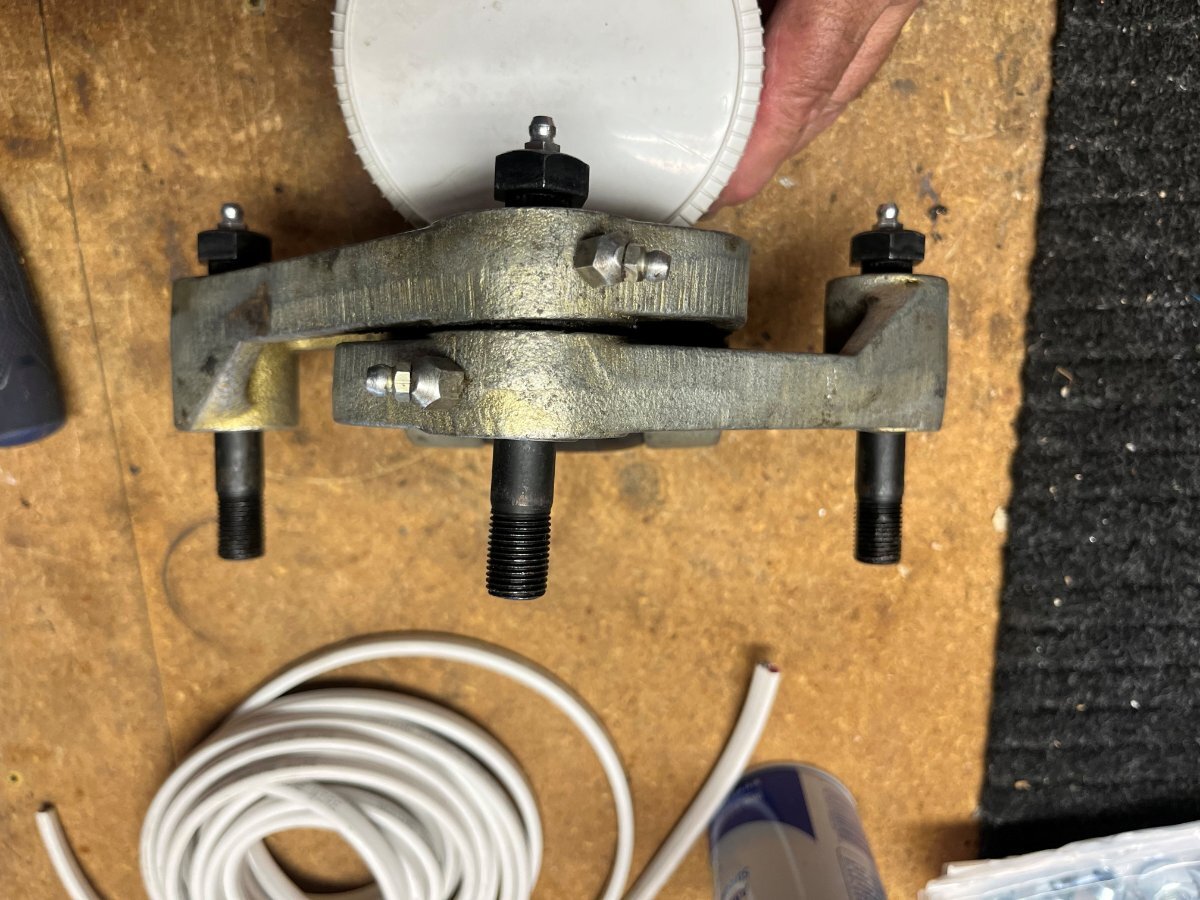
Most of us have the Dexter EZ Flex upgrade which includes bronze bushings, wet bolts, HD shackles, etc. You want to check on the condition of these parts during this installation. Going to Alcan for service? I suggest you bring new EZ Flex equalizers with you to have installed with your new leaf springs! I purchased new wet bolts and HD shackles from Alcan since the new leaf springs have new bronze bushings and I wanted new on new. It was suggested to reuse the center equalizer of the EZ Flex. Turns out ours, installed by OTT in 2018 had seen better days! You cannot truly inspect these parts without removing them and better yet is to fully disassemble them. I've read these parts are not serviceable but you can see here that they could be, yet Dexter does not sell bushing kits for these. I had to buy new equalizers and mounting bolts, another $316 at eTrailer. They can be disassembled by prying the two levers apart. To put them back together you need a LARGE Channellock (or vise), one with jaw opening greater than 4", squeeze square and slip the center sleeve back into the bushings on each equalizer lever. Notice the cock-eyed bolt alignment in the second picture. I believe the dual lever design creates the off-angle wear over time. Keep up on wet-bolt torque settings (65 lb-ft per Alcan) including the center equalizer mount bolt and this should help keep the center bushing square. As I disassembled the original suspension, I noted every wet-bolt was too lose! I'll do better going forward now that we're starting from new! Re-torque annually after the frequent adjustments required during break-in.
-
Full Suspension Replacement - Alcan Spring and Dexter D52 Axles
jd1923 replied to jd1923's topic in Ollie Modifications
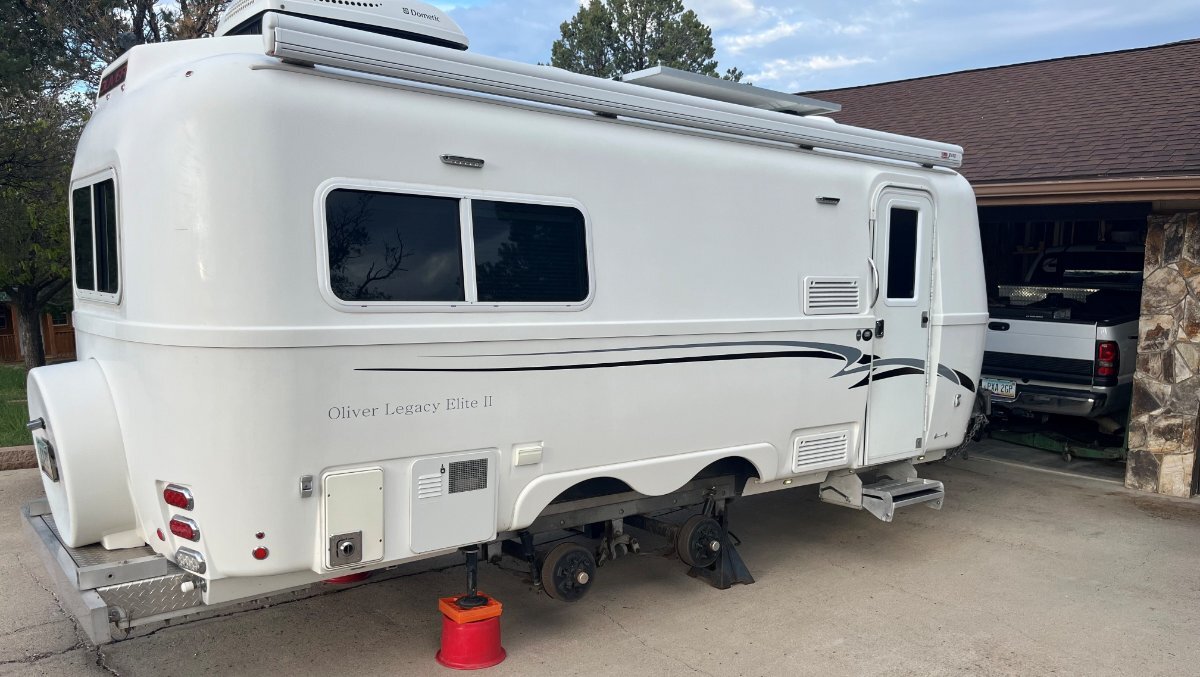
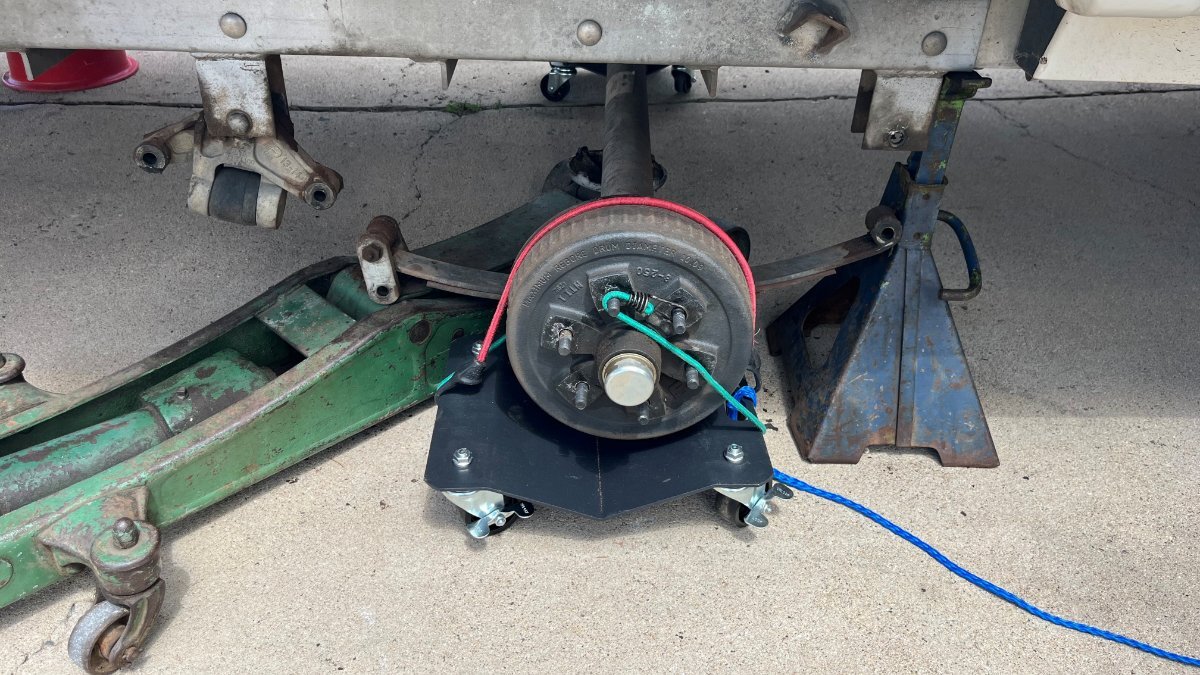
Next step was disassembly and removal of the original suspension. This took about two hours on a first afternoon. The Oliver should be connected to the tow vehicle when doing this, so given our short driveway the truck had to be in the garage with garage door half-open for a few days (TG no Pack Rats in the garage)! I used the rear stabilizer jacks to lift wheels off the ground and then placed jack stands at the front edge of the steel subframe, and lowered the rears to balance the weight of the hull front to back. Thinking this through a few days prior, I realized a pair of wheel dollies would allow me to do this work without a helper to carry axles. Picked up a pair on Amazon for a little over $50. It was great to roll out the old and later roll the new axles into position! Since I've done this work at home and replaced an entire working suspension in relatively good shape (no flat spots in the OEM leaf springs), I have the original suspension listed on Craigs, hoping to get $800 on the entire setup. There are a lot of guys in Arizona that build homemade ATV trailers and this would be perfect for that use vs. spending $3K for new. Wish me luck! 🤣
-
Agreed, it seems to fit this way.
-
1UP Quik Rack With Oliver Standard 1.25" Receiver
jd1923 replied to Rivernerd's topic in Mechanical & Technical Tips
If anybody would like to buy an OEM 2” receiver, at a reasonable cost, I have one removed from ours. Shipping would not be reasonable, so keep it in mind for anybody visiting AZ, going to Quartzsite this winter, etc. -
2+ years for me and still haven't yet gotten to your #4. I've done all the others except been waiting on A/C since we try to be 3-season campers, stay home during summer. Hoping this new year a great new inverter-compressor A/C model hits the market! If we needed A/C today, I would purchase the Turbro Greenland, still on sale for $1,200. Go Greenland if you want to run A/C off batteries/inverter, go Tosot if you want super-quite and if you can afford Truma, many here vouch for it, but must be dealer installed. https://www.turbro.com/products/greenland-13500-btu-inverter-rv-air-conditioner-with-heat-pump Cave Creek - cool, we're neighbors! We often stay at the Maricopa County Regional Parks during Jan-Feb just for a quick get-away warmer weather. Been to Cave Creek Regional Park a couple times, will get up to the Horny Toad for some fried chicken and it's close to everything in Scottsdale and the NE Valley. Maybe we could meet up this winter. Many Oliver owners go to Quartzsite during Jan-Feb too! We should revisit this year to meet up with Oliver friends!
-
Day one, first trailer, you first thought was the “suspension overhaul would be a good start!” We all have made good and bad decisions with our RVs and trailers! Your first action is profound! Go man, great start, do it, and ask away with your questions! 🤣
-
Christian, it's thorough of you to replace new equalizers too. I observed the internal bushing wear that can only be recognized when disassembled, not sitting mounted. The dual-lever design of the EZ Flex equalizer causes the center sleeve to swivel back and forth with use, ovaling the bushings on each lever. My guess is that any trailer that has run several years, greater than 20K miles should replace this part. I'm happy that ALL hardware has been replaced in working my upgrade. I wasn't sure re the red ones The red ones states 8000 LB and eTrailer does not have a weight spec listed on the gold ones. Our EZ Flex was installed in 2018 and they were gold, so I order the gold ones which comes to a $45 + tax savings. I also purchased two new mounting bolts for the equalizers. Red or Gold are for 35" wheel centers and they both show the same measurements picture showing 7 3/4" center-to-center left-to-right. I ordered two of these and two mounting bolts as well. Congratulations on your new Oliver!!! 😂 https://www.etrailer.com/Trailer-Suspension-Parts/Dexter/013-144-03.html https://www.etrailer.com/Trailer-Suspension-Parts/TruRyde/TRFA73Z916DLNZ.html
-
Full Suspension Replacement - Alcan Spring and Dexter D52 Axles
jd1923 replied to jd1923's topic in Ollie Modifications
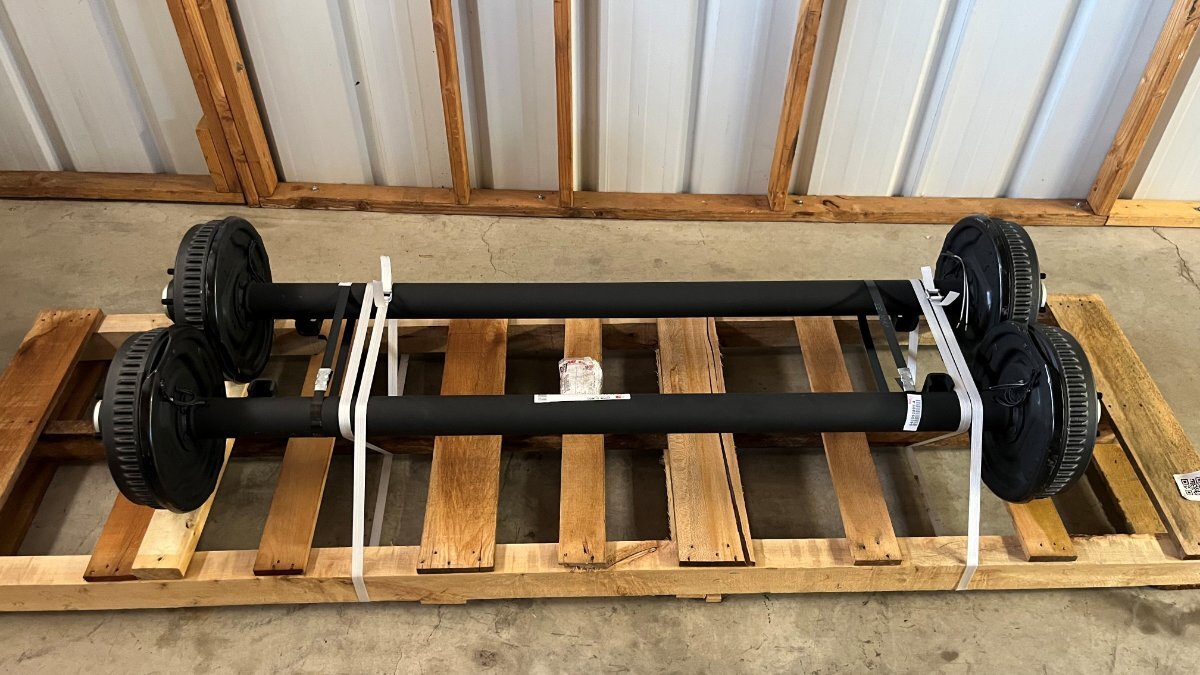
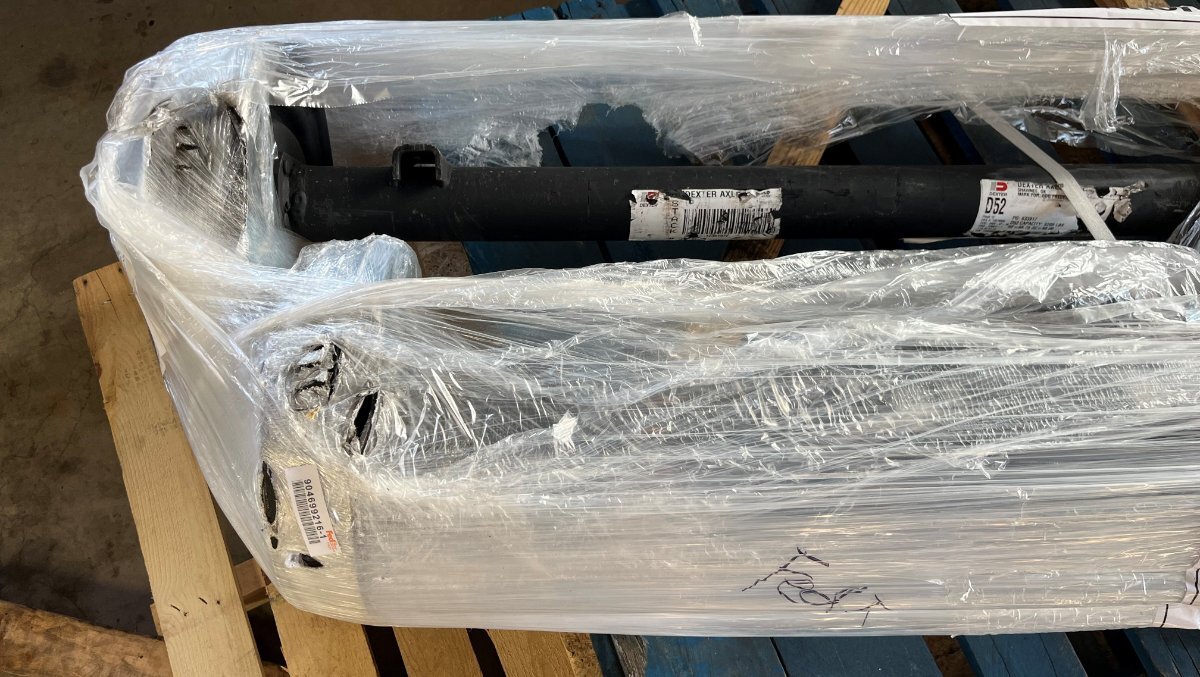
It was exactly 2 weeks as promised and the replacement axles were here. This time they were mounted on a custom pallet 100" long! Two steel straps holding one to the other and two nylon straps to the skid, and no furniture wrap! 🤣 It's time for the work to begin. I'll walk through the process but enough for today. It's been fun working on this, first axles install ever for me! There will be several points to consider in having this work done, that I will discuss later. Not too many of us would do this work ourselves. Going to Alcan Spring is a great excuse to visit SW Colorado! 😂
-
Full Suspension Replacement - Alcan Spring and Dexter D52 Axles
jd1923 replied to jd1923's topic in Ollie Modifications
So while I was waiting for the new shipment, I thought why not check out the inner workings of the Dexter Nev-R Lube bearing? In seemed a reasonable use while these damaged axles were hogging up space on my garage floor! -
Full Suspension Replacement - Alcan Spring and Dexter D52 Axles
jd1923 replied to jd1923's topic in Ollie Modifications
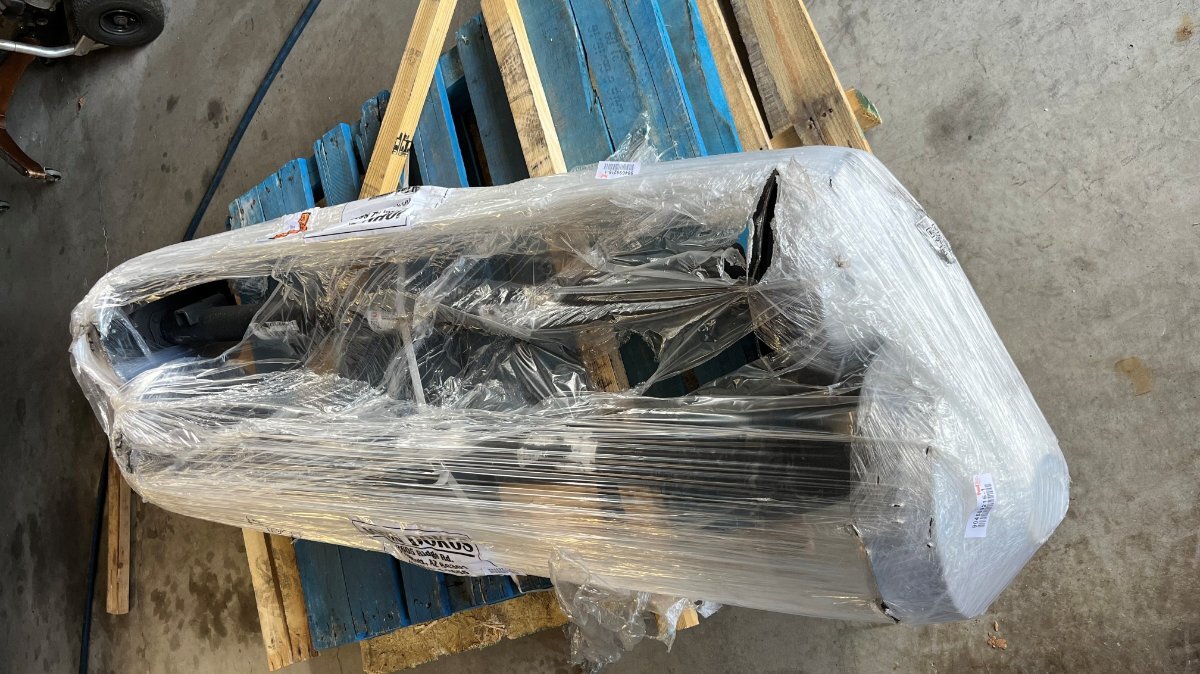
Dexter estimated 3-4 weeks to manufacture the new D52 axles, and it was just 4 weeks when they were delivered to our home. The bad news was that Dexter did such poor job packaging they came to me a basket case. What a waste! They used a single nylon strap (and a whole lot of stretch wrap) to secure the two heavy axles to a standard sized skid. But trailer axles are longer than a skid! They had slipped off to one side! FedEx Freight propped up their packaging on another skid but the damaged had been done. The one drum hanging lowest took a bad bang bending the brake backing plate, to the point that the drum could not turn at all. These could have been repaired, but soon enough I decided to refuse the shipment. Why should I pay over $2K for this mess?! On the weekend, I emailed Tim at Alcan Spring to report the damage, several pics included. When Tim called me first thing Monday morning, he already had contacted Dexter re the shipping damage and got them to place a rush replacement order, with promised delivery in 2 weeks. I accepted their offer.
-
Full Suspension Replacement - Alcan Spring and Dexter D52 Axles
jd1923 replied to jd1923's topic in Ollie Modifications
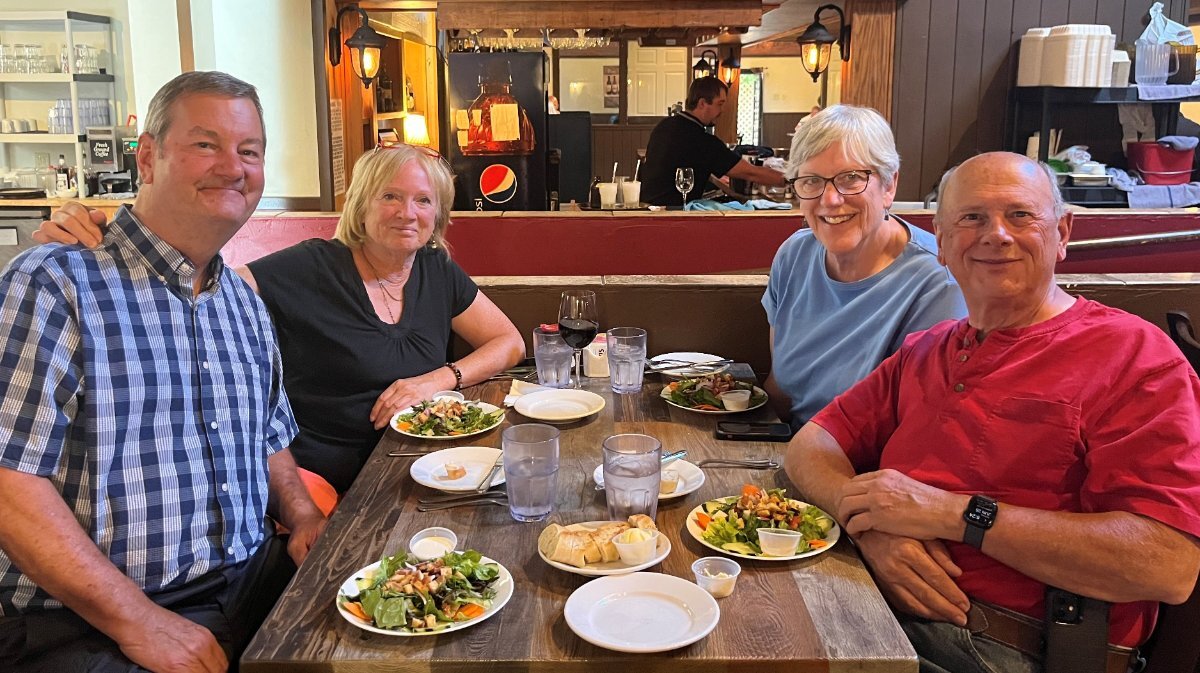
Met up with Ken and Mary Kay in Montrose and we had a great time together! They had dinner ready for our for first night at Riverbend RV Park, considering our long day. Our second night we went to dinner at Ted Nelson’s Steakhouse! A couple days later we had another evening together at our next campsite, Basecamp550 between Ridgway and Ouray. We headed home slowly, other good camps along the way. They stayed another few days at Riverbend until their scheduled Alcan Service appointment.
-
Full Suspension Replacement - Alcan Spring and Dexter D52 Axles
jd1923 replied to jd1923's topic in Ollie Modifications
Seeing is believing! I’ve worked manufacturing a few times in my career, like the ol’-school RAM Golf Club manufacturing back in the early 70s in Melrose Park IL. Later I spent a decade, the 90s in Motorola manufacturing! My immediate first impression, observing a relatively small manufacturing facility which I truly appreciated! I realized a team of good people, working hard with little to no BS, and as busy as they were they took time with me, helped me answering all of my questions. If they could have serviced me that day, or that week, I would have stayed and had the work done. I knew from the start that I would not upgrade springs without upgrading to D52 axles. I’m one of the unlucky few who not only got the inferior D35 axles, but also in a half dozen hulls where OTT installed the 1/2" shorter 50” axles (what the, why?)! Alcan had a skid full of the 50.5” axles from all their Oliver business of late, but replacement of the rare 50” axles must be special ordered! So I’m talking/texting with Ken, when he said, “Don’t let them sell you my springs! 🤣 Ken had a service appointment scheduled for the very next week. I purchased Alcan Springs on this day. When Tim said, they could special order for me the correct 50” axles for our hull and charge me the same going price Oliver owners were paying for the 50.5” axles which they had purchased in bulk. This read like a very good one-time good offer, from a helpful, fully knowledgeable company rep! This is TRUE Customer Service! 😂 All I could say is “let’s do it!” Renee wrote up the order. Tanner assembled the leaf spring parts they manufacture in house, and then he went through their installation instructions and torque specs and later loaded the spring parts in my truck. I wrote Renee a check for half+ down and an hour later we were back on our trip! What was accomplished in an hour was spectacular! Lunch and a fuel stop in Grand Junction and we’re headed out of town…
-
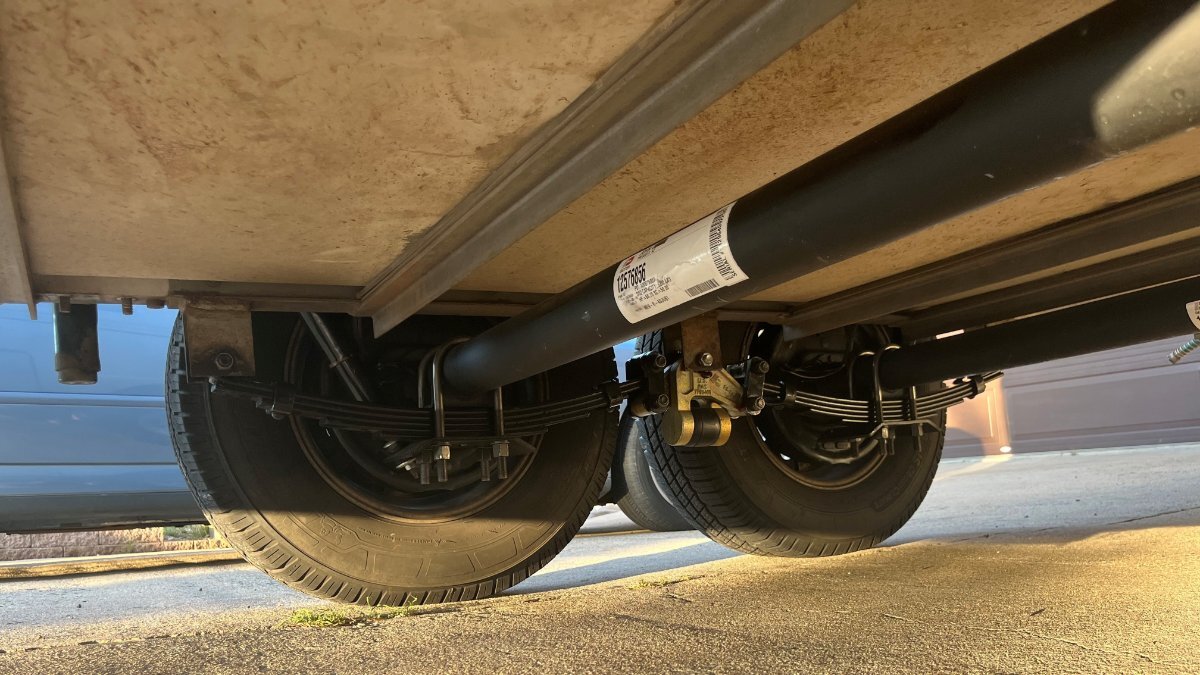
Our OEM suspension was still in good shape. I had worked a full brake service, including the Timken bearing upgrade, two years ago just after we purchased our Oliver June of 2023. Our OEM leaf springs were still properly arced and no rust given life in the SW, never an issue. Until the “Made in USA leaf springs” forum post came up, I had not worried about it, nor ever concerned that the Oliver suspension might be undersized in some way. I headed the warning, but not at first wanting to pay for this extensive upgrade, so I purchased a spare pair of 1750 LB leaf springs and U-bolts to have on hand in case of possible failure on the road. We were on our 5-week June trip to Minnesota, and on the way back we took the northern route. I wasn’t at all thinking about a suspension upgrade! I’m in regular communication with our friend Ken @mountainoliver and realized they were camping in Colorado and perhaps we could meet up. They were there waiting for their scheduled appointment at Alcan Spring in Grand Junction CO. At the time, we were camped in North Dakota on the great Missouri River! But were soon cross Colorado from the NE to the SW on the way back home. Given we could see our friends and the many mentions of Alcan on the Forum, I thought we should visit Alcan Spring to at observe their operation. I called and talked to Tim and made an appointment to visit, not a service appointment. "Every picture tells the story" don't it! The first pic is much later in the process as a preview and the second one was only two years ago after working a complete brake/bearing maintenance. I believed we were good! 🤣
-
Our Oliver came with the Lippert chrome manual lock. We also read here regarding many failures to the touch pad and batteries loosing charge at just the wrong time. $220+ for keyless entry, sorry no thank you. Our hull being 10 years old, the door lock is still working as designed but gear mechanisms and striker parts do wear out over time. I found this on Amazon and at the time it was only $50, same lock in a nice white powder coat. It's for when we need it or when we may upgrade our entrance door. And yes, extra keys are easy to have on hand too! Just match the code on your key to your order. https://www.amazon.com/dp/B00S2IELG6?ref=fed_asin_title https://www.amazon.com/Pair-Keys-Global-Link-Precut/dp/B0BQWVR6YP/?th=1