jd1923
-
Posts
3,578 -
Joined
-
Last visited
-
Days Won
272
Everything posted by jd1923
-
Got my email today too. I just signed up and paid $3.54 for this month and will be billed $5 monthly starting September. What-cha goin' to do? At least the un-pause will occur quickly. It would be a pain to cancel and create a new account each time. Also, it allows you to setup the dish and test when paused. Soon I'm going to work a "Wi-Fi to WAN" setup on our Pepwave router. So now I do not have to wait until we're getting ready to travel to resume service. We're leaving again in about 5 weeks. The longest we're home not camping is 2-3 months. Perhaps it's not the nickel-n-dime thing but for account maintenance issues. They likely have 100,000+ accounts on pause and without a small monthly billing they do not know whether they should carry the account. Keep in mind the value of the $50 plan. Also, if you're planning a trip for the last 2 weeks of your billing cycle you pay half the $50 or $165 plan cost (know your billing cycle date). Try that with Dish network (they charge one full month, use it or not) or with DirecTV, Verizon, etc. with their 2-year plans. I still believe Starlink service cost is quite fair.
-
You and @Golfnut with LEI have this. Just got my new axles yesterday and they are rated the full 5200#. Must be an LEI thing likely limited to 5033# due to the springs. Good news, my axles are here! Bad news, Dexter packed them so poorly, they came badly damaged and going back. Alcan was the reseller on the axles. I special ordered the 50.00" axles from them. They got right on the phone with Dexter this morning, forward the many pictures I took showing the damage. Dexter will Rush Order my axles but rush means another 2 weeks plus shipping. Notice dinged Nev-R Lube cap and dented backing plate. So bashed in that the drum on the left will not turn. What a waste!

-
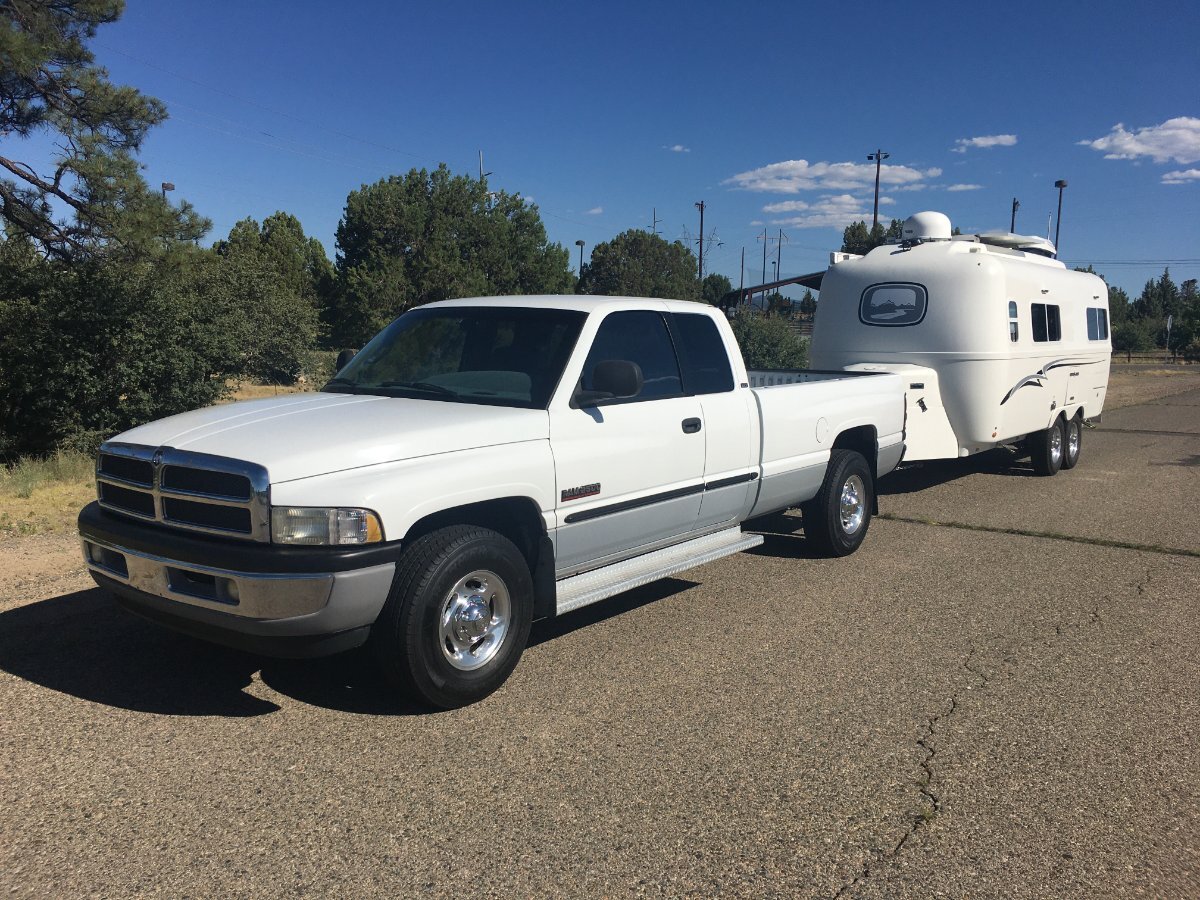
Very NICE! Extended cab and long bed, love it! I thought the big three stopped making extended cab trucks. Everything seems to be quad-cab (or larger) and short bed. Love when the back door is not getting in your way. I guess you're going to keep this one a while! 🤣
-
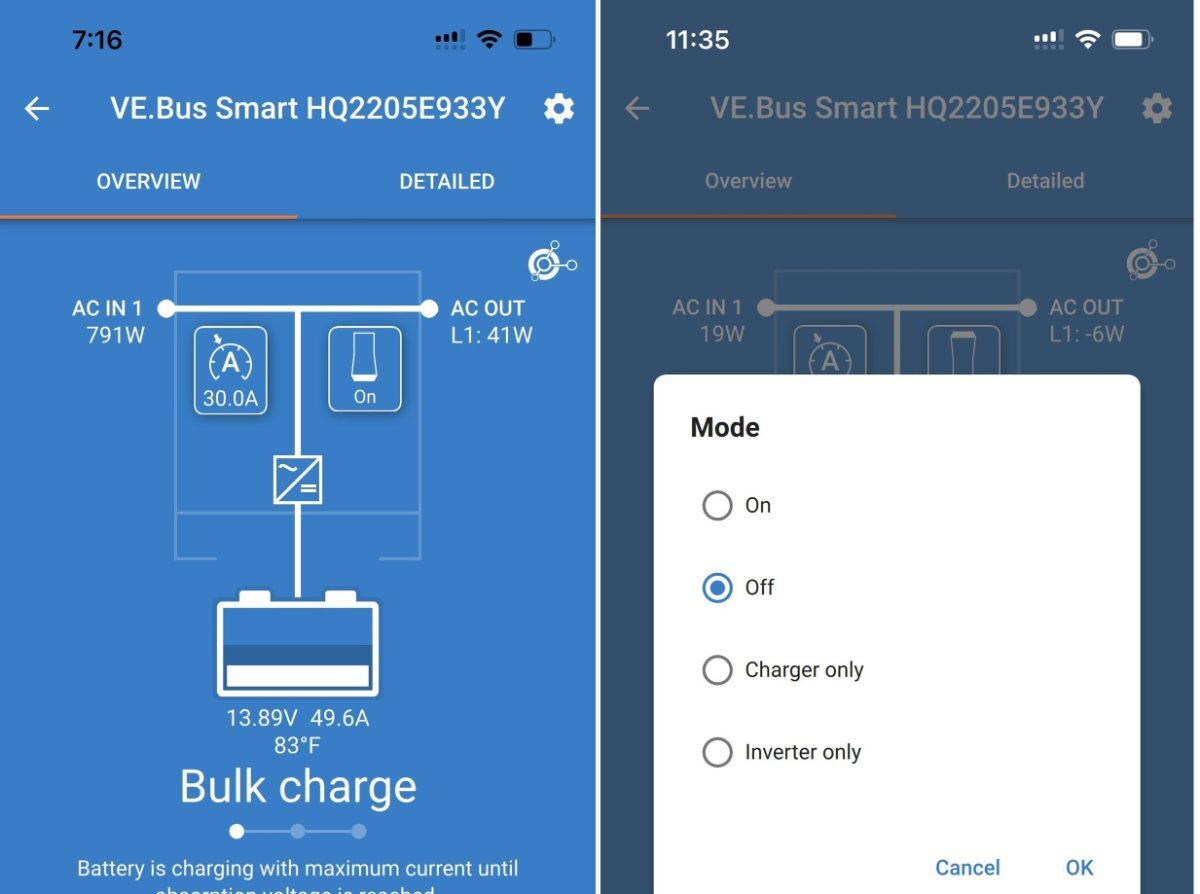
This is correct, I have tested it. The same for "Inverter Only." I've never seen the need to turn the inverter off when connected to shore power. When connected to shore power the Victron MP2 ON acts as an UPS, backup power for brown or blackouts and 1Ah drain is negligible when on the cord. My only issue with no pass-through power is if the MP2 was to fail the 120VAC could be left in an open state. I have a few wire nuts for this small likelihood and your switch idea would also gaurd against inverter failure. Thanks
-
We keep our Victron Multiplus II on ALWAYS because we use AC appliances all the time! Also, with the MP2 full OFF does not allow for shore-power pass-through. There are 4 states as seen in the menu which can be changed via the VictronConnect Bluetooth App (see picture). The MP2 is more efficient than the original Multiplus as follows with power saving modes: - Zero load power 13W - In AES mode 9W - In Search mode 3W 13W is about 1A or 24Ah used per day (I don't bother with the power savings Modes). Since our Oliver is always outdoors, it takes about 3 hours of sun or 6 hours of clouds to replenish the 36Ah in 24 hours, the 24Ah for the inverter and another 0.5Ah x 24 for DC usage, Exterior Courtesy Lights ON and DC parasitic draw. I will on occasion turn the inverter off overnight, for example when charging is creating noise under my bed or when boondocking and SOC is low from use (<50%) and we need to be off-grid more overnights. On the rare occasion when the inverter is turned OFF overnight, Chris will try to start the electric kettle for coffee in the morning and when she gets no power she knows. So, I turn it back on using the app while still in bed! Our batteries have to be really low to use LP. The 1100W electric kettle (usually draws 900W) boils water in half the time. When SOC% gets low we have DC-2-DC charging and an extra 400W in suitcase solar. Our Epoch and Victron upgrades are GREAT and we use them to the fullest!
-

Million Dollar Highway in a half ton truck with LE2?
jd1923 replied to routlaw's topic in Towing an Oliver
Ours is an old 2001 2nd Gen Cummins 2500. For 18 years we had a 2003 3rd Gen Ram, neither had exhaust brake. I don't believe it was an option on pickups back then. No tow mode either and only a 4-speed trans. It has an Over-Drive OFF button which keeps it in drive (3rd gear) and you can manually select 1st or 2nd. I used 2nd on very steep descents where 25-30 MPH is good. I use OD-OFF when climbing a steep incline where 55 MPH is a good speed to climb and it holds there nicely. -
Anybody know what is the make/model of the Oliver closet rod? Please attach a link if you have one! Picture attached is what we have on our older hull, perhaps OTT changed this through the years. We want to install another closet rod further back to hold bath towels. If we could hang at least 2 clean bath towels back there it would help! The closet rod is about 24", though I did not measure. To put one behind I'd have to cut it down to 15". It would be nice to install the same model for a clean installation. Thanks!
-
They just changed the Promo Code to 20% OFF! The Turbro Greenland is now $1,200 plus tax.
-
We use these speakers on occasion, only when Chris connects music on her phone by Bluetooth. I don't like the speaker right on top of my head in front dinette seat. We use a high quality soundbar for TV and can stream or play DVD/Blu-Ray/CD music there with a player installed in the attic (better than cut into the walls)! The interior hull would be better without the 4 large speaker holes, 16 screw holes. I'd go without the Furrion head too! But there are not many of us who would sell our Oliver to buy a new one for a few features, plus or minus! Heck, if we got a new Oliver I go without any factory options and then I'd have to rework all the mods I've worked over the last 2 years. Life is not long enough! 🤣
-
Million Dollar Highway in a half ton truck with LE2?
jd1923 replied to routlaw's topic in Towing an Oliver
That sign was just on a short NF road off AZ Hwy 260 descending into the canyon to Tonto Natural Bridge near Payson. They had a parking lot there for the sole purpose of detaching trailers before descending! Generally 8% is the steepest I’ve seen marked on US Interstates and highways, some state highways are steeper. Good you have a special towing setup. I added 3rd Gen Dodge 2500 front rotors designed for the newer heavier model. Also just now adding oversized rear drum slave cylinders. Trailer brakes from 10” to 12” and these upgrades all help. FedEx Freight just called, axles coming tomorrow! I wanted to add a Pacbrake exhaust brake. Was $1800 two years ago, now $2300 and toooo much money! -
You took the words right out of my mouth! 🤣 Our Oliver has been parked in the sun the 2+ years we've owned it and who knows how much in its 10 years. It had a bit of a shine in 2023, not so much today. We hand wash it when we return from trips. It doesn't really get clean and I'm not going to be one that gets up there with power tools! I was also never one to paint over things, always preferring natural vs. painted finishes. But paint may be an answer for our hull at some point. I've got a local auto painter who painted our Lexus GX470 at a reasonable cost. Painting the Oliver might cost about what CGI charges for their work. I had a thought to match the colors to our tow vehicle. They look good together as is, with Oliver logo and pinstriping matching the TV colors, but what if the Oliver was the same light gray on the lower hull and the same bright white on the upper. Dull egg to bright white may be a bit of a shock to the eyes. Bring back the two-tone look of the great cars of the 60s! 🤣
-
Million Dollar Highway in a half ton truck with LE2?
jd1923 replied to routlaw's topic in Towing an Oliver
I'm with you on this Rob (thanks for the heads up on Teton Pass)! If doing the Million Dollar Highway, I'd choose the direction to be on the hill side vs. the cliff side of the road! 🤣 CO 145 drops 2500 feet, from Telluride down to Delores. A little rugged before Rico CO, then heading south from there it follows the beautiful Delores River and was mainly a good road. We have a trip planned camping along CO 145 late Sept to mid Oct. Starting at Delores we will get up to Sunshine Campground again close to Telluride, maybe as far north as Ridgway CO. Having 3-4 weeks we should be able to find some good campsites without rushing through there like the end of our last trip. Maybe put AZ Hwy 78 on the same list. Grades are not listed but certainly > 10% in some parts. Not a well known road but this was our story. Months later, I found out our brake controller was going bad. Replaced it for much better braking! We're getting new axles which should arrive this week. Going to the D52 trailer axles with 12" brakes should increase stopping power. Our Ram is an older model when the diesel exhaust brake was not an option in pickup trucks. -
Follow-up re this thread. This spring I worked brake service on our Oliver. I wanted to be certain the self-adjusters on the Oliver were dialed in. The front axle was close and the rears were a bit looser. This is likely normal. In doing so, Chris was applying the brake in the tow vehicle. At times there was nothing. I asked, "Are you pushing the brakes?" She said "Yes" but the brakes did not stop the spinning wheels. Increased the gain and tried again, the brakes would stop the wheels but 3-4 seconds later. My next comment was, "We need a new brake controller!" Purchased and installed a Tekonsha P3 Prodigy Brake Controller and ran the same test. On the default 6.0 gain when Chris hit the pedal the brakes (all 4) banged abruptly to a stop when spinning in the air. I now believe that when our brakes were over-heating last October, some of it had to do with the weak controller not applying enough power to the TT brakes which caused the brakes on the TV to overheat!
-
Very good use of this unused space! @ScubaRx put a disc brake controller up there moving the LP tanks back a bit. One day I’m sure I’ll mount something up there, TBD! 🤣 I’m sure you know this, but recycle this fuel into your gasser TV every time you return home. You can’t count on our regulated fuel today to last much more than 30 days without an additive. I fight this battle constantly with all the many (near 20) gas engines we have on the property!
-
Goal: to Minimize the Need to Move the Beds while Camping
jd1923 replied to jd1923's topic in Ollie Modifications
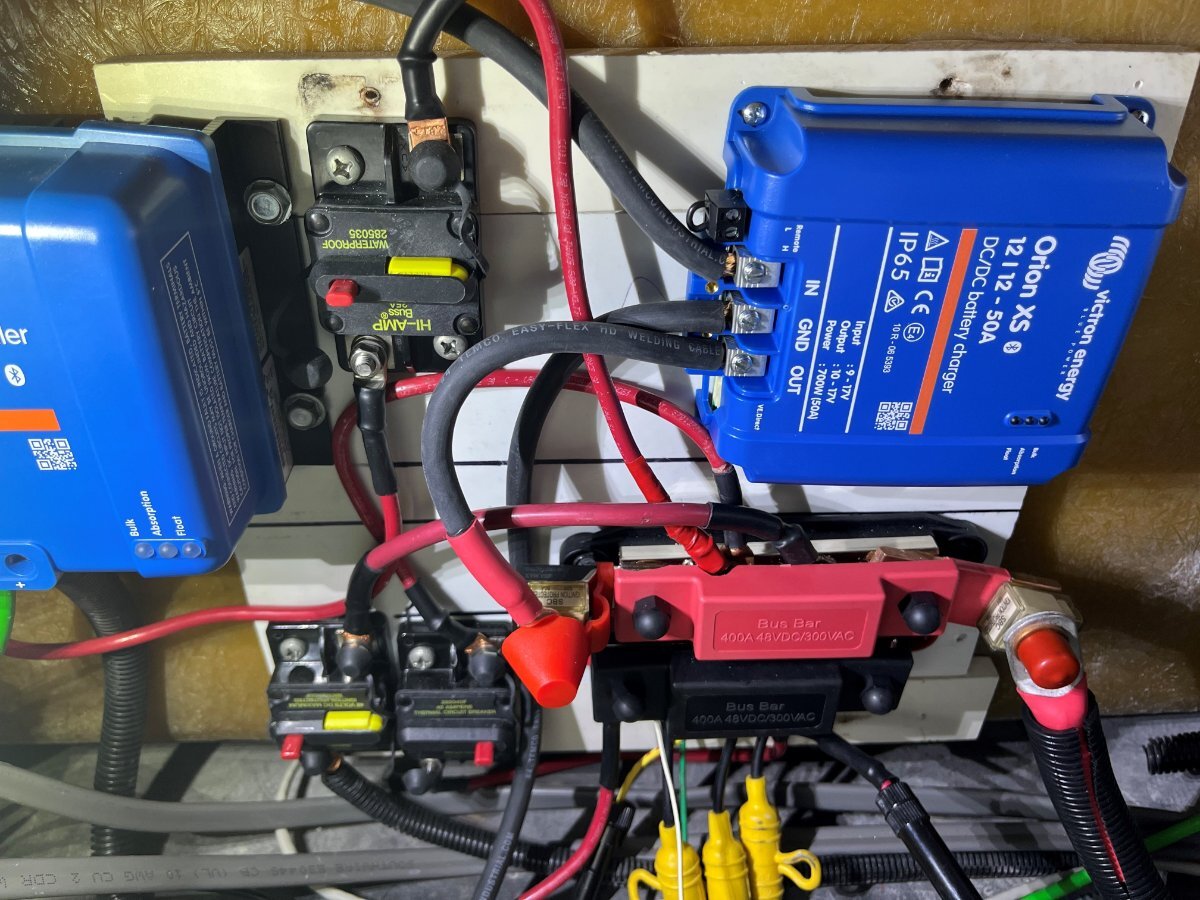
Final step on rewiring the basement electric. I had left room for the DC-2-DC charger and having everything conveniently rewired to the rear dinette seat made everything close and easy! 😂 I have another thread on the charger installation => https://olivertraveltrailers.com/forums/topic/10757-the-victron-orion-xs-1212-50a-dc-dc-charger-complete-installation-and-testing/#comment-115374
-
And thank you for saying so! More info here =>
-
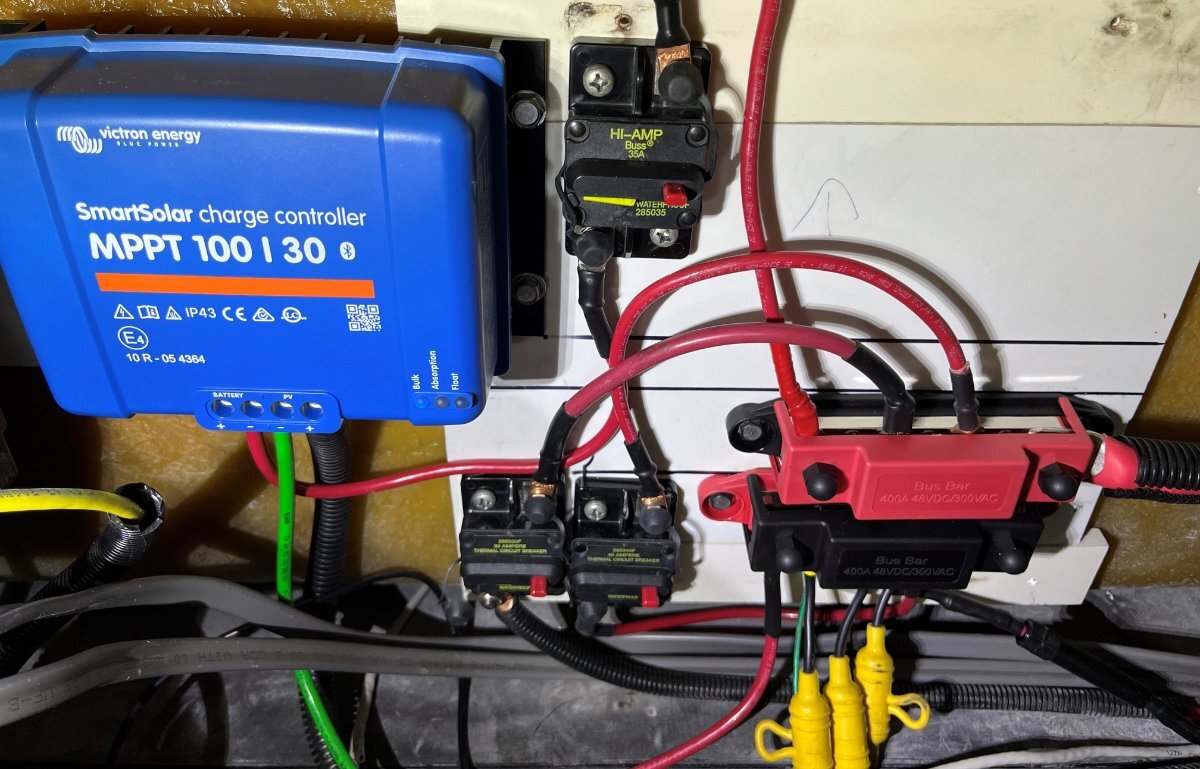
Install heavier gauge wire output of the MPPT SC to the batteries. According to wire gauge charts 10 AWG is good for 50A up to 5ft, #8 to 10ft and #6 for 15ft. Perhaps your 12VDC wires output are longer than 5ft but regardless if they're getting hot, increase the gauge! Or you can double-up the B+ and B- #10 wires if you have more #10 wire on hand (2x #10 = 7 AWG). https://www.wirebarn.com/combined-wire-gauge-calculator_ep_42.html# I installed 6 AWG harvested from the OEM wiring where OTT had extra wires going to the batteries that I shortened now attached to buses. With the SC mounted very close to the buses, I only needed 2 ft of wire on the red B+ with the breaker and another 2 ft on the green B- wire to the -bus. 10-12 AWG wire is good for the high voltage from the solar panels to the input side of the SC. I ran #10 wire from a new rear terminal where the cable TV terminal used to be. This would be similar to your Zamp outlet, as our hull did not have one. I used another 30 ft of 10/2 to make an extension cord for the panels. Two #10 wires are inside the 1/2" black plastic wire loom in the picture below the SmartSolar charge controller, and you can clearly see the #6 red and green wires. The camera angle makes the wiring look like they're attached further right than they're actually connected.
-
Million Dollar Highway in a half ton truck with LE2?
jd1923 replied to routlaw's topic in Towing an Oliver
@Mike and Carol Mike wrote he towed the Million Dollar Highway with a half ton truck (when in another thread I wrote I was too chicken for that route)! We went to Ouray then back out to Ridgway, south to Telluride and took CO 145 down through Rico and to Delores. We're heading back up there for a few weeks late Sept to mid Oct. Love the area! If you're ever in Delores go to the Delores Market. It's an amazing market with onsite butcher, fresh local produce and amazing baked goods! It will be our first stop on the way up and last stop on the way back! 😂 -
Ceiling fan lid motor not working
jd1923 replied to Dennis and Melissa's topic in General Discussion
Likely the electric lift motor is fried. You can unplug it and supply 12V to test it. This should be the motor but check the part number on yours to be certain: https://www.etrailer.com/Accessories-and-Parts/MAXXAIR/MA10-20270.html https://www.amazon.com/Maxx-Air-1020270-Maxxair-Motor/dp/B01MTUWAMK/ -
Weigh Safe 180 Aluminum hitch with 3” shank, 10” drop
jd1923 replied to Patriot's topic in Towing an Oliver
Wow! Can’t do this basic task? He shouldn’t be responsible for towing anything! 😲 -
Installing Pioneer Inverter AC
jd1923 replied to Treasure Coast Vault's topic in Ollie Modifications
That's what I said last year! 🤣 But you are correct. Just hope the Greenland, $1275 now with sale price and promo code, is priced as good or better next year. Or maybe an improved version 2 of these inverter A/C models gets released! We don't travel much in summer temps, but had more heat than expected in northern MN, SD, WY and CO this June where we had to put up with our Dometic A/C. Our next trip is SW Colorado late-Sept through mid-Oct. Starting at Delores CO at 7K ft elevation, to points north, 9500 ft at Sunshine Campground near Telluride, so I'm hoping to run our Atwood furnace for a couple hours before dawn vs. needing the Dometic A/C at all in the afternoons! -
Installing Pioneer Inverter AC
jd1923 replied to Treasure Coast Vault's topic in Ollie Modifications
My Dometic Penguin 2 will see your bet of 685 watts and easily raise you another 1100 watts! And it must also be at least 10 dB LOUDER too! Maybe I should take advantage of the Turbro sale. It's a tough call. Just spent over $3K on D52 axles and Alcan springs that I hear shipped today. That's going to be a bunch of hours installation and a A/C unit would have to sit in the box for awhile! 🤣 -
The Pioneer and Turbro Greenland A/C units are remote or phone controlled. The OEM Dometic thermostat shows set temp but not actual temp, so I often have my phone open to the Ruuvi Sensors App to check cabin temp and fridge/freezer and basement temps. Also, I need my phone to level the trailer and check propane tank levels. I'm happy for these Bluetooth apps for so many things. I check battery stats and all Victron devices via the VictronConnect App. Many Oliver owners have installed Victron BMV-712 or Cerbo GX displays, not me! I can see all the same specs, turn our inverter off when needed and all from my phone. Why spend the extra money for a display that can only be used when standing in front of it? Why cut openings in fiberglass walls and complicate the simple interior design of the Oliver? What happens when technology advances and the installed display is no longer usable? I would not purchase the Cielo Breez Max until after a new A/C installation, determine whether we truly need another device. Take another look at the Cielo Breez Max. It appears it can be operated by touch controls on the device itself or by phone app. Likely control by the phone app is not needed on a daily basis after initial configuration setup.
-
Looking at the Cielo website, they have several models. https://cielowigle.com/products/ Is it only the "Max" model that has the functionality to turn the fan off with the compressor? They also have Pro, Eco and Lite models.
-
We have 600 Ah Epoch LiFePO4 and the 3KVA Victron Multiplus II inverter which can run the A/C for a few hours. When we replace the awful 13.5 Dometic Penguin 2 with an inverter A/C we should be near double runtime on the A/C. If you have the Truma, it is a bit more efficient than the Dometic. When we truly need A/C, like we did almost 10 overnights on our last 36-day trip we booked sites with electrical hookup. Was not expecting so much hot weather up north but we certainly had a heat wave in most parts of the country this June. I won't carry a generator and extra fuel. Soon with an A/C upgrade we can run it longer. I would add another 300 Ah Epoch battery before adding a generator. But that's just me. Best wishes to you and your new DC-to-DC installation!