jd1923
-
Posts
3,582 -
Joined
-
Last visited
-
Days Won
274
Everything posted by jd1923
-

Missing Dexter EZ Flex Hanger Wet Bolt/Zerks
jd1923 replied to Gliddenwoods's topic in Mechanical & Technical Tips
It's just hard to imagine how this happened. The grease fittings on the equalizers I removed were in there solid. The one fitting I removed (so that I could measure threads for you) had threads 5/16" in length. I had to turn it 4-5 revolutions to remove it. I replaced the originals (one is pictured on page 1 of this thread) because the center bushings were very worn after 7 years of use (with weak springs and lose wet-bolts). No reason for grease fittings to wear and inside the suspension hanger they are quite protected from damage. Who knows why? But it is what it is. I purchased two of these: https://www.etrailer.com/Trailer-Suspension-Parts/Dexter/013-144-03.html -
Looks like this, several on Amazon, side shades too. https://a.co/d/95YrFh4 https://a.co/d/25pOwgP
-
Texas Rally 2025 pictures - may contain large image files
jd1923 replied to Steve and MA's topic in Events & Rallies
Miss you guys! Was fun last year and should be bigger and better for y’all this year! -
Inverter freedoms 2000 is not turning on
jd1923 replied to Skipster's topic in Welcome to the Oliver Forums
You don't really need a display on inverter/charger systems. After replacing our Xantrex with the Victron Multiplus, we covered up the hole where the Xantrex switch was with artwork! It's all about readings on the apps! 😎 The App is showing the Victron in Power-Assist mode. I've set incoming amperage for a 15A (household circuit). So to run the A/C, the Victron is inverting the net required power supplied by the LiFePO4 batteries. Xa
-
Inverter freedoms 2000 is not turning on
jd1923 replied to Skipster's topic in Welcome to the Oliver Forums
Learning about this kind-a stuff is why we have this Forum! These links are from the Xantrex and Victron "Stores" on Amazon. The Xantrex is $635 less and I cannot believe the price on the Victron, $100 less than I paid July 2024! Get your money back? https://www.amazon.com/Xantrex-818-3010-Freedom-Inverter-Charger/dp/B08C1VRWZL https://www.amazon.com/Victron-Energy-MultiPlus-II-Inverter-120A-50A/dp/B0BZV91KW4/?th=1 -
Missing Dexter EZ Flex Hanger Wet Bolt/Zerks
jd1923 replied to Gliddenwoods's topic in Mechanical & Technical Tips
If you cannot screw them as mounted. And if you do remove any suspension bolts, be on level ground first. If not the equalizer may not want to go back in the direction it came from. 😎 -
Inverter freedoms 2000 is not turning on
jd1923 replied to Skipster's topic in Welcome to the Oliver Forums
Please do not do this! The better Victron Multiplus II is exactly half this cost, with better functionality and reliability! There are several threads here re failures of this brand inverter-charger. -
Missing Dexter EZ Flex Hanger Wet Bolt/Zerks
jd1923 replied to Gliddenwoods's topic in Mechanical & Technical Tips
Yes, see link below! You're Welcome! 🤣 I can understand that full-timers must get service on the road, but having service done on the road is not a good idea if at all possible to avoid! Hence your situation. I do 98% of my work myself, out of my garage, and it bothers me to have someone else touch my prize possessions, those who generally do not care! 🤣 Given service "mostly while traveling" you cannot go back to ask them to correct their work. Simply buy the correct grease fittings and get them installed. -
Missing Dexter EZ Flex Hanger Wet Bolt/Zerks
jd1923 replied to Gliddenwoods's topic in Mechanical & Technical Tips
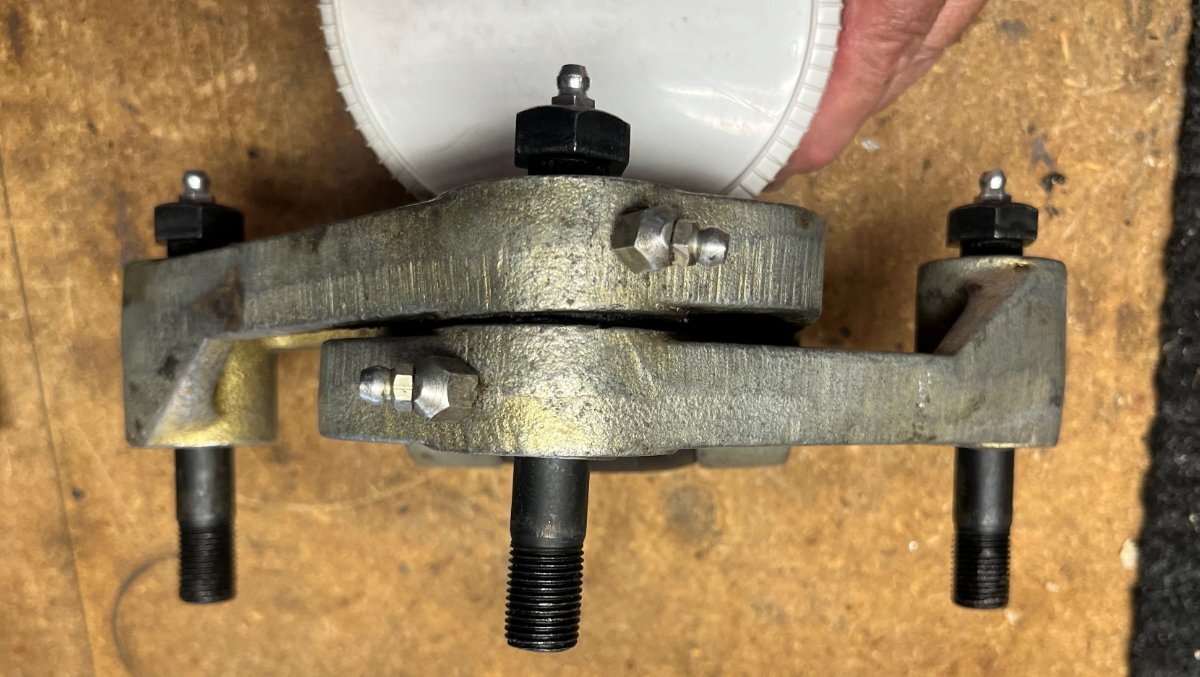
I removed a Zerk fitting from the Dexter EZ Flex equalizer that OTT installed in our hull during service in 2018 (they should still be the same). The four (4) grease fittings that fit the EZ Flex equalizers are 45-angle with 1/4"-28 threads. This Amazon link shows the correct size and shape (taller post style), but not sure of the quality of this product (but likely a fine replacement): https://www.amazon.com/Plews-11-105-Grease-Fitting/dp/B000SL2M0M/ I needed the same kind for the wet-bolts Alcan supplied and I ordered Dorman AutoGrade 1/4-28 Inch Grease Fitting - 852-703 from O'Reilly's. Ron is correct. The fittings for the equalizers are as spec'd above. The fittings for the wet-bolts are the smaller straight M6x1mm fittings (turn with an 8mm wrench). This would work if you have an old-school local Napa that's been around for decades with the old-timers still working! When I ordered mine from O'Reilly's the sales person wanted to show me the assortment kits. They had 10 different assortments, none of what I needed and she had no idea! This may be true! And if you must do so, after removing both wheels on one side, TV attached for safety, just remove the equalizer center bolt and drop both axles enough to clear the top of the equalizer. Do NOT remove the wet-bolts as you will have trouble re-aligning them to remount! If it was me, and you are also very good with your hands and wrenching, I would try to thread the new fittings in without disassembly! You still want the wheels off to get your body closer to the work. Using your fingers get the new fitting started. Then with the smallest open-ended 10mm wrench you have, start to tighten. You must tighten as far as the wrench can go in the small opening, then turn the wrench upside down which changes the angle of the head of the wrench. Keep flipping the wrench over and over and be patient! 😎 I believe these are prone to falling out because the installers point the fittings outward and they are not tightened down to the base. Therefore they are not torqued in place, the threads are basically lose to start! Given you job-out this kind of work... Buy your new fittings, take parts and trailer to your service shop and ask them to install them! They should offer to do this at no charge, given you have used their services regularly and yes, they should have tightened them or made you aware they were missing! -
Missing Dexter EZ Flex Hanger Wet Bolt/Zerks
jd1923 replied to Gliddenwoods's topic in Mechanical & Technical Tips
The Dexter EZ Flex always comes with two Zerk grease fittings (by design, one for each lever)! Also, your left and right side equalizers must be the same! This is NOT an OTT Service issue, no reason for a Service Ticket or warranty claim. Instead of thought spent in how this might have happened, you merely need to purchase the two missing fittings ($10 +/-) and screw them into place! 😎 I have recently removed the OEM suspension from our Oliver and have these parts, EX Flex Equalizers included, in my shed. If you'd like I would measure the thread size and pitch of the required grease fittings and let you know the correct parts to purchase. Just let me know. Best wishes, JD
-
Good for you! My shopping cart is $1,202 (AZ sales tax is higher). Didn’t pull the trigger yet… Thanksgiving will be here soon enough! 😂
-
I chatted, then emailed with Turbro Customer Service. They were quite responsive, with same-day replies. I tried to get them to price-match the white one to the price on the black model, but to NO-avail! They were nice about it though. They have a "12th Anniversary" sale with a day counter, now showing 14 days ('til Sunday Nov 2nd?). The $400-off promo could end at anytime, but is likely part of their anniversary sale.
-
elite 2 Extra portable electric dual burners instead of propane burners?
jd1923 replied to Gail Dean's topic in General Discussion
We do! Chris has used it at home several times and we took it on our recent trip. First time out, I kept it in it's retail packaging sitting on the rear bench seat of the TV. We setup a cooking table near the AC power outlet on the side of the Oliver. Cooking takes very little SOC on inverter and LiFePO4 batteries. I decided to get waterproof case for it. Not like me to spend so much on a case (just this one time)! This case fits the single-burner Duxtop Induction Cooktop nicely. With this case, we can load it anywhere in the back of our open truck bed or it can be left out at the campsite overnight in the rain. This is one high-quality case: https://www.amazon.com/dp/B0CJQB2JYN/ -
The Turbro Greenland now has a $400 promo code. This brings the model down to $1,099! If you select the model with the black outside cover, it's priced $100 lower! Total price comes to $999! How would a black one look up top? Too bad the white one isn't priced the same! 🤣
-
Film/Coatings to Front Oliver to Limit Dents
jd1923 replied to Bobfirst's topic in General Discussion
Ours has chips on the upper front too! But it's not really too bad upper or lower after all these years. -
Not being a theory guy, can somebody give a real example of this? (an Energized Ground) Maybe Geoff? Also, I’ve never heard of retroactive code enforcement. My home was to code in 1980, not today! And unless I file permitting to remodel something it can exist as built grand-fathered.
-
I’m trying to think of a scenario where this is possible. The possibility of power to ground is the reason why circuits are protected by fuses or breakers!
-
Carefree Awning not opening. HELP
jd1923 replied to Teaney Hull 292's topic in Mechanical & Technical Tips
Not sure, we have the Fiamma awning. Given you have a new crank, it must be the gearing on the awning, that the crank connects to is damaged in some way. Suggest you remove the crank again and inspect inside. With the crank off, can the awning be pull out manually? Something is keeping it from coming out. -
"Ollie Gear" Company Store, products desired. Speak up!
jd1923 replied to John E Davies's topic in General Discussion
Sign of a good family-oriented company! (Motorola did the same during the Great Depression! They cut hours, not family members.) 😂 -
I just looked. Amazon is "Currently Unavailable" and the AIRPLUS Store only shows large home units. Walmart search did not come up. If anybody finds it available online at some point, please post here! Are there other viable models, small with this compressor design? After 130 overnights in our Oliver, when I first read this, I thought bottom of the list! The humidity created within the Oliver hulls is generally welcome most places west! But after hurricane rains actually settled over Durango CO last week and rain during our June trip to the upper Midwest, I now see the occasional need for a small dehumidifier! A no-brainer for those traveling in humid climates. 🤣
-
For a working platform, I went with MetalTech last year when @Ronbrink showed it in his Atmos A/C install. At the time, The Home Depot had them on a Special Buy for only $160 ($298 today). Little Giant came up at the time but to buy the minimum of 2 ladders and one plank it added up to a lot more. With two sets, it will make installing a new A/C (this task coming soon!), replacing solar panels, washing/waxing the top... a simple matter. But thanks again, I know we're going to love the Jumbo Step! I bought MetalTech two sets, the attached tool shelf and outriggers for greater stability. I like how this scaffold can stay setup in my garage and rolled out quickly to the Oliver when needed. No carrying and building of the scaffold each time, but you need the floor space to do so (see pics)! I'm forgetting who today, but another Oliver forum brought this product to my our attention earlier this year. Chris uses it often too since on the passenger side of the bed we have a tools box full of Lodge Cast Iron and other outdoor cooking tools. Perhaps less useful for most of you who have truck caps. I also use it working in the engine compartment: https://www.amazon.com/dp/B0002Q8TWI?ref=fed_asin_title
-
Thank you Taylor, now you helped me! I really like the design of this Jumbo Step and had not seen it before. I have a platform like Steve’s but this one with steps to climb up and the railing gives you something to hold onto. Not cheap, Amazon has them for $170. But they had one “Like New” for $123 and I just got it! 😎
-
Full Suspension Replacement - Alcan Spring and Dexter D52 Axles
jd1923 replied to jd1923's topic in Ollie Modifications
Update: I installed these grease fittings before our trip, but had not greased them since that was just done. Today, I got under the trailer to re-torque the new suspension and then to grease the wet-bolts after our 1000-mile trip. These aftermarket "Zerks" must be of poor quality! When greasing with a power grease gun, using the LockNLube fitting, grease was leaking at the entry point. These must be substandard in size or shape as the LockNLube generally connects tight without leaking. Amazon is getting another return! Good thing it's only a 10-min job to change them out! So, back to the drawing board on these. Thinking I will order two Dorman 852-703 (6-packs). Hopefully the Dorman brand is still good quality today. They market them as "Automotive Grade." These are zinc-plated. I would be leery of stainless steel fittings as they will certainly be off-brand (zinc being what’s standard in SAE automotive hardware). BTW, after torquing at 30, 60, 240 and 1020 miles, the last time tightening required was negligible! I'll check them again next summer after several winter and spring outings. All done, all good! 😎 -
Yes, I buy at our local Ford dealership. A few years ago, they changed their rules where they would not fill LP tanks on RVs or trailers directly. The answer I got was it was causing accidents in RVs backing out of the small lot and the fact that large rigs were blocking deliveries to their parts department and traffic to their showroom. So at home I back up our truck on an angle to get as close as possible, stand up on the tailgate so I can lift the tank(s) straight up. Easier to do so for those of us without truck caps. I tie the tanks in the rear of the bed. Aluminum tanks will not reduce weight significantly, expect they’re some lighter when empty and they’re very expensive. If you’re not able to lift your tanks, you could replace them with 20# tanks. Or you could add a hoist: https://a.co/d/8f4i9gl I’ve got this item on my long list. I also have a very heavy fire ring in the front Oliver basket. Much heavier due to the steel surround I built and for the solid lava rocks. It would be great to hoist this item to my tailgate where I could get a good grab on it! @Ronbrink has a crane hoist mounted to the front of his Oliver to unload his van (see his Van post in Towing). I’m not sure if his is positioned to also lift the LP tanks. I would mount mine rear of my open truck bed, close enough to reach the LP tanks and being truck mounted I could use it to load the truck when not towing too.
-
Winterization Issue (As Storm Approaches)
jd1923 replied to Cort's topic in Mechanical & Technical Tips
For those of us without Truma products, can you post a picture of the valve post without the handle. Is this a hardware store item, or something Truma proprietary? Is the post a 1/4" square or is it D-shaped, or...? You would also need the set screw to keep it mounted, but not necessary to turn the valve. Maybe forget the screw and when you get a new handle, and are done using it, keep it in the kitchen junk drawer or somewhere not to lose another! Keep your furnace running!