jd1923
-
Posts
3,554 -
Joined
-
Last visited
-
Days Won
269
Everything posted by jd1923
-
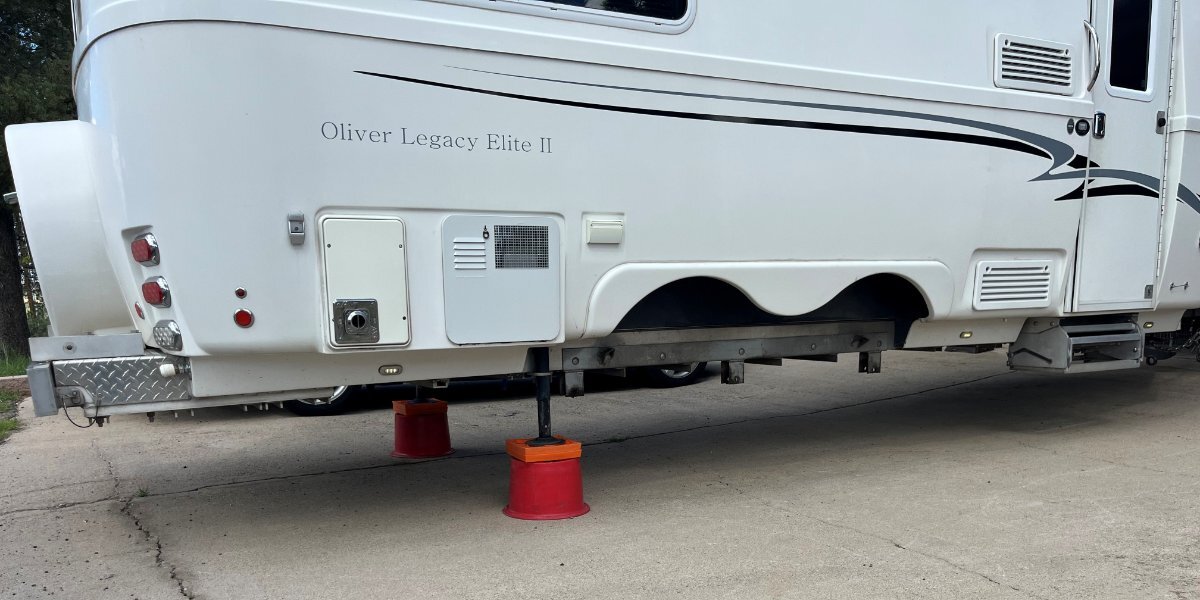
Geoff, I thought some regulars here may notice! I did use jack stands at the fronts of the steel frame members, took them away for the picture! 🤣 I have the jack stands back under the Oliver overnight in the same front positions so the weight of the Oliver is spread over 5 points, sitting nice! With the Alcan leaf springs, I purchased everything new from them, HD shackles and new wet bolts. You may have to remove your wet bolts, the ones not accepting grease, and clean the dirt out of them. After removing ours today, they do get dirty inside! After 25K miles? It certainly could be time for new wet bolts and bushings. After 2 hours cleaning up our Dexter E-Z Flex equalizers, I found the main center bushings cock-eyed and heavily worn, the end bushings for the shackles also a bit worn. After cleaning, the center bolt sleeves just wobbled inside of the bronze bushings. I would not have known this without removing them and fully cleaning, disassembling and inspecting them. I need to replace them, but cannot wait for parts now with work in process. I have no idea total miles on our hull. Good to get a fresh start after 10 years. I've got a whole lot more to write about soon!

- 922 replies
-
- 11
-

-

-
Your wish is my command! 🤣
-

3500 pound versus 5200 pound axles on a LE2
jd1923 replied to John and Debbie's topic in General Discussion
I'm installing ours this weekend (more info soon)... Out with the old and soon in with the new D52 axles and Alcan leaf springs! 😂
-
3500 pound versus 5200 pound axles on a LE2
jd1923 replied to John and Debbie's topic in General Discussion
I just ran across this older post... You'll be happy to know they are NTN brand made in Japan! More info here: https://olivertraveltrailers.com/forums/topic/11020-dexter-nev-r-lubetm-bearings-–-will-bearing-replacement-be-necessary-on-the-road/#comment-119901 -
Water Pump Switch in Bathroom
jd1923 replied to David and Gail's topic in Mechanical & Technical Tips
Thank you Geoff. This is so nicely and concisely stated, now easy to understand! So if I truly do understand, when ON one of the 3-way switches is supplying power to the pump, by connecting 'hot' to the 'traveler' and the pump is grounded independent of the 3-way switches. -
Water Pump Switch in Bathroom
jd1923 replied to David and Gail's topic in Mechanical & Technical Tips
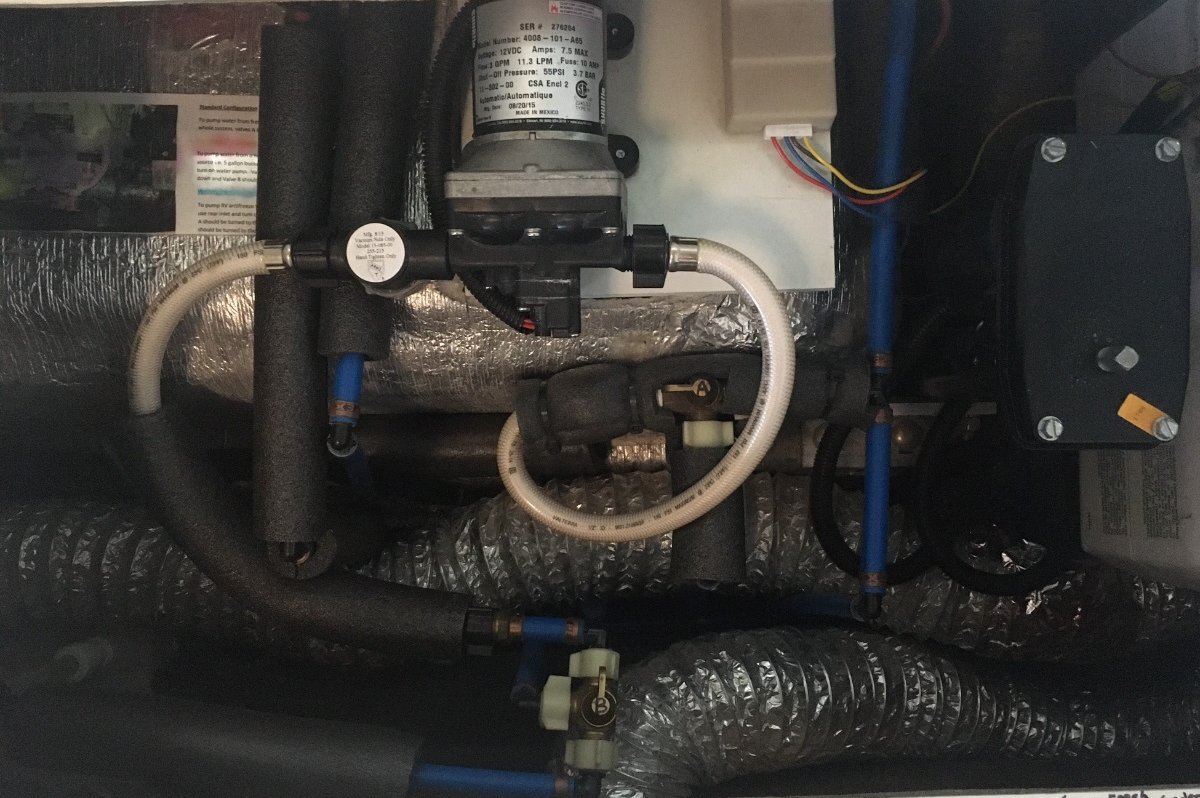
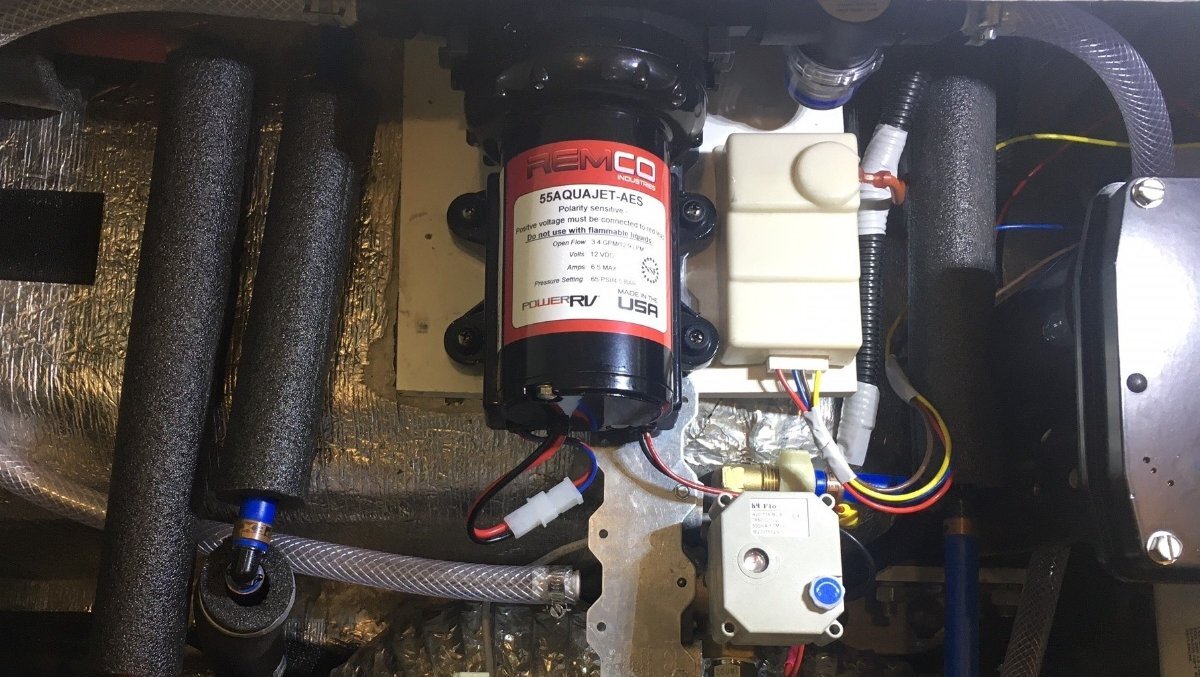
It's odd but true that the simple OEM ShurFlo water pump has two RED wires (see pic1, look very closely) which means it would run in either polarity. When I upgraded our water pump it certainly had explicit RED/BLACK wiring designating DC polarity (see pic2). The water pump switches are 3-way. You need to get the RED positive connected to the correct lead and the two other brown wires are grounds and perhaps the order of these two wires do not matter, but of course they must stay connected. Perhaps on our hull we were lucky to have a past owner to correct these many issues, but in two years, we have not had a wire disconnect while traveling, never a window shade fall off, a kitchen drawer open, or anything else. Thank goodness our black and grey tanks drain without incidents... The Oliver is a robust campin' machine! 🤣
-
Weatherstripping/molding for doghouse cover
jd1923 replied to Fritz's topic in Mechanical & Technical Tips
This is what I used: https://a.co/d/cytULgu- 1 reply
-
- 4
-
-
Likely not, when first hitched. However after towing, the engine, trans, everything connected and under the hood gets very hot! The hot starter armature and battery cables will create resistance requiring more current to turn and start than when cold. Also as the starter armature gets fried, carbon buildup will also create mechanical resistance requiring more current to turn. Given the new starter resolves this issue, it shows the starter was on its way out and soon or later would not start the engine even when cold.
-
There was another thread re bug screens, so I added them after my fan install. I went with the idea Ron mentioned. It was very easy to make my own screens. I had a roll of 6" aluminum screening we had purchased for bug-proofing air vents in our home. I did the same for upper and lower screens, cutting and bending the screening to fit. You can't see it but I riveted the screens to the plastic vents, two rivets on each left and right sides. They made the vents fit nice and snugly, where before they rattled around a bit, even after adding new push-turn mounts. New fans, new screens, mod done! 😂
-
Dexter does not set the self-adjusters, as they come new very loose. I’ve heard this now from you and others with new axles. When I pulled a drum off a new axle it came off wobbling like the OD of the shoes was much smaller than ID of the drum. They must believe they will adjust soon enough. Not good when you drive off just installed and hit mountain roads! I’ll tighten mine up some, to the point I can just hear a light scraping sound, shoes on drum, before I mount the wheels. 😂 I just installed new rear shoes on our truck rear drum brakes. I overdid the adjustment! The brakes were so good, that the parking brake engaged with a 1” push on the pedal, and I found the rears were braking while coasting! 🤣 Understanding the issue, next day I lifted the rear of the truck and loosened the self-adjusters about 1 1/2 turns and my new brakes are now working perfectly, better than ever! 😂
-
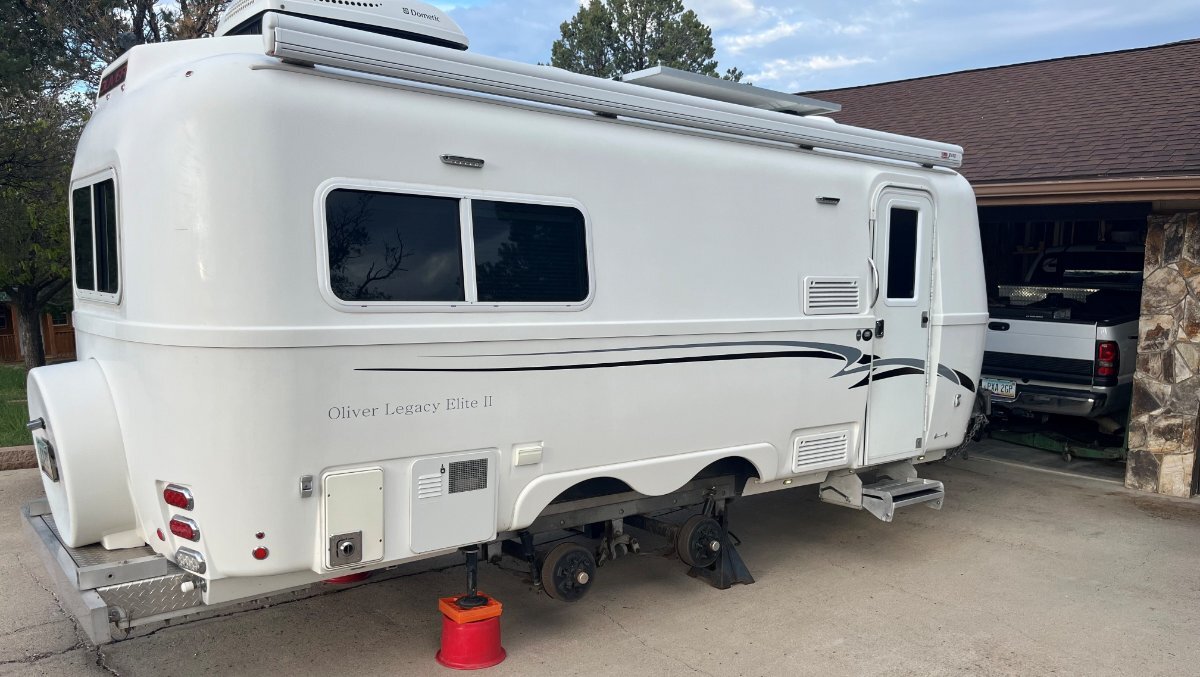
Alcan negotiated with Dexter and they agreed to refund my shipping cost. Thanks to Lew at Alcan for working this out for such a positive outcome, to David for this good idea, and to Ron, Ken and @2008RN for your related comments. They promised a 2-week rush build, and today, exactly two weeks after I entered my complaint, I have new axles delivered! They sure are pretty this time, so the extra time was well worth it.😂 I'm working this week, followed by 10 days off. So likely this Friday or latest Monday, I'll hitch up the Oliver and park it on our driveway. Then all I have to do is figure out, how in the heck to install new Dexter D52 axles and Alcan Springs!!! Love the challenge of a new project, learning something new and the achievement! I'll take pics and start a new installation thread when I get into it. Can't wait to see a picture of our Oliver sitting up in the air without axles, leaf springs, wheels or tires! Or perhaps to be safe, I should remove and replace one axle at a time! 🤣
-
I have.no idea how this happpened
jd1923 replied to Dennis and Melissa's topic in General Discussion
I believe it is. The tire is still well planted on the bead of the wheel. That lip edge is superficial. You’re going to want to source a like wheel and center cap soon, but you should be safe finishing your trip. Try to keep that trailer on the road! 🤣 -
Congrats and good to know OTT is over the 1600 mark!
-
Beech Lane attaches labels to both sides! Look at the two photos I attached, and Ron's, and note the side where the wires are showing which is the exhaust side. When you look at the my first picture and Ron's you see the wires and the fan bracketing (the exhaust side). My second picture show just the fan blades, with wiring and frame on the back side. I did not realize these were "designed to be in the lower cabinet." I must have missed that as I'm not one to carefully read instructions vs. just start installing parts! 🤣 My thought when installing was exactly what Ron stated here. I also tried the additional interior fridge fan that Ron suggested, but returned that one as I could not measure fridge interior temperature improvement, it took valuable fridge space and you could hear the fan when sitting at the dinette. Geoff ended up with a superior installation with his great knowledge of wiring sensors and switches. The Beech Lane control box, although I installed it in the interior cabinet above the microwave where the LEDs are not visible, you still have to reach in there every time you turn the fan switch giving it power. Correct it will not remember a previous setting when last powered on. I do not use its temp sensing function, even though it's wired for that. When camped on a hot afternoon, I will turn the panel switch on and then the fan to 50% speed on the control box (the lowest speed setting) and generally I hear the fan running after dinner or before bed and with the panel switch turning it off is easy! It appears in Geoff's installation the fan is powered by temp sensor where ON/OFF is automated! 😂 I was able to feed wires without removing the microwave which is a bit of a trick! DC power is located through the bottom vent and it's easy to feed new wires to the upper vent. Then I poked through the upper insulation with an electrician's steel fish-tape to push new wires to the panel switch. With a curved section of fish-tape I was able to follow the curve of the hull up into the cabinet above the microwave for the fan control.
-
Nice work Geoff, as always. Your aluminum frame is a very well crafted! I did mine last summer. I have the control panel in the cabinet above the microwave and we switch it on most hot afternoons. Beech Lane makes a good fan and it moves a lot of heat out from behind the fridge. I purchased a second fan that cools the basement area where I installed our Victron MP2 inverter-charger. Not near as much heat down there, but use it on occasion.
-
Do you drink the water from your fresh tank?
jd1923 replied to Dennis and Melissa's topic in General Discussion
I felt the same way until recently. There could never be enough cold water, with room in the fridge for at most 6 water bottles. We make ice too, but for drinks other than water. I long pooh-poohed the idea of an extra fridge, but it makes all the difference in the world to ALWAYS have fresh cold water! We keep 1-2 of these pitchers full in the outside fridge and one inside. When the inside one empties, I bring in one from outside and refill one so we always have one cold in and another cold one outside. Another 6-8 store-bought water bottles outside too for anybody who needs one. Now I'm getting thirsty! It's how we roll. 🤣 https://www.amazon.com/dp/B08VFK4WS6/?th=1 https://olivertraveltrailers.com/forums/topic/11018-dometic-cfx5-refrigerator-tow-vehicle-installation-with-solar-power/ -
Do you drink the water from your fresh tank?
jd1923 replied to Dennis and Melissa's topic in General Discussion
No, not drinking from RV water tanks! And as @routlaw wrote, we do not use it for cooking either. We too had been doing your #1 until more recently we started with your #2 idea. I didn't want 5-gal containers, too heavy, and we have ample room with a long-bed truck so don't need collapsible. I purchased some 2.5-gal and 1-gal food-safe PBA-free plastic containers from Hudson Exchange: https://www.amazon.com/dp/B07G9MT3MB?th=1 https://www.amazon.com/dp/B06XVZ3X49 I fill two or more 2.5-gal containers, stored in the truck bed with an insulated cover (to keep out of sun since we have an open bed). And fill four 1-gal bottles kept on the closet floor, with one handy on the floor under the dinette. On average, we use at least 1-gal a day for coffee, cooking and Charley's drinking water. 🐶 Last time out was a 6-day trip and we had all the filtered drinking water we needed filled from home. When three 1-gal bottles empty, I refill 3 about 85% full using one 2.5-gal jug. We also bring the Clearsource 2-filter system so water from a campground is filtered. And we purchased these to keep cold drinking water ready in our new Dometic CFX5 45L cooler! Drinking from good quality cups or Thermos bottles instead of endless plastic water bottles of which I could easily consume 6 water bottles a day! https://www.amazon.com/dp/B08VFK4WS6?ref=fed_asin_title&th=1 We really like how this is working and should have done it sooner. A lot less trips to grocery stores or Walmart merely to buy water! -
NO BRAKES ; 2019 Oliver Elite II-Hull #448
jd1923 replied to BoondockingAirstream's topic in Mechanical & Technical Tips
You need to get some elevation! Was in the mid 90s today. We had our 3rd brief Monsoon rain for the season after 10 months of drought. Sitting pretty at 5440 ft, and now at 7:30PM it’s 67F now, windy with a drizzle, turned off the A/C, opened the windows. Life is Good! 🤣 -
Ours had what looks like the same single fan, but on the top of the coils, easy to remove (see pics on page 1, first post). Yeah, leave it there and install the dual Beech Lane fans!
-
David, what you wrote is usually my frame of mind. I am generally more of a care-free person vs. being the worrier. I do required maintenance, but if they say annually for me it's going to be every two years. Oliver has had a 3-year history with these bearings. And yes, I imagine it's a good 200 trailers and likely 300 by now. This is a small sample and Oliver owners tow less miles per year than commercial trailers. There are many forums citing failures like the Airstream owner I quoted above. Being safe, conservative and preventive, I would not count on your last sentence always being true. It could be said that a 7K LB Oliver will run much longer without failure on a bearing designed to support much heavier trailers. Installing these axles is over-engineering and they should work as designed for years, even longer on our relatively light and aerodynamic Olivers. At a minimum, I suggest Oliver Owners with Nev-R Lube bearings should get online with RockAuto, Summit (links above) or another auto parts store and spend <$100 for 2 replacement bearings to have onboard. The secondary parts, snap-rings and washer will be reusable except in rare cases and investment in tools is another step. Each of us will decide on the amount of protection, where we feel comfortable. A few parts and perhaps tools is a small amount of insurance so that one day, on some future cross-country trip, we are not stuck somewhere waiting days without having this critical part on-hand. What Don wrote above is seriously true, though many of us carry extra water pumps too! 🤣
-
Do you know the approximately mileage on the failed bearing? Zero miles. I did this work on a brand new drum-hub assembly that was removed from an axle damaged during shipping. This drum was untouched and I wanted to learn this procedure and prove it can be worked on the road when needed. How did you discover the need to replace the bearing? Noise? Inspection by rotating the wheel while lifted off the ground? You are towing close to 6000 miles a year. You should check your bearings and brakes annually or realistically every other year (I'm always on the realistic schedule, so much to do with limited time to do so). I jack up the Oliver using the stabilizer jacks. Get each wheel off the ground and spin them. The Nev-R Lube bearing should make no discernable noise. Listen to the bearing first. If hearing is not one of your keen attributes use some kind of conduit or device to listen more closely. Any slight dragging or scraping sound means the bearing is worn to some extent. Bad sounds, replace it while home vs. chancing failure on the road. If I had 30K on a trailer and ONE bearing was making bad noise, I would replace all 4 at home and have another 5 years of safe travel, period! Preventive Maintenance is a science. These Nev-R Lube bearings can last less than one year, or 100K miles over 5 years. Check the forums, it just depends (and perhaps due more on installation precision vs. component manufacturing). Then you should check the brakes. Generally when working an inspection of brakes they will be somewhat loose, and the rear axle will be looser than the front. Do this after bearing inspection as you want the shoes loose so that noises you hear first would be associated wit' "da bearings" vs. "da shoes." There are two inspection ports on the back of the brake backing plate (when you order new axles these are left open, buy an 8-pack of plugs)! You want to tighten the self-adjusters until you hear and feel the shoes making light contact with the drums, softly scraping. Next, have the TV connected and have a helper hit the brake pedal or pull the lever on the brake controller and feel, yes feel for yourself, that the brakes are engaging as they should! When you feel it, you will understand. 🤣 If you do no feel it and believe you did everything right... Check the amperage to the drum brakes, troubleshoot that! It appears you are recommending owners of OTTs equipped with the Nev-r Lube bearings invest in the... Harbor Freight press kit, but carry onboard only the 6 pounds of necessary tools from the kit to ensure the job could be performed by any competent brake/suspension repair shop wherever the failure happens to occur. Exactly! First, make sure you have 2-4 bearings and 1-2 sets of replacement snap-rings, main washers and spindle nuts. You can carry a 25 LB LARGE Bearing Press kit, or you can know which fittings you need. One reason I did this work was first to show it could be done and second to document the correct tools and press plate sizes we need! If you have the correct sizes of bearing press parts, you're more than half-way there! Trust me and bring this small toolset, or bring the entire bearing press kit and you could help any stranger along the way! 🤣
-
For sure, but not a "little more expensive" but A LOT MORE EXPENSIVE! I don't get the pricing structure re the Nev-R Lube 6-on-5.5" hub/drum assemblies. We can special order a full axle for a little more than $1000, but one hub/drum assembly alone is $650 plus tax! There is also the space consideration. These 12" drums are large and heavy. https://www.etrailer.com/Trailer-Hubs-and-Drums/Dexter/8-388-80UC3.html
-
@dhaig Don, great questions! I'll write up replies when I get time tonight...
-
Ha! That's what Chris said when she read this post! I teach a PMP Prep class virtually on Zoom, a half-day at a time on camera... That's enough for me, though I do enjoy teaching and helping colleagues, giving back to the community! 😂
-
Your kit looks about the same. If they use different numbering, let me know and I can measure the parts and list sizes here. Re snap ring pliers, I have a full Blue Point set which is the Snap-On company value brand. You want the smallest possible since the holes in the little ring are pin-sized. Then you want the largest possible as the bearing snap-ring is large and heavy to compress.