jd1923
-
Posts
3,646 -
Joined
-
Last visited
-
Days Won
281
Everything posted by jd1923
-

Inverter freedoms 2000 is not turning on
jd1923 replied to Skipster's topic in Welcome to the Oliver Forums
Having these pictures is great! It may make all the difference in us helping you. Your test light should have an alligator clip on one end, clip it to the negative bus which is the one you have pictured 3 times with all yellow wires. You then want to touch both sides of the SMP 200A breaker shown in your 4th picture. I’m pretty sure this is the breaker between your batteries and inverter. If the breaker is closed (on) and in working order, there should be power on both terminals (test light ON). If you have power on the battery side and not on the other, you need a new breaker and you’ve found your issue. Let us know on this test for next steps if necessary. -
Xantrex Inverter Issues? Try a Hard Reboot
jd1923 replied to Rivernerd's topic in Mechanical & Technical Tips
@Skipster has two threads going on the same subject. There’s more viable info on the other thread, albeit it’s in the wrong forum folder. -
Inverter freedoms 2000 is not turning on
jd1923 replied to Skipster's topic in Welcome to the Oliver Forums
Are all your 12V circuits working? e.g. lights, stabilizer jacks, etc. Attach some pictures here, of the inverter, inverter panel or on/off switch, wiring into the inverter and devices near the inverter. Do you have a multimeter, or test light? @ADKCamper gave you a good checklist for testing. The gurus are here. Post pictures and get a meter or simple test light at an auto parts store. It is likely simple.. -
When your Oliver is perfectly level, which side is the water leaking from? "Under the shower?" Do you mean in the wet bath? The water lines are in the bathroom vanity. The front cover with the opening and towel bars must be removed. Outdoor shower? Access the water lines under the streetside bed. Ours was leaking once when I left the outdoor shower faucets on. Only the valve on the shower head was holding the water. Check first that these faucets are OFF.
-
@CRM I ordered the $10 aerator and that was my total! 😂 They may add actual shipping cost to that later since they had a note about charging only actual costs.
-
Cool, thank you @mossemi, @CRM and @Tom and Doreen!
-
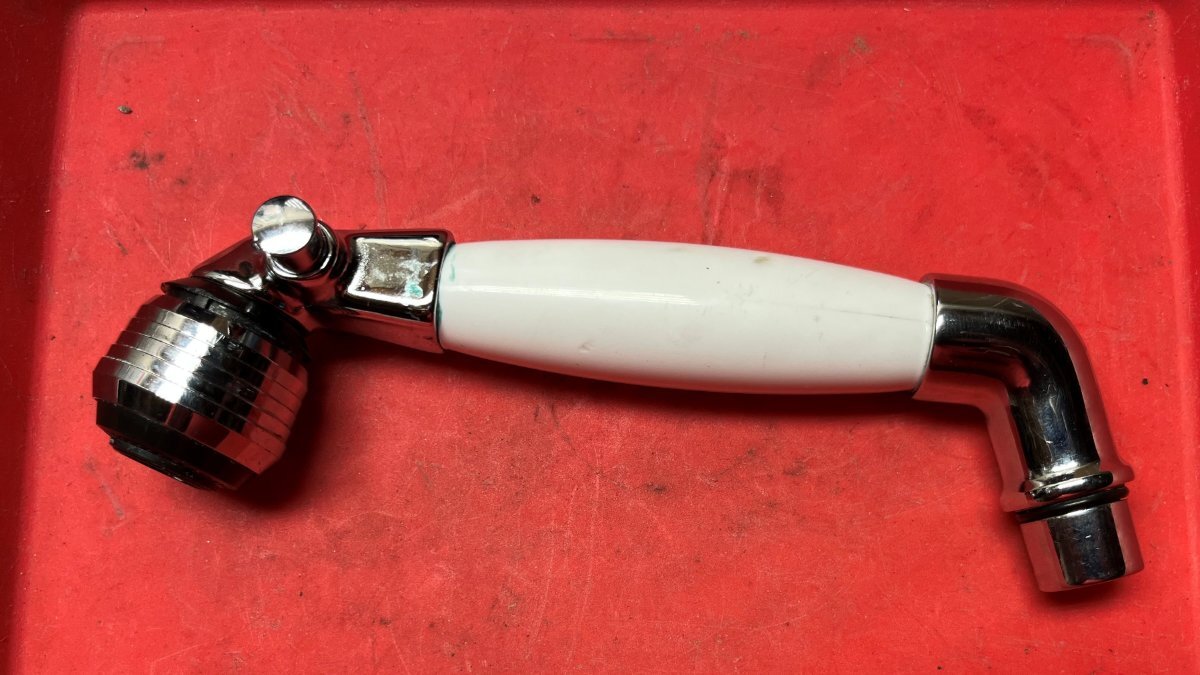
I searched, but not sure of the correct keywords... I remember @SeaDawg posting re this company a couple years ago. What make is this OEM shower head? The plastic end in ours has a pin hole in it. Thank you!

-
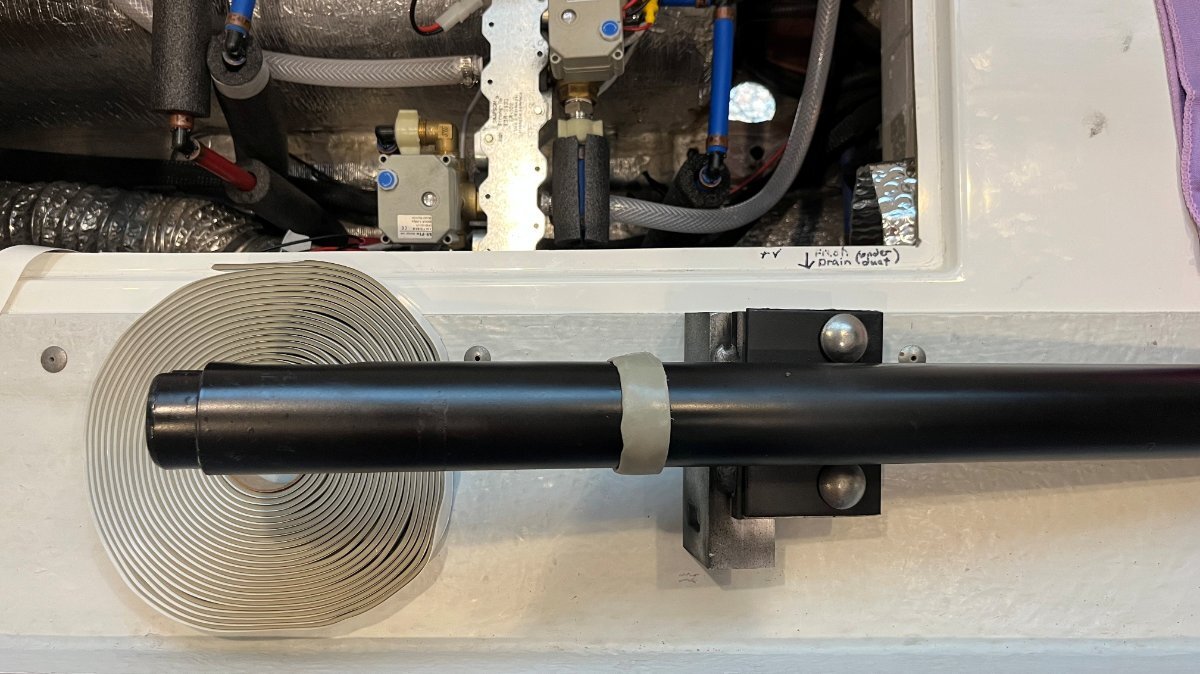
I'll be posting my stabilizer jack rebuild thread soon, a sneak peak here. This new Dicor butyl is top-shelf! It stays where you place it and fills the cracks! 🤣
-
A Convenient Location for the TST TPMS Repeater
jd1923 replied to Tom and Doreen's topic in General Discussion
A call to TST customer service and they may send you one no charge. Worth a try! -
A Convenient Location for the TST TPMS Repeater
jd1923 replied to Tom and Doreen's topic in General Discussion
Excellent idea Tom! Great install location and repeater location for a good signal when towing. 😎 -
Sorry for not posting this sooner. An Oliver friend was at Harbor Freight today asking me the same question, so I went out to my garage and measured. The large snap ring has holes 0.11" ID and they are 1 1/4" apart. The snap-ring pliers I used for this has pins 0.07" OD and has a reach of about 1 1/2". The very small snap ring has holes about 0.05" and are only 1/4" apart. The snap-ring pliers I used for this has pins 0.04" OD. These are the tools I used. Zoom in to see tool part numbers.
-
Changing tires in the wild - lessons learned
jd1923 replied to John and Jodi's topic in General Discussion
If you have rubber, make sure to install high-quality STEEL valve stems first. Buy from Summit or local auto parts store, NOT Amazon China-made. Tire companies do not carry them. https://www.summitracing.com/search?SortBy=BestKeywordMatch&SortOrder=Ascending&keyword=steel valve stems There are also TPMS sensors that can be installed inside of the wheel integral to the stem. More expensive and work required in removing the tires/rebalancing but it is the way the industry is going now that all modern vehicles have TPMS built-in. https://www.discounttire.com/accessories/tpms-catalog Best to have wheels balanced after TPMS sensors are installed. -
elite 2 Extra portable electric dual burners instead of propane burners?
jd1923 replied to Gail Dean's topic in General Discussion
Thank you very much, Chris & Stacie! You sold me without trying! 🤣 You linked the silver model and yesterday I purchased the black model Amazon used "Like New" model at a very good price. https://www.amazon.com/dp/B07KSNTSVR/?th=1 Most of us have LP grills too but the induction hotplate has a different purpose (e.g. boil water quickly). When you have 600 Ah you need to use it! We traveled with the Weber Q for 8 years, shown by @Patriot and @Mike and Carol above. The Q is a nice small grill but a single burner design does not allow for indirect cooking (can kill a baked potato quickly)! if you cook smaller, meals for two, the Weber Q is the way to go. The Napoleon is about 5 inches longer and 7 pounds heavier. Our old Weber Q1200 is cleaned up and I gave it our son for his camping trips. https://www.amazon.com/Weber-51190001-Liquid-Propane-Orange/dp/B00RFXRZ9Y/?th=1 For $50 more, we strongly recommend the Napoleon! We use these items and vouch for them: https://www.amazon.com/Napoleon-PRO285-BK-Portable-Propane-Grill/dp/B00J4576FE/?th=1 https://www.amazon.com/Reversible-PRO285X-BK-PRO285-BK-TQ285X-BL-Accessories/dp/B0BJDM93QD/?th=1 https://www.amazon.com/Napoleon-Grills-61286-Premium-Grill/dp/B077SLW6L4/ -
@Michael A Are you original owners? The cigarette lighter plug and 110V adapter in your picture look like aftermarket cables somebody just put there, not something OTT installed. You certainly want to take the advice from Mossey. Both adapters pictured are disconnected, but what is at the other end of the cables? What is disconnected? My guess is nothing and you could toss these out! The panel comes out simply held by two bolts along the bottom (3/8" or maybe 10mm). We had some items like this in our attic when we purchased used. I removed everything from prior owners, wiring not OEM. I also refuse to power anything with a cigarette lighter connection when they can be reliably hardwired behind the "wall panel" (attic left cover plate).
-
@Townesw I just purchased a new roll of butyl, even though I have some left in an older roll. It's hard to keep butyl, glues and tapes fresh in our very dry Arizona climate. I'm rebuilding the rear stabilizer jacks on our hull which includes removal of the jack post assemblies. They were caulked at both interior and exterior hulls. I'm thinking butyl wrapped in a circle will be easier and cleaner to apply than caulk from a tube. I just received this product today. it looks fresh, of good quality and the roll is huge! This might be worth your consideration and for others reading. https://www.amazon.com/dp/B001FCB4JS/?th=1
-
Changing tires in the wild - lessons learned
jd1923 replied to John and Jodi's topic in General Discussion
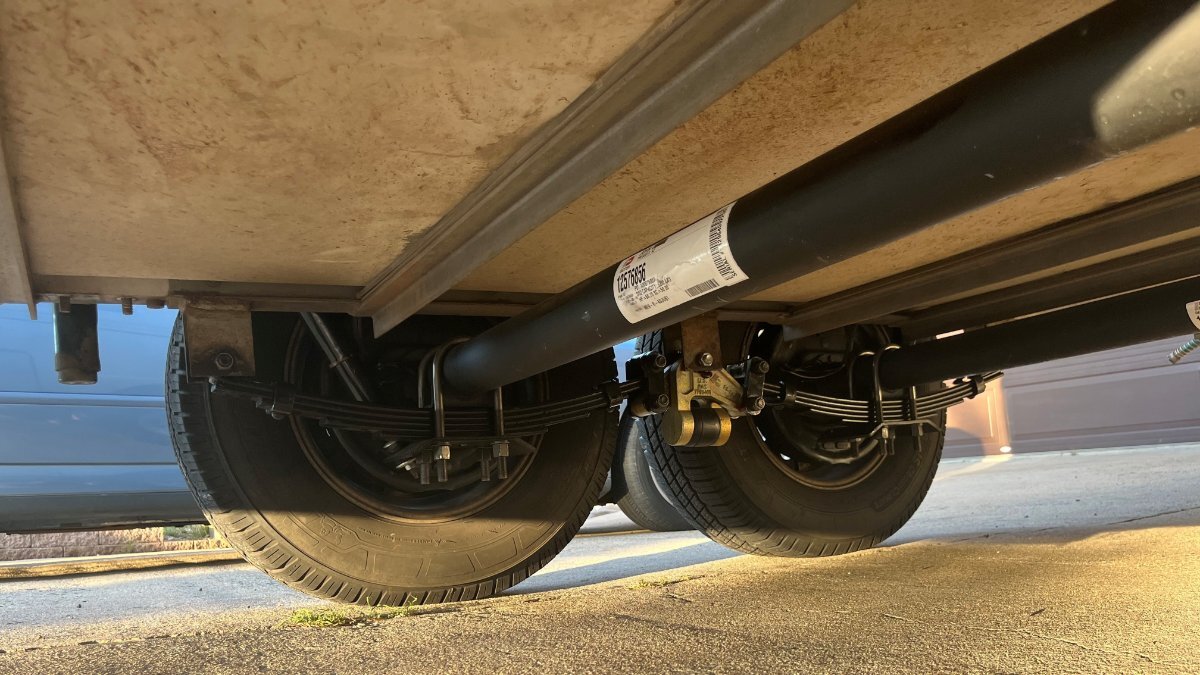
Rob is absolutely correct! Use your onboard Stabilizer Jacks! It's the easiest and safest way to change a tire. Using the labeled "Jack Points" and the trailer weight shifts and then you have other issues. OTT got legal (not engineering) advice on not using the stabilizer jacks. I have posted before what Oliver wrote in the 2017 User Manual, where they detail the tire change procedure using these jacks. I also carry a bottle jack and jack stand, for more major repairs. Hard to imagine any of this on a 3-year-old hull. I expect and have never seen tires self-destruct in less than 7 years, except for China-made ST tires. If you are original owners, I would think about what may have caused or led to these failures (two tires). The steel cable must be the cable from the blown radial tire The shock bushings look awful. Remove one shock to see if it has compression along the full length. My guess is you need 4 new shocks and if I were you, I would be buying four (4) brand new top-of-the-line LT tires, mounted and balanced at a reputable shop. I'd like to ask again re your tire make-model and running tire pressure. Use your TPMS and "see something, hear something, say something!" When you hear any odd noise, get out immediately and inspect all 8 tires, leaf springs, shocks, etc. Look under to see if you're dragging some road debris, then look again. 😎 -
It's odd their only interior picture is actually an Oliver interior picture! They also site OTT as a Canadian company. Hard to tell how much of the dark surfaces are actually windows.
-
elite 2 Extra portable electric dual burners instead of propane burners?
jd1923 replied to Gail Dean's topic in General Discussion
Good call Steve! I found the spec on this unit at 1760 watts. We run our 1500W Emeril Air Fryer all the time (installed in place of the OEM microwave). With a 3KW inverter and ample LiFePO4 SOC you're good. @Dennis and Melissa My only issue with cookers like this is storage space. At 17" L x 14" W x 11" H it will take up the entire space under the front dinette seat or more room in your TV once you store it in a case. Chris keeps a pressure cooker under the front dinette seat. A wonderful device, pot roast in a half hour, yet only about 8" dia and 10" tall. She also keeps dog food down there and several other cooking accessories. -
Lake picture?
-
I would do this. Take a length of the butyl. Roll it and stretch it like using Play-Doh when we were kids! If you can roll it up in a ball and stretch it out again and all the original lines disappear, you have good butyl.
-
Xantrex Freedom XC Pro 3000 Inverter Charger Noise
jd1923 replied to dewdev's topic in Mechanical & Technical Tips
Not sure about the term "breaker rating" but if you decrease the "charge rate" it may help. When you're connected to shore power overnight you do not need a high charge rate to get back to 100% SOC. @dewdev I believe the max charge on your model is 150A. If it is set at this rate, it will produce a bit of noise and for example it would top off 600 LiFePO4 batteries down to 50% SOC in just 2 hours! You could set the rate down to 50A and instead 50% will take 6 hours. Our Victron Multiplus II is rather quiet, though I sleep directly over our inverter-charger. I have our charger set at 100A so it can regain amp-hours quickly. Because of this, the charger kicks in when we first connect at a campsite in the afternoon. By bedtime SOC is normally at 100% and unit stops charging. There has been 2-3 times when it is still charging that time of night (e.g. when running our oven and other 120VAC during evening hours). When this occurs, lying in bed I open the Victron app, turn it off to go to sleep. I turn it back on first thing, and by the time we break camp we are back to 100%! Make sure all your battery settings are correct for your Xantrex. I don't believe this should occur with LiFePO4 batteries. -
Full Suspension Replacement - Alcan Spring and Dexter D52 Axles
jd1923 replied to jd1923's topic in Ollie Modifications
Is that a thing?! 🤣 Thanks, Bill. I thought about at least pressure-washing when she was up in the air, with old parts off! There is a slight chance of some shiny gelcoat down under! -
1UP Quik Rack With Oliver Standard 1.25" Receiver
jd1923 replied to Rivernerd's topic in Mechanical & Technical Tips
Front of TV makes the most sense! Why put more weight on the rear of the Oliver, when Olivers are already tongue light? There's a lot of bounce back there too! We don't carry bikes now, but I've thought some on bringing my dirt bike (240 lbs plus rack weight). A 1-up very light bike and rack, back of the trailer is OK. Going with something heavier, front of TV helps with the balance and both TT and TV! You have to get used to seeing it up there, but it's better than wondering about the rear or watching a camera instead of eyes on the road. -
Full Suspension Replacement - Alcan Spring and Dexter D52 Axles
jd1923 replied to jd1923's topic in Ollie Modifications
A couple 30 mile test drives so far. I've torqued everything 3-4 times now. 90 ft-lbs on the U-bolts, 80 lbs on end spring bolts, 65 on the shackle bolts. After 30 miles with very little trailer brakes, I manually tightened the self-adjusters the the point it was difficult to turn the drums by hand. Next test drive my brakes were 4x better. When any of you are going to Alcan for this service and return there to re-torque, I'd also ask them to tighten the shoes. Don't leave Grand Junction and tow any steep mountain declines until the shoes are properly seated. One of the rear stabilizer jacks started to slip with all the ups and downs doing this work. However, I maintain/strongly recommend using the onboard jacks for service and tire changes vs. the risk of damage using some aftermarket jack. My next Oliver project is restoration of all 3 Barker VIP 3000 jacks! 😎 With Nev-R Lube bearings and ALL new suspension parts, it's relatively carefree. Check the bearings/brakes every couple years. We don't tow as many miles as many of you do. I left the center caps off for now to check bearing and drum temps. I'm not carrying a spare set of leaf springs anymore. Since I have a drum/hub with bearing off the first axle set, I'll put it in my toolbox. It should just sit there in case. If I sell the other axles, I'll buy 2 Nev-R Lube bearings and I already have correct bearing press and tested its use. It's a good feeling towing a reliable trailer down the road and no worries about the next rocky Forest Service road either! Hull #113 doesn't waddle like a duck anymore when entering a service station driveway or crossing RR tracks on an angle, she's tight, she's done! 🤣
-
Full Suspension Replacement - Alcan Spring and Dexter D52 Axles
jd1923 replied to jd1923's topic in Ollie Modifications
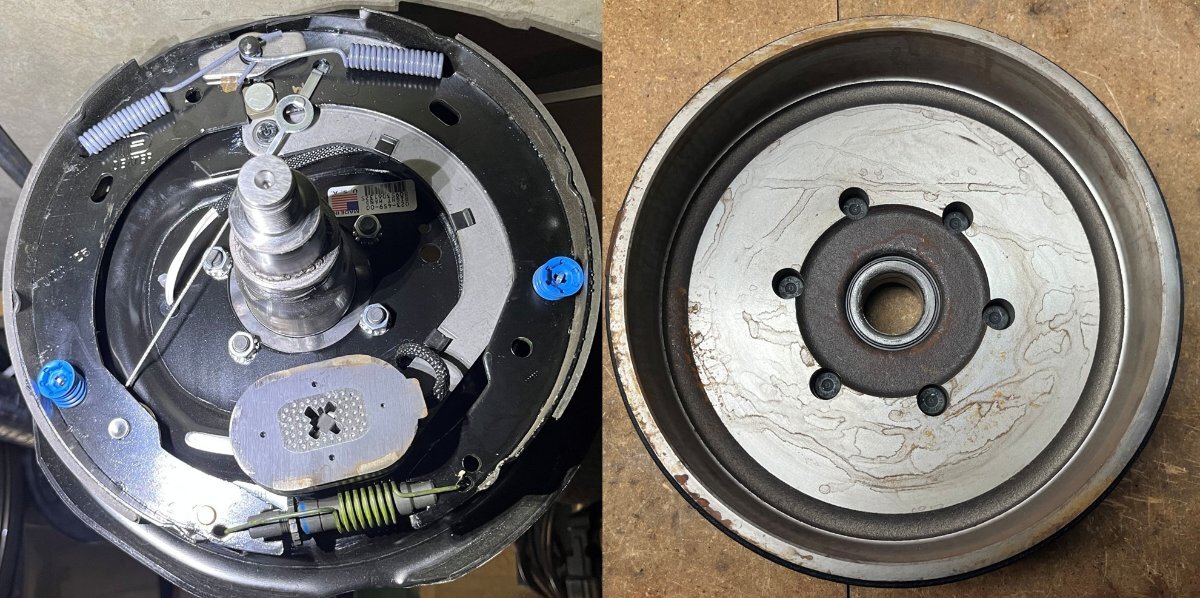
The Alcan springs are an obvious upgrade and the Dexter D52 axles as well. Tim at Alcan got Dexter to refund my shipping cost for the inconvenience of the damaged axles and another 2-week wait. I thought $200 to ship two axles freight was very fair, but I'll take free shipping in a heartbeat - thank you Alcan and Dexter! FedEx Freight contacted me re the 2nd shipment more quickly than I would have thought. I asked the rep, "Is this the return order?" She said she did not know of a return. Turns out Dexter did not want them back! So I have all the spare parts I need, 4 drums with Nev-R Lube bearings, 4 backing plate brake assemblies... Or perhaps I should replace the damaged brake assembly and this set would be good for another Oliver with 50" axles. There are only a few Olivers out there with the 1/2" shorter axles. The 12" brake drums are certainly more substantial, though my side-by-side photo does not do them justice since I made them the same size as the 10". Another photo shows the internals of the 12" Self-Adjust and Nev-R Lube setup.