Search the Community
Showing results for 'Generator box'.
-
 We've never owned a truck or a trailer. My wife and I are retiring in 6 months and diving in with all 4 feet. Tell me what we don't know please. We looked at lots of trailers and are finally pulling the trigger on the LEII. I've read a bunch of threads on here over the last year. Very helpful. But if you can point me to some that have already discussed this sort of thing, I'd appreciate that, too. We prefer simple: Everything we need, but nothing we don't. So.... LEII - starting the ordering process today 🙂. Scheduling factory tour soon. Standard except as follows: Twin Bed Floor Plan Two Upgraded Foam Mattresses Hypervent for Twin Bed Floor Plan Front & Rear Propane Quick Connects Backup Camera with 4.3” display Aluminum Storage Basket Inside Basement Access Door Auto Drain (push button drain valve) - What is this? Door lock (do I need the electric one?) TV - bought yesterday 🙂 Ram 1500 Laramie, 5.7L 8 cyl hemi, 4wd, max tow, air shocks, class iv hitch, 9 pin connector, rear video Approx 1,700 load capacity Locking hard tonneau cover, bed liner Miscellaneous side purchases (yet to be made) Generator that runs on propane - to be carried in Ollie's storage basket Surge protector (no idea what sort of electrical equipment I need for generator or shore power) TPMS for trailer Screen house carpet for under awning hoses, leveling blocks, antitheft? tools? Storage - We intend to use these toys a lot. Maybe even 6 months a year. But, inevitably, they will get placed in storage when not in use. We live in a FL subdivision, with no garage space for this size stuff. So, I thinking I buy a cover for both.
 -
We just returned from a 5 week trip west in our 2021 LE1 with 260 AH of lithium newly installed and 300 W of solar - 200 W on top and an outboard extra 100W panel. We had several 5-day boon docking sessions and never had a problem with keeping power around 100% - or getting it back up to 100% after a cloudy day. BUT, we had mostly sun and we have the 3 way refrigerator running on propane. The bigger challenge in boon docking was running out of fresh water, or needing to dump grey or black tanks. Full time would need water and sewage hookups, at least, we suspect. And electricity via shore power or a generator in cloudy seasons. One other challenge - we needed to develop careful choreography and rhythms to live well in a tight space. And our dog had to learn them as well!! We actually had a lot of laughs as we figured them out!! Geoff
-
 what must I do to use generator power on my 2018 elite II? What steps are required?
 -

Our Annual St George trip and PPA Pickleball Tournament
jd1923 replied to jd1923's topic in Campgrounds & Parks
Thank you. It sure started that way until we ran into some unexpected weather. Last year, the tournament was early vs. late April. We drove into St George on April 5, 2023, and the temps were in the 40s with snow flurries. We had a friend playing Womens Doubles that day. We grabbed coats and hats and watched for a while. Our matches were the next day and it got up to the high 60s and the rest of the week was perfect! This year is a much different story, OMG! Getting ready the week before we noticed the forecast would be in the 80s for the tournament. But it got worse, and Chris is not a summer person at all. Driving out on Sunday, as we dropped 3500 FT leaving the elevation of the Prescott NF, it got hot and was in the high 90s the remainder of the drive. Yes, the pictures look nice, but what you can't see is Chris and Charley were hiding in the shade of the Oliver as the sun had just set. It was 91 degrees in the Oliver, when we parked, and it stayed hot until 9 PM. We were in the Sonoran Desert at 2000 FT, so lows got down to the 60s and we slept well. Right now, I can remember @Patriot writing, "I like options" when he was referring to carrying a generator, that I was not wanting to do. Living SW, we don't summer camp and weren't thinking of high 90s in April. The real issue was the next two nights, where we had booked 2 nights "no utilities" at Valley of Fire. How fitting is that name, when the forecast is 99 degrees? We wasted our reservation there and looked for a place with hookups to run the A/C! Ended up a bit short of our planned stay, two nights at Callville Bay RV Village Park, which we would not recommend. It's a park of rundown singlewides for weekend boating types, with 5-6 RV pads (picture taken Monday night). Today we head to St George. Looks like a great route, driving by Pinto Valley and Jimbilnan Wilderness Areas on the way to Valley of Fire. We will at least drive into the valley to take a look. Then Moapa Valley, Mesquite NV and on to St. George tonight.
-
What you have had is Li-ion NMC. Lithium but very different than LFP technology. GZ first LiFePo4 solar generator was the Pro 4000.
-
No doubt it will be a great ‘backup’ power supply, but not certain it can be integrated into the Olivers electrical system in similar manner as a generator or shared solar input. This is one for the electrical engineers to chime in on!
-
My nice RV mechanic suggested I place the Honda generator I plan on ordering on the bumper? What would be the best rack? Thank you!!
-
 I am not an electrician, I don’t play one on TV and I did not stay at a Holiday Inn Express, so please keep it simple for my simple mind. I have been reading the forum for a few days and I have found posts that talk about and around using a generator solely for charging the Ollie batteries. Is using a generator solely for charging the Ollie batteries a good idea? My objective is to have as small a dual fuel generator as possible, while I am off shore-power to compensate or complement for the 400 Watt solar panels. My larger objective is to be as untethered as possible while traveling. I don’t want to go to a bigger generator to run Ollie in full or partial mode. My Oliver Elite II is on order. It is coming with 390 AH Lithium batteries, 400 Watt Solar panels with charge controller and 3,000 Watt Pro inverter. Is there any special request I need to make to Oliver to create a plug from the generator to the battery to make the connection as clean and simple as possible? Dumb question time – Why couldn’t the generator power enter the battery system via the external solar panel connection?
 -
A few years ago, generators were all over our forum. Nearly all portable generators were of standard Motor/Generator design. I refer to them and my Dometic Penguin AC as "Hammer Mills". Then Honda came out with their inverter line. Super quiet, fuel efficient, and their EU 2000 watt unit with an EzStart would run our A/C units. The vast majority of us purchased the Honda inverter 2000 or 2200 units. But they were, and are pricy. Time has passed and most of us still have the Hondas that you could not pry out of our dead hands. But much less costly Champion, Yamaha and Predator inverters (to name a few) have come into play. With the OTT production rate acceleration, I suspect we have many new owners that likely would likely benefit from a revival of the topic. This thread is intended to hear from our owners their thoughts about their generator. Please touch upon the below as well as your experiences: Generator Name and Model Cost of Purchase Power Output (Rated Full Load) Ability to handle our A/C cycling while switched to "Eco-Mode". Please specify if you have an 11K BTU or 13.5K BTU A/C. Decibels idle and full power Ease of use Maintainability Reliability Durability Number of seasons used Thank you! GJ
- 68 replies
-
- 10
-

-

-
 I am going to be replacing my old Victron color display (push button) which took the place of the old Zamp solar charger. So yes, doing the same. For anyone reading the install, this is what I was trying to do without success so far, "The best place to insert a multiplus is inbetween the ATS (assuming you have a generator) or shore power input (if you don't) and the breaker panel itself. That way the shore or generator power will charge the batteries, and the inverter itself keeps the power on even without shore or generator. It also enables the power assist mode to function correctly, where you can dial down the current limit to match the available power, and then no longer need a power shedding device to avoid overload. Any outlets that have GFCI then continue to have GFCI as they should. Those that don't are probably better not to have GFCI, as heavy loads (air conditioner, electric heat) would end up often tripping the GFCI inconveniently and unnecessarily. The one drawback though is that you *must* then have the multiplus in on or charge only mode to have shore power pass through. If you turn it to OFF, there will be no power at any outlet, regardless of the presence of shore or generator power available. Also, no backfeeding. You don't want to deal with islanding, and you don't have to since the multiplus will do the right thing if wired correctly. Shore/gen (or ATS) is connected to AC IN1, and AC OUT1 goes to breaker panel. That's it. You *can* use AC OUT2 to switch additional loads based on other criteria (see relay assistant for control of ACOUT2 relay) but that would require an additional breaker as you couldn't then put that switched power through the existing breaker panel. Note that if you have an existing converter/charger plugged into power from the breaker panel, this will have to be removed/disabled to avoid setting up a loop (120->12->120->...) This is all assuming you have a single phase breaker panel, or one where the two phases have been merged with a jumper wire (also assuming 30a 120vac service here, not 50a 240/120 split, in which case get a multiplus2-2x). If you do have a 30a split panel (where an existing inverter has already been wired in) you would need to either connect it up the same way as the original inverter (one side of the split is "shore", the other side is "inverter"), or if you wanted to power everything through the multiplus (gain ability to operate aircon from battery) then you want to merge the two sides of the split (jumper between the two 30a breakers) and wire the multiplus in as above (shore/gen->ats->multiplus->breakers). I do this on a regular basis (upgrading mostly b, some c class RVs).
 -
What do you all do to cover your generators when you need to run them and it's poring rain outside? I've seen some "covers" at the Jungle Store - not sure about them.
-
I "full time" in mine when im not out working on a ship which is about 9 months out of the year so generally i spend about 2-3 months at a time in mine. Storage is really the only issue with it. the bed of my f150 serves as my garage so its usually packed with my bulky or outdoor gear and i made a sort of under bed dresser drawer for my clothes in order to keep the closet free for bulkier items. If you want to boondock full time you'd need to make significant upgrades to the solar package as well as carry a small generator as even with the lithium and solar package the new fridges being used starting in 2023 draw too much power to go for more than a few days maybe a week of clear skies without needing supplemental charging.
-
Please help!! We are boondock camping and we're trying to top off our lithium batteries. I plugged into a small watt generator it did not charge anything. I switched over to a 3500 generator and there's a clicking noise going on and it's not charging. Clicking noise in the compartment of the dinette, the one on the left. I do not know what to do. Can anybody help? Thank you, Christi
-
 You need a neutral ground plug like this one https://www.amazon.com/Southwire-Company-LLC-44400-Generator/dp/B07F4R7BDL/ref=sr_1_4?crid=1U28YA880VP37&dib=eyJ2IjoiMSJ9.I-pLsdfsMyYCXEnn08O01KLUWNGgc26-op4qZF23eekGNYeLblqAXvM7jvBKtuyHFrxtHpXL5f6cL8FSi43Z7i0-Ghxnmndu2ScDGmdjoijtou40TOc4LQdmFPl_YTpxWreQi_NPNlG_7bxGLMmP5WcTg-GKlhR9MhCt0RYGTgW1t8Eh9g5AVLeSX4ubHy4QUgnhQ6LxszOW4yIDEK1R4Cc6DfCqmaDugvAB7mSsIRc.dTWhDb8tlbu6JiBaZ1olHYxHljGMDsnniRy5XQOetGk&dib_tag=se&keywords=generator+neutral+ground+bonding+plug&qid=1712764295&sprefix=generator+neutr%2Caps%2C317&sr=8-4
 -
Our Oliver is the first trailer we’ve owned with an EMS, and I’m a bit nervous about using a small generator (Yamaha 1000) for charging if we don’t have enough sunlight for solar and/or truck charging. I don’t yet have a grounded neutral plug, but will build or buy one before any travels. I did check to see if the generator would work, and of course it didn’t because of the floating ground. For info, we have four 6 VDC AGM batteries, and 480 watts of Solar (trailer and Zamp portable). We prefer to boondock, but are not big power users. Mostly lights, Maxfan, and furnace, but we do tow with the 3way refrigerator on DC. Any words of wisdom? Have I missed anything?
-
Honda just released a new 3200watt (26.6 ) amp generator. It is in the same format of the EU 2200i. It will fit under a tonneau cover an should also fit in the front basket. I haven’t measure the basket yet thought. 60 pounds, fuel injection, and all of the same features of the EU2200. It is a little expensive at list price $2999, the 2200 main and companion together are about $500 cheaper than the 3200. If I hadn’t just bought the EU2200i main and companion I would really consider this because of the space savings and one less generator to maintain. The 2 Eu2200i are 4400 watts or 36.6 amps vs 26.6 amps of the 3200
-
 Woke up thinking about this, so briefly researched and confirmed my recollection regarding the Xantrec Freedom XC 2000 in my unit. ‘All Xantrex Inverter/Chargers incorporate an automatic transfer switch. This switch senses when outside AC Power is present and transfers the load from the inverter to the source of incoming power (shore or generator). The unit also automatically switches from invert mode to charge mode.’ I suspect the ATS in the MP2 serves the same function and that an additional TS is required to run an A/C via the inverter.
 -
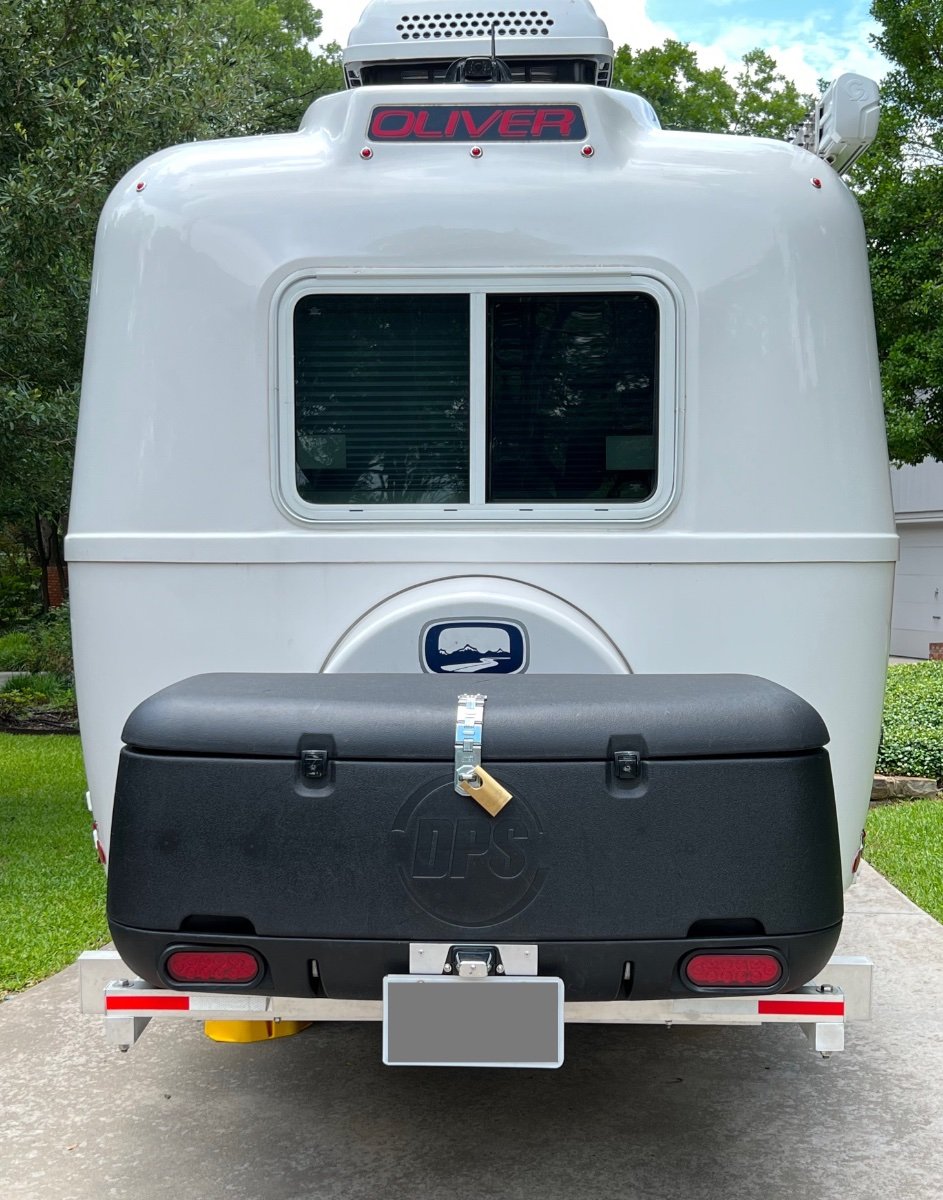
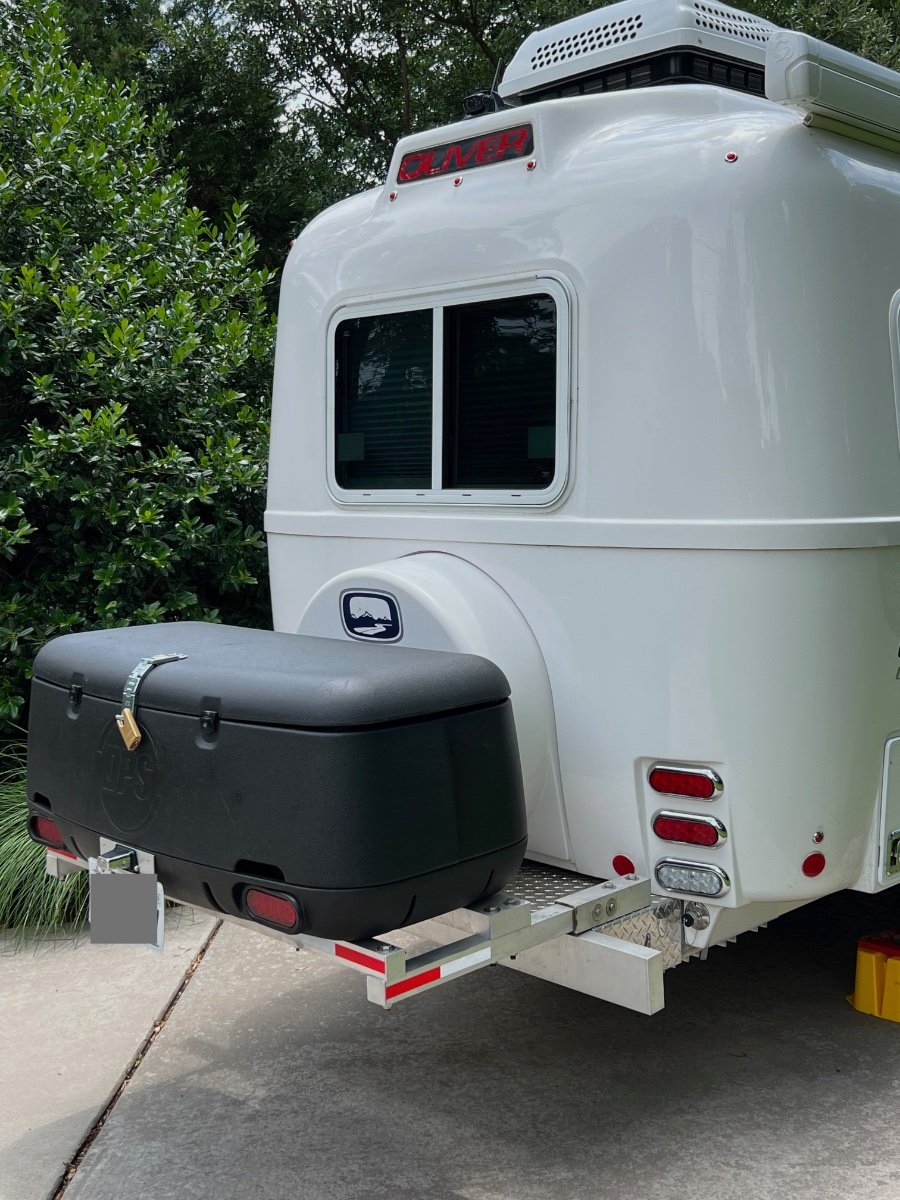
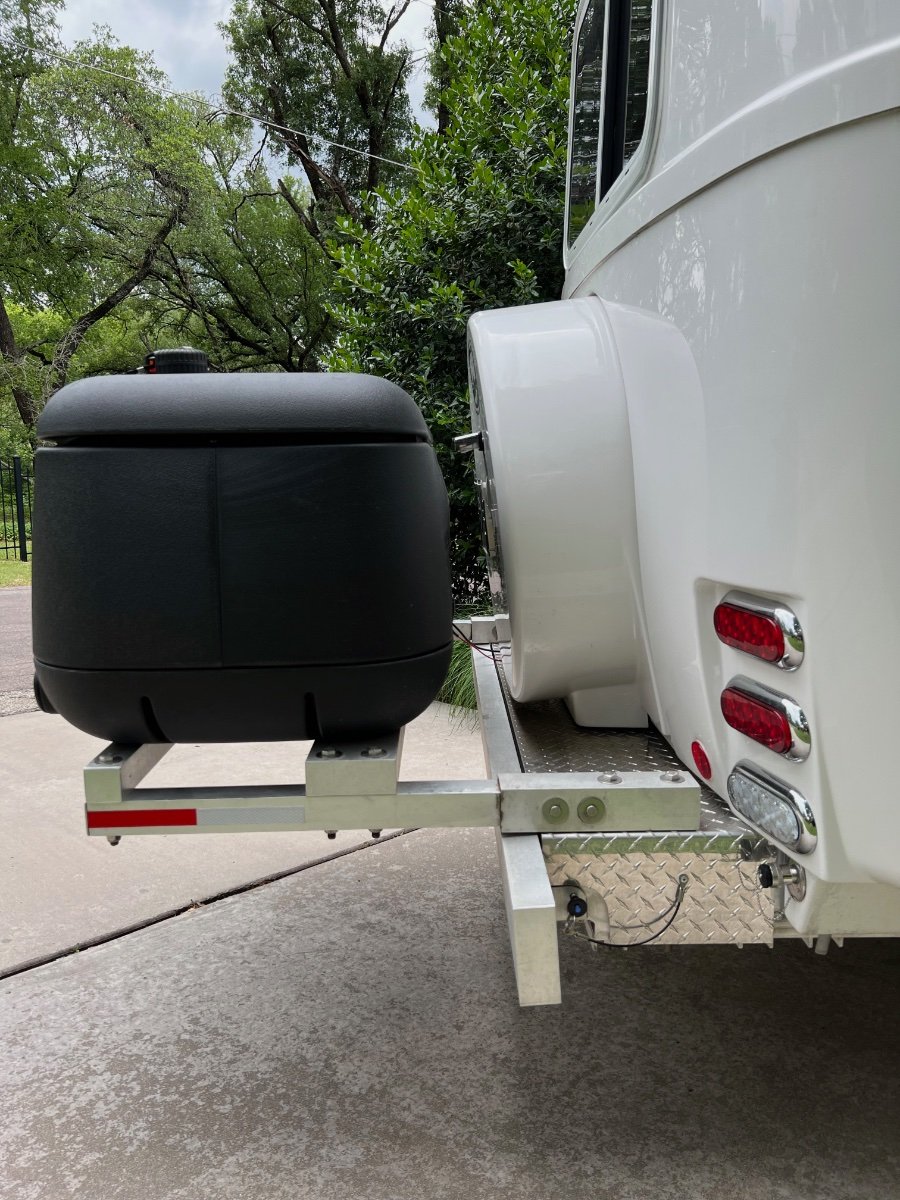
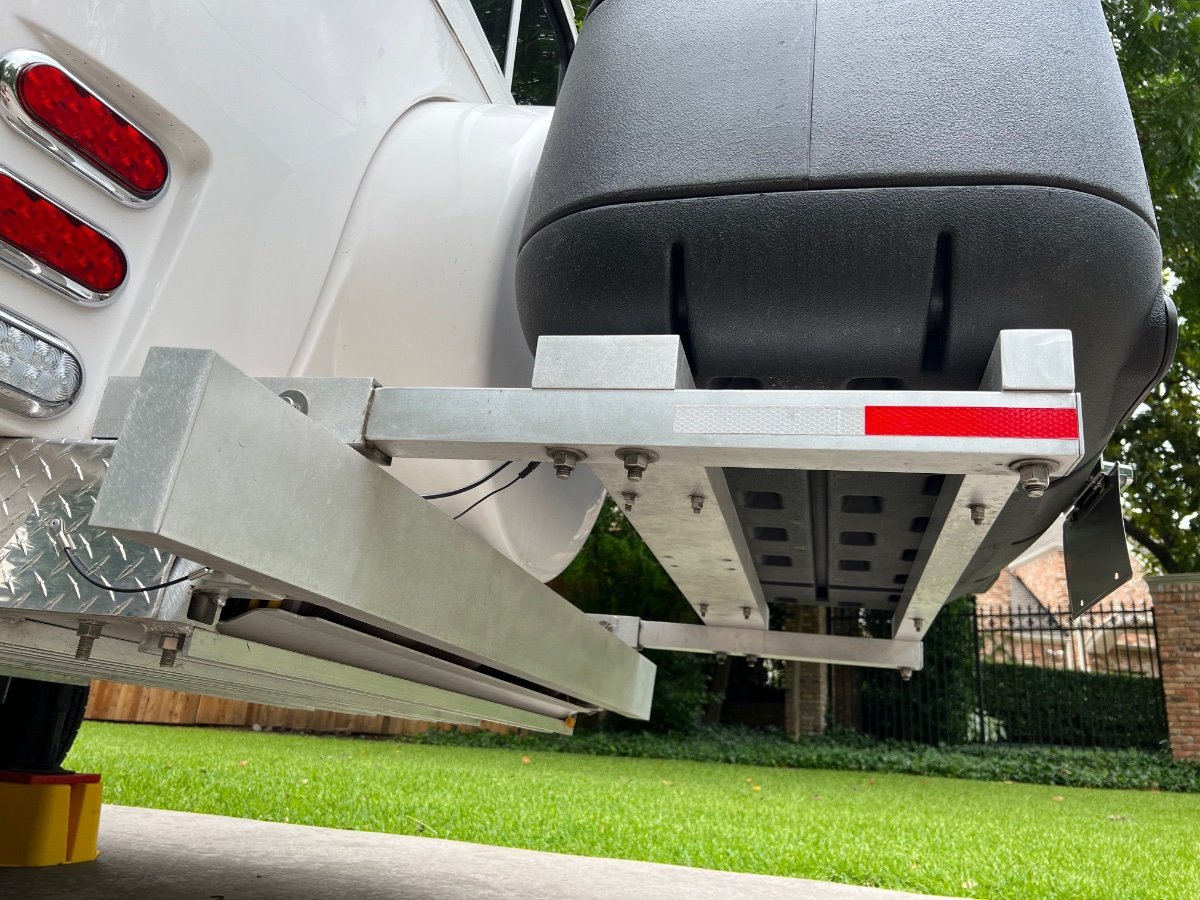
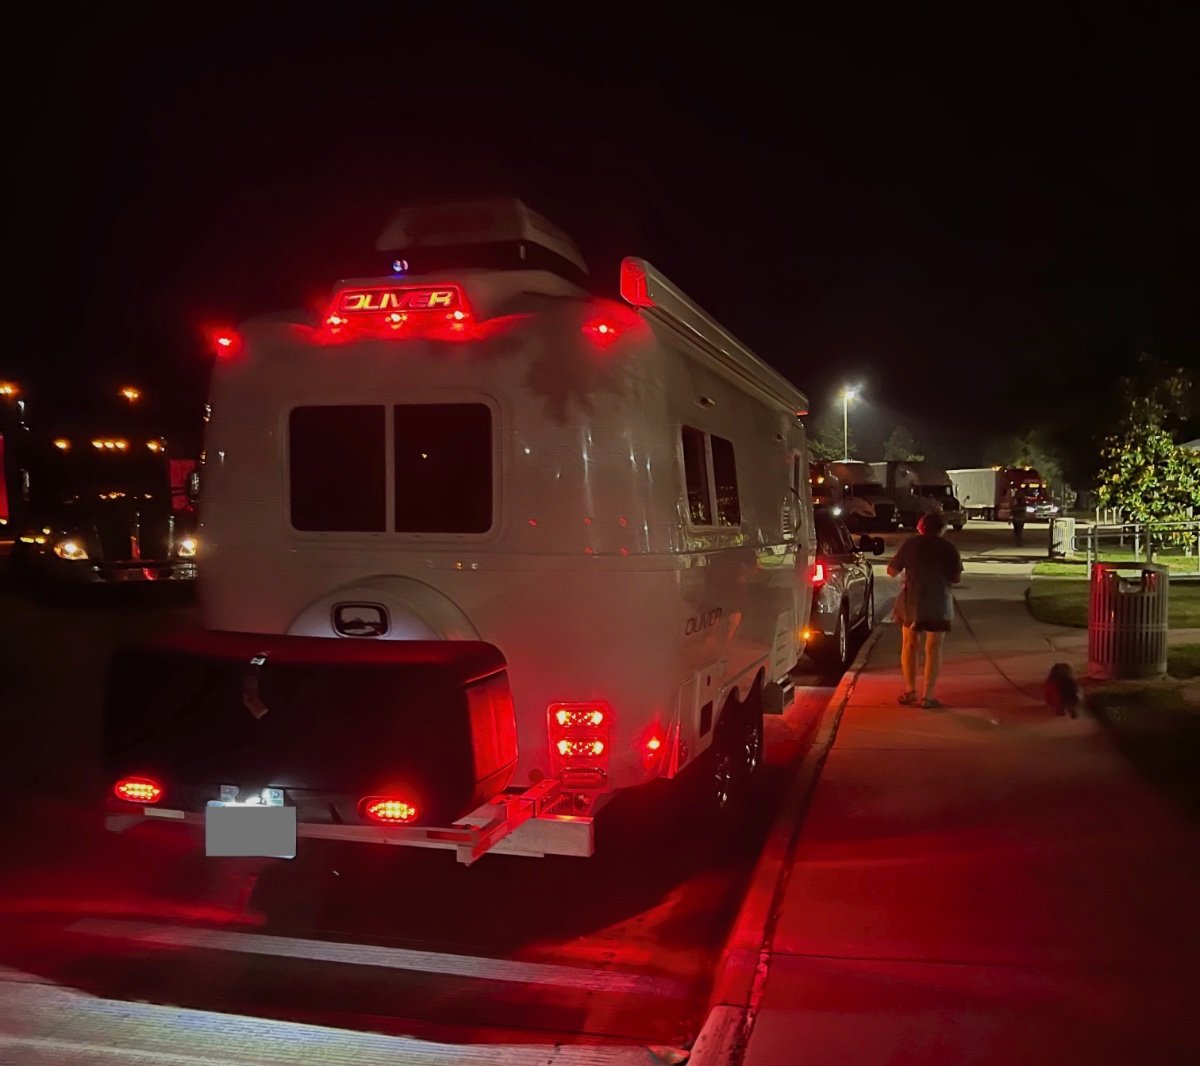
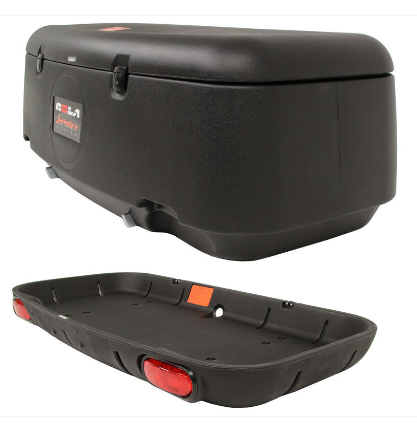
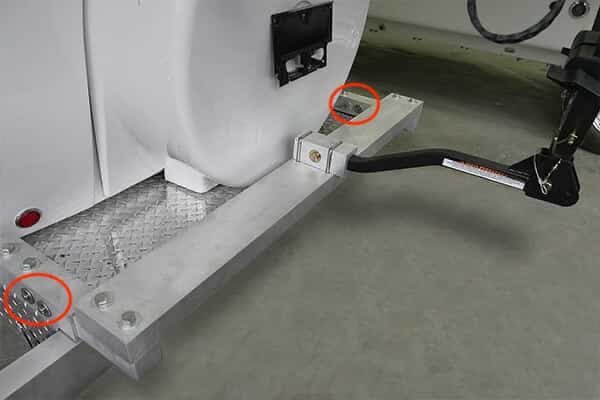
 Summary I have installed a rear mounted cargo carrier, with lights, to our 2022 Oliver Legacy Elite II (LEII) travel trailer. We recently completed a two week, ~2000 mile trip, using the cargo carrier, which performed flawlessly. Below are photos of the installed cargo carrier, which are followed by a detailed description of its installation. Storage Constraints Prior to ordering our Oliver Legacy Elite II (LEII) travel trailer I knew we would need additional storage space on the trailer. We are using a 2014 BMW X5 35d (diesel) as our tow vehicle, rather than a pickup truck. Thus, we could not plan to use the pickup bed for supplemental storage. We also needed to stay within the tow vehicle's cargo capacity of 1100 lbs and maximum tongue weight of 600 lbs.. Expecting a tongue weight of approximately 500 lbs. plus two occupants at approximately 300 lbs, we could only accommodate a maximum of 300 lbs. of other cargo. The available payload will be partially used by our camera gear, which must be protected from exposure to moisture. A tongue mounted cargo carrier was not viable, given the tongue weight limit for the tow vehicle. Storage Requirements I anticipated needing additional storage space for the following items: Champion Dual Fuel Generator- 2500 watt (~45 lbs.) (too large for basement storage) Napoleon TravelQ™ 285 Portable Propane Gas Grill and hose (~35 lbs.) (too large for basement storage) Anderson Ultimate Leveling kit (~25 lbs) Harbor Freight rubber chocks (4) (~20 lbs.) Camco Stabilizer Jack Supports (3) (~10 lbs.) Miscellaneous accessories All of these items can tolerate some exposure to moisture, which is likely when stored in any external cargo carrier. A closed and reasonably secure cargo carrier was needed. Searching the owners' forum, I found examples of rear cargo carriers/bike racks and found several examples, including: Oliver's original bike rack design using twin receivers and extending approximately 3 feet beyond the rear bumper; Various rear mounted metal cargo boxes, including custom designs; Rear mounting of an Oliver tongue cargo box by John E. Davies. I also looked extensively at aluminum cargo boxes from various manufacturers, trying to find options which could accommodate the cargo items listed above. I already owned a cargo carrier which we had used on the BMW X5 tow vehicle. This carrier has a heavy steel swing-away frame which mounts to a standard 2" receiver. Mounted on the steel frame are a polypropylene tray and an enclosed container with 13.5 cubic foot capacity. The tray and enclosed container interlock. This cargo carrier also is equipped with fully functional lights (running, brake, turn, flasher). Interlocking pins on the enclosed container mate with the tray. Locking latches secure the container to the tray. Solution Approach I decided to re-use the polypropylene tray and enclosed cargo container, but not the heavy steel frame. Instead, I would use a design similar to the original Oliver bike rack. I ordered the current optional Oliver bike rack when we placed our LEII order, planning to utilize some, but not all, of its components. The current Oliver rear hitch (photo below) utilizes twin receivers that are 11" long, constructed to receive 2" x 2" X 0.25" (wall thickness) T6061 aluminum square tube support arms, which are 17 inches long. The receivers are each mounted to the LEII frame by two long 0.5" diameter stainless steel bolts and nuts. The other components of the rack are a 2" x 5" x 0.25" T6061 aluminum cross-member, 51-1/8" long (with end caps), and a 1-1/4" receiver for connecting a bike rack. I planned to use the twin receivers, and the cross-member, but not the support arms, nor the 1-1/4" receiver. Instead, I would replace the 17" long original support arms with longer equivalents, whose length was to be determined. I would utilize the original 2" x 5" x 0.25" T6061 aluminum cross-member and add another cross member, this one 2" x 2" x 0.25" T6061 aluminum, also 51-1/8" inches long with end caps. The cross members would be bolted to the support arms, in the same manner as on the Oliver rear hitch. The tray and enclosed container from my existing cargo carrier would be mounted to the cross-members. Note the clevis pins circled in the photo below, there are two 0.50" diameter horizontal clevis pins securing the support arms in their receivers. Each clevis pin has a washer on either side of the receiver. Removing the clevis pins permits the support arms to be pulled to the rear, enabling removal of the spare tire cover and spare tire without dismount the support arms. Solution Model A critical dimension to be determined was the length of the 2" x 2" x 0.25" support arms. The new support arms need to be long enough to: Support the polypropylene tray and enclosed cargo box and attach using the molded mounting holes in the tray; Allow the lid of the enclosed cargo box to open without striking the spare tire cover; Permit removal of the spare tire cover and spare tire without removing the cargo carrier and support frame; Permit access to waste water hoses stored behind the bumper; Minimize the additional length of the cargo carrier and support frame to the LEII's length. I fabricated 2" x 2" wooden support arms, approximately 40" long. Using woodworking equipment, I cut slots into one end of each support arm to fit around the bolts holding the twin receivers to the frame. I also drilled horizontal holes for the clevis pins which retain the support arms in the receivers. Positioning the Cargo Carrier on the Cross-members The wooden support arms were inserted into the twin receivers and secured with the clevis pins. Then the 2" x 5" x 51.125" T6061 cross-member was placed across the support arms near the bumper. The additional 2" x 2" x 51.125" wooden cross-member, was also placed across the support arms, but further from the bumper. Clamps were used to hold the cross-members in place on the support arms. The polypropylene tray and enclosed container, latched together, were positioned on the cross-members, centering both to the trailer's width. I opened the lid of the enclosed container and adjusted the spacing (fore and aft) between the lid and the spare tire cover to ensure they did not contact each other. Once I had located the joined tray and enclosed container in what appeared to be a desirable position, I adjusted the positions of the cross-members fore and aft to establish alignment with the mounting holes in the tray. The 2" x 5" cross-member engages two mounting holes on each side of the tray. The 2" x 2" cross- member engages only one mounting hole on each side of the base of the tray. Six 5/16" carriage bolts will fasten the tray to the cross-members. Only four carriage bolts attached the tray to its original steel support frame. I used a mason's string stretched across the width of the tray with weights on either end to aid in aligning the mounting holes in the tray with the positions of the cross-members. I also used carpenter's squares to verify the cross-members were perpendicular to the support arms. Another check of squareness was made by measuring the distance from the trailer bumper to the cross-members. Once I was satisfied with the position of the tray and enclosed container on the support structure, I marked the locations for the holes to be drilled for the six mounting bolts to secure the tray to the cross-members. The tray overhangs the rear cross-member at the rear. With the cargo carrier tray and enclosed container in place on the clamped cross-members, I wanted to determine if the spare tire cover could be removed without removing the entire cargo carrier and support assembly. I found I could remove the clevis pins and pull the support arms aft approximately 7 inches out of the twin receivers and enable removal of the spare tire cover. With the tray and enclosed container positioned on the cross-members, I could now determine the required length of the support arms, which is 33.75 inches. The location of the rear cross-member determines the length of the support arms. After locating the mounting position of the tray and enclosed container I marked all key positions and hole locations on the wooden support arms and wooden rear cross-member. I cut the wooden support arms to the desired final length. Material Sourcing and Machining The required T6061 aluminum components required are: 2" x 2" x 0.25" x 33.75", square tube, quantity 2 (support arms), cost= $110.18 2" x 2" x 0.25" x 51.125", square tube, quantity 1 (cross-member), cost= to $99.08 2" x 12" x 0.125", flat bar, quantity 1 (to be cut into 2" squares for end caps on the support arms and rear cross-member), cost= $6.86 Sales tax= $17.83 No shipping charge. I picked up the materials at the local Metal Supermarkets warehouse Total cost= a $233.95 The above T6061 aluminum components, cut to specified length, were obtained from: Stainless steel bolts and nyloc nuts were obtained from: I was referred by Metal Supermarkets to a local machine shop: When I received the materials I took them and my wooden mockups of the support arms and cross-member to Air & Earth. I also took one of the original support arms. I discussed the machining needed: to cut the slots in one end of the support arms and to drill the needed 0.50 diameter holes for the clevis pins and mounting bolts. I also asked them to cut the 2" x 0.125" flat bar into 2" x 2" squares. I did not ask them to drill the smaller holes for mounting the cargo tray to the cross-members. I was quoted $220 and turnaround of the job within a week. They did an excellent job within the promised timeframe. Finishing and Assembly of the Support Structure After Air & Earth completed the requested machining, I performed the following finishing steps, which included: Rounding the edges of the 2" x 2" square tubing on the slotted end to be inserted into the receivers. I used a 3" wide belt sander with 100 grit sanding belts to round the corners of approximately 12" of the tube which would be inserted into the receivers . The original Oliver support arms also had the corners rounded to more easily slide within the receivers. Several trial fittings were required to verify smooth insertion and removal to/from the receivers. The support arms and the rear cross-member were sanded with an orbital sander using 200 grit disks. This sanding removed markings on the tubes and made the surface textured, similar to the Oliver rear hitch components. The support arms were inserted into their receivers and fastened with the clevis pins. The cross members were aligned with the mounting holes on the support arms and bolted into place. The cargo tray was positioned on the 2" x 5" cross-member at the previously determined mounting position and holes drilled to mount the cargo tray. Holes were then drilled in the 2" x 2" rear cross-member. Carriage bolts, flat washers and double jamb nuts were used to secure the cargo tray to the cross-members. Once all test fittings of the support assembly were completed, lithium grease was applied to the ends of the support arms which are inserted into the receivers. 2" x 2" x 0.125" caps were attached to the open ends of the support arms and the rear cross-member, similar to the end caps used by Oliver. These were attached to the square tubing using JB Weld epoxy. Cargo Carrier Lighting The cargo carrier partially blocks visibility to the taillights of the trailer, which is most noticeable when viewed from close behind the trailer. At a distance the taillights are largely visible. The cargo tray is fitted with two LED light fixtures and a wiring harness with a 4-pin flat connector. A corresponding 4-pin flat connector was installed on the LEII to integrate the lighting on the cargo carrier with the trailer lighting. Details of the installation of the 4-pin connector in the trailer are covered in a separate article. The lights on the cargo carrier ensure the trailer is quite visible from behind. A license plate mount was added to the cargo carrier tray, since the license plate mount on the spare tire cover is blocked by the cargo carrier. Lighting for the license plate mount is provided by adding a Y connector to the license plate light cable under the spare tire cover and adding an extension cable routed to the cargo tray mounted license plate mount. I also added reflective tape to the support frame members. I used the following reflective tape: https://www.amazon.com/gp/your-account/order-history/ref=ppx_yo2ov_dt_b_search?opt=ab&search=reflective Conclusion This addition to our trailer provides significant benefits, with no significant disadvantages. It does add approximately two feet to the length of the trailer. Besides the additional storage space, the cargo carrier and its load slightly reduces the tongue weight. I measured the tongue weight, using a Sherline scale, at 450 lbs., with no water onboard. Tongue weight seems sufficient, as no swaying or other handling issues have been observed. This project had a successful outcome due largely to the information I was able to glean from the Oliver Owners Forum. I hope this information is useful to others on the forum. Comments and suggestions welcome. Regards, Don
- 22 replies
-
- 19
-
-
-

-

-

Generator Inverter Usage
Chukarhunter replied to Wandering Sagebrush's topic in Mechanical & Technical Tips
With no offense intended, I believe there is some questionable advice in this thread. In particular, it is counterintuitive to me that reducing the input amperage to the inverter is the best way to limit the level of charging current that the inverter is delivering into the batteries, especially when the inverter has a setting (#24) designed specifically for that function. Wandering Sage Brush is apprehensive about using the smaller Honda 1000 to charge his house batteries while boondocking. There is nothing to be nervous about as many of us do it all the time. The only issue you need to be aware of is ensuring that the combination of trailer loads (120 volt loads and 12 volt charging load) is less than the maximum output of the generator. If you try to run higher loads (i.e., greater watts) than the generator can produce, the generator will overload and shut down. The table above showing inverter settings are for a 3,000 watt inverter. Setting 28 is factory defaulted to 25 amps because 25 amps * 120 volts = 3,000 watts. If you lower the amperage limit in Setting 28 down to lets say 15 amps, you are turning your 3,000 watt inverter into an 1800 watt inverter because 15 amps * 120 volts = 1800 watts. There is no need to do that. If you want to charge your batteries with a 1000 watt generator, then you need to limit the draw on the generator to less than 1,000 watts. If you want all the available 1,000 watts to go into your batteries, then there are two steps you need to take when you decide to charge. First is to turn off your inverter and any 120 volt loads if you want to all the generator output to go into your batteries. You don't want any 120 volt trailer loads drawing on the generator at the same time you are charging the batteries. Second, you need to reduce the amperage limit in Setting #24: Charger Current. The charger typically charges at about 14 volts when the batteries are getting close to full. Since volts x amps = watts, 1000 watts into the batteries is going to require 71 amps of Charge Current (14 volts * 71 amps = 1,000 watts) . Adjusting for losses and generator derating at altitude and in higher temperatures, you should probably limit the watts from the generator at no more than 900 watts which equates to 64 amps (900 watts / 14 volts = 64 amps). So whatever inverter/charger you have, set the max charging current at 60 amps and your Honda EU1000 will probably charge just fine without overloading. If you are running the Honda 1000 and you are also getting 20 amps from your solar panels at the same time, then you will be putting 80 amps into the batteries (60 amps from the generator and 20 amps from the solar). This is equal to 1,120 watts (80 amps x 14 volts = 1,120 watts) You can leave the Charge Current setting at 60 amps all the time if you want unless you want your batteries to charge faster when you are on shore power. If so, just increase the max charging amps in setting # 24 before you go back on shore power. -

Multiplus II with PD EMS wiring help
Galway Girl replied to rideadeuce's topic in Ollie Modifications
It says on the mp2 datasheet: ”Two AC Outputs The main output has no break functionality. The MultiPlus takes over the supply to the connected 120V loads in the event of a grid failure or when shore/generator power is disconnected. The transfer time of the L1 output is less than 18 milliseconds so that computers and other electronic equipment will continue to operate without disruption. The transfer time of the L2 output is longer: approximately 40 milliseconds. The second (auxiliary) output is live only when AC is available on the input of the MultiPlus. Loads that should not discharge the battery can be connected to this output.” -
 I use a 2000 watt generator (with the ground plug) and it powers up the Ollie and the AC. I do have to shut off the breaker to the inverter/charger for it to power up the AC compressor.
 -
 Any ideas why my generator power isn’t showing up in the trailer despite being plugged in the same as always. The only thing that has happened since I last ran the generator last Winter is my water pump stopped working, so repair guy ran new positive line from switch to pump. could the repair guy have done something to prevent generator power to enter the trailer? thank you
 -
Multiplus II with PD EMS wiring help
rideadeuce replied to rideadeuce's topic in Ollie Modifications
Thank you. I think we were reading the some of the same information. "AC-Out-2 supports loads that you only want to run when on shore power or generator. " Yes, unfortunately they don't show their electrical schematics on new systems with 3000 W inverters it seems. -
Multiplus II with PD EMS wiring help
Galway Girl replied to rideadeuce's topic in Ollie Modifications
It says on the mp2 datasheet: ”Two AC Outputs The main output has no break functionality. The MultiPlus takes over the supply to the connected 120V loads in the event of a grid failure or when shore/generator power is disconnected. The transfer time of the L1 output is less than 18 milliseconds so that computers and other electronic equipment will continue to operate without disruption. The transfer time of the L2 output is longer: approximately 40 milliseconds. The second (auxiliary) output is live only when AC is available on the input of the MultiPlus. Loads that should not discharge the battery can be connected to this output.” You might try asking service how they connect up their 3000 watt inverter to run both a/c and outlets. -
Multiplus II with PD EMS wiring help
Galway Girl replied to rideadeuce's topic in Ollie Modifications
The shore power ( or generator) feeds thru the ems to the breaker panel. The a/c ciircuit is on its own 20 amp circuit . if you want to power the a/c from the new inverter, you would need to also wire into that 20 amp breaker from your inverter. what does the multiples 2 have as ac output? Is it one output or two?