All Activity
- Past hour
-
IMG_0062.mov We had our Oliver ceramic coated by Blake, owner of Triple B Detailing near Lake Norman, NC. He did an outstanding job and was absolutely incredible to work with! His reviews were stellar and making the 3 hour trip to see him was more than worth it! He is knowledgeable, passionate, and takes pride in every step of the process! Our Oliver looks better than when we took delivery a month ago. I wanted to share Blake’s information and an honest review in case anyone is looking for someone in the area and wants someone who does exceptional work with Olivers.

- Today
-

Pepwave Cellular Router and not the common install
jd1923 replied to jd1923's topic in Ollie Modifications
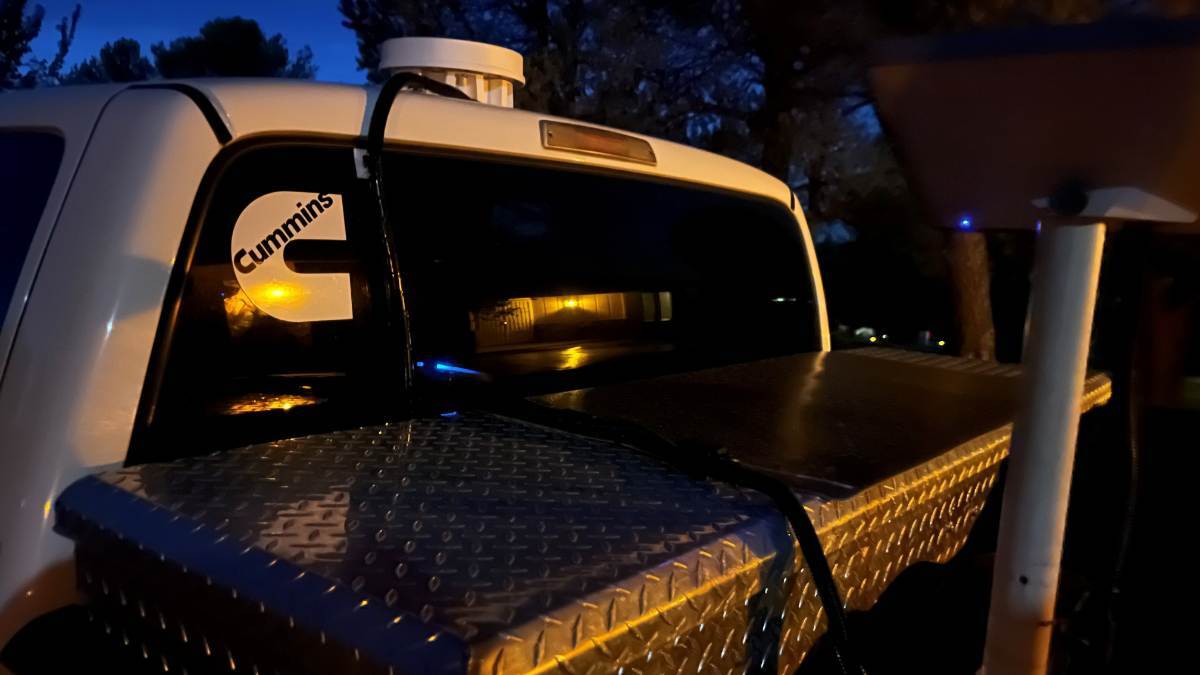
While traveling we've used our Starlink Mini often. Though more often with cell coverage we are able to use our our T-Mobile 5G SIM on our Pepwave router. I have also used the Pepwave with 5G service as a backup to our home network. Twice while teaching, in the last two years, our Sparklight service has gone down, and I've logged into the Pepwave Wi-Fi to continue the Zoom class sessions. Over the last two years, 5G service in our neighborhood has gotten better/faster. I decided to cancel our home cable service which has grown in cost from $40/mo eight years ago to $86/mo lately for 300 Mbps service. I've worked out a complex installation that allows us to be logged into the same Home Network whether we are physically at home or on the road with the Oliver! To date we have only used the Starlink powered by battery, connecting via Wi-Fi using the built-in Starlink Router. I just finished a more complete installation where we have the Starlink powered by 12-24V DC-DC charger (thanks Geoff) and connected by Ethernet cable to the WAN port of the Pepwave. This will start to get technical for many of you... Internet connection comes into Pepwave router by means of the Parsec 5G antenna (priority #1) or when needed by the Starlink Mini via the Pepwave LAN input. The Pepwave can if needed also share bandwidth between WAN connections for greater overall speed. The Pepwave router will also broadcast Wi-Fi but like any Wi-Fi broadcast it has distance limitations. The Wi-Fi coming from our truck installation by itself will not pass through the garage and the walls of our home to the other side of the house or our lower level where it's half underground. But it does fine more than 100 ft radius around any campsite. At home, we've been using a Wi-Fi 6 Mesh network, a main with two satellite routers to cover all the area on our 3/4 acre property. Including the Oliver which is parked 100 ft away! Now that we're not using a home-based modem anymore, I thought "How could I repurpose this system connected to the Pepwave?" I installed the Mesh Wi-Fi main unit in our truck connected by ethernet cable to a LAN output of the Pepwave. It's so cool that when I read the label on the 120V power adapter for the mesh unit, the output was stated at 12VDC 3.5A which means all I had to do was to cut off the adapter and connect two wires to the 12VDC in the truck! I mounted it in the back window behind the rear bench seat, behind the driver's head. Out of sight when driving and good line-of-sight out the rear of the truck. Where our truck is parked most of the time, backed into the driveway, the mesh satellite in my office also has line-of-site to the main. Our "Home" network is getting 300-400 Mbps down and about 20-50 up from this installation, 5G cell through the cell antenna on the truck! I then parked the truck in the garage where the Wi-Fi signal must travel through 3 walls. We could still stream TV at about half these numbers. Half speed is also about what the Starlink Mini delivers day-to-day. Yeah, good 5G service is 2-4 times faster than the Mini. I've canceled our cable Internet service. The savings of $86/mo in two years will pay for everything spent in this installation; the Pepwave and antenna, the Starlink Mini and accessories, the converters and cabling, etc. Now here's the real kicker! 😎 I setup a home network on the Wi-Fi mesh. We have all of our laptops, cell phones, network printer, TVs etc. all connected to the same "home" network. We also have the TV in the Oliver on the same network. Regardless of whether we are home or away the network login is constant so no need to reconnect ever to another Wi-Fi. If we need Starlink, when traveling, or for emergencies when at home and the cell network is overloaded, just mount and connect the Starlink Mini and it feeds the same home network. If we wanted to connect to a public or friend's Wi-Fi we can also input that to the Pepwave "Wi-Fi as WAN" so it becomes the Internet source for our home network. It's a lifetime, seamless setup! 🤣 So, you might be thinking a router with antenna, the Starlink Mini and a Wi-Fi Mesh could pull a bit of power from your truck starter batteries. Yes, and it will over time. Earlier I had installed a 100W Renogy flexible solar panel on our truck toolbox along with a small 15A Victron MPPT SC. This small solar setup always keeps our truck AGM batteries to 13V+ and powers everything listed above. It also has ample power for our Dometic CFX5 45l fridge in the truck bed! 😎 One exception is when I have the truck parked inside the garage for more than a couple days. So then I connect a battery charger, quick connect leads already installed above the front bumper. I got done yesterday as the sun was setting and this picture shows it all. Notice the Starlink Mini mounted top right with the small blue power light on. You can see the Renogy panel on the toolbox, the SC is installed inside with outputs to battery and the fridge in a separate circuit. You can see cable looms, going up to the antenna and to the Starlink running across the box. The Mini is removable but the cabling stays. If we ever camp where the Northern sky is blocked where the TV is parked, then the Starlink would be mounted elsewhere, Starlink Wi-Fi login, powered by battery again. We find this is a rare case where we camp most of the time out West. The Pepwave install was shown earlier in this thread and is behind the rear bench seat below. Lastly, notice the blue light in the truck rear window. This is the Arris Mesh. I had purchased this mesh network 6 years ago, so it was great to reuse it, no cost. If I was to purchase new today there are better and smaller products available, though this system as a whole works great. We've got more installed in our tow vehicle than most have in their homes and RVs put together. What a great upgrade! 🤣
- Yesterday
-
Yeah I had read that before picking up the trailer, but with the tsunami of getting used to the rig it got lost until a search jogged it loose again Not exactly following your reasoning, seems to be that Alcan kills the porpoising (yay!) so WD not really necessary? What I found putting the WD tension on is that the truck went from feeling a little 'butt heavy with a tail trying to wag the dog' to basically driving no differently from normal. Meaning the trailer wasn't attempting to push the truck around. I'd opine that its the greater lever arm. Now, the hitch, instead of just being a dead 700 lbs down on the ball, is instead a lever arm extending up to the front wheels, taking much of the burden off it all coming in at the hitch. Even with no squat that just results in a smoother 'we're working together' feeling between the two. Hold on let's check my idea ... yes! God I love AI's, been working in the field for decades and we're finally here ... So you're saying perhaps that despite this, with Alcan dampens porpoising so dramatically so as to make no difference and you can eliminate the hassle. That's a fair assertion, I'll test both and see.
-
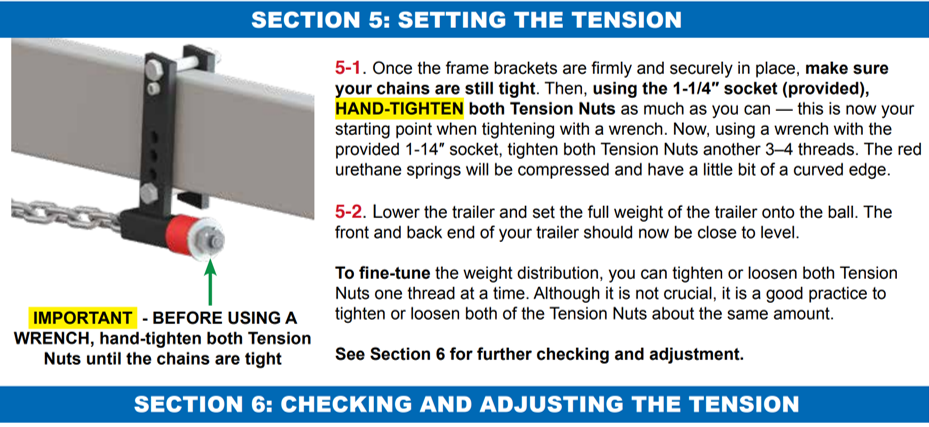
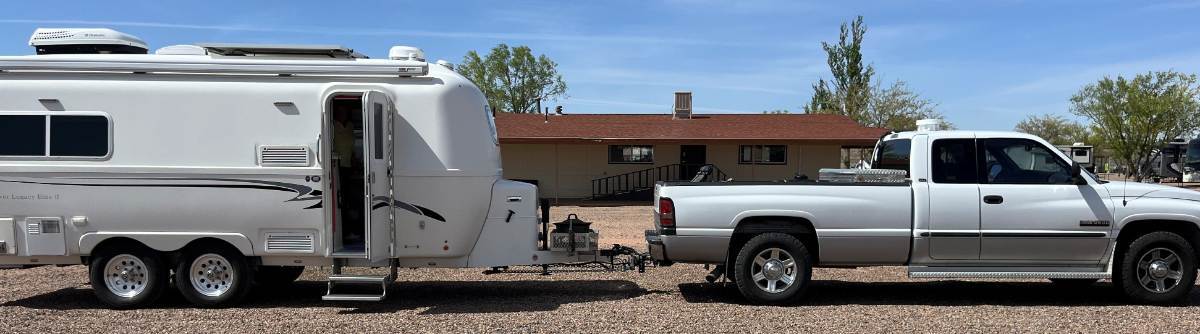
Dan, you are correct and if "two techs" made such statements, the were absolutely WRONG in stating such nonsense! See PDF page 11 of the Andersen Installation Instructions which I have also captured in the picture below. It states first hand-tight and then use socket and tighten to 3-4 more threads showing. The WDH only works from the chain tension. If you kick on the chains properly adjusted you should hear a bass note hum from the tension! 😎 I used the Andersen before we upgraded to Alcan Springs. My older Dodge 2500 is borderline, owners manual stating it's needed when over 500 LB tongue weight or 5000 LB tow weight. The Oliver exceeds both numbers. The Oliver would cause our rear to sag 2" and the Andersen when adjusted would bring the height back up to perfectly level (see pic). Without the Andersen we would have serious porpoising. Turns out the Alcans allow the Oliver suspension to manage itself eliminating the porpoising, so we stopped using the Andersen WDH after the suspension upgrade. First thing to do for your 9K LB 2500 series EV truck is to remove the Andersen WDH! CAUTION: If you remove the Andersen WDH also replace the ball hitch <OR> if you continue to use the same ball mount provided by Andersen, lock the base with the collar pin. If not there is only a circlip holding the hitch ball in place. If @Douglas Rink is towing with a 1/2 ton truck then it is suggested but a waste of money for the 2500 series truck. Anybody need a good used Andersen WDH with a new 2 5/16" ball and cone? Andersen-WD-Hitch-Installation.pdf
-
FWIW, I ended up ordering the Nova Kool. Someone either on here or Facebook wanted the old burner. I also expect to have new optical board and main board we acquired du4ing troubleshooting ,if interested.
-
FWIW, we keep a cover on our tongue Jack in the hope of reducing failures. https://a.co/d/013Mrxua
-
We are looking for a used Cal-Mark cover for our 2023 Oliver Elite II travel trailer.
-
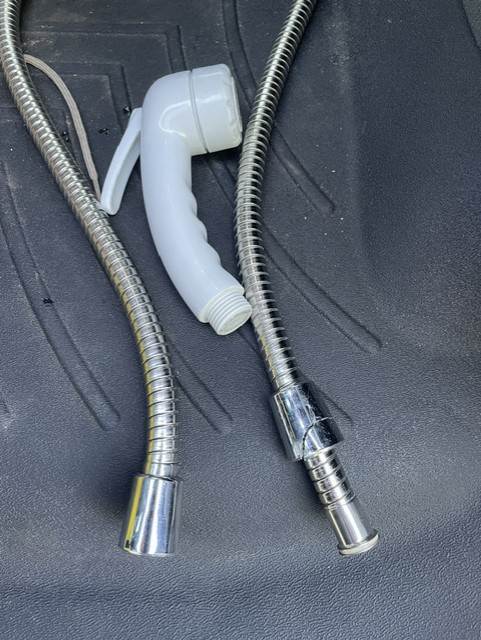
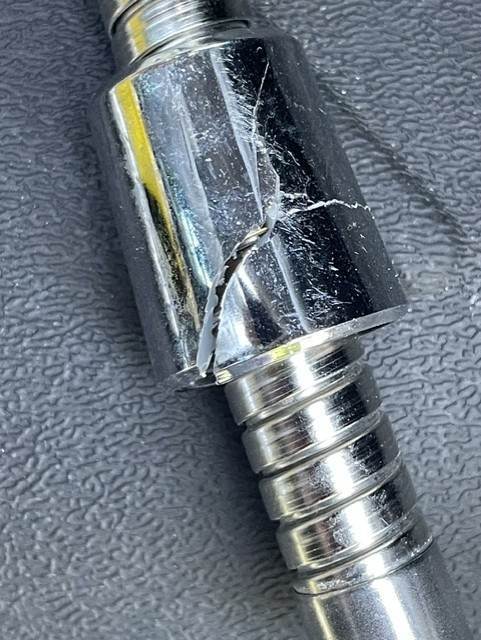
You might check your inside connection of the outside faucet. The inside collar broke. One end is metal and the one that broke is plastic. I think the metal end should be the inside trailer connection. It is under more stress. Oliver might want to revise the build instructions. The plastic end was connected inside the trailer. Honestly, neither end should be made of plastic. Hopefully this is a standard hardware store buy. We are on the road, where these things always happen!
-
- 1
-

-
You're having the factory install it? Question them about chain tension. When I picked up in March the two techs told me they prefer keeping it 'a little slack'. Basically hit the chains and you should see a little bounce. Ever since I've been puzzling about this, there is simply no way that can be providing any weight distribution. Easier to hitch, but no WD. Now technically I don't need WD, the GVWR is just at the rating above which requires for a WD hitch, but they recommend using one at all weights. Anyhow, after consulting with AI which read the instructions and instructional videos I was reminded about the red plastic puck compression. It's too much tension to use a wrench, you have to lift the back end of the truck, tighten, then lower and tension the chains. Long story short I did this and it rode better. Not remarkable - I didn't have squat before, this Sierra EV has independent rear coil suspension (dedicated rear motor and no transmission!) and handles the 700 lb tongue wonderfully. But now it handles it even better. With all the power and torque of the EV I basically can't tell it's back there. Hitching isn't that much harder, I simply attach the whale tail before lowering onto the truck when hitching. When unhitching I just raise the truck rear a bit until it loosens up. Anyhow do this, if they recommend slack chains again for you push back on that about the WD and find out why they recommend it. Makes no sense to me unless you want to throw away half the reason for having this hitch. I don't need anti fishtail as the truck as rear steer and it built in (it just turns the rear wheels to counter any fishtailing), and anyway the Oliver is hardly prone to it.
-
So that's very roughly about 60 hulls since March, 230 days, so basically a new trailer rolls off the line every 3-4 days. Sold units will be less than that due to protos and scraps, my number got bumped up during the order as the factory took the one I had for some reason or another. With Apex and the 27's that's at least three, so call it 55 maybe. Projecting out that's maybe in the ballpark of 80 trailers a year.
-
It's a great way to begin the adventure -- there is a lot to learn at the Rally and a great group of people you will meet. Congrats! Love the name!
-
z
- Last week
-
 Andy Ritter joined the community
 -

tongue jack switch???
Dennis and Melissa replied to Dennis and Melissa's topic in General Discussion
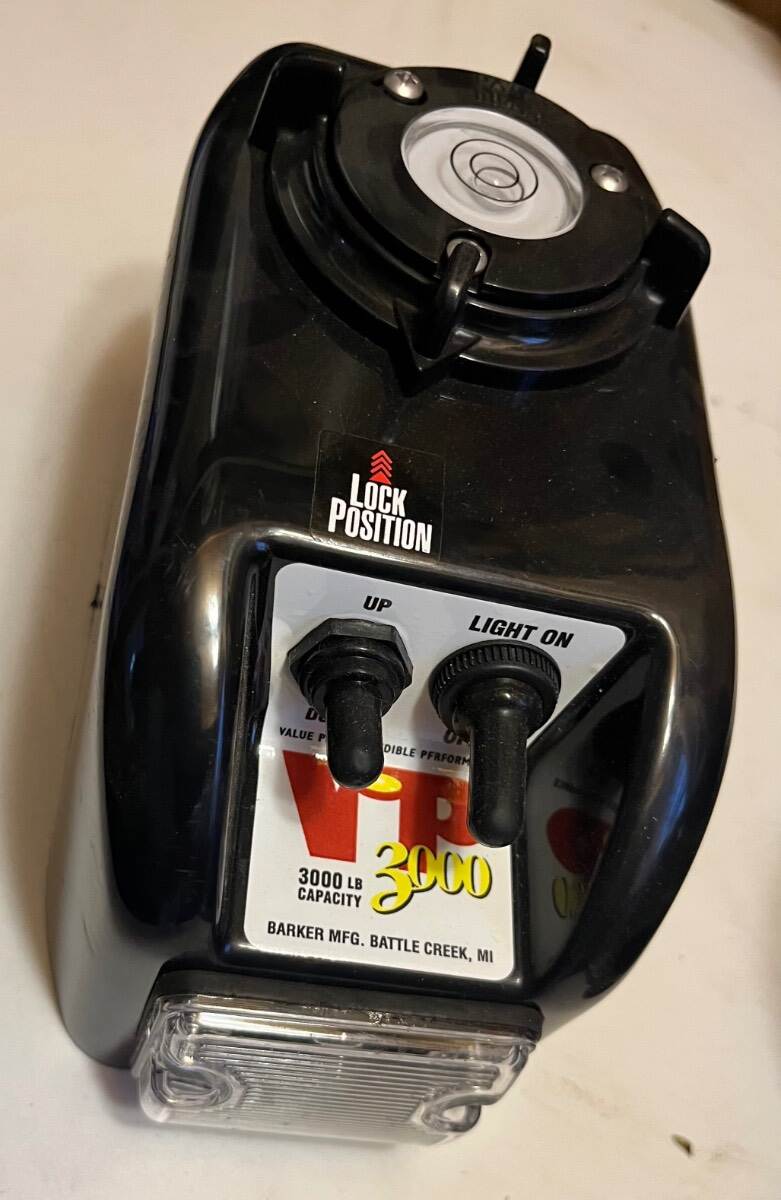
That’s not a phone number for Barker. It’s the “ Barker manufacturing number” that uniquely identifies the part -
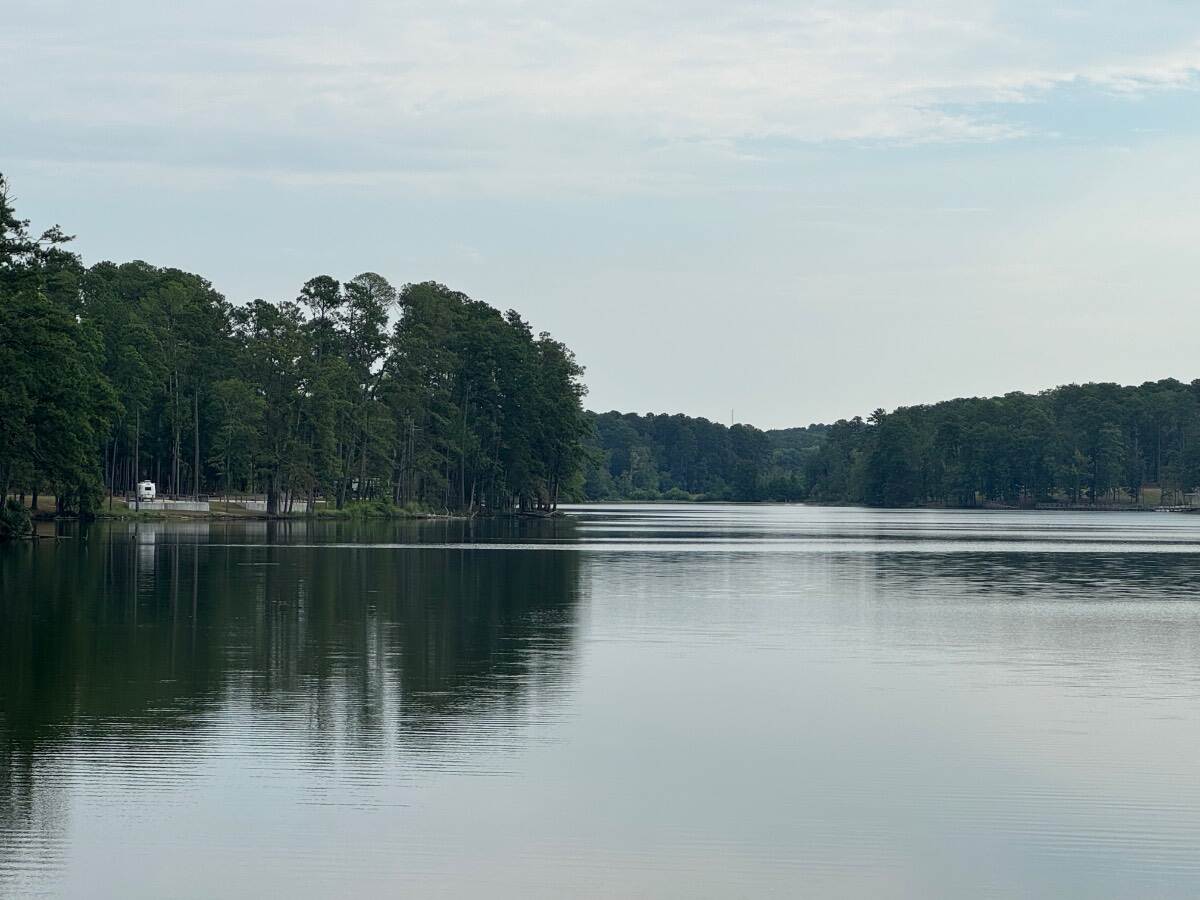
Roosevelt State Park, Mississippi
Dennis and Melissa replied to Steve and MA's topic in Campgrounds & Parks
From across the lake
-
 Hope to see ya all soon. Coming from So Cal. I may have an extra spot as our friends (#073) may not make it. I'll post again real soon
 -
Update for anyone out there wondering. The trailer is in the shop at Bretz RV in WA. Truma needed the issues confirmed by a certified rep, of course. They thought it was part A, and it was confirmed to be part A. However, the shop reached out to order part A, and Truma is saying they don't sell just that part, so now there is a debate about whether we have to buy a new furnace! The warranty is 2 years, and the trailer was built in 2023, so that is nice that it recently expired. At this point, no idea when we will get her back, and we have a departure date of next Saturday for a long long trip. urgh.
-
 RJD joined the community
 -
Some things I’ve found out that will be of interest, a lot of it from consulting with various AI’s which have gotten really good and more reliable than humans Trailer Cover I’ve debated getting a cover, but that’s more for the traditional trailers with leak prone seams that need protecting. Other than cost and difficulty to get on/off there’s a ‘greenhouse effect’. I’m seeing it now, I’ve got a tarp on the roof to keep morning dew off while the graphene cures. Already in the morning that inside ceiling gets hot. A cover bakes the trailer, better to graphene coat and no cover which lets moisture evaporate and radiate heat UV Protection What about preventing chalking? Hands down SiO2 without or without graphene is the best solution. Gel coat is rather porous, providing a perfect base for the coating to adhere to and it perfectly seals and prevents basically 100% UV protection. Just make sure to refresh it every few years, depending on use and climate it can last up to eight Graphene This is an additive to a regular SiO2 coating and solvent. By itself it can’t coat, but as a dopant it greatly improves the performance in many ways Which brand? Glidecoat. Originally made for marine applications it’s Elite level protection for your Oliver. Additionally its rated multi-surface, get the 30’ kit and you’ll have plenty to coat all the aluminum too, and probably much of your truck Why? Basically its the best protection for this trailer other than garaging it. Even then it’ll be easier to travel, you want to get bug guts off, droppings and sap because they eat the gelcoat. But after this treatment they just wipe off. Looks great too. And its cheaper than the alternatives. Garaging is expensive (and rare out West) and you want protection on the road anyhow. CalMark covers are near $2k and a pain, and this only requires minimal upkeep and maintenance. Total cost and tools was around $1k + sweat equity, or you can have CGI do it. Application The CGI Detailing is the best method, which is roughly Do a deep, deep clean For heavily oxidized trailers use a rotary polisher and heavy cutting compound Then (and for trailers in good condition) use an orbital polisher working in 2x2 or 3x3 squares with Inox Cutmax, four dots on a particular pad. Three passes, Wipe off Go to 6-4 polishing compound, same method IPA wipe off, two towel method Coat Lots of particular details here that are important, highlights Moisture must be managed. The solvent uses humidity to cure, but actual moisture will ruin it. Working outside is fine - I’m doing it - but I time it to periods during the day and cover the trailer at night for the first 48 hours to avoid morning dew and be out of the sunlight so it doesn’t flash off too quickly. Don’t wash the trailer with soap for at least a week. Do two coats, three doesn’t add anything In general use a two towel method and rotate pads. It took me two days do the roof, partly because I think it’s on the ladder so lots of moving that around, fiddling with the odd areas, and getting used to it. Next I’m taking three days to do the sides and back. First day to compound, second to polish and coat one side, final day to do the other side. Much easier outside as can pop the awnings to avoid any sun. Then finally I’ll take two days to do the front as that’s the most important
-
@Dennis and Melissa Meaher State Park, Alabama A sunset view from a site close to where you took yours. Mossey
-
@Dennis and Melissa What is the area code for Barker?
-
Dennis, PM me with your address and I’ll put a brand new original in the mail to you. 😎 Barker is great. I purchased two reconditioned heads for our rears and they came with new plastic covers, switches, etc. which of course you don’t need when replacing the rears. It would be my pleasure!
-
tongue jack switch???
Dennis and Melissa replied to Dennis and Melissa's topic in General Discussion
Thanks to both of you. Ordering tomorrow and will let you know how it goes. Hooray for the Oliver community once again! -
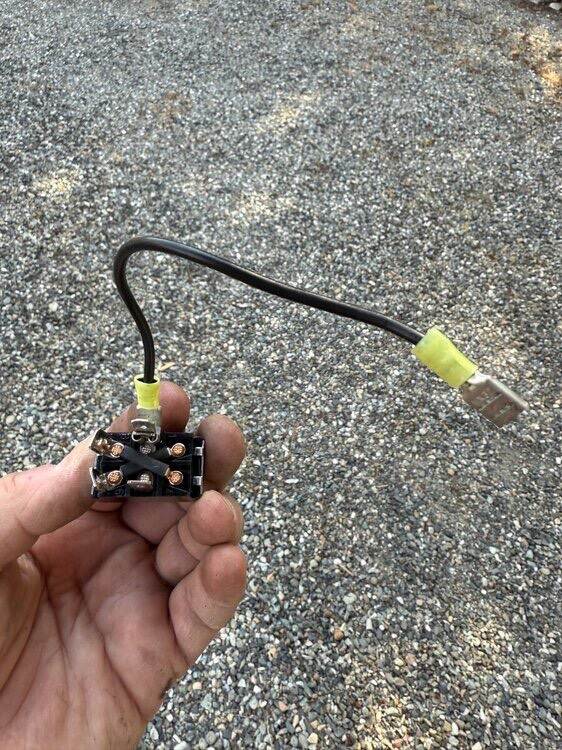
Those are momentary motor reversing switches (spring return to center). Don't get a latching switch! A knock-off version is available from Amazon https://a.co/d/01EAzrSv . They are okay. Amazon includes the waterproof rubber cap, but many suppliers don't. No worries because they are available at ACE hardware and auto part stores. You can also use a center off or momentary Double Throw Double Pole DPDT switch in an emergency, but you would have to make your own jumpers as can be seen in your picture. Judging from the jumper wire in your picture, it looks like your switch was wired with the power leads going to the center terminals. That jumper wire is power for the lamp switch, and it's doubled up with the +12v power wire for the jack. Normally the power wires are on the outer terminals per the Barker jack wiring diagrams, but it makes no difference electrically. The lamp -12v wire is spliced to the jacks ground. Your jack motor leads go to the outer terminals (polarity is not important yet). With wires hooked up, look at the position of the notch or flat side of the switch threads for correct alignment with the jack housing. Then try the switch to verify that the jack is going the right direction. Just reverse the motor leads on the switch to change direction if needed. Use a piece of heat shrink over all the switches terminal spades. This prevents shorts, but more importantly it helps hole the spade terminals from coming off. Sometimes it's also necessary to pinch the wire terminals for better grip on the switch spades. Hope that is not too confusing! Cheers, Geoff
-
This one off Amazon should work fine and you shouldn't have to do any rewiring. Waterproof Reverse Polarity Switch
-
tongue jack switch???
Dennis and Melissa replied to Dennis and Melissa's topic in General Discussion
I just got off the phone with Oliver technical support They gave me a Barker number 736-2300 which appears completely legit However, getting that part is going to be tricky given our travel schedule. There’s an off-the-shelf six pin replacement that should work that I can buy for 10 bucks just about anywhere. But then I have to do some wiring myself. I think I know what needs to be done, but I’ve never done it before. It could be a bit tricky. -
tongue jack switch???
Dennis and Melissa replied to Dennis and Melissa's topic in General Discussion
I need to buy a new one of these Can someone who speaks electric tell me what it’s called so I can buy one on Amazon? I think it’s some variation of “double throw momentum”. But not sure how to specify the exact one Thanks















.thumb.jpg.e34bf01ef7f7d5e99ad31856d45afbeb.jpg)